
© 2005 Sony Corporation© 2005 Sony Corporation© 2005 Sony Corporation
HDPS-M10
© 2005 Sony Corporation
HDPS-M10
© 2005 Sony Corporation
HDPS-M10
© 2005 Sony Corporation
HDPS-M10
© 2005 Sony Corporation
HDPS-M10
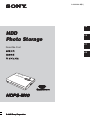
HDD
Photo Storage
© 2005 Sony Corporation
HDPS-M10
HDD
Photo Storage
OPEN
GB
CS
CT
KR
Read Me First
2-639-394-25(1)

2
GB
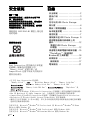
Safety regulations
WARNING
Keep away from children. If any part
of the unit is swallowed, promptly see
a doctor.
To reduce the risk of fire or electric
shock, do not expose this apparatus
to rain or moisture.
To avoid electrical shock, do not
open the cabinet. Refer servicing to
qualified personnel only.
For use only with power supply SONY,
Model HDAC-M1.
Disclaimer
Sony Corporation assumes no
responsibility for the loss of information
stored on the hard disk of this unit, or
information transferred to a “Memory
Stick” and/or CompactFlash card with
your computer.
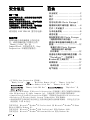
Table of contents
Safety regulations ............................2
Introduction .....................................3
Accessories ......................................3
What you can do with the HDD
Photo Storage ..................................4
Opening/closing the covers .............5
Powering the unit ............................6
Language setting .............................7
Copying data to the HDD Photo
Storage ............................................9
Viewing data on the internal hard
disk using a computer ...................12
Preparing the HDD Photo Storage
and computer ..............................12
Checking the remaining battery
charge and hard disk capacity .......16
“PhotoDiary” (the implemented
software for Windows only) .........17
Troubleshooting ............................18
Error Messages ...........................18
Electric Specifications ...................23
• The following are trademarks of Sony Corporation:
“Memory Stick”, , “MagicGate Memory Stick”, “Memory Stick Duo”,
“ ”, “MagicGate Memory Stick Duo”, “Memory Stick PRO”,
“ ”, “Memory Stick PRO Duo”, “ ”, “MagicGate”, and
“”.
• Microsoft and Windows are registered trademarks of Microsoft Corporation in the United States
and/or other countries.
• Mac and Macintosh are trademarks of Apple Computer Inc., registered in the U.S. and/or other
countries.
• CompactFlash is a trademark of SanDisk Corporation and is licensed to the CompactFlash
Association.
• Microdrive is a registered trademark of Hitachi Global Storage Technologies.
• Other system and product names used herein are registered trademarks or trademarks of their
respective manufacturers, although the ™ and ® marks are not used in the text.
In this document, Microsoft
®
Windows
®
XP Professional and Microsoft
®
Windows
®
XP Home
Edition are referred to as Windows XP.
In this document, Microsoft
®
Windows
®
2000 Professional is referred to as Windows 2000.
In this document, Microsoft
®
Windows
®
Millennium Edition is referred to as Windows Me.

3
GB
GB
Introduction
Thank you for purchasing the HDD Photo Storage HDPS-M10. This document
explains how to prepare your unit for use. For details about how to use the unit,
refer to the operating instructions in PDF format on the hard disk of the unit.
To locate the operating instructions, refer to “ReadMe.html” on the internal
hard disk of the unit.
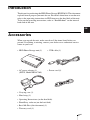
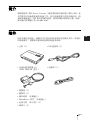
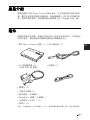
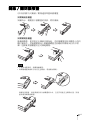
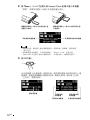
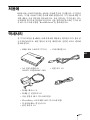
Accessories
When you unpack the unit, make sure that all the items listed below are
present. If anything is missing, contact your dealer or an authorized service
center in your area.
• HDD Photo Storage unit (1) • USB cable (1)
• AC power adapter (1)
(SONY, Model HDAC-M1)
• Power cord (1)
• Carrying case (1)
• Hand strap (1)
• Operating Instructions (on the hard disk)
• PhotoDiary software (on the hard disk)
• Read Me First (this document) (1)
• Warranty card (1)
OPEN

4
GB
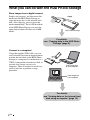
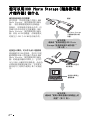
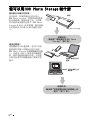
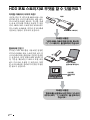
What you can do with the HDD Photo Storage
Store images from a digital camera!
Simply take pictures, and then insert the
media into the HDD Photo Storage to
copy the image data to the internal hard
disk. After copying, you can reuse the
media immediately. The 40 GB hard disk
of the HDD Photo Storage can store the
equivalent of about 620 units of 64 MB
media.
Connect to a computer!
Using the supplied USB cable, you can
easily transfer data from an inserted media
or from the hard disk of the HDD Photo
Storage to a computer. It can function as a
USB2.0-compatible external hard disk, to
provide data storage capacity to a
computer. There is no need to install any
special software or perform a setup
procedure.
Copy!
HDD Photo Storage
For details,
see “Copying data to the HDD Photo
Storage”(page 9).
Copy image files
to your computer.
View images on
your computer.
For details,
see “Viewing data on the internal hard
disk using a computer”(page 12).

5
GB
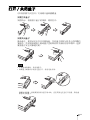
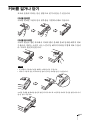
Opening/closing the covers
You can open/close the port and slot covers the same way.
To open the covers
Lightly push down the top part of the cover to open it, as illustrated.
To close the covers
Push the cover up from its fully open position, until the tab of the cover fits
into the notch of the body. Then, lightly push up the cover until you feel it click
into place. When it does, the cover is securely closed.
Notes
• Close the covers when the unit is not in use.
• If the cover only opens as far as illustrated, you cannot close the cover.
To solve this problem, press the center of the cover as illustrated until it is in its fully open
position, and then try closing it again.
Click

6
GB
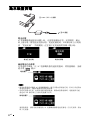
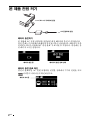
Powering the unit
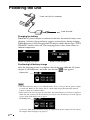
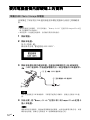
Charging the battery
When the AC power adapter is connected to the unit, the internal battery starts
charging. A battery charge indicator appears on the display during charging.
When the battery is fully charged, the LCD display shows the message “FULL
CHARGE” before it turns off. The charging process takes about 4 hours at
ambient temperature.
Confirming full battery charge
After the charging process is complete, turn on the unit while the AC power
adaptor is still connected, and make sure that the icon appears.
Hints
• The internal battery charges even when the unit is in use, as long as the AC power adapter
is connected. However, the charge time is considerably longer than when the internal
battery is charged as outlined above.
• If the unit has not been charged for some time, the internal battery level may be depleted.
When the unit is turned on, the low battery level may cause the battery icon at the top left
corner of the LCD display not to appear.
To recover, fully charge the battery using the supplied AC power adapter. Do not remove
the adapter while charging is in progress.
To the AC outlet
To the ! (DC In) connector
Battery charging in progress Battery is fully charged
Battery icon
No battery icon

7
GB
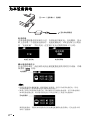
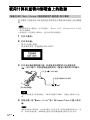
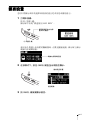
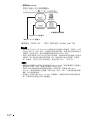
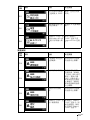
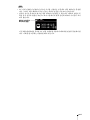
Language setting
You can change the language to your own for the menus and the messages in
the display.
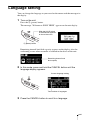
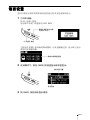
1 Turn on the unit.
Press the ! (power) button.
The message “Welcome to SONY HDPS” appears on the unit display.
Remaining internal hard disk capacity appears on the display after the
welcoming screen when no media is inserted in the drives of the unit.
2 In this mode, press and hold the CANCEL button until the
language display appears.
3 Press the CANCEL button to scroll to a language.
!
! (power) button
Slide the HOLD switch
in the direction opposite
to that of the arrow.
Remaining internal hard
disk capacity
!
Current language setting
Total number of languages

8
GB
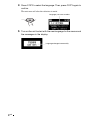
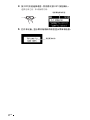
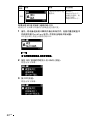
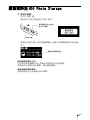
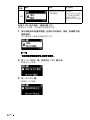
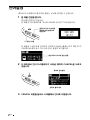
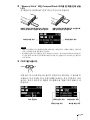
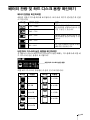
4 Press COPY to select the language. Then, press COPY again to
confirm.
The unit turns off after the selection is made.
5 Turn on the unit to start with the new language for the menus and
the messages in the display.
CANCEL
Language you want to select
Language changed successfully

9
GB
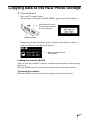
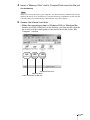
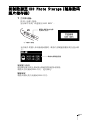
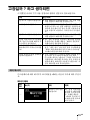
Copying data to the HDD Photo Storage
1 Turn on the unit.
Press the ! (power) button.
The message “Welcome to SONY HDPS” appears on the unit display.
Remaining internal hard disk capacity appears on the display when no
media is inserted in the drives of the unit.
Locking the controls (HOLD)
You can lock the controls to prevent accidental button presses while carrying
the device.
Slide the HOLD switch in the direction of the arrow to lock the controls.
To unlock the controls
Slide the HOLD switch in the direction opposite to that of the arrow.
!
! (power) button
Slide the HOLD switch
in the direction opposite
to that of the arrow.
Remaining internal hard
disk capacity

10
GB
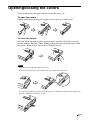
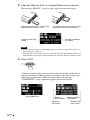
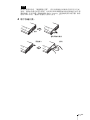
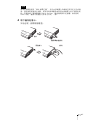
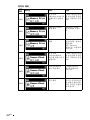
2 Insert the “Memory Stick” or CompactFlash card into the unit.
The message “READY” (ready to copy) appears on the unit display.
Notes
• An error message appears on the display when an error has occurred. For details, see
“Error Messages” (page 18).
• When the unit is used stand-alone, it is not possible to insert both a “Memory Stick” and
CompactFlash card, and copy data from both at the same time. Insert one media at a time.
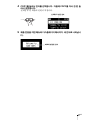
3 Press COPY.
A folder is automatically created on the internal hard disk and the data is
copied to the folder. While copying is in progress, the copy progress bar
shows the copying status. When copying is done, the message
“COMPLETED” (copy completed) appears on the unit display.
The label should face up. Insert it in the
v direction all the way into the slot.
The label should face up. Insert it in the
v direction until you hear a click.
Number of folders to
be copied
Number of files to be
copied
CANCEL
Copy progress bar
Number of
folders copied
Number of folders
to be copied
Number of
files copied
Number of files
to be copied

11
GB
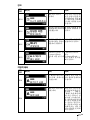
Note
If the error message “HDD Disk Full” appears, the remaining space on the internal hard
disk is insufficient to finish copying. Connect the unit to a computer and use the
computer to delete unnecessary data on the internal hard disk of the unit. For details, see
“Deleting unnecessary files and folders” in the HDD Photo Storage Operating
Instructions (PDF).
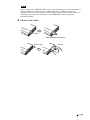
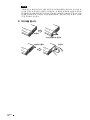
4 Remove the media.
Push in fully Pull out
Push in
Release briefly and pull out

12
GB
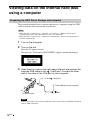
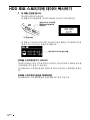
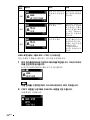
Viewing data on the internal hard disk
using a computer
This section describes how to connect the unit to a computer using the USB
cable to transfer data between the two devices.
Hints
• When the unit is connected to a computer, you can insert a “Memory Stick” and a
CompactFlash card at the same time and access data from both.
• When the unit is connected to a computer for the first time, the necessary programs are
installed automatically.
1 Turn on the computer.
2 Turn on the unit.
Press the ! (power) button
The message “Welcome to SONY HDPS” appears on the unit display.
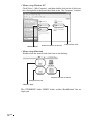
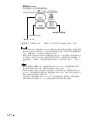
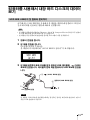
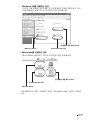
3 Open the port cover on the right side of the unit and connect the
supplied USB cable to the (USB) port. Connect the other
end of the cable to the USB port of your computer.
Note
Correct operation is not guaranteed when the unit is connected to a USB hub. Establish
a direct USB connection.
Preparing the HDD Photo Storage and computer
1
2
To the (USB) port
To the USB port of your computer
To the AC outlet

13
GB
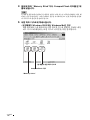
4 Insert a “Memory Stick” and/or CompactFlash card into the unit
as necessary.
Hint
When you connect the unit to your computer, the internal battery automatically charges
whether the unit is on or off. However, to maintain battery performance, make sure that
you fully charge it periodically by connecting the AC power adapter.
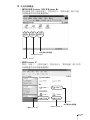
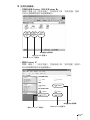
5 Access the internal hard disk.
• When the operating system is Windows 2000 or Windows Me
Double-click [My Computer] on the desktop, and then double-click the
local disk icon that corresponds to the internal hard disk in the “My
Computer” window.
CompactFlash card
“Memory Stick”
Internal hard disk of the unit

14
GB
• When using Windows XP
Click [Start] - [My Computer], and then double-click the local disk icon
that corresponds to the internal hard disk in the “My Computer” window.
• When using Macintosh
Double-click the internal hard disk icon on the desktop.
The “STORE.IPS” folder, “HDPS” folder, and the “ReadMe.html” file are
displayed.
Internal hard disk of the unit
CompactFlash card
“Memory Stick”
Internal hard disk of the unit
CompactFlash card
“Memory Stick”

15
GB
Notes
• Do not format the internal hard disk of the unit with Windows or your Macintosh
computer. In particular, if formatted with Windows NTFS, you will no longer be able
to use the unit. If you partition the internal hard disk of the unit, make sure that the file
system of the first partition is FAT32.
• If the hard disk has been formatted using your computer or NTFS format, Error Code
F20 will be shown on the LCD display when it is turned on while not connected to a
computer. Reformat the internal hard disk. For details, see “If an HDD Format Error
(error code: F20) appears” (page 21).
Hints
• To delete files from the internal hard disk, see “Deleting unnecessary files and folders”
in the HDD Photo Storage Operating Instructions (PDF).
• Always disconnect the unit from the computer properly. For details, see
“Disconnecting the USB cable from the computer or removing media” in the HDD
Photo Storage Operating Instructions (PDF).
• When the drives of the HDD Photo Storage do not appear on the computer, uninstall
the device and turn it off. Power on the unit and wait for detection by the computer.

16
GB
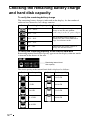
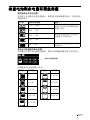
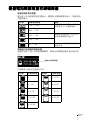
Checking the remaining battery charge
and hard disk capacity
To verify the remaining battery charge
The remaining battery charge is indicated on the display. As the number of
indicator bars decreases, less charge remains.
To verify the remaining capacity of the internal hard disk
Remaining internal hard disk capacity appears on the display when no media
is inserted in the drives of the unit.
The used capacity of the internal hard disk is displayed as follows:
Indicator Remaining battery capacity Description
75% ~ 100%
There is enough remaining battery
charge to use the unit without
connecting it to the AC power adapter.
50% ~ 75%
25% ~ 50%
The remaining battery charge is
getting low, but is still sufficient to
copy several more media.
10% ~ 25%
0% ~ 10%
Connect the AC power adapter to
charge the internal battery.
Indicator Used capacity Indicator Used capacity
0 21-25 GB
1-5 GB 26-30 GB
6-10 GB 31-35 GB
11-15 GB 36-40 GB
16-20 GB
Remaining internal hard
disk capacity

17
GB
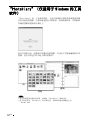
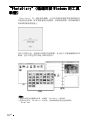
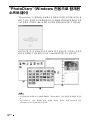
“PhotoDiary” (the implemented
software for Windows only)
“Photo Diary” is a useful software that allows you to view and manage images
stored in the unit using a computer. When the unit is connected to a computer, auto-
search starts and newly stored images can then be copied to the computer.
Images can be viewed by the month, week, or day. You can easily edit and print
images, as well as attach them to an e-mail.
Hints
• For details on how to operate the software, see “PhotoDiary” help.
• For information on how to install “PhotoDiary”, refer to “Readme.html” on the internal
hard disk of the unit.
Day
Month
Week

18
GB
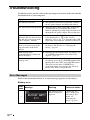
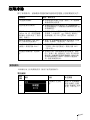
Troubleshooting
In addition to this section, refer to the operating instructions of the unit and the
documentation of your computer.
Follow the instructions below if an error message appears on the display.
Battery error
Symptom Cause/remedy
The unit does not start. c The internal battery may be depleted. Connect
the AC power adapter and charge the battery.
The unit turns off unexpectedly. c When the unit is used stand-alone, it turns off
automatically after remaining idle for five
minutes, whether operating on internal power or
through the AC power adapter. Restart the unit.
With Windows 2000 or
Windows Me, the drive icon of
the unit does not appear in the
“My Computer” window.
c Make sure that the “USB Mass Storage Device”
is not displayed as a in the “Device
Manager”. If it is, delete it, disconnect the USB
cable from your computer, and then reconnect it.
When the unit is turned on,
there is no battery icon at the
top left corner of the LCD
display.
c Connect the AC power adapter and fully charge
the battery. For details, see “Charging the
battery” (page 6).
HDD Format Error
(error code:F20) is shown on
the LCD display.
c Reformat the internal hard disk. For details, see
“If an HDD Format Error (error code: F20)
appears” (page 21).
The unit does not respond in
hang up state.
c Wait for a few moments. If the drive status does
not change, press the ! (POWER) button while
holding down the COPY and CANCEL button.
This will reset the drive. If RESET was
performed during data copying, the data may
not be valid. Please recopy the data.
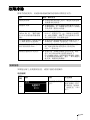
Error Messages
Error
code
Message Meaning Corrective action
—
The battery level is
almost completely
depleted.
Connect the AC
power adapter and
fully charge. For
details, see
“Charging the
battery” (page 6).

19
GB
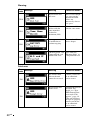
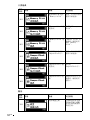
Media error
Error
code
Message Meaning Corrective action
M11
The “Memory Stick”
cannot be accessed
during copying.
Press the COPY
button again to
restart copying.
M21
“Memory Stick”
format error
Format the “Memory
Stick”.
M31
“Memory Stick”
error
The “Memory Stick”
may be damaged.
Use a different
“Memory Stick”.
M12
The CompactFlash
card cannot be
accessed during
copying.
Press the COPY
button again to
restart copying.
M22
CompactFlash card
format error
Format the
CompactFlash card.
M32
CompactFlash card
error
The CompactFlash
card may be
damaged. Use a
different card.

20
GB
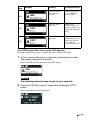
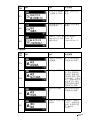
Warning
Fatal error
Error
code
Message Meaning Corrective action
W10
Internal hard disk
full error
There is not enough
free space on the
internal hard disk.
Delete any
unnecessary data to
free space.
W11
The number of
folders with the
same name has
reached its
maximum (999).
Delete some folders
with the same name.
W01
Battery power alone
is insufficient to
perform copying.
Connect the AC
power adapter.
W02
“Memory Stick” and
CompactFlash card
double load error
Eject either the
“Memory Stick” or
CompactFlash card.
Error
code
Message Meaning Corrective action
F10
The internal hard
disk on the unit
cannot be accessed.
Contact your dealer
or an authorized
service center.
F20
Internal hard disk
format error
Reformat the internal
hard disk. For
details, see “If an
HDD Format Error
(error code: F20)
appears” (page 21).
If the unit still does
not operate properly,
contact your dealer
or an authorized
service center.
ページが読み込まれています...
ページが読み込まれています...
ページが読み込まれています...
ページが読み込まれています...
ページが読み込まれています...
ページが読み込まれています...
ページが読み込まれています...
ページが読み込まれています...
ページが読み込まれています...
ページが読み込まれています...
ページが読み込まれています...
ページが読み込まれています...
ページが読み込まれています...
ページが読み込まれています...
ページが読み込まれています...
ページが読み込まれています...
ページが読み込まれています...
ページが読み込まれています...
ページが読み込まれています...
ページが読み込まれています...
ページが読み込まれています...
ページが読み込まれています...
ページが読み込まれています...
ページが読み込まれています...
ページが読み込まれています...
ページが読み込まれています...
ページが読み込まれています...
ページが読み込まれています...
ページが読み込まれています...
ページが読み込まれています...
ページが読み込まれています...
ページが読み込まれています...
ページが読み込まれています...
ページが読み込まれています...
ページが読み込まれています...
ページが読み込まれています...
ページが読み込まれています...
ページが読み込まれています...
ページが読み込まれています...
ページが読み込まれています...
ページが読み込まれています...
ページが読み込まれています...
ページが読み込まれています...
ページが読み込まれています...
ページが読み込まれています...
ページが読み込まれています...
ページが読み込まれています...
ページが読み込まれています...
ページが読み込まれています...
ページが読み込まれています...
ページが読み込まれています...
ページが読み込まれています...
ページが読み込まれています...
ページが読み込まれています...
ページが読み込まれています...
ページが読み込まれています...
ページが読み込まれています...
ページが読み込まれています...
ページが読み込まれています...
ページが読み込まれています...
ページが読み込まれています...
ページが読み込まれています...
ページが読み込まれています...
ページが読み込まれています...
ページが読み込まれています...
ページが読み込まれています...
ページが読み込まれています...
ページが読み込まれています...
-
 1
1
-
 2
2
-
 3
3
-
 4
4
-
 5
5
-
 6
6
-
 7
7
-
 8
8
-
 9
9
-
 10
10
-
 11
11
-
 12
12
-
 13
13
-
 14
14
-
 15
15
-
 16
16
-
 17
17
-
 18
18
-
 19
19
-
 20
20
-
 21
21
-
 22
22
-
 23
23
-
 24
24
-
 25
25
-
 26
26
-
 27
27
-
 28
28
-
 29
29
-
 30
30
-
 31
31
-
 32
32
-
 33
33
-
 34
34
-
 35
35
-
 36
36
-
 37
37
-
 38
38
-
 39
39
-
 40
40
-
 41
41
-
 42
42
-
 43
43
-
 44
44
-
 45
45
-
 46
46
-
 47
47
-
 48
48
-
 49
49
-
 50
50
-
 51
51
-
 52
52
-
 53
53
-
 54
54
-
 55
55
-
 56
56
-
 57
57
-
 58
58
-
 59
59
-
 60
60
-
 61
61
-
 62
62
-
 63
63
-
 64
64
-
 65
65
-
 66
66
-
 67
67
-
 68
68
-
 69
69
-
 70
70
-
 71
71
-
 72
72
-
 73
73
-
 74
74
-
 75
75
-
 76
76
-
 77
77
-
 78
78
-
 79
79
-
 80
80
-
 81
81
-
 82
82
-
 83
83
-
 84
84
-
 85
85
-
 86
86
-
 87
87
-
 88
88


他の言語で
- English: Sony HDPS-M10 User manual
その他のドキュメント
-
Shimano DH-C2100-D-NT Exploded View
-
Casio YA-F10, YA-F20 ユーザーマニュアル
-
-
Panasonic Arbitrator 360 取扱説明書
-
Panasonic SDRH250GC 取扱説明書
-
-
Compaq Presario CQ4100 - Desktop PC Getting Started Manual
-
HP Photosmart 330 Printer series ユーザーガイド
-
Yamaha EL-100 取扱説明書
-