User Manual

1
Introduction
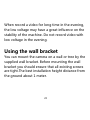
Thanks for purchasing this hunting camera which is
an professional product for recording and
observing the wildlife.
We provide detail user manual for your reference.
Please read this manual carefully before first use.
We are serious and strict when writhing the manual.
While the errors and omissions may exist during
printing process. Please understand.
We have no responsibility for the data damage
which are caused by faulty operation,incompetent
repairment or other accidents.
There is no notice if the information of this user
manual changed.

2
This document is subject to copyright protection.
Any other copy without prior written permission of
our company is not allowed.
Our company reserve all the right for the final
interpretation of this user manual,three guarantees
and relative documents.
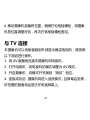
Safety
Please read below safety precautions carefully
before using the camera.
· Do not try to disassemble the product case.Only
authorized technician can repair the product.
· The camera will be hot after using for too long
time.This is normal.
· Please use the accessory provided by our factory.

3
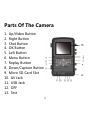
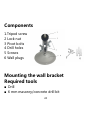
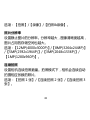
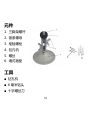
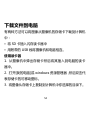
Parts Of The Camera
1. Up/Video Button
2. Right Button
3. Shot Button
4. OK Button
5. Left Button
6. Menu Button
7. Replay Button
8. Down/Capture Button
9. Micro SD Card Slot
10. AV Jack
11. USB Jack
12. OFF
13. Test
15

4
14. ON
15. Display Screen
16. Infrared LEDs
17. Lens
18. Motion Sensor
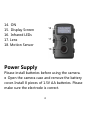
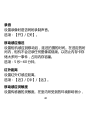
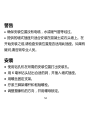
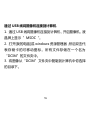
Power Supply
Please install batteries before using the camera.
♦
Open the camera case and remove the battery
cover. Install 8 pieces of 1.5V AA batteries. Please
make sure the electrode is correct.
16
17
18

5
♦
If the camera is in low power, please connect the
camera to a power adapter(not provide) for power
supply.
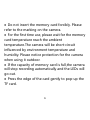
Inserting The Memory Card
The camera has no built-in memory. Please prepare
a Micro SD card and insert it into the camera for
saving files. Before recording, please format the
memory card first.
♦
Support Micro SD card,up to 32GB. Suggest to
use class 6 or above high speed card.
♦
To avoid malfunction, the memory card should
be far away water, strong vibration,dust, hot source
and direct sunlight.

6
♦
Do not insert the memory card forcibly. Please
refer to the marking on the camera.
♦
For the first time use, please wait for the memory
card temperature reach the ambient
temperature.The camera will be short-circuit
influenced by environment temperature and
humidity. Please notice protection for the camera
when using it outdoor.
♦
If the capacity of memory card is full,the camera
will stop recording automatically and the LEDs will
go out.
♦
Press the edge of the card gently to pop-up the
TF card.

7
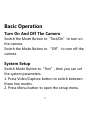
Basic Operation
Turn On And Off The Camera
Switch the Mode Button to“Test/On”to turn on
the camera.
Switch the Mode Button to “Off” to turn off the
camera.
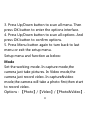
System Setup
Switch Mode Button to“Test”, then you can set
the system parameters.
1. Press Video/Capture button to switch between
these two modes.
2. Press Menu button to open the setup menu.

8
3. Press Up/Down button to scan all menu. Then
press OK button to enter the options interface.
4. Press Up/Down button to scan all options. And
press OK button to confirm options.
5. Press Menu button again to turn back to last
menu or exit the setup menu.
Setup menu and function as below:
Mode
Set the working mode. In capture mode,the
camera just take pictures. In Video mode,the
camera just record video. In capture&video
mode,the camera will take a photo first,then start
to record video.
Options:【Photo】/【Video】/【Photo&Video】.

9
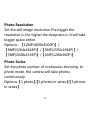
Photo Resolution
Set the still image resolution.The bigger the
resolution is ,the higher the sharpness is. It will take
bigger space either.
Options:【12MP(4000x3000P)】/
【8MP(3264x2448P)】/【5MP(2592x1944P)】/
【3MP(2048x1536P)】/【1MP(1280x960P)】.
Photo Series
Set the photo number of continuous shooting. In
photo mode, the camera will take photos
continuously.
Options:【1 photo】/【2 photos in series】/【3 photos
in series】.

10
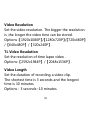
Video Resolution
Set the video resolution. The bigger the resolution
is ,the longer the video time can be stored.
Options:【1920x1080P】/【1280x720P】/【720x480P】
/【640x480P】/【320x240P】.
TL Video Resolution
Set the resolution of time lapse video .
Options:【2592x1944P】/【2048x1536P】.
Video Length
Set the duration of recording a video clip.
The shortest time is 3 seconds and the longest
time is 10 minutes.
Options:3 seconds~10 minutes.

11
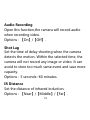
Audio Recording
Open this function,the camera will record audio
when recording video.
Options:【On】/【Off】.
Shot Lag
Set the time of delay shooting when the camera
detects the motion. Within the selected time, the
camera will not record any image or video. It can
avoid to store too much same event and save more
capacity.
Options:5 seconds~60 minutes.
IR Distance
Set the distance of infrared induction.
Options:【Near】/【Middle】/【Far】.

12
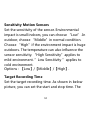
Sensitivity Motion Sensors
Set the sensitivity of the sensor. Environmental
impact is small indoors, you can choose “Low”. In
outdoor, choose “Middle”in normal condition.
Choose “High”if the environment impact is huge
outdoors. The temperature can also influence the
sensor sensitivity. “High Sensitivity”applies to
mild environment. ”Low Sensitivity ”applies to
cold environment.
Options:【Low】/【Middle】/【High】.
Target Recording Time
Set the target recording time. As shown in below
picture, you can set the start and stop time. The

13
camera will work just in the stated time slot. In
other time, the camera will keep in standby state.
Options:【On】/【Off】.
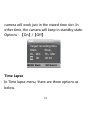
Time Lapse
In Time lapse menu, there are three options as
below.
Set
Target recording time
Start: Stop:
Hr:Min Hr:Min
00 00 00 00
MENU Back OK Select

14
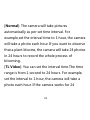
[Normal]: The camera will take pictures
automatically as per set time interval. For
example,set the interval time to 1 hour, the camera
will take a photo each hour. If you want to observe
that a plant blooms, the camera will take 24 photos
in 24 hours to record the whole process of
blooming.
[TL Video]: You can set the interval time.The time
range is from 1 second to 24 hours. For example,
set the interval to 1 hour, the camera will take a
photo each hour. If the camera works for 24

15
hours,there will be 24 photos. These photos will be
converted into a video.
[Off]: Close the time lapse function.
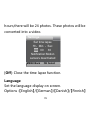
Language
Set the language display on screen.
Options:【English】/【German】/【Danish】/【Finnish】
Settings
Set time lapse
Hr:Min :Sec
00 00 30
Notification:Motion
sensors deactivated
MENU Back OK Select

16
/【Swedish】【Spanish】/【French】/【Italian】/【Dutch】
/【Portuguese】/【Simplified Chinese】/【Japanese】.
Time & DateSet the date and time of camera.
The date format: dd/mm/yyyy, yyyy/mm/dd,
mm/dd/yyyy.
The time format: 24h,12h.
Press Left/Right button to choose the item.Press
Up/Down button to adjust the value. And press OK
button to confirm.
Options:【Set time&date】/【Time format】/【Date
format】.
Photo Stamp
Stamp the date&time on the photos or not.
Options:【Time&date】/【Date】/【Off】.

17
Password Protection
Set the power-on password of the camera. The
password is four digits,each digit ranges from 0 to
9.
If you forget the password, please reset the camera.
Then all parameters will reset to the factory
settings.
Options:【On】/【Off】.
Beep Sound
Open/close the button sound.
Options:【On】/【Off】.
Format Memory Card
Formatting the memory card will delete all data
permanently. Before using a new memory card or a

18
card that has been used in another device
previously ,please format the memory card.
Options:【Yes】/【No】.
Serial NO.
Set the unique serial number for the camera. The
number is four digits,each digit ranges from 0 to 9.
Options:【On】/【Off】.
Reset Settings
Restore the camera to factory default settings including
password,serial number and so on.
Options:【On】/【Off】.
Version
Look up the Firmware information of the camera.

19
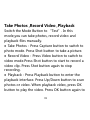
Take Photos ,Record Video ,Playback
Switch the Mode Button to “Test”. In this
mode,you can take photos, record video and
playback files manually.
♦
Take Photos:Press Capture button to switch to
photo mode. Press Shot button to take a picture.
♦
Record Video:Press Video button to switch to
video mode.Press Shot button to start to record a
video clip. Press Shot button again to stop
recording.
♦
Playback:Press Playback button to enter the
playback interface. Press Up/Down button to scan
photos or video. When playback video, press OK
button to play the video. Press OK button again to
ページが読み込まれています...
ページが読み込まれています...
ページが読み込まれています...
ページが読み込まれています...
ページが読み込まれています...
ページが読み込まれています...
ページが読み込まれています...
ページが読み込まれています...
ページが読み込まれています...
ページが読み込まれています...
ページが読み込まれています...
ページが読み込まれています...
ページが読み込まれています...
ページが読み込まれています...
ページが読み込まれています...
ページが読み込まれています...
ページが読み込まれています...
ページが読み込まれています...
ページが読み込まれています...
ページが読み込まれています...
ページが読み込まれています...
ページが読み込まれています...
ページが読み込まれています...
ページが読み込まれています...
ページが読み込まれています...
ページが読み込まれています...
ページが読み込まれています...
ページが読み込まれています...
ページが読み込まれています...
ページが読み込まれています...
ページが読み込まれています...
ページが読み込まれています...
ページが読み込まれています...
ページが読み込まれています...
ページが読み込まれています...
ページが読み込まれています...
-
 1
1
-
 2
2
-
 3
3
-
 4
4
-
 5
5
-
 6
6
-
 7
7
-
 8
8
-
 9
9
-
 10
10
-
 11
11
-
 12
12
-
 13
13
-
 14
14
-
 15
15
-
 16
16
-
 17
17
-
 18
18
-
 19
19
-
 20
20
-
 21
21
-
 22
22
-
 23
23
-
 24
24
-
 25
25
-
 26
26
-
 27
27
-
 28
28
-
 29
29
-
 30
30
-
 31
31
-
 32
32
-
 33
33
-
 34
34
-
 35
35
-
 36
36
-
 37
37
-
 38
38
-
 39
39
-
 40
40
-
 41
41
-
 42
42
-
 43
43
-
 44
44
-
 45
45
-
 46
46
-
 47
47
-
 48
48
-
 49
49
-
 50
50
-
 51
51
-
 52
52
-
 53
53
-
 54
54
-
 55
55
-
 56
56