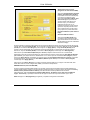
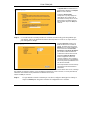
Prestige 334
Broadband Router with Firewall
Quick Start Guide
03/2010
Version 3.60
English
中
文
Deutsch
Espanol
Français
Italiano

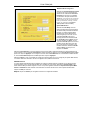
P334 Multilingual Guide
1
Contents
ENGLISH ................................................................................................................ 2
中文....................................................................................................................... 11
DEUTSCH ............................................................................................................ 21
ESPANOL............................................................................................................. 32
FRANÇAIS............................................................................................................ 43
ITALIANO .............................................................................................................53

P334 ENGLISH
2
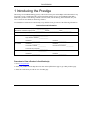
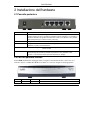
1 Introducing the Prestige
The Prestige is a broadband sharing gateway with a built-in four-port 10/100 Mbps switch that makes it easy
for people to set up a small home/office network and share Internet access via a broadband (cable/DSL)
modem. Key features of the Prestige include a firewall, VPN, content filtering, NAT and UPnP. See your
User’s Guide for more details on all Prestige features.
You should have an Internet account already set up and have been given most of the following information.
Internet Account Information
Your device’s WAN IP Address (if given): __________________
DNS Server IP Address (if given): First ______________, Second ______________, Third ______________
Encapsulation: (select one below):
Ethernet
Service Type: _______________________
Login Server IP Address: ______________
User Name: ____________ Password: ____________
PPTP
User Name: ____________ Password: ____________
Your WAN IP Address: ____________ PPTP Server IP Address: ___________
Connection ID (if required): ____________
PPPoE (PPPoE) Service Name: ____________
User Name: ____________ Password: ____________
Procedure to View a Product’s Certification(s)
1. Go to www.zyxel.com.
2. Select your product from the drop-down list box on the ZyXEL home page to go to that product's page.
3. Select the certification you wish to view from this page.

P334 ENGLISH
3
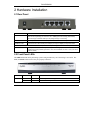
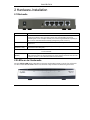
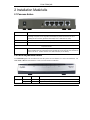
2 Hardware Installation
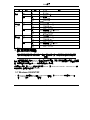
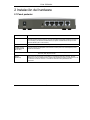
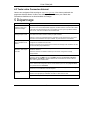
2.1 Rear Panel
LABEL DESCRIPTION
LAN 10/100M Use an Ethernet cable to connect at least one computer for initial Prestige configuration. These
ports are auto-negotiating (can connect at 10 or 100Mbps) and auto-sensing (automatically
adjust to the type of Ethernet cable you use (straight-through or crossover)).
WAN 10/100M Connect your cable/DSL modem to this port with the cable that came with your modem.
POWER 12 VDC Connect the end of the included power adaptor (use only this adapter) to this power socket.
After you’ve made the connections, connect the power cable to a power supply and look at the front panel LEDs.
RESET You only need to use this button if you’ve forgotten the Prestige’s password. It returns the
Prestige to the factory defaults (password is 1234, LAN IP address 192.168.1.1. See your User’s
Guide for details).
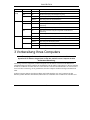
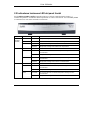
2.2 Front Panel LEDs
The PWR LED blinks while performing system testing and then stays on if the testing is successful. The
LAN, and WAN LEDs turn on if they are properly connected.
LED STATUS COLOR DESCRIPTION
Off The Prestige is not receiving power. PWR
Amber On Power to the Prestige is too low

P334 ENGLISH
4
LED STATUS COLOR DESCRIPTION
On The Prestige is receiving power. Green
Blinking The Prestige is performing testing.
Off The LAN is not connected.
On The Prestige has a successful 10Mb Ethernet connection. Green
Blinking The Prestige is sending/receiving data
On The Prestige has a successful 100Mb Ethernet connection.
LAN 1- 4
Amber
Blinking The Prestige is sending/receiving data
Off The WAN connection is not ready, or has failed.
On The Prestige has a successful 10Mb WAN connection. Green
Blinking The Prestige is sending/receiving data
On The Prestige has a successful 100Mb Ethernet connection.
WAN
Amber
Blinking The Prestige is sending/receiving data
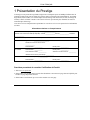
3 Preparing Your Computer
Skip this section if your computer is already set up to accept a dynamic IP
address. This is the default for most new computers.
The Prestige is already set up to assign your computer an IP address. Use this section to set up your computer
to receive an IP address or assign it a static IP address in the 192.168.1.2 to 192.168.1.254 range with a
subnet mask of 255.255.255.0. This is necessary to ensure that your computer can communicate with your
Prestige.
Your computer must have an Ethernet card and TCP/IP installed. TCP/IP should already be installed on
computers using Windows NT/2000/XP, Macintosh OS 7 and later operating systems.
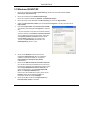
3.1 Windows 2000/NT/XP
1. In Windows XP, click start, Control Panel. In Windows 2000/NT, click Start, Settings, Control Panel.
2. In Windows XP, click Network Connections.
In Windows 2000/NT, click Network and Dial-up Connections.
3. Right-click Local Area Connection and then click Properties.
4. Select Internet Protocol (TCP/IP) (under the General tab in Win XP) and click Properties.

P334 ENGLISH
5
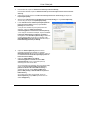
5. The Internet Protocol TCP/IP Properties screen opens (the
General tab in Windows XP).
- To have your computer assigned a dynamic IP address, click
Obtain an IP address automatically.
-To configure a static IP address, click Use the following IP
Address and fill in the IP address (choose one
from192.168.1.2 to 192.168.1.254), Subnet mask
(255.255.255.0), and Default gateway (192.168.1.1) fields.
6. Click Advanced. Remove any previously installed gateways in
the IP Settings tab and click OK to go back to the Internet
Protocol TCP/IP Properties screen.
7. Click Obtain DNS server address automatically if you do
not know your DNS server IP address(es).
If you know your DNS server IP address(es), click Use the
following DNS server addresses, and type them in the
Preferred DNS server and Alternate DNS server fields.
If you have more than two DNS servers, click Advanced, the
DNS tab and then configure them using Add.
8. Click OK to close the Internet Protocol (TCP/IP) Properties
window.
9. Click OK to close the Local Area Connection Properties
window.
Checking Your Computer’s IP Address
1. In the computer, click Start, (All) Programs, Accessories and then Command Prompt.
2. In the Command Prompt window, type "ipconfig" and then press ENTER. Your computer’s IP address must be in
the correct range (192.168.1.2 to 192.168.1.254) with subnet mask 255.255.255.0 in order to communicate with
the Prestige.
Refer to your User’s Guide for detailed IP address configuration for other Windows and Macintosh computer
operating systems.

P334 ENGLISH
6
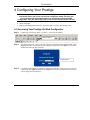
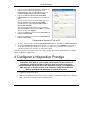
4 Configuring Your Prestige
Choose one of these methods to access and configure the Prestige. This Quick
Start Guide shows you how to use the web configurator wizard only. See your
User’s Guide for background information on all Prestige features and SMT
configuration. Click the web configurator online help for screen-specific web help.
Web Configurator
SMT (System Management Terminal). Access the SMT via LAN or WAN using Telnet.
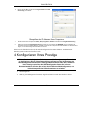
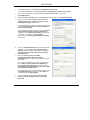
4.1 Accessing Your Prestige Via Web Configurator
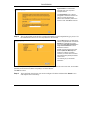
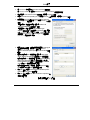
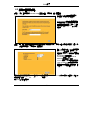
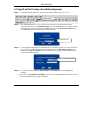
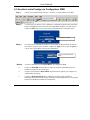
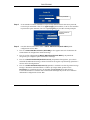
Step 1. Launch your web browser. Enter “192.168.1.1” as the web site address.
Step 2. The default password (“1234”) is already in the password field (in non-readable format). Click
Login to proceed to a screen asking you to change your password. Click Reset to revert to the
default password in the password field.
Step 3. It is highly recommended you change the default password! Enter a new password, retype it to
confirm and click Apply; alternatively click Ignore to proceed to the main menu if you do not
want to change the password now.
Web site address.
Default password.

P334 ENGLISH
7
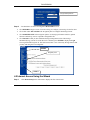
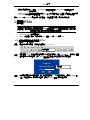
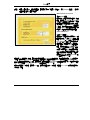
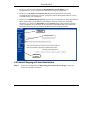
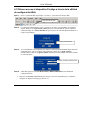
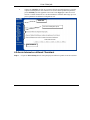
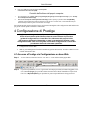
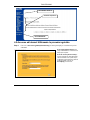
Step 4. You should now see the web configurator MAIN MENU screen.
Click WIZARD to begin a series of screens to help you configure your Prestige for the first time.
Click a link under ADVANCED in the navigation panel to configure that Prestige feature.
Click MAINTENANCE in the navigation panel to see Prestige performance statistics, upload
firmware and back up, restore or upload a configuration file.
Click LOGOUT when you have finished a Prestige management session. The Prestige
automatically logs you out if it is left idle for five minutes; press ENTER to display the Login
screen again and then log back in. This idle timeout timer is one of the many Prestige features that
you may edit using the web configurator.
4.2 Internet Access Using the Wizard
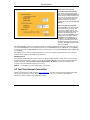
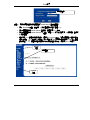
Step 1. Click Wizard Setup in the main menu to display the first wizard screen.
Change default password.
WIZARD
Navigation panel
LOGOUT

P334 ENGLISH
8
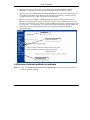
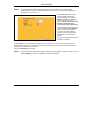
System Name is for identification
purposes. Enter your computer's
"Computer Name".
The Domain Name entry is what is
propagated to the DHCP clients on the
LAN. If you leave this blank, the
domain name obtained by DHCP from
the ISP is used. Click Next to continue.
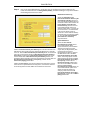
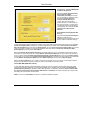
Step 2. The second wizard screen has three variations depending on what encapsulation type you use. Use
the information in Internet Account Information to fill in fields.
Choose Ethernet when the WAN port is
used as a regular Ethernet. Choose from
Standard or a RoadRunner version.
You’ll need User Name, Password and
Login Server IP Address for some
Roadrunner versions.
PPPoE or Point-to-Point Protocol over
Ethernet (PPP over Ethernet) also
functions as a dial-up connection.
Therefore you’ll also need a username
and password and possibly the PPPoE
service name.
Your ISP will give you all needed
information.
Choose PPTP if your service provider uses a DSL terminator with PPTP login. You’ll also need a user name, an associated
password, the PPTP server IP address and possibly a connection ID/name.
Click Next to continue.
Step 3. This is the final wizard screen you need to configure. Fill in the fields and click Finish to save
and complete the wizard setup.

P334 ENGLISH
9
WAN IP Address Assignment
Select Get automatically from ISP if
your ISP did not assign you a fixed IP
address. Select Use fixed IP address if
the ISP assigned a fixed IP address and
then enter your IP address and subnet
mask in the next two fields. Enter the
gateway IP address in this field (if
provided) when you select Use Fixed IP
Address.
DNS Server Address Assignment
Select From ISP if your ISP dynamically
assigns DNS server information (and
the Prestige’s WAN IP address). The
field to the right displays the (read-only)
DNS server IP address that the ISP
assigns. If you chose From ISP, but the
Prestige has a fixed WAN IP address,
From ISP changes to None after you
click Next. If you chose From ISP for
the second or third DNS server, but the
ISP does not provide a second or third
IP address, From ISP changes to None
after you click Next.
Select User-Defined if you have the IP address of a DNS server. Enter the DNS server's IP address in the field to the right.
If you chose User-Defined, but leave the IP address set to 0.0.0.0, User-Defined changes to None after you click Apply. If
you set a second choice to User-Defined, and enter the same IP address, the second User-Defined changes to None after
you click Apply.
Select None if you do not want to configure DNS servers. If you do not configure a system DNS server, you must use IP
addresses when configuring VPN, DDNS and the timeserver.
WAN MAC Address
The WAN MAC address field allows users to configure the WAN port's MAC address by either using the factory default or
cloning the MAC address from a computer on your LAN. Select Factory Default to use the factory assigned default MAC
address. Alternatively, select Spoof this Computer's MAC address - IP Address and enter the IP address of the
computer on the LAN whose MAC address you are cloning.
Step 4. Click Next to save and complete the wizard setup.
4.3 Test Your Internet Connection
Launch your web browser and navigate to www.zyxel.com. You don’t need a dial-up program such as Dial
Up Networking. Internet access is just the beginning. Refer to the User’s Guide for more detailed
information on the complete range of Prestige features.

P334 ENGLISH
10
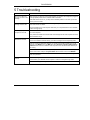
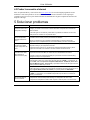
5 Troubleshooting
PROBLEM CORRECTIVE ACTION
None of the LEDs turn
on when you turn on the
Prestige.
Make sure that you have the correct power adapter connected to the Prestige and plugged in
to an appropriate power source. Check all cable connections.
If the LEDs still do not turn on, you may have a hardware problem. In this case, you should
contact your local vendor.
Cannot access the
Prestige from the LAN.
Check the cable connection between the Prestige and your computer or hub. Refer to the
Rear Panel section for details.
Ping the Prestige from a LAN computer. Make sure your computer Ethernet card is installed
and functioning properly.
Cannot ping any
computer on the LAN.
If the 10/100M LAN LEDs are off, check the cable connections between the Prestige and
your LAN computers.
Verify that the IP address and subnet mask of the Prestige and the LAN computers are in the
same IP address range.
The WAN IP is provided after the ISP verifies the MAC address, host name or user ID.
Find out the verification method used by your ISP and configure the corresponding fields.
If the ISP checks the WAN MAC address, you should clone the MAC address from a LAN
computer. Click WAN and then the MAC tab, select Spoof this Computer's MAC address -
IP Address and enter the IP address of the computer on the LAN whose MAC address you
are cloning.
If the ISP checks the host name, enter your computer’s name (refer to the Wizard Setup
section in the User’s Guide) in the System Name field in the first screen of the WIZARD.
Cannot get a WAN IP
address from the ISP.
If the ISP checks the user ID, click WAN and then the ISP tab. Check your service type, user
name, and password.
Check the Prestige’s connection to the cable/DSL device.
Check whether your cable/DSL device requires a crossover or straight-through cable.
Cannot access the
Internet.
Click WAN to verify your settings.

P334 中文
11
1 P334 介紹
P334 是一部寬頻分享閘道器,內建 4 埠自動調整 10/100 Mbps 交換器功能,讓用戶很容易設置小型
的家庭/辦公室網路,經由寬頻(cable/DSL)數據機,分享網際網路上的資源。P334 的主要特點包括防
火牆(firewall),內容過濾器(content filtering),網路位址轉譯(Network Address Translation ,NAT)及通
用隨插即用(Universal Plug And Play,UpnP)。
您應該已經有一個設定好的網路帳號並已取得大部份底下的資訊。
網路帳號資訊
用來上網的電腦之 WAN IP 位址 (如果有的話):: __________________
DNS 伺服器 IP 位址(如果有的話):第一 ______________,第二 ______________,第三 ______________
Encapsulation:
(請選擇底下的一種):
Ethernet
服務類型:_______________________
登入伺服器 IP 位址: ______________
使用者名稱: ____________ 密碼: ____________
PPTP
使用者名稱:: ____________ 密碼: ____________
您的 WAN IP 位址: ____________ PPTP 伺服器 IP 位址: ___________
連線 ID (如果需要的話): ____________
PPPoE
(PPPoE) 服務名稱: ____________
使用者名稱: ____________ 密碼: ____________
檢視產品驗證的步驟
1. 請連上 www.zyxel.com。
2. 在 ZyXEL 的首頁的下拉清單框中選擇您的產品,連接至該產品的頁面。
3. 在本頁面中選擇您要檢視的驗證。

P334 中文
12
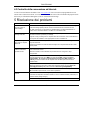
2 硬體安裝
2.1 背面板
標籤 說明
LAN 10/100M
(區域網路 10/100M)
可使用 Ethernet 網路線連接至少一台電腦進行 P334 的初始配置。這些埠可自動判斷 (可用 10 或
100Mbps 的速度連線) 和自動偵測 (自動調整為您使用的 Ethernet 網路線類型 (直線或跳線接頭))。
WAN 10/100M
(廣域網路 10/100M)
以您的 Cable/DSL 數據機隨付的網路線連接至本埠。
POWER 12 VDC
(電源)
將包裝內隨附的電源變壓器(請只使用本變壓器)的一端連接至本電源插孔。
完成上述連接之後,請將電源線插上插座並查看前面板的 LED 燈。
RESET
(重新設定)
如果您忘記了 P334 的密碼,您將需要使用此按鍵。按下它可將 P334 返回至原廠設定值 (密碼是
1234,LAN IP 位址是 192.168.1.1。 詳細資訊請參閱您的
使用手冊
).。
2.2 前面板 LED 燈
當進行系統測試時 PWR LED 燈會閃爍,如果測試成功將一直亮著。正確連接 LAN 和 WAN 埠時
LAN 和 WAN LED 也會亮起。

P334 中文
13
LED 燈 顏色 狀態 說明
滅 P334 未受電。
黃色 亮 P334 接收的電力太低。
亮 P334 已受電。
PWR
(電源)
綠色
閃爍 P334 正在執行測試。
滅 未連接 LAN。
亮 P334 已成功連接 10Mb 的 Ethernet。 綠色
閃爍 P334 正在傳送/接收資料。
亮 P334 已成功連接 100Mb 的 Ethernet。
LAN 1- 4
(區域網路
1-4)
黃色
閃爍 P334 正在傳送/接收資料。
滅 WAN 連線未備妥或失敗。
亮 P334 已成功連接 10Mb 的 WAN。 綠色
閃爍 P334 正在傳送/接收資料。
亮 P334 已成功連接 100Mb 的 WAN。
WAN
(廣域網路)
黃色
閃爍 P334 正在傳送/接收資料。
3 設定您的電腦
如果您的電腦已設定為可接受動態 IP 位址,請跳過這一節。此處設定是大部份新電腦的預
設值。
P334 出廠時已設定成將指派(DHCP)一個 IP 位址給您的電腦。本節將設定您的電腦可接收 IP 位址或
指派一個子網路遮罩為 255.255.255.0、範圍在 192.168.1.2 到 192.168.1.254 內的靜態 IP 位址給您的電
腦。這是要確定您的電腦能與 P334 進行資料傳輸的必要步驟。
您的電腦必須有一張 Ethernet 網路卡且已安裝 TCP/IP,在 WindowsNT/2000/XP、Macintosh OS 7 和
更新的版本上都應該已經安裝了 TCP/IP。
3.1 Windows 2000/NT/XP
1.
在 Windows XP 中, 請按下 start(開始)、Control Panel(控制台)。 在 Windows 2000/NT 中,請按下 Start(開
始)、Settings(設定)、Control Panel(控制台)。

P334 中文
14
2.
在 Windows XP 中,請按下 Network Connections(網路連線)。
在 Windows 2000/NT 中,請按下 Network and Dial-up Connections(網路和撥號連線)。
3.
按右鍵點選 Local Area Connection(區域連線),再選擇 Properties(內容)。
4.
選擇 Internet Protocol (TCP/IP) (Win XP 中是在 General(一般)標籤頁中) ,再選擇 Properties(內容)。
5.
此時會開啟 Internet Protocol TCP/IP Properties (Internet
Protocol TCP/IP 內容)畫面 (在 Win XP 中是 General (一般)標
籤頁)。
- 要指派動態 IP 位址給您的電腦,請勾選 Obtain an IP
address automatically(自動取得 IP 位址)。
-要配置靜態 IP 位址,請勾選 Use the following IP
Address(使用下列的 IP 位址)並在 IP address(IP 位址) (範圍
介於 192.168.1.2 到 192.168.1.254 之間)、 Subnet mask(子
網路遮罩) (255.255.255.0)、和 Default gateway(預設閘道)
(192.168.1.1) 等欄位中填入數據。
6.
點選 Advanced(進階)。移除任何先前已安裝在 IP Settings(IP
設定)標籤頁中的閘道,再按下 OK(確定)返回 Internet
Protocol TCP/IP Properties (Internet Protocol TCP/IP 內容)
畫面。
7.
如果您不知道您的 DNS 伺服器位址,請勾選 Obtain DNS
server address automatically(自動取得 DNS 伺服器位址)。
如果您知道您的 DNS 伺服器位址,請勾選 Use the following
DNS server addresses(使用 DNS 伺服器位址),然後在
Preferred DNS server(慣用 DNS 伺服器) 和 Alternate DNS
server(其他 DNS 伺服器)欄位中填入位址。
如果您有兩個以上的 DNS 伺服器,請點選 Advanced(進階)、
DNS 標籤頁,然後使用 Add(新增)來配置它們。
8.
按下 OK( 確定),關閉 Internet Protocol TCP/IP Properties
(Internet Protocol TCP/IP 內容)視窗。
9.
按下 OK( 確定),關閉 Local Area Connection Properties (區
域連線 內容)視窗。
檢查您電腦的 IP 位址

P334 中文
15
1.
依序按下電腦螢幕上的 Start(開始)、 (All) Programs(所有程式或程式集)、 Accessories(附屬應用程式) 和
Command Prompt.(命令提示字元)。
2.
Command Prompt.(命令提示字元)視窗中,輸入"ipconfig"後按下鍵盤上的 ENTER 鍵。你電腦的 IP 位址必定有
255.255.255.0 的子網路遮罩為且範圍正確 (192.168.1.2 到 192.168.1.254 之間),才能和 P334 進行資料傳輸。
其他 Windows 和 Macintosh 電腦作業系統的詳細 IP 位址配置方式請參閱您的
使用手冊
。
4 配置 P334
請選擇下列方法中的一個來存取和配置 P334。本
快速啟動手冊
只在告訴您如何使用網路
配置精靈。請參閱您的
使用手冊
以取得 P334 所有功能和 SMT 配置的背景資訊
。
按下網頁
配置程式的線上說明可取得特定畫面的網頁說明。
Web Configurator(網頁配置程式)
SMT (系統管理終端機)。您可使用 Telnet 經由 LAN 或 WAN 存取 SMT。
4.1 經由網頁配置程式存取 P334
步驟 1. 開啟您的網頁瀏覽器。在網路位址欄輸入 “192.168.1.1”。
步驟 2. 預設密碼 (“1234”)已經出現在密碼欄中 (以加密格式顯示)。按下 Login(登入),前進到下個畫
面時會要求您變更密碼 。按下 Reset(重新設定) 會回復為密碼欄位中的預設密碼。
步驟 3. 我們高度建議您變更預設密碼!輸入新密碼且再輸入一次以確認無誤後,請按下 Apply(套
用);或者如果您不想現在變更密碼,請按下 Ignore(略過) 前進到主選單。
網路位址欄.
預設密碼。

P334 中文
16
步驟 4. 現在您應該會看到網路配置程式 MAIN MENU(主選單)畫面。
按下 WIZARD(精靈),會出現一系列的畫面幫助您首次配置 P334。
按下導覽畫面中的 MAIN MENU(主選單),配置該項 P334 功能。
按下導覽畫面中的 MAINTENANCE(維護),查看 P334 的效能統計數字、上傳韌體、回復或
上傳配置檔。
當您完成 P334 管理區中的設定值後,請按下 LOGOUT(登出)。如果您閒置五分鐘都沒有任
何動作的話, P334 會自動將您登出;按下鍵盤上的 ENTER 鍵可重新顯示 Login(登入)畫面
讓您再登入一次。閒置逾時計時器是您可以使用網路設定功能,是在眾多 P334 功能之一。
變更預設密碼。
WIZARD
(精靈)
導覽畫面
LOGOUT
(
登出
)

P334 中文
17
4.2 使用精靈存取網路
步驟 1. .按下主選單中的 Wizard Setup(設定精靈),顯示第一個精靈畫面。
System Name(系統名稱)是做辨識之
用請輸入您電腦的「電腦名稱」
Domain Name(網域名稱)項目是傳送到
區域網路上的 DHCP 用戶端的資料當
此欄位空白時會使用從 ISP 的 DHCP 所
取得的網域名稱按下 Next(下一步)繼
續設定
步驟 2. 第二個精靈設定畫面會根據您目前使用的連線服務方式,顯示三種不同的設定欄位。請參考
網路帳號資訊
,將資料填入相關欄位。
當 WAN 埠作為一般 Ethernet 使用時請選
擇 Ethernet(乙太網路)。請選擇
Standard (標準)或 RoadRunner 版本。
在部份的 RoadRunner 版本中您將需要輸
入 User Name(使用者名稱)、
Password(密碼)和 Login Server IP
Address(登入伺服器 IP 位址)。
Ethernet 上的 PPPoE 或點對點通訊協定
(PPP over Ethernet)也可作為撥號連線
使用所以您也需要輸入使用者名稱、密
碼甚至是 PPPoE 服務名稱
如果您的網路供應商使用的是以 PPTP 登入的 DSL 終端,請選擇 PPTP P334 必定可以提供您一個靜態 IP 位址您
也會需要登入名稱DSL IP 連線 ID
按下 Next(下一步)繼續設定

P334 中文
18
步驟 3. 這是精靈的最後一個設定畫面。請在欄位內填入相關 IP 位址後,按下 Finish (完成),將設定
值儲存並結束精靈設定程式。
WAN IP Address Assignment
(指派 WAN IP 位址)
如果您的 ISP 業者不是提供您固定 IP 位址
的話,請選擇 Get automatically from
ISP(從 ISP 自動取得)。如果您的 ISP 業者
提供您固定 IP 位址,請輸入您的 IP 位址
然後選擇 Use fixed IP address(使用固定
IP 位址)。 當您選取使用固定 IP 位址 (Use
Fixed IP Address)時,請在欄位內輸入閘
道器的 IP 位址(如果有提供此欄位的話)。
System DNS Servers
(系統 DNS 伺服器)
如果您的 ISP 業者提供您的是動態 DNS 伺
服器資訊(以及 P334 的 WAN IP 位址),請
選擇 From ISP(從 ISP 取得) 。如果您選擇
From ISP(從 ISP 取得),右邊的欄位將顯
示(唯讀的)ISP 指派給您的 DNS 伺服器 IP
位址,但是 P334 的 WAN IP 位址是固定
的話,在您按下套用 (Apply)之後 From
ISP(從 ISP 取得)會變成 None(無)。如果
您在第二或第三個 DNS 伺服器欄位選擇
From ISP(從 ISP 取得),但是您的 ISP 業
者並沒有提提供第二或第三個 IP 位址時,
在您按下 Next (下一步)之後 From ISP(從
ISP 取得)會變成 None(無)。
如果您有 DNS 伺服器的 IP 位址,請在下拉清單框中選擇 User-Defined(使用者定義)。在右邊的欄位中輸入 DNS 伺服器的
IP 位址。如果您選擇 User-Defined(使用者定義),但是維持 IP 位址欄為預設的 0.0.0.0,在您按下套用 (Apply)之後 User-
Defined(使用者定義)會變成 None(無)。如果您在第二個欄位中選擇 User-Defined(使用者定義)而輸入的 IP 位址和第一個相
同時,在您按下套用 (Apply)之後 User-Defined(使用者定義)會變成 None(無)。
如果您不想配置 DNS 伺服器,請選擇 None(無)。如果您不配置系統 DNS 伺服器,在配置 VPN、DDNS 和時間伺服器時您
必須使用 IP 位址。

P334 中文
19
WAN MAC Address(WAN MAC 位址)
您可選擇原廠預設值或複製您的 LAN 上的電腦之 MAC 位址到 WAN MAC 位址欄位中,讓使用者可以配置 WAN 埠的 MAC
位址。選擇 Factory Default(原廠預設值)將使用原廠指派的預設 MAC 位址。或者是選擇 Spoof this Computer's MAC
address - IP Address (偽造目前使用的電腦之 MAC 位址-IP 位址),然後輸入您在 LAN 上複製 MAC 位址的電腦之 IP 位址。
按下 Next (下一步)繼續設定
步驟 4. 按 Next (下一步),儲存並完成設定精靈。
4.3 測試您的網路連線
開啟您的網頁瀏覽器,並連上 www.zyxel.com.tw。您將不需要例如「撥號網路」之類的撥接程式。
存取網路資訊只是本路由器的初步功能。更多關於 P334 完整功能的詳細資訊,請參閱
使用手冊
。
5 疑難排解
問題 更正動作
當您開啟 P334 時,沒有
一個 LED 燈是開啟的。
請確定您連接到 P334 的電源變壓器是正確的且已連接到正確的電源插座上。同時檢查所有線
路的連接。
如果 LED 燈還是沒有開啟,您可能遇到了硬體的問題。遇此情形,您應該連絡您當地的經銷
商。
無法從 LAN 存取
P334。
請檢查 P334 和您的電腦或集線器之間的連線。詳細資訊請參閱
背面板
一節
。
請從 LAN 上的電腦偵測 P334。請確定您電腦的 Ethernet (乙太網路)卡已正確安裝且正常作用
中。
無法偵測 任何在 LAN 上
的電腦。
如果 10/100M LAN LED 燈號熄滅了,請檢查 P334 與您的 LAN 電腦之間的連線。
請驗證 P334 與 LAN 電腦之間的 IP 位址與子網路遮罩是在同樣的 IP 位址範圍內。
當 ISP 驗證了 MAC 位址、主機名稱或使用者 ID 之後才會提供您 WAN IP。
請找出您的 ISP 使用的驗證方式並配置對應的欄位。
如果 ISP 檢查 WAN MAC 位址,您應該從 LAN 電腦上複製 MAC 位址。請按下 WAN 後再按
下 MAC 標籤頁,選擇 Spoof this Computer's MAC address - IP Address (偽造目前使用的
電腦之 MAC 位址-IP 位址)然後輸入您在 LAN 上複製 MAC 位址的電腦之 IP 位址。
如果 ISP 檢查主機名稱,請在 WIZARD(精靈)的第一個設定畫面中的 System Name(系統名
稱)欄位中輸入您的主機名稱(請參閱
使用手冊
中的
設定精靈
)。
無法從 ISP 取得 WAN IP
位址。
如果 ISP 檢查使用者 ID,請按下 WAN 後再按下 MAC 標籤頁。檢查您的服務類型、使用者名
稱和密碼。
ページが読み込まれています...
ページが読み込まれています...
ページが読み込まれています...
ページが読み込まれています...
ページが読み込まれています...
ページが読み込まれています...
ページが読み込まれています...
ページが読み込まれています...
ページが読み込まれています...
ページが読み込まれています...
ページが読み込まれています...
ページが読み込まれています...
ページが読み込まれています...
ページが読み込まれています...
ページが読み込まれています...
ページが読み込まれています...
ページが読み込まれています...
ページが読み込まれています...
ページが読み込まれています...
ページが読み込まれています...
ページが読み込まれています...
ページが読み込まれています...
ページが読み込まれています...
ページが読み込まれています...
ページが読み込まれています...
ページが読み込まれています...
ページが読み込まれています...
ページが読み込まれています...
ページが読み込まれています...
ページが読み込まれています...
ページが読み込まれています...
ページが読み込まれています...
ページが読み込まれています...
ページが読み込まれています...
ページが読み込まれています...
ページが読み込まれています...
ページが読み込まれています...
ページが読み込まれています...
ページが読み込まれています...
ページが読み込まれています...
ページが読み込まれています...
ページが読み込まれています...
ページが読み込まれています...
-
 1
1
-
 2
2
-
 3
3
-
 4
4
-
 5
5
-
 6
6
-
 7
7
-
 8
8
-
 9
9
-
 10
10
-
 11
11
-
 12
12
-
 13
13
-
 14
14
-
 15
15
-
 16
16
-
 17
17
-
 18
18
-
 19
19
-
 20
20
-
 21
21
-
 22
22
-
 23
23
-
 24
24
-
 25
25
-
 26
26
-
 27
27
-
 28
28
-
 29
29
-
 30
30
-
 31
31
-
 32
32
-
 33
33
-
 34
34
-
 35
35
-
 36
36
-
 37
37
-
 38
38
-
 39
39
-
 40
40
-
 41
41
-
 42
42
-
 43
43
-
 44
44
-
 45
45
-
 46
46
-
 47
47
-
 48
48
-
 49
49
-
 50
50
-
 51
51
-
 52
52
-
 53
53
-
 54
54
-
 55
55
-
 56
56
-
 57
57
-
 58
58
-
 59
59
-
 60
60
-
 61
61
-
 62
62
-
 63
63


他の言語で
- italiano: ZyXEL P-334 Guida Rapida
- español: ZyXEL P-334 Guía de inicio rápido
- Deutsch: ZyXEL P-334 Schnellstartanleitung
- français: ZyXEL P-334 Guide de démarrage rapide