A
2 Press CD u.
When the button is pressed, the display shows
the total number of tracks and the running time
of the CD.
When a track is playing, the display shows the
track number and the elapsed time of the track.
3 Adjust the volume using VOLUME.
Note
When you press CD u, it normally takes about 12
seconds before the CD starts playing.
It may also take a few seconds after pressing
CD u before the CD starts spinning, but this is
not a malfunction.
Listening through the built-in
speakers
The built-in speakers are located in the inner side
of the main cover. Open the main cover when
listening through the speakers.
To
Pause
Resume play after pause
Locate the beginning of
the current track (AMS*)
Locate a previous track
(AMS)
Locate the next track
(AMS)
Locate a succeeding track
(AMS)
Review
Cue
Stop play
* AMS = Automatic Music Sensor
** Possible during both playback and pause.
Handle compact discs…
…this way.
Not this way
Notes
• Do not open the CD compartment lid during
playback, as doing so may damage the disc.
• If you press CD u with no disc in the CD
compartment, “00” will flash for a few seconds.
Various Modes of CD
Playback
You can play tracks repeatedly or in random order.
Press CD PLAY MODE repeatedly to select
a playback mode.
Each press changes the playback mode as follows:
Display Play Mode
none (normal play)
All the tracks are played once.
v
“SHUFFLE” (shuffle play)
All the tracks are played once in random order.
v
“SHUFFLE (shuffle repeat)
REPEAT ALL”
All the tracks are played repeatedly in random
order.
v
“REPEAT 1” (single repeat)
A single track is played repeatedly.
v
“REPEAT ALL” (all repeat)
All the tracks are played repeatedly.
Notes
• When playing a CD in the Shuffle mode,
pressing .will not shift playback to the
preceding track.
• The CD PLAY MODE button does not function
when the main cover is closed.
Preventing sound from
skipping (ESP)
The ESP (Electronic Shock Protection) function
prevents the sound from skipping by using a buffer
memory that stores music data for about 10
seconds. Use this function when playing a CD in a
car or during a walk.
Press ESP.
The “ESP” indication appears in the display.
The ESP function is activated by factory preset. To
deactivate the function, hold down ESP for two
seconds until the “ESP” indication disappears in
the display.
Notes
• A strong shock may cause playback to stop even
with the ESP function on.
• The sound may skip or become noisy when:
— listening to a dirty or scratched CD,
— listening to an audio test CD or,
— the player receives continuous shock.
• The sound will drop for a while when ESP is
switched on or off during play.
• ESP cannot be switched on or off when the main
cover is closed.
Operating the Radio
Manual Tuning
1 Press RADIO•SLEEP to turn on the radio.
2 Press BAND repeatedly to select the
desired band.
FM1 and FM2 are differentiated only for Preset
tuning. For Manual or Auto Station Scan tuning
of FM stations, select either band.
3 Tune in to a station by pressing TUNE/
SCAN TIME SET + or – .
Press + for a higher frequency and – for a lower
frequency.
To change the frequency rapidly, hold down
the button for more than 2 seconds. Be sure
“SCAN” does not appear in the display. The
frequency indication will stop when you release
the button.
4 Adjust the volume using VOLUME.
Listening through the built-in
speakers
The built-in speakers are located in the inner side
of the main cover. Open the main cover to listen
through the speakers.
Note
When a headphones set is connected to the
i(headphones) jack, there will be no sound from
the speakers.
D.S.T.
SUMMER T.
ALARM TIMETRACK
WORLD/
LOCAL
S
L
E
E
P
O
F
F
/
L
I
G
H
T
.>
1 2
3 4
5
BAND
R
A
D
I
O
S
L
E
E
P
C
D
N
X
x
O
F
F
S
N
O
O
Z
E
A
L
A
R
M
R
E
S
E
T
STATION SELECT/ PRESET
TUNE/SCAN TIME SET
TIME MODE
TRACK/STATION
ALARM
DC IN 6V
ZOPEN
i
VOLUME
OFF ON
MEGA BASS
ESP
CD PLAY MODE
CLOCK
Setting the voltage (World model
only)
Use the supplied AC power adaptor, which has an
voltage-selector. Be sure to adjust the voltage-
selector to the local power supply.
If the plug on the AC power adaptor does not fit to
the wall outlet, use the supplied AC plug adaptor.
100
120
V
200
240
V
Notes
• When using the unit on AC power, we
recommend that you remove the dry batteries to
avoid possible battery leakage.
• When the AC power adaptor is not to be used for
a long period of time, be sure to unplug it both
from the DC IN 6V jack and from the wall outlet.
• Do not remove the lithium battery even when
operating the unit on house current, as it serves
as backup power for the memory.
• If power from the AC power adaptor is disrupted
due to power interruption, etc., the unit switches
to battery power when available.
• Use only the supplied Sony AC power adaptor.
Using any other adaptor may cause damage to
the unit.
Polarity of the plug
Setting the Clock
When the batteries are first installed, “AM 12:00”
flashes and “LOCAL” appears in the display.
The clock is on the 12-hour system. (AM 12:00 =
midnight, PM 12:00 = noon)
Setting the LOCAL Time
1 Press WORLD/LOCAL to display
“LOCAL”.
2 Hold down CLOCK until you hear a
beep.
3 Press TUNE/SCAN TIME SET + or – to
set the hour.
Press + to advance and – to go back. Hold
down the button to change the time
continuously.
4 Press CLOCK to enter the hour.
5 Press TUNE/SCAN TIME SET + or – to
set the minute, and then press CLOCK.
Two beeps sound to confirm the setting. The
clock starts to operate and “:” flashes.
Setting the WORLD Time
The WORLD time displays the time for a selected
time area in the world.
1 Press WORLD/LOCAL to display
“WORLD”.
“TIME DIFF” and the time difference to your
local time appears.
2 Hold down CLOCK until you hear a beep.
3 Press TUNE/SCAN TIME SET + or – to
set the desired hour and press CLOCK.
Press + to advance and – to go back.
The time difference indication changes
accordingly.
Two beeps sound to confirm the setting. The
clock starts to operate and “:” flashes.
Notes
• For WORLD time, only the hour can and need to
be set.
• When you change the LOCAL time, the WORLD
time will be adjusted accordingly based on the
time difference setting.
Adjusting the current
time display to daylight
saving time (summer
time)
Press D.S.T. SUMMER T.
“ ” appears in the display and the current time is
adjusted to the daylight saving time.
To cancel daylight saving time
adjustment
Press D.S.T. SUMMER T. again.
Note
The daylight saving time setting is done separately
for the LOCAL time and WORLD time.
Changing AM
Channel Step
The channel step of this unit is factory-set to 9 kHz.
Switch the channel step when using the unit in
areas with the 10 kHz frequency allocation system.
Area Channel step
North and South 10 kHz
American countries
Other countries 9 kHz
1 Hold down xOFF•ALARM RESET and
BAND for about 5 seconds until you hear
two beeps.
Note
The station presets are erased when the AM
channel step is changed.
Playing a CD
An 8 cm (3-inch) CD can be played without an
adaptor.
1 Press ZOPEN to open the CD
compartment lid and place a disc.
To turn off the radio
Press xOFF•ALARM RESET.
To improve radio reception
FM: Extend and adjust the angle of the telescopic
antenna.
AM: Rotate the unit horizontally for optimum
reception. A ferrite bar is built in to the unit.
Avoid operating the unit on a steel desk or metal
surface.
Auto Station Scan Tuning
The unit automatically scans the selected
waveband and stops at reception.
1 Press RADIO•SLEEP to turn on the radio.
2 Press BAND repeatedly to select the
desired band.
3 Hold down TUNE/SCAN TIME SET + or
– until “SCAN” flashes in the display,
then release the button.
Scanning starts.
Scanning is paused when a station is received.
The station is tuned in for a few seconds, then
the unit resumes scanning.
4 Press TUNE/SCAN TIME SET + or –
while your desired station is tuned in.
“SCAN” disappears in the display and
scanning stops to receive your desired station
continuously.
5 Adjust the volume using VOLUME.
Preset Tuning
You can preset up to 15 stations (5 stations each for
FM1, FM2 and AM). Once a station is preset, it can
be recalled with just a press of the respective preset
button.
Presetting the Station
Example: To preset 87.50 MHz on FM2 onto preset
button 2.
1 Tune in to the desired station (87.50 MHz
on FM2, in this case) by Manual tuning or
Auto Station Scan tuning.
2 Hold down the desired preset button (2,
in this case) until you hear two short
beeps.
To change the preset station
Tune in to the station to be preset and hold
down the desired preset button until you
hear two short beeps.
The station previously assigned to the button will
be erased.
Tuning in to a preset station
1 Press RADIO•SLEEP to turn on the radio.
2 Press BAND to choose a band.
3 Press the preset button where the desired
station is stored.
4 Adjust the volume using VOLUME.
Sleep Timer
Enjoy falling asleep to the radio with the sleep
timer. The radio turns off automatically after the
selected duration.
1 Press RADIO•SLEEP to turn on the radio.
2 Press RADIO•SLEEP again.
“SLEEP” and the sleep countdown duration
appear in the display.
3 Press RADIO•SLEEP repeatedly until the
desired duration appears in the display.
Each press changes the sleep countdown
duration in the following order:
30
(none)
60
90
15
The sleep timer starts counting down the
remaining number of minutes until the radio
turns off.
• To change the timer duration after the timer
function is activated, press RADIO•SLEEP
repeatedly until the desired duration appears.
• To switch off the power during countdown,
press SNOOZE•SLEEP OFF/LIGHT.
Setting the Alarm
The unit comes with 3 alarm modes — CD, radio
and buzzer. Before setting the alarm, make sure to
set the clock (see “Setting the Clock”).
Setting the Alarm Time
1 Hold down ALARM TIME until you hear
a short beep.
2 Press TUNE/SCAN TIME SET + or – to
select the desired hour, then press
ALARM TIME.
3 Press TUNE/SCAN TIME SET + or – to
select the desired minute, then press
ALARM TIME.
Two short beeps sound to confirm the setting.
4 Press ALARM MODE repeatedly to
display the indication for the desired
alarm mode.
Each press of ALARM MODE changes the mode
in the following order:
RADIO
BUZZER
CD
(none)
The alarm you chose will sound at the alarm time.
To check the alarm time
Press ALARM TIME.
Notes
• The radio or the buzzer alarm will sound for
about 60 minutes before stopping automatically.
• The loudness of the buzzer is fixed and cannot
be adjusted with VOLUME.
• The CD alarm will last for about 60 minutes
under the SHUFFLE REPEAT ALL, REPEAT 1
or the REPEAT ALL modes, and until all the
tracks in the CD are played for the other
playback modes.
To Stop the Alarm
Press xOFF•ALARM RESET.
The alarm will come on at the same time the next
day.
To Cancel the Alarm
Press ALARM MODE repeatedly until there
is no alarm mode indication in the display.
To Doze for a Few More
Minutes (Snooze)
Press SNOOZE•SLEEP OFF/LIGHT.
The alarm turns off, but will be activated
automatically after about 8 minutes.
• The alarm mode indication flashes in the display
while the Snooze function is in effect.
To Set the Wake-up Track
for CD Alarm
For the CD alarm, you can choose a track on the
CD to wake up to (the Wake-up track).
1 Select the CD alarm mode (see “Selecting
the Alarm Mode”).
2 Press ALARM TRACK/STATION until
you hear a beep.
3 Press TUNE/SCAN TIME SET + or – to
select the desired track number.
4 Press ALARM TRACK/STATION again.
Two short beeps sound to confirm the setting.
The track you chose will sound at the time set.
Notes
• If the playback mode is set to SHUFFLE or
SHUFFLE REPEAT, the CD alarm will disregard
the Wake-up track designation.
• The selected Wake-up track number remains
even when the CD is changed.
• If the alarm mode is set to the CD alarm but
there is no CD in the player, the buzzer alarm
will sound in its place at the time set.
To Set the Wake-up
Station for Radio Alarm
For the radio alarm, you can choose a station from
the preset memory to wake up to (the Wake-up
station).
1 Select the radio alarm mode (see
“Selecting the Alarm Mode”).
2 Press ALARM TRACK/STATION until
you hear a beep.
3 Press TUNE/SCAN TIME SET + or –
repeatedly to select a preset station.
4 Press ALARM TRACK/STATION again.
Two short beeps sound to confirm the setting.
The preset station you chose will sound at the
time set.
Note
If you did not choose a Wake-up station (i.e., the
WAKE UP preset indication is “- -”), the station last
received will be played.
Other Useful
Functions
Emphasizing Bass
Set MEGA BASS to ON.
Switch it off if the sound becomes distorted.
Lighting the Display
Press SNOOZE•SLEEP OFF/LIGHT.
The light comes on for about 10 seconds.
When the unit is operating on house current, the
display is lit at all times.
Precautions
• Operate the unit on the power sources specified
in “Specifications”.
• The nameplate indicating voltage, etc. is located
at the bottom.
• Disconnect the AC power adaptor cord by
grasping the plug. Never pull it by the cord.
• Do not leave the unit in a location near a heat
source such as a radiator or airduct, or in a place
subject to direct sunlight, excessive dust,
mechanical vibration, or shock.
• Allow adequate air circulation to prevent internal
heat build-up. Do not place the unit on a surface
(a rug, a blanket, etc.) or near materials (a curtain)
which might block the ventilation holes.
• Should any liquid or solid object fall into the unit,
unplug (or remove batteries from) the unit and
have it checked by a qualified personnel before
operating it further.
• When the casing becomes soiled, clean it with a
soft cloth dampened with a mild detergent
solution. Never use abrasive cleansers or
chemical solvents, as they may mar the casing.
• The unit is not disconnected from the AC power
source (mains) as long as it is connected to the
wall outlet, even if the unit itself has been turned
off.
If you have any question, please consult your
nearest Sony dealer.
Notes on Headphones
Road safety
Do not use headphones while driving, cycling, or
operating any motorized vehicle. It may create a
traffic hazard and is illegal in many areas. It can
also be potentially dangerous to play your
headphones at high volume while walking,
especially at pedestrian crossings. You should
exercise extreme caution or discontinue use in
potentially hazardous situations.
Preventing hearing damage
Avoid using headphones at high volume.
Hearing experts advise against continuous, loud
and extended play. If you experience a ringing in
your ears, reduce volume or discontinue use.
Caring for others
Keep the volume at a moderate level. This will
allow you to hear outside sounds and to be
considerate to people around you.
Troubleshooting
Should any problem occur with the unit, make the
following checks to determine whether or not
servicing is required. If the problem persists,
consult your nearest Sony dealer.
There is no radio or CD sound.
• The batteries are exhausted. Replace all batteries
when “E” appears in the display.
• The batteries are not inserted with correct
polarity.
• The AC power adaptor is not plugged in
properly.
• The volume is not adjusted properly.
• The headphones are plugged into the i
(headphones) jack when you are trying to listen
through the speakers.
• The disc is not placed correctly.
The CD player does not operate.
• The batteries are exhausted. Replace all batteries
when “E” appears in the display.
• The disc is not placed correctly (the labeled
surface should face up).
• The CD compartment lid is not completely
closed.
• The CD is dusty or defective. Clean the disc with
an optional cleaning cloth. Wipe the disc from
the center out.
The CD sound skips.
• The CD is dusty or defective. Clean the disc with
an optional cleaning cloth.
• The pickup lens is dirty. Clean the lens with a
commercially available blower.
• The unit is exposed to vibration.
• Activate the ESP function.
The CD, radio or buzzer alarm does not come on
at the preset time.
• The current time is not set correctly.
• The alarm time is not set correctly.
• An alarm mode has not been selected.
• The disc has not been placed (for CD alarm).
• The CD compartment lid is not completely
closed.
• The volume is not adjusted properly.
The clock flashes “AM 12:00” and the station
presets are erased.
• The lithium battery is exhausted. Replace it.
Specifications
CD player section
System: Compact disc digital audio system
Laser diode properties
Material: GaAlAs
Wavelength: 780 nm
Emission duration: Continuous
Laser output: Less than 44.6 µW
(This output is the value measured at a distance
of about 200 mm from the objective lens surface
on the optical pick-up block with 7 mm
aperture.)
Frequency response: 20-20,000 Hz
+1
–1.5
dB
Wow and flutter: Below measurable limit
Radio section
Frequency range
Band Frequency Channel step
FM 76-108 MHz 0.05 MHz
AM 531-1,710 kHz 9 kHz
FM 76-108 MHz 0.1 MHz
AM 530-1,710 kHz 10 kHz
General
Time display: 12-hour system
Speaker: Full range: 4 cm (1
5
/
8
inches), 8 ohms (2)
Output: i (headphones) jack (stereo minijack,
3.5 mm dia.)
Power output: 200 mW + 200 mW (at 10%
harmonic distortion)
Power requirements:
Main unit:
• 6V DC, four LR6 (size AA)
alkaline batteries
• DC IN 6V jack accepts supplied AC
power adaptor for use with 100–120V/
200–240V AC, 50/60 Hz (World model
only)/ for use with 220–230V AC, 50 Hz
(Singapore model only)
Backup for Clock:
3V DC, one CR2025 lithium battery
External power source: DC IN 6V
Dimensions: Approx. 166.5 × 34 × 173 mm
(w/h/d) (Approx. 6
5
/
8
× 1
3
/
8
× 6
7
/
8
inches)
incl. projecting parts and controls
Mass: Approx. 660 g (1 lb 7 oz) incl. batteries
Supplied Accessories
Sony CR2025 lithium battery (1)
Sony LR6 (AA) alkaline batteries (4)*
AC power adaptor (1)**
AC plug adaptor (1)*
Stereo headphones (1)
Ear pads (2)*
* World model only
**World model and Singapore model only
Design and specifications are subject to change
without notice.
Handle the disc by its
edge.
Do not touch the
surface.
Do not stick paper or
tape nor write
anything on the
surface.
xxx
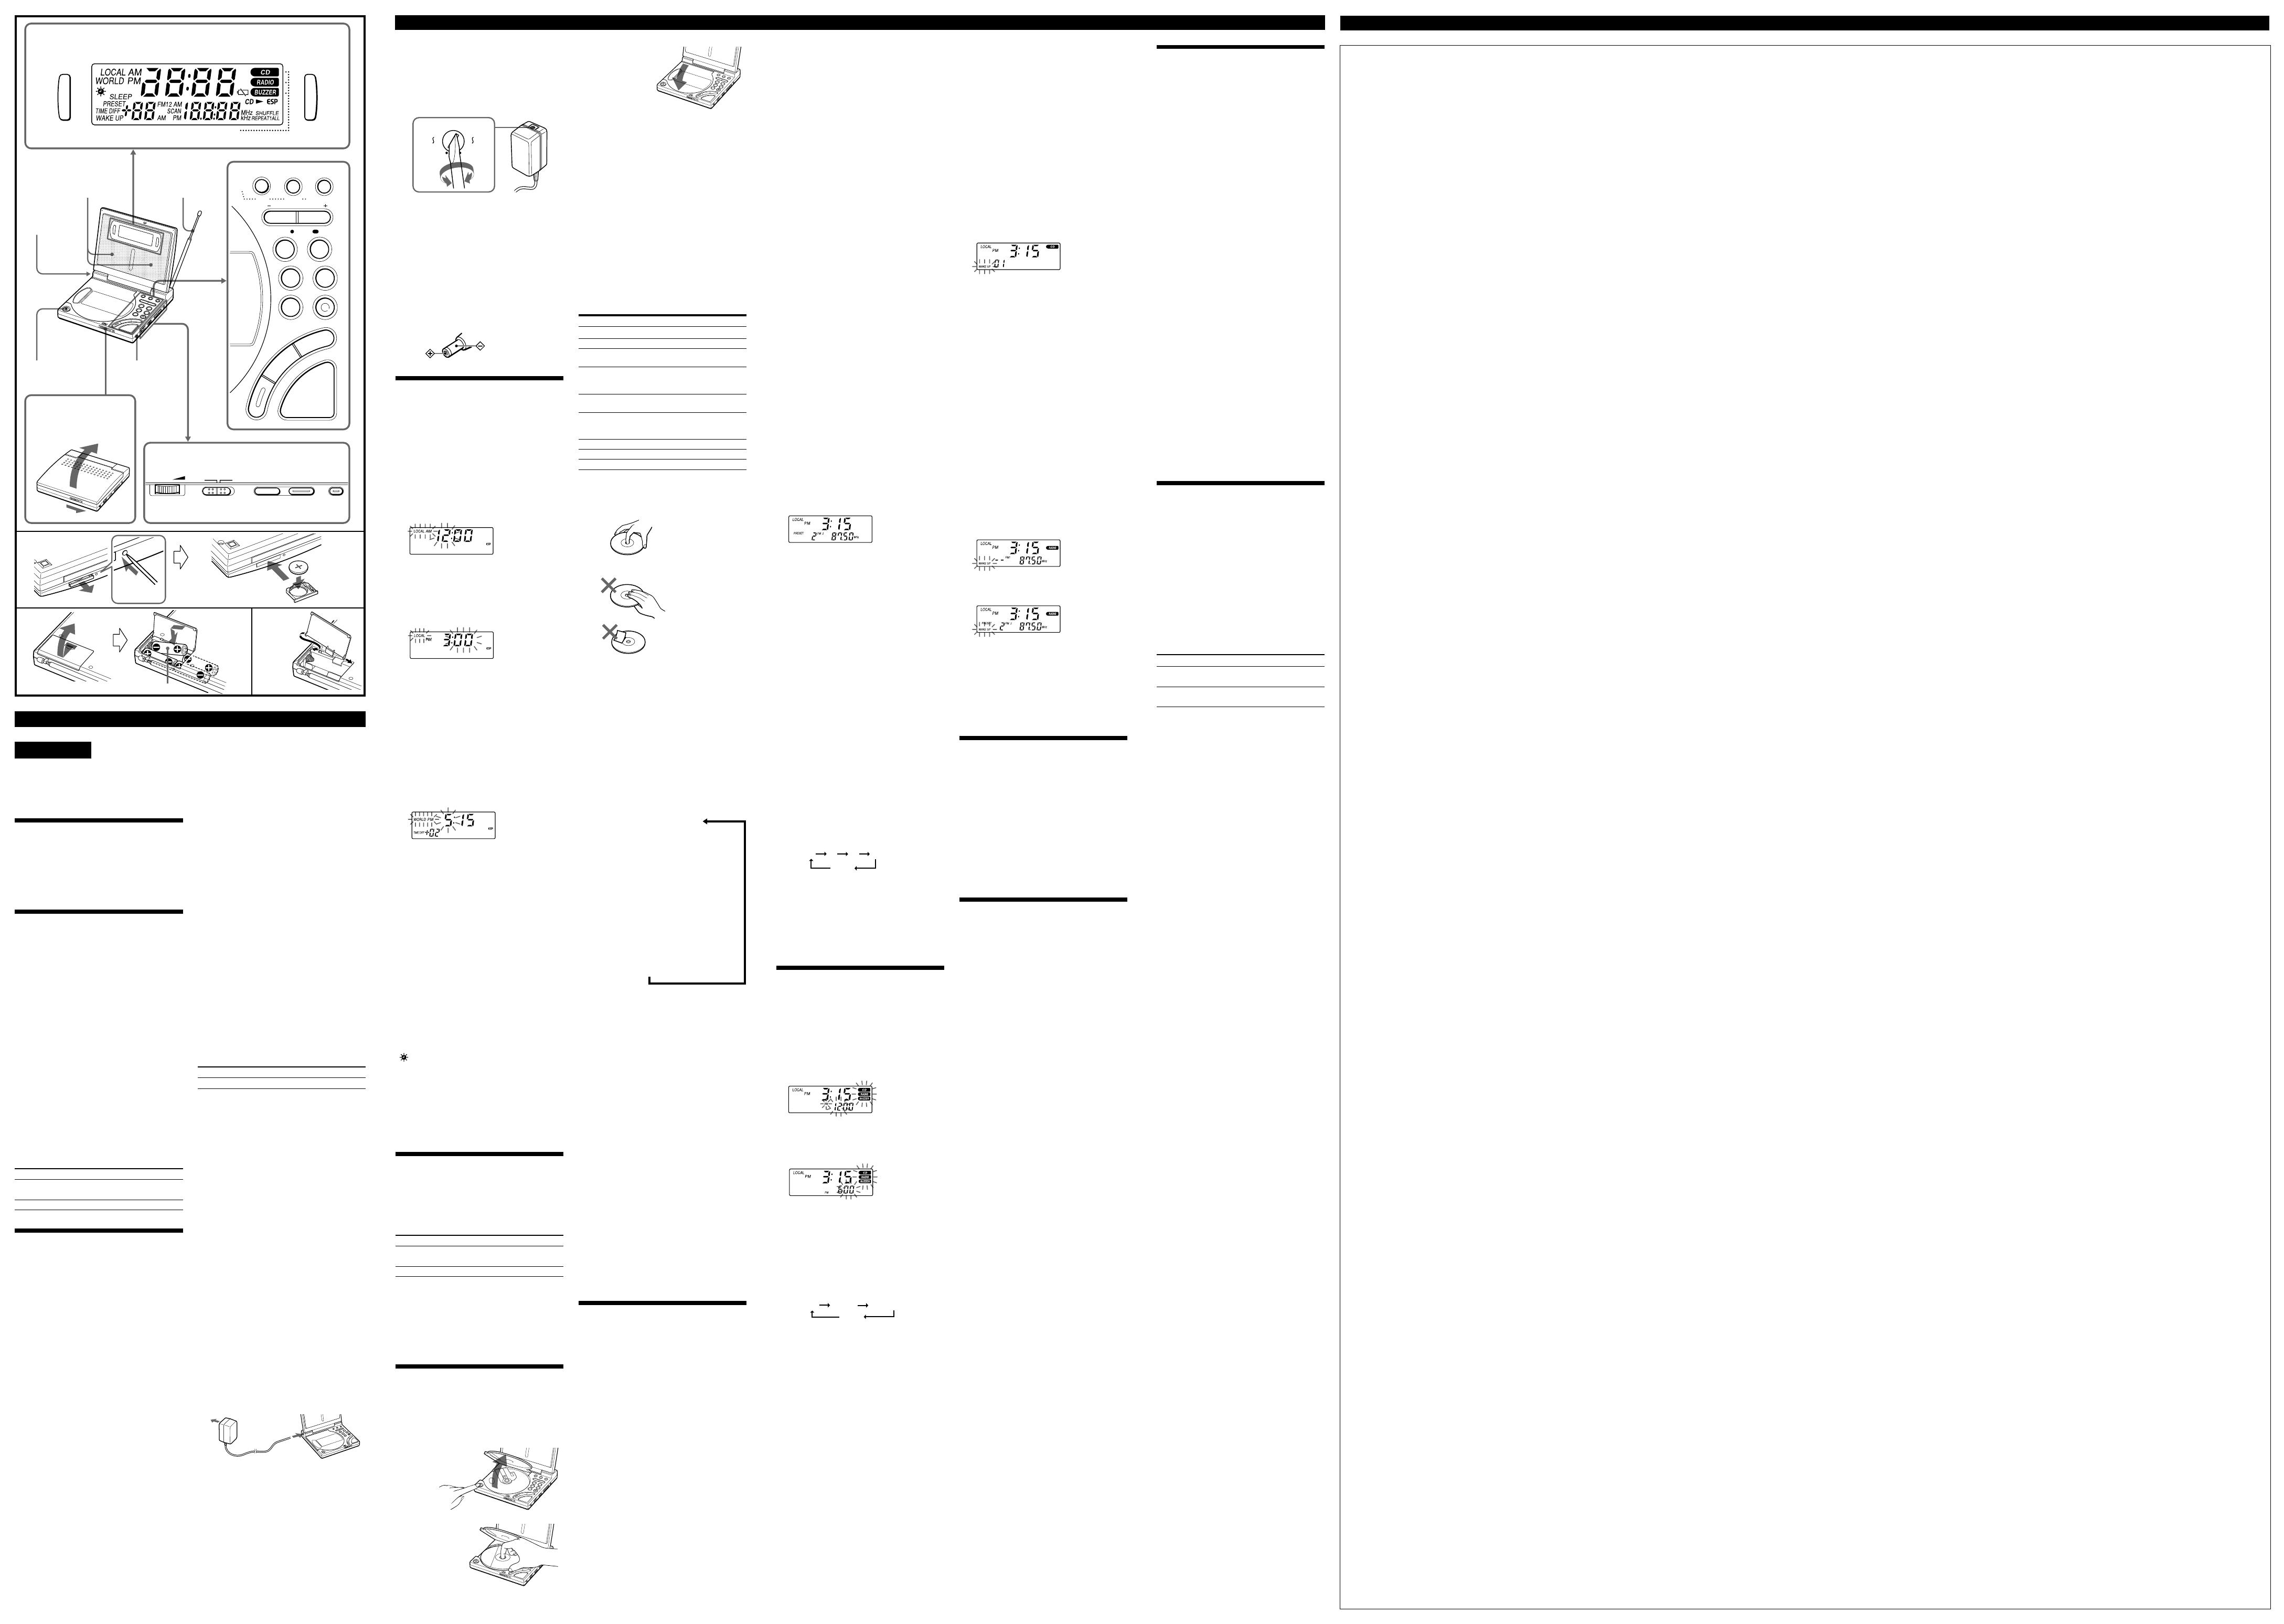
1
2
To open
xx
Telescopic antenna
xx
Display
xx
Bottom/xx
CR2025
Bottom/xx
Bottom/xx
LR6 (AA) x 4
English
WARNING
To prevent fire or shock hazard, do not expose the
unit to rain or moisture.
To avoid electrical shock, do not open the cabinet.
Refer servicing to qualified personnel only.
Before You Begin
Thank you for choosing a Sony CD clock radio! It
will give you many hours of reliable service and
listening pleasure.
Before operating the CD clock radio, please read
these instructions thoroughly and retain them for
future reference.
Features
• PLL (Phase Locked Loop) synthesized travel
clock radio with CD player.
• Wake up to your choice of alarm sound source
— CD (with selectable Wake-up track), radio
(with selectable Wake-up station), or buzzer.
• Clock function for the traveller
— display the time in your destination with the
WORLD time function.
— display both the current time and the alarm
time with the dual display.
• Simple radio operation with the Auto Station
Scan tuning and preset tuning. Preset tuning
stores up to 15 (10 FM, 5 AM) stations.
• Multi-functioned CD player — variety of
playback modes (repeat, shuffle, etc.) plus a 10-
second Electronic Shock Protection function to
prevent skipping of sound.
• Stereo output from both the speakers and the
headphones.
Note on AM channel step
The AM channel step differs depending on areas.
The channel step of this unit is factory-set to
9 kHz. Switch the channel step when using the unit
in areas with the 10 kHz frequency allocation
system (see “Changing AM Channel Step”).
Area Channel step
North and South 10 kHz
American countries
Other countries 9 kHz
Power Sources
The unit cannot be played on manganese batteries.
Use only alkaline batteries.
Installing the Lithium
Battery for Clock Backup
(see Fig. A)
1 Insert a pointed object into the hole
beside the lithium battery compartment
to eject the tray.
2 Place the lithium battery CR 2025 on the
tray with the e side facing up, and slide
the tray into the compartment until you
hear a click.
Note
The lithium battery is only for clock backup. The
unit cannot play a CD or the radio unless it is
powered by alkaline batteries or the AC power
adaptor.
Replacing the lithium battery
The battery life of the backup lithium battery is 3
months when both the alkaline batteries or house
current are not connceted. The lithium battery will
last longer with these power sources, since either
source will supply power for clock backup as well.
If the clock flashes “AM 12:00” when you replace
the alkaline batteries, the lithium battery is
exhausted. Replace the lithium battery.
Reset the clock and the station presets if needed.
Notes on batteries
• Keep the lithium battery out of reach of children.
Should the battery be swallowed, consult a
doctor immediately.
• Wipe the batteries with a dry cloth to assure good
contact.
• Be sure to install the batteries in the correct
polarity position.
• Do not hold the batteries with metallic tweezers,
as doing so may cause a short-circuit.
• Do not break up the batteries or throw them into
a fire, which might cause them to explode.
Carefully dispose of used batteries.
CAUTION
Danger of explosion if battery is replaced
incorrectly. Replace only with the same or
equivalent type recommended by the equipment
manufacturer. Discard used batteries according to
manufacturer's instructions.
Installing Alkaline
Batteries (see Fig. B)
1 Slide the battery compartment lid in the
direction of the arrow and lift it up.
2 Install four LR6 (size AA) alkaline
batteries with correct polarity.
Insert the batteries with the polarity as shown
in the diagram at the bottom of the unit. Be sure
to insert the batteries from the E terminal (see
Fig. B-A).
Battery life
Using Sony alkaline LR6 (size AA)
CD (ESP on) Approx. 7 hours
Radio Approx. 17 hours
Replacing batteries
• When the batteries become weak, “E” flashes in
the display. When the batteries are exhausted,
“E” stops flashing and remains in the display.
Replace all the four batteries with new alkaline
batteries of the same kind.
• When “E” is lit in the display, the unit stops all
operation. Only the clock display will appear in
the display.
After replacing the batteries, press CDu or
RADIO•SLEEP so that “E” disappears in the
display.
When the battery compartment lid
becomes detached (see Fig.C)
The battery compartment lid is designed to become
detached if opened with excessive force. In such a
case, reattach it as shown in the illustration.
Note
When the unit is not being used for a long period of
time, remove the batteries to avoid damage from
battery leakage and corrosion.
Using House Current
Connect the AC power adaptor to the DC IN
6V jack, and plug it into a wall outlet.
Be sure to plug in the adaptor securely to
both the DC IN 6V jack and to the wall
outlet. The unit automatically switches to
external power even with the batteries
inserted.
Push
xx
Open
Labeled surface
up
A
B
C
“LOCAL”and the
hour flashes.
A beep sounds
and the minute
flashes.
“WORLD” and
the hour flashes.
“PRESET” flashes
while the station is
being stored, and
the preset number is
displayed.
“WAKE UP”
flashes in the
display.
“WAKE UP”
flashes in the
display.
The alarm mode
indications and the
hour of the alarm
time flashes.
A beep sounds
and the minute
flashes.
English
AC power
adaptor
to DC IN 6V
to wall outlet
Speakers
xxxx
Close the lid
Press
CD u
CD u
. once**
. repeatedly for the
number of tracks to be
skipped**
> once**
> repeatedly for the
number of tracks to be
skipped**
Hold down .**
Hold down >**
xOFF•ALARM RESET


