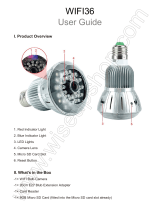
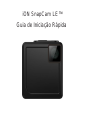
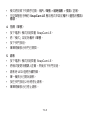
iON SnapCam LE™
Quick Start Guide

EN-2
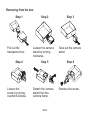
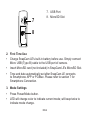
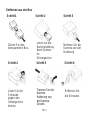
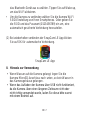
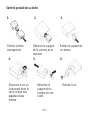
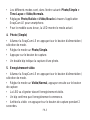
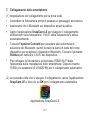
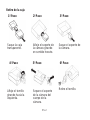
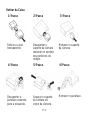
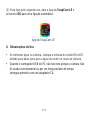
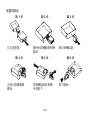
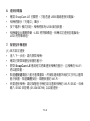
Removing from the box
Step 1 Step 2 Step 3
Pull out the
transparent box.
Loosen the camera
stand by turning
clockwise.
Take out the camera
stand.
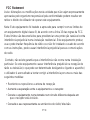
Step 4 Step 5 Step 6
Loosen the
screw by turning
counterclockwise.
Detach the camera
stand from the
camera frame.
Remove the screw.

EN-3
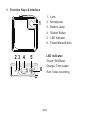
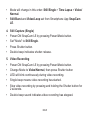
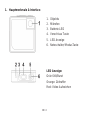
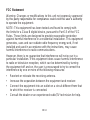
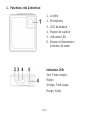
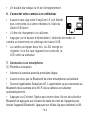
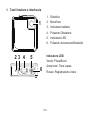
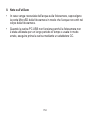
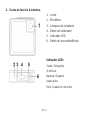
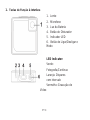
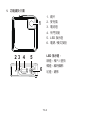
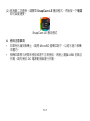
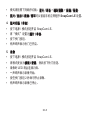
1. Function Keys & Interface
1
1. Lens
2. Microphone
3. Battery Lamp
4. Shutter Button
5. LED Indicator
6. Power/Mode Button
2 3 4 5
6
LED Indicator:
Green: Still/Burst
Orange: Time Lapse
Red: Video recording

EN-4
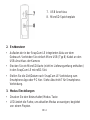
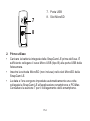
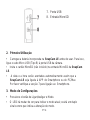
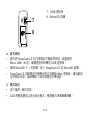
7
8
7. USB Port
8. MicroSD Slot
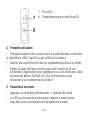
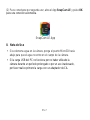
2. First Time Use
• Charge SnapCam LE's built-in battery before use. Simply connect
Micro USB (Type B) cable to the USB port of camera.
• Insert MicroSD card (not included) in SnapCam LE's MicroSD Slot.
• Time and date automatically set after SnapCam LE connects
to Smartphone APP or PC/Mac. Please refer to section 7 for
Smartphone Connection.
3. Mode Settings
• Press Power/Mode button.
• LED will change color to indicate current mode; will beep twice to
indicate mode change.

EN-5
• Mode will change in this order: Still/Single > Time Lapse > Video/
Normal.
• Still/Burst and Video/Loop set from Smartphone App SnapCam
LE.
4. Still Capture (Single)
• Power ON SnapCam LE by pressing Power/Mode button.
• Set "Mode" to Still/Single.
• Press Shutter button.
• Double beep indicates shutter release.
5. Video Recording
• Power ON SnapCam LE by pressing Power/Mode button.
• Change Mode to Video/Normal, then press Shutter button
• LED will blink continuously during video recording.
• Single beep means video recording has started.
• Stop video recording by pressing and holding the Shutter button for
2 seconds.
• Double beep sound indicates video recording has stopped.

EN-6
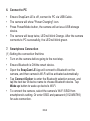
6. Connect to PC
• Ensure SnapCam LE is off, connect to PC via USB Cable.
• The camera will show "Power Charging" icon.
• Press Power/Mode button, the camera will act as a USB storage
device.
• The camera will beep twice, LED will blink Orange. After the camera
connects to PC successfully, the LED will blink green.
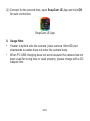
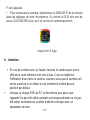
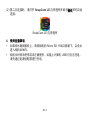
7. Smartphone Connection
(1)Settingtheconnectionrsttime
• Turn on the camera before going to the next step.
• Ensure Bluetooth is ON the smart device.
• Open the SnapCam LE App will connect to Bluetooth on the
camera, and then camera's Wi-Fi will be activated automatically.
• Tap Connect Option to enter the Bluetooth selection screen, and
tap the text bar of device name to choose Bluetooth device. Tap
Wake up button to wake up device's Wi-Fi.
• To connect the camera, select the camera's Wi-Fi SSID from
smartphone's setting. Or enter SSID and password (0123456789)
for auto connection.

EN-7
(2) Connect for the second time, open SnapCam LE App and click OK
for auto connection.
SnapCam LE App
8. Usage Note
• If water is spilled onto the camera, place camera MicroSD port
downwards so water does not enter the camera body.
• When PC USB charging does not work because the camera has not
been used for a long time or used properly, please charge with a DC
Adapterrst.

EN-8
FCC Statement
Warning:Changesormodicationstothisunitnotexpresslyapproved
by the party responsible for compliance could void the user’s authority
to operate the equipment.
NOTE: This equipment has been tested and found to comply with
the limits for a Class B digital device, pursuant to Part 15 of the FCC
Rules. These limits are designed to provide reasonable protection
against harmful interference in a residential installation. This equipment
generates, uses and can radiate radio frequency energy and, if not
installed and used in accordance with the instructions, may cause
harmful interference to radio communications.
However, there is no guarantee that interference will not occur in a
particular installation. If this equipment does cause harmful interference
to radio or television reception, which can be determined by turning
the equipment off and on, the user is encouraged to try to correct the
interference by one or more of the following measures:
• Reorient or relocate the receiving antenna.
• Increase the separation between the equipment and receiver.
• Connect the equipment into an outlet on a circuit different from that
to which the receiver is connected.
• Consult the dealer or an experienced radio/TV technician for help.

EN-9
This device complies with Part 15 of the FCC Rules. Operation is
subject to the following two conditions:
(1) This device may not cause harmful interference.
(2) This device must accept any interference received, including
interference that may cause undesired operation.
TRADEMARK INFORMATION
© 2015 World Wide Licenses Limited.
® The iON logo is a registered trademark of World Wide Licenses Limited
Questions?
Need Some Help?
This manual should
help you understand
your new product.
If you still have
questions,
visit our website:
www.ioncamera.com
Like Us:
www.facebook.com/ioncamera
Tweet Us:
www.twitter.com/ioncamera

EN-10
Learn more.
Learn more about iON camera features at http://www.ioncamera.com
For instructions and safety information, see the iON User Guide.
Download the PDF at http://www.ioncamera.com/user-manuals/
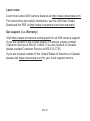
Get support. (i.e. Warranty)
Visit https://www.ioncamera.com/support/ for all iON camera support.
If you are located in the United States of America, please contact
Customer Service at 855-411-4466. If you are located in Canada,
please contact Customer Service at 905-513-7733.
If you are located outside of the United States of America or Canada
please visit www.ioncamera.com for your local support service

iON SnapCa
m LE™
Schnellstartanleitung

DE-2
Entfernen aus der Box
Schritt 1 Schritt 2 Schritt 3
Ziehen Sie den
transparenten Box.
Lösen Sie die
Kamerahalterug
durch Drehen
im
Uhrzeigersinn
Nehmen Sie die
Kamera von der
Halterung
Schritt 4 Schritt 5 Schritt 6
Lösen Sie die
Schraube
gegen den
Uhrzeigersinn
drehen.
Trennen Sie die
Kamera
Halterung von
die Kamera
Gestell.
Entfernen Sie
die Schraube

DE-3
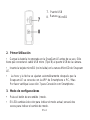
1. Hauptmerkmale & Interface
1. Objektiv
2. Mikrofon
3. Batterie-LED
4. Verschluss Taste
5. LED Anzeige
6. Netzschalter/ ModusTaste
LED Anzeige:
Grün:Still/Burst
Orange: Zeitraffer
Red: Video Aufzeichen

DE-4
7. USB Anschluss
8. MicroSD Speicherplatz
2. Erstbenutzer
• Aufladen der in der SnapCam LE integrierten Akku vor dem
Gebrauch. Verbinden Sie einfach Micro USB (Typ B) Kabel an den
USB-Anschluss der Kamera
• Stecken Sie ein MicroSD-Karte (nicht im Lieferungumfang enthalten)
in den SnapCam LE microSD-Slot.
• Stellen Sie die Zeit/Datum nach SnapCam LE Verbindung zum
Smartphone App oder PC hier. Siehe Abschnitt 7 für Smartphone-
Verbindung.
3. Modus Einstellungen
• Drucken Sie den Netzschalter/ Modus Taste
• LED ändert die Farbe, um aktuellen Modus anzuzeigen; begleitet
von einem Piepton.

DE-5
• Modus wird in dieser Reihenfolge zu ändern: Einzel Foto>
Zeitraffer> Video/Normal:
• Burst und Video/Loop können Sie mit dem Smartphone-App
SnapCam LE einstellen
4. Standbildaufnahme (Einzel)
• SnapCam LE Einschalten drücken Sie den Netzschalter/ Modus
Taste
• Modus nach still/Einzel
• Drücke den Auslöser.
• Doppelter piepton ist zu hören, wenn Foto aufgenommen wurde.
5. Videoaufnahme
• Einschalten der SnapCam LE, indem Sie den Power / Modus-
Taste drücken.
• Wechsel Modus auf Video / Normal, und drücken Sie dann den
Auslöser.
• LED blinkt kontinuierlich während der Videoaufnahme.
• Eine Single Signalton zeigt an, dass die Videoaufzeichnung
begonnen hat.
• Stoppen die Videoaufzeichnung durch Drücken der Auslöser taste für

DE-6
2 Sekunden.
• Ein doppelter Signalton zeigt an, dass Videoaufzeichnung
angehalten wurde.
6. Anschließen an den PC
• Stellen Sie sicher SnapCam LE ausgeschaltet ist, eine
Verbindung zum PC über USB-Kabel.
• Die Kamera-Symbol "aufladen" wird angezeigt
• Drücken Sie die Power / Modus-Taste, die Kamera wirkt als
USB-Speichergerät.
• Die Kamera piept zweimal, wird LED orange blinken. Nachdem die
Kamera eine Verbindung zum PC hergestellt hat, blinkt die LED
grün.
7. Smartphone Anschluss
(1) Einstellen der Verbindung zum ersten Mal.
• Schalten Sie die Kamera, bevor Sie zum nächsten Schritt.
• Stellen Sie sicher Bluetooth basiert auf dem intelligenten Gerät.
• Ö ffnen Sie die SnapCam LE App und eine Verbindung wird
hergestellt, stellen Sie sicher das Bluetooth aktiviert ist. Eine
Wi-Fi Verbindung wird dann automatisch hergestellt
• Tippen Sie auf Connect Optionen um einen Bluetooth Bildschirm
zu öffnen. klicken Sie auf die Textleiste der Gerätenamens, um

DE-7
das Bluetooth-Gerät aus zu wählen. Tippen Sie auf Wake up,
um das Wi-Fi aktivieren.
• Um die Kamera zu verbinden wählen Sie die Kamera Wi-Fi
SSID-Einstellung von Ihren Smartphones. Oder geben Sie
die SSID und das Passwort (0123456789) ein um, eine
automatisch gesicherte Verbindung herzustellen.
(2) Bei wiederholten verbinden der SnapCam LE App klicken
Sie auf OK für automatische Verbindung.
SnapCam LE App
8. Hinweis zur Verwendung
Wenn Wasser auf die Kamera gelangt, legen Sie die
Kamera MicroSD-Anschluss nach unten, so kein Wasser in
das Kameragehäuse gelangen.
Wenn das Aufladen der Kamera über USB nicht funktioniert,
da die Kamera über einen längeren Zeitraum nicht oder
nicht richtig verwendet wurde, laden Sie diese bitte zuerst
mit einem Netzteil auf.

DE-8
FCC Statement
Warning: Changes or modifications to this unit not expressly approved
by the party responsible for compliance could void the user’s authority
to operate the equipment.
NOTE: This equipment has been tested and found to comply with
the limits for a Class B digital device, pursuant to Part 15 of the FCC
Rules. These limits are designed to provide reasonable protection
against harmful interference in a residential installation. This equipment
generates, uses and can radiate radio frequency energy and, if not
installed and used in accordance with the instructions, may cause
harmful interference to radio communications.
However, there is no guarantee that interference will not occur in a
particular installation. If this equipment does cause harmful interference
to radio or television reception, which can be determined by turning
the equipment off and on, the user is encouraged to try to correct the
interference by one or more of the following measures:
• Reorient or relocate the receiving antenna.
• Increase the separation between the equipment and receiver.
• Connect the equipment into an outlet on a circuit different from that
to which the receiver is connected.
• Consult the dealer or an experienced radio/TV technician for help.

DE-9
This device complies with Part 15 of the FCC Rules. Operation is
subject to the following two conditions:
(1) This device may not cause harmful interference.
(2) This device must accept any interference received, including
interference that may cause undesired operation.
TRADEMARK INFORMATION
© 2015 World Wide Licenses Limited.
® The iON logo is a registered trademark of World Wide Licenses Limited
Questions?
Need Some Help?
This manual should
help you understand
your new product.
If you still have
questions,
visit our website:
www.ioncamera.com
Like Us:
www.facebook.com/ioncamera
Tweet Us:
www.twitter.com/ioncamera

DE-10
Learn more.
Learn more about iON camera features at http://www.ioncamera.com
For instructions and safety information, see the iON User Guide.
Download the PDF at http://www.ioncamera.com/user-manuals/
Get support. (i.e. Warranty)
Visit https://www.ioncamera.com/support/ for all iON camera support.
If you are located in the United States of America, please contact
Customer Service at 855-411-4466. If you are located in Canada,
please contact Customer Service at 905-513-7733.
If you are located outside of the United States of America or Canada
please visit www.ioncamera.com for your local support service
ページが読み込まれています...
ページが読み込まれています...
ページが読み込まれています...
ページが読み込まれています...
ページが読み込まれています...
ページが読み込まれています...
ページが読み込まれています...
ページが読み込まれています...
ページが読み込まれています...
ページが読み込まれています...
ページが読み込まれています...
ページが読み込まれています...
ページが読み込まれています...
ページが読み込まれています...
ページが読み込まれています...
ページが読み込まれています...
ページが読み込まれています...
ページが読み込まれています...
ページが読み込まれています...
ページが読み込まれています...
ページが読み込まれています...
ページが読み込まれています...
ページが読み込まれています...
ページが読み込まれています...
ページが読み込まれています...
ページが読み込まれています...
ページが読み込まれています...
ページが読み込まれています...
ページが読み込まれています...
ページが読み込まれています...
ページが読み込まれています...
ページが読み込まれています...
ページが読み込まれています...
ページが読み込まれています...
ページが読み込まれています...
ページが読み込まれています...
ページが読み込まれています...
ページが読み込まれています...
ページが読み込まれています...
ページが読み込まれています...
ページが読み込まれています...
ページが読み込まれています...
ページが読み込まれています...
ページが読み込まれています...
ページが読み込まれています...
ページが読み込まれています...
ページが読み込まれています...
ページが読み込まれています...
ページが読み込まれています...
ページが読み込まれています...
ページが読み込まれています...
ページが読み込まれています...
ページが読み込まれています...
ページが読み込まれています...
ページが読み込まれています...
ページが読み込まれています...
ページが読み込まれています...
ページが読み込まれています...
ページが読み込まれています...
ページが読み込まれています...
ページが読み込まれています...
-
 1
1
-
 2
2
-
 3
3
-
 4
4
-
 5
5
-
 6
6
-
 7
7
-
 8
8
-
 9
9
-
 10
10
-
 11
11
-
 12
12
-
 13
13
-
 14
14
-
 15
15
-
 16
16
-
 17
17
-
 18
18
-
 19
19
-
 20
20
-
 21
21
-
 22
22
-
 23
23
-
 24
24
-
 25
25
-
 26
26
-
 27
27
-
 28
28
-
 29
29
-
 30
30
-
 31
31
-
 32
32
-
 33
33
-
 34
34
-
 35
35
-
 36
36
-
 37
37
-
 38
38
-
 39
39
-
 40
40
-
 41
41
-
 42
42
-
 43
43
-
 44
44
-
 45
45
-
 46
46
-
 47
47
-
 48
48
-
 49
49
-
 50
50
-
 51
51
-
 52
52
-
 53
53
-
 54
54
-
 55
55
-
 56
56
-
 57
57
-
 58
58
-
 59
59
-
 60
60
-
 61
61
-
 62
62
-
 63
63
-
 64
64
-
 65
65
-
 66
66
-
 67
67
-
 68
68
-
 69
69
-
 70
70
-
 71
71
-
 72
72
-
 73
73
-
 74
74
-
 75
75
-
 76
76
-
 77
77
-
 78
78
-
 79
79
-
 80
80
-
 81
81


他の言語で
- italiano: iON SnapCam LE Manuale utente
- español: iON SnapCam LE Manual de usuario
- Deutsch: iON SnapCam LE Benutzerhandbuch
- français: iON SnapCam LE Manuel utilisateur
- português: iON SnapCam LE Manual do usuário
- English: iON SnapCam LE User manual