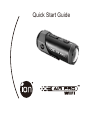
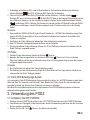
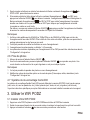
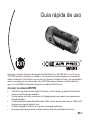
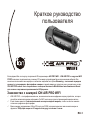
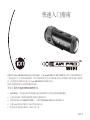
iON Air Pro Lite Wi-Fi クイックスタートガイド
- カテゴリー
- アクションスポーツカメラ
- タイプ
- クイックスタートガイド

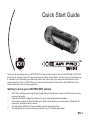
Quick Start Guide

EN-1
Quick Start Guide
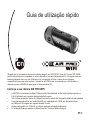
Thank you for purchasing the ion AIR PRO WiFi HD sports video camera. The ion AIR PRO with WiFi PODZ
allows you to connect to your PCs and smart devices without using cables. You can use your smart phone as
a viewfinder (Live Streaming) or transfer the photos and videos from your camera and share them to your
social media sites. The ion AIR PRO can be mounted with the Bike & Helmet Kit or the BOARD Kit for the
ultimate adventure HD recording experience.
AIR PRO is a Professional, High Quality Digital Video Recorder that records in Full HD video by using
an easy slide switch
It also has the latest 5 Mega Pixel Sensor for you to take great digital photographs
Your camera supports a Micro SD card up to 32GB, which allows you to take video in 1080p with 30
frames per second for about 4 Hours.
The embedded 1200mAh Li-Polymer Battery can be recharged quickly.
The Waterproof Housing lets the camera perform up to 10 meters under water.
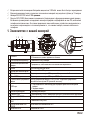
Getting to know your AIR PRO WIFI camera

EN-2
AIR PRO is about 4.6 ounces or 130g.
WiFi PODZ provides the Wireless Capability to your ion camera. Your can access and transfer your
photos and videos to your PC, mobile phone or tablet. It also turns your mobile device to be a viewfinder
and you can live-stream the camera view from your mobile device.
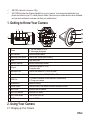
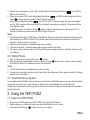
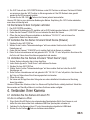
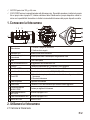
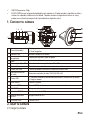
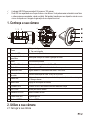
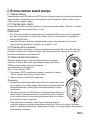
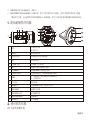
1. Getting to Know Your Camera
7
10
9
5
6
8
11
4
1 2
3
Power
1
2
3
4
5
6
7
8
9
10
11
12
13
14
15
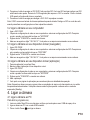
1. Turn the camera on or off
2. Take single photograph
LED indicator
Show the camera status
Recording Slide Switch
Slide to start or stop video recording
Lens
High quality lens
MicroSD card slot
MicroSD card storage location.
AV port
Connect the camera to TV via
Composite cable
Mini HDMI Port
Connect the camera to TV via HDMI cable
Video Resolution Switch
Select video resolution: FHD (Full HD) or HD.
USB Port
1. Connect to computer for data transfer or camera setup
2. Charge your camera
Reset button Reset the camera
PODZ Socket
WiFi PODZ
WiFi LED indicator
WiFi Power button
PODZ Latch
Connect PODZ to the camera to achieve additional function
Rotate to seal the camera
Show the WiFi status
Turn the WiFi on or off
Lock the PODZ
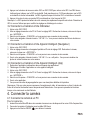
2. Using Your Camera
2.1 Charging up Your Camera

EN-3
Charge your camera with either the USB cable or AC/DC adapter. The red LED lights up to indicate the
camera is charging and turns off as soon as the camera has been fully charged. It takes about 3 hours to fully
charge the camera.
2.2 Inserting a Memory Card
2.3 Set up Date and Time
Connect your camera to a computer and run the ion software from the MicroSD card folder. You can set date
and time on the camera through the settings page. Please see section 4.1 to open ion software
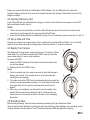
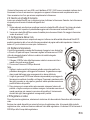
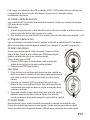
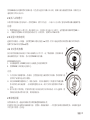
2.4 Sealing Your Camera
The Waterproof Housing lets the camera perform up to 10 meters or 30 feet
under water. You must seal the camera with PODZ in order to protect the
camera when using it in wet or moist conditions.
Insert a MicroSD card (not included) before using your camera. Assure that the camera power is turned OFF
before inserting the card to the slot.
Notes
1. There is only one correct direction to insert the MicroSD card into the slot. Do not force the card into the
card slot as it may damage both the camera and the MicroSD card.
2. A new MicroSD card should be formatted before using. For more information, please see section 4.1 and 4.2
To secure the PODZ
1. Attach the PODZ to the back of the camera and rotate clockwise until
two dots are aligned
2. Slide the latch on the PODZ to lock it.
1. Failure to properly seal your camera can result in leaks that damage or
destroy your camera. Your warranty does not cover water damage
resulting from user damage.
2. The rubber seal on the PODZ forms the waterproof barrier to protect the
camera in wet and underwater conditions. You must keep this seal clean
as a single strain of hair or grain of sand can cause a leak into the
product.
3. After every use in salt water, you will need to rinse the outside of the
product and the seal with non-salt water and dry. Not doing this can
cause corrosion in the product or failure in the seal, in turn, damaging
the product.
Notes
2.5 Recording Video
Before starting recording, select the video resolution by switching the Video Resolution Switch
There are two methods available for starting the video record function. When starting a video recording, a short
vibration indicates recording started. The LED indicator illuminates RED throughout the recording.

EN-4
1. Whether the camera power is ON or OFF, simply slide the Recording Slide Switch from STOP to
REC to start recording.
2. When your camera is OFF and the Recording Slide Switch is at REC location, press and hold the
Power button to turn the camera ON and it will start recording.
Move the Recording Slide Switch from REC to STOP to stop recording. The camera will vibrate
and the LED indicator will illuminate GREEN to indicate the recording has stopped. The camera will then
enter Standby mode.
An additional option is to hold the Power button to stop the recording and turn the camera off. The
camera will vibrate two seconds and the Red LED light will turn off.
1. An additional 432x240 (w/ 1080p/720p) or 320x240 (w/ 960p) video file will be created simultaneously with
the recording of an HD/FHD video file. The smaller video file size allows for more efficient uploading of
content to social media sites and email.
2. Changing video resolution is disabled during video recording.
3. There will be around 1-2 seconds delay before the camera starts recording.
4. The various video resolution options for HD and FHD can be changed under the “Settings” selection in the
ion software.
Notes
2.6 Taking Photos
1. Turn on the camera by pressing the Power button.
2. After the camera power has been turned on, press the Power button to take a photo. A short vibration
and a flash of Green LED indicate the action was successful.
Notes
1. The Still Photo function is disabled during video recording.
2. Change photo resolutions and shot mode (Single Shot, Burst Mode and Time Lapse) through the “Settings”
section on the ion software.
2.7 CamLOCK Mount System
ion’s versatile CamLOCK Mount System allows you to attach the AIR PRO camera to any type of helmet (bike,
motorcycle, ski, skydive etc.), pole, board (surf, skate, ski etc) and handlebar (bike and motorcycle).
Please refer to the specific mounting guides for instructions on how to install your mounts with your camera for
particular activities.
3. Using the WiFi PODZ
3.1 Install Your WiFi PODZ
1. Remove your PODZ and put your WiFi PODZ to the camera PODZ socket
2. Seal the camera by rotating the back cover and slide the latch until it is locked
3. Press and hold the Power button to turn on your camera

EN-5
4. Press the WiFi power button on the WiFi PODZ to turn on your WiFi. The blue LED lights up to indicate the
WiFi is warming up. It will take around 15-20 seconds for the WiFi to warm up and become connectable.
The LED will flash when the Wi-Fi function is active or connected.
5. Press the WiFi power button to turn off the WiFi anytime.
3.2 Connect The Camera to Your Computer
1. Turn on your WiFi PODZ.
2. Go to network setting of your PC and choose WiFi setting. Search the network, find and click “WIFIPODZ”
3. Enter password “123456789” and you can connect to your camera.
4. Open your Internet browser and input “192.168.1.2”. You can view the files stored in your camera
3.3 Connect The Camera to Your Smart Device (Browser)
1. Turn on your WiFi PODZ.
2. Go to network setting of your mobile device and choose WiFi setting. Search the network, find and click
“WIFIPODZ”
3. Enter password “123456789” and you can connect to your camera.
4. Open your Internet browser and input “192.168.1.2” or “wifi.podz”. You can view the photos and videos
stored in your camera.
Notes:WiFi will drain your camera battery more rapidly when activated. Turn the WiFi off if you are not using it
to change settings or upload content.
3.4 Connect The Camera to Your Smart Device (App)
1. Search iontheaction app at the App store.
2. Download and install the app to your smart device
3. Turn on your WiFi PODZ.
4. Go to network setting of your PC and choose WiFi setting. Search the network, find and click “WIFIPODZ”
5. Enter password “123456789” and you can connect to your camera.
6. Open your app.
7. You can refer to app page for the detailed operation description.
Notes: As long as your camera starts video recording, the live streaming and file play back and transfer function
will be temporarily disabled. You can resume the functions when your camera in standby status.
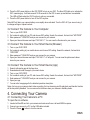
4. Connecting Your Camera
4.1 Connecting Your Camera to a PC
To open the ion software,
1. Inserted a MicroSD card into your camera and make sure there is at least 2MB free space.
2. Connect your camera to a PC via the USB cable included.
3. Press the Power button to turn the camera

EN-6
4. Open the MicroSD folder and you will find the file “ion.exe”.
5. Double click the file to open
Once you open the software you can:
1. Browse the files saved in the camera
2. Change the camera setting
3. Link to the ion website and cloud service
4. Check the firmware update
Notes
1. If you cannot find ion.exe at your MicroSD folder, you can unplug the cable from PC and turn the camera on
and off once and connect the PC again.
2. If you are a Mac user, visit the ion website (www.iontheaction.com) to download the software in Mac version.
4.2 Connecting Your Camera to a TV/HDTV
You can connect your camera to a TV or HDTV via a Composite RGB (not included) or an HDMI cable (not
included). Once you are connected you can:
1. Take photos or videos by using your TV as a viewfinder
2. Playback any photo or video files saved in the camera
3. Delete any files saved in the camera
4. Format the MicroSD Card
4.3 Sign up for Free ion Cloud Storage
You can sign up 8GB of free Cloud storage for storing and sharing of video and photo content. Enter
www.iontheaction.com/ioncloud to sign up.
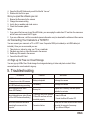
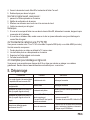
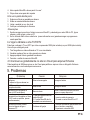
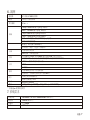
5. Troubleshooting
Problems Causes Solutions
1. LED flashes and camera turns off
2. Cannot turn on the iON camera
Battery is depleted Recharge the camera
Red LED flashes during recording
Low battery Recharge the camera
Cannot take photos or video
(Green LED flashes)
Memory full
Replace with a memory card with space
available for contents
Cannot take photos or video (Green
and Red LED flashes alternatively)
1. MicroSD card is not inserted
2. MicroSD card has not been
formatted properly.
1. Insert a SD card
2. Format the MicroSD card at PC
Cannot find removable disk after
connecting the camera to the
computer.
Connection failure.
1. Make sure all cable connections are secured
and restart the computer if necessary.
2. Try a different USB port.

EN-7
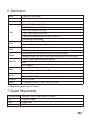
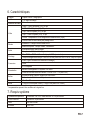
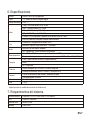
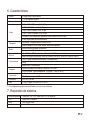
6. Specification
* Settings can be changed through ion software
Sensor
5 Mega pixel CMOS sensor
Lens
170º ultra wide angle field of view
Focus range
0.5m - ∞
Video
1080p: 1920x1080 pixels (16:9), 30 fps
960P*: 1280x960 pixels (4:3), 30 fps
720p: 1280x720 pixels (16:9), 60 fps
720p *: 1280x720 pixels (16:9), 30 fps
Format: H.264 compression, saved as MPEG4 (.mp4) file
Dual video files for easy sharing
Photo
Resolution: 5 Mega Pixel in JPEG format
Capture Modes: Single, Burst-shot*, Time lapse*
Audio
Built-in high quality microphone
AAC Compression, Automatic Gain Control
Storage
MicroSD/MicroSDHC with minimum Class 6 up to 32GB (not included)
Average Recording Times: about 4 hours (using 32GB mSD card in 1080p30/720p60)
Connection
USB2.0 (for data connection and battery charging)
HDMI
AV / Composite
Power
Build-in 1200 mAH Rechargeable Li-Polymer Battery
Battery Life: Approx. 2.5 hrs / 1 hr (w/ WiFi)
Housing
High quality Aluminum barrel and rubberized finishing
Depth up to 30 feet / 10 meters
Dimension
40 x 40 x 108 mm
Weight ~130g/4.58oz (w/ PODZ), ~136g/4.79oz (w/ WiFI PODZ)
7. System Requirements
Operating system Windows® 7/XP SP3 /Vista and Mac 10.5 or above
CPU Pentium III or above
RAM At least 64MB
Interface
USB port

EN-8
EN-7
For EU only
Questions?
Need Some Help?
This manual should help you
understand your new product.
If you still have questions,
visit our website:
www.iontheaction.com
Like Us:
www.facebook.com/iontheaction
Tweet Us:
www.twitter.com/iontheaction
• Keep the lens clean. Dirt and fingerprints will affect the quality of the picture.
• Close the PODZ properly for best water sealing. Do not open it under water.
• Rinse the camera with clean water after used and keep it dry for storage.
• You can refer to the detail operation instruction at the user manual
IMPORTANT
© 2012 World Wide Licenses Limited.
® The ion logo is a registered trademark of World Wide Licenses Limited.
• CamLOCK, PODZ, Shoot/Share and AIR PRO and their respective logos are trademarks or registered
trademarks of World Wide Licenses Limited in the United States and other countries. Copyright © 2012. All Rights
Reserved.
TRADEMARK INFORMATION
FCC ID: NW71006
WARNING:
NOTE:
IMPORTANT REGULATORY INFORMATION
This device complies with Part 15 of the FCC Rules: Operation is subject to the
following two conditions:
1. This device may not cause harmful interference and
2. This device must accept any interference that is received, including any interference that may cause undesired operation.
Changes or modifications to this unit not expressly approved by the party responsible for compliance could void the user’s
authority to operate the equipment.
Changes or modifications not expressly approved by the party responsible for compliance could void the user’s authority to
operate the equipment.
This equipment has been tested and found to comply with the limits for a Class B digital device, pursuant to Part 15 of the FCC
Rules. These limits are designed toprovide reasonable protection against harmful interference in a residential installation.
This equipment generates, uses and can radiate radio frequency energy and, if not installed and used in accordance with the
instructions, may cause harmful interference to radio communications. However,there is no guarantee that interference will not
occur in a particular installation. If this equipment does cause harmful interference to radio or television reception, which can be
determined by turning the equipment off and on, the user is encouraged to try to correct the interference by one or more of the
following measures:
• Reorient or relocate the receiving antenna.
• Increase the separation between the equipment and receiver.
• Connect the equipment into an outlet on a circuit different from that to which the receiver is connected.
• Consult the dealer or an experienced radio/TV technician for help.

DE-1
Kurzanleitung
Danke dass sie sich für die ion AIR PRO WiFi HD Sport Video Kamera entschieden haben Die iON AIR PRO
mit WiFi PODZ erlaubt es ihnen sich mit ihrem PC oder "Smart Device" ohne zur Hilfe nahme von Kabeln , zu
verbinden. Sie können ihr Smart Phone als Bild-Sucher (Live-Streaming) verwenden oder ihre Bilder und
Videeos von ihrer Kamer mit der ganzen Welt auf Social Media Plattformen Teilen! The ion AIR PRO kann
mittels des Bike & Helm Kits oder des BOARD Kit angebracht werden und führt somit zum ultimativen
Abenteuer HD Aufnahme Erlebnis .
AIR PRO ist eine Professioneller, Hochqualitativer Digitaler Video Rekorder der in Full HD aufnimmt, nur
mittels einfachem Schiebeschalter
Die Kamera hat auch den aktuellsten 5 Mega Pixel Sensor damit Sie ihre grossartigen digitalen Bilder
Fotografieren können.
Ihre Kamera unterstützt eine Micro SD Karte mit bis zu 32GB, und ermöglicht ihnen Aufnahmen in 1080p
mit 30 fps für ca. 4 Stunden
Der integrierte 1200mAh Li-Polymer Akku kann rasch aufgeladen werden
Das Wasserdichte Gehäuse ermöglicht es Ihnen die Kamera auch bis zu 10m unter Wasser zu benutzen.
ERSTE ERFAHRUNGEN MIT IHRER KAMERA

DE-2
AIR PRO wiegt ca. 130g (4.6 ounces)
WiFi PODZ beitet ihnen die Kabellose Verbindung zu ihrer ion Kamera. Sie können auf ihre Fotos und
Videos mit ihrem PC, Mobil-Telefon oder Tablet zugreifen und übertragen. Der WiFi PODZ macht aus ihrem
mobilen Gerät einen Sucher und Sie können ihre Kamera-Sicht auf ihre mobilen Geräte Live-Streamen.
1. ERSTE ERFAHRUNGEN MIT IHRER KAMERA
7
10
9
5
6
8
11
4
1 2
3
Power
1
2
3
4
5
6
7
8
9
10
11
12
13
14
15
1. Schalten Sie die Kamera Ein oder Aus
2. Machen Sie ein Einzelfoto
LED Indikator Zeigt den Kamera Status
Aufnahme Schiebe Schalter
Schieben Sie ihn vor oder zurück um die Aufnahme zu Starten oder zu Stoppen
Linse Hoch Qualitative Linse
MicroSD Karten Schlitz
MicroSD Karten Speicher Lokation
AV Anschluß
Verbinden Sie die Kamera mit einem
TV Gerät mittels des Composite Video Kabels
Mini HDMI Anschluß Verbinden Sie die Kamera mit einem TV Gerät mittels des HDMI Kabels
Video Auflösungs-Schalter
Wählen Sie die Video-Aufläsung aus: FHD (Full HD) oder HD
USB Anschluß
1. Zur Verbindung des Computers für die Daten-Übertragung oder der Kamera-Einstellungen
2.
Laden Sie ihre Kamera
Reset Knopf Zur Rücksetzung der Kamera auf den Werkszustand
PODZ Anschluß
Schließen Sie den PODZ an die Kamera an um zusätzliche Funktionen zu erhalten
2. Die Kamera bedienen
2.1 Laden der Kamera
WiFi PODZ
WiFi LED Indikator
WiFi Ein / Aus Schalter
PODZ Verriegelung
Schaltet das WiFi Ein oder Aus
Verriegelt den PODZ
Zeigt den WiFi Status an
Verdrehen Sie den PODZ um die Kamera zu versiegeln

DE-3
Laden Sie die Kamera entweder mittels des mitgelieferten USB Kabels an ihrem PC oder Mac oder mittels des
mitgelieferten Ladegerätes und des mitgelieferten USB Kabels.
2.2 Einsetzen der Speicher Karte
2.3 Einstellung des Datums und der Zeit
Verbinden Sie die Kamera zu einem Computer und starten sie die ion Software des MicroSD Ordners. Nun
können Sie die Zeit und das Datum der Kamera durch die Einstellungsseite des Programms einstellen. Für
weitere Anweisungen bitte Absatz 3.1 weiterlesen (Aufrufen der ion Software)
2.4 Dichtes Verschliessen der Kamera
Das Wasserdichte Gehäuse ermöglicht es der Kamera bis zu 10m (oder 30
ft) unter Wasser betrieben zu werden. Sie müssen die Kamera dicht
Verschliessen um Sie in nasser oder feuchter Umgebung zu benutzen.
Setzen sie die MicroSD Karte (nicht im Lieferumfang enthalten) in den dafür vorgesehenen Schlitz ein, bevor
Sie die Kamera benützen.. Stellen Sie sicher dass die Kamera augeschalten ist, bevor Sie die Speicher Karte
einführen.
Hinweise
1. Es gibt nur eine korrekte Einsteckrichtung für die MicroSD Karte in den dafür vorgesehenen Schlitz. Üben
Sie keinen Kraft aus um die Karte in den dafür vorgesehen Schlitz zu drücken, dass könnte zur Zerstörung
der Karte oder der Kamera führen.
2. Eine neue MicroSD Karte sollte for der Verwendung in der Kamera formattiert warden. Für weitere
Anweisungen lesen Sie bitte Kapitel 4.1 und 4.2.
Den PODZ zu sichern
1. Bringen Sie den PODZ an der Rückseite der Kamera an und verdrehen Sie
diese im Uhrzeigersinn bis die Markierungspunkte sich in einer Linie befinden.
2. Verriegeln Sie den Verschluss am PODZ um diesen zu verschliessen.
1. Ein nicht korrekter Verschluss der Kamera kann zu einem Leck führen und die
Kamera zerstören. Die Garantie und Gewährleistung deckt Wasserschäden und
Feuchtigkeitsschäden die durch Benutzer Fehler hervorgerufen werden nicht ab
2. Die Gummidichtung am podz bildet die wasserdichte Sperre, um die Kamera in
der Nass-und Unterwasserwelt zu schützen. Sie sind verpflichtet, diese Dichtung
sauber zu halten. Eiin einzelnes Haar oder Sandkorn kann zu einem Leck in das
Produkt führen kann..
3. Spülen Sie die Kamera nach Gebrauch mit sauberem Wasser ab und bewahren
Sie die Kamera in trockener Umgebung. Dies nicht zu tun, cann corrosion am
Produkt hervorurufen oder die Versiegelung negativ beeinflussen, die wiederum
zu einer Beschädigung des Produktes führen kann
Hinewise
2.5 Video-Aufzeichnung
Bevor Sie mit der Aufnahme beginnen, wählen Sie die gewünschte Video-Auflösung mittels des
Video-Auflösung Schalters an der Rückseite der Kamera.
Es gibt zwei Möglichkeiten um die Video-Aufnahme Funktion zu starten. Wenn die Video-Aufnahme gestartet
wird fühlen Sie eine kurze Vibration der Kamera. Zusätzlich leuchtet während der gesametn Aufnahme die
LED Aufnahmelampe in ROT

DE-4
1. Unabhängig ob die Kamera EIN – oder AUS-geschalten ist, durch einfaches Schieben des Aufnahme
Schiebe Schalters von STOP in Richtung REC starten Sie die Aufnahme
2. Falls sich Ihre Kamera auf der Stufe OFF befindent und der Aufnahme – Schiebe Schalter in
Richtung REC weist, drücken und halten Sie die EIN/AUS Taste um die Kamera EIN-zuschalten und mit
der Aufnahme zu beginnen. Um die Aufnahme zu stoppen schieben Sie den Aufnahme Schiebe Schalter
vonRichtung REC in Richtung. Die Kamera wird vibrieren und die LED Kontroll-Lampe wird GRÜN
aufleuchten um anzuzeigen, dass die Aufnahme gestoppt wurde. Die Kamera setzt sich in den Standby
Modus.
1. Eine zusätzliche WQVGA (432x240) Video File wird Simultan zur HD/FHD Video Aufnahme erzeugt. Das
kleinere WQVGA File ermöglicht es Ihnen ein effizientes Hochladen Ihres Inhaltes in Social Media oder
E-Mails zu ermöglichen.
2. Das Ändern der Video Auflüsung ist während der Video-Aufzeichnung unterbunden.
3. Nach 1-2 Sekunden Verzögerung beginnt die Kamer mit der Aufnahme
4. Die unterschiedlichen Video-Auflösungs Optionen für HD und FHD kann mittels der ion software unter der
Rubrik “Settings” ausgewählt werden
Hinweise
2.6 Fotos
1. Schalten Sie die Kamera durch drücken der Ein/Aus Taste ein.
2. Nachdem die Kamera eingeschalten ist, drücken sie die Ein/Aus Taste um ein Foto zu schiessen.
Eine kurze Vibration und das kurze Aufleuchten der grünen LED Anzeigelampe zeigt an, dass die Vorgang
erfolgreich abgeschlossen wurde.
Hinweise
1. Die Foto-Aufnahme ist während der Video-Aufzeichnung inaktiv.
2. Die Auflösung und der Aufnahmemodus (Single Shot, Burst Mode und Time Laps) können mittels der ion
software unter der Rubrik “Settings” geändert
2.7 CamLOCK Befestigungs-System
ion’s universelles CamLOCK Befestigungs-System ermöglicht es Ihnen, Ihre AIR PRO Kamera an jeden Helm
(Motorrad, Rad, Ski, Skisprung, und viele mehr), Mast, Boards (Surf, Skate, Snow, Ski und viele mehr) and
Lenkgabel (Fahrade oder Motorrad oder Quad und viele mehr) zu befestigen.
Bitte lesen Sie die Installationshinweise der entsprechenden CamLOCK Befestigungssysteme der Kamara,
entsprechend des gewünschten Einsatzes.
3. Verwendung des PODZ
3.1 Installation des WiFi PODZTM
1. Entfernen Sie den PODZTM und setzen sie den WiFi PODZTM der Kamera auf den PODZTM Anschluss
2. Verschliessen und Versiegeln sie die Kamera indem sie die Rückabdeckung verdrehen und den Verschluss
bis zum einrasten verschieben.
3. Drücken Sie die EIN / AUS Taste um ihre Kamera einzuschalten

DE-5
4. Die WiFi Taste auf dem WiFi PODZTM drücken um die WiFi Funktion zu aktivieren. Die blaue LED blinkt
um anzuzeigen, dass die WiFi Funktion im Aktivierungsmodus ist. Das WiFi Netzwerk kann gesucht
warden bis die LED permanent leuchtetn.
5. Drücken Sie die EIN / AUS Taste um ihre Kamera jederzeit auszuschalten
3.2 Die Kamera mit dem Computer verbinden
1. Den WiFi PODZTM einschalten
2. Die Netzwerk Einstellung beim PC anwählen und bei WiFi Einstellungen das Netzwerk „WIFIPODZ“
auswählen
3. Geben Sie dias Passwort“123456789” ein und verbinden Sie damit ihre Kamera
4. Öffnen Sie den Internet Browser und wählen sie die Address "192.168.1.2", und sie können Ihre
gespeicherten Daten ihrer Kamera sehen
3.3 Verbinden Sie Ihre Kamer mit einem Smart Device (Browser)
1. Schalten Sie ihren WiFi PODZ ein.
2. Wählen Sie die Funktion "Netzwerkeinstellungen" auf ihrem mobilen Gerät und rufen Sie die WiFi
Einstellungen auf.
3. Geben Sie das Passwort “123456789” um ihr mobiles Gerät mit der Kamera zu verbinden.
4. Rufen Sie ihren Internetbrowser auf und geben die URL “192.168.1.2” oder “wifi.podz”ein. Nun können Sie
die Fotos und Videos die auf ihrer Kamera gespeichert sind ansehen.
Hinweis: WiFi führt zu einer elektrischen Belastung der Batterie. Empfehlung: Die WiFi Funktion abschalten,
wenn diese nicht benötigt wird.
3.4 Verbinden Sie ihre Kamera mit einem "Smart Device" (App)
1. Suchen Sie den iontheaction App in ihrem App Store.
2. Laden Sie die App auf ihr "Smart Device" und Installieren Sie dieses.
3. Schalten Sie ihren WiFi PODZ ein.
4. Wählen Sie die Funktion "Netzwerkeinstellungen" auf ihrem mobilen Gerät und rufen Sie die WiFi
Einstellungen auf.
5. Rufen Sie ihren Internetbrowser auf und geben die URL “192.168.1.2” oder “wifi.podz”ein. Nun können Sie
die Fotos und Videos die auf ihrer Kamera gespeichert sind ansehen.
6. Öffnen Sie ihre App
7. Sie können auf die App Information Seite gehen um weitere detaillierte Informationen zur Benutzung
dieser App erhalten
Hinweise: Während der Aufnahme ist der Live Stream und Play-Back Modus vorläufig deaktiviert. Sobald ihre
Kamera wieder auf Stand-Bye Modus ist, sind diese Funktionen wieder verfügbar.
4. Verbinden Ihrer Kamera
4.1 Verbinden Sie Ihre Kamera mit einem PC
Um die ion software zu öffnen
1. Fügen Sie die MicroSD Karte in den entsprechenden Speicherkarten-Schlitz Ihrer Kamera ein, und
stellen Sie sicher dass auf der Karte mindestens 2MB freier Speicherplatz vorhanden ist.
2. Verbinden Sie Ihre Kamera mit dem PC unter Verwendung des mitgelieferten USB Kabels.
3. Drücken Sie die Ein/Aus Taste um die Kamera einzuschalten.

DE-6
4. Rufen Sie den MicroSD Ordner auf und suchen Sie die Datei “ion.exe”.
5. Doppelklick auf die Datei “ion.exe” um das Program zu starten
Sobald das Program gestartet wurde können Sie:
1. Die Dateien die auf der Kamera gespeichert wurden durchsuchen
2. Die Kamera-Einstellungen ändern
3. Den Internet-Link zur ion-Homepage und dem Cloud Service nutzen
4. Den Firmware-Status der Kamera überprüfen
Hinweise
1. Sollten Sie die Datei ion.exe nicht in dem MicroSD Ordner finden, Trennen Sie das Kabel vom PC und
schalten Sie Ihre Kamera nochmals Ein und Aus und Verbinden Sie diese wieder mit dem PC..
2. Sollten Sie ein Mac User sein, besuchen Sie bitte die ion Homepage (www.iontheaction.com) und laden
Sie sich die jüngste Version der Software
4.2 Verbinden Sie Ihre Kamera mit einen TV- oder HDTV-Gerät
Sie können Ihre Kamera mit einem TV -or HDTV via the Composite RGB (not included) or an HDMI cable (not
included). Once you are connected you can:
1. Schießen Sie Fotos oder Videos indem Sie ihr TV-Gerät als Sucher verwenden
2. Spielen Sie sämtliche Fotos oder Videos die auf der Kamera gespeichert sind einfach ab
3. Löschen oder Speichern Sie ihre Dateien/Files der Kamera
4. Formatieren Sie ihre MicroSD Karte
4.3 Formatieren Sie ihre MicroSD Karte
Sie können sich kostenlose für 8GB freien Cloud Speicher registrieren um Ihre Videos und Fotos zu speichern
oder mit ihren Freunden zu teilen. Einfach unter www.iontheaction.com/ioncloud registrieren und 8GB
kostenlosen Datenspeicher erhalten.
5. Fehlerbehebung
Fehler Grund Lösung
1. LED Kontroll-Lampe blinkt und Kamera
schaltet sich aus.
2. Die iON Kamera läßt nicht einschalten
Battery is entladen Kamera aufladen
Rot LED Lampe blinkt während des
Aufnehmens
Batterie Ladewert ist niedrig Kamera aufladen
Es ist nicht möglich Fotos zu schiessen
oder Videos aufzunehmen (Grüne LED
blinks)
Speicherkarte ist voll
Memory Karte ersetzen mit einer Memory Kart
emit genügend Speicherplatz
Es ist nich tmöglich Fotos zu schiessen
oder Videos aufzunehmen (Grüne und
Rote LED blinkt abwechselnd)
1. MicroSD card is not inserted
2. Karte wurde nicht korrekt
formatiert.
1. Insert a SD card
2. MicroSD Karte auf dem PC formatieren
Die zu wechselnde / removable Disk
kann nach Verbindung der Kamera mit
dem PC nicht gefunden werden
Verbindungsfehler
1. Stellen Sie sicher, dass sämtliche Kabel sicher
und korrekt mit dem PC verbunden sind und starten
sie den PC gegebenenfalls neu
2. Versuchen Sie die Kamera an einem anderen
USB Anschluss Ihres PCs anzuschliessen.

DE-7
6. Spezifikation
* Einstellungen können durch die ion Software geändert werden
Sensor 5 Mega pixel CMOS sensor
Lens
170º ultra wide Winkel
Fokus Bereich
0.5m - ∞
Video
1080p: 1920x1080 pixels (16:9), 30 fpsps
960P*: 1280x960 pixels (4:3), 30 fps
720p: 1280x720 pixels (16:9), 60 fps
720p *: 1280x720 pixels (16:9), 30 fps
Format: H.264 compression, gespeichert als MPEG4 (.mp4) Datei
Dual Video Dateien für einfaches Hochladen
Foto
Auflösung: 5 Mega Pixel im JPEG Format
Aufnahme Modi:: Single, Burst-shot*, Time lapse*
Audio
Eingebautes Hoch-
AAC Compression, Automatic Gain Control
Speicher
MicroSD/MicroSDHC mindestens Class 4 bis 32GB (ist nicht im Lieferumfang enthalten)
Durchschnittliche Aufnahmezeit: ca 4 Stunden (bei 32GB mSD Karte im Betrieb 1080p30/720p60)
Anschlüsse
USB2.0 (für die Datenverbindung und zur Ladung der Batterie)
HDMI
AV / Composite
Power
Eingebaute 1200 mAH wiederaufladbarer Li-Ion Akku
Aufnahmezeit Batterie: ca. 2.5 h / 1 hr (m/ WiFi)
Gehäuse
Hoch Qualitativer Aluminium Zylinder mit gummierter Oberfläche
Tiefe bis zu 30 Fuß / 10 Meter
Abmaße
40 x 40 x 108 mm
Gewicht
~130g/4.58oz (w/ PODZ), ~136g/4.79oz (w/ WiFI PODZ)
7. System Voraussetzungen
Operating system
Windows® 7/XP SP3 /Vista oder Mac 10.5 oder Höher
CPU
Pentium III oder Höher
RAM
Midestens 64MB
Interface
USB Anschluss

DE-8
EN-7
For EU only
Fragen?
Sie benötigen Hilfe?
Das Betriebshandbuch soll
Ihnen helfen ihr News product
kennenzulernen.
Haben Sie noch weitere Fragen,
oder besuchen Sie unsere
Homepage:
www.iontheaction.com
Like Us:
www.facebook.com/iontheaction
Tweet Us:
www.twitter.com/iontheaction
• Die Linse sauber halten. Schmutz und Fingerabdrücke beeinflussen die Qualität des Bildes
• Verschliessen Sie die PODZ ordungsgemäss um sie Wasserdicht zu machen. Nicht unter Wasser öffnen.
•
Spülen Sie die Kamera nach Gebrauch mit sauberem Wasser ab und bewahren Sie die Kamera in trockener Umgebung.
• Weitere Informationen entnehmen Sie den detaillierten Bedienungsanweisungen des Benutzerhandbuches
WICHTIG
© 2012 World Wide Licenses Limited.
® Das ion logo ist ein eingetragenes Warenzeichen der World Wide Licenses Limited.
• CamLOCK, PODZ, Shoot/Share und AIR PRO inklusive der entsprechenden Logos sind Warenzeichen oder
eingetragene Warenzeichen der World Wide Licenses Limited in den Vereinigten Staaten von Amerika und
weiteren anderen Ländern. Copyright © 2012. All Rights Reserved.
TRADEMARK INFORMATION
FCC Erklärung
Bediendungs Mitteilung:
HINWEIS:
Vorsichts-Mitteilung
"Veränderungen, die nicht vom Beauftragten für Vorschriftenkonformität genehmigt wurden, machen die Berechtigung des
Benutzers zur Verwendung des Geräts ungültig."
1. Dieses Gerät verursacht keine gefährdende Strahlung und
2. Dieses Gerät muss Strahlungen empfangen, inklusive jener Strahlung die zu einer ungewollten Funktion führen.
Veränderungen oder Abänderungen an diesem Gerät, welche nicht ausdrücklich vom Beauftragten des Produkten genehmigt
wurden, machden die Berechtigung des Benutzers zur Verwendung des Geräts ungültig.
Veränderungen oder Abänderungen welche nicht ausdrücklich vom Beauftragten des Produkten genehmigt wurden, machden
die Berechtigung des Benutzers zur Verwendung des Geräts ungültig.
This equipment has been tested and found to comply with the limits for a Class B digital device, pursuant to Part 15 of the FCC
Rules. These limits are designed to provide reasonable protection against harmful interference in a residential installation. This
equipment generates, uses and can radiate radio frequency energy and, if not installed and used in accordance with the
instructions, may cause harmful interference to radio or television reception, which can be determined by turning the equipment
off and on, the user is encouraged to try to correct the interference by one or more of the following measures:
• Reorient or relocate the receiving antenna.
• Increase the separation between the equipment and receiver.
• Connect the equipment into an outlet on a circuit different from that to which the receiver is connected.
• Consult the dealer or an experienced radio/ TV technician for help.
WARNING: THE MANUFACTURER IS NOT RESPONSIBLE FOR ANY RADIO OR TV INTERFERENCE CAUSED BY
UNAUTHORIZED MODIFICATIONS TO THE DEVICE. ANY SUCH MODIFICATIONS COULD VOID THE USER’S
AUTHORITY TO OPERATE THE EQUIPMENT.

FR-1
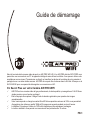
Guide de démarrage
Merci d’avoir acheté la camera vidéo de sport ion AIR PRO WiFi-HD. L’ion AIR PRO doté du WiFi PODZ vous
permet de vous connecter à vos PC et appareils intelligents sans utiliser les câbles. Vous pouvez utiliser votre
smartphone comme viseur (Transmission en direct) ou transférer les photos et les vidéos de votre caméra et
partager les sur vos sites médias sociaux. AIR PRO de ion peut être contenue dans le Kit Vélo & Casque ou le
Kit PLANCHE pour vous permettre d'enregistrer vos excursions en HD.
AIR PRO est une caméra vidéo de type professionnel, de haute qualité, qui enregistre en Full HD d'une
simple pression sur un bouton coulissant.
Elle est équipée d'un capteur 5 Méga Pixels de dernière génération pour prendre des images
exceptionnelles.
Votre caméra prend en charge les cartes MicroSD d'une capacité maximum de 32Go vous permettant
d'enregistrer des vidéos en qualité 1080p à 30 images par seconde pendant environ 4 heures.
La Batterie Polymère en Lithium de 1200 mAh intégrée peut être rapidement rechargée.
Le boîtier résistant à l'eau permet une immersion à une profondeur de 10 mètres.
En Savoir Plus sur votre Caméra AIR PRO WIFI

FR-2
7
10
9
5
6
8
11
4
1 2
3
AIR PRO pèse environ 4,6 onces, ou 130g.
WiFi PODZ offre la Capacité Sans Fil à votre caméra ion. Vous pouvez accéder et transférer vos photos
et vidéos à votre PC, téléphone portable et tablette. Il transforme aussi votre téléphone portable en un
viseur et vous pouvez transmettre en direct l’affichage caméra à partir de votre appareil portable.
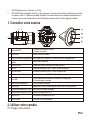
1. Connaître votre caméra
Bouton ON/OFF
1
2
3
4
5
6
7
8
9
10
11
12
13
14
15
1. Allumer ou éteindre la caméra
2. Prendre une photo
Voyant DEL
Affiche l'état de la caméra
Bouton coulissant d'enregistrement
Faire glisser pour commencer / mettre en pause l'enregistrement.
Lentille
Lentille haute sensibilité
Fente microSD
Emplacement pour insertion d'une carte MicroSD.
Port AV Connectez la caméra à une TV avec le câble composite.
Port Mini HDMI
Connectez la caméra à une TV avec le câble HDMI.
Sélecteur de résolution rapide Pour basculer entre : FHD (Full HD) ou HD.
Port USB
1. Pour connexion de transfert de données ou configuration
2. Pour recharger la caméra.
Bouton de réinitialisation Pour réinitialiser la caméra
Prise PODZ
Couvercle Arrière du WiFi PODZ
Bouton de Mise en Marche WiFi PODZ
Branchez le PODZ à la caméra pour obtenir plus de fonctionnalités
Faire roter pour sceller la caméra
Activer ou Désactiver le WiFi
Bouton Wi-Fi
Verrou PODZ
Pour activer ou désactiver le Wi-Fi
Pour fixer le PODZ en position
2. Utiliser votre caméra
2.1 Charger votre caméra

FR-3
Connectez la caméra soit avec un câble USB ou l'adaptateur CA/CC. Le voyant rouge indique la charge et
s'éteint lorsque la batterie est pleine. Le processus de charge prend environ 3 heures.
2.2 Insérer la carte mémoire
2.3 Définir la date et l'heure
Connectez la caméra à un ordinateur et lancez le logiciel ion depuis la carte MicroSD. Vous pouvez définir la
date et l'heure via la page de configuration. Reportez-vous à la section 4.1 pour plus d'informations sur le
logiciel ion.
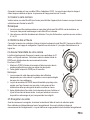
2.4 Assurer l'étanchéité de votre caméra
Le boîtier étanche permet d'immerger la caméra à une profondeur de 10
mètres, ou 30 pieds maximum. Vous devez sceller la caméra à l'aide du
PODZ avant utilisation dans des environnements humides.
Veuillez insérer une carte MicroSD (non fournie) avant d'utiliser l'appareil photo. Assurez-vous que la caméra
est éteinte avant d’insérer la carte SD.
Remarques
1. La carte ne peut être insérée que dans un sens dans la fente pour MicroSD.En cas de résistance, ne
forcez pas, cela pourrait endommager la carte MicroSD ou la caméra.
2. Une carte neuve doit être formatée avant utilisation. Pour plus d'informations, reportez-vous aux sections
4.1 et 4.2
Pour fixer le PODZ
1. Attachez le PODZ à l'arrière de la caméra et faites-le pivoter dans le
sensdes aiguilles d'une montre pour aligner les deux points.
2. Faites glisser le loquet du PODZ pour le verrouiller.
1. Le non-respect de cette étape peut entraîner des infiltrations
dangereuses pour votre caméra. La garantie ne couvre pas les dégâts
des eaux dus à une négligence.
2. Le joint de caoutchouc du PODZ assure l'étanchéité qui protège votre
caméra sous l'eau. Assurez-vous que celui-ci reste propre et libre
d'obstructions telles que des grains de sable ou même un cheveu.
3. Après utilisation dans l'eau salée, il est nécessaire de rincer l'extérieur et
le joint à l'eau claire et laisser sécher. Le sel peut entraîner la corrosion
du produit ou endommager le joint, compromettant son intégrité.
Remarques
2.5 Enregistrer une vidéo
Avant de commencer à enregistrer, choisissez la résolution à l'aide du bouton de sélection rapide.
Deux méthodes sont disponibles pour lancer l'enregistrement. Une courte vibration indiquera le
commencement de l'enregistrement. Le voyant s'allume en rouge pendant toute la durée de l'enregistrement.
ページが読み込まれています...
ページが読み込まれています...
ページが読み込まれています...
ページが読み込まれています...
ページが読み込まれています...
ページが読み込まれています...
ページが読み込まれています...
ページが読み込まれています...
ページが読み込まれています...
ページが読み込まれています...
ページが読み込まれています...
ページが読み込まれています...
ページが読み込まれています...
ページが読み込まれています...
ページが読み込まれています...
ページが読み込まれています...
ページが読み込まれています...
ページが読み込まれています...
ページが読み込まれています...
ページが読み込まれています...
ページが読み込まれています...
ページが読み込まれています...
ページが読み込まれています...
ページが読み込まれています...
ページが読み込まれています...
ページが読み込まれています...
ページが読み込まれています...
ページが読み込まれています...
ページが読み込まれています...
ページが読み込まれています...
ページが読み込まれています...
ページが読み込まれています...
ページが読み込まれています...
ページが読み込まれています...
ページが読み込まれています...
ページが読み込まれています...
ページが読み込まれています...
ページが読み込まれています...
ページが読み込まれています...
ページが読み込まれています...
ページが読み込まれています...
ページが読み込まれています...
ページが読み込まれています...
ページが読み込まれています...
ページが読み込まれています...
ページが読み込まれています...
ページが読み込まれています...
ページが読み込まれています...
ページが読み込まれています...
ページが読み込まれています...
ページが読み込まれています...
ページが読み込まれています...
ページが読み込まれています...
ページが読み込まれています...
ページが読み込まれています...
-
 1
1
-
 2
2
-
 3
3
-
 4
4
-
 5
5
-
 6
6
-
 7
7
-
 8
8
-
 9
9
-
 10
10
-
 11
11
-
 12
12
-
 13
13
-
 14
14
-
 15
15
-
 16
16
-
 17
17
-
 18
18
-
 19
19
-
 20
20
-
 21
21
-
 22
22
-
 23
23
-
 24
24
-
 25
25
-
 26
26
-
 27
27
-
 28
28
-
 29
29
-
 30
30
-
 31
31
-
 32
32
-
 33
33
-
 34
34
-
 35
35
-
 36
36
-
 37
37
-
 38
38
-
 39
39
-
 40
40
-
 41
41
-
 42
42
-
 43
43
-
 44
44
-
 45
45
-
 46
46
-
 47
47
-
 48
48
-
 49
49
-
 50
50
-
 51
51
-
 52
52
-
 53
53
-
 54
54
-
 55
55
-
 56
56
-
 57
57
-
 58
58
-
 59
59
-
 60
60
-
 61
61
-
 62
62
-
 63
63
-
 64
64
-
 65
65
-
 66
66
-
 67
67
-
 68
68
-
 69
69
-
 70
70
-
 71
71
-
 72
72
-
 73
73
-
 74
74
-
 75
75


iON Air Pro Lite Wi-Fi クイックスタートガイド
- カテゴリー
- アクションスポーツカメラ
- タイプ
- クイックスタートガイド
他の言語で
- italiano: iON Air Pro Lite Wi-Fi Guida Rapida
- español: iON Air Pro Lite Wi-Fi Guía de inicio rápido
- Deutsch: iON Air Pro Lite Wi-Fi Schnellstartanleitung
- français: iON Air Pro Lite Wi-Fi Guide de démarrage rapide
- português: iON Air Pro Lite Wi-Fi Guia rápido
その他のドキュメント
-
Casio EX-F1 预先记录动画
-
-
 iiView 420TPC-WT ユーザーマニュアル
-
AKASO V50 Elite Touch ユーザーマニュアル
-
 Wiseup WIFI36 ユーザーマニュアル
-
BMW Advanced Car Eye 2.0 Instructions For Use Manual
-
-
 VANTRUE N2 Pro ユーザーマニュアル
-
 Wiseup WIFI39 ユーザーマニュアル
-
VAVA VA-VD002 ユーザーマニュアル


