
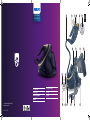
PerfectCare
9000 Series
PerfectCare
9000 Series
5 6
7 8 109
1 3 42
1416 15 1113 12
17 18
© 2019 Koninklijke Philips N.V.
All rights reserved.
4239 001 16451
User manual
사용자 설명서
Manual pengguna
คู่มือผู้ใช้
Hướng dẫn sử dụng
用户手册
使用手冊
8

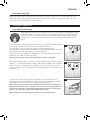
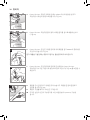
Do not open the EASY DE-CALC knob when the device is powered on, or
immediately after use.
장치의 전원이 켜져 있을 때 또는 사용 직후에는 EASY DE-CALC
조절기를 열지 마십시오.
Jangan buka tombol EASY DE-CALC apabila peranti dihidupkan
atau sebaik sahaja selepas digunakan.
EASY DE-CALC
Không mở núm EASY DE-CALC khi thiết bị được bật nguồn hoặc ngay sau khi sử dụng.
请勿在设备接通电源或使用后立即打开
EASY DE-CALC
旋钮。
請勿在裝置電源開啟時或剛使用完畢後,開啟
EASY DE-CALC
簡易除鈣
旋鈕。
CLICK
2 hr
1 3
42
1
1
1
75
5 7
2
2
2
1
6
6
3
3
3
350 ml
4
42 3
4
4

English 6
한국어 15
Bahasa Melayu 24
ภาษาไทย 33
Tiếng Việt 42
简体中文 51
繁體中文 60

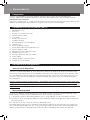
6 ENGLISH
Introduction
Congratulations on your purchase and welcome to Philips! To fully benet from the support that
Philips oers, register your product at www.philips.com/welcome.
Read this user manual, the important information leaet, and the quick start guide carefully before
you use the appliance. Save them for future reference.
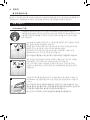
Product overview (Fig. 8)
1 Steam supply hose
2 Steam trigger
3 Intelligent automatic steam button
4 Iron ready light
5 Soleplate
6 ActiveSense camera
7 Iron platform
8 Carry lock release button
9 Filling hole
10 Detachable water tank
11 Steam supply hose storage compartment
12 Cord storage compartment
13 Mains cord with plug
14 EASY DE-CALC knob
15 On/o button with light
16 Calc alert
17 Max steam setting light
18 Low water alert light
Preparing for use
Type of water to use
This appliance has been designed to be used with tap water. However, if you live in an area
with hard water, fast scale build-up may occur. Therefore, it is recommended to use distilled or
demineralized water (50% demineralized/distilled water mixed with water could be used as well) to
prolong the lifetime of the appliance.
Warning: Do not use perfumed water, water from the tumble dryer, vinegar, starch, descaling
agents, ironing aids, chemically descaled water or other chemicals, as they may cause water
spitting, brown staining or damage to your appliance.
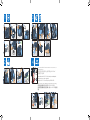
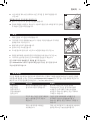
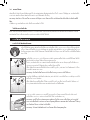
Getting the product ready
Fill the water tank before every use or when the ‘low water alert’ light ashes. You can rell the
water tank at any time during use.
1 Remove the water tank from the appliance and ll it with water up to the MAX indication.
2 Put the water tank back into the appliance by tting the bottom part into the appliance rst.
3 Push in the top part of the water tank until it locks into place (‘click’).
Put the mains plug in an earthed wall socket and press the on/o button to switch on the steam
generator. Wait until the ‘iron ready’ light lights up continuously. Once your appliance is ready, you
will also hear a short beep.
Note: For rst time use, we recommend you to place the iron on the ironing board before you turn
on the appliance for optimum performance.
There will be sound from the base of your product due to the water being pumped for steam
generation.

7
ENGLISH
Low water alert light
When the water tank is almost empty, the ‘low water alert’ light ashes. Fill the water tank and
press the steam trigger to let the appliance heat up again. When the ‘iron ready’ light lights up
continuously, you can continue steam ironing.
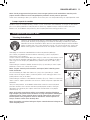
Using your appliance
ActiveSense technology
Your appliance comes with the world’s very rst fabric sensing technology in irons
called ActiveSense. It works with articial intelligence recognizing fabrics during
ironing with built-in camera, adjusting the ideal temperature and steam amount
automatically. You can also leave your iron on the ironing board without risk of
burns.
The ActiveSense technology enables you to iron all types of ironable fabrics,
in any order, without adjusting the iron temperature setting.
The ‘iron ready’ light can light up steadily in either blue or white,
corresponding to the level of temperature/steam needed (normal and high
for the respective light), based on the fabric detected.
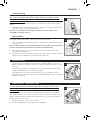
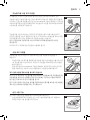
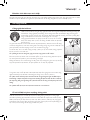
Fabrics with these symbols are ironable (Fig. 9), for example linen, cotton,
polyester, silk, wool, viscose and rayon.
Note: Do not iron on prints, even if the fabric around is ironable.
For certain delicate fabric and nishing (e.g: suede, velvet, metallic weaving,
sequins), it is recommended to steam a short distance above the garment.
Fabrics with this symbol are not ironable (Fig. 10). These fabrics include
synthetic fabrics such as Spandex or elastane, Spandex-mixed fabrics and
polyolens.
During ironing, you can place the iron either on the iron platform or
horizontally on the ironing board. Thanks to the ActiveSense technology,
the soleplate will not damage the ironing board cover (Fig. 11).
Note: There may be some steam observed when the iron is resting for a
longer period of time. This is normal as it is part of the system process to
ensure the soleplate is at the right temperature during rest. During this
process, the ‘iron ready’ light will be breathing in blue.
Note: Minimise touching the front of the iron as it will get warm.
9
10
11

8
ENGLISH
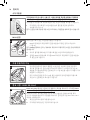
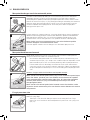
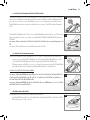
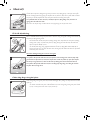
Ironing with intelligent automatic steam mode
Your appliance comes with intelligent automatic steam thanks to DynamiQ
sensor technology which recognizes how and when your iron is moving.
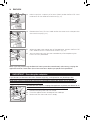
When you turn on your appliance, this mode will be activated by default
(Fig. 12). Coupled with ActiveSense technology, your iron will steam
automatically the right amount of steam based on your movements and the
fabric type without the need to use the steam trigger.
In intelligent automatic steam mode, steam comes out automatically when
you move the iron and stops when you stop moving the iron (Fig. 13). You
can still press the steam trigger in this mode to activate the steam when the
iron is not moving.
Note: For your safety, in intelligent automatic steam mode, the steam
stops when the iron is lifted up.
Ensure that the board is tting to the size and weight of steam generator.
Ironing in manual mode
You can control the amount of steam manually during ironing by turning o
the intelligent automatic steam mode .
- To exit the intelligent automatic steam mode, press the intelligent
automatic steam button (Fig. 14). The intelligent automatic steam light
turns o. You need to press the steam trigger to continue your ironing.
- In manual mode, ActiveSense technology will still adjust the
temperature and steam amount automatically to dierent fabrics, but
you need to press the steam trigger to activate steam release.
Warning: Never direct steam at people.
Note: For best result on tough fabrics such as cotton, linen and denim,
keep the steam trigger pressed continuously when you move the iron over
the fabric (Fig. 15). Then move the iron over the same area a few more
times without steam to dry the fabric.
Note: For the best results on silk and shiny synthetic fabrics, it is
recommended to keep the steam trigger pressed continuously while
ironing.
Steam boost function
The steam boost function is designed to help tackle dicult creases.
- Press the steam trigger twice quickly to activate the steam boost
function. The appliance releases 3 powerful shots of steam (Fig. 16).
12
13
14
15
2x
16

9
ENGLISH
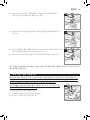
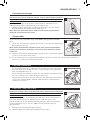
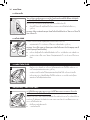
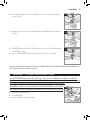
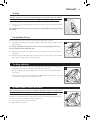
Vertical ironing
Hot steam is emitted from the iron. Never attempt to remove creases
from a garment that someone is wearing. Do not apply steam near your or
someone else’s hand.
You can use the iron in vertical position to remove wrinkles from hanging
fabrics.
1 Hold the iron in vertical position, press the steam trigger and touch the
garment slightly with the soleplate (Fig. 17).
Note: For your safety, the intelligent automatic steam mode is not
available for vertical ironing.
MAX setting
For higher amount of steam, you can use the MAX setting.
1 Press and hold the on/o button for 2 seconds until the MAX light turns
white (Fig. 18).
Note: In Max setting, your appliance will always give the maximum steam
amount, while the temperature will still adjust automatically.
2 The appliance returns to normal steam mode automatically after 15
minutes to save energy.
3 To directly switch o the MAX setting at any time, press and hold the on/
o button for 2 seconds until the MAX light goes o.
Auto shut-o
- To save energy, the appliance enters the standby mode if it has not
been used for 4-5 minutes. The light in the on/ o button starts to ash
(Fig. 19).
- To activate the appliance again, press the on/o button or the steam
trigger. The appliance starts to heat up again.
- The appliance switches o automatically if it has not been used for
another 10 minutes after it enters the standby mode. The light in the on/
o button goes o.
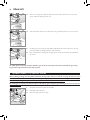
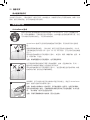
IMPORTANT - EASY DE-CALC
It is very important to use the EASY DE-CALC function as soon as the
EASY DE-CALC light starts to ash (Fig. 20) and the appliance beeps
continuously.
The EASY DE-CALC light ashes and the appliance beeps continuously
after about a month or 10 ironing sessions to indicate that the appliance
needs to be descaled. Perform the following EASY DE-CALC procedure
before you continue ironing.
1 Remove the plug from the wall socket.
2 Place the appliance on the edge of the tabletop.
17
2 sec
18
19
20

10
ENGLISH
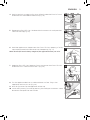
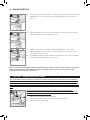
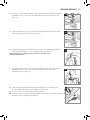
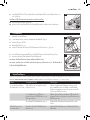
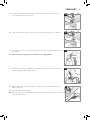
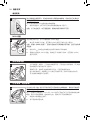
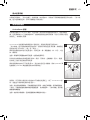
3 Hold a cup (with a capacity of at least 350ml) under the EASY DE-CALC
knob and turn the knob anticlockwise (Fig. 21).
4 Remove the EASY DE-CALC knob and let the water with scale particles
ow into the cup (Fig. 22).
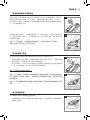
5 When no more water comes out of the appliance, reinsert the EASY DE-
CALC knob and turn it clockwise to fasten it (Fig. 23).
6 You can continue using your iron immediately after completing the
EASY DE-CALC procedure.
Note: If you are performing the EASY DE-CALC procedure immediately after ironing, unplug the
appliance and let it cool down for at least two hours before you perform the procedure.
IMPORTANT – Descaling the soleplate
If you do not use the EASY DE-CALC function regularly, scale particles may build up in the
soleplate and brown stains may come out of the soleplate during ironing. In this situation, you
need to descale the soleplate by following the procedure below. We advice you to repeat the
procedure twice to better clean the soleplate.
To avoid the risk of burns, unplug the appliance and let it cool down for at
least two hours before you descale the soleplate (Fig. 24).
1 Remove the plug from the wall socket.
2 Place the appliance on the edge of the tabletop.
3 Make sure that the water tank is empty.
350 ml
21
350 ml
22
23
2 hr
24

11
ENGLISH
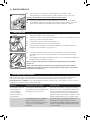
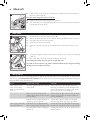
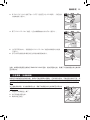
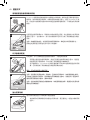
4 Hold a cup (with a capacity of at least 350ml) under the EASY DE-CALC
knob and turn the knob anticlockwise (Fig. 25).
5 Remove the EASY DE-CALC knob and let the water with scale particles
ow into the cup (Fig. 26).
6 Hold the appliance in the position that EASY DE-CALC opening is facing
up and pour 900ml distilled water into the opening (Fig. 27).
Note: Be mindful on the heavy weight of the appliance when you tilt it.
7 Keep the EASY DE-CALC opening facing up, reinsert the EASY DE-CALC
knob and turn it clockwise to fasten it (Fig. 28).
8 Put the appliance back on a stable and even surface. Plug in the
appliance and switch it on (Fig. 29).
9 Wait for 5 minutes for the appliance to heat up.
10 Switch o DynamiQ function by pressing the intelligent automatic steam
button on the top of the iron handle.
350 ml
25
350 ml
26
900 ml
27
28
29

12
ENGLISH
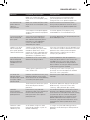
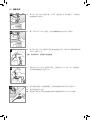
11 Keep the steam trigger pressed continuously while you move the iron
on a piece of thick cloth for 3 minutes (Fig. 30).
Warning: Hot, dirty water comes out of the soleplate.
12 Stop moving the iron when no more water comes out.
13 You can continue to use the appliance immediately. Otherwise unplug
the appliance after the descaling is completed.
Storage
1 Switch o the appliance and unplug it.
2 Put the iron on the iron platform. Push the carry lock to lock the iron
onto the platform.
3 Remove the water tank and empty it.
4 Wrap the steam supply hose around the base.
5 Slot it into the supply hose storage compartment by pushing the hose
through the gap (Fig. 31).
6 Fold the mains cord with the velcro provided, and insert it into the cord
storage compartment (Fig. 32).
7 You can carry the appliance with one hand by the handle of the iron.
Note: Do not carry the appliance by holding the water tank release lever
Note: If there is calc/bre build up around the ActiveSense camera,
remove it gently with a cotton swab or equivalent.
Troubleshooting
This chapter summarises the most common problems you could encounter with the appliance. If
you are unable to solve the problem with the information below, visit www.philips.com/support
for a list of frequently asked questions or contact the Consumer Care Centre in your country
(+65 6882 3999).
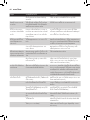
Problem Possible cause Solution
The ironing board
cover becomes
wet or there are
water droplets on
the garment during
ironing.
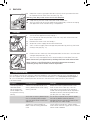
Steam has condensed on the
ironing board cover after a long
ironing session.
Replace the ironing board cover if the
foam material has worn out. You can
also add an extra layer of felt material
under the ironing board cover to prevent
condensation on the ironing board. You
can buy felt in a fabric shop.
You have an ironing board cover
that is not designed to cope
with the high steam rate of the
appliance.
Put an extra layer of felt material under
the ironing board cover to prevent
condensation on the ironing board. You
can buy felt in a fabric shop.
Automatic steam mode has
been used for a long period of
time.
Switch o the automatic steam mode
and use the manual trigger to activate the
steam when needed.
30
31
32

13
ENGLISH
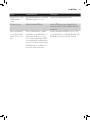
Problem Possible cause Solution
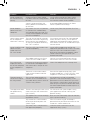
Water condenses
on the iron during
ironing.
Automatic/Max steam mode
has been used for a long period
of time.
Switch o the automatic/Max steam
mode and use the manual trigger to
activate the steam when needed.
Steam is reected from the
ironing board and condenses
on the iron.
Use a board/board cover that allows
steam to penetrate through.
Water droplets
come out of the
soleplate.
The steam that was still present
in the hose has cooled down
and condensed into water. This
causes water droplets to come
out of the soleplate.
Steam away from the garment for a few
seconds.
Some steam comes
out of soleplate
when iron is resting.
The iron has rested for a longer
period of time and is regulating
to ensure that the soleplate is
at the right temperature during
rest. This is normal.
If the steam continues for a long period
when the iron is resting, switch o the
appliance and remove the plug from the
wall socket. Contact an authorised Philips
service centre.
Steam and/or water
come out from
under the EASY
DE-CALC knob.
The EASY DE-CALC knob is not
tightened properly.
Switch o the appliance and let the
appliance cool down for 2 hours. Unscrew
the EASY DE-CALC knob and screw it
back onto the appliance properly. Note:
Some water may escape when you
remove the knob.
The rubber sealing ring of the
EASY DE-CALC knob is worn.
Contact an authorised Philips service
centre for a new EASY DE-CALC knob.
Dirty water and
impurities come
out of the soleplate
or the soleplate is
dirty.
Impurities or chemicals present
in the water have deposited in
the steam vents and/or on the
soleplate.
Clean the soleplate with a damp cloth.
Too much scale and minerals
have accumulated inside the
appliance.
Descale the appliance regularly (see
chapter ‘Important - EASY DE-CALC’ and
‘Important -Descaling the soleplate’).
The iron leaves a
shine or an imprint
on the garment.
The surface to be ironed was
uneven, for instance because
you were ironing over a seam or
a fold in the garment.
ActiveSense is safe on all ironable
garments. The shine or imprint is not
permanent and will come o if you wash
the garment. Avoid ironing over seams or
folds or you can place a cotton cloth over
the area to be ironed to avoid imprints at
seams and folds.
The appliance does
not produce any
steam.
There is not enough water in the
water tank (the ‘low water alert’
light ashes).
Fill the water tank (see chapter ‘Using
your appliance’, section ‘Getting the
product ready’).
The appliance is not hot enough
to produce steam.
Wait until the ‘iron ready’ light on the iron
lights up continuously.
The automatic steam mode is
o and you did not press the
steam trigger.
Press the steam trigger and keep it
pressed while you iron or ensure that the
automatic steam mode is on.
The water tank is not placed in
the appliance properly.
Slide the water tank back into the
appliance rmly (‘click’).

14
ENGLISH
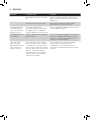
Problem Possible cause Solution
The appliance is not switched
on.
Insert the plug in the wall socket and
press the on/o button to switch on the
appliance.
The Easy De-calc light is on. Descale the appliance (see chapter
‘IMPORTANT - EASY DE-CALC’).
The appliance has
switched o. The
light in the on/o
button ashes.
The auto-o function is
activated automatically when
the appliance has not been
used for more than 4-5 minutes.
Press the power on/o button to switch
on the appliance again.
The appliance has
switched o.
There is poor contact of power
plug to socket.
This is a high power product. Ensure that
the plug is properly plugged to the wall
socket. It is not recommended to use
extension cord or adapter.
The ‘iron ready’
light changes
between blue and
white during my
ironing session.
The ‘iron ready’ light will be in
blue to indicate that the iron is
in the optimal state for certain
fabrics like silk, polyester. When
the ‘iron ready’ light turns white,
the iron is providing higher
temperature/steam for other
types of fabrics, for example,
cotton, linen, denim.
This is normal. With the ActiveSense
technology, the ‘iron ready’ light
automatically turns blue or white to
indicate the temperature/steam state of
the iron.

15한국어
소개
필립스 제품을 구입해 주셔서 감사합니다! 필립스가 드리는 지원 혜택을 받으실 수 있도록
www.philips.com/welcome에서 제품을 등록하십시오.
본 제품을 사용하기 전에 이 사용자 설명서와 중요 정보 책자, 요약 설명서를 주의 깊게 읽고 나중에 참조할
수 있도록 이 설명서를 보관하십시오.
제품 개요(그림 8)
1 스팀호스
2 스팀 버튼
3 지능형 자동 스팀 버튼
4 다림질 준비 표시등
5 열판
6 ActiveSense 카메라
7 다리미 플랫폼
8 이동용 고정장치 해제 버튼
9 주입구
10 분리형 물탱크
11 스팀 호스 보관함
12 코드 보관함
13 플러그 전원 코드
14 EASY DE-CALC 조절기
15 표시등이 있는 전원 버튼
16 석회질 세척 알림
17 MAX 스팀 설정 표시등
18 물 부족 알림 표시등
사용 준비
사용할 물의 종류
이 제품은 수돗물을 사용하도록 제작되었습니다. 그러나 사용 지역의 수돗물이 경수일 경우, 석회질이 더
빨리 축적될 수 있습니다. 따라서 제품의 수명을 연장하려면 증류수나 탈염수(수돗물과 증류수/탈염수를
반씩 섞어서 사용하는 것도 가능)를 사용하는 것이 좋습니다.
경고: 향수, 회전식 건조기의 물, 식초, 풀, 석회질 제거제, 다림질 보조제, 이물질 제거용 화학 약품이나 기타
화학 용품을 넣지 마십시오. 물이 튀거나 갈색 얼룩이 생기거나 제품이 손상될 수 있습니다.
사용 전 확인사항
매번 사용하기 전이나 '물 부족 알림' 표시등이 깜박일 때는 물탱크에 물을 채워주십시오. 다림질하는 도중에
언제나 물탱크의 물을 보충할 수 있습니다.
1 제품에서 물 탱크를 분리한 뒤 MAX 표시선까지 수돗물을 채웁니다.
2 물 탱크 하단부터 제품에 끼워서 다시 장착하십시오.
3 물 탱크가 제자리에 ‘딸깍’ 소리를 내며 잠길 때까지 상단을 밀어 넣으십시오.
전원 플러그를 접지된 벽면 콘센트에 꽂고 전원 버튼을 눌러 다리미의 전원을 켜십시오. '다림질 준비'
표시등이 켜진 상태로 유지될 때까지 기다리십시오. 사용할 준비가 되면 짧은 신호음이 들립니다.
참고: 처음 사용할 경우 최적의 성능을 위해 제품을 켜기 전에 다리미를 다림판에 놓는 것이 좋습니다.
스팀 분사를 위해 제품 하단에서 물이 펌핑되는 소리가 납니다.

16
한국어
물 부족 알림 표시등
물 탱크가 거의 비면 '물 부족' 표시등이 깜박입니다. 물탱크에 물을 채운 다음 스팀 버튼을 눌러 제품을 다시
가열하십시오. '다림질 준비' 표시등이 켜진 상태로 유지되면 스팀 다림질을 계속할 수 있습니다.
제품 사용하기
ActiveSense 기술
이 제품에는 세계 최초의 섬유 센서 기술인 ActiveSense 기술이 탑재되어 있습니다.
다림질을 할 때 섬유를 감지하는 인공 지능 기능과 내장 카메라가 작동하여 최적의 온도와
스팀 양을 자동으로 조정해줍니다. 또한 다리미판 위에 다리미를 두는 경우에도 태울
염려가 없습니다.
ActiveSense 기술로 다리미 온도나 스팀 설정을 조절하지 않고 다림질이 가능한
모든 종류의 옷감을 다림질할 수 있습니다.
‘다림질 준비’ 표시등이 파란색이나 하얀색으로 유지되면, 감지된 섬유에 따라
필요한 온도/스팀 수준을 나타냅니다(순서대로 일반/높음).
이와 같은 기호가 있는 섬유(그림 9)는 다림질이 가능하며 그 예로, 마, 면,
폴리에스테르, 실크, 모, 인견, 레이온 등이 있습니다.
참고: 옷감을 다림질할 수 있는 경우라도 프린트 부분은 다림질하지 마십시오.
특정 민감한 소재 및 마감의 경우(예: 스웨이드, 벨벳, 금속 소재 직조, 스팽글),
옷감으로부터 약간 간격을 두고 스팀을 분사하는 것이 좋습니다.
이런 기호가 있는 섬유는 다림질할 수 없습니다(그림 10). 이러한 섬유에는
스판덱스나 엘라스테인, 스판덱스 혼합 섬유, 폴리올레핀과 같은 합성 섬유가
포함됩니다.
다림질 중 다리미를 받침대 위에 두거나 다림판 위에 수평으로 둘 수 있습니다.
ActiveSense 기술 덕분에 열판으로 인한 다림판 덮개 손상을 막을 수 있습니다
(그림 11).
참고: 다리미가 장시간 사용되지 않을 경우 스팀이 약간 나올 수 있습니다. 이는
보관 중 열판의 온도를 유지하기 위한 제품 설계의 일환으로 정상적인 현상입니다.
이 과정에서 ‘다림질 준비’ 표시등이 파란색으로 표시됩니다.
참고: 온도가 뜨거워지는 다리미 앞부분과의 접촉을 최소화하십시오.
9
10
11

17
한국어
지능형 자동 스팀 모드 다림질
이 제품에는 다리미가 언제, 어떻게 움직이는지를 인지하는 DynamiQ 센서
기술에 기반한 지능형 자동 스팀 기능이 탑재되어 있습니다. 제품이 켜져 있을 때
이 모드는 기본으로 작동됩니다(그림 12). ActiveSense 기술이 채택된 이 다리미는
사용자의 움직임과 옷감의 종류에 따라 적정 분량의 스팀을 자동으로 분사하므로
스팀 버튼을 누를 필요가 없습니다.
지능형 자동 스팀 모드에서는 다리미가 움직일 때 스팀이 자동으로 분사되고,
다리미가 멈추면 스팀도 멈춥니다(그림 13). 이 모드에서 스팀 버튼을 계속 누르면
다리미를 움직이지 않는 상태에서도 스팀을 분사할 수 있습니다.
참고: 안전을 위해 지능형 자동 스팀 모드에서 다리미를 들어올리면 스팀이
중지됩니다.
다리미의 크기, 무게와 맞는 다림판을 사용해야 합니다.
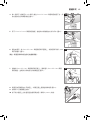
수동 모드 다림질
지능형 자동 스팀 모드를 끄고 수동으로 스팀 양을 조절하여 다림질할 수
있습니다.
- 지능형 자동 스팀 모드를 종료하려면 지능형 자동 스팀 버튼을 누릅니다(그림
14). 지능형 자동 스팀 표시등이 꺼집니다. 다림질을 계속하려면 스팀 버튼을
눌러야 합니다.
- 수동 모드에서도 ActiveSense 기술은 계속해서 옷감에 따라 스팀의 온도와
양을 조절하지만 사용자가 스팀 버튼을 눌러 스팀을 분사해야 합니다.
경고: 절대 사람을 향해 스팀을 분사하지 마십시오.
참고: 면, 마, 데님 등의 거친 섬유를 다룰 때 최상의 결과를 보려면 다림질을 할 때
스팀 버튼을 계속 누른 상태를 유지합니다(그림 15). 그런 다음 스팀을 사용하지
않고 같은 곳에 여러 번 건식 다림질을 합니다.
참고: 실크나 광택이 있는 합성 섬유를 다룰 때 최상의 결과를 보려면 스팀 버튼을
계속 누른 상태에서 다림질을 하는 것이 좋습니다.
순간 스팀 기능
순간 스팀 기능은 심한 주름을 펼 수 있도록 설계되었습니다.
- 스팀 버튼을 빠르게 두 번 눌러 순간 스팀 기능을 활성화합니다. 제품에서
강력한 스팀이 3번 분사됩니다(그림 16).
12
13
14
15
2x
16

18
한국어
수직 다림질
다리미에서 뜨거운 스팀이 나옵니다. 사람이 의복을 착용한 상태에서 다림질을
하지 마십시오. 본인 또는 주위 사람 손 근처에 스팀을 분사하지 마십시오.
다리미를 수직 방향으로 사용하여 걸려 있는 옷감의 주름을 제거할 수 있습니다.
1 다리미를 수직으로 들고 스팀 버튼을 눌러 열판을 옷감에 살짝 대어
사용합니다(그림 17).
참고: 안전을 위해 지능형 자동 스팀 모드에서는 다림질을 세로로 할 수 없습니다.
MAX 설정
MAX 설정으로 더 많은 스팀량을 사용할 수 있습니다.
1 MAX에 흰색 불이 켜질 때까지 전원 버튼을 2초 동안 길게 누르십시오
(그림 18).
참고: MAX 설정에서 온도는 계속해서 자동으로 조정되지만 스팀은 항상 최대량이
분사됩니다.
2 에너지 절약을 위해 15분 후 자동으로 일반 스팀 모드로 돌아옵니다.
3 언제든 MAX 설정을 바로 끄려면 MAX 표시등이 꺼질 때까지 전원 버튼을 2
초 동안 길게 누릅니다.
자동 전원 차단 기능
- 에너지를 절약하기 위해 이 제품은 4~5분 동안 사용하지 않을 경우 대기
모드로 전환됩니다. 전원 버튼의 표시등이 깜박이기 시작합니다(그림 19).
- 제품을 다시 활성화하려면 전원 버튼이나 스팀 버튼을 누릅니다. 제품이 다시
예열되기 시작합니다.
- 대기 모드로 전환된 후 다시 10분 동안 사용하지 않으면 제품이 자동으로
꺼집니다. 전원 버튼의 표시등이 꺼집니다.
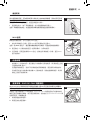
중요 사항 - EASY DE-CALC
EASY DE-CALC 표시등이 깜박이고 제품이 신호음을 계속 내기 시작하면 EASY
DECALC 기능을 사용해야 합니다(그림 20).
EASY DE-CALC 표시등은 매달 또는 매 10회 다림질 후 깜빡여 석회질 제거
시기가 되었음을 알립니다. 다림질을 계속 하기 전에 먼저 다음 EASY DE-CALC
과정을 수행하십시오.
1 벽면 콘센트에서 플러그를 뽑으십시오.
2 다리미를 테이블 상단 가장자리에 두십시오.
17
2 sec
18
19
20

19
한국어
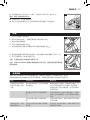
3 EASY DE-CALC 조절기 아래에 컵(최소 350ml 이상의 용량)을 받치고
조절기를 시계 반대 방향으로 돌립니다(그림 21).
4 EASY DE-CALC 조절기를 열어 물과 석회질 입자를 컵으로 배출하십시오
(그림 22).
5 더 이상 제품에서 물이 배출되지 않으면 EASY DE-CALC 조절기를 다시 끼운
다음 시계 방향으로 돌려 고정시키십시오(그림 23).
6 EASY DE-CALC 절차를 완료한 직후 다리미를 계속 사용할 수 있습니다.
참고: 다림질 직후에 EASY DE-CALC 기능을 이용할 경우 제품의 플러그를 뽑고 최소 2시간 이상 식힌 다음
해당 절차를 진행하십시오.
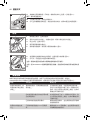
중요 사항 - 열판 석회질 제거
EASY DE-CALC 기능을 정기적으로 이용하지 않으면 열판에 침전된 석회질 입자로 인해 다림질을 하는
동안 갈색 얼룩이 새어 나올 수 있습니다. 이런 경우, 아래 절차에 따라 열판의 석회질을 제거해야 합니다.
열판을 더 깨끗하게 관리하려면 절차를 두 번 반복하는 것이 좋습니다.
화상의 위험을 방지하려면 제품의 플러그를 뽑고 최소 2시간 이상 식힌 다음
열판의 석회질을 제거하십시오(그림 24).
1 벽면 콘센트에서 플러그를 뽑으십시오.
2 다리미를 테이블 상단 가장자리에 두십시오.
3 물 탱크가 비어 있는지 확인하십시오.
350 ml
21
350 ml
22
23
2 hr
24

20
한국어
4 EASY DE-CALC 조절기 아래에 컵(최소 350ml 이상의 용량)을 받치고
조절기를 시계 반대 방향으로 돌립니다(그림 25).
5 EASY DE-CALC 조절기를 열어 물과 석회질 입자를 컵으로 배출하십시오
(그림 26).
6 EASY DE-CALC 주입구가 위를 향하게 하여 제품을 잡고 900ml의 증류수를
주입구에 붓습니다(그림 27).
참고: 제품을 기울일 때는 중량이 무겁다는 점을 염두에 두셔야 합니다.
7 EASY DE-CALC 주입구를 위로 향하게 한 상태에서 EASY DE-CALC
조절기를 다시 끼운 다음 시계 방향으로 돌려 조입니다(그림 28)를 보관할 수
있습니다.
8 제품을 다시 안정적이고 평평한 곳에 놓습니다. 제품을 전원에 연결하고
전원을 켭니다(그림 29).
9 제품이 가열될 때까지 약 5분간 기다립니다.
10 다리미 손잡이 상단의 지능형 자동 스팀 버튼을 눌러 DynamiQ 기능을
끕니다.
350 ml
25
350 ml
26
900 ml
27
28
29

21
한국어
11 스팀 버튼을 계속 누른 상태에서 3분간 두꺼운 천 위로 다림질합니다
(그림 30).
열판에서 뜨겁고 더러운 물이 떨어집니다.
12 물이 더 이상 나오지 않으면 다림질을 멈춥니다.
13 곧바로 제품을 사용할 수 있습니다. 사용하지 않을 경우 석회질 제거가 완료된
후 제품의 전원 코드를 뽑습니다.
보관
1 제품 전원을 끄고 전원 코드를 뽑습니다.
2 다리미를 다리미 플랫폼에 놓습니다. 이동용 고정장치를 눌러 다리미를
플랫폼 위에 고정시킵니다.
3 물탱크를 분리하고 물을 비웁니다.
4 본체에 스팀 호스를 감습니다.
5 호스를 틈으로 밀어 넣어 스팀 호스 보관함에 꽂습니다(그림 31).
6 제공된 벨크로를 사용하며 전원 코드를 절반으로 접습니다(그림 32).
7 다리미의 손잡이를 잡아 한 손으로 제품을 운반할 수 있습니다.
참고: 물탱크 열림 레버를 잡고 제품을 옮기지 마십시오.
참고: ActiveSense 카메라 주변에 석회질/섬유가 쌓인 경우 면봉 등으로
조심스럽게 제거하십시오.
문제 해결
이 란은 제품을 사용하면서 일반적으로 경험하게 되는 문제와 그 해결 방법을 제시합니다. 발생한 문제를
아래 정보로 해결할 수 없는 경우에는 www.philips.com/support에서 자주 묻는 질문 목록을 확인하거나
해당 국가의 고객 상담실로 문의하십시오(+82 080-600-6600).
문제점 예상 원인 해결책
다림질하는
동안 다림판
덮개가 젖거나
옷감에 물방울이
떨어집니다.
장시간 다림질을 할 경우 다림판
덮개 위에 스팀이 응축됩니다.
폼 소재가 낡은 경우 다림판 덮개를
교체하십시오. 다림판 덮개 아래에 펠트
소재를 한 겹 추가해도 다림판의 응결을
방지할 수 있습니다. 펠트는 옷감 가게에서
구매할 수 있습니다
가지고 있는 다림판 덮개가 제품의
높은 스팀량을 견디지 못할 수
있습니다.
다림판 덮개 아래에 펠트 소재를 한 겹
추가해도 다림판의 응결을 방지할 수
있습니다. 펠트는 옷감 가게에서 구매할 수
있습니다
자동 스팀 모드를 오랫동안
사용했습니다.
자동 스팀 모드를 끄고 수동 버튼을 사용하여
필요할 때 스팀 기능을 활성화합니다.
30
31
32

22
한국어
문제점 예상 원인 해결책
다림질하는 동안
물이 응축됩니다.
자동/최대 스팀 모드를 오랫동안
사용했습니다.
자동/최대 스팀 모드를 끄고 수동
버튼을 사용하여 필요할 때 스팀 기능을
활성화합니다.
스팀이 다림판에서 반사되어
다리미에 응축됩니다.
스팀을 통과시키는 다림판/다림판 덮개를
사용합니다.
열판에서 물이
떨어집니다.
호스에 남아 있던 스팀이 물로
응결됩니다. 이로 인해 열판에서
물이 떨어지게 됩니다.
다리미를 의류에 닿지 않도록 하고 스팀을 몇
초간 분사합니다.
다리미를 사용하지
않는 동안 열판에서
약간의 스팀이
배출됩니다.
충분한 휴지기를 거친 다리미가
열판의 온도를 적절한 수준으로
유지하기 위해 취하는 자체적인
조치입니다. 이는 정상적인
현상입니다.
다리미를 보관하는 동안 스팀이 장시간
배출되면 전원을 끄고 벽면 콘센트에서
플러그를 뽑으십시오. 필립스 서비스 센터로
연락하십시오.
EASY DE-CALC
조절기 아래에서
스팀 및/또는 물이
나옵니다.
EASY DE-CALC 조절기를 제대로
닫지 않았습니다.
제품 전원을 끄고 2시간을 기다려 제품을
식힙니다. EASY DE-CALC 조절기를 풀어
올바르게 맞춘 후 다시 돌립니다. 참고:
조절기를 분리하면 물이 샐 수 있습니다.
EASY DE-CALC 조절기의 고무
봉합 링이 마모되었습니다.
필립스 서비스 센터로 연락하여 EASY DE-
CALC 조절기를 교체하십시오.
열판에 더러운
물이나 불순물이
떨어지거나 열판이
지저분합니다.
스팀 분사구 또는 열판에
이물질이나 물때가 낀 것입니다.
젖은 천을 사용하여 열판을 닦으십시오.
물탱크 내에 물때나 이물질이 매우
많이 낀 것입니다.
제품에서 석회질을 정기적으로
제거해주십시오('중요 사항 - EASY DE-
CALC' 및 '중요 사항 - 열판 석회질 제거'
참조).
다림질 후에 옷감에
윤이나 자국이
남습니다.
옷의 솔기 또는 주름과 같이
다림질한 표면이 고르지 않은
것입니다.
ActiveSense는 다림질 가능한 모든 옷감에
안전하게 사용할 수 있습니다. 윤이나
자국은 영구적인 것이 아니라 옷을 세탁하면
지워집니다. 솔기 또는 주름에 자국이 생기는
것을 방지하려면 솔기 또는 주름 부분은
다림질을 하지 않거나 다림질할 부위에 면
소재의 천을 올려놓고 다림질을 하십시오.
제품에서 스팀이
나오지 않습니다.
물 탱크의 물이 충분하지 않습니다
('물 부족' 표시등이 깜박임).
물 탱크를 채우십시오('제품 사용'란의 '사용
전 확인사항' 참조).
제품이 스팀이 나올 만큼 가열되지
않았습니다.
다리미에 '다림질 준비' 표시등이 켜진 상태로
유지될 때까지 기다리십시오.
자동 스팀 모드가 꺼져 있으며
스팀 버튼을 누르지 않았습니다.
다림질하는 동안 스팀 버튼을 누르고 있거나
자동 스팀 모드를 켜십시오.
물 탱크가 제품에 제대로 장착되지
않았습니다.
물탱크를 밀어서 본체에서 '딸깍' 소리가
나도록 다시 끼우십시오.
ページが読み込まれています...
ページが読み込まれています...
ページが読み込まれています...
ページが読み込まれています...
ページが読み込まれています...
ページが読み込まれています...
ページが読み込まれています...
ページが読み込まれています...
ページが読み込まれています...
ページが読み込まれています...
ページが読み込まれています...
ページが読み込まれています...
ページが読み込まれています...
ページが読み込まれています...
ページが読み込まれています...
ページが読み込まれています...
ページが読み込まれています...
ページが読み込まれています...
ページが読み込まれています...
ページが読み込まれています...
ページが読み込まれています...
ページが読み込まれています...
ページが読み込まれています...
ページが読み込まれています...
ページが読み込まれています...
ページが読み込まれています...
ページが読み込まれています...
ページが読み込まれています...
ページが読み込まれています...
ページが読み込まれています...
ページが読み込まれています...
ページが読み込まれています...
ページが読み込まれています...
ページが読み込まれています...
ページが読み込まれています...
ページが読み込まれています...
ページが読み込まれています...
ページが読み込まれています...
ページが読み込まれています...
ページが読み込まれています...
ページが読み込まれています...
ページが読み込まれています...
ページが読み込まれています...
ページが読み込まれています...
ページが読み込まれています...
ページが読み込まれています...
-
 1
1
-
 2
2
-
 3
3
-
 4
4
-
 5
5
-
 6
6
-
 7
7
-
 8
8
-
 9
9
-
 10
10
-
 11
11
-
 12
12
-
 13
13
-
 14
14
-
 15
15
-
 16
16
-
 17
17
-
 18
18
-
 19
19
-
 20
20
-
 21
21
-
 22
22
-
 23
23
-
 24
24
-
 25
25
-
 26
26
-
 27
27
-
 28
28
-
 29
29
-
 30
30
-
 31
31
-
 32
32
-
 33
33
-
 34
34
-
 35
35
-
 36
36
-
 37
37
-
 38
38
-
 39
39
-
 40
40
-
 41
41
-
 42
42
-
 43
43
-
 44
44
-
 45
45
-
 46
46
-
 47
47
-
 48
48
-
 49
49
-
 50
50
-
 51
51
-
 52
52
-
 53
53
-
 54
54
-
 55
55
-
 56
56
-
 57
57
-
 58
58
-
 59
59
-
 60
60
-
 61
61
-
 62
62
-
 63
63
-
 64
64
-
 65
65
-
 66
66


