
Register your product and get support at
FC9910
HomeRun
EN User manual 3
ZH-TW 使用手冊 33
ZH-CN 用户手册 63


3
ENGLISH
7 Cleaning and maintenance 21
7.1 Emptying the dust container 21
7.2 Cleaningthemeshlter 22
7.3 Cleaning and replacing
theexhaustlter 23
7.4 Cleaningthemotorprotectionlter 24
7.5 Cleaning the roller brush 24
7.6 Cleaning the sensors 25
7.7 Cleaning the front wheel 26
7.8 Cleaning the side brushes 26
7.9 Cleaning the robot 27
7.10 Cleaning the base station 27
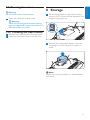
8 Storage 27
9 Software updates 28
10 Orderingaccessoriesandlters 28
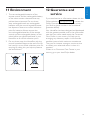
11 Environment 29
12 Guarantee and service 29
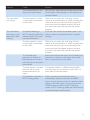
13 Troubleshooting 30
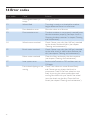
14 Error codes 32
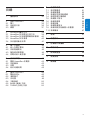
Table of contents
1 Important 4
2 Your HomeRun 6
2.1 Introduction 6
2.2 What is in the box 6
2.3 Overview 7
3 How your HomeRun works 9
3.1 HowyourHomeRunndsitswayaround9
3.2 How your HomeRun avoids
obstacles and stairs 10
3.3 How your HomeRun cleans 10
3.4 How to get the best results 11
4 Beforerstuse 12
4.1 Inserting the rechargeable battery 12
4.2 Mounting the side brushes 12
4.3 Removing the transparent plastic foils 12
4.4 Inserting batteries into the remote
control 12
5 Preparing for use 13
5.1 Switching on your HomeRun 13
5.2 Installing the base station 13
5.3 Charging 14
5.4 Setting the clock time 15
6 Using your HomeRun 16
6.1 Starting and stopping 16
6.2 Cleaning modes 16
6.3 Timer 19
6.4 Manual driving 20
6.5 BASE function 20
6.6 TURBO function 20

4
1.0.2 Warning
• Check if the voltage indicated on the adapter
corresponds to the local mains voltage before
you connect the adapter.
• Do not use the robot if the adapter, the mains
cord or the robot itself is damaged or if the
robot is not complete.
• If the mains cord or adapter is damaged, you
must have it replaced by Philips, a service
centre authorised by Philips or similarly
qualied persons in order to avoid a hazard.
• Never attempt to repair the robot yourself.
• This robot is designed for indoor household
use only.
• This robot is only intended for cleaning oors.
• This robot is not intended for use by persons
(including children) with reduced physical,
sensory or mental capabilities, or lack of
experience and knowledge, unless they
have been given supervision or instruction
concerning use of the robot by a person
responsible for their safety.
• Children should be supervised to ensure that
they do not play with the robot.
• Keep children and pets away from the robot.
Do not let children or pets sit or stand on the
robot.
• Keep loose clothing, hair and body parts away
from the roller brush and other moving parts
of the robot.
• Remove all fragile and light objects from the
oor and make sure the robot does not
get entangled in the pull cords of blinds or
curtains.
• Do not let the robot move over the mains
cords of other appliances or other cables as
this may cause a hazard.
• Switch off the robot if a dangerous situation
occurs or if the robot behaves abnormally or
gives off an abnormal smell.
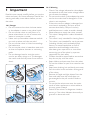
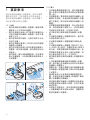
1 Important
Read this user manual carefully before you use the
robot and save it for future reference. Read all the
warning and safety issues below before you use
the robot.
1.0.1 Danger
• Do not immerse the robot, the base station
or the adapter in water or any other liquid.
• Do not use the robot on wet oors or in
places where there is a risk of contact with
water or immersion in water.
• Never suck up ammable substances and do
not suck up ashes until they are cold.
• Do not use the robot in humid surroundings
like bathrooms.
• Do not use the robot in hazardous areas such
as close to replaces, showers or swimming
pools.
• Do not damage, bend or twist the mains
cord or put heavy things on it. This damages
the mains cord and may cause re or electric
shock.
1 2
1 2

5
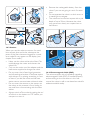
• Remove the rechargeable battery from the
robot if you are not going to use it for some
time.
• Do not operate the robot in a dark room, as
it needs light to navigate.
• The robot can be used on carpets with a pile
depth of up to 20mm. However, the robot
may move more slowly on carpets than on
hard oors.
1.0.4 Electromagneticelds(EMF)
The robot complies with all standards regarding
electromagnetic elds (EMF). If handled properly
and according to the instructions in this user
manual, the robot is safe to use based on scientic
evidence available today.
1 2
1
max.
20mm
2
1.0.3 Caution
When you use the robot to vacuum ne sand,
lime, cement dust and similar substances, the
pores of the lters become clogged. As a result,
error code E6 may appear on the display (see
chapter ‘Error codes’).
• Never use the robot without the lters. This
could damage the motor and shorten the
robot’s life.
• Only use the mains cord, the adapter and the
base station supplied to charge the robot.
• Do not cover the infrared signal generator
and infrared signal emitter of the base station
with stickers or by placing something in front
of them. If you do, the robot and the base
station cannot communicate with each other.
• Do not cover the camera or the sensors on
the robot, as this prevents it from nding its
way and from communicating with the base
station.
• Always switch off the robot by setting the on/
off switch on the bottom to OFF before you
transport or store it.
ENGLISH
1 2
1 2

6
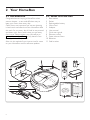
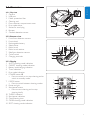
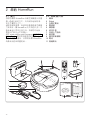
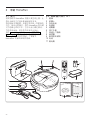
2.2 What is in the box
1 Base station
2 Robot
3 Rechargeable battery
4 Mains cord
5 Adapter
6 User manual
7 Quick start guide
8 Remote control
9 Spare exhaust lters
10 Batteries
11 Side brushes
2 Your HomeRun
2.1 Introduction
Congratulations on buying a HomeRun robot
vacuum cleaner - a new and effortless way to
keep your oors clean every day.
Clean oors are important, but vacuum cleaning
is hard work and takes time. Your HomeRun does
this work for you every day. It nds its way around
and cleans your oors, even when you are away
from home. Please register your HomeRun on
www.philips.com/homerun to fully benet from
the support that Philips offers.
Also visit this website from time to time for news
on your HomeRun and for software updates.
Quick Start Guide
ww
w.philips.com/welcome
FC9910
67
89
1
2
3
4
5
10
11

7
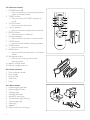
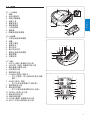
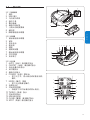
2.3 Overview
2.3.1 Top view
1 Camera
2 USB port
3 Motor protection lter
4 Cleaning tool
5 Dust container compartment cover
6 Error code sticker
7 Socket for small plug
8 Bumper
9 Obstacle detection sensor
2.3.2 Bottom view
1 Front oor detection sensors
2 Front wheel
3 Rechargeable battery
4 Side brushes
5 Roller brush
6 Roller brush retainer
7 Side oor detection sensors
8 On/off switch
9 Charging terminals
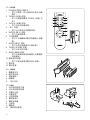
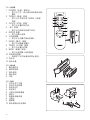
2.3.3 Display
1 AUTO cleaning mode indication
2 CARPET cleaning mode indication
3 Battery level/charging indication
4 Timer indication
5 Error code indication
6 POWER button 3
• Press to switch on, to stop cleaning and to
switch to standby mode.
7 MODE button
• Press to switch between cleaning modes.
8 Power-on light
9 Start/pause button
• Press to start cleaning and to stop
cleaning briey.
10 TURBO indication
11 Start/pause indication
12 Clock/cleaning time
13 CLIMB cleaning mode indication
14 SPOT cleaning mode indication
ENGLISH
Error codes
E0 E1 E2 E3 E4
E5 E6 E7 E8
12
4
5
7
8
9
3
6
341
9
8
7
5 6
2
1
2
3
4
5
6
7 98
14
13
12
11
10

8
2.3.4 Remote control
1 POWER button 3
• Press to switch on, to stop cleaning and to
switch to standby mode.
2 TURBO button
• Press to switch the TURBO function on
or off.
3 CLOCK button
• Press to set the clock time.
4 - and + buttons
• Press to move time backward or forward.
5 ENTER button
• Press to conrm a selection.
6 Direction selector
• Press to drive the robot in manual mode.
7 MODE button
• Press to switch between cleaning modes.
8 TIMER button
• Press to set the timer.
9 BASE button
• Press to make the robot return to its base
station.
10 Start/pause button
• Press to start cleaning and to stop
cleaning briey.
11 Battery compartment
12 Battery compartment lid
2.3.5 Dust container
1 Dust container handle
2 Filter holder
3 Exhaust lter
4 Mesh lter
5 Latch
2.3.6 Base station
1 Infrared signal generator
2 Infrared signal emitter
3 Charging light
4 Charging terminals
5 Socket for small plug
6 Cord feed-through opening
7 Cord storage reel
8 Small plug
9 Adapter
10 Mains cord with mains plug
11 12
1
3
4
10
2
9
8
7
6
5
5
1
4 3 2
657
109
8
32
1
4

9
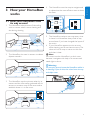
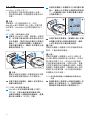
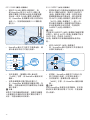
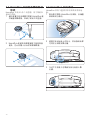
4 The HomeRun uses the map to navigate and
to determine the most efcient route to clean
the oor.
5 The HomeRun makes a new map every time
it cleans. It will therefore always nd its way
around, even if you have changed the layout of
the room.
6 If your HomeRun appears to miss an area
while cleaning, you do not have to worry. The
robot will use its map to return to this area
and clean it later.
D
Note:
You cannot use the HomeRun in a dark room
because it navigates with help of its camera and
needs light to do so.
B
Warning:
Do not pick up and move the HomeRun while it
is cleaning. If you do this, the robot loses its way
and skips areas.
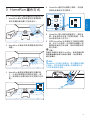
3 How your HomeRun
works
3.1HowyourHomeRunnds
its way around
1 The HomeRun takes pictures of the ceiling
with its camera when it starts cleaning and
also during cleaning.
2 The HomeRun also uses its sensors to detect
objects around it.
3 The HomeRun uses the pictures taken by its
camera and the information gathered with its
sensors to create a map of the room and to
establish where it is in the room.
ENGLISH

10
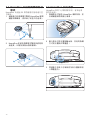
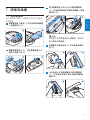
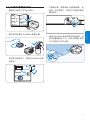
3.3 How your HomeRun cleans
Your HomeRun has a 3-stage cleaning system to
clean your oors efciently.
1 Side brushes help your HomeRun clean
in corners and along walls and pieces of
furniture.
2 The roller brush works the dust loose from
the oor and its rotations transport the dust
towards the dust container.
3 The suction power generated by the motor
ensures that all dirt particles are sucked into
the dust container.
3.2 How your HomeRun avoids
obstacles and stairs
Your HomeRun has more than 20 sensors to help
it navigate through the room.
1 The sensors in the bumper help the
HomeRun avoid walls and obstacles such as
tables or standing plants.
2 The sensors in the bottom of the HomeRun
help it detect height differences and prevent it
from falling down steps or stairs.

11
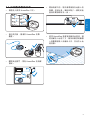
3.4 How to get the best results
• Use your HomeRun at least three times a
week.
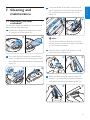
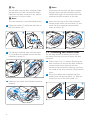
• Empty the dust container of the HomeRun
after every use.
• Close the doors to other rooms to limit the
area the HomeRun should clean.
ENGLISH
• Before you start to clean, clear the oor of
loose objects such as toys, magazines and
shoes. Move aside the mains cords of other
appliances.
• When you use the HomeRun to clean a rug
with tassels, fold the tassels under the rug to
prevent the robot from getting stuck on the
tassels and to prevent the rug from getting
damaged.

12
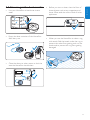
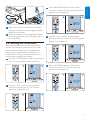
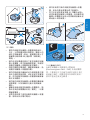
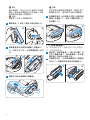
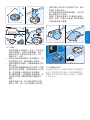
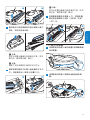
4.3 Removing the transparent
plastic foils
1 Turn over the robot and remove the
transparent plastic foil from the display (1).
Then remove the transparent plastic foil from
the infrared signal generator of the base
station (2).
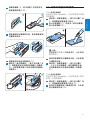
4.4 Inserting batteries into the
remote control
Two non-rechargeable batteries (AAA 1.5V
alkaline) for the remote control are supplied
with your HomeRun. Insert the batteries into
the battery compartment before you use the
robot. Replace the batteries with batteries of the
same type when they are empty.
1 Remove the battery compartment lid (1)
and insert the batteries into the battery
compartment lid (2).
2 Reattach the battery compartment lid.
D
Note:
Make sure the + and - poles of the batteries point
in the right direction.
1 2
1 2
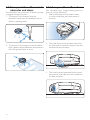
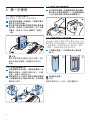
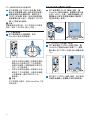
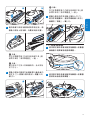
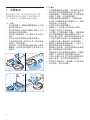
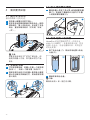
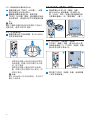
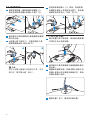
4 Beforerstuse
4.1 Inserting the rechargeable
battery
The rechargeable battery needs to be
inserted before use.
1 Place the robot upside down on a soft, at
surface.
2
Align the latches on the sides of the
rechargeable battery with the recesses in the
side of the battery compartment and insert the
rechargeable battery. Press the rechargeable
battery home until it locks into place (‘click’).
D Note:
Although the rechargeable battery is partially
charged at the factory, you may have to
charge it before you can use the robot.
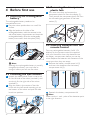
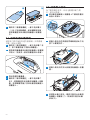
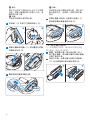
4.2Mountingthesidebrushes
1 Unpack the side brushes. There is one brush
for the left side of the robot (marked L) and
one brush for the right side of the robot
(marked R).
2 Align the holes in the centre of the side
brush with the half-round mounting pin on
the bottom of the robot and push the side
brush into position.
CLICK

13
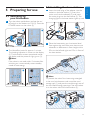
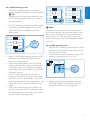
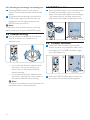
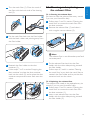
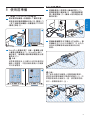
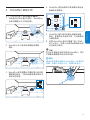
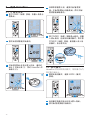
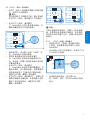
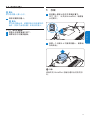
5.2 Installing the base station
1 Insert the small plug of the adapter into the
socket on the base station (1). Insert the
mains cord into the adapter (2) and insert
the mains plug into the wall socket (3). The
charging light on the base station lights up red.
2 Place the base station on a horizontal, level
oor against the wall. Make sure there are no
obstacles or differences in oor height within
0.5m to the left and right and 1.5m in front of
the base station.
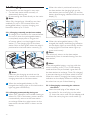
D
Note:
To prevent the robot from becoming entangled
in the cord, wind excess cord round the cord
storage reel (1) and pass the cord through one of
the cord feed-through openings if the wall socket
is on the other side of the base station (2).
1
3
2
1
2
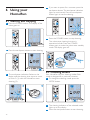
5 Preparing for use
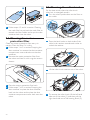
5.1 Switching on
your HomeRun
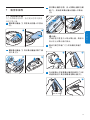
1 Turn the robot upside down and set the on/
off switch on the bottom to ON (1). Press the
POWER button on the robot (2).
2 The HomeRun boots for approx. 1 minute.
The booting indication is shown on the display
(1). The HomeRun enters operational mode:
the display and the power-on light go on (2).
D
Note:
If the robot is not used within 5 minutes after
switching on, it automatically enters standby
mode to save energy.
1 2
1 2
ENGLISH

14
2 When the robot is positioned correctly on
the base station, the charging light on the
base station starts to ash green (1) and the
battery level/charging indication ashes on the
display (2).
3 When the rechargeable battery is fully
charged, the battery level/charging indication
on the display lights up continuously and the
charging light on the base station lights up
green continuously.
D
Note:
The robot only returns to the base station
automatically when it started cleaning from the
base station.
D
Note:
If the rechargeable battery runs low while the
robot is cleaning in AUTO or CLIMB cleaning
mode and has not yet nished, it goes back to
the base station to recharge. Once fully charged,
it resumes cleaning on the place where it left off.
When the robot is charging, the cleaning mode
indication on the display ashes to indicate that
the robot has not yet nished cleaning.
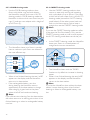
5.3.3 Charging by connecting the robot to
the mains
1 Insert the small plug of the adapter into
the socket for the small plug on the robot
(1). Insert the mains cord into the adapter and
insert the mains plug into a wall socket (2).
1 2
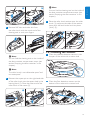
5.3 Charging
Your HomeRun can be charged in two ways:
• On the base station either manually or
automatically during use;
• By connecting the robot directly to the mains.
D
Note:
When fully charged, your HomeRun can clean
cordlessly for up to 100 minutes. When the
rechargeable battery is empty, charging your
HomeRun takes up to 3 hours.
5.3.1 Charging: manually on the base station
1 To charge your HomeRun, for instance before
rst use or when the rechargeable battery
is completely empty after a long period
of nonuse, place it on the plugged-in base
station (1). The charging light on the base
station starts to ash green when the robot is
positioned on the base station correctly (2).
D
Note:
Make sure the charging terminals on the
bottom of the robot are in contact with the
charging terminals on the base station.
2 When the rechargeable battery is fully
charged, the charging light on the base station
lights up green continuously.
5.3.2 Charging: automatically during use
1 When your HomeRun has nished cleaning or
when only 15% of the battery power remains,
it automatically returns to the base station
to recharge. When the robot returns to the
base station, the text ‘bASE’ is shown on the
display.
1 2

15
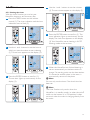
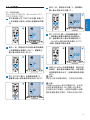
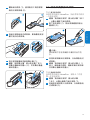
3 Press the ENTER button on the remote
control to conrm (1). The minutes indication
appears on the display (2).
4 Use the + and - buttons on the remote
control to set the minutes (1). The set minutes
appear on the display (2).
5 Press the ENTER button on the remote
control to conrm (1). The set clock time
appears on the display (2).
1 2
1 2
1 2
2 When the robot is connected to the mains
correctly, the battery level/charging indication
ashes on the display.
3 When the battery is fully charged, the battery
level/charging indication on the display lights
up continuously.
5.4 Setting the clock time
The clock time has to be set with the remote
control. The HomeRun uses the 12-hour clock
format. When AM lights up on the display, the
time shown is a time between midnight and
midday. When PM lights up, the time shown is a
time between midday and midnight.
1
Press the CLOCK button on the remote control
(1). The hour indication starts to ash (2).
2 Use the + and - buttons on the remote
control to set the hour (1). The set hour
appears on the display (2).
1
3
2
1 2
1 2
ENGLISH

16
4 If you want to pause for a moment, press the
start/pause button. The start/pause indication
lights up continuously. Press the start/pause
button again to resume cleaning.
5 Press the POWER button to stop cleaning.
The robot stops cleaning but stays in
operational mode. Press the POWER
button again to make the robot enter standby
mode. The display goes off.
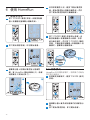
6.2 Cleaning modes
Your HomeRun has four cleaning modes. Each
mode is designed for a particular situation.
1 To change the cleaning mode, press the
MODE button.
2 The cleaning indication of the selected mode
lights up on the display.
3 Press the start/pause button to start cleaning.
6 Using your
HomeRun
6.1 Starting and stopping
1 Press the POWER button. The display of the
robot goes on.
2 Press the start/pause button to start cleaning.
3 The start/pause indication ashes on the
display and the cleaning time starts to count
up from 0 (1) while the HomeRun starts
cleaning (2).
1 2

17
D Note:
The robot will only return to the base station if
you started cleaning from the base station. If you
did not start cleaning from the base station, the
robot returns to its starting point when it has
nished cleaning or when its rechargeable battery
runs low.
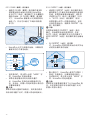
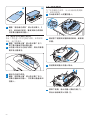
6.2.2 SPOT cleaning mode
• Use the SPOT cleaning mode to clean a small
area. Start the HomeRun in the centre of the
area you want to clean.
• The HomeRun moves in parallel straight lines,
cleaning a square area of 1.5 x 1.5m.
• When it has nished cleaning the area, the
text ‘bASE’ appears on the display and the
HomeRun returns to its starting point.
1.5m
1.5m
6.2.1 AUTO cleaning mode
• The AUTO cleaning mode is the default
cleaning mode. It is suitable for most situations.
E
Tip:
We advise you to always start cleaning in the
AUTO cleaning mode before you try one of
the other modes.
• In AUTO cleaning mode, the HomeRun cleans
your oors in parallel straight lines to make
sure your oors are cleaned in the most
efcient way.
• When it has nished cleaning, the text ‘ bASE’
appears on the display and the HomeRun
returns to its base station.
• If the rechargeable battery runs low during
cleaning, the HomeRun returns automatically
to the base station to charge. After charging,
it goes back to the place where it left off and
continues cleaning.
• In AUTO cleaning mode the HomeRun is
programmed to avoid climbing objects higher
than 10mm, such as thresholds or rugs. If the
area to be cleaned contains thresholds or rugs
higher than 10mm, use the CLIMB cleaning
mode.
• Thick wall-to-wall carpets can be difcult to
clean for the robot in AUTO cleaning mode. If
the robot does not move easily in this mode,
use the CARPET cleaning mode.
ENGLISH

18
6.2.4 CARPET cleaning mode
• Use the CARPET cleaning mode to clean
rooms or areas with wall-to-wall carpeting
with a pile depth of up to 20mm. If you have
a thick wall-to-wall carpet, rst try the AUTO
cleaning mode (see section ‘AUTO cleaning
mode’ above). If the robot moves back and
forth on the same spot or fails to keep a
straight line, use the CARPET cleaning mode.
D
Note:
If you use the CARPET cleaning mode too often,
it shortens the life of the battery. Only use the
CARPET cleaning mode on wall-to-wall carpets if
the AUTO cleaning mode does not do the job.
• In the CARPET cleaning mode, the HomeRun
cleans your oors in a mixed pattern of
straight and crisscross movements.
• The HomeRun cleans with the TURBO
function on by default to increase its cleaning
power.
• When it has nished cleaning, the text ‘bASE’
appears on the display and the HomeRun
returns to the base station.
D
Note:
If you let the HomeRun clean without the base
station, it stops cleaning when it has nished
cleaning or when its rechargeable battery runs
low.
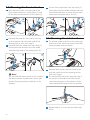
6.2.3 CLIMBcleaningmode
• Use the CLIMB cleaning mode to clean
oors with thicker rugs and with objects
the HomeRun cannot climb over in AUTO
cleaning mode. In CLIMB cleaning mode the
HomeRun is able to climb onto most low-pile
rugs (1) and can cross objects with a height of
up to 15mm (2).
• The HomeRun cleans your oors in parallel
lines to make sure your oors are cleaned in
the most efcient way.
• When it has nished cleaning, the text ‘ bASE’
appears on the display and the HomeRun
returns to its base station.
• If the rechargeable battery runs low
during cleaning, the HomeRun returns
automatically to the base station to charge.
After charging, it goes back to the place
where it left off and continues cleaning.
D
Note:
If you did not start cleaning from the base station,
the robot returns to its starting point when it has
nished cleaning or when its rechargeable battery
runs low.
1 2

19
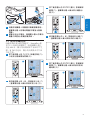
4 Use the + and - buttons to set the minutes
(1). The set minutes appear on the display (2).
5 Press the ENTER button to conrm (1). The
timer indication lights up continuously on the
display. The clock time appears on the display
(2). Your HomeRun starts cleaning in AUTO
cleaning mode at the set time.
6 When the HomeRun has nished cleaning, it
returns automatically to the base station to
charge if its starting point was the base station.
If it started at another place in the room, it
automatically returns to that place.
D
Note:
You can only use the timer if the clock time has
been set.
D
Note:
The timer function only works when the
HomeRun is in standby mode, i.e. when the on/off
switch on the bottom is in ON position. It does
not work when the robot is charging directly from
the mains.
1 2
1 2
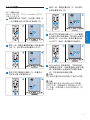
6.3 Timer
6.3.1 Setting the timer
With the timer function, you can let your
HomeRun clean at a set time every day.
1 Press the TIMER button on the remote
control (1). The timer indication and the hour
indication start to ash (2).
2 Use the + and - buttons to set the hour at
which you want the robot to start cleaning
(1). The set hour appears on the display (2).
3 Press the ENTER button to conrm (1).
The set hour lights up continuously on the
display (2).
1 2
1 2
1 2
ENGLISH

20
6.5 BASE function
1 Press the BASE button on the remote control
to make the HomeRun return to its base
station. The text ‘bASE’ appears on the display.
The robot moves to the base station and
docks itself (see chapter ‘Preparing for use’).
6.6 TURBO function
1 Press the TURBO button on the remote
control to make your HomeRun clean more
thoroughly (1). The TURBO indication lights
up on the display (2).
2 Press the TURBO button again to return to
the robot’s normal level of thoroughness.
1 2
6.3.2 Checking or removing a set cleaning time
1 Press the TIMER button on the remote
control. The set time becomes visible on the
display.
2 To remove the set cleaning time, press the
TIMER button again to make the set time
disappear from the display and press the
ENTER button to conrm.
D
Note:
To leave the timer function without removing
the set cleaning time, press the ENTER button.
6.4Manualdriving
1 Press the direction selector on the remote
control to direct your HomeRun to a
particular area.
• If you press the direction selector when
the robot is on but not cleaning, the
robot moves in the desired direction
without cleaning.
• If you press the direction selector when
the robot is cleaning, the robot moves in
the desired direction while cleaning.
D
Note:
The down arrow does not work because your
HomeRun cannot move backwards.
1 3
2
1 3
2
ページが読み込まれています...
ページが読み込まれています...
ページが読み込まれています...
ページが読み込まれています...
ページが読み込まれています...
ページが読み込まれています...
ページが読み込まれています...
ページが読み込まれています...
ページが読み込まれています...
ページが読み込まれています...
ページが読み込まれています...
ページが読み込まれています...
ページが読み込まれています...
ページが読み込まれています...
ページが読み込まれています...
ページが読み込まれています...
ページが読み込まれています...
ページが読み込まれています...
ページが読み込まれています...
ページが読み込まれています...
ページが読み込まれています...
ページが読み込まれています...
ページが読み込まれています...
ページが読み込まれています...
ページが読み込まれています...
ページが読み込まれています...
ページが読み込まれています...
ページが読み込まれています...
ページが読み込まれています...
ページが読み込まれています...
ページが読み込まれています...
ページが読み込まれています...
ページが読み込まれています...
ページが読み込まれています...
ページが読み込まれています...
ページが読み込まれています...
ページが読み込まれています...
ページが読み込まれています...
ページが読み込まれています...
ページが読み込まれています...
ページが読み込まれています...
ページが読み込まれています...
ページが読み込まれています...
ページが読み込まれています...
ページが読み込まれています...
ページが読み込まれています...
ページが読み込まれています...
ページが読み込まれています...
ページが読み込まれています...
ページが読み込まれています...
ページが読み込まれています...
ページが読み込まれています...
ページが読み込まれています...
ページが読み込まれています...
ページが読み込まれています...
ページが読み込まれています...
ページが読み込まれています...
ページが読み込まれています...
ページが読み込まれています...
ページが読み込まれています...
ページが読み込まれています...
ページが読み込まれています...
ページが読み込まれています...
ページが読み込まれています...
ページが読み込まれています...
ページが読み込まれています...
ページが読み込まれています...
ページが読み込まれています...
ページが読み込まれています...
ページが読み込まれています...
ページが読み込まれています...
ページが読み込まれています...
ページが読み込まれています...
ページが読み込まれています...
ページが読み込まれています...
ページが読み込まれています...
-
 1
1
-
 2
2
-
 3
3
-
 4
4
-
 5
5
-
 6
6
-
 7
7
-
 8
8
-
 9
9
-
 10
10
-
 11
11
-
 12
12
-
 13
13
-
 14
14
-
 15
15
-
 16
16
-
 17
17
-
 18
18
-
 19
19
-
 20
20
-
 21
21
-
 22
22
-
 23
23
-
 24
24
-
 25
25
-
 26
26
-
 27
27
-
 28
28
-
 29
29
-
 30
30
-
 31
31
-
 32
32
-
 33
33
-
 34
34
-
 35
35
-
 36
36
-
 37
37
-
 38
38
-
 39
39
-
 40
40
-
 41
41
-
 42
42
-
 43
43
-
 44
44
-
 45
45
-
 46
46
-
 47
47
-
 48
48
-
 49
49
-
 50
50
-
 51
51
-
 52
52
-
 53
53
-
 54
54
-
 55
55
-
 56
56
-
 57
57
-
 58
58
-
 59
59
-
 60
60
-
 61
61
-
 62
62
-
 63
63
-
 64
64
-
 65
65
-
 66
66
-
 67
67
-
 68
68
-
 69
69
-
 70
70
-
 71
71
-
 72
72
-
 73
73
-
 74
74
-
 75
75
-
 76
76
-
 77
77
-
 78
78
-
 79
79
-
 80
80
-
 81
81
-
 82
82
-
 83
83
-
 84
84
-
 85
85
-
 86
86
-
 87
87
-
 88
88
-
 89
89
-
 90
90
-
 91
91
-
 92
92
-
 93
93
-
 94
94
-
 95
95
-
 96
96


