
D28730
D28730D

B
English 3
简体中文 10
繁體中文 15
한국어 20
26
T
iếng việt 33

1
Fig. B Fig. C
29
31
32
30
Fig. A
4
5
6
7
8
10
11
12
17
9
9
16
16
16
13
15
2
3
1
19
14
XXXX XX XX
18
17
圖 A
图 A
그림
A
Hình A
圖 B
图 B
그림
B
Hình B
圖 C
图 C
그림
C
Hình C

2
Fig. F
Fig. H
Fig. G
Fig. I
Fig. D Fig. E
6
5
15
5
15
28
12
21
22
23
10
20
25
24
8mm
26
27 26
圖 D
图 D
그림
D
Hình D
圖 E
图 E
그림
E
Hình E
圖 F
图 F
그림
F
Hình F
圖 G
图 G
그림
G
Hình G
圖 H
图 H
그림
H
Hình H
圖 I
图 I
그림
I
Hình I

ENGLISH
3
Congratulations!
You have chosen a DeWALT tool. Years of experience, thorough
product development and innovation make DeWALT one of the
most reliable partners for professional power toolusers.
Technical Data
D28730/D28730D
Voltage V
AC
220-240
Power Input W 2300
No-load speed min
-1
4000
Min. peripheral speed cutting disc m/s 80
Disc diameter mm 355
Disc bore mm 25.4
Disc body thickness mm 3.0
Thread size of spindle M10
Type of cutting disc straight, non-recessed
Cross-cutting capacity at 90˚
circular mm 125
square mm 115 x 115
rectangular mm 115 x 130
angular mm 120 x 120
Cross-cutting capacity at 45˚
circular mm 115
square mm 98 x 98
rectangular mm 95 x 105
angular mm 105 x 105
Weight kg 15.5
Definitions: Safety Guidelines
The definitions below describe the level of severity for each
signal word. Please read the manual and pay attention to
thesesymbols.
DANGER: Indicates an imminently hazardous
situation which, if not avoided, will result in death or
seriousinjury.
WARNING: Indicates a potentially hazardous situation
which, if not avoided, could result in death or
seriousinjury.
CAUTION: Indicates a potentially hazardous situation
which, if not avoided, may result in minor or
moderateinjury.
NOTICE: Indicates a practice not related to
personal injury which, if not avoided, may result in
propertydamage.
Denotes risk of electricshock.
Denotes risk offire.
English (original instructions)
CHOP SAW
D28730/D28730D
General Power Tool Safety Warnings
WARNING: Read all safety warnings, instructions,
illustrations and specifications provided with this
power tool. Failure to follow all instructions listed below
may result in electric shock, fire and/or serious injury.
SAVE ALL WARNINGS AND INSTRUCTIONS
FOR FUTURE REFERENCE
The term “power tool” in the warnings refers to your mains-
operated (corded) power tool or battery-operated (cordless)
powertool.
1) Work Area Safety
a ) Keep work area clean and well lit. Cluttered or dark
areas inviteaccidents.
b ) Do not operate power tools in explosive
atmospheres, such as in the presence of flammable
liquids, gases or dust. Power tools create sparks which
may ignite the dust orfumes.
c ) Keep children and bystanders away while operating
a power tool. Distractions can cause you to losecontrol.
2) Electrical Safety
a ) Power tool plugs must match the outlet. Never
modify the plug in any way. Do not use any adapter
plugs with earthed (grounded) power tools.
Unmodified plugs and matching outlets will reduce risk of
electricshock.
b ) Avoid body contact with earthed or grounded
surfaces such as pipes, radiators, ranges and
refrigerators. There is an increased risk of electric shock if
your body is earthed orgrounded.
c ) Do not expose power tools to rain or wet conditions.
Water entering a power tool will increase the risk of
electricshock.
d ) Do not abuse the cord. Never use the cord for
carrying, pulling or unplugging the power tool. Keep
cord away from heat, oil, sharp edges or moving
parts. Damaged or entangled cords increase the risk of
electricshock.
e ) When operating a power tool outdoors, use an
extension cord suitable for outdoor use. Use of a cord
suitable for outdoor use reduces the risk of electricshock.
f ) If operating a power tool in a damp location is
unavoidable, use a ground fault circuit interrupter
(GFCI) protected supply. Use of a GFCI reduces the risk
of electricshock.
3) Personal Safety
a ) Stay alert, watch what you are doing and use
common sense when operating a power tool. Do not
use a power tool while you are tired or under the
influence of drugs, alcohol or medication. A moment

4
ENGLISH
of inattention while operating power tools may result in
serious personalinjury.
b ) Use personal protective equipment. Always wear eye
protection. Protective equipment such as a dust mask,
non-skid safety shoes, hard hat, or hearing protection used
for appropriate conditions will reduce personalinjuries.
c ) Prevent unintentional starting. Ensure the switch
is in the off-position before connecting to power
source and/or battery pack, picking up or carrying
the tool. Carrying power tools with your finger on the
switch or energising power tools that have the switch on
invitesaccidents.
d ) Remove any adjusting key or wrench before turning
the power tool on. A wrench or a key left attached
to a rotating part of the power tool may result in
personalinjury.
e ) Do not overreach. Keep proper footing and balance
at all times. This enables better control of the power tool
in unexpectedsituations.
f ) Dress properly. Do not wear loose clothing or
jewellery. Keep your hair, clothing and gloves away
from moving parts. Loose clothes, jewellery or long hair
can be caught in movingparts.
g ) If devices are provided for the connection of dust
extraction and collection facilities, ensure these are
connected and properly used. Use of dust collection
can reduce dust-relatedhazards.
h ) Do not let familiarity gained from frequent use of
tools allow you to become complacent and ignore
tool safety principles. A careless action can cause severe
injury within a fraction of asecond.
4) Power Tool Use and Care
a ) Do not force the power tool. Use the correct power
tool for your application. The correct power tool
will do the job better and safer at the rate for which it
wasdesigned.
b ) Do not use the power tool if the switch does not turn
it on and off. Any power tool that cannot be controlled
with the switch is dangerous and must berepaired.
c ) Disconnect the plug from the power source and/
or the battery pack, if detachable, from the power
tool before making any adjustments, changing
accessories, or storing power tools. Such preventive
safety measures reduce the risk of starting the power
toolaccidentally.
d ) Store idle power tools out of the reach of children
and do not allow persons unfamiliar with the power
tool or these instructions to operate the power tool.
Power tools are dangerous in the hands of untrainedusers.
e ) Maintain power tools. Check for misalignment or
binding of moving parts, breakage of parts and any
other condition that may affect the power tool’s
operation. If damaged, have the power tool repaired
before use. Many accidents are caused by poorly
maintained powertools.
f ) Keep cutting tools sharp and clean. Properly
maintained cutting tools with sharp cutting edges are less
likely to bind and are easier tocontrol.
g ) Use the power tool, accessories and tool bits, etc.
in accordance with these instructions, taking into
account the working conditions and the work to be
performed. Use of the power tool for operations different
from those intended could result in a hazardoussituation.
h ) Keep handles and grasping surfaces dry, clean and
free from oil and grease. Slippery handles and grasping
surfaces do not allow for safe handling and control of the
tool in unexpectedsituations.
5) Service
a ) Have your power tool serviced by a qualified repair
person using only identical replacement parts. This
will ensure that the safety of the power tool ismaintained.
Safety Instructions for Cut-off Machines
1) Cut-off Machine Safety Warnings
a ) Position yourself and bystanders away from the
plane of the rotating wheel. The guard helps to protect
the operator from broken wheel fragments and accidental
contact withwheel.
b ) Use only bonded reinforced or diamond cut-off
wheels for your power tool. Just because an accessory
can be attached to your power tool,it does not assure safe
operation.
c ) The rated speed of the accessory must be at least
equal to the maximum speed marked on the power
tool. Accessories running faster than their rated speed can
break and fly apart.
d ) Wheels must be used only for recommended
applications. For example: do not grind with the side
of a cut-off wheel. Abrasive cut-off wheels are intended
for peripheral grinding, side forces applied to these wheels
may cause them toshatter.
e ) Always use undamaged wheel flanges that are of
correct diameter for your selected wheel. Proper
wheel flanges support the wheel thus reducing the
possibility of wheelbreakage.
f ) The outside diameter and the thickness of your
accessory must be within the capacity rating of
your power tool. Incorrectly sized accessories cannot be
adequately guarded orcontrolled.
g ) The arbour size of wheels and flanges must properly
fit the spindle of the power tool. Wheels and flanges
with arbour holes that do not match the mounting
hardware of the power tool will run out of balance, vibrate
excessively and may cause loss ofcontrol.
h ) Do not use damaged wheels. Before each use,
inspect the wheels for chips and cracks. If the power
tool or wheel is dropped, inspect for damage or
install an undamaged wheel. After inspecting
and installing the wheel, position yourself and
bystanders away from the plane of the rotating
wheel and run the power tool at maximum no load

5
ENGLISH
speed for one minute. Damaged wheels will normally
break apart during this testtime.
i ) Wear personal protective equipment. Depending
on application, use face shield, safety goggles or
safety glasses. As appropriate, wear a dust mask,
hearing protectors, gloves and shop apron capable
of stopping small abrasive or workpiece fragments.
The eye protection must be capable of stopping flying
debris generated by various operations. The dust mask or
respirator must be capable of filtrating particles generated
by your operation. Prolonged exposure to high intensity
noise may cause hearingloss.
j ) Keep bystanders a safe distance away from work
area. Anyone entering the work area must wear
personal protective equipment. Fragments of
workpiece or of a broken wheel may fly away and cause
injury beyond immediate area ofoperation.
k ) Position the cord clear of the spinning accessory. If
you lose control, the cord may be cut or snagged and your
hand or arm may be pulled into the spinningwheel.
l ) Regularly clean the power tool’s air vents. The
motor’s fan can draw the dust inside the housing and
excessive accumulation of powdered metal may cause
electricalhazards.
m ) Do not operate the power tool near flammable
materials. Do not operate the power tool while
placed on a combustible surface such as wood.
Sparks could ignite thesematerials.
n ) Do not use accessories that require liquid coolants.
Using water or other liquid coolants may result in
electrocution orshock.
Kickback and Related warnings
Kickback is a sudden reaction to a pinched or snagged rotating
wheel. Pinching orsnagging causes rapid stalling of the rotating
wheel which in turn causes the uncontrolled cutting unit to be
forced upwards toward theoperator.
For example, if an abrasive wheel is snagged or pinched by the
workpiece, the edge of thewheel that is entering into the pinch
point can dig into the surface of the material causingthe wheel
to climb out or kick out. Abrasive wheels may also break under
theseconditions.
Kickback is the result of power tool misuse and/or incorrect
operating procedures orconditions and can be avoided by taking
proper precautions as givenbelow.
a ) Maintain a firm grip on the power tool and position
your body and arm to allow you to resist kickback
forces. The operator can control upward kickback forces,
if proper precautions aretaken.
b ) Do not position your body in line with the rotating
wheel. If kickback occurs, it will propel the cutting unit
upwards toward theoperator.
c ) Do not attach a saw chain, woodcarving blade,
segmented diamond wheel with a peripheral gap
greater than 10 mm or toothed saw blade. Such
blades create frequent kickback and loss ofcontrol.
d ) Do not “jam” the wheel or apply excessive pressure.
Do not attempt to make an excessive depth of
cut. Overstressing the wheel increases the loading and
susceptibility to twisting or binding of the wheel in the cut
and the possibility of kickback or wheelbreakage.
e ) When the wheel is binding or when interrupting a
cut for any reason, switch off the power tool and
hold the cutting unit motionless until the wheel
comes to a complete stop. Never attempt to remove
the wheel from the cut while the wheel is in motion
otherwise kickback may occur. Investigate and take
corrective action to eliminate the cause of wheelbinding.
f ) Do not restart the cutting operation in the
workpiece. Let the wheel reach full speed and
carefully re-enter the cut. The wheel may bind, walk up
or kickback if the power tool is restarted in theworkpiece.
g ) Support any oversized workpiece to minimize the
risk of wheel pinching and kickback. Large workpieces
tend to sag under their own weight. Supports must be
placed under the workpiece near the line of cut and near
the edge of the workpiece on both sides of thewheel.
Additional Safety Warnings for Chop Saws
• In operation, avoid bouncing the cutting disc or giving it
rough treatment. If this occurs, stop the tool and inspect the
cuttingdisc.
• Do not operate the tool while standing in line with the cutting
disc. Keep other persons away from the workarea.
• Be aware of cutting chips and the material being cut.
They may be sharp and hot. Allow cut off parts to cool
beforehandling.
• The spark deflector becomes hot during use. Avoid touching or
adjusting the spark deflect or immediately afteroperation.
• Switch off the tool and wait for the cutting disc to stop before
moving the workpiece or changing thesettings.
• After switching off, never attempt to stop the cutting disc by
pressing against the side of thedisc.
• Do not use cutting fluids. These fluids could ignite or cause
electricalshock.
• Check that the workpiece is properlysupported.
• Use the cutting discs recommended by the manufacturer only.
Do not use tools for purposes not intended; for example do not
use circular saw blade to cut tree limbs orlogs.
• The max. allowable speed of the cutting disc must always be
equal to or greater than the no-load speed of the tool specified
on thenameplate.
• Do not use cutting discs that do not conform to the
dimensions stated in the TechnicalData.
• Read the operating instructions supplied by the
wheelmanufacturer.
• Ensure that the abrasive wheel is correctly fitted and tightened
beforeuse.
• Let the tool run at no-load in a safe position for at least
30 seconds. If there is a considerable vibration or if any

6
ENGLISH
other defect occurs, stop the tool and check it to determine
thecause.
• Do not use cutting discs for sidegrinding.
• Do not cut concrete, brick, tile or ceramicmaterials.
• Do not cut wood, plastic or syntheticmaterials.
• Do not cut cast-ironmaterials.
• Never cut magnesiummaterials.
• Do not cut electrically livematerial.
• Use this tool in a well-ventilated area. Do not operate the
tool near flammable liquids, gases or dust. Sparks or hot
chips from cutting or arcing motor brushes may ignite
combustiblematerials.
• Regularly clear the ventilation slots when working in dusty
conditions. If it should become necessary to clean the slots,
always use a soft brush; remember to unplug the machinefirst.
• Always store cutting discs well-protected and in a dry place,
out of reach ofchildren.
• Check damaged parts. Before further use of the tool, a guard
or other part that is damaged should be carefully checked
to determine that it will operate properly and perform its
intended function—check for alignment of moving parts,
binding of moving parts, breakage of parts, mounting, and
any other conditions that may affect its operation. A guard
or other part that is damaged should be properly repaired
orreplaced.
Residual Risks
• The following risks are inherent to the use of these machines:
ʵ injuries caused by touching the rotatingparts.
ʵ injuries caused by disruption of the cuttingdisc.
• These risks are most evident:
ʵ within the range of operation
ʵ within the range of the rotating machine parts
• In spite of the application of the relevant safety regulations
and the implementation of safety devices, certain residual risks
cannot beavoided. These are:
ʵ Impairment ofhearing.
ʵ Risk of accidents caused by the uncovered parts of the
rotating cuttingdisc.
ʵ Risk of injury when changing thedisc.
ʵ Risk of squeezing fingers when opening theguards.
Electrical Safety
The electric motor has been designed for one voltage only.
Always check that the power supply corresponds to the voltage
on the ratingplate.
Your DeWALT tool is double insulated in accordance
with IEC62841; therefore no earth wire isrequired.
WARNING: 115 V units have to be operated via a fail-safe
isolating transformer with an earth screen between the
primary and secondarywinding.
If the supply cord is damaged, it must be replaced by a
specially prepared cord available through the DeWALT
serviceorganisation.
Voltage Drops
Inrush currents cause short-time voltage drops. Under
unfavourable power supply conditions, other equipment may
be affected.
If the system impedance of the power supply is lower than
0.11 Ω, disturbances are unlikely to occur.
Using an Extension Cable
If an extension cable is required, use an approved 3–core
extension cable suitable for the power input of this tool (see
Technical Data).The minimum conductor size is 1.5 mm
2
; the
maximum length is 30m.
When using a cable reel, always unwind the cablecompletely.
Package Contents
The package contains:
1 Chopsaw
1 Abrasive wheel
1 Hex key
1 Instruction manual
• Check for damage to the tool, parts or accessories which may
have occurred duringtransport.
• Take the time to thoroughly read and understand this manual
prior tooperation.
Markings on Tool
The following pictograms are shown on the tool:
Read instruction manual beforeuse.
Wear earprotection.
Wear eyeprotection.
Bore Diameter
Direction of rotation
Date Code Position (Fig. A)
The date code
18
which also includes the year of manufacture,
is printed into thehousing.
Example:
2019 XX XX
Year of Manufacture

7
ENGLISH
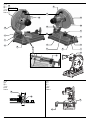
Description (Fig. A)
WARNING: Never modify the power tool or any part of it.
Damage or personal injury couldresult.
1
Lock pin
2
Spark deflector screw
3
Spark deflector
4
Base
5
Fence
6
Vise
7
8mm hex key
8
Crank
9
Vise lever
10
Wheel
11
Guard
12
Spindle lock
13
Lock-off trigger switch
14
Lock-off lever
15
Fence bolts
16
Mounting holes
17
Operating handle
18
Date code
19
Carrying handle
Intended Use
Your D28730/D28730D chop saw has been designed for the
cutting of variously shaped steelmaterials. It is designed only for
use with reinforced bonded abrasives. Diamond or TCT blades
should not be used with thisunit.
DO NOT use under wet conditions or in the presence of
flammable liquids orgases.
The D28730 chop saw is a professional powertool.
DO NOT let children come into contact with the tool.
Supervision is required when inexperienced operators use
thistool.
• Young children and the infirm. This appliance is not
intended for use by young children or infirm persons
withoutsupervision.
• This product is not intended for use by persons (including
children) suffering from diminished physical, sensory or
mental abilities; lack of experience, knowledge or skills
unless they are supervised by a person responsible for their
safety. Children should never be left alone with thisproduct.
ASSEMBLY AND ADJUSTMENTS
WARNING: To reduce the risk of serious personal
injury, turn tool off and disconnect tool from power
source before making any adjustments or removing/
installing attachments or accessories. Be sure the
trigger switch is in the OFF position. An accidental start-up
can causeinjury.
Cutting Capacity
The wide vise opening and high pivot point provide cutting
capacity for many large pieces. Use the cutting capacity chart to
determine total maximum size of cuts that can be made with a
newwheel.
CAUTION: Certain large, circular or irregularly shaped
objects may require additional holding means if they
cannot be held securely invise.
CAUTION: DO NOT CUT MAGNESIUM, WOOD, BRICK OR
CONCRETE WITH THIS TOOL.
Workpiece Shape
A
A
A
A
B
A
A
90° Cutting angle A = 125 mm A = 115 mm 115 mm x 130 mm 120 mm
45° Cutting angle A = 115 mm A = 98 mm 95 mm x 105 mm 105 mm
OPERATION
Instructions for Use
WARNING: Always observe the safety instructions and
applicableregulations.
WARNING: To reduce the risk of serious personal
injury, turn tool off and disconnect tool from power
source before making any adjustments or removing/
installing attachments or accessories. Be sure the
trigger switch is in the OFF position. An accidental start-up
can causeinjury.
Proper Hand Position (Fig. A)
WARNING: To reduce the risk of serious personal injury,
Always use proper hand position as shown.
WARNING: To reduce the risk of serious personal injury,
always hold securely in anticipation of a sudden reaction.
Proper hand position requires one hand on the operating
handle
17
.
To Carry (Fig.A)
Fold down unit to position where you can carry the saw. Push in
the lock pin
1
to lock the armdown. Always carry the saw using
the carrying handle
19
.
Unlocking (Fig.A)
To unlock tool and raise head, depress motor arm slightly and
pull lock pin
1
out. Motor arm will then pivotupward.
Mounting (Fig.A)
CAUTION: Tool must be supported on stable, level,
non-skid surface to prevent unexpected movement
whenoperating.
1. Drill holes through the work surface that align the base of
the chopsaw.
2. Insert two M10 bolts down through the mounting holes
16
in the base and through holes in mounting surface. The
approximate length of the screws should be the thickness of
the mounting surface plus 102mm.
Spark Deflector Adjustment (Fig. A)
WARNING: Do not touch the spark deflector during or
immediately after operation as it becomes hot and may
cause skin burn.

8
ENGLISH
To best deflect sparks away from surrounding persons and
materials, loosen the spark deflector screw
2
, adjust the spark
deflector
3
and then retighten screw. Do not allow cordset to
come into contact with deflector or sparks as damage to cordset
mayoccur.
Trigger Switch (Fig. A)
To start the tool, depress the trigger switch 13 . To turn the tool
off, release the trigger switch. Keep hands and material from
wheel until it has coasted to a stop.To prevent unauthorized use
of tool, install a standard padlock (not included) into the padlock
hole 14 located in the trigger. There is provision for locking the
switch on.
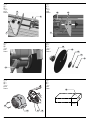
Material Clamping and Supporting (Fig.B,C)
• Angles are best clamped and cut with both legs resting
againstbase.
• A spacer block
29
slightly narrower than the workpiece
30
can be used to increase wheel utilization (Fig.B).
• Long workpieces must be supported by a block
31
so it will
be level with top of base (Fig.C). The cut-off end
32
should
be free to fall downward to avoid wheelbinding.
Vise Operation (Fig.A, D)
The vise has a quick travel feature. To release the vise
6
when
it is clamped tightly, turn the crank
8
counterclockwise one or
two times to remove clamping pressure. Lift the vise lever
9
up. Pull crank assembly out as far as desired. The vise may
be shoved into work without cranking. Lower vise lever then
tighten vise on work by usingcrank.
Fence Operation (Fig. A, D, E)
WARNING: Turn off and unplug the tool before
making any adjustments or removing or installing
attachments or accessories. Be sure the trigger
switch is in the OFFposition.
The fence
5
can be adjusted two ways: to change desired
cutting angle and to change spacing between the fence
andvise.
To Change the Desired Cutting Angle
Use the 8 mm hex key
7
provided to loosen (do not remove)
the two fence bolts
15
. Align the desired angle indicator line
with the slot line
28
in the base
4
. Securely tighten both fence
bolts before use. For more accurate square cuts, disconnect the
power supply, loosen the two fence bolts, push arm down until
wheel extends into base. Place a square against the wheel and
adjust fence against the square. Securely tighten both fence
bolts before use. When making a miter cut, the vise
6
may not
clamp securely, depending on the thickness of the workpiece
and the miter angle. Other aids (such as spring, bar or C-clamps)
will be necessary to secure the workpiece to the fence when
making thesecuts.
Removal and Installation of Wheels
(Fig. F, G)
WARNING: To reduce the risk of serious personal
injury, turn tool off and disconnect tool from power
source before making any adjustments or removing/
installing attachments or accessories. Do not make
any adjustment while the wheel is in motion. Do not
make any adjustment while chop saw is plugged into
powersupply.
WARNING: Always use gloves when handlingwheels.
WARNING: Do not impact the wheel, and do not use a
wheel that has been dropped or impacted. Do not use a
chipped, deformed or damagedwheel.
1. Push in spindle lock
12
and rotate wheel
10
by hand until
wheel lock lever engages slot in inside flange
20
to lock
wheel. Loosen the bolt
21
counterclockwise in the center
of the abrasive wheel with the 8mm hex key
7
. Bolt has
right-handthread.
2. Remove the bolt
21
, washer
22
, outside flange
23
and
old wheel
10
.
3. Make sure flange surfaces are clean and flat. Install the new
abrasive wheel by reversing the abovesteps.
4. For safe operation, securely tighten bolt
21
to firmly secure
the abrasive wheel
10
in between inner
20
and outer
flanges
23
. Do not overtighten bolt
21
.
WARNING: Check the work surface that the chop saw
rests on when replacing with a new abrasive wheel. It
is possible that the wheel may contact ANY ITEMS OR
STRUCTURE THAT EXTENDS ABOVE work surface
(under the base) when the arm is fullylowered.
Soft Start Feature (D28730D only)
The soft start feature (Time Delay Relay--TDR) allows a slow
speed run-up over 300 ms to avoid an initial jerk when starting.
This feature is also particularly useful when the installed fuse
value is too low or not of inert character.
Operation Tips for More Accurate Cuts
• Allow the wheel to do the cutting. Excessive force will cause
the wheel to glaze reducing cutting efficiency and/or to
deflect causing inaccuratecuts.
• Properly adjust fenceangle.
• Make sure material is laying flat acrossbase.
• Properly clamp material to avoid movement andvibration.
Motor Brush Inspection and Replacement
(Fig. H, I)
BE SURE TOOL IS UNPLUGGED BEFORE INSPECTING BRUSHES.
Brushes should be regularly inspected for wear. To inspect
brushes, unscrew the two end cap screws
24
and remove the
end cap
25
. To remove each brush
26
, first unplug the shunt
wire
27
terminal connection. Then carefully back the brush
spring out of the brush box and remove brush. Brushes should

9
ENGLISH
slide freely in brush box. If brushes are worn down to 8 mm as
shown in FigureI, they should bereplaced.
To reinstall each brush, carefully back the spring out of the
brush box, insert the brush and return the spring making sure
it is pressing on the brush and not touching the brush box.
Reconnect shunt wire terminal, then replace the end cap and
twoscrews.
MAINTENANCE
Your DeWALT power tool has been designed to operate
over a long period of time with a minimum of maintenance.
Continuous satisfactory operation depends upon proper tool
care and regularcleaning.
WARNING: To reduce the risk of serious personal
injury, turn tool off and disconnect tool from power
source before making any adjustments or removing/
installing attachments or accessories. Be sure the
trigger switch is in the OFF position. An accidental start-up
can causeinjury.
Lubrication
Closed-type, grease-sealed ball bearings are used throughout.
These bearings have sufficient lubrication packed in them at the
factory to last the life of the chopsaw.
Cleaning
WARNING: Blow dirt and dust out of the main housing
with dry air as often as dirt is seen collecting in and around
the air vents. Wear approved eye protection and approved
dust mask when performing thisprocedure.
WARNING: Never use solvents or other harsh chemicals
for cleaning the non-metallic parts of the tool. These
chemicals may weaken the materials used in these parts.
Use a cloth dampened only with water and mild soap.
Never let any liquid get inside the tool; never immerse any
part of the tool into aliquid.
Optional Accessories
WARNING: Since accessories, other than those offered
by DeWALT, have not been tested with this product, use
of such accessories with this tool could be hazardous.
To reduce the risk of injury, only DeWALT recommended
accessories should be used with thisproduct.
Consult your dealer for further information on the
appropriateaccessories.
Use only high-strength Type 1 organic bonded wheels rated
4100 rpm orhigher according to EN12413, safety requirements
for bonded abrasiveproducts.
Protecting the Environment
Separate collection. Products and batteries marked
with this symbol must not be disposed of with normal
householdwaste.
Products and batteries contain materials that can
be recovered or recycled reducing the demand for raw
materials. Please recycle electrical products and batteries
according to local provisions. Further information is available at
www.2helpU.com.

10
简体中文
简体中文
3
恭喜!
感谢您选购
DeWALT
工具。凭借多年的产品开发和创新经验,
DeWALT
已经成为专业电动工具用户最可靠的合作伙伴之一。
技术参数
D28730
电压 伏特
交流
220-240
输入功率 瓦
2300
空载转速 转/分
4000
最小圆周速度圆盘刀 米/秒
80
圆盘直径 毫米
355
圆盘孔 毫米
25.4
圆盘体厚度 毫米
3.0
主轴螺纹尺寸
M10
圆盘刀类型,直形非嵌入式
90°
的横切能力
圆形
毫米
125
方形
毫米
115 x 115
矩形
毫米
115 x 130
角形
毫米
120 x 120
45°
的横切能力
圆形
毫米
115
方形
毫米
98 x 98
矩形
毫米
95 x 105
角形
毫米
105 x 105
重量 千克
15
.
5
定义:安全指南
下列定义描述了各标志术语的严重程度。请仔细阅读本手册,并
注意这些标志。
危险:表示存在紧急危险情况,如果不加以避免,将导致
死亡或严重伤害。
警告:表示存在潜在的危险情况,如果不加以避免,可能
导致死亡或严重伤害。
警示:表示存在潜在危险情况,如果不加以避免,可能导
致轻度或中度伤害。
注意:表示存在不涉及人身伤害的情况,如果不加以避
免,可能导致财产损失。
表示存在触电风险。
表示存在火灾风险。
电动工具通用安全警告
警告!阅读所有警告和所有说明。不遵照以下警告和说明
会导致电击、着火和
/
或严重伤害。
型材切割机
D28730
保存所有警告和说明书以备查阅。
在所有下列的警告中术语
“
电动工具
”
指 市 电 驱 动( 有 线 )电 动 工 具
或 电 池 驱 动( 无 线 )电 动 工 具 。
a)
工作场地的安全
1 )
保持工作场地清洁和明亮。混乱和黑暗的场地会引发事故。
2 )
不要在易爆环境,如有易燃液体、气体或粉尘的环境下
操作电动工具。电动工具产生的火花会点燃粉尘或气体。
3 )
让儿童和旁观者离开后操纵电动工具。注意力不集中会
使你失去对工具的控制。
b)
电气安全
1 )
电动工具插头必须与插座相配。绝不能以任何方式改装
插头。需接地的电动工具不能使用任何转换插头。未经
改装的插头和相配的插座将减少电击风险。
2 )
避免人体接触接地表面,如管道、散热片和冰箱。如果你
身体接地会增加电击危险。
3 )
不得将电动工具暴露在雨中或潮湿环境中。水进入电动
工具将增加电击危险。
4 )
不得滥用电线。绝不能用电线搬运、拉动电动工具或拔
出其插头。使电线远离热源、油、锐边或运动部件。受损
或缠绕的软线会增加电击危险。
5 )
当在户外使用电动工具时,使用适合户外使用的外接电线。
适合户外使用的电线将降低电击危险。
6 )
如果电动工具处于潮湿环境是不可避免的,应使用剩余
电流动作保护器。RCD 的使用可降低电击风险。
c)
人身安全
1 )
保持警觉,当操作电动工具时关注所从事的操作并保持
清醒。当操作者感到疲倦,或在有药物、酒精或治疗反应
时,不要操作电动工具。在操作电动工具时瞬间的疏忽会
导致严重人身伤害。
2 )
使用个人防护装置。始终佩戴护目镜。安 全 装 置 ,诸 如 适
当条件下使用防尘面具、防滑安全鞋、安全帽、听力防护
等装置能减少人身伤害。
3 )
防止意外起动。确保开关在连接电源和/或电池盒、拿起
或搬运工具时处于关断位置。手指放在已接通电源的开
关上或开关处于接通时插入插头可能会导致危险。
4 )
在电动工具接通之前,拿掉所有调节钥匙或扳手。遗留在
电动工具旋转零件上的扳手或钥匙会导致人身伤害。
5 )
手不要伸展得太长。时刻注意立足点和身体平衡。这样
在意外情况下能很好地控制电动工具。
6 )
着装适当。不要穿宽松衣服或佩戴饰品。让你的衣服、手
套和头发远离运动部件。宽松衣服、佩饰或长发可能会卷
入运动部件。
7 )
保持手干燥、清洁且没有油脂。油腻的手柄对于意外情况
下的工具安全握持和控制是不允许的。
8 )
如果提供了与排屑、集尘设备连接用的装置,要确保他
们连接完好且使用得当。使用这些装置可减少尘屑引起
的危险。

11
简体中文
4
简体中文
d)
电动工具使用和注意事项
1 )
不要滥用过载使用电动工具,根据用途使用合适的电动
工具。选用适当的设计额定值的电动工具会使操作者工作
更 有 效 、更 安 全 。
2 )
如果开关不能接通或关断工具电源,则不能使用该电动
工具。不能用开关来控制的电动工具是危险的且必须进
行修理。
3 )
在进行任何调节、更换附件或贮存电动工具之前,必须
从电源上拔掉插头。这种防护性措施将减少电动工具意
外起动的危险。
4 )
将闲置不用的电动工具贮存在儿童所及范围之外,并且
不要让不熟悉电动工具或对这些说明不了解的人操作
电动工具。电动工具在未经培训练的用户手中是危险的。
5 )
保养电动工具。检查运动件是否调整到位或卡住,检查
零件破损情况和影响电动工具运行的其他状况。如有损
坏 ,电 动 工 具 应 在 使 用 前 修 理 好 。许多事故由维护不良的
电动工具引发。
6 )
保持切削刀具锋利和清洁。保养良好的有锋利切削刃的
刀具不易卡住而且容易控制。
7 )
按照使用说明书,考虑作业条件和进行的作业来使用电
动工具、附件和工具的刀头等。将电动工具用作于那些与
其用途不符的操作可能会导致危险情况。
e)
维修
将电动工具送交专业维修人员,必须使用同样的备件进行更换。
这样将确保所维修的电动工具的安全性。
型材切割机
chop saw
专用警告语:
⸺ 佩 戴 护 目 镜 ;
⸺ 不要使用损坏的砂轮;
⸺ 不要使用在适当位置上没有护罩的型材切割机;
⸺ 只允许使用制造厂推荐的砂轮,其标明的速度等于或大于工
具上标明的速度;
⸺ 阅读砂轮制造厂提供的使用说明。
切割机安全指示
1)
切割机安全警告
a )
保持身体远离旋转轮的平面,并且勿使旁观者靠近。护罩
有助于保护操作人员免于受到爆裂砂轮碎片和意外触及
砂轮的危险。
b )
电动工具仅可使用固结加筋或金刚切割砂轮。这是因为
附件即使能安装到工具上但也无法确保安全操作。
c )
附件的额定转速必须至少达到电动工具上标示的最大
转速。附件以比其额定转速大的转速运转会发生爆裂和
飞溅。
d )
砂轮只用于推荐的用途。例如,不要使用切割砂轮的侧面
进行磨削。磨切砂轮设计用于圆周磨削,对砂轮侧面施力
可能会使其碎裂。
e )
始终为所选砂轮选用未损坏的、直径适合的砂轮法兰盘。
合适的砂轮法兰盘支撑砂轮可以减小砂轮破裂的可能性。
f )
附件的外径和厚度必须在电动工具的额定能力范围内。
不正确的附件尺寸不能得到充分防护或控制。
g )
砂轮和法兰的轴孔尺寸必须适合电动工具的主轴。砂轮和
法兰的轴孔若与电动工具安装件不相配会导致失稳、过度
震动并且可能会引起失控。
h )
请勿使用破损的砂轮。每次使用之前,请检查砂轮是否
有缺口和裂缝。如果电动工具或砂轮跌落,请检查其是
否受损,或者安装未受损的砂轮。检查并安装砂轮后,您
本人和旁观者需要远离旋转砂轮的平面,并且让电动工
具以最大空载转速运行一分钟。受损砂轮通常会在此测
试期间碎裂。
i )
佩戴个人防护装备。根据适用情况,使用面罩、安全护目
镜或防护眼镜。适当情况下,戴上防尘面罩、听力保护
器、手套和能阻挡细小磨料或工件碎片的工作围裙。护目
装备必须能够挡住各种操作产生的飞屑。防尘面具或口罩
必须能够过滤操作产生的颗粒。长期暴露在高强度噪声
中会引起失聪。
j )
让旁观者与工作区域保持一定安全距离。任何进入工作
区域的人必须戴上防护用品。工件或破损砂轮的碎片可能
会飞出并导致紧邻操作区域的旁观者受伤。
k )
使软线远离旋转的附件。如果控制不当,电线可能被切断
或缠绕,并使得您的手或手臂可能被卷入旋转砂轮中。
l )
经常清理电动工具的通风口。电动机风扇会将灰尘吸进
机壳,过多的金属粉尘沉积可能会导致电气危险。
m )
不要在易燃材料附近操作电动工具。放置于易燃表面
(如木材)上时,请勿操作该电动工具。火星可能会点燃
这些材料。
n )
不要使用需用冷却液的附件。用水或其他冷却液可能会
导致触电或电击。
反弹和相关警告
反冲是因卡住或缠绕住的旋转砂轮产生的突然反作用力。卡住或
缠绕会引起旋转轮的迅速堵转,随之使失控的切割装置被向上推
往操作员。
例如,如果砂轮被工件缠绕或卡住,伸入卡住点的砂轮边缘可能
会进入材料表面而引起砂轮爬出或反弹。在这些条件下砂轮也可
能会碎裂。
反弹是由于电动工具使用不当和/或不正确的操作工序或环境造
成的,采取以下适当的预防措施可避免反冲现象:
a )
保持紧握电动工具,使您的身体和手臂处于正确状态以
抵抗反冲力。如果采取合适的预防措施,操作员就可以控
制向上的反弹力。
b )
身体不要对着旋转的砂轮。如 果 发 生 反 冲 ,则 会 将 切 割 装
置向上推往操作员。
c )
请勿附接周边间隙超过
10
毫米或带有齿形锯片的锯
条、木雕锯片、节状金刚轮。此类锯片会产生频繁的反弹
和失控。
d )
不要“挤压”砂轮或对其施加过大的压力。不要试图切割
过深。对砂轮过度施压会增加负载,使砂轮在切割时更容
易扭曲或卡住,而且还会增大反冲或砂轮爆裂的可能性。
e )
当砂轮被卡住或因任何原因而中断切割时,请切断电动工
具的电源并握住切割装置不动,直到砂轮完全停止。切勿
试图在砂轮仍在运行时使砂轮脱离切割体,否则会发生
反冲。检查并采取纠正措施以消除导致砂轮卡住的因素。
f )
不能在工件上重新启动切割操作。让砂轮达到全速后再
小心地重新进入切割。如果在工件上重新启动电动工具,
砂 轮 可 能 会 卡 住 、爬 升 或 反 冲 。
g )
为任何超大工件提供支撑可最大程度地降低砂轮卡住
和反冲的风险。大 工 件 容 易 因 自 身 的 重 量 而 下 陷 。必 须
在工件下方靠近切割线处和砂轮两侧近工件边缘处放置
支撑物。

12
简体中文
5
简体中文
型材切割机附加安全警告
•
操作中,避免撞击圆盘刀或其它粗暴操作。如发生这种情况,
请停止操作并检查圆盘刀。
•
操作人员和圆盘刀成一条直线时请勿操作工具。并让其他人
员离开工作区域。
•
要注意那些切割下来的碎屑和被切掉的材料。它们可能非常
尖锐和灼热。先让切割零件冷却,然后再搬运。
•
使用期间火花偏转板会变热。操作完成后,不要马上触摸或调
整火花偏转板。
•
关闭工具电源并等待圆盘刀停止,然后再移动工件或更改设置。
•
关闭电源后,严禁通过按压圆盘的侧面停止圆盘刀。
•
不要使用切削液。这些液体可能会燃烧或引起电击。
•
检查是否正确支撑住了工件。
•
只能使用制造商推荐的圆盘刀。请勿将工具用于其非限定用
途;例如,不得使用圆锯片切割树枝或原木。
•
允许的圆盘刀最大速度必须始终等于或大于铭牌上指定的工
具空载速度。
•
请勿使用尺寸不符合
技术参数
中介绍的圆盘刀。
•
阅读锯轮制造商提供的操作说明。
•
使用前,确保正确安装和紧固砂轮。
•
让工具在安全位置至少空载运行
30
秒 。如 果 有 明 显 振 动 或 发
生任何其他问题,请停止操作并进行检查以确定原因。
•
请勿使用圆盘刀进行侧面研磨。
•
请勿切割混凝土、砖、瓦或陶瓷材料。
•
请勿切割木材、塑料或合成材料。
•
请勿切割铸铁材料。
•
严禁切割镁材料。
•
请勿切割通电材料。
•
在通风良好的区域使用此工具。请勿在易燃液体、气体或粉尘
附近使用本工具。切割或电弧马达电刷产生的火花或灼热的
碎屑可能引燃易燃材料。
•
在灰尘多的条件下工作时,请定期清洁通风槽。如果需要清洁
通风槽,请始终使用软刷;并记住先拔下电源插头。
•
始终将圆盘刀存放在保护良好和干燥的地方,不要让儿童碰到。
•
检查受损部件。进一步使用工具前,损坏的护罩或其他部件应
仔细检查,以确定其是否可正确操作并执行其预期功能,即检
查运转部件是否有任何安装偏差或卡住、零件是否破损,以及
是否有其他可能影响电动工具操作的状况。损坏的护罩或其
他部件应交由经授权的服务中心进行适当修理或更换。
剩余风险
•
使用这些机器时具有下列风险:
-
接触旋转部件造成的伤害
-
切割片破裂造成的伤害。
•
这些 危险最常见于:
-
在操作范围内。
-
在旋转机器部件范围内。
•
尽管遵守了相关的安全法规并采用了安全装备,某些剩余风
险仍然是无法避免的。这些风险包括:
-
听力损伤。
-
旋转切割片的未遮盖部件造成的事故风险。
-
更换锯片时的受伤风险。
-
打开护罩时夹伤手指的风险。
电气安全
电机只适用一种工作电压。请务必检查电源电压是否与铭牌上的
电压一致。
您的
DeWALT
工具依据
IEC62841
标准设置双重绝缘;
因此无须接地线。
警告:
115 V
装置必须通过故障保险隔离变压器操作,在
初级绕组和次级绕组之间使用接地屏蔽。
若 电 源 线 损 坏 ,必 须 交 由
DeWALT
维修部门采用专门制备的电线
进行更换。
使用延长线
如需使用延长电缆,请使用与本工具的输入功率(见
技术参数
)
匹配的经检验
3
芯 延 长 线 。最 小 导 体 尺 寸 为
1
.
5
平 方 毫 米 ,最 大
长度为
30
米。
使用电缆卷筒时,请务必拉出所有的电缆。
包装内的物品
包装内的物品包括:
1
只
型材切割机
1
只
砂轮
1
只
六角扳手
1
本
说明手册
•
检查工具、部件或附件是否在运输过程中损坏。
•
操 作 前 ,请 抽 空 仔 细 阅 读 并 掌 握 本 手 册 。
工具上的标记
工具上印有下列图形:
使用前请阅读使用手册。
请佩戴听力保护器。
请佩戴护目装备。
孔径
旋转方向
日 期 码 位 置( 图
A
)
日期码
18
印 在 工 具 外 壳 上 ,其 中 还 包 含 制 造 年 份 。
示例:
2019 XX XX
制造年份
说 明( 图
A
)
警告:切勿改装电动工具或其任何部件,否则可能会导致
损坏或人身伤害。
1
锁定销
2
火花偏转板螺钉
3
火花偏转板
4
底座
5
挡板
6
台钳
7
8
毫米六角扳手
8
曲柄

13
简体中文
6
简体中文
9
台钳拨杆
10
砂轮
11
防护罩
12
主轴锁
13
锁定触发开关
14
锁止杆
15
挡板螺栓
16
安装孔
17
操作手柄
18
日期代码
19
搬运手柄
设计用途
您的
D28730
型材切割机设计用于切割各种形状的钢材。仅适用
于增强型固结研磨产品。钻石或
TCT
锯片不应与本机一起使用。
请勿在潮湿环境中或在易燃液体或气体存在的环境中使用本工具。
D28730
型材切割机是专业电动工具。
请勿让儿童接触本工具。缺乏经验的操作员需要在监督下使用本工具。
•
儿童和体弱者。在没有他人监督的情况下,儿童或体弱者不适
宜使用本产品。
•
本产品不适合体力、感官或智力不足以及缺乏经验、知识或技
能的人员(包括儿童)使用,除非一旁有能为他们的安全负责
的监督人员。不得在无人监管的情况下让儿童接触本产品。
组装与调整
警告:为降低严重的人身伤害风险,在进行任何调整或取
出
/
安装附件或配件之前,请关闭工具电源和断开工具电
源连接。请确保触发开关处于
OFF
( 关 闭 )位 置 。意 外 启
动可能会导致人身伤害。
切割能力
宽台钳开口和高枢轴点可切割许多大型工件。参照切割能力图表
确定使用新砂轮可实现的总体最大切割尺寸。
警示:某些大型的圆形或不规则形状物体如果不能使用
台钳安全固定,则可能需要额外的固定方法。
警示:切勿使用此工具切割镁、木材,砖块或混凝土。
工件形状
A
A
A
A
B
A
A
90°
切割角度
A = 125
毫米
A = 115
毫米
115
毫米 x
130
毫米
120
毫米
45°
切割角度
A =
115
毫米
A = 98
毫米
95
毫米
x 105
毫米
105
毫米
操作
使用说明
警告:务必遵守安全指示和适用法规。
警告:为降低严重的人身伤害风险,在进行任何调整或取
出/安装附件或配件之前,请关闭工具电源和断开工具电
源连接。请确保触发开关处于
OFF
( 关 闭 )位 置 。意 外 启
动可能会导致人身伤害。
正 确 的 手 持 方 式( 图
A
)
警告:为降低严重人身伤害的风险,请务必使用正确的手
持方式,如图所示。
警告:为降低严重的人身伤害风险,请务必紧握工具以防
止出现突然的反作用力。
正确的手持位置是一只手握住操作手柄
17
。
搬 运( 图
A
)
向下折叠到位,以便搬运型材切割机。推入锁定销
1
以锁定臂。
务必使用搬运手柄
19
以搬运切割机。
解 锁( 图
A
)
要解锁工具并抬高工具头,请轻轻按下电机臂然后拉出锁定销
1
。
电机臂会沿枢轴向上转动。
安 装( 图
A
)
警示:必须在稳定、水平、防滑表面上支撑工具,防止在操
作时意外移动。
1.
在工作表面上钻孔,使型材切割机底座对齐。
2.
将两个
M10
螺栓穿过底座中的安装孔
16,然 后 穿 过 安 装 表
面中的孔。螺钉的长度大约是安装表面的厚度加
102
毫米。
火花偏转板调整(图
A
)
警告:请勿在操作期间或之后触摸火花偏转板,因为它将
变热并可能导致皮肤灼伤。
如需尽可能偏转火花以远离周围的人员和材料,请拧松火花偏转
螺钉
2 ,调 整 火 花 偏 转 板
3,然 后 重 新 拧 紧 螺 钉 。避 免 电 线 组 件
接触偏转板或火花,否则可能损坏偏转板。
锁 定 触 发 开 关( 图
A
)
如 需 开 启 电 锯 ,请 将 锁 止 杆
14
推至左侧,然后按下锁定触发开
关
13。按下开关时,电锯将运行。切割前,请使锯片加速至全速。
如需关闭电锯,请释放触发开关。确保双手和材料远离砂轮,直到
砂轮惯性旋转至停止。在抬起锯头之前先等待锯片停止运行。本
工具不可锁定为开启状态。
材料夹紧和支撑(图
B
,
C
)
•
最好的夹紧和切割角度是两个脚架稳固支撑在底座上。
•
垫块
29
比工件
30
稍 窄 ,可 增 加 砂 轮 利 用 率( 图
B
)。
•
长工件必须用垫块
31
支撑以便与底座顶部持平(图
C
)。
切割端
32
应可自由下落以避免砂轮卡住。
台 钳 操 作( 图
A
,
D
)
台钳具备快速移动功能。要松开夹紧的台钳
6,请 将 曲 柄
8
按逆
时针方向旋转一到两次以移除夹紧压力。抬起台钳拨杆
9。将 曲
柄组件向外拉至最远处。台钳可在不使用曲柄的情况下推进到工
件上。放下台钳拨杆,然后通过曲柄使用台钳紧固工件。
挡 板 操 作( 图
A
、
D
、
E
)
警告:在进行任何调整或者取出或安装附件或配件之前,
请关闭工具的电源并拔下插头。请确保触发开关处于
OFF
(关 闭 )位 置 。
挡板
5
的调整方法有两种:更改所需的切割角度以及更改挡板和
台钳之间的间距。
更改所需的切割角度
使用随附的
8
毫米六角扳手
7
拧松(请勿移除)两颗挡板螺栓
15 。将 所 需 的 角 度 指 示 线 与 底 座
4
上的插槽线
28
对 齐 。使 用 前
拧
紧两颗挡板螺栓。要实现更精确的直角尺切割,请断开电源连
接,拧松两颗挡板螺栓,然后向下推机臂直到砂轮深入底座。紧靠
砂轮放置直角尺,然后根据直角尺调整挡板。使用前拧紧两颗挡
板 螺 栓 。进 行 斜 角 切 割 时 ,台 钳
6
可 能 不 会 夹 紧 ,具 体 取 决 于 工 件
的厚度和斜角角度。进行这些切割时,需要使用其他辅助工具(如弹
簧夹、杆夹或
C
形夹)以将工件固定到挡板上。

14
简体中文
7
简体中文
移 除 和 安 装 砂 轮( 图
F
、
G
)
警告:为降低严重的人身伤害风险,在进行任何调整或移
除
/
安装配件或附件之前,请关闭工具电源和断开工具电
源连接。请勿在砂轮旋转时进行任何调整。请勿在型材切
割机插入电源时进行任何调整。
警告:处理砂轮时务必戴上手套。
警告:请勿撞击砂轮,也请勿使用已经掉落或经过撞击的
砂轮。请勿使用破损,变形或损坏的砂轮。
1.
推入主轴锁
12
并手动旋转砂轮
10 ,直 到 砂 轮 锁 定 杆 和 内
部法兰
20
上的插槽接合以锁定砂轮。使用
8
毫米六角扳
手
7
按逆时针方向拧松研磨砂轮中心的螺栓
21 。螺 栓 具 有
右旋螺纹。
2.
移除螺栓
21 、垫 圈
22 、外 部 法 兰
23
和旧砂轮
10 。
3.
确保法兰表面干净平整。按照以上相反步骤安装新研磨砂
轮。
4.
为了安全操作,请牢固地拧紧螺栓
21 ,将 砂 轮
10
牢牢固定
在内法兰
20
和外法兰
23
之 间 。请 勿 过 度 拧 紧 螺 栓
21 。
警告:更换新研磨砂轮时检查放置型材切割机的工作表
面。机臂完全放下时,砂轮可能会接触工作表面(底座下)
的突出部分或任何突出物体。
更精确切割的操作提示
•
让砂轮自行切割。用力过度会导致砂轮变光滑,从而降低切割
效率和
/
或偏转,造成切割不精确。
•
正确调整挡板角度。
•
确保材料平坦放置在底座上。
•
正确夹紧材料,避免移动和振动。
电 机 电 刷 检 查 和 更 换( 图
H
,
I
)
检查电刷前务必确保已拔除电源插头。应定期检查电刷是否磨
损。要检查电刷,请拧松两颗端盖板螺钉
24
然后移除端盖板
25。在 卸 下 每 个 电 刷
26
之 前 ,请 先 拔 下 分 流 线
27
端口连接。
然后小心地将电刷弹簧从电刷盒中取出并移除电刷。电刷应可
在电刷盒中自由滑动。如果电刷磨损到如图
I
所示的
8
毫 米 ,则
应更换。
在重新安装每个电刷之前,请小心地将弹簧从电刷盒中取出,插入
电刷并装回弹簧,以确保弹簧固定住电刷而不会接触到电刷盒。
重新连接分流线端口,然后更换端盖和两个螺钉。
维护
DeWALT
电动工具设计精良,可以长期使用,而且只需最少的维护。
要持续获得令人满意的工作效果,需要进行合适的工具维护和定
期清洁。
警告:为降低严重的人身伤害风险,在进行任何调整或取
出/安装附件或配件之前,请关闭工具电源和断开工具电
源连接。请确保触发开关处于
OFF
( 关 闭 )位 置 。意 外 启
动可能会导致人身伤害。
润滑
操作时使用封闭类型的油脂密封滚珠轴承。这些轴承在出厂时具
有足够的润滑度,可支撑型材切割机的整个使用寿命。
清洁
警告:一旦看到通风口及其周围积聚了尘屑,请用干燥的
空气将灰尘和尘屑从主机外壳内吹出。执行此过程时,需
戴上经认可的护目装备和防尘面具。
警告:
切勿使用溶剂或其他刺激性化学制品来清洁工具的非
金属部件。这些化学物质可能会削弱这些部位使用的材料。
请用布蘸温和的肥皂水擦拭。切勿让任何液体渗入工具,切
勿让工具的任何部件浸在液体中。
可选配件
警告:除了
DeWALT
提供的附件之外,其他附件都未经
此 产 品 兼 容 性 测 试 ,若 将 此 类 附 件 与 本 工 具 一 起 使 用 将
存 在 安 全 隐 患 。为 降 低 人 身 伤 害 风 险 ,本 产 品 只 可 使 用
DeWALT
推荐的附件。
请向您的经销商咨询更多关于合适附件的信息。
根据标准
EN12413
针对固结研磨产品的安全要求,请仅使用额定
值为
4100 rpm
或更高的高强度
1
型有机固结砂轮。
保护环境
分类回收。由此符号标记的产品和电池不得与普通家庭
垃圾一起处理。
产品和电池包含可恢复或回收的材料,从而降低对原材
料的需求。请根据当地供给回收电子产品和电池。要获
得更多信息,请参看
www
.2helpU.com 。

15
繁體中文
繁體中文
3
恭 喜!
感謝您選購
DeWALT
工具。憑藉多年的經驗、完善的產品開發與創
新,
DeWALT
已成為專業電動工具使用者最可靠的合作夥伴之一。
台灣上市之
DeWALT
產品規格、技術資料和訊息,以繁體中文說明
為 主。
技術資料
D28730
電壓 伏特
交流
110
輸入功率 瓦特
2300
空載轉速 轉/分
4000
切盤最低圓周速度
m
/
s 80
切盤直徑 公釐
355
切盤孔徑 公釐
25.4
切盤厚度 公釐
3.0
軸心螺紋尺寸
M10
切 盤 類 型 平 直 式、非 隱 藏 式
90
。
橫切範圍
圓形
公釐
125
方形
公釐
115 x 115
矩形
公釐
115 x 130
尖角形
公釐
120 x 120
45
。
�
橫切範圍
圓形
公釐
115
方形
公釐
98 x 98
矩形
公釐
95 x 105
尖角形
公釐
105 x 105
重量
kg
15.5
定義:安全指南
以下定義描述了每一個詞彙的嚴重程度。請閱讀本手冊並注意這
些符 號。
危 險:表示緊急危險狀況,若未能避免,將導致死亡或
嚴重傷害。
警 告:表示潛在危險情況,若未能避免,可能導致死亡或
嚴重傷害。
小 心:表示潛在危險情況,若未能避免,可能導致輕微或
中度傷害。
注 意:表示一種非人身傷害的 行為,若 未 能 避 免,可能導
致財產損失。
表示觸電危險。
表示火災危險。
金屬切斷機
D28730
電動工具一般安全警告
警 告:請閱讀本電動工具隨附的所有安全警告、指示、圖
示和規格。不遵循下列的所有指示可能會導致觸電、火災
及 / 或 嚴 重傷 害。
請妥善保存所有警告及指示
以備將來查閱
警告中的名詞「電動工具」是指電源驅動(插電)電動工具,或者
電池驅動(充電)電動工具。
1)
工作場地安全
a )
請 保 持工作 場 地 清 潔 明 亮。雜亂或黑暗的場地會引發
事 故。
b )
不要在易爆環境,如有易燃液體、氣體或塵埃的環境中
操 作 電 動 工 具。電動工具產生的火花可能會引燃粉塵或
煙 霧。
c )
請等待兒童和旁觀者離開之後才操縱電動工具。分心會
導致 您 疏 於控 制。
2)
電氣安全
a )
電動工具插頭必須與插座相符。切勿以任何方式改裝插
頭。需 接 地 的 電 動工 具 不 能 使 用 任 何 配 接 器 插 頭。未經
改裝的插頭和相符的插座可以減少觸電危險。
b )
避免人體接觸接地表面,如管道、散熱片、爐灶和冰箱。
若 您 的 身 體 接 地,會 增 加 觸 電 危 險。
c )
不得將電動工具暴露在雨中或潮濕環境中。水進入電動
工具會 增加 觸 電 危險。
d )
請勿濫用電線。請勿使用電線來搬運、拉動電動工具或
拔出插頭。讓電線遠離熱、油、銳邊和活動部件。受損或
纏 繞 的 電 線 會 增 加 觸 電 危 險。
e )
若要在戶外使用電動工具,請使用適合戶外使用的延長
電 線。使用適合戶外使用的電線可減少觸電危險。
f )
若必須在潮濕場合使用電動工具,請使用接地漏電斷路
器
GFCI
。使用
GFCI
可 降 低觸 電 危 險。
3)
人身安全
a )
保持警覺;在操作電動工具時,請留意所執行的操作並
按照一般的常識執行。請勿在疲倦,或受到藥物、酒精或
治療的影響下操作電動工具。操作電動工具期間注意力
分散會導致嚴重人身傷害。
b )
使 用 個 人防 護 裝置。始 終佩 戴 護 目 裝 置。防護裝置,例如
在適當條件下使用的防塵面具、防滑安全鞋、安全帽或聽
力保護等裝置可減少人身傷害。
c )
避免意外啟動。在連接至電源及/或電池組、拾起或搬運
工具之前,請確保開關處於關閉位置。若搬運電動工具時
將手指放在開關上,或者在電動工具開關開啟時將插頭插
入電 源 插 座,這 兩 種 行 為 都 會 引 發 事 故。
d )
啟動電動工具之前,請卸下所有的調整鑰匙或扳手。遺留
在電動工具旋轉部件上的扳手或鑰匙會導致人身傷害。
e )
不要過度伸張雙手。時刻注意腳下與身體的平衡。如此
即可在發生意外的情況下更好地控制電動工具。

16
繁體中文
4
繁體中文
f )
適當穿著。請勿穿寬鬆衣服或佩戴飾品。讓頭髮、衣服
和手套遠離活動部件。寬 鬆 衣 服、佩 飾 和長 髮 可能會 捲
入活動部件。
g )
若配備用於連接排屑裝置和集塵設備的裝置,請確定正
確 連 接 和 使 用 這 些 裝 置。使用集塵設備可減少與粉塵有
關的危險。
h )
請勿因頻繁使用而對工具特別熟悉,讓你變得自滿而
忽略工具的安全原 則。粗心操作可以在片刻間造成嚴重
傷 害。
4)
電動工具的使用與注意事項
a )
請勿超負荷使用電動工具。請根據您的應用使用正確的
電 動 工 具。若使用的電動工具正確無誤,該工具能以設計
額 定值 更 有 效、更 安 全 地 執 行 工 作。
b )
若開關不能開啟或關閉電源,請勿使用該電動工具。若
開關無法控制電動工具,則電動工具存在危險,必須予
以 維 修。
c )
在執行任何調整、更換配件或儲存電動工具之前,必須
從電源上拔掉插頭及
/
或電池組(若可卸下)。這類防護
性措施可降低電動工具意外啟動的風險。
d )
將閒置的電動工具儲存在兒童無法接觸的地方,並且不
要讓不熟悉電動工具或對這些使用指示不瞭解的人員
操 作 電 動 工 具。電動工具在未經培訓的使用者手中會發
生 危 險。
e )
維護電動工具。檢查活動部件是否對準或卡住、破損情
況以及是否存在影響電動工具運行的其他情況。若有損
毀,必 須 在 使 用 之 前 修 理 電 動 工 具。許多事故都是由於電
動工具欠缺維護所導致。
f )
保 持 切 削 工 具鋒 利 和 清 潔。妥善維護的帶利刃的切削工
具不會輕易卡住並可更輕鬆控制。
g )
在使用電動工具、配件及刀頭等部件時,請遵循上述指
示,並將工作條件與要執行的工作考慮在內。不按照設計
目的 使 用電 動 工 具會 導 致 危 險。
h )
手柄和抓握表面都應保持乾燥、清潔及遠離油脂。光滑
手柄和抓握表面不便於在意外情況下對工具進行安全處
理 與 控 制。
5)
檢修
a )
本電動工具必須由合格的維修人員並只採用相同的原廠
零件來執行檢修。這 將 確 保電 動 工 具 的 安 全性。
切斷機之安全指示
1)
切斷機之安全警告
a )
保持身體遠離旋轉砂輪的平面,並且勿使旁觀者靠近。
防護罩有助於保護操作人員免於受到爆裂砂輪碎片和意
外觸及砂輪的危險。
b )
電動工具僅可使用黏合加強或金剛切割砂輪。就算配件
可 裝 到 電 動 工 具 上,這 並不 代 表 它 能 確 保 安 全 操 作。
c )
配件的額定速度必須至少相等於電動工具上所標示的最
大 速 度。配件以比其額定速度大的速度運行可能會引發
爆裂和飛濺。
d )
砂輪只可用於推薦的用途。例如,不要使用切割砂輪的側
面進行打磨。切割砂輪設計用於圓周打磨,施加到砂輪側
面的側 力可能會 使 其碎裂。
e )
始終為所選砂輪選用未損毀、直徑適合的砂輪凸緣。合適
的砂輪凸緣可支撐砂輪,從而可以減小砂輪破裂的可能性。
f )
配件的外徑與厚度必須在電動工具的額定能力範圍內。
錯誤 尺寸的配件 將 無 法 得 到 充分 保護或控 制。
g )
砂輪和凸緣的軸孔尺寸必須適合電動工具的心軸。砂輪
和法蘭的軸孔若與電動工具安裝件不相配會導致失穩、
過度震動並且可能會引起失控。
h )
請勿使用受損的砂輪。每次使用之前,請檢查砂輪是否
有缺口和裂縫。若電動工具或砂輪跌落,請檢查是否損
毀,或安裝未破損的砂輪。檢查並安裝砂輪後,讓自己
和旁觀者遠離砂輪的旋轉範圍,並讓電動工具以最大
的空載 速 度 運 行 一 分 鐘。受損砂輪一般會在此測試過程
中碎裂。
i )
佩 戴 個 人 防 護 裝 置。根 據 適 用情 況,使 用 面 罩、安 全 護目
鏡或防護眼鏡。適用時,佩戴防塵面具、聽力保護器、手
套及能阻擋細小磨料或工件碎片的工作圍裙。護目裝備
必須能夠擋住各種操作所產生的飛屑。防塵面具或口罩必
須能夠過濾各種操作所產生的顆粒。長期暴露於高強度
噪音中可能會 使 聽 力受 損。
j )
讓旁觀者與工作場地保持一定安全距離。任何進入工
作場地的人員都必須佩戴個人防護裝置。工件或受損砂
輪的碎片可能會飛出並導致緊靠著操作區域的旁觀者受
到 傷 害。
k )
讓電線遠離旋轉的配件。若 控 制 不 當,電 線 可 能 會 被 切 斷
或纏繞,並可能使您的手或手臂被捲入旋轉砂輪中。
l )
定 期 清 理電 動 工 具 的 通 風口。電動機風扇可將灰塵吸進
機殼,過多的金屬粉塵沉積可能會導致電氣危險。
m )
請勿在易燃材料附近操作電動工具。電動工具放置在易
燃 表 面( 如 木 材 )上 時 , 請 勿 操 作 。火星可能會點燃這些
材料。
n )
請 勿 使 用需要冷卻液的 配 件。用水或其他冷卻液可能會
導致觸電或觸電致死。
反衝和相關警告
反衝是因卡住或纏繞住的旋轉砂輪產生的突然反作用力。卡住或
纏繞會引起旋轉砂輪迅速失速,隨之使失控的切割裝置朝上撞
向 操 作人 員。
例如,若砂輪被工件纏繞或卡住,伸入卡住點的砂輪邊緣可能會
進入材料表面,從而引起砂輪爬出或反衝。在此條件下,砂輪也
可能會碎 裂。
反衝是由於電動工具使用不當及/或不正確的操作程序或條件而
導致,可透過採取下列適當的預防措施而避免:
a )
保持緊握電動工具,調整身體和手臂位置,以應對反衝。
若採取合適的預防措施,操作人員即可以控制向上的反
衝 力。
b )
身體不要與旋轉砂輪呈一條直線。如 果 發 生 反衝,將會 使
切割裝置朝上撞向操作人員。
c )
請勿附接周邊間隙超過
10
公釐或帶有齒形鋸片的鋸
條、木雕鋸片和節狀金剛輪。此類鋸片會產生頻繁的反
衝 和 失 控。
d )
請勿「夾」住砂輪或施加過大的壓力。請勿試圖進行過
深的切割。給砂輪施加過高的應力將增加砂輪在切削時
的 負 載,容 易 纏 繞 或卡 住,而 且 將增 加 反衝 或 砂 輪 爆 裂
的可能 性。
e )
砂輪被卡住或無論因任何原因而中斷切削時,關掉電動
工具並握住切割裝置不動,直到砂輪完全停止。切勿試
圖在砂輪仍然運行時使砂輪脫離切削,否則可能會產生
反衝。檢查並採取矯正措施,以消除砂輪卡住的原因。

17
繁體中文
5
繁體中文
f )
切勿在工件上重新啟動切削操作。讓砂輪達到全速後再
小心地重新進入切削。若電動工具在工件中重新啟動,砂
輪可能會卡住、爬出或反衝。
g )
支撐住任何超大工件以最大限度地降低砂輪卡住和反衝
的風 險。大型工件由於自身重量而有下陷的傾向。必須在
工件靠近切線處及砂輪兩側近工件邊緣處放置支撐物。
切斷機之附加安全警告
•
操作時避免切盤跳動或粗暴操作。如果出現跳動,停止工作,
然 後 檢 查 切 盤。
•
請勿與切盤站在同一直線下操作工具。不可讓其他人員進入
工作 場地。
•
小心切屑和正在被切割的材料。它們可能銳利且高溫。待切下
物料冷卻後再進行處置。
•
使用時火花偏導器將變熱。避免在操作後立即接觸或調整火
花偏導器。
•
移動工具或變更設定前要關閉工具並等待切盤停止運轉。
•
關閉後嚴禁嘗試透過按壓切盤側面來阻止切盤運轉。
•
請勿使用切割液。這些液體可能會燃燒或導致觸電。
•
檢查確保工件支撐牢固。
•
只可使用製造商推薦的切盤。請勿將本工具用於非預期用途;
例如,不得使用圓鋸鋸片切割樹枝或原木。
•
切盤最大允許速度必須等於或高於銘牌上標注的工具空載
速 度。
•
請勿使用不符合
技術資料
所標注尺寸的切盤。
•
閱讀切盤製造商提供的操作說明書。
•
確保在使用前砂輪已正確安裝並緊固。
•
讓工具在空載狀態下在安全位置上運行至少
30
秒。若震 動 明
顯或出現其他問題,停止工具進行檢查,找出原因。
•
請勿使用切盤進行側磨。
•
請勿切割混凝土、磚塊、瓷磚或陶瓷材料。
•
請勿切割木質、塑料或合成材料。
•
請勿切割鑄鐵材料。
•
嚴 禁 切 割 鎂 質 材 料。
•
請勿切割帶電材料。
•
在通風良好的場地使用本工具。請勿在易燃液體、氣體或粉
塵附近操作工具。切割或電弧電動機電刷所產生的火花或熱
碎片可能會引燃易燃材料。
•
在布滿灰塵的環境下工作要經常清潔通風槽。若有必要清潔
通風槽,請務必使用軟布,並首先拔出切斷機的插頭。
•
務必將切盤妥善包裝並儲存在干燥且兒童無法接觸的地方。
•
請檢查受損的零件。在進一步使用工具前,應仔細檢查受損的
防護罩或其他零件,以確定其是否能正確運作並執行預期功
能,即檢查運動的零件是否對齊、運動的零件是否卡住、零件
是否有破損、是否已固定以及是否存在可能影響運作的其他
狀況。應正確修理或更換受損的防護罩或其他零件。
剩餘風險
•
使 用 此 類 機 器 有以下 固 有危 險:
ʵ
接觸旋轉部件造成的傷害。
ʵ
停止切盤轉動導致的傷害。
•
以下這些危險最為常見:
ʵ
進入運行範圍
ʵ
進入機器旋轉部件的範圍
•
即使應用有關的安全規定並採用安全設備,仍然還有一些無
法避免的剩餘風險。此類風險包括:
ʵ
聽 力受損。
ʵ
旋轉切盤未遮蔽部件導致的事故危險。
ʵ
更 換 切 盤 時 的 傷 害 危 險。
ʵ
開啟防護裝置時夾傷手指的危險。
電氣安全
電動機只適用一種電壓。請務必檢查電源電壓是否與銘牌一致。
DeWALT
工具根據
IEC62841
進 行 雙 重 絕 緣,因 此 不 需
要使 用接 地 線。
警 告:
115
伏特裝置必須透過失靈安全隔離變壓器運作,
在初級繞組和次級繞組之間使用接地屏蔽。
若電源線損壞,必須使用
DeWALT
維修機構提供的專用電線進
行 更 換。
使用延長電纜
若需要使用延長電纜,請使用適合本工具功率輸入的認證
3
芯延
長 電 纜( 請 參 閱
技術資料
)。導電體的最小橫截面積為
1
.
5
平分公
釐;最 大長 度 為
30
米。
使用電纜捲筒時,每次必須把電纜完全展開。
套裝內的物件
本 套 裝 包 括:
1
部
金屬切斷機
1
個
砂輪
1
個
六角扳手
1
本
使用手冊
•
檢查工具、部件或配件有否在運送途中損壞。
•
操作前,請抽空徹底地閱讀和掌握本手冊的內容。
工具上的標誌
工 具 上會 附 帶 下 列 圖 示:
使用前請閱讀使用手冊。
請佩戴聽力保護器。
請 佩 戴 護目鏡。
盤孔直徑
旋轉方向
日 期 代 碼 位 置( 圖
A
)
日期代碼
18,包 括 製 造 年 份,已 經 印 刷 在 工 具 外 殼 上。
範 例:
2019 XX XX
製造年份

18
繁體中文
6
繁體中文
說 明( 圖
A
)
警 告:切勿改動本電動工具或其任何部件。否則可能導致
損壞或人身傷害。
1
鎖銷
2
火花偏導器螺絲
3
火花偏導器
4
底座
5
擋板
6
夾具
7
8
公釐六角扳手
8
曲柄
9
夾具水平支架
10
砂輪
11
防護罩
12
軸心鎖
13
鎖定觸發開關
14
鎖定桿
15
擋板螺栓
16
安裝孔
17
操作手柄
18
日期代碼
19
搬運手柄
設計用途
D28730
金屬切斷機設計用於切割各種形狀的鋼材。本工具僅設計
用於與加強黏合的研磨產品配合使用。不應將金剛或
TCT
鋸片與
此 裝 置 配 合 使 用。
請勿在潮濕有水或存有易燃液體或氣體的環境下使用本工具。
D28730
金屬切斷機是專業的電動工具。
不要讓兒童接觸本工具。缺乏經驗的操作人員需要在監督下使
用 本 工具。
•
兒童和體弱者。兒童或體弱者在沒有他人監督的情況下不適
宜使用本工具。
•
體力、感覺或智力不足,以及缺乏經驗、知識或技能的人員
(包括兒童)
不 適 合 使 用 本 產 品,除非 一 旁 有 能 為 他 們安 全 負
責的監督人員。請勿讓兒童單獨接觸本工具。
裝配與調整
警 告:為了降低造成嚴重人身傷害的風險,在進行任何調
整或卸下或安裝附件或配件之前,切記關閉工具並斷開
工 具電源。請確保觸發開關處於關閉
(
OFF
)
位 置。意 外啟
動工具可能 會 造 成 傷 害。
切割能力
本工具備有更高的樞軸點、更大的夾具開口,讓它能夠輕易切割
許多大型工件。請參閱切割能力圖表,確定新砂輪能切割的工件
的 最 大 總 尺寸。
小 心:某些大型環狀或形狀不規則的物體,則可能會需要
動 用 更 多 的 夾 具。
小 心:請勿使用本工具來切割鎂質材料、木材、磚塊或
混 凝 土。
工件形狀
A
A
A
A
B
A
A
90°
切割角度
A = 125
公釐
A = 115
公釐
115
公釐
x 130
公釐
120
公釐
45°
切割角度
A = 115
公釐
A = 98
公釐
95
公釐
x 105
公釐
105
公釐
操作
使用說明
警 告:務必遵守安全指示和適用的規則。
警 告:為了降低造成嚴重人身傷害的風險,在進行任何調
整或卸下或安裝附件或配件之前,切記關閉工具並斷開
工 具電源。請確保觸發開關處於關閉
(
OFF
)
位 置。意 外啟
動工具可能 會 造 成 傷 害。
正確的雙手放置位置(圖
A
)
警 告:為降低遭受嚴重人身傷害的風險,務必如圖示那樣
正確 放 置 雙 手。
警 告:為了減低造成嚴重人身傷害的風險,預期有突然反
應時務必 握 緊。
正確的雙手放置位置是將一隻手放在主手柄
17
上。
搬 運( 圖
A
)
將您的裝置折疊至一個可讓您搬運切斷機的程度。推入鎖銷
1
以鎖定電動機移動臂。請務必使用搬運手柄
19
搬 運 切 斷機。
解 鎖( 圖
A
)
要為本工具解鎖並拉高鋸頭,請輕輕按下電動機移動臂並將鎖
銷
1
往外拉。電動機移動臂將向上轉動。
安 裝( 圖
A
)
小 心:工具必須放置到穩固、平坦和防滑平面上以防止在
執行操作時發生意外移動。
1.
在工作表面上鑽孔,使切斷機底座對齊。
2.
將兩顆
M10
螺栓向下插入穿過底座上的安裝孔
16
和安裝
表面上的孔。螺絲的大致長度為安裝表面的厚度再加上
102
公釐。
調 整 火 花 偏 導 器( 圖
A
)
警 告:由於火花偏導器會變熱並可能灼傷皮膚,請勿在操
作期間或操作後立即接觸火花偏導器。
要將火花偏導至別的地方,避免它濺到周圍人員和材料,請擰鬆火
花偏導器螺絲
2 ,調整火花偏導器
3,然 後再 擰 緊 螺 絲。不 要 讓
電源線接觸到火花偏導器或火花,這可能會損壞電源線。
鎖 定 觸 發 開 關( 圖
A
)
若要開啟切斷機,請將鎖定桿
14
推向左邊,然後按下鎖定觸發
開關
13。按下開關時,切斷機將運行。允許鋸片旋轉達到全速後
再進行切割。若要關閉切斷機,請鬆開觸發開關。讓手和材料遠離
砂 輪,直 至 其停止 運 轉。在 抬 起 鋸 頭 之 前,請 等 候 鋸 片停 止。未 提
供將開關鎖定在開啟狀態的裝置。
夾 緊 並 支 撐 材 料( 圖
B
、
C
)
•
用兩個支腳抵住工具底座,即可最好支撐工件進行斜角切割。
•
可使用比工件
30
稍窄的墊塊
29 ,以 增 加 砂 輪 利 用 率( 圖
B
)。
•
長工件必須由墊塊
31
支 撐,好 讓 它能 夠 與 底 座 的 頂 部 呈 水
平 線( 圖
C
)。工 件 的 切 斷 端
32
必 須 能 夠 自 由 向 下 掉 落,避 免
導 致 砂 輪 卡 住。
ページが読み込まれています...
ページが読み込まれています...
ページが読み込まれています...
ページが読み込まれています...
ページが読み込まれています...
ページが読み込まれています...
ページが読み込まれています...
ページが読み込まれています...
ページが読み込まれています...
ページが読み込まれています...
ページが読み込まれています...
ページが読み込まれています...
ページが読み込まれています...
ページが読み込まれています...
ページが読み込まれています...
ページが読み込まれています...
ページが読み込まれています...
ページが読み込まれています...
ページが読み込まれています...
ページが読み込まれています...
ページが読み込まれています...
ページが読み込まれています...
ページが読み込まれています...
ページが読み込まれています...
-
 1
1
-
 2
2
-
 3
3
-
 4
4
-
 5
5
-
 6
6
-
 7
7
-
 8
8
-
 9
9
-
 10
10
-
 11
11
-
 12
12
-
 13
13
-
 14
14
-
 15
15
-
 16
16
-
 17
17
-
 18
18
-
 19
19
-
 20
20
-
 21
21
-
 22
22
-
 23
23
-
 24
24
-
 25
25
-
 26
26
-
 27
27
-
 28
28
-
 29
29
-
 30
30
-
 31
31
-
 32
32
-
 33
33
-
 34
34
-
 35
35
-
 36
36
-
 37
37
-
 38
38
-
 39
39
-
 40
40
-
 41
41
-
 42
42
-
 43
43
-
 44
44


