
STR-DA7100ES 2-320-746-41(1) GB/CT/KR
2-320-746-41(1)
Sony Corporation © 2005 Printed in Malaysia
1: Installing speakers/
1: 安裝揚聲器/
1: 스피커의 설치
STR-DA7100ES
Quick Setup Guide
快速設定指南
빠른 셋업 안내
2: Connecting the speakers/ 2: 連接揚聲器/
2: 스피커의 연결
3: Connecting other components/
3: 連接其他組件/ 3: 기타 기기의 연결
Super Audio CD player/ 超級音訊CD播放機/ 슈퍼 오디오 CD 플레이어
Video components/ 視頻組件/ 비디오 기기
Audio cord (not supplied)/
音頻線(非附件)/
오디오 코드 (별도 구입)
TV monitor/
電視監視器/
TV 모니터
HDMI cable (not supplied)/
HDMI電纜(非附件)/
HDMI 케이블 (별도 구입)
Optical digital cord (not supplied)/
光纖數位線(非附件)/
옵티컬 디지털 코드 (별도 구입)
HDMI cable (not supplied)/
HDMI電纜(非附件)/
HDMI 케이블 (별도 구입)
English
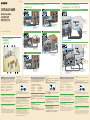
This Quick Setup Guide describes how to connect a Super Audio
CD/CD player, DVD player, TV monitor, speakers, and a sub woofer so
that you can enjoy multi channel surround sound. Refer to the operating
instructions supplied with the receiver for details.
The illustrations in the guide designate speakers as
through
.
Front speaker (L)
Surround speaker (R)
Front speaker (R)
Surround back speaker (L)*
Center speaker
Surround back speaker (R)*
Surround speaker (L)
Sub woofer
1: Installing speakers
The illustrations above show an example of a 7.1 channel speaker
system (seven speakers and one sub woofer) configuration. Refer to the
operating instructions supplied with the receiver and the other side of
this guide.
* The surround back speakers (L/R) are compliant with the 2nd zone operation.
Refer to the operating instructions supplied with the receiver.
2: Connecting the speakers
Connect the speakers according to the number and kind of your
speakers.
About speaker cords
• Use speaker cords, which are appropriate for the width of the room.
• By deciding on the color or mark of the speaker cord to be connected
to the plus (+) or minus (–) connector, you can always be sure of
connecting the cord correctly without mistaking plus or minus.
About speaker jacks
• Connect the
jack to the
jack of the receiver and connect the
jack to the
jack of the receiver.
• Refer to the lower illustration or the operating instructions supplied
with the receiver for details of connecting speaker cords.
• Turn the locking knob until the speaker cord is connected
securely.
About the front speaker switch
You can select the speaker system. Refer to “Selecting the speaker
system” in the operating instructions supplied with the receiver for
details.
3: Connecting other components
This is an example of how to connect this receiver and your
components. Refer to step 3 of “Getting started” of the operating
instructions supplied with this receiver for details on other connections
and other components.
This receiver is equipped with function for converting video signals.
Refer to “Connecting the video components” in the operating
instructions supplied with the receiver.
4: Connect all power cords last
Connect the supplied AC power cord to the AC IN terminal on the
receiver, then connect the AC power cord to a wall outlet.
The configuration, shape, and number of AC outlets vary according
to the area code. Refer to “Connecting the AC power cord” in the
operating instructions supplied with the receiver.
Audio cord (not supplied)/
音頻線(非附件)/
오디오 코드 (별도 구입)
Speaker cord (not supplied)/
揚聲器線(非附件)/
스피커 코드 (별도 구입)
Speaker cord (not supplied)/
揚聲器線(非附件)/
스피커 코드 (별도 구입)
Speaker cord (not supplied)/
揚聲器線(非附件)/
스피커 코드 (별도 구입)
DVD player/
DVD播放機/
DVD 플레이어
Speaker cord (not supplied)/
揚聲器線(非附件)/
스피커 코드 (별도 구입)
中文
本快速設定指南說明如何連接超級音訊CD/CD播放機、DVD播放
機、電視監視器、揚聲器以及超低音揚聲器,以便享受多聲道環
繞音效。詳情請參考收音擴大機所附的操作說明。
指南中的圖解以
至
來稱呼揚聲器。
前方揚聲器(L)
環繞揚聲器(R)
前方揚聲器(R)
後方環繞揚聲器(L)*
中央揚聲器
後方環繞揚聲器(R)*
環繞揚聲器(L)
超低音揚聲器
1: 安裝揚聲器
上圖顯示的是7.1 聲道揚聲器系統(七支揚聲器和一支超低音
揚聲器)的配置範例。請參考收音擴大機所附的操作說明以及本
指南的另一面。
* 後方環繞揚聲器(L/R)符合第二區的操作。請參考收音擴大機的操作說
明。
2: 連接揚聲器
請根據您的揚聲器數目和種類連接揚聲器。
關於揚聲器線
• 請使用適合房間寬度的揚聲器線。
• 根據揚聲器線上的顏色或標誌決定要連接在正極(+)或負極
(-)接頭,便可以正確的連接揚聲器線而不會把正負極搞錯。
關於揚聲器插孔
• 將
插孔連接到收音擴大機的
插孔,而將
插孔連接到收音擴
大機的
插孔。
• 關於連接揚聲器線的詳情,請參考下圖或收音擴大機所附的操作
說明。
• 轉動固定旋鈕直到揚聲器線穩固的連接上去為止。
關於前方揚聲器切換開關
您可以從選擇揚聲器系統。詳情請參考收音擴大機所附的操作
說明中的“選擇揚聲器系統”。
3: 連接其他組件
這是一個連接本收音擴大機和您的組件的範例。關於其他連接
方式和其他組件的詳情,請參考本收音擴大機所附的操作說明中
的“簡介”的步驟3。
本收音擴大機配備有轉換視頻訊號的功能。請參考收音擴大機
所附的操作說明中的“連接視頻組件”。
4: 最後連接所有電源線
將所附的交流電源線連接到收音擴大機上的AC IN端子,然後
將交流電源線連接到牆上的電源插座。
交流電源插座的配置、形狀和數目會因為區碼而有所不同。請
參考收音擴大機所附的操作說明中的“連接交流電源線”。
한국어
본 빠른 셋업 안내는 멀티 채널 서라운드 사운드를 즐길 수 있도
록 슈퍼 오디오 CD/CD 플레이어, DVD 플레이어, TV 모니터, 스
피커 및 서브우퍼의 연결 방법을 설명합니다. 자세한 사항은 리시
버의 사용 설명서를 참조하여 주십시오.
안내의 그림에서는 스피커를
에서
로 지정합니다.
전면 스피커 (L)
서라운드 스피커 (R)
전면 스피커 (R)
서라운드 후면 스피커 (L)*
중앙 스피커
서라운드 후면 스피커 (R)*
서라운드 스피커 (L)
서브우퍼
1: 스피커의 설치
위의 그림은 7.1 채널 스피커 시스템 (7 대의 스피커와 한 대의
서브우퍼) 구성의 예를 보여줍니다. 자세한 사항은 리시버의 사
용 설명서와 본 안내의 다른 부분을 참조하여 주십시오.
* 서라운드 후면 스피커 (L/R)는 2차 영역 작동에 대응합니다. 자세한 사
항은 리시버의 사용 설명서를 참조하여 주십시오.
2: 스피커의 연결
스피커의 수와 종류에 따라 스피커를 연결하여 주십시오.
스피커 코드에 관하여
• 방의 넓이에 적절한 길이의 스피커 코드를 사용하여 주십시오.
• 플러스 (+) 또는 마이너스 (-) 커넥터에 연결할 스피커 코드
의 색깔 또는 마크를 정함으로써 플러스 또는 마이너스의 실수
없이 항상 정확하게 코드를 연결할 수 있습니다.
스피커 잭에 관하여
• 스피커의
와
잭을 리시버의
와
잭에 각각 연결하여
주십시오.
• 스피커 코드의 연결에 관한 자세한 사항은 아래의 그림 또는 리
시버의 사용 설명서를 참조하여 주십시오.
• 스피커 코드가 확실하게 연결될 때가지 잠금 손잡이를 돌려 주
십시오.
전면 스피커 스위치에 관하여
스피커 시스템을 선택할 수 있습니다. 자세한 사항은 리시버의 사
용 설명서에서 "스피커 시스템의 선택"을 참조하여 주십시오.
3: 기타 기기의 연결
이것은 본 리시버와 구성 기기를 연결하는 방법의 한 예입니다.
기타 기기 및 연결에 관한 자세한 사항은 리시버의 사용 설명서
에 기술된 "시작하기 전에"의 3 단계를 참조하여 주십시오.
본 리시버에는 비디오 신호를 변환하는 기능이 장착되어 있습니
다. 리시버의 사용 설명서에 기술된 "비디오 기기의 연결"을 참조
하여 주십시오.
4: 마지막으로 모든 전원 코드를 연결하
여 주십시오
부속의 AC 전원 코드를 리시버의 AC IN 단자에 연결한 다음에
AC 전원 코드를 전원 콘센트에 연결하여 주십시오. AC 콘센트의
구성, 형상 및 수는 지역 코드에 따라 다릅니다. 리시버의 사용 설
명서에 기술된 "AC 전원 코드의 연결"을 참조하여 주십시오.
10 mm
10 mm
10 mm
Super Audio CD player/
超級音訊CD播放機/
슈퍼 오디오 CD 플레이어

STR-DA7100ES 2-320-746-41(1) GB/CT/KR
English
Setting up the speakers
Set the speakers to obtain the desired sound from all connected
speakers. You can set up the speakers easily just by selecting “The
combination and the number of speakers (speaker pattern) ” which is
designated as the default for this receiver. Set up the speakers according
to the following explanation.
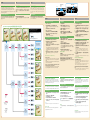
Check your speaker pattern
Check your speaker pattern from the following flow chart
Start following the flow chart on the assumption that front speaker
/
is connected.
English
Setting up the speaker pattern
1 Turn on the receiver.
2 Turn MAIN MENU to select “SPEAKER SET UP.”
Perform the next steps while checking the display in the display
window.
3 Turn MENU to select “SP EASY SET UP.”
4 Turn +/– to select “YES.”
5 Turn MENU to select “SPEAKER PATTERN [
].”
6 Turn +/– to select the speaker pattern, then press
MEMORY/ENTER.
Refer to the “Speaker Setup Diagram.”
Checking whether sound is coming from all speakers
1 Turn MAIN MENU to display the LEVEL menu.
2 Turn MENU to select “TEST TONE,” then turn +/–
clockwise to select “AUTO.”
The test tone is output from each speaker.
3 Adjust the volume to check that the sound is output from
all of the speakers.
You can adjust all of the speakers at the same time, here. Refer to
“8: Adjusting the speaker levels and balance (TEST TONE)” in
the operating instructions to adjust the level and balance of each
speaker.
4 Repeat steps 1 and 2, then turn +/– counter-clockwise.
“TEST TONE [OFF]” appears on the display, and the test tone
stops.
When a test tone is not output correctly
No sound is output.
• The speaker cord may not be connected securely. Connect it securely
so that the speaker cord does not come loose even if you pull the cord
lightly.
• The speaker cord may have shorted. Refer to instructions for speaker
connection of an attached sheet.
Test tone comes out from the different speaker from the speaker
currently displayed on the display window.
• The set-up speaker pattern differs from the connected speaker. Check
the speaker pattern and the connection of the speaker cord again.
Setting up other components
You should set up each component so that take out sound is output
from speakers correctly when you play back a connected component.
The following case describes Sony components. Refer to the operating
instructions supplied with each component.
Sony Super Audio CD player
Select a suitable playback area (multichannel or 2 channel). Sound may
come out from only the front speaker L/R when 2 channel is selected.
Sony DVD player
1 Select “AUDIO SETUP” on the setup display of the DVD
player.
2 Set “AUDIO DRC” to “WIDE RANGE.”
3 Set “DIGITAL OUT” to “ON.”
4 Set “DOLBY DIGITAL” to “DOLBY DIGITAL.”
5 Set “DTS” to “ON” or “DTS.” (Select the setting depending
on the model)
Note
Set up the audio format of the playback disc to listen to multi channel sound.
After the setting
The receiver is now ready to use. Refer to the operating instruction
supplied with the receiver for details.
中文
設定揚聲器
設定揚聲器以便從所有連接的揚聲器獲得您要的聲音。您只要
選擇被指定為本收音擴大機預設值的“揚聲器組合與數目(揚聲
器模式)”,便可以輕鬆的設定揚聲器。請根據下面的解釋設定
揚聲器。
核對您的揚聲器模式
根據下面的流程圖核對您的揚聲器模式
開始按照下面的流程圖進行時,假設已經連接了前方揚聲器
/
。
한국어
스피커의 설정
연결된 모든 스피커로부터 원하는 사운드를 얻을 수 있도록 스
피커를 설정하여 주십시오. 본 리시버의 기본을 지정된 "스피커
의 조합 및 수 (스피커 패턴)"을 선택함으로써 스피커를 간단하
게 설정할 수 있습니다. 다음의 설명을 따라 스피커를 설정하여
주십시오.
스피커 패턴의 확인
다음의 플로 차트로부터 스피커 패턴을 확인하여 주십시오.
전면 스피커
/
가 연결되어 있는 전제 하에 다음의 플로 차트
를 따라 시작하여 주십시오.
/
Window display/
顯示窗/
표시창
MEMORY/ENTER
MAIN MENU MENU +/–
設定其他組件
您應該設定各組件,使得聲音能夠在您播放連接的組件時正確
的從揚聲器輸出。底下的例子說明的是Sony的組件。請參考各組
件所附的操作說明
Sony超級音訊CD播放機
選擇一個合適的播放區域(多聲道或2聲道)。選擇2聲道時,
聲音可能只從前方的揚聲器L/R出來。
Sony DVD播放機
1 選擇DVD播放機設定顯示畫面上的“AUDIO SETUP”。
2 將“AUDIO DRC”設定為“WIDE RANGE”。
3 將“DIGITAL OUT”設定為“ON”。
4 將“DOLBY DIGITAL”設定為“DOLBY DIGITAL”。
5 將“DTS”設定為“ON”或“DTS”。(請根據型號選擇設定)
附註
設定播放光碟的音頻格式以便聆聽多聲道的聲音。
設定之後
現在收音擴大機可以使用了。詳情請參考收音擴大機所附的操
作說明。
기타 기기의 연결
기기를 연결해서 재생할 때 스피커로부터 사운드가 제대로 출력
되도록 연결된 각 기기를 설정해야 합니다. 다음의 설명은 Sony
기기를 연결했을 때의 경우입니다. 그 밖의 기기는 각 기기의 사
용 설명서를 참조하여 주십시오.
Sony 슈퍼 오디오 CD 플레이어
적절한 재생 영역 (멀티채널 또는 2 채널)을 선택하여 주십시오.
2 채널을 선택하면 사운드가 전면 스피커 L/R로만 출력되는 경
우가 있습니다.
Sony DVD 플레이어
1 DVD 플레이어의 설정 화면에서 "AUDIO SETUP"을 선택하
여 주십시오.
2 "AUDIO DRC"를 "WIDE RANGE"로 설정하여 주십시오.
3 "DIGITAL OUT"을 "ON"으로 설정하여 주십시오.
4 "DOLBY DIGITAL"을 "DOLBY DIGITAL"로 설정하여 주십
시오.
5 "DTS"를 "ON" 또는 "DTS"로 설정하여 주십시오.
(모델에 따라 설정을 선택)
주의
멀티채널 사운드를 청취하려면 재생 디스크의 오디오 형식을 설정하여
주십시오.
설정이 완료되면
리시버의 준비가 완료되었습니다. 자세한 사항은 리시버의 사용
설명서를 참조하여 주십시오.
中文
設定揚聲器模式
1 打開收音擴大機。
2 轉動MAIN MENU以選擇“SPEAKER SET UP”。
執行下列步驟同時查看顯示窗上的顯示畫面。
3 轉動MAIN MENU以選擇“SP EASY SET UP”。
4 轉動+/-以選擇“YES”。
5 轉動MENU以選擇“SPEAKER PATTERN[
]”。
6 轉動+/-以選擇揚聲器模式,然後按下MEMORY/ENTER。
請參考“揚聲器設定圖”。
確認聲音是否來自所有揚聲器
1 轉動MAIN MENU以顯示LEVEL選單。
2 轉動MENU以選擇“TEST TONE”,然後順時針方向轉動+/-以
選擇“AUTO”。
測試音會從各支揚聲器輸出。
3 調整音量以便確認聲音從所有揚聲器輸出。
您可以在此同時調整所有揚聲器的聲音。請參考操作說明中
的“8:調整揚聲器的電平和平衡(TEST TONE)”,以調整各
揚聲器的電平和平衡。
4 重複步驟1和2,然後逆時針方向轉動+/-。
“TEST TONE[OFF]”出現在顯示畫面上,測試音停止。
測試音無法正確輸出時
沒有聲音輸出。
• 可能是揚聲器線沒有連接牢靠。牢靠的連接揚聲器線,使得即使
您輕輕拉扯時,揚聲器線也不會鬆脫。
• 揚聲器線可能被短路了。請參考附頁中的揚聲器連接說明。
輸出測試音的揚聲器和顯示窗中目前顯示的揚聲器不一樣。
• 設定的揚聲器模式和連接的揚聲器不一樣。請再度核對揚聲器模
式和揚聲器的連接情形。
한국어
스피커 패턴의 설정
1 리시버의 전원을 켜 주십시오.
2 MAIN MENU를 돌려서 "SPEAKER SET UP"을 선택하여 주
십시오.
표시창의 표시를 확인하면서 다음 단계를 수행하여 주십시오.
3 MENU를 돌려서 "SP EASY SET UP"을 선택하여 주십시오.
4 +/-를 돌려서 "YES"를 선택하여 주십시오.
5 MENU를 돌려서 "SPEAKER PATTERN [
]"을 선택하여
주십시오.
6 +/-를 돌려서 스피커 패턴을 선택한 다음에 MEMORY/
ENTER를 눌러 주십시오.
"스피커 설정도"를 참조하여 주십시오.
스피커로부터의 사운드 출력 확인
1 MAIN MENU를 돌려서 LEVEL을 표시하여 주십시오.
2 MENU를 돌려서 "TEST TONE"을 선택한 다음에 +/-를 시
계 방향으로 돌려서 "AUTO"를 선택하여 주십시오.
각 스피커로부터 테스트 톤이 출력됩니다.
3 음량을 조절해서 모든 스피커로부터 사운드가 출력되는지 확
인하여 주십시오.
여기서 모든 스피커의 레벨을 동시에 조절할 수 있습니다.
사용 설명서의 "8: 스피커 레벨 및 밸런스의 조절 (TEST
TONE)"을 참조해서 각 스피커의 레벨 및 밸런스를 조절하
여 주십시오.
4 1과 2 단계를 반복한 다음에 +/-를 시계 반대 방향으로 돌
려 주십시오.
표시창에 "TEST TONE [OFF]"가 표시되고 테스트 톤의 출
력이 정지됩니다.
테스트 톤이 제대로 출력되지 않을 때는
사운드가 출력되지 않는 경우
• 스피커 코드가 바르게 연결되지 않았을 가능성이 있습니다. 코
드를 가볍게 당겨도 느슨해지지 않도록 스피커 코드를 확실하
게 연결하여 주십시오.
• 스피커 코드가 쇼트되어 있을 가능성이 있습니다. 부속의 시트
에서 스피커의 연결에 관한 지시를 참조하여 주십시오.
현재 표시창에 표시된 것과 다른 스피커에서 테스트 톤이 출력되는
경우
• 설정된 스피커 패턴이 연결된 스피커와 다릅니다. 스피커 패턴
과 스피커 코드의 연결을 다시 확인하여 주십시오.
Speaker Setup Diagram/ 揚聲器設定圖/ 스피커 설정도
Center speaker/
中央揚聲器/
중앙 스피커
,
Surround speaker/
環繞揚聲器/
서라운드 스피커
,
Surround back
speaker/
後方環繞揚聲器/
서라운드 후면
스피커
Sub woofer/
超低音揚聲器/
서브우퍼
Sub woofer/
超低音揚聲器/
서브우퍼
Sub woofer/
超低音揚聲器/
서브우퍼
Sub woofer/
超低音揚聲器/
서브우퍼
Sub woofer/
超低音揚聲器/
서브우퍼
Sub woofer/
超低音揚聲器/
서브우퍼
Sub woofer/
超低音揚聲器/
서브우퍼
Sub woofer/
超低音揚聲器/
서브우퍼
,
Surround speaker/
環繞揚聲器/
서라운드 스피커
,
Surround back
speaker/
後方環繞揚聲器/
서라운드 후면
스피커
provided/
提供/
부속
one of them provided/
提供其中之一/
일부 부속
not provided/
不提供/
별도 구입
Ex) Number of speakers/ 例如)揚聲器的數目/
예) 스피커의 수
Sub woofer/ 超低音揚聲器/ 서브우퍼
Set the following number/ 設定下列數目/
다음의 숫자를 설정하여 주십시오
Typical speaker pattern/
典型的揚聲器模式/
일반적인 스피커 패턴
START/
開始
/
시작
2 units/
2支/
2 유닛
1 unit/
1支/
1 유닛
2 units/
2支/
2 유닛
1 unit/
1支/
1 유닛
-
 1
1
-
 2
2

