STR-DA7100ES 2-320-746-71(1) GB/CS
English
Setting up the speakers
Set the speakers to obtain the desired sound from all connected speakers. You can set up the speakers easily
just by selecting “The combination and the number of speakers (speaker pattern) ” which is designated as
the default for this receiver. Set up the speakers according to the following explanation.
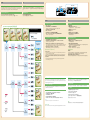
Check your speaker pattern
Check your speaker pattern from the following flow chart
Start following the flow chart on the assumption that front speaker
/
is connected.
English
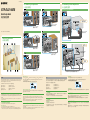
Setting up the speaker pattern
1 Turn on the receiver.
2 Turn MAIN MENU to select “SPEAKER SETUP.”
Perform the next steps while checking the display in the display window.
3 Turn MENU to select “SP EASY SETUP.”
4 Turn +/– to select “YES.”
5 Turn MENU to select “SPEAKER PATTERN [
].”
6 Turn +/– to select the speaker pattern, then press MEMORY/ENTER.
Refer to the “Speaker Setup Diagram.”
Checking whether sound is coming from all speakers
1 Turn MAIN MENU to display the LEVEL menu.
2 Turn MENU to select “TEST TONE,” then turn +/– clockwise to select “AUTO.”
The test tone is output from each speaker.
3 Adjust the volume to check that the sound is output from all of the speakers.
You can adjust all of the speakers at the same time, here. Refer to “8: Adjusting the speaker levels and
balance (TEST TONE)” in the operating instructions to adjust the level and balance of each speaker.
4 Repeat steps 1 and 2, then turn +/– counter-clockwise.
“TEST TONE [OFF]” appears on the display, and the test tone stops.
When a test tone is not output correctly
No sound is output.
• The speaker cord may not be connected securely. Connect it securely so that the speaker cord does not
come loose even if you pull the cord lightly.
• The speaker cord may have shorted. Refer to instructions for speaker connection of an attached sheet.
Test tone comes out from the different speaker from the speaker currently displayed on the
display window.
• The set-up speaker pattern differs from the connected speaker. Check the speaker pattern and the
connection of the speaker cord again.
Setting up other components
You should set up each component so that take out sound is output from speakers correctly when you
play back a connected component. The following case describes Sony components. Refer to the operating
instructions supplied with each component.
Sony Super Audio CD player
Select a suitable playback area (multichannel or 2 channel). Sound may come out from only the front
speaker L/R when 2 channel is selected.
Sony DVD player
1 Select” AUDIO SETUP” on the setup display of the DVD player.
2 Set “AUDIO DRC” to “WIDE RANGE.”
3 Set “DIGITAL OUT” to “ON.”
4 Set “DOLBY DIGITAL” to “DOLBY DIGITAL.”
5 Set “DTS” to “ON” or “DTS.” (Select the setting depending on the model)
Note
Set up the audio format of the playback disc to listen to multi channel sound.
After the setting
The receiver is now ready to use. Refer to the operating instruction supplied with the receiver for details.
/
Window display/
窗口显示
MEMORY/ENTER
MAIN MENU MENU +/–
中文
设定扬声器
设定扬声器,以便从所有连接的扬声器获得理想的声音。只要从本接收机默认设定中指定的“扬声
器组合和数目(扬声器式样)”中进行选择,便可以轻松地设定扬声器。请按照以下说明设定扬声
器。
查看您的扬声器式样
使用下面的流程图查看您的扬声器式样
以连接了前扬声器
/
为前提,开始流程图操作。
Speaker Setup Diagram/ 扬声器设定图
Center speaker/
中央扬声器
,
Surround speaker/
环绕声扬声器
,
Surround back
speaker/
环绕声后扬声器
Sub woofer/
超低音扬声器
Sub woofer/
超低音扬声器
Sub woofer/
超低音扬声器
Sub woofer/
超低音扬声器
Sub woofer/
超低音扬声器
Sub woofer/
超低音扬声器
Sub woofer/
超低音扬声器
Sub woofer/
超低音扬声器
,
Surround speaker/
环绕声扬声器
,
Surround back
speaker/
环绕声后扬声器
provided/
提供
one of them provided/
提供一套
not provided/
未提供
Ex) Number of speakers/ 例)扬声器数
Sub woofer/ 超低音扬声器
Set the following number/ 设定以下号码
Typical speaker pattern/
典型扬声器式样
START/ 开始
2 unit/
2套
1 unit/
1套
2 unit/
2套
1 unit/
1套
中文
设定扬声器式样
1 接通接收机电源。
2 转动MAIN MENU选择“SPEAKER SET UP”。
一边查看显示窗中的显示,一边执行以下各步骤的操作。
3 转动MENU选择“SP EASY SET UP”。
4 转动+/-选择“YES”。
5 转动MENU选择“SPEAKER PATTERN [
]”。
6 转动+/-选择扬声器式样,然后按MEMORY/ENTER。
请参阅“扬声器设定图”。
查看是否所有扬声器均发出声音
1 转动MAIN MENU以显示LEVEL菜单。
2 转动MENU选择“TEST TONE”,然后顺时针转动+/-选择“AUTO”。
从各个扬声器输出测试音。
3 调整音量,检查是否所有扬声器均发出声音。
此时可以同时调整所有扬声器的音量。请参阅使用说明书中的“8: 调整扬声器电平和平衡
(TEST TONE)”对各个扬声器的电平和平衡进行调整。
4 重复步骤1和2,然后逆时针转动+/-。
显示窗中显示“TEST TONE [OFF]”,并且测试音停止。
不能正确输出测试音时
无声音输出。
• 可能没有牢固连接扬声器导线。牢固连接扬声器导线,使其即使在轻微拉扯时也不会松脱。
• 扬声器导线可能发生了短路。请参阅附属说明卡上的指示进行扬声器连接。
发出测试音的扬声器与当前显示窗上显示的扬声器不一致。
• 扬声器设定式样与所连接的扬声器不一致。请再次检查扬声器式样和扬声器导线的连接情况。
设定其它组件
应该对所连接的各个组件进行设定,以便在播放某个连接组件时能够从扬声器正确输出声音。以下
介绍Sony组件的设定方法。请参阅随各组件附带的使用说明书。
Sony超级音频CD播放机
选择适当的播放区域(多声道或2声道)。选择2声道时,声音可能只从左/右前扬声器发出。
Sony DVD播放机
1 在DVD播放机的设定显示中选择“AUDIO SETUP”。
2 将“AUDIO DRC”设定为“WIDE RANGE”。
3 将“DIGITAL OUT”设定为“ON”。
4 将“DOLBY DIGITAL”设定为“DOLBY DIGITAL”。
5 将“DTS”设定为“ON”或“DTS”。(请根据机型选择设置)
注
设定播放光盘的音频格式以收听多声道声音。
设定后
便可以使用接收机。有关详细内容,请参阅随本接收机附带的使用说明书。


 1
1
 2
2

