Bowers & Wilkins 683 S2 取扱説明書

タイプ
取扱説明書

このマニュアルも適しています

www.bowers-wilkins.com
Bowers & Wilkins製品をお買い上げだき
いまBowers & Wilkinsの創業者るJohn Bowersは、
創意に富んだデ革新的な工業技術、先進技術が、
家庭ーデ充分にむ鍵
彼の信念はBowers & Wilkinsで共有の信
念はBowers & Wilkinsが設計すの製品命を吹き込ん
買い上げいただいたカーは、念入な設置行う価値
非常に高性能な製品ご使用る前
お読みい。52ページに
Добро пожаловать и благодарим вас за приобретение
акустики компании Bowers & Wilkins. Наш основатель, Джон
Бауэрс, верил в то, что творческий подход в проектировании,
новаторская конструкция и передовые технологии смогут
открыть людям путь к подлинному звучанию в доме. Мы
продолжаем разделять его веру, и она вдохновляет нас при
проектировании всех новых продуктов.
Эти акустические системы способны на высококачественное
воспроизведение звука, поэтому они заслуживают вдумчивого
подхода к установке, и мы советуем вам уделить некоторое
время на изучение этой инструкции, прежде чем приступить к
прослушиванию. Продолжение на стр. 40
欢迎并感谢您选择Bowers & Wilkins。我们公司的创办人John
Bowers先生相信具有想象力的设计、创新的工程学设计和先进
的技术是开启家庭音响娱乐大门的重要元素。我们依然坚持着他
的信念,并赋予我们所有产品设计灵感。
这是一款高性能产品,在妥当安装后您将获得极佳的音效,
因此我们建议您在开始安装前花一些时间仔细阅读本手册。第46
页继续
Contents
ENGLISH 2
1. Unpacking 4
2. Positioning 5
3. Connections 7
4. Fine Tuning 8
5. Running In 9
6. Aftercare 9
683-684 S2 manual for printer_ALL.indb 3 20/05/2014 09:26
ENGLISH
4
1. Unpacking
Carton Contents
Check in the carton for:
1 Two-part foam plug
1 Plinth
1 Accessory pack containing
4 M6 spike feet
4 Rubber feet
4 Lock nuts (10mm across ats)
1 Accessory pack containing
1 Allen key
4 M6 x 35mm screws
4 Plain washers
4 Shakeproof washers
Environmental Information
This product complies with international directives, including but
not limited to:
i. the Restriction of Hazardous Substances (RoHS) in
electrical and electronic equipment,
II. the Registration, Evaluation, Authorisation and restriction of
CHemicals (REACH)
iii. the disposal of Waste Electrical and Electronic Equipment
(WEEE).
Consult your local waste disposal authority for guidance on how
properly to recycle or dispose of this product.
683-684 S2 manual for printer_ALL.indb 4 20/05/2014 09:26
ENGLISH
5
Speaker Installation
The speakers are intended to be oor mounted only. It is
important to ensure that the speakers stand rmly on the oor
using the spike feet supplied whenever possible. In addition, t
the plinth for proper stability.
You may attach the plinth during the unpacking process, following
the diagrams on the top ap of the carton. Alternatively, you may
attach it after the product has been fully unpacked, by covering
a suitable support such as a table with a cloth and laying the
speaker on its side with the base of the cabinet overhanging the
support. Align the plinth with its attachment holes in the underside
of the cabinet, ensuring that the arrow on the underside of the
plinth points forwards. Secure the plinth using the screws and
washers supplied. Fit the shakeproof washers between the plain
washers and the screw heads. Tighten the screws using the Allen
key supplied.
The spike feet are designed to pierce carpet and rest on the oor
surface. Initially, screw the lock nuts onto the spikes enough to
leave the nuts oating just above the carpet when the spikes
are resting on the oor beneath. Screw the spikes fully into the
threaded inserts in the plinth. If the cabinet rocks when placed
on the oor, unscrew the two spikes that do not touch the oor
until the cabinet rests rmly without rocking. Finally, lock the nuts
against the cabinet. It may be more convenient to t and adjust
the spike feet after speaker positioning has been optimised.
If there is no carpet and you wish to avoid scratching the oor
surface, use either a protective metal disc (a coin perhaps)
between the spike and the oor, or use the supplied rubber feet.
Fit the rubber feet and level the cabinet in the same manner as
with the spike feet.
2. Positioning
683-684 S2 manual for printer_ALL.indb 5 20/05/2014 09:27
ENGLISH
6
Speaker Positioning
Adjustment of speaker position following initial installation
will probably further improve the sound quality and is usually
worthwhile.
In either stereo or home theatre installations, try to ensure that the
immediate surroundings of each speaker are similar in acoustic
character. For example, if one speaker is adjacent to bare walls
while the other is adjacent to soft furnishings and curtains, both
the overall sound quality and the stereo image are likely to be
compromised.
Conventional Stereo Systems
To begin with, the speakers should be positioned between 1.5m
and 3m apart at two corners of an equilateral triangle completed
by the listening area at the third corner. The speakers should be
approximately 0.5m away from the back wall, and at least 0.5m
away from any side walls (above).
Home Theatre Systems
If the speakers are to be used for the front channels in a home
theatre system, they should be placed closer together than for
2-channel audio, because the surround channels tend to widen
the image. Positioning the speakers within approximately 0.5m
of the sides of the screen will also help keep the sound image
in scale with the visual image. As with conventional stereo
positioning, the speakers should ideally be at least 0.5m away
from any side walls. If the speakers are preferred placed against
the back wall and this location results in over emphasised bass,
see the Fine Tuning section of this manual for information on
using the foam plugs.
Stray Magnetic Fields
The speaker drive units create stray magnetic elds that extend
beyond the boundaries of the cabinet. We recommend you keep
magnetically sensitive articles (CRT television and computer
screens, computer discs, audio and video tapes, swipe cards and
the like) at least 0.5m from the speaker. LCD, OLED and plasma
screens are not affected by magnetic elds.
5.1 Channels 6.1 Channels 7.1 Channels
0.5m
110° - 130°
~40°
Stereo
683-684 S2 manual for printer_ALL.indb 6 20/05/2014 09:27
ENGLISH
7
Ensure that the positive terminals on the speaker (marked
+ and coloured red) are connected to the positive output
terminal on the amplier and the negative terminals on the
speaker (marked – and coloured black) are connected to the
negative output terminal on the amplier. Incorrect connection
can result in poor imaging and loss of bass.
Ask your dealer for advice when selecting speaker cable.
Keep its total impedance below the maximum recommended
in the speaker specication and use a low inductance cable
to avoid attenuation of high frequencies.
All connections should be made with the audio equipment
switched off.
There are 2 linked pairs of terminals on the back of the
speaker. For conventional connection (above left), the
terminal links should remain in place (as delivered) and
just one pair of terminals connected to the amplier. For
bi-wire connection (above right), the terminal links should
be removed and each pair of terminals connected to the
amplier independently. Bi-wiring can improve the resolution
of low-level detail.
3. Connections
683-684 S2 manual for printer_ALL.indb 7 20/05/2014 09:27
ENGLISH
8
Before ne tuning, make sure that all the connections in the
installation are correct and secure.
Moving the speakers further from the walls will generally
reduce the volume of bass. Space behind the speakers will
also help to create an aural impression of depth. Conversely,
moving the speakers closer to the walls will increase the
volume of bass. If you want to reduce the volume of bass
without moving the speakers further from the wall, t the
foam plugs or, for less severe bass reduction, the foam rings
in the port tubes (above).
If the bass seems uneven with frequency this will most
probably be due to resonance modes in the listening room.
Even small changes in the position of the speakers or the
listening position can have a profound effect on how these
resonances affect the sound. Try moving the listening position
or locating the speakers along a different wall. The presence
and position of large pieces of furniture can also inuence
resonance modes.
If the central image lacks focus, try moving the speakers
closer together or angling them inward so that they point at a
location just in front of the listening position.
If the sound is too bright, increasing the amount of soft
furnishing in the room (heavier curtains for example) may help
balance the sound. Conversely, reducing the amount of soft
furnishing may help brighten a dull sound.
Ensure that the speaker stands rmly on the oor. Use carpet
piercing spikes if appropriate and adjust them to take up any
unevenness.
4. Fine Tuning
683-684 S2 manual for printer_ALL.indb 8 20/05/2014 09:27
ENGLISH
9
The cabinet surfaces will usually only require dusting. If you wish
to use an aerosol or other cleaner, apply the cleaner onto the
cloth, not directly onto the product and test a small area rst,
as some cleaning products may damage some of the surfaces.
Avoid products that are abrasive, or contain acid, alkali or
antibacterial agents. Marks on the paint surface may be removed
with a dilute perfume-free soap solution. Remove any remaining
streak marks by spraying with a proprietary glass cleaner and
lightly wiping dry with a microbre cloth. Do not use cleaning
agents on the drive units and avoid touching them as damage
may result.
The performance of the speaker will change subtly during the
initial listening period. If the speaker has been stored in a cold
environment, the damping compounds and suspension materials
of the drive units will take some time to recover their correct
mechanical properties. The drive unit suspensions will also loosen
up during the rst hours of use. The time taken for the speaker to
achieve its intended performance will vary depending on previous
storage conditions and how it is used. As a guide, allow up to
a week for the temperature effects to stabilise and 15 hours of
average use for the mechanical parts to attain their intended
design characteristics.
However, longer run-in periods (as long as a month) have
been reported and there is evidence to suggest that this has
little to do with the speaker changing and more to do with the
listener getting used to the new sound. This is especially so with
highly revealing speakers such as these, where there may be a
signicant increase in the amount of detail compared with what
the listener has previously been used to; the sound may at rst
appear too “up front” and perhaps a little hard. After an extended
period of time, the sound will seem to mellow, but without losing
clarity and detail.
5. Running In 6. Aftercare
683-684 S2 manual for printer_ALL.indb 9 20/05/2014 09:27
FRANÇAIS
10
1. Déballage
Vérication du contenu de l’emballage
Vériez que le carton contienne bien :
1 tampon en mousse en deux parties
1 support de sol
1 carton d’accessoires contenant :
4 pieds-pointes M6
4 pieds en caoutchouc
4 écrous de blocage (10 mm)
1 carton d’accessoires contenant :
1 clé Allen
4 vis M6 x 35 mm
4 rondelles pleines
4 rondelles autobloquantes
Information sur l’environnement
Ce produit est conforme avec les directives internationales, y
compris mais sans se limiter à:
i. la limitation des substances dangereuses (RoHS) dans les
équipements électriques et électroniques,
ii. l’enregistrement, l’évaluation, l’autorisation et la restriction
des substances chimiques (REACH)
iii l’élimination des déchets électriques et électroniques
(WEEE).
Consultez votre organisme local d’élimination des déchets pour
des conseils sur la façon appropriée de recycler ou de jeter ce
produit.
FRANÇAIS
683-684 S2 manual for printer_ALL.indb 10 20/05/2014 09:27
FRANÇAIS
11
Installation des enceintes
Les enceintes sont uniquement prévues pour être directement
posées au sol. Il est important de s’assurer qu’elles sont
parfaitement équilibrées sur le sol, en utilisant les pointes de
découplage fournies partout où cela est possible. De plus, xez le
support de sol (socle) pour une meilleure stabilité.
Vous pouvez xer le socle pendant la phase de déballage,
en suivant les indications situées sur la partie supérieure du
carton. Sinon, vous pouvez xer le socle une fois l’enceinte
complètement déballée en prenant soin d’intercaler un tissu épais
sur un support adéquat, comme par exemple une table. Couchez
l’enceinte sur le coté en faisant légèrement déborder la base de
l’enceinte de la table pour xer le socle. Alignez le socle avec
ses trous de xation présents à la base du coffret de l’enceinte,
en vous assurant que la èche gravée sur le support pointe bien
vers l’avant de l’enceinte. Fixez le socle en utilisant les rondelles
et les vis fournies. Placez les rondelles autobloquantes entre les
rondelles pleines et les vis. Serrez soigneusement chaque vis
avec la clé Allen fournie.
Les pieds-pointes fournis sont conçus pour transpercer la
moquette et prendre directement contact sur le sol en dur.
Avant de les mettre en place, vissez les écrous en les laissant
libres, de telle manière qu’ils afeurent la moquette une fois
les pointes correctement mises en contact avec le sol en dur.
Vissez complètement les pointes dans les inserts letés du
support de sol. Si l’enceinte n’est pas totalement stable sur le
sol, dévissez une ou plusieurs pointes jusqu’à ce que l’enceinte
soit parfaitement équilibrée sur le sol. Une fois cela assuré,
vissez complètement chaque écrou de blocage vers la base
de l’enceinte. Il est conseillé de garantir l’équilibrage parfait de
chaque enceinte seulement après avoir précisément déterminé sa
position dans la pièce d’écoute.
2. Positionnement
Contents
FRANÇAIS 4
1. Déballage 4
2. Positionnement 5
3. Connexions 7
4. Ajustements 8
5. Rodage 9
6. Entretien 9
683-684 S2 manual for printer_ALL.indb 11 20/05/2014 09:27
FRANÇAIS
12
Choix de la position
Le réglage de la position des enceintes au moment de leur
installation est susceptible d’améliorer grandement les résultats
sonores, et constitue donc une première étape essentielle.
Qu’il s’agisse d’une installation stéréophonique ou multicanal
Home Cinema, faites en sorte que l’environnement acoustique
de chaque enceinte soit le plus identique possible, dans son
caractère sonore. Par exemple, si une des enceintes est placée
près d’un mur lisse et nu, tandis que l’autre se trouve proche
d’épais tissus et tapis, la qualité et l’équilibre stéréophonique
naux risquent fort d’être compromis.
Systèmes stéréophoniques conventionnels
Comme base de départ, placer les deux enceintes éloignées
entre 1,5 et 3 mètres l’une de l’autre, formant ainsi les deux
angles d’un triangle équilatéral dont le troisième angle sera la
position d’écoute privilégiée. Les enceintes seront également
éloignées d’environ 50 centimètres du mur arrière et des murs
latéraux (ci-dessus).
Systèmes Home Cinema
Si les enceintes sont utilisées en tant qu’enceintes frontales d’un
système Home Cinema, elles doivent être plus rapprochées
l’une de l’autre que dans le cas d’une installation stéréophonique
traditionnelle, car les enceintes Surround arrière ont tendance
à agrandir l’image sonore générale. Positionnez les deux
enceintes à environ 0,50 mètre de chaque côté de l’écran, an
de conserver une image sonore en rapport avec l’image vidéo. Si
les enceintes doivent être plaquées contre le mur arrière pour des
raisons pratiques, il peut en résulter une augmentation articielle
du niveau de grave : voir le paragraphe Réglage n plus loin dans
ce manuel, pour une utilisation optimale des tampons de mousse
fournis.
Champs magnétiques
Les haut-parleurs à l’intérieur de l’enceinte génèrent des champs
magnétiques qui peuvent s’étendre au-delà du coffret de
l’enceinte. Nous vous recommandons donc de tenir éloignés d’au
moins 50centimètres des enceintes les appareils sensibles à ces
champs magnétiques (télévisions et moniteurs informatiques à
tube cathodique CRT, cassettes et bandes magnétiques audio
et vidéo, cartes magnétiques, etc.). Les écrans LCD, OLED et
plasma ne sont pas affectés pas les champs magnétiques.
5.1 Channels 6.1 Channels 7.1 Channels
0.5m
110° - 130°
~40°
Stereo
683-684 S2 manual for printer_ALL.indb 12 20/05/2014 09:27
FRANÇAIS
13
Branchez la prise « positif » de l’enceinte (prise de couleur rouge,
avec le repère « + ») sur la prise de sortie enceinte « positif » de
l’amplicateur, et branchez la prise « négatif » (prise de couleur
noire, avec le repère « – ») sur la prise « négatif » de l’amplicateur.
Le non-respect de cette polarité plus/moins entraîne une image
stéréophonique dégradée et une perte dans le grave.
Demandez conseil à votre revendeur pour le choix du câble
utilisé. L’impédance totale de charge ne doit jamais être inférieure
au minimum recommandé dans les spécications, et le câble doit
présenter une faible inductance, an d’éviter toute atténuation
des fréquences aiguës.
Tous les branchements doivent être effectués les appareils étant
tous éteints.
Il y a deux paires de prises réunies entre elles à l’arrière de
chaque enceinte. Pour les branchements classiques (ci-dessus
à gauche), les connexions reliant les prises (comme installé à la
livraison) doivent impérativement rester en place, une seule paire
de prises étant alors reliée à l’amplicateur. En cas de bi-câblage
(ci-dessus à droite), les liens seront retirés, et chaque paire de
prises sera alors reliée à l’amplicateur de manière indépendante.
Ce principe de bi-câblage permet d’améliorer la résolution et la
qualité des plus ns détails.
3. Connexions
683-684 S2 manual for printer_ALL.indb 13 20/05/2014 09:27
FRANÇAIS
14
Avant de procéder à ces réglages, vériez que tous les
branchements sont correctement effectués, dans toute
l’installation, et fermement sécurisés.
Décaler les enceintes par rapport aux murs de la pièce a
généralement pour effet de réduire le niveau général du
grave. Un espace sufsant derrière les enceintes acoustiques
permet également d’améliorer la sensation de profondeur de
la reproduction sonore. Inversement, un rapprochement des
enceintes par rapport aux cloisons de la pièce entraîne une
augmentation du niveau du grave. Pour réduire le niveau de grave
sans modier la position des enceintes, utilisez les tampons de
mousse fournis dans les évents de décompression, ou, si le
niveau de grave à corriger reste limité, utilisez uniquement les
anneaux de mousse à la place des tampons, comme illustré
ci-dessus.
Si vous désirez réduire sensiblement le niveau de grave sans
pour autant modier la position des enceintes par rapport
aux murs, placez un des tampons de mousse dans l’évent
de décompression. Pour accéder à ces évents, retirez la grille
frontale des enceintes en la tirant doucement vers l’avant.
Si le niveau de grave vous paraît tout de même encore trop
important, cela est généralement dû à des modes de résonances
parasites dans la pièce d’écoute. Une modication, même légère,
de la position des enceintes dans la pièce peut alors avoir pour
effet des améliorations très sensibles. Essayez de placer les
enceintes le long d’un autre mur de la pièce. Le déplacement
des meubles les plus encombrants peut également sensiblement
modier les résultats sonores.
Si la focalisation centrale de l’image sonore est mauvaise,
essayez de rapprocher les deux enceintes acoustiques, et/ou
de modier leur angle (plus fermé) par rapport à la zone centrale
d’écoute privilégiée.
Si le son paraît trop brillant, ajoutez des meubles ou éléments
amortissants dans la pièce (par exemple, des tapis plus
nombreux ou épais). Inversement, réduisez l’inuence de tels
éléments si le son semble trop sourd ou éteint.
Assurez-vous que les enceintes sont fermement posées
sur le sol. Utilisez les pointes pour transpercer la moquette
si nécessaire, et réglez-les parfaitement pour compenser
parfaitement toute inégalité du sol.
4. Ajustements
683-684 S2 manual for printer_ALL.indb 14 20/05/2014 09:27
FRANÇAIS
15
La surface du coffret ne nécessitera dans la plupart des cas
qu’un simple dépoussiérage. Si vous souhaitez utiliser un
produit en aérosol, ou tout autre produit nettoyant, vaporisez le
produit sur le tissu et pas directement sur la surface du coffret,
et faites d’abord un test sur une petite surface car certains
produits peuvent s’avérer néfastes. Éviter les produits abrasifs,
ou ceux qui contiennent de l’acide, de l’ammoniaque ou des
agents antibactériens. Les traces sur les surfaces peintes
peuvent être ôtées avec de l’eau et du savon dilué sans parfum.
Enlever les éventuelles marques résistantes en pulvérisant un
produit de nettoyage industriel pour vitres, que vous essuierez
complètement à l’aide d’un chiffon sec en microbres. Ne pas
employer de produits nettoyants sur les haut-parleurs et évitez
dans tous les cas d’y toucher pour ne pas les endommager.
Les performances d’une enceinte acoustique se modient
subtilement pendant une période de rodage initiale. Si l’enceinte
a été stockée dans un environnement de faible température, ses
composants amortissants et les suspensions des haut-parleurs
vont demander un peu de temps avant de retrouver leurs qualités
mécaniques optimales. De plus, ces suspensions vont également
se « libérer » pendant les premières heures d’utilisation. Ce temps
de rodage est variable, suivant la température de stockage et la
manière dont vous utilisez les enceintes. En moyenne, comptez
un week-end pour que les effets de la température se stabilisent,
et une quinzaine d’heures d’utilisation normale pour que tous les
composants mécaniques atteignent le fonctionnement parfait
correspondant à leur conception mécanique.
Cependant, des périodes plus longues (jusqu’à un mois) ont
été relevées, mais il semble que cela soit dû un peu à cause du
rodage des enceintes, et beaucoup parce que l’auditeur doit
se familiariser avec le nouveau son ! C’est particulièrement le
cas ici, avec des enceintes extrêmement dénies, capables de
reproduire un niveau de détail exceptionnellement élevé, plus que
ce à quoi s’attendait l’auditeur ; simplement, au début, ce son
peut sembler un tout petit peu « projeté » en avant et brillant. À la
n de la période de rodage, le son semblera plus neutre, sans ne
rien perdre pour autant de ses qualités en terme de transparence
et de sens du détail.
5. Rodage 6. Entretien
683-684 S2 manual for printer_ALL.indb 15 20/05/2014 09:27
DEUTSCH
16
1. Auspacken
Kartoninhalt
Im Versandkarton liegen:
1 zweiteiliger Schaumstoffeinsatz
1 Sockel
1 Zubehörpaket mit:
4 M6-Spikes
4 Gummifüßen
4 Sicherungsmuttern (Schlüsselweite 10 mm)
1 Zubehörpaket mit:
1 Innensechskantschlüssel
4 Schrauben M6 x 35 mm
4 Unterlegscheiben
4 rüttelfesten Unterlegscheiben
Umweltinformation
Dieses Produkt entspricht internationalen Richtlinien. Dazu
gehören unter anderem:
i. die Beschränkung der Verwendung bestimmter gefährlicher
Stoffe in Elektro- und Elektronikgeräten (Restriction of
Hazardous Substances (kurz RoHS genannt))
ii. die Registrierung, Bewertung, Zulassung und
Beschränkung chemischer Stoffe (REACH)
iii. die Entsorgung von Elektro- und Elektronik-Altgeräten
(Waste Electrical and Electronic Equipment (WEEE)).
Wenden Sie sich an Ihre örtliche Entsorgungsstelle, wenn Sie
Fragen zum ordnungsgemäßen Recyceln bzw. Entsorgen dieses
Produktes haben.
DEUTSCH
683-684 S2 manual for printer_ALL.indb 16 20/05/2014 09:27
DEUTSCH
17
Aufstellen der Lautsprecher
Die Lautsprecher sind als Standversion konzipiert. Es ist wichtig,
dass sie fest auf dem Boden stehen. Ver wenden Sie daher, wann
immer möglich, die beiliegen den Spikes. Befestigen Sie zusätzlich
den Sockel, um eine optimale Stabilität zu gewährleisten.
Sie können den Sockel während des Auspackens anbringen
(siehe Abbildungen auf der oberen Verschlussklappe des
Kartons). Alternativ können Sie dies auch nach dem Auspacken
machen. Suchen Sie sich dazu eine geeignete Auageäche
wie beispielsweise einen Tisch und decken Sie diese mit einem
Tuch ab. Legen Sie den Lautsprecher auf die Seite, so dass die
Unterseite des Lautsprechergehäuses vorne an der Auageäche
vorsteht. Richten Sie den Sockel den Befestigungslöchern an
der Gehäuseunter seite ent spre chend aus. Stellen Sie dabei
sicher, dass der Pfeil an der Sockelunterseite nach vorne zeigt.
Befestigen Sie den Sockel mit den beiliegenden Schrauben und
Unterlegscheiben. Setzen Sie die rüttelfesten Unterleg scheiben
zwischen die Unterleg scheiben und die Schraubenköpfe. Ziehen
Sie die Schrauben mit dem beiliegenden Innensechskantschlüssel
fest.
Die Spikes sind so ausgelegt, dass sie durch einen Teppich
hindurchgehen und auf der Bodenoberäche auiegen. Drehen
Sie zunächst die Sicherungsmuttern so auf die Spikes, dass
sie sich über dem Teppich benden, wenn die Spikes auf dem
Boden darunter auiegen. Drehen Sie die Spikes vollständig in die
Gewindebohrungen des Sockels. Sollte das Gehäuse wackeln,
wenn es auf den Boden gestellt wird, so lösen Sie die beiden
nicht auiegenden Spikes, bis der Lautsprecher fest auf dem
Boden steht. Ziehen Sie nun die Sicherungsmuttern gegen das
Gehäuse fest. Es ist sinnvoll, die Spikes erst dann anzubringen
und einzustellen, wenn Sie die optimale Position für den
Lautsprecher gefunden haben.
Liegt kein Teppich und möchten Sie ein Zerkratzen der
Bodenoberäche vermeiden, legen Sie entweder jeweils eine
Schutzscheibe (vielleicht eine Münze) unter die Spikes oder
verwenden die beiliegenden Gummifüße.
2. Aufstellen und Positionieren
Contents
DEUTSCH 4
1. Auspacken 4
2. Aufstellen und Positionieren
5
3. Anschließen der Lautsprecher
7
4. Feinabstimmung 8
5. Einlaufphase 9
6. Pege 9
683-684 S2 manual for printer_ALL.indb 17 20/05/2014 09:27
DEUTSCH
18
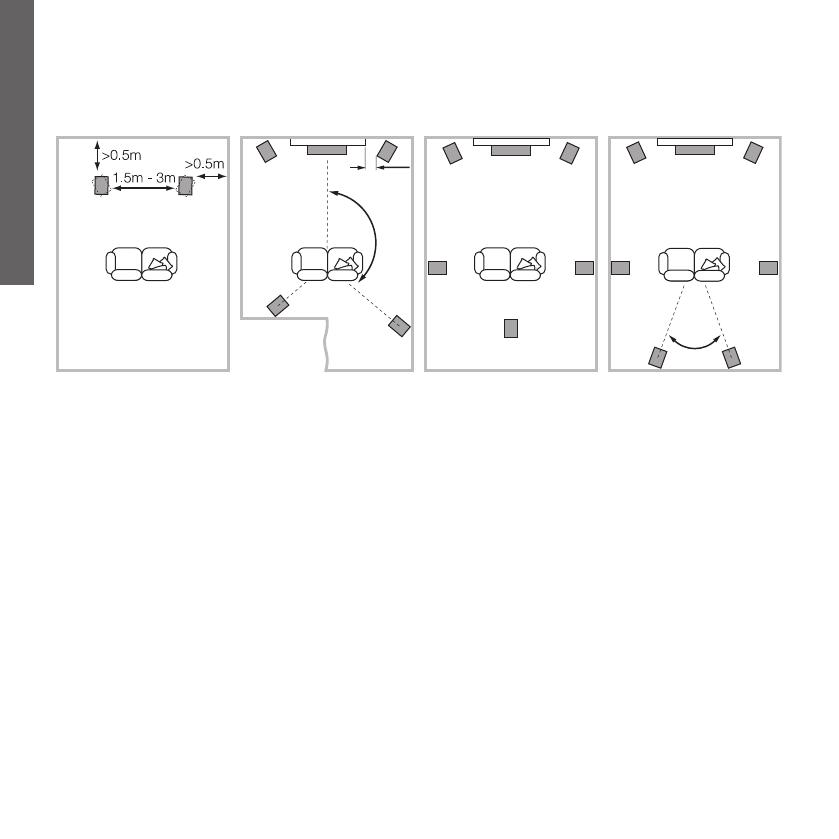
Positionieren der Lautsprecher
Die Position der Lautsprecher nach der Installation weiter zu
optimieren, kann zu einer Verbesserung der Klangqualität führen
und ist daher sinnvoll.
Versuchen Sie sowohl bei Stereo- als auch bei Heim kino-
installationen sicherzustellen, dass sich die direkte akustische
Umgebung aller Lautsprecher ähnelt. Bendet sich beispielsweise
ein Lautsprecher in der Nähe einer kahlen Wand, während der
andere von weichen Einrichtungsgegenständen und Vorhängen
umgeben ist, so leiden darunter die Klang qualität und das Stereo-
Klangbild.
Herkömmliche Stereosysteme
Zunächst sind die Lautsprecher in einem Abstand von 1,5 bis
3 m in zwei Ecken eines gleichseitigen Drei ecks zu platzieren,
das an der dritten Ecke durch den Hörbe reich vervollständigt
wird. Der Abstand zur Rück wand und zu den Seitenwänden
sollte mindestens 0,5 m betragen (siehe oben).
Heimkinosysteme
Werden die Lautsprecher für die Frontkanäle eines
Heimkinosystems genutzt, so sollten sie näher zusammengestellt
werden als bei 2-Kanal-Audio systemen, da die Surroundkanäle
zu einer Erwei te rung des Klangbildes führen. Eine Positionierung
der Lautsprecher innerhalb von ungefähr 0,5 m zu den Seiten
des Bildschirms ist darüber hinaus sehr hilf reich, um das
Klangbild optimal an das visuelle Bild anzupassen. Wie bei
der Positionierung in konven tionellen Stereosystemen sollten
die Lautsprecher einen Ab stand von ungefähr 0,5 m von der
Rückwand haben und einen Mindestabstand von 0,5 m zu den
Seiten wänden. Sollen die Lautsprecher an die Rück wand gestellt
werden und führt dies zu einem zu starken Bass, so erhalten Sie
unter „Feinabstimmung” in dieser Bedienungsanleitung Hinweise
zur Nutzung der Schaumstoffeinsätze.
Magnetische Streufelder
Die Lautsprecherchassis erzeugen ein magnetisches
Streufeld, das über die Gehäusegrenzen hinaus reicht. Daher
empfehlen wir, einen Mindestabstand von 0,5 m zwischen
magnetisch empndlichen Artikeln (CRT-Fernsehgeräten,
Computerbildschirmen, Discs, Audio- und Videobändern,
Scheckkarten usw.) und Lautspre cher zu bewahren. LCD-,
OLED- und Plasma-Bild schirme werden von magnetischen
Streufeldern nicht beeinusst.
5.1 Channels 6.1 Channels 7.1 Channels
0.5m
110° - 130°
~40°
Stereo
683-684 S2 manual for printer_ALL.indb 18 20/05/2014 09:27
DEUTSCH
19
Stellen Sie sicher, dass positive (rote und mit + gekennzeichnete)
Anschlussklemmen am Lautsprecher mit dem positiven
Ausgang am Verstärker und nega tive (schwarze und mit –
gekennzeichnete) Anschluss klemmen mit dem negativen
Ausgang am Verstärker verbunden werden. Ein nicht korrektes
Anschließen der Kabel kann zu einer Verschlechterung des Klang-
bildes und zu Bassverlusten führen.
Lassen Sie sich bei der Auswahl der Lautsprecherka bel von Ihrem
autorisierten Fachhändler beraten. Die Gesamtimpedanz sollte
unterhalb der in den Techni schen Daten angegebenen maximalen
Kabelimpedanz liegen. Insbesondere sollte das zum Hochtöner
füh rende Kabel eine geringe Induktivität besitzen, da sehr hohe
Töne sonst gedämpft werden.
Schalten Sie alle Geräte vor dem Anschließen ab.
An der Lautsprecherrückseite sind jeweils zwei An-
schlussklemmen über Brücken miteinander verbunden. Im
konventionellen Betrieb (siehe oben links) bleiben die Brücken
(wie bei der Lieferung) in ihrer Position und nur ein An-
schlussklemmenpaar wird an den Verstärker ange schlossen.
Sollen die Lautsprecher im Bi-Wiring-Verfahren betrieben werden
(siehe oben rechts), sind zunächst die Brücken zu entfernen.
Hierbei werden alle vier Anschlussklemmen mit dem Verstärker
verbunden. Bi-Wiring kann die Detailtreue im Tieftonbereich
ver bessern.
3. Anschließen der Lautsprecher
683-684 S2 manual for printer_ALL.indb 19 20/05/2014 09:27
DEUTSCH
20
Vergewissern Sie sich vor der Feinabstimmung Ihres Systems
noch einmal, dass alle Verbindungen richtig hergestellt wurden
und alle Kabel ordnungsgemäß angeschlossen sind.
Ein größerer Abstand zwischen Lautsprechern und Wänden führt
zu einer Reduzierung des Bassniveaus. Der Raum hinter den
Lautsprechern schafft auch einen Eindruck der Tiefe. Umgekehrt
wird das Bassniveau erhöht, wenn die Lautsprecher näher an
die Wände gestellt werden. Möchten Sie das Bassniveau redu-
zieren, ohne den Abstand zwischen Lautsprechern und Wand zu
vergrößern, setzen Sie die Schaumstoff einsätze oder – wenn Sie
eine geringere Reduzierung des Bassniveaus wünschen – nur die
Schaumstoff ringe in die Bassreexöffnungen ein (siehe oben).
Steht das Bassniveau nicht im Einklang mit der Frequenz, so ist
dies auf starke Resonanzen im Raum zurückzuführen. Selbst
kleinste Änderungen bei der Lautsprecherpositionierung bzw.
in der Hörposition können eine erhebliche Wirkung auf die
wahrgenom mene Klangqualität haben. So ändert sich die Klang-
qualität beispielsweise, wenn Sie die Hörposition verändern oder
die Lautsprecher an eine andere Wand gestellt werden. Auch das
Vorhandensein großer Möbelstücke und deren Position können
erhebliche Auswirkungen haben.
Ist das Klangbild in der Mitte schlecht, stellen Sie die
Lautsprecher näher zusammen oder so auf, dass sie in Richtung
Hörbereich zeigen.
Ist der Klang zu schrill, hilft die Verwendung weicher
Einrichtungsgegenstände (wie z. B. schwerer Vor hänge).
Umgekehrt sollte man bei dumpfem, leblosem Klang die
Verwendung solcher Einrichtungsgegenstände auf ein Minimum
reduzieren.
Stellen Sie sicher, dass der Lautsprecher fest auf dem Boden
steht. Liegt Teppich(boden), verwenden Sie die beiliegenden
Spikes und passen diese so an, dass alle Unebenheiten des
Bodens ausgeglichen werden.
4. Feinabstimmung
683-684 S2 manual for printer_ALL.indb 20 20/05/2014 09:27
  • Page 1 1
  • Page 2 2
  • Page 3 3
  • Page 4 4
  • Page 5 5
  • Page 6 6
  • Page 7 7
  • Page 8 8
  • Page 9 9
  • Page 10 10
  • Page 11 11
  • Page 12 12
  • Page 13 13
  • Page 14 14
  • Page 15 15
  • Page 16 16
  • Page 17 17
  • Page 18 18
  • Page 19 19
  • Page 20 20
  • Page 21 21
  • Page 22 22
  • Page 23 23
  • Page 24 24
  • Page 25 25
  • Page 26 26
  • Page 27 27
  • Page 28 28
  • Page 29 29
  • Page 30 30
  • Page 31 31
  • Page 32 32
  • Page 33 33
  • Page 34 34
  • Page 35 35
  • Page 36 36
  • Page 37 37
  • Page 38 38
  • Page 39 39
  • Page 40 40
  • Page 41 41
  • Page 42 42
  • Page 43 43
  • Page 44 44
  • Page 45 45
  • Page 46 46
  • Page 47 47
  • Page 48 48
  • Page 49 49
  • Page 50 50
  • Page 51 51
  • Page 52 52
  • Page 53 53
  • Page 54 54
  • Page 55 55
  • Page 56 56
  • Page 57 57
  • Page 58 58
  • Page 59 59

Bowers & Wilkins 683 S2 取扱説明書

タイプ
取扱説明書
このマニュアルも適しています