
Always here to help you
User manual
Register your product and get support at
www.philips.com/welcome
NT5175

1


4
Introduction
Congratulations on your purchase and welcome to Philips!
To fully benet from the support that Philips offers, register your
product at www.philips.com/welcome.
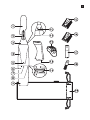
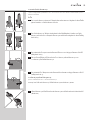
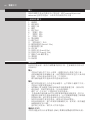
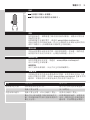
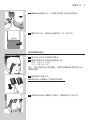
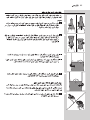
General description (Fig. 1)
1 Protection cap
2 Cutting element
3 Trimming head
4 Handle
5 Setting indicator
6 ’On’ indication
7 ’Off’ indication
8 ’Open’ indication
9 Battery compartment cover
10 Locking indication
11 ’Unlocked’ indication
12 Precision trimming comb (3mm/0.12in)
13 Precision trimming head
14 Sealing ring
15 Long eyebrow comb (5mm/0.2in)
16 Short eyebrow comb (3mm/0.12in)
17 Disposable AA alkaline battery
18 Cleaning brush
19 Storage pouch
Important
Read this user manual carefully before you use the appliance and save it for
future reference.
Warning
- This appliance is not intended for use by persons with reduced physical,
sensory or mental capabilities or lack of experience and knowledge,
unless they have been given supervision or instruction concerning use
of the appliance by a person responsible for their safety.
- Children should be supervised to ensure that they do not play with the
appliance.
Caution
- Do not immerse the motor unit in water or any other liquid, nor rinse
it under the tap.
- This appliance can only be operated on a battery.
- Do not use the appliance when the cutting elements of the nose/ear
trimming head and the precision trimming head, the combs or the
motor unit are damaged or broken, as this may cause injury.
-
Use and store the appliance at a temperature between 15°C and 35°C.
- This appliance is only intended for trimming nose or ear hair and to
shape the contours of facial hair. With the eyebrow combs, you can use
the appliance to trim eyebrows. With the precision trimming head
you
can also trim neck hair. Do not use the appliance for any other purpose
.
ENGLISH

- Remove the battery from the appliance if you are not going to use it
for some time.
- If the appliance is subjected to a major change in temperature,
pressure or humidity, let the appliance acclimatise for 30 minutes
before you use it.
- For hygienic reasons, the appliance should only be used by one person.
Electromagnetic elds (EMF)
This Philips appliance complies with all applicable standards and regulations
regarding exposure to electromagnetic elds (EMF).
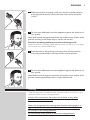
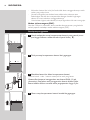
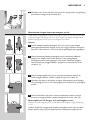
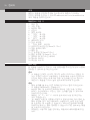
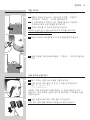
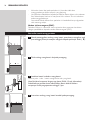
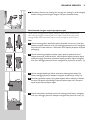
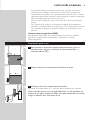
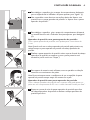
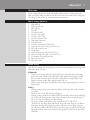
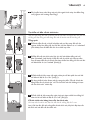
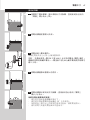
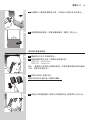
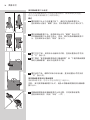
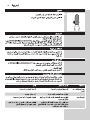
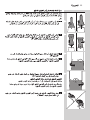
Preparing for use
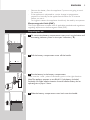
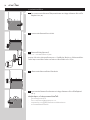
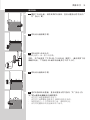
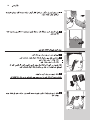
1 To remove the battery compartment cover, turn it to clockwise until
the setting indicator points to the ‘open’ indication ( ^).
2 Pull the battery compartment cover off the handle.
3 Put the battery in the battery compartment.
Make sure the + and - poles of the battery point in the right direction.
Note: The appliance operates on one R6 AA 1.5-volt battery (included).
Preferably use Philips alkaline batteries. A new AA alkaline battery has an
operating time of up to 2 hours.
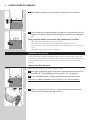
4 Slide the battery compartment cover back onto the handle.
AA
ENGLISH 5

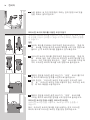
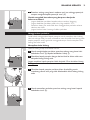
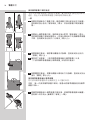
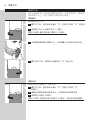
5 Turn the battery compartment cover anticlockwise until the setting
indicator points to the ‘off’ indication (0).
To avoid damage due to battery leakage:
- do not expose the appliance to direct sunlight.
- do not expose the appliance to temperatures higher than 35°C.
- remove the battery if you are not going to use the appliance for a
month or more.
- do not leave an empty battery in the appliance.
Using the appliance
You can use the trimming head to trim your nose hair and ear hair. If you
put one of the eyebrow combs onto the trimming head, you can also use it
to trim your eyebrows and neck hair.
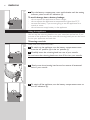
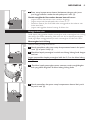
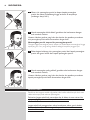
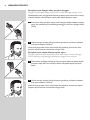
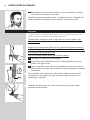
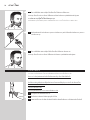
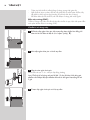
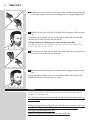
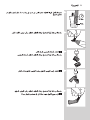
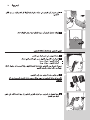
Trimming nose hair
Make sure your nostrils are clean.
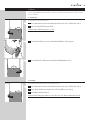
1 To switch on the appliance, turn the battery compartment cover
from the ‘off’ position (0) to the ‘on’ position (I).
2 Carefully insert the trimming head into one of your nostrils.
Do not insert the trimming head more than 0.5cm into your nostrils.
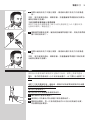
3 Slowly move the trimming head around to remove all unwanted
hairs in your nostrils.
4 To switch off the appliance, turn the battery compartment cover to
the ‘off’ indication (0).
ENGLISH6

Trimming ear hair
Make sure your outer ear channels are clean and free from wax.
1 To switch on the appliance, turn the battery compartment cover
from the ‘off’ position (0) to the ‘on’ position (I).
2 Slowly move the trimming head along the rim of the ear to remove
hairs that stick out beyond the rim.
3 Insert the trimming head into the outer ear channel.
Do not insert the trimming head more than 0.5cm into your ear channel,
as this could damage the eardrum.
4 Slowly turn the trimming head around to remove all unwanted hairs
from your outer ear channel.
5 To switch off the appliance, turn the battery compartment cover to
the ‘off’ indication (0).
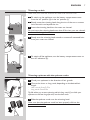
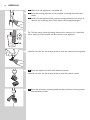
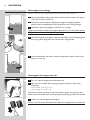
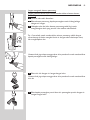
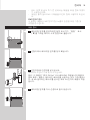
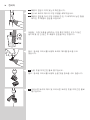
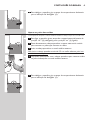
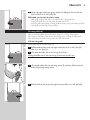
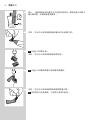
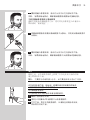
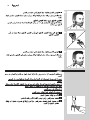
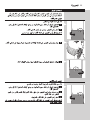
Trimming eyebrows with the eyebrow combs
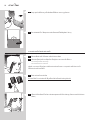
1 Comb your eyebrows in the direction of hair growth.
2 Choose the short or long comb, depending on the desired hair
length.
- short comb: 3mm/0.12in
- long comb: 5mm/0.2in
Tip: We advise you to start trimming with the long comb. If you think your
eyebrows are still too long after this, use the short comb.
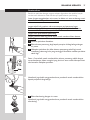
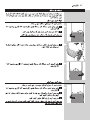
3 Slide the eyebrow comb onto the trimming head.
Make sure that the eyebrow comb has been properly slid into the
grooves on both sides.
ENGLISH 7

4 Move the comb over the eyebrow from the outer tip of the eyebrow
towards the base of the nose (against the direction of hair growth).
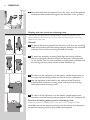
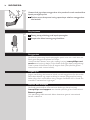
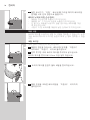
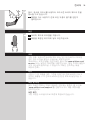
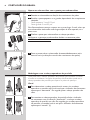
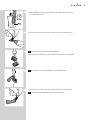
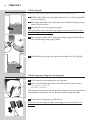
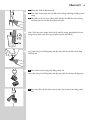
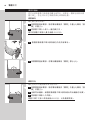
Shaping with the precision trimming head
You can use the precision trimming head to shape and maintain your
beard, sideburns and neck hair. You can also use the precision trimming
head to trim neck hair.
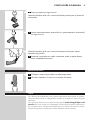
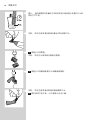
General
1 To detach the trimming head from the motor unit, turn the trimming
head anticlockwise until the locking indicator points to the ‘unlocked’
indication. Then pull the trimming head off the handle.
2 To attach the precision trimming head, align the locking indicator
with the ‘unlocked’ indication and put the precision trimming head
on the handle. Then turn the precision trimming head clockwise until
the locking indicator points to the ‘locked’ indication (I).
3 To switch on the appliance, turn the battery compartment cover to
the right until the setting indicator points to the ‘on’ indication (I).
4 Use the appliance as described in the sections below ‘Precision
trimming with precision trimming comb’ and ‘Precision trimming
without precision trimming comb’.
5 To switch off the appliance, turn the battery compartment cover
closckwise until the setting indicator points to the ‘off’ indication (0).
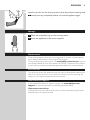
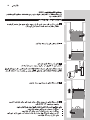
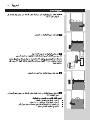
Precision trimming with precision trimming comb
With the precision trimming comb, you can trim to a length of 3mm.
Note: When you use the precision trimming head for the rst time, always put
the precision trimming comb on the precision trimming head.
ENGLISH8

1 Slide the precision trimming comb onto the front of the precision
trimming head and push it onto the back until it locks into place
(‘click’).
2 To trim most effectively, move the appliance against the direction of
hair growth.
Note: Make smooth and gentle movements and make sure the surface of the
precision trimming comb always stays in contact with the skin.
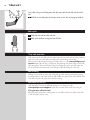
Precision trimming without precision trimming comb
With the precision trimming head without comb, you can trim to a length
of 0.5mm, the so-called ‘stubble look’.
1 Push the back of the precision trimming comb off the precision
trimming head and slide it off the precision trimming head.
2 To trim most effectively, move the appliance against the direction of
hair growth,
Note: Make smooth and gentle movements and make sure the surface of the
precision trimming head always stays in contact with the skin.
Cleaning
Clean the appliance immediately after use and when a lot of hair or dirt
has accumulated on the cutting elements.
Caution: Do not immerse the motor unit in water or any other
liquid, nor rinse it under the tap.
Never use compressed air, scouring pads, abrasive cleaning agents or
aggressive liquids such as petrol or acetone to clean the appliance.
Do not tap on the cutting elements.
Do not use any sharp objects to clean the cutting elements.
ENGLISH 9

1 Make sure the appliance is switched off.
2 Rinse the cutting element of the nose/ear trimming head with hot
water.
3 Switch on the appliance and rinse the cutting element once more to
remove any remaining hairs. Then switch off the appliance again.
Tip: The best way to clean the cutting element is to immerse it in a bowl with
warm water for a few minutes and then switch on the appliance.
Note: You can also use the cleaning brush to clean the nose/ear trimming head.
4 Rinse the eyebrow combs with lukewarm water.
Note: You can also use the cleaning brush to clean the eyebrow combs.
5 Rinse the precision trimming head and the precision trimming comb
with lukewarm water.
ENGLISH10

Note: You can also use the cleaning brush to clean the precision trimming head.
6 Let all parts dry completely before you use the appliance again.
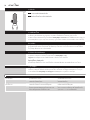
Storage
1 Place the protection cap on the trimming head.
2 Store the appliance in the pouch supplied.
Replacement
If the cutting element, precision trimming head or combs are damaged or
worn, always replace them with original Philips parts.
To buy accessories or spare parts, visit www.philips.com/service or go to
your Philips dealer. You can also contact the Philips Consumer Care Centre
in your country (see the worldwide guarantee leaet for contact details).
Environment
Do not throw away the appliance with the normal household waste at the
end of its life, but hand it in at an ofcial collection point for recycling. By
doing this, you help to preserve the environment.
Guarantee and support
If you need information or support, please visit www.philips.com/
support or read the separate worldwide guarantee leaet.
Guarantee restrictions
Cutting units are not covered by the terms of the international guarantee
because they are subject to wear.
ENGLISH 11

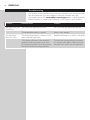
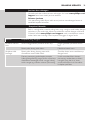
Troubleshooting
This chapter summarises the most common problems you could encounter
with the appliance. If you are unable to solve the problem with the
information below, visit www.philips.com/support for a list of frequently
asked questions or contact the Consumer Care Centre in your country.
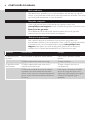
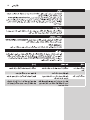
Problem Possible cause Solution
The appliance pulls
at the hairs.
You move the appliance too fast. Do not move the appliance too fast.
The disposable battery is empty. Insert a new battery.
The appliance
does not work.
The disposable battery is empty or has
been inserted incorrectly.
Replace the battery or insert it correctly.
The cutting element of the nose/ear/
eyebrow trimming head is very dirty,
for instance because some nasal mucus
has dried inside the cutting element.
To clean the cutting element, immerse
it in a bowl with warm water for a few
minutes. Then switch on the appliance.
ENGLISH12

13
Pendahuluan
Selamat atas pembelian Anda dan selamat datang di Philips!
Untuk memanfaatkan sepenuhnya dukungan yang ditawarkan Philips,
daftarkan produk Anda di www.philips.com/welcome.
Gambaran umum (Gbr. 1)
1 Tutup pelindung
2 Elemen pemangkas
3 Kepala pemangkas
4 Gagang
5 Indikator setelan
6 Indikator ‘Hidup’
7 Indikator ‘Mati’
8 Indikator ‘Terbuka’
9 Tutup wadah baterai
10 Indikator penguncian
11 Indikator ‘tidak terkunci’
12 Sisir pemangkas presisi (3 mm/0,12 inci)
13 Kepala pemangkas akurat
14 Gelang penyegel
15 Sisir alis panjang (5 mm/0,2 inci)
16 Sisir alis pendek (3 mm/0,12 inci)
17 Baterai alkaline AA sekali-pakai
18 Sikat pembersih
19 Kantung penyimpan
Penting
Bacalah petunjuk penggunaan ini dengan saksama sebelum Anda
menggunakan alat dan simpanlah sebagai referensi di masa mendatang.
Peringatan
- Alat ini tidak dimaksudkan untuk digunakan oleh orang dengan
keterbatasan sik, indera atau kecakapan mental yang kurang, atau
kurang pengalaman dan pengetahuan, kecuali jika mereka diberikan
pengawasan atau petunjuk mengenai penggunaan alat oleh orang yang
bertanggung jawab terhadap keselamatan mereka.
- Anak kecil harus diawasi untuk memastikan mereka tidak bermain-main
dengan alat ini.
Perhatian
- Jangan sekali-kali merendam alat di dalam air atau cairan lain apa
pun, jangan pula membilasnya di bawah keran air.
- Alat ini hanya dapat dioperasikan dengan baterai.
- Jangan gunakan alat saat elemen pemotong kepala pemangkas untuk
bulu hidung/telinga dan kepala pemangkas presisi, sisir, atau unit
motor rusak atau patah karena hal ini dapat menyebabkan cedera.
- Gunakan dan simpan alat pada suhu antara 15°C dan 35°C.
- Alat ini hanya ditujukan untuk memangkas bulu hidung atau telinga dan
untuk membentuk kontur bulu wajah. Dengan sisir alis, Anda dapat
menggunakan alat untuk memangkas alis. Dengan kepala pemangkas
presisi, Anda juga dapat memangkas bulu leher. Jangan gunakan
perangkat untuk tujuan lain.
INDONESIA

- Keluarkan baterai dari alat jika Anda tidak akan menggunakannya untuk
waktu yang cukup lama.
- Jika alat mengalami perubahan besar akibat suhu, tekanan atau
kelembaban, biarkan alat menyesuaikan dengan kondisi lingkungan
selama 30 menit sebelum menggunakannya.
- Untuk alasan higienis, alat sebaiknya hanya digunakan oleh satu orang saja.
Medan elektromagnet (EMF)
Alat dari Philips ini mematuhi semua standar dan peraturan yang berlaku
terkait paparan terhadap medan elektromagnet (EMF).
Persiapan penggunaan
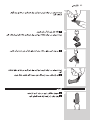
1 Untuk melepaskan tutup kompartemen baterai, putar searah jarum
jam hingga indikator setelan berada di posisi ‘buka ( ^).
2 Tarik penutup kompartemen baterai dari gagangnya.
3 Masukkan baterai ke dalam kompartemen baterai.
Pastikan kutub + dan - baterai menunjuk ke arah yang benar.
Catatan: Alat beroperasi menggunakan satu baterai R6 AA 1,5-volt
(disertakan). Disarankan untuk menggunakan baterai alkaline Philips.
Baterai alkaline AA baru memiliki waktu pengoperasian hingga 2 jam.
4 Geser tutup kompartemen baterai kembali ke gagangnya.
AA
INDONESIA14

5 Putar tutup kompartemen baterai berlawanan dengan arah jarum
jam hingga indikator setelan berada pada posisi ‘mati’ (0).
Untuk menghindari kerusakan karena baterai bocor:
- jangan biarkan alat terkena sinar matahari langsung.
- jangan sampai alat berada pada suhu di atas 35 °C.
- keluarkan baterai jika Anda tidak akan menggunakan alat selama satu
bulan atau lebih.
- jangan meninggalkan baterai kosong di dalam alat.
Menggunakan alat
Anda dapat menggunakan kepala pemangkas untuk memangkas bulu hidung
dan telinga. Jika Anda memasang salah satu sisir alis ke kepala pemangkas,
Anda juga dapat menggunakannya untuk memangkas alis dan bulu leher.
Memangkas bulu hidung
Pastikan lubang hidung Anda bersih.
1 Untuk menyalakan alat, putar tutup kompartemen baterai dari posisi
‘mati’ (0) ke posisi ‘hidup’ (I).
2 Masukkan kepala pemangkas ke salah satu lubang hidung Anda dengan
hati-hati.
Jangan memasukkan kepala pemangkas lebih dari 0,5 cm ke dalam lubang
hidung Anda.
3 Gerakkan kepala pemangkas secara memutar untuk menghilangkan
bulu yang tidak diinginkan di dalam lubang hidung Anda.
4 Untuk mematikan alat, putar tutup kompartemen baterai dari posisi
ke posisi ‘mati’ (0).
INDONESIA 15

Memangkas bulu telinga
Pastikan saluran luar telinga Anda bersih dan bebas dari kotoran.
1 Untuk menyalakan alat, putar tutup kompartemen baterai dari posisi
‘mati’ (0) ke posisi ‘hidup’ (I).
2 Gerakkan secara perlahan kepala pemangkas di sepanjang daun
telinga untuk menghilangkan bulu yang keluar dari lubang telinga.
3 Masukkan kepala pemangkas ke saluran luar telinga.
Jangan memasukkan kepala pemangkas lebih dari 0,5 cm ke dalam saluran
telinga karena dapat merusak gendang telinga.
4 Gerakkan kepala pemangkas memutar perlahan untuk menghilangkan
bulu yang tidak diinginkan dari saluran luar telinga Anda.
5 Untuk mematikan alat, putar tutup kompartemen baterai dari posisi
ke posisi ‘mati’ (0).
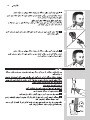
Memangkas alis dengan sisir alis
1 Sisir alis searah dengan pertumbuhan bulu.
2 Pilih sisir alis pendek atau panjang, tergantung ukuran bulu yang
diinginkan.
- sisir pendek: 3 mm/0,12 inci
- sisir panjang: 5 mm/0,2 inci
Tip: Kami sarankan agar Anda mulai memangkas dengan sisir panjang. Jika
Anda merasa alis Anda masih terlalu panjang setelahnya, gunakan sisir pendek.
3 Geser sisir alis ke kepala pemangkas.
Pastikan sisir alis sudah dimasukkan ke dalam alur dengan benar di kedua sisi.
INDONESIA16

4
Gerakkan sisir di atas alis dari ujung luar alis mengarah ke ujung hidung
(berlawanan dengan arah tumbuh alis).
Membentuk dengan kepala pemangkas presisi
Anda dapat menggunakan kepala pemangkas presisi untuk membentuk dan
menjaga jenggot, cambang, dan bulu leher. Anda juga dapat menggunakan
kepala pemangkas presisi untuk memangkas bulu leher.
Umum
1 Untuk melepas kepala pemangkas dari unit motor, putar kepala
pemangkas berlawanan dengan jarum jam hingga indikator mengarah
ke posisi ‘tidak terkunci’. Lalu, tarik kepala pemangkas dari gagangnya.
2 Untuk memasang kepala pemangkas presisi, sejajarkan indikator
penguncian dengan posisi ‘tidak terkunci’ dan pasang kepala
pemangkas presisi pada gagangnya. Lalu, putar kepala pemangkas
searah jarum jam hingga indikator penguncian menunjuk ke posisi
‘terkunci’ (I).
3 Untuk menghidupkan alat, putar tutup kompartemen baterai ke
kanan hingga indikator setelan mengarah ke posisi ‘hidup’ (I).
4 Gunakan alat seperti diuraikan di bagian ‘Memangkas presisi dengan
sisir pemangkas presisi’ dan ‘Memangkas presisi tanpa sisir pemangkas
presisi’.
5 Untuk mematikan alat, putar tutup kompartemen baterai searah
jarum jam hingga indikator setelan mengarah ke posisi ‘mati’ (0).
Memangkas presisi dengan sisir pemangkas presisi
Dengan sisir pemangkas presisi, Anda dapat memangkas hingga sepanjang
3 mm.
Catatan: Saat Anda menggunakan kepala pemangkas presisi untuk pertama
kalinya, selalu pasang sisir pemangkas presisi di kepala pemangkas presisi.
INDONESIA 17

1 Geser sisir pemangkas presisi ke depan kepala pemangkas
presisi dan tekan ke belakang hingga terkunci di tempatnya
(terdengar bunyi ‘klik’).
2 Untuk memangkas lebih efektif, gerakkan alat berlawanan dengan
arah tumbuh rambut.
Catatan: Lakukan gerakan yang halus dan lembut dan pastikan permukaan
sisir pemangkas presisi selalu bersentuhan dengan kulit.
Memangkas presisi tanpa sisir pemangkas presisi
Dengan kepala pemangkas presisi tanpa sisir, Anda dapat memangkas hingga
sepanjang 0,5 mm, yang sering disebut sebagai ‘tampilan jenggot tipis’.
1 Tekan bagian belakang sisir pemangkas presisi dari kepala pemangkas
presisi dan geser keluar dari kepala pemangkas presisi.
2 Untuk memangkas paling efektif, gerakkan alat berlawanan dengan
arah tumbuh rambut,
Catatan: Lakukan gerakan yang halus dan lembut dan pastikan permukaan
kepala pemangkas presisi selalu bersentuhan dengan kulit.
Membersihkan
Bersihkan alat segera setelah digunakan dan ketika sudah banyak bulu atau
debu terkumpul pada elemen pemangkas.
Perhatian: Jangan sekali-kali merendam alat di dalam air atau cairan lain
apa pun, jangan pula membilasnya di bawah keran air.
Jangan sekali-kali menggunakan udara bertekanan, sabut gosok, bahan
pembersih abrasif atau cairan agresif seperti bensin atau aseton untuk
membersihkan alat.
INDONESIA18

Jangan mengetuk elemen pemotong.
Jangan gunakan benda tajam untuk membersihkan elemen elemen
pemotong.
1 Pastikan alat telah dimatikan.
2 Bilas elemen pemotong kepala pemangkas untuk hidung/telinga
dengan air hangat.
3 Hidupkan alat dan bilas elemen pemotong sekali lagi untuk
menghilangkan bulu yang tersisa. Lalu matikan alat kembali.
Tip: Cara terbaik untuk membersihkan elemen pemotong adalah dengan
merendamnya di dalam mangkuk berisi air hangat selama beberapa menit,
lalu menghidupkan alat.
Catatan: Anda juga dapat menggunakan sikat pembersih untuk membersihkan
kepala pemangkas untuk hidung/telinga.
4 Bilas sisir alis dengan air hangat-hangat kuku.
Catatan: Anda juga dapat menggunakan sikat pembersih untuk membersihkan
sisir alis.
5 Bilas kepala pemangkas presisi dan sisir pemangkas presisi dengan air
hangat-hangat kuku.
INDONESIA 19

Catatan: Anda juga dapat menggunakan sikat pembersih untuk membersihkan
kepala pemangkas presisi.
6 Biarkan semua komponen kering sepenuhnya sebelum menggunakan
alat kembali.
Penyimpanan
1 Pasang tutup pelindung pada kepala pemangkas.
2 Simpan alat dalam kantung yang disediakan.
Penggantian
Jika elemen pemotong, kepala pemangkas presisi, atau sisir rusak atau aus,
selalu ganti dengan komponen asli Philips.
Untuk membeli aksesori atau suku cadang, kunjungi www.philips.com/
service atau kunjungi dealer Philips Anda. Anda juga dapat menghubungi
Pusat Layanan Konsumen Philips di negara Anda (lihat pamet garansi
internasional untuk rincian kontak).
Lingkungan
Jangan membuang alat bersama limbah rumah tangga biasa jika alat sudah
tidak dapat dipakai lagi, tetapi serahkan ke tempat pengumpulan barang
bekas yang resmi untuk didaur ulang. Dengan melakukan hal ini, Anda ikut
membantu melestarikan lingkungan.
Garansi dan dukungan
Jika Anda membutuhkan informasi atau dukungan, harap kunjungi
www.philips.com/support atau bacalah pamet garansi internasional.
Batasan garansi
Unit pemotong tidak termasuk dalam ketentuan garansi internasional
karena mudah aus.
INDONESIA20
ページが読み込まれています...
ページが読み込まれています...
ページが読み込まれています...
ページが読み込まれています...
ページが読み込まれています...
ページが読み込まれています...
ページが読み込まれています...
ページが読み込まれています...
ページが読み込まれています...
ページが読み込まれています...
ページが読み込まれています...
ページが読み込まれています...
ページが読み込まれています...
ページが読み込まれています...
ページが読み込まれています...
ページが読み込まれています...
ページが読み込まれています...
ページが読み込まれています...
ページが読み込まれています...
ページが読み込まれています...
ページが読み込まれています...
ページが読み込まれています...
ページが読み込まれています...
ページが読み込まれています...
ページが読み込まれています...
ページが読み込まれています...
ページが読み込まれています...
ページが読み込まれています...
ページが読み込まれています...
ページが読み込まれています...
ページが読み込まれています...
ページが読み込まれています...
ページが読み込まれています...
ページが読み込まれています...
ページが読み込まれています...
ページが読み込まれています...
ページが読み込まれています...
ページが読み込まれています...
ページが読み込まれています...
ページが読み込まれています...
ページが読み込まれています...
ページが読み込まれています...
ページが読み込まれています...
ページが読み込まれています...
ページが読み込まれています...
ページが読み込まれています...
ページが読み込まれています...
ページが読み込まれています...
ページが読み込まれています...
ページが読み込まれています...
ページが読み込まれています...
ページが読み込まれています...
ページが読み込まれています...
ページが読み込まれています...
ページが読み込まれています...
ページが読み込まれています...
ページが読み込まれています...
ページが読み込まれています...
ページが読み込まれています...
ページが読み込まれています...
ページが読み込まれています...
ページが読み込まれています...
ページが読み込まれています...
ページが読み込まれています...
ページが読み込まれています...
ページが読み込まれています...
ページが読み込まれています...
ページが読み込まれています...
ページが読み込まれています...
ページが読み込まれています...
ページが読み込まれています...
ページが読み込まれています...
ページが読み込まれています...
ページが読み込まれています...
ページが読み込まれています...
ページが読み込まれています...
ページが読み込まれています...
ページが読み込まれています...
-
 1
1
-
 2
2
-
 3
3
-
 4
4
-
 5
5
-
 6
6
-
 7
7
-
 8
8
-
 9
9
-
 10
10
-
 11
11
-
 12
12
-
 13
13
-
 14
14
-
 15
15
-
 16
16
-
 17
17
-
 18
18
-
 19
19
-
 20
20
-
 21
21
-
 22
22
-
 23
23
-
 24
24
-
 25
25
-
 26
26
-
 27
27
-
 28
28
-
 29
29
-
 30
30
-
 31
31
-
 32
32
-
 33
33
-
 34
34
-
 35
35
-
 36
36
-
 37
37
-
 38
38
-
 39
39
-
 40
40
-
 41
41
-
 42
42
-
 43
43
-
 44
44
-
 45
45
-
 46
46
-
 47
47
-
 48
48
-
 49
49
-
 50
50
-
 51
51
-
 52
52
-
 53
53
-
 54
54
-
 55
55
-
 56
56
-
 57
57
-
 58
58
-
 59
59
-
 60
60
-
 61
61
-
 62
62
-
 63
63
-
 64
64
-
 65
65
-
 66
66
-
 67
67
-
 68
68
-
 69
69
-
 70
70
-
 71
71
-
 72
72
-
 73
73
-
 74
74
-
 75
75
-
 76
76
-
 77
77
-
 78
78
-
 79
79
-
 80
80
-
 81
81
-
 82
82
-
 83
83
-
 84
84
-
 85
85
-
 86
86
-
 87
87
-
 88
88
-
 89
89
-
 90
90
-
 91
91
-
 92
92
-
 93
93
-
 94
94
-
 95
95
-
 96
96
-
 97
97
-
 98
98


