
V1.0 2017.10
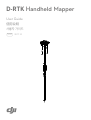
D-RTK Handheld Mapper
User Guide
使用说明
사용자 가이드


EN
2
Disclaimer
Thank you for purchasing the D-RTK
TM
Handheld Mapper (hereinafter referred to
as the “Product”). Read this disclaimer carefully before using this Product. By using
this Product, you hereby agree to this disclaimer and signify that you have read it
fully. Please use this Product in strict accordance with the manual and be sure to
pay attention to the Warnings. SZ DJI TECHNOLOGY CO., LTD., and its affiliated
companies assume no liability for damage(s) or injuries incurred directly or indirectly
from using, installing or retting this Product improperly, including but not limited to
using non-designated accessories.
DJI
TM
is a trademark of SZ DJI TECHNOLOGY CO., LTD. (abbreviated as “DJI”) and
its affiliated companies. Names of products, brands, etc., appearing in this manual
are trademarks or registered trademarks of their respective owner companies. This
Product and manual are copyrighted by DJI with all rights reserved. No part of this
Product or manual shall be reproduced in any form without the prior written consent or
authorization of DJI.
This disclaimer is produced in various languages. In the event of divergence among
different versions, the Chinese version shall prevail when the Product in question is
purchased in China, and the English version shall prevail when the Product in question
is purchased in any other region.

EN
3
Warnings
1. Only use the D-RTK Handheld Mapper in the corresponding frequency band and
in accordance with local laws and regulations.
2. Only operate in an open environment free from radio interference. To avoid
interference, turn off nearby devices using the same frequencies as the D-RTK
Handheld Mapper (e.g. radio transceivers).
3. Ensure that the antennas are unobstructed during use.
4. Pay attention to the following when using the Intelligent Batteries and Charging
Hub:
a. Make sure to fully charge the Intelligent Batteries before rst-time use.
b. The Charging Hub is only compatible with one specic model of DJI Intelligent
Battery. DO NOT attempt to use the Charging Hub with any other battery.
c. Place the Charging Hub on a flat and stable surface when in use. Ensure the
device is properly insulated to prevent re hazards.
d. DO NOT touch the metal terminals on the Charging Hub.
e. If there is a noticeable buildup of debris, wipe the metal terminals with a clean,
dry cloth.
5. Only use genuine DJI parts or parts certied by DJI. Unauthorized parts or parts
from non-DJI certied manufacturers may cause the system to malfunction and
compromise safety.
6. Ensure that the D-RTK Handheld Mapper and its components are free from
contamination (e.g. water, oil, soil, and sand).
7. DO NOT attempt to disassemble any part of the D-RTK Handheld Mapper that
has already been mounted prior to shipping.
8. Operate the sharp end of the pole with caution.
9. Operate with caution and protect the D-RTK Handheld Mapper from lightning
strikes in lightning storms.

EN
4
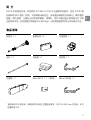
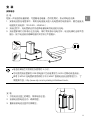
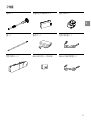
In the Box
Mapper × 1
Pole × 1
Carrying Case × 1
Intelligent Battery × 2
Charger × 1
Micro SD Card × 1
(
16GB
)
Charging Hub × 1
Power Cable × 1
Micro USB Cable × 1
Introduction
The D-RTK Handheld Mapper is specially designed for the AGRAS
TM
MG-1S RTK.
When used with the D-RTK Base Station, it can obtain centimeter-level positioning
accuracy for more accurate field planning. The operation panel of the D-RTK
Handheld Mapper is equipped with buttons to make it easy to mark edges and
obstacles. The screen and indicator will show the system status during operation.
Measurement data can be transmitted to the DJI MG app for using the built-in
intelligent operation planning system.

EN
5
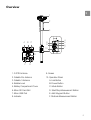
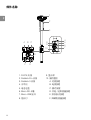
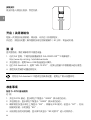
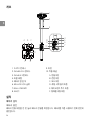
Overview
1
A B C
EF
D
2
3
5
6
7
10
9
8
4
1. D-RTK Antenna
2. Datalink Pro Antenna
3. Datalink 3 Antenna
4. Bubble Level
5. Battery Compartment Cover
6. Micro SD Card Slot
7. Micro USB Port
8. Indicator
9. Screen
10. Operation Panel
A. Link Button
B. Power Button
C. Mode Button
D. Start/Stop Measurement Button
E. Add Waypoint Button
F. Obstacle Measurement Button

EN
6
The maximum run time of a fully charged battery is approximately ve hours.
USB power supply port can be used to charge a 5V/2A mobile device.
Refer to the Charging Hub (WCH2) User Guide and the Intelligent Battery
(WB37) Safety Guidelines for more details.
http://www.dji.com/crystalsky/info#downloads
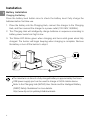
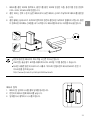
Installation
Battery Installation
Charging the Battery
Press the battery level button once to check the battery level. Fully charge the
batteries before rst-time use.
1. Place the battery into the Charging Hub, connect the charger to the Charging
Hub, and then connect the charger to a power outlet (100–240V, 50/60Hz).
2. The Charging Hub will intelligently charge batteries in sequence according to
battery power levels from high to low.
3. The Status LED blinks green when charging and turns solid green when fully
charged. The buzzer will begin beeping when charging is complete. Remove
the battery or turn off the buzzer to stop it.

EN
7
Mounting the Battery
1. Loosen the screw on the battery compartment
cover, then remove the cover.
2. Place the battery into the battery compartment
securely.
3. Re-mount the cover and tighten the screw.
Pole Installation
Insert the pole into the bottom of the mapper and rotate it until it tightens.
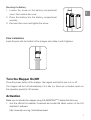
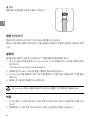
Turn the Mapper On/Off
Press the power button of the mapper, then again and hold to turn it on or off.
The mapper will turn off automatically if it is idle (i.e. there are no button inputs on
the operation panel) for 30 minutes.
Activation
Make sure to activate the mapper using DJI ASSISTANT
TM
2 before rst-time use.
1. Visit the official DJI website. Download and install the latest version of the DJI
Assistant 2 software.
http://www.dji.com/mg-1s/info#downloads

EN
8
2. Turn on the mapper. Connect it to your computer via a Micro USB cable.
3. Run DJI Assistant 2 and click “MG-1S RTK”. Activate the device following the
instructions in the pop-up window.
4. Restart the mapper manually after activation.
DO NOT change any of the settings in DJI Assistant 2. Use the product under
the default settings.
If there is no device linked with the base station when beeping, it will exit
linking and stop beeping automatically.
Press the power button on the base station or mapper once to cancel when
linking is initiated.
Linking is required only for rst-time use with the same mapper and base
station. The two will connect to each other automatically during future use.
Linking
1. Turn on the D-RTK Base Station. “GNSS” in the lower left corner of the screen
indicates a successful start.
2. Turn on the mapper. “GNSS” in the lower left corner of the screen indicates a
successful start.
3. Ensure that the upper left corner of the screen shows “BS”, which indicates Base
Station RTK Mode. If it shows “RC”, press and hold the Mode button to switch to
“BS”.
4. Press and hold the Link button on the mapper. “Linking with BS” on the screen
indicates that the mapper has initiated linking.
5. Press and hold the Link button on the base station and it will beep for ve seconds.
“Linking Successful” on the screen of the mapper during beeping indicates
successful linking.

EN
9
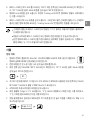
Usage
Field Planning
1. Ensure that the mapper has adequate power, sucient free space on the
Micro SD card (max capacity 16 GB) and that it is inserted into the slot on
the mapper correctly.
2. Press the power button once, then again, and hold to turn on the mapper.
3. Ensure that the upper left corner of the screen shows “BS”. If it shows “RC”, press
and hold the Mode button to switch to “BS”.
4. Wait for initialization to complete. The lower left corner of the screen shows “GNSS”
and the center shows “Ready” if RTK data is obtained and used.
5. Press and hold the Start/Stop Measurement button to start.
6. The center of the screen will show “Edge X-Y”. “X” means the recorded point
number for the edge measurement and “Y” means the recorded calibration point
number.
7. Walk alongside the boundary of the eld and press the Add Waypoint button once
to record a point. The corresponding number will increase by one.
8. If any obstacles are in the operating area, press the Obstacle Measurement button
once to enter Obstacle Measurement mode. The center of the screen will show
“Obstacle Z-N.” “Z” is for the recorded point number around the obstacle. Walk
alongside the boundary of the obstacle and press the Add Waypoint button once to
record a point. Z will increase by one.
“N” refers to the Nth obstacle being measured, meaning that each time you enter
Obstacle Measurement mode N will increase by one.
After obstacle measurement, press the Obstacle Measurement button once to exit
from the mode and continue edge measurement.
Edge 0-0
BS
Obstacle 0-0

EN
10
9. Calibration points are required to rectify measurement bias caused by the
positioning dierence between the mapper and aircraft.
Ensure that the screen displays “Edge”. If it displays “Obstacle”, press the Obstacle
Measurement button once to switch.
Choose at least one xed reference point for calibration like a metal peg or obvious
marker. Then press and hold the Add Waypoint button. The mapper will beep for
one second to indicate that the calibration point has been recorded.
10. After measurement complete, press and hold the Start/Stop Measurement button.
The screen will display “Ready”.
More than one calibration point can be recorded for the eld, but at least
one is required. Measurement cannot be stopped by pressing and holding
the Start/Stop Measurement button. The mapper will sound an alarm if no
calibration point is recorded. Record at least one calibration point and then
stop measurement by pressing and holding the button.
Try to keep the mapper upright and level during measurement by
monitoring the bubble level. When the bubble is within the black circle, the
mapper is vertical.
Importing Data
Measurement data is saved to the Micro SD card in the mapper. Export it to the
remote controller for use.
1. After a measurement is complete, turn o the mapper. Take out the Micro SD card
and insert it into the Micro SD card slot on the remote controller.
2. Power on the remote controller and go to the DJI MG app.
3. Select “Handheld RTK Task” in the pop-up box. Data in the Micro SD card will be
listed and sorted by time. Select the data corresponding to the desired eld and tap
“Import”.
4. After importing, enter Operation View. Tap the Task List and sort by time. Here you
can nd the last imported task.

EN
11
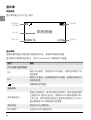
Screen
Interface Descriptions
The interface consists of ve parts:
BS
Ready
Fixed
GNSS:16
RTK Mode and
Signal Strength
Battery Level
NoticationsGNSS Status
System Status
Display Descriptions
Determine the system status via prompts on the screen. Resolve any potential
issues if an abnormal status is displayed.
The language can be switched to English or Chinese using DJI Assistant 2.
Displays Descriptions
RTK Mode and Signal Strength
BS
Base Station mode. Link and use the mapper in this
mode when used with D-RTK Base Station
RC
Network RTK Mode via the remote controller. This mode
is not supported yet.
Data transmission signal strength.
System Status
System Initializing
The system is initializing. The system will remain in
this state for an extended time if there are not enough
satellites for positioning. Make sure that the D-RTK Base
Station is working normally and move the mapper to a
location where there is a strong satellite signal within the
transmission range of the base station.
Ready The mapper is working normally.
Linking with BS Linking with the base station.

EN
12
Linking Successful Linked with the base station.
Locating Satellites
Satellite signal is weak. Measurement cannot be continued
in this status. Check if there is any obstruction or
interference. Then wait for display on the screen back to
what it was before to continue measurement.
Edge X-Y
Measuring the edge of the eld. “X” means the recorded
point number for the edge measurement, and “Y” means
the recorded calibration point number.
Obstacle Z-N
Measuring obstacle. “Z” means the recorded point number
around the obstacle and “N” means the Nth obstacle being
measured.
No SD Card!
No Micro SD card detected. Insert an available card
correctly.
File Error!
File storage error. Check if the Micro SD card is damaged
or if it has enough free space. The max supported SD
card capacity is 16 GB. Check if the capacity is at or
below 16 GB.
Activate in Software
Device not activated. Connect it to DJI Assistant 2 for
activation.
GNSS Status
GNSS: XX
GNSS board initialization succeeds. XX indicates the
number of satellites.
N/A
GNSS board initialization failed. Please contact DJI
Support or an authorized dealer.
Notications
>>>--
Arrows will appear and disappear to indicate system
initialization.
Fixed
The position of the mapper is conrmed.

EN
13
Not Fixed
The position of the mapper cannot be obtained. This
may be caused by cable connection issues, damage,
obstruction, interference, or insucient satellite signal for
the base station positioning. If troubleshooting doesn't
work, contact DJI Support or an authorized dealer.
No BS Data
No base station data received. This may be caused
by cable connection issues, damage, obstruction, or
interference, or being too far away from the base station.
If troubleshooting doesn't work, contact DJI Support or an
authorized dealer.
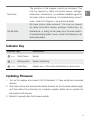
Indicator Key
Indicator Light Descriptions
—— Solid Green Ready.
Blinking Red System initializing.
—— Solid Red System error. Check the notications on the screen.
Updating Firmware
1. Turn on the mapper and connect it to DJI Assistant 2. There will be two connected
devices.
2. Click each device and download the latest rmware on the Firmware Update page,
and then follow the instructions to complete updates. Make sure to update the
rmware for both devices.
3. Restart it manually after the rmware update.

EN
14
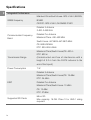
Specifications
Integrated Performance
GNSS Frequency
Mainland China/South Korea: GPS L1&L2, BEIDOU
B1&B2
CE/FCC: GPS L1&L2, GLONASS F1&F2
Communication Frequency
Band
Datalink 3 Antenna
2.400–2.483 GHz
Datalink Pro Antenna
Mainland China: 430–432 MHz
South Korea: 447.8625–447.9875 MHz
CE: 869.525 MHz
FCC: 903–925.5 MHz
Transmission Range
Mainland China/South Korea/CE: 400 m
FCC: 600 m
(Unobstructed and free of interference with a
height of 3.2 m from the D-RTK antenna to the
end of the tripod)
Power Consumption 7 W
EIRP
Datalink 3 Antenna
Mainland China/South Korea/CE: 19 dBm
FCC: 24 dBm
Datalink Pro Antenna
Mainland China/South Korea: 10 dBm
CE: 13 dBm
FCC: 27dBm
Supported SD Cards
Micro SD
Max capacity: 16 GB. Class 10 or UHS-1 rating
required.

EN
15
Weight (Carrying case
excluded)
1.92 kg
Height (Mapper with pole)
1.8 m
Operating Temperature
0° to 45°C (32° to 113°F)
Intelligent Battery
Model
WB37-4920mAh-7.6V
Battery Type
LiPo battery
Capacity
4920 mAh
Voltage
7.6 V
Energy
37.39 Wh
Charging Temperature
5° to 40°C (41° to 104°F)
Charging Hub
Model
WCH2
Input Voltage
17.3–26.2 V
Output Voltage and Current
8.7 V, 6 A; 5 V, 2 A
Operating Temperature
5° to 40°C (41° to 104°F)
Charger
Model
A14-057N1A
Voltage
17.4 V
Operating Temperature
5° to 40°C (41° to 104°F)
This content is subject to change without priority.
Download the latest version from
http://www.dji.com/mg-1s
AGRAS is a trademark of DJI.
Copyright © 2017 DJI All Rights Reserved.

CH
16
免责声明
感谢您购买 D-RTK
TM
手持测绘仪。在使用之前,请仔细阅读本声明,一旦使用,即被
视为对本声明全部内容的认可和接受。请严格遵守本文安装和使用该产品,并务必重
视注意事项。因用户不当使用、安装、改装(包含但不限于使用非 DJI
TM
指定的零配件)
造成的任何损失,深圳市大疆
TM
创新科技有限公司及其关联公司将不承担任何责任。
DJI 是深圳市大疆创新科技有限公司及其关联公司的商标。本文出现的产品名称、品
牌等,均为其所属公司的商标或注册商标。本产品及文档为深圳市大疆创新科技有限
公司版权所有。未经许可,不得以任何形式复制翻印。
关于不同语言版本的免责声明可能存在的语义差异,中国以中文版为准,其他地区以
英文版为准。
注意事项
1. 根据当地无线电规定,使用对应频段的 D-RTK 手持测绘仪,并遵守当地无线电法
律法规。
2. 在开阔、不受无线电干扰的环境中使用。使用时务必关闭其他同频段的无线设备(如
对讲机等)。
3. 使用过程中请确保天线不受遮挡。
4. 使用智能电池及充电管家时请注意:
a.
首次使用智能电池时务必充满电。
b.
充电管家仅适用于 DJI 指定型号的智能电池充电。请勿使用充电管家为非指定
型号电池充电。
c.
使用充电管家时请将其平稳放置,并注意绝缘及防火。
d.
请勿用手或其他物体触碰金属端子。
e.
若金属端子附着异物,请用干布擦拭干净。
5. 使用原厂配件或经过 DJI 认证的配件。使用非原厂配件有可能对系统的安全使用
造成危险。
6. 部件内部没有进入任何异物(如:液体、油、沙土等)。
7. 切勿自行拆下出厂时已安装的任何部件。
8. 支杆底部较为尖锐,使用时务必小心。
9. 雷电天气请谨慎使用,注意防雷。
10. 网络 RTK 服务需要使用遥控器中 SIM 卡的移动数据流量,确保流量充足。

CH
17
简 介
D-RTK 手持测绘仪是一款适用于 DJI MG-1S RTK 农业植保机的配件,配合 D-RTK 基
站或网络 RTK 服务 * 使用,可获得厘米级定位,实现更加精准的农田规划。操作面板
配备一系列按键,方便标记边界及障碍物。使用时,用户可通过显示屏和指示灯了解
当前系统状态。测绘数据可传输至 DJI MG App,以使用智能规划作业系统进行作业。
物品清单
测绘仪 ×1
支杆 ×1
手提箱 ×1
智能电池 ×2
充电器 ×1
Micro SD 卡×1(16GB)
充电管家 ×1
电源线 ×1
Micro USB 线×1
* 使用网络 RTK 服务前,请确保您所在地区已覆盖此服务,可在 DJI MG App 中查询。详见
配置网络 RTK。

CH
18
部件名称
1
A B C
EF
D
2
3
5
6
7
10
9
8
4
1. D-RTK 天线
2. Datalink Pro 天线
3. Datalink 3 天线
4. 水平仪
5. 电池仓盖
6. Micro SD 卡槽
7. Micro USB 接口
8. 指示灯
9. 显示屏
10. 操作面板
A. 对频按键
B. 电源按键
C. 模式按键
D. 开始 / 结束测量按键
E. 添加航点按键
F. 障碍物测量按键
ページが読み込まれています...
ページが読み込まれています...
ページが読み込まれています...
ページが読み込まれています...
ページが読み込まれています...
ページが読み込まれています...
ページが読み込まれています...
ページが読み込まれています...
ページが読み込まれています...
ページが読み込まれています...
ページが読み込まれています...
ページが読み込まれています...
ページが読み込まれています...
ページが読み込まれています...
ページが読み込まれています...
ページが読み込まれています...
ページが読み込まれています...
ページが読み込まれています...
ページが読み込まれています...
ページが読み込まれています...
ページが読み込まれています...
ページが読み込まれています...
ページが読み込まれています...
ページが読み込まれています...
-
 1
1
-
 2
2
-
 3
3
-
 4
4
-
 5
5
-
 6
6
-
 7
7
-
 8
8
-
 9
9
-
 10
10
-
 11
11
-
 12
12
-
 13
13
-
 14
14
-
 15
15
-
 16
16
-
 17
17
-
 18
18
-
 19
19
-
 20
20
-
 21
21
-
 22
22
-
 23
23
-
 24
24
-
 25
25
-
 26
26
-
 27
27
-
 28
28
-
 29
29
-
 30
30
-
 31
31
-
 32
32
-
 33
33
-
 34
34
-
 35
35
-
 36
36
-
 37
37
-
 38
38
-
 39
39
-
 40
40
-
 41
41
-
 42
42
-
 43
43
-
 44
44


dji AGRAS MG-1S Series ユーザーガイド
- タイプ
- ユーザーガイド
- このマニュアルも適しています
他の言語で
- English: dji AGRAS MG-1S Series User guide