
D-RTK 2
High-Precision GNSS Mobile Station
2018.12v1.0
User Guide
使用说明


2
EN
Disclaimer
Thank you for purchasing D-RTK
TM
2 High-Precision GNSS Mobile Station (hereinafter referred to as
the “Product”). Read this disclaimer carefully before using this Product. By using this Product, you
hereby agree to this disclaimer and signify that you have read it fully. Please use this Product in strict
accordance with the manual and be sure to pay attention to the Warnings. SZ DJI TECHNOLOGY
CO., LTD., and its afliated companies assume no liability for damage(s) or injuries incurred directly or
indirectly from using, installing or retting this Product improperly, including but not limited to using non-
designated accessories.
DJI
TM
is a trademark of SZ DJI TECHNOLOGY CO., LTD. (abbreviated as “DJI”) and its affiliated
companies. Names of products, brands, etc., appearing in this manual are trademarks or registered
trademarks of their respective owner companies. This Product and manual are copyrighted by DJI with
all rights reserved. No part of this Product or manual shall be reproduced in any form without the prior
written consent or authorization of DJI.
This disclaimer is produced in various languages. In the event of divergence among different versions,
the Chinese version shall prevail when the Product in question is purchased in China, and the English
version shall prevail when the Product in question is purchased in any other region.
Warnings
1. MG-12000P batteries can be purchased separately to be used with D-RTK 2 High-Precision GNSS
Mobile Station (abbreviated as D-RTK 2 Mobile Station). Please DO NOT use other battery models.
2. Only use the D-RTK 2 in the corresponding frequency band and in accordance with local laws and
regulations.
3. DO NOT bend or fold the cables excessively.
4. Ensure that the D-RTK 2 Mobile Station is perfectly level when mounted and placed.
5. Only operate in an open environment free from radio interference. Turn off nearby devices using the
same frequencies as the D-RTK 2 Mobile Station (e.g. radio transceivers).
6. Ensure that the antennas of all the devices used are unobstructed when in use.
7. Only use genuine DJI parts or parts certified by DJI. Unauthorized parts or parts from non-DJI-
certied manufacturers may cause the system to malfunction and compromise safety.
8. Ensure that the D-RTK 2 Mobile Station and its components are free from contamination (e.g. water,
oil, soil and sand).
9. DO NOT attempt to disassemble any part of the D-RTK 2 Mobile Station that has already been
mounted prior to shipping.
10. Handle the sharp ends of the extension rod and tripod with caution.
11. Take necessary measures to protect the D-RTK 2 Mobile Station and batteries from water in rain,
snow, and/or thunderstorms. Operate with caution in severe weather conditions.
12. To maximize the lifespan of the battery, remove the Intelligent Battery from the D-RTK 2 Mobile
Station when not in use.
Introduction
The D-RTK 2 High-Precision GNSS Mobile Station is a next-generation high-precision satellite signal
receiver that supports four global satellite navigation systems: GPS, BEIDOU, GLONASS, and Galileo with
11-band satellite signal* reception. Its built-in OCUSYNC
TM
, Wi-Fi, LAN, 4G, and CAN data transmission
links ensure uninterrupted, stable data transmission under a variety of application scenarios. The D-RTK
2 Mobile Station can be used as an RTK mobile base station to achieve centimeter-level positioning
accuracy of an aircraft equipped with a DJI RTK positioning system (such as MG-1P RTK or PHANTOM
TM
4 RTK). Its functions are uncompromised even in environments with strong magnetic interference, for
example, near high-voltage power lines or metal structures. The D-RTK 2 Mobile Station can also be used
as a handheld mapping device** to achieve enhanced precision in point positioning during surveying and
mapping, or lofting and other engineering applications. In addition, the D-RTK 2 Mobile Station can be
used as a stationary RTK base station to quickly build network RTK services***.
* Refer to the Specications for details.
** Supported later.
*** Supported later. DJI only provides technical services, users must comply with the local laws, regulations and
requirements for building network RTK services.

3
EN
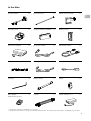
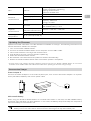
In the Box
* Optional accessories available for purchase.
** Optional accessories for using the D-RTK 2 Mobile Station as a stationary base station. Available for purchase.
D-RTK 2 Body Extension Rod×1 ×1
Charging Hub Intelligent Battery (WB37) Battery Cover ×1 ×2 ×1
AC Power Adapter AC Power Cable MG Power Cable*×1 ×1 ×1
USB-C Cable USB-C OTG Cable×1 ×1
Hex Key ClaspBattery Strap×1 ×1 ×1
Tripod* Power Adapter II **×1 ×1
Mobile Phone Holder ×1
LAN Cable* ×1
MG-12000P
XT90 Shorting Plug
×1

4
EN
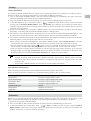
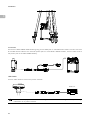
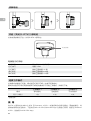
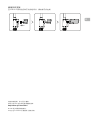
Overview
D-RTK 2 Body Tripod
1. Antenna
2. Link Button and Indicator
3. Power Button and Indicator
4. Operating Mode Button and Indicator
5. USB-C Port
6. Dongle Compartment
7. Rosette Mount
8. Battery Compartment
9. Battery Cover
10. Lock Nut
11. CAN Port*
12. LAN Port*
13. External Power Port*
1. Sleeve
2. Mount Base
3. Retractable Legs
4. Knobs
1
1 2
34
5
6
7
8
9
10
2
3
4
11
12
13
* Equipped with a protective cover that can be stored when the unit is in use.
When not in use, cover the ports to protect the unit from moisture and dust.
Bottom View

5
EN
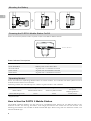
Preparation
Mounting the Dongle
• Only use a DJI approved dongle*. Unapproved dongles may not be installed into the D-RTK 2 Mobile Station.
Internet access and OcuSync may be interfered.
• The dongle supports various network standards. Use a SIM card that is compatible with the chosen mobile network
provider and select a mobile data plan according to the planned level of usage.
• Use the dongle and the SIM card in accordance with their manuals.
* ZTE MF833U (LTE TDD B38/41, FDD B1/3/5/8, UMTS B1/8 supported) is recommended for Mainland China.
ZTE MF833V (LTE FDD B1/2/3/4/5/7/8/12&B17/20, UMTS B1/2/4/5/8, GSM 850/900/1800/1900 supported) is
recommended for other countries/regions.
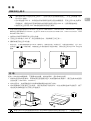
1. Remove the screws with the hex key and then remove the dongle compartment cover.
2. Insert the dongle into the USB port with the SIM card inserted into the dongle and test. *
3. Re-mount the dongle compartment cover.
* Test procedure: Press and hold the power button of the D-RTK 2 Mobile Station to turn it on, and then link it with
the remote controller by following the Linking Procedure below. In the app tap
>
and select
Network
Diagnostics
. If the statuses of all the devices in the network chain are shown in green the dongle and SIM card are
functioning properly.
Charging the Battery
Press the battery level button once to check the battery level. Fully charge the batteries before rst-
time use.
1. Place the battery into the charging hub, connect the AC power adapter to the Charging Hub, and
then connect the AC power adapter to a power outlet (100–240V, 50/60Hz).
2. The charging hub will intelligently charge batteries in sequence according to battery power levels
from high to low.
3. The Status LED blinks green when charging and turns solid green when fully charged. The buzzer
will begin beeping when charging is complete. Remove the battery or turn off the buzzer to stop it.
Refer to the WCH2 Charging Hub User Guide and the WB37 Intelligent Battery Safety
Guidelines for more details.
A
A

6
EN
Powering the D-RTK 2 Mobile Station On/Off
Press and hold the power button to power on/off the D-RTK 2 Mobile Station.
Mounting the Battery
Power Button
Power Indicator Descriptions
Solid Red System initializing/error notication
Quick Red Blink Battery level is less than 20%
Slow Red Blink Signals from ≤ 5 Satellite received
Solid Yellow Signals from 6-9 Satellite received
Solid Green Signals from ≥10 Satellite received
Operating Modes
Press and hold the Operating Mode button to switch modes. The indicator will blink yellow once to
indicate that the switch is successful.
Operating modes are indicated by the number of green blinks in the indicator.
Operating Mode 1 Operating Mode 2* Operating Mode 3*
Mode Name Mobile Base Station Stationary Base Station
Handheld
Mapping Device
Green Blinking Times Once Twice Three Times
* Supported later.
How to Use the D-RTK 2 Mobile Station
The D-RTK 2 Mobile Station can be used as a compatible base station for the MG-1P RTK or the
Phantom 4 RTK. The linking, activation, and usage procedures are similar for the two aircraft. The
following procedures use the MG-1P RTK and DJI MG app. When using with the Phantom 4 RTK, use
the DJI GS RTK app.

7
EN
Linking
Linking Procedure
The D-RTK 2 Mobile Station must be linked to the remote controller when using with the MG-1P RTK or
Phantom 4 RTK. The following descriptions use the MG-1P RTK for example.
1. Turn on the D-RTK 2 Mobile Station, wait until system initialization is completed, and then press and
hold the operating mode switch to enter Operating Mode 1.
2. Turn on the MG-1P RTK remote controller and ensure that the DJI MG app is launched.
3. In the DJI MG app go to Operation View > >
RTK
to enable RTK function. Select the RTK
service type to
D-RTK 2 Mobile Station
. Then, tap
Linking
at the bottom. The remote controller status
indicator will blink blue and a beeping sound from the remote controller will indicate that the remote
controller is being linked.
4. Press the Link button on the D-RTK 2 Mobile Station and the link indicator will blink red and green
alternately, indicating that the D-RTK 2 Mobile Station is being linked.
5. The linking is successful when the indicator light on the remote controller becomes solid green. The
D-RTK 2 link indicator shows the current working status. Refer to the table below for the details.
6. The remote controller and aircraft must be relinked after the remote controller is linked with the D-RTK
2 Mobile Station. There are three ways that this can be done:
•
After linking the remote controller with the D-RTK 2 Mobile Station, tap
Link with Aircraft
in the pop-
up window to link it with the aircraft. Then press the Link button on the aircraft to nish linking.
•
On the RTK Settings page, tap the button next to the prompt indicating the aircraft has been
disconnected, and then tap
Link with Aircraft
in the pop-up window to link it with the aircraft.
•
Link the remote controller with the aircraft on the RC Settings page. When nished, go to the RTK
Settings page and tap
Try to Reconnect
next to the D-RTK 2 Status to reconnect to D-RTK 2. The
D-RTK 2 status must indicate
Connection Success
for the RTK functions to work.
•
When the D-RTK 2 Mobile Station has been connected to the remote controller and the
aircraft is being controlled by the remote controller, the D-RTK 2 Mobile Station cannot
be linked with other remote controllers. If required, link after the aircraft lands and the
motors stop.
•
One D-RTK 2 Mobile Station can link with up to ve remote controllers.
Link Indicator Descriptions
When the linking process starts, the indicator blinks red and green alternately.
When the linking process is nished, the indicator blinking patterns are as shown below.
Operating Mode 1 and 3 Status
Solid Green OcuSync signal quality >70%
Quick Green Blink OcuSync signal quality 35%-70%
Slow Green Blink OcuSync signal quality ≤ 35%
Solid Red OcuSync signal quality = 0
Operating Mode 2 Status
Solid Green Network connected
Solid Red Network disconnected
Activation
Make sure to activate the D-RTK 2 Mobile Station before rst-time use. Activation can be done in the
app or in the DJI ASSISTANT
TM
2 software. The following descriptions use the app for example.
1. Power on the D-RTK 2 Mobile Station.
2. Turn on the MG-1P RTK remote controller and ensure that the DJI MG app is launched.
3. In the DJI MG app go to Operation View > >
RTK
to enable the RTK function. Select
D-RTK 2
Mobile Station
under RTK service type. When connecting for the rst-time, a prompt for activation will
appear. Follow the on-screen steps for activation.

8
EN
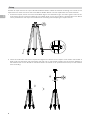
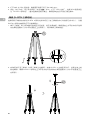
2. Insert the extension rod into the tripod and tighten the sleeve on the tripod. Then attach the D-RTK 2
body onto the extension rod and tighten the lock nut on the D-RTK 2 body. Ensure that the bubble of
the bubble level on the D-RTK 2 is located within the black circle (viewed from the top of the bubble
level vertically).
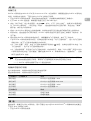
Setup
Choose an open area to set up the D-RTK 2 Mobile Station. Mark the location and align the center of the
tripod with the mark to ensure that the D-RTK 2 Mobile Station can be replaced at the same location.
1. Unfold the tripod, stretch the three retractable legs to the desired length, and then tighten each of the
three knobs. Ensure that the bubble of the bubble level on the mount base is located within the black
circle (viewed from the top of the bubble level vertically) while keeping the tripod secure.

9
EN
•
DO NOT change the position or angle of the tripod or the D-RTK 2 Mobile Station after the
tripod has been leveled, or else it should be readjusted.
•
The setup environment requires a wild eld of vision. Ensure that there are no obstructions
(trees, buildings) within the zone more than a 15° angel above the horizontal plane of the
D-RTK 2 antenna to prevent the GNSS signals from being absorbed or blocked.
•
The setup location should be at least 200 m away from high-power radio emission sources
(such as television stations, microwave stations, etc.) and at least 50 m away from high-
voltage transmission lines to avoid electromagnetic interference to GNSS signals.
•
The setup location should be away from large-area waters or objects that strongly interfere
with satellite signal reception to reduce multipath effects.
Usage
Instructions
1. Lift the extension rod in the tripod to adjust the D-RTK 2 Mobile Station to the desired height, and
then tighten the sleeve.
2. Turn on the D-RTK 2 Mobile Station, wait until system initialization is completed, and then press and
hold the operating mode button to enter Operating Mode 1.
3. Turn on the MG-1P RTK remote controller and ensure that the DJI MG app is launched, and then turn
on the aircraft.
4. In the DJI MG app go to Operation View > >
RTK
to enable RTK function. Select the RTK
service type to
D-RTK 2 Mobile Station
. Then view the
Status
display to check the connection.
5. Wait for the system to start searching for satellites. The RTK status icon and satellite number will be
shown on the status bar at the top of the Operation View. Start the motors and take off the aircraft
when the RTK status is FIX.
• Descriptions of the RTK/GNSS signal strength displayed in the Operation View are as below:
12
: This icon is displayed once the RTK is enabled and begins working properly. The
number on the upper right corner indicates the number of satellites connected. The RTK
status below includes two statuses: FIX indicates that differential data analysis is completed
and RTK can be used for aircraft positioning. Only under this status can the aircraft take off.
FLOAT indicates that differential data is in analysis. Waiting for it to be FIX is required.
: This icon is displayed if the RTK is disabled, indicating the current GNSS signal
strength and number of satellites connected.
•
During ight, if the D-RTK 2 Mobile Station is moved or it is powered off, the aircraft RTK
will switch to GNSS mode and will not enter the RTK FIX status again. Restart the D-RTK 2
Mobile Station after ight and wait for it to enter the RTK FIX status.
Advanced Settings
1. Go to the bottom of the RTK settings page, and then tap Advanced Settings.
2. Manage the list of linked remote controllers.
3. Input measured coordinates and altitude* to set them to the D-RTK 2 Mobile Station when using as a
base station.
4. The Wi-Fi connection password can be set.
* If coordinates input into the app are more than 50 m away from the actual coordinates of the D-RTK 2 Mobile
Station, they will not be imported.
If the D-RTK 2 Mobile Station is restarted after input coordinates are successfully set, these coordinates will be
used only if the difference between the actual coordinates and the set coordinates is less than 5 m. Otherwise, the
actual positioning coordinates will be used.

10
EN
Appendix
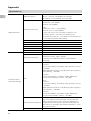
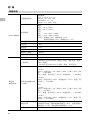
Specications
GNSS Receiver
GNSS Frequency
Simultaneously receive:
GPS: L1 C/A, L2, L5; BeiDou: B1, B2, B3
GLONASS: F1, F2; Galileo: E1, E5A, E5B
Positioning Accuracy
Single Point
Horizontal: 1.5 m (RMS)
Vertical: 3.0 m (RMS)
RTK
Horizontal: 1 cm + 1 ppm (RMS)
Vertical: 2 cm + 1 ppm (RMS)
1 ppm: For every 1 km increase in distance, the
accuracy will be 1 mm less. For example, the
horizontal accuracy is 1.1 cm when the receiving end
is 1 km away from the base station.
Positioning Update Rate 1 Hz, 2 Hz, 5 Hz, 10 Hz and 20 Hz
Cold Start < 45 s
Hot Start < 10 s
Recapture Time < 1 s
Initialization Reliability > 99.9%
Differential Data Format RTCM 2.x/3.x
Communication
and Data Storage
Data Link OcuSync, Wi-Fi, LAN, 4G
Operating Frequency
2.400 GHz to 2.483 GHz (China, United States,
Australia, Europe, Japan, Korea)
5.725 GHz to 5.850 GHz (China, United States,
Australia)
EIRP
OcuSync
2.4 GHz
FCC (United States, Australia) / NCC (Taiwan, China):
< 26 dBm
SRRC (Mainland China) / CE (Europe) / MIC (Japan) /
KCC (Korea): < 20 dBm
5.8 GHz
FCC (United States, Australia) / SRRC (Mainland
China) / NCC (Taiwan, China): < 26 dBm
Wi-Fi
2.4 GHz
FCC (United States, Australia) / NCC (Taiwan, China):
< 22 dBm
SRRC (Mainland China) / CE (Europe) / MIC (Japan) /
KCC (Korea): < 20 dBm
5.8 GHz
FCC (United States, Australia) / SRRC (Mainland
China) / NCC (Taiwan, China): < 22 dBm
Communication Distance
OcuSync: 2 km (unobstructed and free of interference,
when the distance from the D-RTK 2 antenna to the
bottom of the tripod is 1.8 m, when the difference in
height between the remote controller and D-RTK 2 is
less than 2 m, and when the remote controller is 1.2 m
from ground level)
Memory Capacity 16 GB

11
EN
IMU Features
Built-in high-precision 6-axis accelerometer
D-RTK 2 movement monitoring
Sloping measurements
Electronic bubble level
Electrical
Characteristics
Power Consumption 12 W
Power Supply 16.5 to 58.8VDC
Battery
Type: Lithium-ion battery
Capacity: 4920 mAh
Energy: 37.3 WH
Run Time
WB37 battery: > 2 h
MG-12000P battery: > 50 h
Physical
Characteristics
Dimensions (D-RTK 2
body with extension rod)
168 mm × 168 mm × 1708 mm
IP Rating IP67
Operating
Temperature
32° to 113° F (0° to 45° C)
Updating the Firmware
Update the D-RTK 2 rmware in the DJI Assistant 2 software or the app*. The following instructions use
the DJI Assistant 2 software for example.
1. Turn on the D-RTK 2 Mobile Station.
2. Connect the D-RTK 2 Mobile Station to the computer via the USB-C cable.
3. Launch DJI Assistant 2 and login with a DJI account.
4. Click D-RTK 2 and then click the rmware update tag.
5. Select the desired rmware version.
6. DJI Assistant 2 will download and update the rmware automatically.
7. Restart the D-RTK 2 Mobile Station after the rmware update is completed.
* An app version that supports firmware update is required. Connect the D-RTK 2 Mobile Station to the remote
controller via the USB-C cable and USB-C OTG cable when updating the firmware using the app.
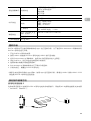
Accessories Usage
Power Adapter II
Connect the Power Adapter II to the external power port, then connect the Power Adapter II to a power
outlet (100-240V, 50/60Hz) with the AC power cable.
MG-12000P Battery
When using the D-RTK 2 Mobile Station as a mobile base station in the eld, the MG-12000P battery
should be used. DO NOT use other batteries. In this case, the Battery Strap and Clasp are required to
mount the battery to the extension rod.
Be sure to replace the MG-12000P battery when the Battery Level Indicator indicates that the
battery level is less than 25% to avoid excessive discharge that may affect battery life.

12
EN
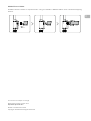
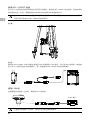
Installation
Connection
Connect the MG-12000P XT90 Shorting Plug to the XT90 port on the MG Power Cable. Connect one end
of the MG Power Cable to the external power port on the D-RTK 2 Mobile Station, and the other end to
the power port of the MG-12000P battery.
LAN Cable
Use the LAN cable to access the public network.
RJ45 Port
Be sure to comply with local laws and regulations when transmitting satellite positioning
information on a public network.

EN
Mobile Phone Holder
A Mobile Phone Holder is required when using the D-RTK 2 Mobile Station as a handheld mapping
device.
This content is subject to change.
Download the latest version from
http://www.dji.com/d-rtk-2
D-RTK is a trademark of DJI.
Copyright © 2018 DJI All Rights Reserved.

CHS
14
免责声明
感谢您购买 D-RTK
TM
2 高精度 GNSS 移动站(简称 D-RTK 2 移动站)。在使用之前,请仔细阅
读本声明,一旦使用,即被视为对本声明全部内容的认可和接受。请严格遵守本文安装和使用该
产品,并务必重视注意事项。因用户不当使用、安装、改装(包含但不限于使用非 DJI 指定的零
配件)造成的任何损失,深圳市大疆
TM
创新科技有限公司及其关联公司将不承担任何责任。
DJI
TM
是深圳市大疆创新科技有限公司及其关联公司的商标。本文出现的产品名称、品牌等,均
为其所属公司的商标或注册商标。本产品及文档为深圳市大疆创新科技有限公司版权所有。未经
许可,不得以任何形式复制翻印。
关于不同语言版本的免责声明可能存在的语义差异,中国以中文版为准,其他地区以英文版为准。
注意事项
1. 若使用 MG-12000P 电池为 D-RTK 2 移动站供电,请自行购买。切勿使用其他非指定型号的
电池。
2. 根据当地无线电规定,使用对应频段的 D-RTK 2 移动站,并遵守当地无线电法律法规。
3. 安装时切勿过度弯曲和折叠线材。
4. 安装和摆放时,务必确保 D-RTK 2 移动站与水平面相对水平。
5. 在开阔、不受无线电干扰的环境中使用 D-RTK 2 移动站。务必在关闭其他同频段的无线设备(如
对讲机等)后再使用。
6. 使用过程中请确保所有设备的天线均不受遮挡。
7. 使用原厂配件或经过 DJI 认证的配件。使用非原厂配件有可能对系统的安全使用造成危险。
8. 确保部件内部没有进入任何异物(如:水、油等液体,沙土等)。
9. 切勿自行拆下出厂时已安装的任何部件。
10. 延长杆底部及三脚架底部较为尖锐,使用时务必小心。
11. 雨雪天气时使用,请对 D-RTK 2 移动站和电池采取必要的防水措施。雷电天气请谨慎使用,
注意防雷。
12. 为提高电池使用寿命,关闭 D-RTK 2 移动站后,请及时取出其中的智能电池。
简 介
D-RTK 2 高精度 GNSS 移动站是 DJI 最新研发的高精度卫星信号接收机,支持 GPS、BEIDOU、
GLONASS 和 Galileo 4 系统 11 频 * 的卫星信号接收,同时内置 OCUSYNC
TM
、Wi-Fi、LAN、
4G 和 CAN 等数据传输链路,方便用户在不同应用场景使用。D-RTK 2 移动站可作为 RTK 移动
基站,将装备有 DJI RTK 定位系统的飞行器(如 MG-1P RTK、PHANTOM
TM
4 RTK 等)定位精
度由米级提升至厘米级,而且提供强大的抗磁干扰能力,在高压线、金属建筑等强磁干扰的环境
下保障可靠的作业飞行。D-RTK 2 移动站作为手持测绘杆 **,用于手持测绘、工程放样等其他用
途,可实现更加精准的定点测量。另外,D-RTK 2 移动站还可以作为固定基站,用来快速建立网
络 RTK 服务 ***。
* 详见规格参数。
** 后续支持。
*** 后续支持;网络 RTK 服务的建设必须符合当地法律法规和资质要求,DJI 仅提供技术服务。

CHS
15
物品清单
* 选配,需要另行购买。
** 用作固定基站时选配,需要另行购买。
D-RTK 2 主体 延长杆×1 ×1
充电管家 智能电池(WB37) 电池盖×1 ×2 ×1
电源适配器 AC 电源线 MG 电源线 *×1 ×1 ×1
USB-C 线 USB-C OTG 线×1 ×1
内六角扳手 电池扣电池绑带×1 ×1 ×1
三脚架(选配)* 电源适配器 II(选配)**×1 ×1
手机支架 ×1
LAN 线 * ×1
MG-12000P XT90 短接头 ×1

CHS
16
部件说明
D-RTK 2 主体 三脚架
1. 天线
2. 对频按键及指示灯
3. 电源按键及指示灯
4. 模式按键及指示灯
5. USB-C 接口
6. 无线上网卡仓
7. 盘齿
8. 电池仓
9. 电池盖
10. 锁定螺母
11. CAN 口 *
12. LAN 口 *
13. 外部电源接口 *
1. 套筒
2. 基座
3. 伸缩杆
4. 旋钮
1
1 2
34
5
6
7
8
9
10
2
3
4
11
12
13
底视图
* 配备保护盖,接口使用时取下保护盖并保存好;接口未使用时请盖好保护盖以防水防尘。

CHS
17
准 备
安装无线上网卡
•
务必使用 DJI 认证的无线上网卡 *。否则可能无法安装到设备上,无法上网或者干扰
OcuSync 通信。
•
用户需自备 SIM 卡,并根据实际使用情况选择合适的流量服务。无线上网卡支持多种
网络制式,根据当地运营商网络的实际情况选择合适的 SIM 卡,以获得最佳体验。
•
按照无线上网卡及 SIM 卡本身的使用说明进行操作。
* 中国大陆地区推荐使用中兴 MF833U(支持 LTE TDD B38/41,FDD B1/3/5/8,UMTS B1/8),其他国
家和地区推荐使用中兴 MF833V(支持 LTE FDD B1/2/3/4/5/7/8/12&B17/20,UMTS B1/2/4/5/8,GSM
850/900/1800/1900)。
1. 使用内六角扳手移除无线上网卡仓盖。
2. 无线上网卡中装入 SIM 卡,然后安装到仓内。测试确保工作正常 *。
3. 重新安装无线上网卡仓盖。
* 测试方法:长按电源按键开启 D-RTK 2 移动站,按照后文的“对频方法”与遥控器对频后,进入 App
主界面 > > > 网络诊断,网络链路上所有设备状态均显示绿色,表示无线上网卡及 SIM 卡可正常
使用。
充 电
短按一次电池的电量按键,可查看电池电量。首次使用时,务必将电池充满。
1. 安装电池到充电管家中,再将电源适配器接头插入充电管家的电源接口,最后连接充电器到
交流电源(100-240V,50/60Hz)。
2. 充电过程中,充电管家会优先选择电量较高的电池进行充电。
3. 充电管家绿灯闪烁表示正在充电,绿灯常亮表示充电完毕。电池充满时会有声音提示,拔下
电池或关闭蜂鸣器开关可停止声音提示。
参考《WCH2 充电管家使用说明》和《WB37 智能电池安全使用指引》,了解更多内容。
A
A

CHS
18
开启 / 关闭 D-RTK 2 移动站
长按电源按键以开启 / 关闭 D-RTK 2 移动站。
安装电池
电源按键
电源指示灯说明
红灯常亮 正在初始化 / 错误报警
红灯快闪 电量 <20%
红灯慢闪 接收卫星数量 ≤5 颗
黄灯常亮 接收卫星数量 6-9 颗
绿灯常亮 接收卫星数量 ≥10 颗
选择工作模式
长按模式按键进行切换,模式指示灯黄灯闪烁一次表示切换成功。
模式状态指示灯绿灯周期内循环闪烁的次数表示不同的工作模式,详细见下表:
工作模式 1 工作模式 2* 工作模式 3*
模式 移动基站 固定基站 手持测绘杆
闪灯(绿色) 1 次 2 次 3 次
* 后续支持。
使 用
D-RTK 2 移动站与 MG-1P RTK 及 Phantom 4 RTK 一起使用时作为移动基站,两者的激活、对
频和使用等的方法类似。下面均以 MG-1P RTK 和 DJI MG App 为例进行说明;若配合 Phantom
4 RTK,则使用 DJI GS RTK App。

CHS
19
对 频
对频方法
D-RTK 2 移动站与 MG-1P RTK 及 Phantom 4 RTK 一起使用时,需要遥控器与 D-RTK 2 移动站
对频,对频的方法类似,下面以 MG-1P RTK 为例进行说明。
1. 开启 D-RTK 2 移动站电源,等待系统完成初始化,长按模式按键切换到工作模式 1。
2. 打开 MG-1P RTK 遥控器,确保显示设备已运行 DJI MG App。
3. 点击“执行作业”进入作业界面,点击
>
RTK,打开“RTK 功能”。选择 RTK 服务类型
为“D-RTK 2 移动站”,然后点击“对频”。遥控器状态指示灯蓝色闪烁,并且发出“滴滴”
提示音,表示进入对频状态。
4. 短按一次 D-RTK 2 移动站上的对频按键,对频状态指示灯红绿交替闪烁表示进入对频状态。
5. 对频成功,遥控器指示灯绿灯常亮,D-RTK 2 移动站指示灯显示当前工作模式下的状态,详
见下表。
6. 遥控器与 D-RTK 2 移动站对频成功后,需要重新与飞行器对频。有以下三种方式:
•
与 D-RTK 2 移动站对频完成后,在弹出的窗口中点击“与飞行器对频”,进入与飞行器对
频的状态,按下飞行器对频按键以完成对频。
•
在“RTK 设置”页面,点击飞行器未连接提示旁边的 按钮,在弹出的窗口中点击“与
飞行器对频”,进入与飞行器对频的状态。
•
在“遥控器设置”页面进行与飞行器的对频。完成对频后,需在“RTK 设置”页面 D-RTK
2 移动站状态处点击“尝试重连”重新连接 D-RTK 2,并确保状态为“连接成功”,否则
将无法使用 RTK 功能。
•
当 D-RTK 2 移动站已经连接遥控器且遥控器正在控制飞行器作业时,D-RTK 2 移动站
无法与其他遥控器进行对频,请等待飞行器降落并关闭电机后再进行对频。
•
一个 D-RTK 2 移动站最多可与 5 个遥控器对频。
对频状态指示灯说明
进入对频状态时,对频状态指示灯将红绿交替闪烁。
退出对频状态时,对频状态指示灯显示如下:
工作模式 1 / 工作模式 3 状态
绿灯常亮 OcuSync 信号质量 >70%
绿灯快闪 OcuSync 信号质量 35%-70%
绿灯慢闪 OcuSync 信号质量 ≤ 35%
红灯常亮 OcuSync 信号质量 =0
工作模式 2 状态
绿灯常亮 网络已连接
红灯常亮 网络未连接
激 活
首次使用,需激活 D-RTK 2 移动站。用户可通过 App 或 DJI ASSISTANT
TM
2 调参软件完成激活,
下面以 App 为例进行说明。
1. 开启 D-RTK 2 移动站电源。
ページが読み込まれています...
ページが読み込まれています...
ページが読み込まれています...
ページが読み込まれています...
ページが読み込まれています...
ページが読み込まれています...
ページが読み込まれています...
ページが読み込まれています...
ページが読み込まれています...
ページが読み込まれています...
-
 1
1
-
 2
2
-
 3
3
-
 4
4
-
 5
5
-
 6
6
-
 7
7
-
 8
8
-
 9
9
-
 10
10
-
 11
11
-
 12
12
-
 13
13
-
 14
14
-
 15
15
-
 16
16
-
 17
17
-
 18
18
-
 19
19
-
 20
20
-
 21
21
-
 22
22
-
 23
23
-
 24
24
-
 25
25
-
 26
26
-
 27
27
-
 28
28
-
 29
29
-
 30
30


他の言語で
- English: dji D-RTK 2 User guide
関連論文
-
dji Matrice 200 Series V2 ユーザーマニュアル
-
dji MATRICE 300 RTK ユーザーガイド
-
-
dji Osmo Pocket 3 ユーザーガイド
-
dji Assistant 2 For Phantom クイックスタートガイド
-
-
-
-
-
その他のドキュメント
-
ZTE T203 ユーザーマニュアル
-
Philips SHM5108BK/00 ユーザーマニュアル
-
-
Insta360 GPS Smart Remote Controller ユーザーマニュアル
-
TP-LINK tp-link Tapo C400 Smart Wire Free Security Camera System ユーザーガイド
-
 Aidialink AL-100 UHF Handheld Reader ユーザーマニュアル
-
Asus Zenpad Z580CA 8" 64Gb Wi-Fi Metallic (1B046A) ユーザーマニュアル
-
 Pro'sKit MT-7071N 取扱説明書
-
Inrico T310R 取扱説明書
-
Autel EVO II RTK Series V3 Rugged Bundle Drone ユーザーガイド

