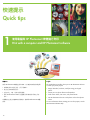
HP Photosmart D6100 Printer series クイックスタートガイド
- カテゴリー
- 印刷
- タイプ
- クイックスタートガイド
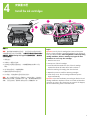
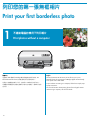
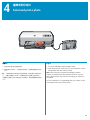
HP Photosmart D6100 Printer seriesは、ご自宅や小規模オフィスに最適なプリンターです。スタイリッシュなデザインとコンパクトなサイズで、設置場所を選びません。また、Wi-FiやAirPrintに対応しており、スマートフォンやタブレットからも簡単に印刷できます。
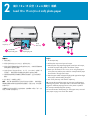
HP Photosmart D6100 Printer seriesは、高品質な写真印刷が可能です。最大解像度4800×1200dpiで、写真やイラストを鮮やかに印刷できます。また、用紙の種類に合わせて、自動的に印刷設定を調整する機能を搭載しています。
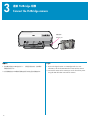
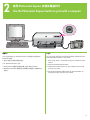
HP Photosmart D6100 Printer seriesは、スキャン機能も備えています。最大解像度1200dpiで、書類や写真などを簡単にスキャンできます。スキャンしたデータは、パソコンやスマートフォンに保存したり、メールで送信したりすることができます。
HP Photosmart D6100 Printer seriesは、コピー機能も備えています
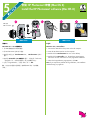
HP Photosmart D6100 Printer seriesは、ご自宅や小規模オフィスに最適なプリンターです。スタイリッシュなデザインとコンパクトなサイズで、設置場所を選びません。また、Wi-FiやAirPrintに対応しており、スマートフォンやタブレットからも簡単に印刷できます。
HP Photosmart D6100 Printer seriesは、高品質な写真印刷が可能です。最大解像度4800×1200dpiで、写真やイラストを鮮やかに印刷できます。また、用紙の種類に合わせて、自動的に印刷設定を調整する機能を搭載しています。
HP Photosmart D6100 Printer seriesは、スキャン機能も備えています。最大解像度1200dpiで、書類や写真などを簡単にスキャンできます。スキャンしたデータは、パソコンやスマートフォンに保存したり、メールで送信したりすることができます。
HP Photosmart D6100 Printer seriesは、コピー機能も備えています


-
 1
1
-
 2
2
-
 3
3
-
 4
4
-
 5
5
-
 6
6
-
 7
7
-
 8
8
-
 9
9
-
 10
10
-
 11
11
-
 12
12
-
 13
13
-
 14
14
-
 15
15
-
 16
16


HP Photosmart D6100 Printer series クイックスタートガイド
- カテゴリー
- 印刷
- タイプ
- クイックスタートガイド
HP Photosmart D6100 Printer seriesは、ご自宅や小規模オフィスに最適なプリンターです。スタイリッシュなデザインとコンパクトなサイズで、設置場所を選びません。また、Wi-FiやAirPrintに対応しており、スマートフォンやタブレットからも簡単に印刷できます。
HP Photosmart D6100 Printer seriesは、高品質な写真印刷が可能です。最大解像度4800×1200dpiで、写真やイラストを鮮やかに印刷できます。また、用紙の種類に合わせて、自動的に印刷設定を調整する機能を搭載しています。
HP Photosmart D6100 Printer seriesは、スキャン機能も備えています。最大解像度1200dpiで、書類や写真などを簡単にスキャンできます。スキャンしたデータは、パソコンやスマートフォンに保存したり、メールで送信したりすることができます。
HP Photosmart D6100 Printer seriesは、コピー機能も備えています
他の言語で
関連論文
-
HP Photosmart Pro B8800 Printer series ユーザーガイド
-
HP Photosmart C4600 All-in-One Printer series 取扱説明書
-
HP Photosmart 330 Printer series ユーザーガイド
-
-
-
-
-
-
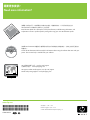
HP Scanjet N6350 Networked Document Flatbed Scanner Getting Started