
T1
www.ezvizlife.com


COPYRIGHT ©2018 Hangzhou Hikvision Digital Technology Co., Ltd. or its subsidiaries.
ALL RIGHTS RESERVED.
About this Manual
The Manual includes instructions for using and managing the product. Pictures, charts,
images and all other information hereinafter are for description and explanation only. The
information contained in the Manual is subject to change, without notice, due to firmware
updates or other reasons. Please find the latest version in the ™ website
(http://www.ezvizlife.com).
Any and all information, including, among others, wordings, pictures, graphs are the
properties of Hangzhou Hikvision Digital Technology Co., Ltd. or its subsidiaries (hereinafter
referred to be “Hikvision”). This user manual (hereinafter referred to be “the Manual”)
cannot be reproduced, changed, translated, or distributed, partially or wholly, by any
means, without the prior written permission of Hikvision. Unless otherwise stipulated,
Hikvision does not make any warranties, guarantees or representations, express or
implied, regarding to the Manual.
Trademarks Acknowledgement
™, ™, and other Hikvision’s trademarks and logos are the properties of
Hikvision in various jurisdictions. Other trademarks and logos mentioned below are the
properties of their respective owners.
Legal Disclaimer
TO THE MAXIMUM EXTENT PERMITTED BY APPLICABLE LAW, THE PRODUCT DESCRIBED,
WITH ITS HARDWARE, SOFTWARE AND FIRMWARE, IS PROVIDED “AS IS”, WITH ALL
FAULTS AND ERRORS, AND HIKVISION MAKES NO WARRANTIES, EXPRESS OR IMPLIED,
INCLUDING WITHOUT LIMITATION, MERCHANTABILITY, SATISFACTORY QUALITY, FITNESS FOR
A PARTICULAR PURPOSE, AND NON-INFRINGEMENT OF THIRD PARTY. IN NO EVENT WILL
HIKVISION, ITS DIRECTORS, OFFICERS, EMPLOYEES, OR AGENTS BE LIABLE TO YOU FOR
ANY SPECIAL, CONSEQUENTIAL, INCIDENTAL, OR INDIRECT DAMAGES, INCLUDING, AMONG
OTHERS, DAMAGES FOR LOSS OF BUSINESS PROFITS, BUSINESS INTERRUPTION, OR LOSS
OF DATA OR DOCUMENTATION, IN CONNECTION WITH THE USE OF THIS PRODUCT, EVEN IF
HIKVISION HAS BEEN ADVISED OF THE POSSIBILITY OF SUCH DAMAGES.
TO THE MAXIMUM EXTENT PERMITTED BY APPLICABLE LAW, IN NO EVENT SHALL
HIKVISION’S TOTAL LIABILITY FOR ALL DAMAGES EXCEED THE PURCHASE PRICE THE
PRODUCT.

HIKVISION does not undertake any liability for personal injury or property damage, as the
result of product interruption or service termination cause by: a) improper installation or
usage other than as requested; b) the protection of national or public interests; c) Force
Majeure; d) yourself or the third party, including not limitation, using any third party’s
products, software, applications, and among others.
REGARDING TO THE PRODUCT WITH INTERNET ACCESS, THE USE OF PRODUCT SHALL BE
WHOLLY AT YOUR OWN RISKS. HIKVISION SHALL NOT TAKE ANY RESPONSIBILITES FOR
ABNORMAL OPERATION, PRIVACY LEAKAGE OR OTHER DAMAGES RESULTING FROM CYBER
ATTACK, HACKER ATTACK, VIRUS INSPECTION, OR OTHER INTERNET SECURITY RISKS;
HOWEVER, HIKVISION WILL PROVIDE TIMELY TECHNICAL SUPPORT IF REQUIRED.
The purpose of the Products is to provide an adequate warning in the event of illegal
encroachment in certain area; however, the proper installation of the Products will not
eliminate, but only reduce, that accidents will not occur or that there will be no personal
injury or property loss as a result. You are highly recommended to raise your vigilance and
strengthen the safety awareness in the daily life.
SURVEILLANCE LAWS VARY BY JURISDICTION. PLEASE CHECK ALL RELEVANT LAWS IN
YOUR JURISDICTION BEFORE USING THIS PRODUCT IN ORDER TO ENSURE THAT YOUR USE
CONFORMS TO THE APPLICABLE LAW. YOU FUTHER AGREE THAT THIS PRODUCT IS ONLY
FOR CIVIL USE, AND HIKVISION SHALL NOT BE LIABLE IN THE EVENT THAT THIS PRODUCT
IS USED WITH ILLEGITIMATE PURPOSES, SUCH AS THIRD PARTY RIGHTS INFRINGEMENT,
MEDICAL TREATMENT, SAFETY EQUIPMENT OR OTHER SITUATIONS WHERE THE
PRODUCT FAILURE COULD LEAD TO DEATH OR PERSONAL INJURY, OR WEAPON OF MASS
DESTRUCTION, CHEMINCAL AND BIOLOGICAL WEAPON, NUCLEAR EXPLOSION, AND ANY
UNSAFE NUCLEAR ENERGY USES OR ANTI-HUMANITY USAGES. YOU SHOULD UNDERTAKE
ALL RESPONSIBILITIES FOR LOSSES OR DAMAGES RESULTING FROM THE ABOVE USAGES
WHATSOEVER.
IN THE EVENT OF ANY CONFLICTS BETWEEN THE ABOVE AND THE APPLICABLE LAW, THE
LATER PREVAILS.
Safety Instruction
CAUTION: THE PRODUCT IS BUILT IN A REPLACEABLE BATTERY. RISK OF EXPLOSION IF
BATTERY IS REPLACED BY AN INCORRECT TYPE. DISPOSE OF USED BATTERIES ACCORDING
TO THE INSTRUCTIONS.

Regulatory Information
This device complies with Part 15 of the FCC Rules. Operation is subject to the following
two conditions:
(1) This device may not cause harmful interference, and
(2) This device must accept any interference received, including interference that may
cause undesired operation.
Please take attention that changes or modification not expressly approved by the party
responsible for compliance could void the user’s authority to operate the equipment.
Note: This product has been tested and found to comply with the limits for a Class B
digital device, pursuant to Part 15 of the FCC Rules. These limits are designed to provide
reasonable protection against harmful interference in a residential installation. This
product generates, uses, and can radiate radio frequency energy and, if not installed
and used in accordance with the instructions, may cause harmful interference to radio
communications. However, there is no guarantee that interference will not occur in
a particular installation. If this product does cause harmful interference to radio or
television reception, which can be determined by turning the equipment off and on, the
user is encouraged to try to correct the interference by one or more of the following
measures:
—Reorient or relocate the receiving antenna.
—Increase the separation between the equipment and receiver.
—Connect the equipment into an outlet on a circuit different from that to which the
receiver is connected.
—Consult the dealer or an experienced radio/TV technician for help.
Гарантийный срок-1 год
Срок службы-3 года
Производитель:Ханджоу Хиквижн Диджитал
Технолоджи(Китай)
Импортер-поставщик в России: ЗАО ''Хиквижн''
Импортер-поставщик в Республике Беларусь:ООО
''Торговый Дом ''АВАНТ-ТЕХНО''
Сайт:www.ezviz.ru

EU Conformity Statement
This product and - if applicable - the supplied accessories too
are marked with "CE" and comply therefore with the applicable
harmonized European standards listed under the Radio Equipment
Directive 2014/53/EU, the EMC Directive 2014/30/EU, the RoHS
Directive 2011/65/EU.
2012/19/EU (WEEE directive): Products marked with this symbol
cannot be disposed of as unsorted municipal waste in the
European Union. For proper recycling, return this product to your
local supplier upon the purchase of equivalent new equipment, or
dispose of it at designated collection points. For more information
see: www.recyclethis.info.
2006/66/EC and its amendment 2013/56/EU (battery directive):
This product contains a battery that cannot be disposed of as
unsorted municipal waste in the European Union. See the product
documentation for specific battery information. The battery is
marked with this symbol, which may include lettering to indicate
cadmium (Cd), lead (Pb), or mercury (Hg). For proper recycling,
return the battery to your supplier or to a designated collection
point. For more information see: www.recyclethis.info.
EC DECLARATION OF CONFORMITY
Hereby, Hangzhou Hikvision Digital Technology Co., Ltd. declares that the radio
equipment type [ CS-AS210] is in compliance with Directive 2014/53/EU.
The full text of the EC DECLARATION OF CONFORMITY is available at the following web
link:
http://www.ezvizlife.com/declaration-of-conformity.
Due to the product shape and dimension, the name and address of the
importer/manufacturer are printed on the package.

1
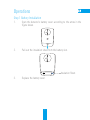
Operations
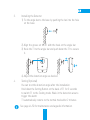
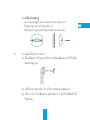
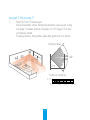
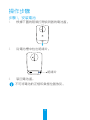
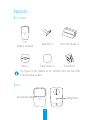
Step 1 Battery Installation
1. Open the detector’s battery cover according to the arrow in the
figure below.
2. Pull out the insulation sheet from the battery slot.
3. Replace the battery cover.
Insulation Sheet

2
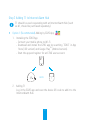
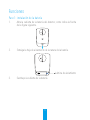
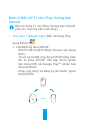
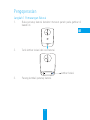
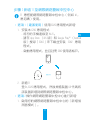
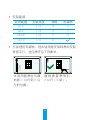
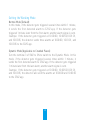
Step 2 Adding T1 to Internet Alarm Hub
T1 should be used cooperating with an Internet Alarm Hub (such
as A1, should be purchased separately).
• Option 1 (Recommended) Adding by EZVIZ App
1. Installing the EZVIZ App
- Connect your mobile phone to Wi-Fi.
- Download and install the EZVIZ app by searching “EZVIZ” in App
Store (iOS version) and Google Play
TM
(Android version).
- Start the app and register for an EZVIZ user account.
2. Adding T1
Log in the EZVIZ app and scan the device QR code to add it to the
Internet Alarm Hub.

3
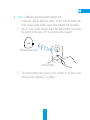
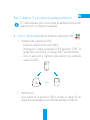
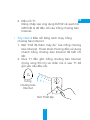
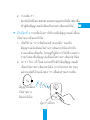
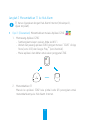
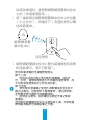
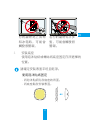
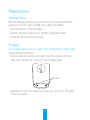
• Option 2 Adding by Operating Internet Alarm Hub
1. Enable the “Adding Detectors Mode” of your Internet Alarm Hub.
Refer to Quick Start Guide of your Internet Alarm Hub for details.
2. Take T1 close to the Internet Alarm Hub (within 50cm) and press
the button on the back of T1 to send the adding request.
3. The Internet Alarm Hub issues a voice prompt of the device type
and serial No. indicating T1 is added.
Internet Alarm Hub
Within 50 cm
Setting Button

4
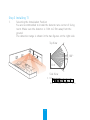
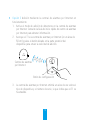
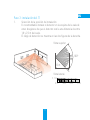
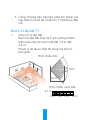
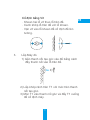
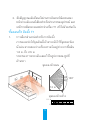
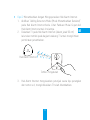
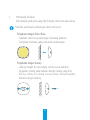
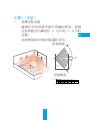
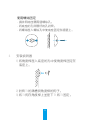
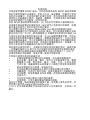
Step 3 Installing T1
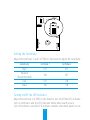
1. Selecting the Installation Position
You are recommended to install the detector at a corner of living
room. Make sure the detector is 1.8m to 2.5m away from the
ground.
The detection range is shown in the two figures on the right side.
Top View
Side View
12 m
100°
2.1 m
0 m
12 m8 m
4 m

5
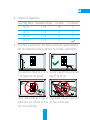
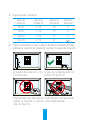
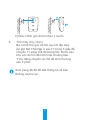
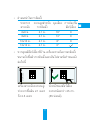
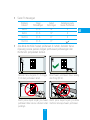
• Installation Suggestions
Detecting Range Installation Height Tilt Angle Pet Immune
6x6 m 2.1 m 18° X
8x8 m 2.1 m 13° X
10x10 m 2.1 m 8° X
12x12 m 2.1 m 0°
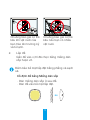
• If you have a pet at home, the detector should be installed parallel
with the installation surface and meet the following requirements.
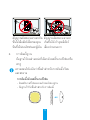
The detector should be 2.1m to
2.5m away from the ground.
The pet's weight should be less
than 25 kg (55 lb) .
False alarm may be triggered
when your pet climbes up onto
the couch and fridge.
False alarm may be triggered if
you have several pets.

6
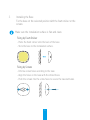
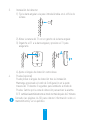
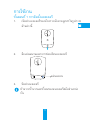
2. Installing the Base
Fix the base on the selected position with the foam sticker or the
screws.
Make sure the installation surface is flat and clean.
Fixing by Foam Sticker
- Paste the foam sticker onto the back of the base.
- Stick the base to the installation surface.
Fixing by Screws
- Drill two screw holes according to the base.
- Align the holes on the base with the drilled holes.
- Push the screws into the screw holes to secure the base with wall.

7
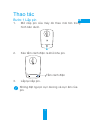
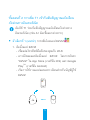
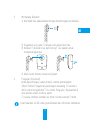
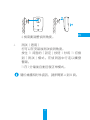
3. Installing the Detector
1) Fix the angle bar to the base by pushing the bar into the hole
on the base.
2) Align the groove on the T1 with the hook on the angle bar.
3) Hook the T1 to the angle bar and push down the T1 to secure
it.
4) Adjust the detection angle as desired.
4. Testing (Optional)
You can test the detection angle after the installation.
Hold down the Setting Button on the back of T1 for 3 seconds
to switch T1 to the Testing mode. Walk in the detection area to
trigger the alarm.
T1 automatically returns to the normal mode after 2 minutes.
See page 46-50 for maintenance and appedix information.
1
2

8
Funciones
Paso 1: instalación de la batería
1. Abra la cubierta de la batería del detector, como indica la flecha
de la figura siguiente.
2. Extraiga la hoja de aislamiento de la ranura de la batería.
3. Sustituya la cubierta de la batería.
Lámina de aislamiento

9
Paso 2: añadir el T1 a la central de alarmas por Internet
El T1 debe utilizarse junto con la central de alarmas por Internet (al
igual que el A1, se compra por separado).
• Opción 1 (Recomendada) Adición mediante la aplicación EZVIZ
1. Instalación de la aplicación EZVIZ
- Conecte el teléfono móvil a la red Wi-Fi.
- Descárguese e instale la aplicación EZVIZ buscando "EZVIZ" en
la App Store (versión iOS) y en Google Play
TM
(versión Android).
- Inicie la aplicación y regístrese para obtener una cuenta de
usuario de EZVIZ.
2. Adición del T1
Inicie sesión en la aplicación EZVIZ y escanee el código QR del
dispositivo para agregarlo a la central de alarmas por Internet.

10
• Opción 2 Adición mediante la central de alarmas por Internet en
funcionamiento
1. Active el modo de adición de detectores en la central de alarmas
por Internet. Consulte la Guía de inicio rápido del centro de alarmas
por Internet para obtener información.
2. Acerque el T1 a la central de alarmas por Internet (en un área de
50 cm) y pulse el botón ubicado en la parte posterior del
dispositivo para enviar la solicitud de adición.
3. La central de alarmas por Internet emitirá un aviso de voz sobre el
tipo de dispositivo y el número de serie, lo que indica que el T1 se
ha añadido.
Central de alarmas
por Internet
Dentro de un
área de 50 cm
Botón de configuración

11
Paso 3: instalación del T1
1. Selección de la posición de instalación
Es recomendable instalar el detector en la esquina de la sala de
estar. Asegúrese de que el detector esté a una distancia de entre
1,8 y 2,5 m del suelo.
El rango de detección se muestra en las dos figuras de la derecha.
Vista superior
Vista lateral
12 m
100°
2,1 m
0 m
12 m8 m
4 m

12
• Sugerencias de instalación
Rango de
detección
Altura de
instalación
Ángulo de
inclinación
Inmune a
mascotas
6x6 m 2,1 m 18° X
8x8 m 2,1 m 13° X
10x10 m 2,1 m 8° X
12x12 m 2,1 m 0°
• Si tiene una mascota en casa, el detector tendría que instalarse de forma
paralela a la superficie de instalación y cumplir los siguientes requisitos.
El detector debe estar de 2,1 m a
2,5 m del suelo.
El peso de la mascota debe ser
inferior a 25 kg (55 lb).
Puede activarse una falsa alarma
cuando su mascota se suba al
sofá o al frigorífico.
Puede activarse una falsa alarma
si tiene varias mascotas.

13
2. Instalación de la base
Fije la base en la selección que desee con el adhesivo de espuma
o los tornillos.
Asegúrese de que la superficie de instalación sea lista y esté
limpia.
Fijación del adhesivo de espuma
- Pegue el adhesivo de espuma en la parte trasera de la base.
- Pegue la base a la superficie de instalación.
Fijación con tornillos
- Perfore dos orificios para tornillos en función de la base.
- Alinee los agujeros de la base con los orificios perforados.
- Introduzca los tornillos en los orificios para asegurar la base a la
pared.

14
3. Instalación del detector
1) Fije la barra angular a la pase introduciéndola en el orificio de
la base.
2) Alinee la ranura del T1 con en gancho de la barra angular.
3) Enganche el T1 a la barra angular y presione el T1 para
asegurarlo.
4) Ajuste el ángulo de detección como desee.
4. Prueba (opcional)
Puede probar el ángulo de detección tras la instalación.
Mantenga presionado el botón de Configuración en la parte
trasera del T1 durante 3 segundos para cambiarlo al modo de
Prueba. Camine por la zona de detección para activar la alarma.
El T1 cambiará automáticamente al modo normal después de 2 minutos.
Consulte las páginas 46-50 para obtener información sobre el
mantenimiento y ver el apéndice.
1
2
ページが読み込まれています...
ページが読み込まれています...
ページが読み込まれています...
ページが読み込まれています...
ページが読み込まれています...
ページが読み込まれています...
ページが読み込まれています...
ページが読み込まれています...
ページが読み込まれています...
ページが読み込まれています...
ページが読み込まれています...
ページが読み込まれています...
ページが読み込まれています...
ページが読み込まれています...
ページが読み込まれています...
ページが読み込まれています...
ページが読み込まれています...
ページが読み込まれています...
ページが読み込まれています...
ページが読み込まれています...
ページが読み込まれています...
ページが読み込まれています...
ページが読み込まれています...
ページが読み込まれています...
ページが読み込まれています...
ページが読み込まれています...
ページが読み込まれています...
ページが読み込まれています...
ページが読み込まれています...
ページが読み込まれています...
ページが読み込まれています...
ページが読み込まれています...
ページが読み込まれています...
ページが読み込まれています...
ページが読み込まれています...
ページが読み込まれています...
ページが読み込まれています...
ページが読み込まれています...
ページが読み込まれています...
ページが読み込まれています...
ページが読み込まれています...
ページが読み込まれています...
ページが読み込まれています...
-
 1
1
-
 2
2
-
 3
3
-
 4
4
-
 5
5
-
 6
6
-
 7
7
-
 8
8
-
 9
9
-
 10
10
-
 11
11
-
 12
12
-
 13
13
-
 14
14
-
 15
15
-
 16
16
-
 17
17
-
 18
18
-
 19
19
-
 20
20
-
 21
21
-
 22
22
-
 23
23
-
 24
24
-
 25
25
-
 26
26
-
 27
27
-
 28
28
-
 29
29
-
 30
30
-
 31
31
-
 32
32
-
 33
33
-
 34
34
-
 35
35
-
 36
36
-
 37
37
-
 38
38
-
 39
39
-
 40
40
-
 41
41
-
 42
42
-
 43
43
-
 44
44
-
 45
45
-
 46
46
-
 47
47
-
 48
48
-
 49
49
-
 50
50
-
 51
51
-
 52
52
-
 53
53
-
 54
54
-
 55
55
-
 56
56
-
 57
57
-
 58
58
-
 59
59
-
 60
60
-
 61
61
-
 62
62
-
 63
63


