
使用者手册
MX241P/ MX341P/ MX641P 系列
热转式
/
热感式条形码打印机

- 1 -
版权声明
©2016 TSC Auto ID Technology Co., Ltd,
本手册和手册中所述之条形码打印机软件和固件版权均归 TSC Auto ID Technology Co., Ltd 所有。
本手册提供购买设备的操作者参考和使用,未经明确的书面许可,不得为了其他目的使用、复制。
所有其他品牌名称、产品名称或商标,隶属于其他个别拥有者。
因持续产品的改进,故手册中所述的机种规格、配件、零件、设计及程序内容以实机为主,如有变
更,恕不另行通知。
TSC 尽力确保手册内容正确无误,但错误在所难免。TSC 保留更正任何这类错误的权利,并声明
不对因此所造成的后果负责。

- 2 -
安规认证
EN 55032: Class B
EN 55035
EN 55024
EN 60950-1
EN 62368-1
FCC part 15B, Class B
ICES-003, Class B
AS/NZS CISPR 32, Class B
UL 60950-1 (2nd Edition)
CSA C22.2 No. 60950-1-07 (2nd Edition)
UL 62368-1, 2nd Edition, 2014-12-
01 (Audio/video, Information and
Communication Technology Equipment - Part 1: Safety Requirements) CAN/CSA
C22.2 No. 62368-1-14, 2nd Edition, 2014-
12 (Audio/video, Information and
Communication Technology Equipment - Part 1: Safety Requirements)
Mexico
CoC
UL 60950
UL 60950
EN 62368-1:2014/A11:2017
KN 32
KN 35
K60950-1(2011-12)
GB 4943.1
GB/T9254
GB 17625.1
Energy Star for Imaging Equipment Version 3.0
CNS 13438
CNS 14336-1

- 3 -
CNS 15663
TP TC 004
TP TC 020
IS 13252(Part 1)/
IEC 60950-1
Note: There may have certification differences in the series models, please refer to product label for
accuracy.
Important safety instructions:
1. Read all of these instructions and keep them for later use.
2. Follow all warnings and instructions on the product.
3. Disconnect the power from the AC inlet before cleaning or if fault happened.
Do not use liquid or aerosol cleaners. Using a damp cloth is suitable for cleaning.
4. The mains socket shall be installed near the equipment and easily accessible.
5. The unit must be protected against moisture.
6. Ensure the stability when installing the device, Tipping or dropping could cause damage.
7. Make sure to follow the correct power rating and power type indicated on marking label
provided by manufacture.
8. Please refer to user manual for maximum operation ambient temperature.
provided by manufacture.
8. Please refer to user manual for maximum operation ambient temperature.
WARNING:
Moving parts. Keep finger or body away from moving parts.
CAUTION:
(For equipment with RTC (CR2032) battery or rechargeable battery pack)
Risk of explosion if battery is replaced by an incorrect type.
Dispose of used batteries according to the Instructions as below.
1. DO NOT throw the battery in fire.
2. DO NOT short circuit the contacts.
3. DO NOT disassemble the battery.
4. DO NOT throw the battery in municipal waste.
5. The symbol of the crossed out wheeled bin indicates that the battery should not be placed in
municipal waste.

- 4 -
Caution: Hot surface for printhead.
Do not touch the printhead before it cooling.
WARNING:
Remove the power from AC inlet before opening the media cover for cleaning or repairing faults. After
cleaning or fixing faults, media cover closing before power connecting to AC inlet.
CAUTION:
Any changes or modifications not expressly approved by the grantee of this device could void the
user's authority to operate the equipment.
CE Statement:
This equipment complies with EU radiation exposure limits set forth for an uncontrolled environment.
This equipment should be installed and operated with minimum distance 20 cm between the radiator &
your body.
All operational modes:
2.4GHz: 802.11b, 802.11g, 802.11n (HT20), 802.11n (HT40)
5GHz: 802.11a,
The frequency, mode and the maximum transmitted power in EU are listed below:
2400 MHz – 2483.5 MHz: 19.88 dBm (EIRP)
5150 MHz – 5250 MHz: 17.51 dBm (EIRP)
5150-5350MHz for Only indoor use
5470-5725MHz for indoor/outdoor use
Restrictions In AZE
National restrictions information is provided below
Frequency Band
Country
Remark
5150-5350MHz
Azerbaijan
No license needed if used indoor and
power not exceeding 30mW
5470-5725MHz

- 5 -
Hereby, TSC Auto ID Technology Co., Ltd. declares that the radio equipment type [Wi-Fi] IEEE 802.11
a/b/g/n is in compliance with Directive 2014/53/EU
The full text of the EU declaration of conformity is available at the following internet address: http://
www.tscprinters.com
RF exposure warning (Wi-Fi)
This equipment must be installed and operated in accordance with provided instructions and must not
be co-located or operating in conjunction with any other antenna or transmitter. End-users and
installers must be providing with antenna installation instructions and transmitter operating conditions
for satisfying RF exposure compliance.
SAR Value: 0.736 W/kg
RF exposure warning (For Bluetooth)
The equipment complies with FCC RF exposure limits set forth for an uncontrolled environment.
The equipment must not be co-located or operating in conjunction with any other antenna or
transmitter.
Canada, Industry Canada (IC) Notices
This Class B digital apparatus complies with Canadian ICES-003 and RSS-210.
Operation is subject to the following two conditions: (1) this device may not cause interference, and (2)
this device must accept any interference, including interference that may cause undesired operation of
the device.
Radio Frequency (RF) Exposure Information
The radiated output power of the Wireless Device is below the Industry Canada (IC) radio frequency
exposure limits. The Wireless Device should be used in such a manner such that the potential for
human contact during normal operation is minimized.
This device has been evaluated for and shown compliant with the IC Specific Absorption Rate (“SAR”)
limits when installed in specific host products operated in portable exposure conditions. (For Wi-Fi)
This device has also been evaluated and shown compliant with the IC RF Exposure limits under
portable exposure conditions. (Antennas are less than 20 cm of a person's body). (For Bluetooth)
Canada, avis de l'Industry Canada (IC)
Cet appareil numérique de classe B est conforme aux normes canadiennes ICES-003 et RSS-210.
Son fonctionnement est soumis aux deux conditions suivantes : (1) cet appareil ne doit pas causer
d'interférence et (2) cet appareil doit accepter toute interférence, notamment les interférences qui
peuvent affecter son fonctionnement.
Informations concernant l'exposition aux fréquences radio (RF)

- 6 -
La puissance de sortie émise par l’appareil sans fil est inférieure à la limite d'exposition aux
fréquences radio de l'Industry Canada (IC). Utilisez l’appareil sans fil de façon à minimiser les contacts
humains lors du fonctionnement normal.
Ce périphérique a été évalué et démontré conforme aux limites SAR (Specific Absorption Rate – Taux
d'absorption spécifique) par l'IC lorsqu'il est connecté à des dispositifs hôtes spécifiques opérant dans
des conditions d’utilisation mobile. (Pour le Wi-Fi)
Ce périphérique a également été évalué et démontré conforme aux limites d'exposition radio-
fréquence par l'IC pour des utilisations par des opérateurs mobiles (les antennes sont à moins de 20
cm du corps d'une personne). (Pour le Bluetooth)
NCC
警语
:
经型式认证合格之低功率射频电机,非经许可,公司、商号或用户均不得擅自变更频率、加大功率或变
更原设计之特性及功能。(即低功率电波辐射性电机管理办法第十二条)
低功率射频电机之使用不得影响飞航安全及干扰合法通信;经发现有干扰现象时,应立即停用,并改善
至无干扰时方得继续使用。
前项合法通信,指依电信法规定作业之无线电通信。低功率射频电机须忍受合法通信或工业、科学及医
疗用电波辐射性电机设备之干扰。(即低功率电波辐射性电机管理办法第十四条)

- 7 -
目录
1. 打印机简介 ............................................................................................................................. 9
1.1 介绍 ................................................................................................................................... 9
1.2 产品规格与特色 .............................................................................................................. 10
2. 产品介绍 ...............................................................................................................................12
2.1 拆封与检查 ......................................................................................................................12
2.2 打印机组件 ...................................................................................................................... 13
2.2.1
外观
................................................................................................................................... 13
2.2.2
内部
................................................................................................................................... 14
2.2.3
后部
................................................................................................................................... 15
2.3 控制面板 .......................................................................................................................... 17
2.3.1 LED
辅助警示灯和操作按键
.............................................................................................. 18
2.3.2
主画面图标功能
................................................................................................................. 19
2.3.3
触控屏幕
............................................................................................................................ 20
3. 安装 .......................................................................................................................................21
3.1 安装打印机 ......................................................................................................................21
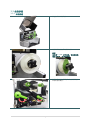
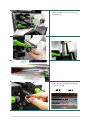
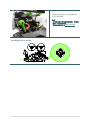
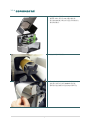
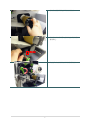
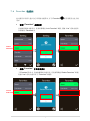
3.2 安装碳带 ......................................................................................................................... 22
3.3 安装标签 ......................................................................................................................... 25
3.3.1
安装标签
............................................................................................................................ 25
3.3.2
安装折迭式标签
(
外部进纸
) ................................................................................................ 28
3.3.3
剥纸模式装纸
(
选配
) ........................................................................................................... 29
3.3.4
整卷回收模式装纸
(
选配
) .................................................................................................... 32
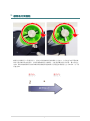
4. 可移动式打印头压力调整钮 ................................................................................................. 34
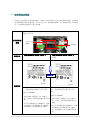
4.1 皱折解说及排除 .............................................................................................................. 35
5. 碳带张力调整钮 ................................................................................................................... 36
5.1 碳带张力调整建议........................................................................................................... 37
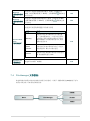
6. TSC Console ........................................................................................................................ 39
6.1 启动 TSC Console ............................................................................................................. 39
6.2 设置 WiFi 并新增至 TSC Console 接口 ...........................................................................41
6.3 TPH CARE ..................................................................................................................... 44

- 8 -
6.4 打印机功能 ..................................................................................................................... 45
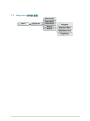
7. 打印机内建功能(Menu) ....................................................................................................... 46
7.1 进入菜单 ......................................................................................................................... 46
7.2 菜单简介 ......................................................................................................................... 47
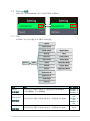
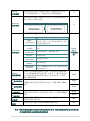
7.3 Setting(设置) .................................................................................................................. 48
7.3.1 TSPL ................................................................................................................................. 48
7.3.2 ZPL2 ................................................................................................................................. 50
7.4 Sensor(传感器设置) ....................................................................................................... 53
7.5 Interface(通讯接口) ....................................................................................................... 54
7.5.1 Serial Comm. (
串口设置
) ................................................................................................. 54
7.5.2 Ethernet(
以太网络设置
) ................................................................................................... 55
7.5.3 Wi-Fi(
无线网络
)................................................................................................................. 56
7.5.4 Bluetooth(
蓝牙
) ................................................................................................................ 57
7.5.5 GPIO ................................................................................................................................. 57
7.5 Advanced(高级) .............................................................................................................. 58
7.4 File Manager(文件管理) ................................................................................................. 59
7.5 Diagnostic(打印机诊断) ................................................................................................. 60
7.6 Favorites (收藏夹) .......................................................................................................... 63
8 故障排除 .............................................................................................................................. 64
9 打印机简易保养 ................................................................................................................... 67
更新记录 ................................................................................................................................... 68

- 9 -
1.
打印机简介
1.1
介绍
感谢您对本公司所出品的条形码打印机的支持。
此系列工业型条形码标签打印机,其扎实坚固机身设计,可满足企业大量标签打印之任务,内含高
速处理器,大幅提升打印效能,尤其适用于制造业、物流运输业与产品标签打印之应用。此高阶工
业型条形码标签打印机可满足企业用户 24 小时连续大量标签打印之需求,铝合金铸造打印机构模
块搭配强固之机身,耐用度高且稳定性佳。
本系列包含 203 dpi,最高打印速度达每秒 18 英吋、300 dpi 最高打印速度达每秒 14 英吋与 600
dpi 适合于二维条形码、图示、小字或其他超高解析打印需求之图形标签。
标配包含彩色触控面板与六个操作按钮、碳带容量最大长度可达 600 公尺、标签耗材最大外径
20.32 公分(8 英吋)、内建式以太网络服务器、两个 USB 主控端接口、USB 2.0、串口与可选配并
列端口通讯接口和 GPIO 接口。
字型和条形码可以朝四个方向印出,本机型有内建高质量高效率的 MONOTYPE IMAGING
®
仿真字
型(True Type Font)引擎和 CG Triumvirate Bold Condensed 平滑字型。搭配灵活的固件设计, 用户
也可以自行从计算机下载 True Type Font 字型到打印机的内存中。除了可以缩放字体外,还提供了
五种不同尺寸的字母数字图(bitmap font), OCR-A 和 OCR-B 字型。
本文件提供了此机种的操作说明,于打印标签格式时,请参阅您的标签编辑软件所提供的信息,如
果你需要自行编写指令程序,请参阅 TSPL/TSPL2 指令手册,您可于随机配件的光盘中或于 TSC
网站 http://www.tscprinters.com 上看到此指令手册。
− 适用范围
工厂大量标签打印
制造标示
产品规范标签
库存标示管理
物流标示管理
资产标示管理
珠宝电子产品标签

- 10 -
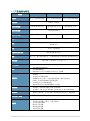
1.2
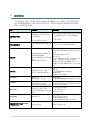
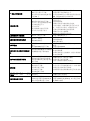
产品规格与特色
机型
MX241P MX341P MX641P
分辨率
8 点 / 毫米 (203 DPI) 12 点 / 毫米 (300 DPI)
24 点 / 毫米 (600 DPI)
打印模式
热转式 / 热感式
最大打印速度
457 毫米 (18") / 秒 356 毫米 (14") / 秒 152 毫米 (6") / 秒
最大打印宽度
104 毫米 (4.09")
最大打印长度
25,400 毫米 (1,000") 11,430 毫米 (450") 2,540 毫米 (100")
机壳
铝合金铸造打印机构模块与主结构、金属外壳,含透明大窗口设计
体积
300 毫米 (宽) x 393 毫米 (高) x 510 毫米 (长) 11.81" (宽) x 15.47" (高) x
20.08" (长)
重量
18 公斤 (39.68 磅)
内部纸卷最大尺寸
203.2 毫米 (8") 外径
碳带
600 公尺,最大 90 毫米外径,1" 碳带滚动条 (内卷式和外卷式碳带皆适用)
碳带宽度
25.4 毫米 ~ 115 毫米 ( 1 寸至 4.5 寸)
中央处理器
32 位高效处理器
内存
512 MB Flash memory
512 MB SDRAM
microSD
卡内存扩充插槽可扩展内存至
32 GB
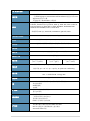
通讯接口
串口 (RS-232
USB 2.0
内建式以太网络服务器
USB host * 2 (正面),支持单机操作键盘与条形码扫描仪
GPIO + 并列埠(Parallel) (经销商选配)
内接式蓝牙 5.0 (经销商选配)
802.11 a/b/g/n
无线网络插槽
(
客户选配
)
电源规格
内建电压自动切换电源供应器
交流输入:AC 100-240V, 4-2A, 50-60Hz
直流输出:
DC 5V, 5A; DC 24V, 7A; DC 36V, 1.4A; Total 243W
操作面板
16 bits 彩色屏幕,显示屏 480 × 272 画素及背光显示,触控面板
操作开关、按钮
一个电源开关及六个操作按钮
(Menu
、
Pause
、
Feed
、
Up
、
Down
、
Select)
传感器
纸张间距传感器 (穿透式,位置可调整)
黑线标记传感器 (反射式,位置可调整)
打印头抬起传感器
碳带用尽传感器
碳带转速传感器
纸张容量传感器

- 11 -
日期
/
时间产生器
标准
内建字型
八种位图字体
一套 Monotype® CG Triumvirate Bold Condensed 向量字体及 True
Type Font 字型产生器
可通过软件下载
Windows
字型使用
条形码
一维条形码
Code 39, Code 93, Code128UCC, Code128 subsets A.B.C,
Codabar, Interleave 2 of 5, EAN-8, EAN-13, EAN-128, UPC-A, UPC-E,
EAN and UPC 2(5) digits add-on, MSI, PLESSEY, POSTNET, RSS-
Stacked, GS1 DataBar, Code 11, China Post
二维条形码 PDF-417, Maxicode, DataMatrix, QR code, Aztec
字型及条形码旋转
0, 90, 180, 270 degree
指令集
TSPL-EZD (相容于 to EPL, ZPL, ZPL II, DPL)
纸张类型
连续纸、间距纸、穿孔纸、折迭纸、黑标纸 (外卷式)
纸张宽度
20 ~ 114 毫米(0.78“ ~ 4.49“)
纸张厚度
0.076 ~ 0.305 毫米 (2.99 ~ 12.01 密耳)
纸卷轴心尺寸
76.2 毫米 (3”)
标签长度
3 ~ 25,400 毫米
(0.1“ ~ 1,000“)
3 ~ 11,430 毫米
(0.1“ ~ 450“)
3 ~ 2,540 毫米
(0.1“ ~ 100“)
环境条件
操作环境: 0~ 40˚C (32 ~ 104˚F), 25~85% non-condensing
储存环境-40 ~ 60 ˚C (-40 ~ 140˚F), 10~90% non-condensing
安规认证
BIS、CB、CCC、CE Class B、EAC、FCC Class B、KC、TUV、UL、
cUL、C-Tick Class B、Energy Star
环境规范
Comply with RoHS, WEEE
配件
Windows 标签编辑软件、驱动程序及操作手册光盘
快速安装指南
USB 传输线
电源线
出厂选配
标签回卷模块 (整卷回收)
蓝芽 5.0 模块
经销商选配
标签剥离模块
一般切刀(闸刀全切式切刀)
重度使用切刀(闸刀式)
GPIO + 并列端口接口模块
客户选配
单机操作键盘 (KU-007 Plus & KP-200 Plus
802.11 a/b/g/n 无线网络模块与蓝芽模块
Universal cutter tray

- 12 -
2.
产品介绍
2.1
拆封与检查
本打印机业经特殊包装以抵抗运输途中可能产生的损害。然而有鉴于打印机在运送的途中仍可能受
到意想不到的损害,因此建议您在收到打印机时,仔细检查包装及打印机装置。万一有明显的损伤,
请直接接洽贩卖商店指明损伤的本质及程度;并请保留包装材质,以便邮寄打印机。
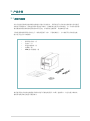
当您收到您的条形码打印机之后,请将其置放于干净、平稳的桌面上,小心地拆开打印机的包装。
清点是否包含以下的物品
请妥善保管打印机的包装配备及材料以便日后搬运的需要;如果上述物品中,有任何短少或缺失,
请联系您购买商号的客户服务部门。
条形码打印机一台
光盘片一只
快速安装指南一份
电源线一条
USB 接口传输线一条

- 13 -
2.2
打印机组件
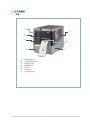
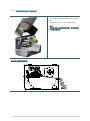
2.2.1
外观
1. LED 辅助警示灯
2. 彩色液晶触控显示屏
3. 面板操作按键
4. USB host x 2
5. 透明窗口
6. 打印出纸口
7. 打印机右侧掀盖
2
1
3
4
6
7
5

- 14 -
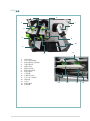
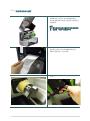
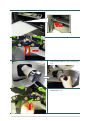
2.2.2
内部
1. 碳带回收轴
2. 打印头座架释放杆
3. 纸张传感器位置调整钮
4. 导纸杆释放杆
5. 碳带供应轴
6. 碳带张力调整
7. 纸张容量传感器
8. 纸张供应轴
9. 后导纸器
10. 外部纸张进纸口
11. 打印头压力调整钮
12. 橡胶滚轮
13. 打印头
14. 纸张传感器
15. 前导纸器
2
3
4
1
6
5
8
9
10
6
7
15
11
12 13 14

- 15 -
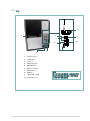
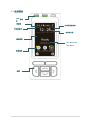
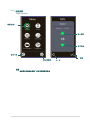
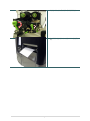
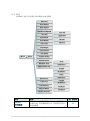
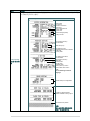
2.2.3
后部
1. 外部纸张进纸口
2. 电源线插槽
3. 电源开关
4. WiFi 模块(选配)
5. RS-232C 端口
6. GPIO 端口(选配)
7. Ethernet 端口
8. USB 端口
9. * Micro SD 卡插槽
10. Centronics 端口
1
3
2
4
7
6
5
8
9
10
注意:
图片中打印机的传输接口会依据您所购
买的机种类型而有所差异
,
实际传输接
口请参考产品型录规格
.

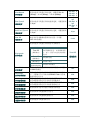
- 16 -
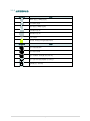
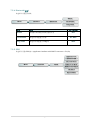
* Micro SD
卡建议规格
类型
SD
卡规格
SD 卡容量
经验证过的厂牌
Micro SD
V2.0 Class 4
4G
Transcend
V2.0 Class 4
8G
Transcend
V3.0 Class 10 UHS-I
16G
Transcend
V3.0 Class 10 UHS-I
32G
Transcend
V3.0 Class 10
16G
Kingston
V2.0 Class 4
16G
Scandisk
V3.0 Class 10 UHS-I
16G
Scandisk
-
请使用
FAT
的文件系统
-
档名请用 8.3 的格式,不支持长文件名
-miniSD
或
microSD
请需通过转接卡使用

- 17 -
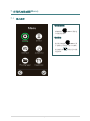
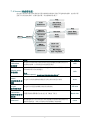
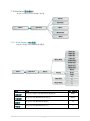
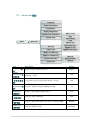
2.3
控制面板
按键
LED 指示
灯
触控屏幕
功能图标
打印机型号
打印机固件版本
时间和日期
IP1: Ethernet
IP2: Wi-Fi
状态栏

- 18 -
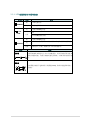
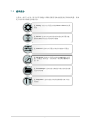
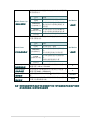
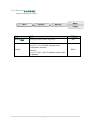
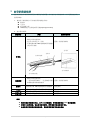
2.3.1 LED
辅助警示灯和操作按键
LED 指示灯
状态
指示
POWER
熄 打印机电源关闭
亮 打印机电源开启
ON-
LINE
亮 打印机在”Ready”状态
闪烁
暂停
正在下载数据到打印机
ERROR
熄 打印机在”Ready”状态
亮
“
打印头座架释放杆开启
”, “
裁刀错误
”
或
“
打印机正在清除数据
时
”
闪烁 “标签用尽”, “卡纸”, “碳带用尽” 或 “资料清除中”
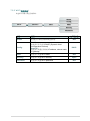
按键
功能
组合键
在屏幕底部的 2 侧会有左右 2 个按键消息,其显示的指示即为此 2
颗组合键的功能。此组合键的功能是多样地,请依
屏幕的指示使
用。
箭头键
此 4 颗箭头键用于选取屏幕上的图标(icons), 菜单中的选择和导航..
等功能。

ページが読み込まれています...
ページが読み込まれています...
ページが読み込まれています...
ページが読み込まれています...
ページが読み込まれています...
ページが読み込まれています...
ページが読み込まれています...
ページが読み込まれています...
ページが読み込まれています...
ページが読み込まれています...
ページが読み込まれています...
ページが読み込まれています...
ページが読み込まれています...
ページが読み込まれています...
ページが読み込まれています...
ページが読み込まれています...
ページが読み込まれています...
ページが読み込まれています...
ページが読み込まれています...
ページが読み込まれています...
ページが読み込まれています...
ページが読み込まれています...
ページが読み込まれています...
ページが読み込まれています...
ページが読み込まれています...
ページが読み込まれています...
ページが読み込まれています...
ページが読み込まれています...
ページが読み込まれています...
ページが読み込まれています...
ページが読み込まれています...
ページが読み込まれています...
ページが読み込まれています...
ページが読み込まれています...
ページが読み込まれています...
ページが読み込まれています...
ページが読み込まれています...
ページが読み込まれています...
ページが読み込まれています...
ページが読み込まれています...
ページが読み込まれています...
ページが読み込まれています...
ページが読み込まれています...
ページが読み込まれています...
ページが読み込まれています...
ページが読み込まれています...
ページが読み込まれています...
ページが読み込まれています...
ページが読み込まれています...
ページが読み込まれています...
-
 1
1
-
 2
2
-
 3
3
-
 4
4
-
 5
5
-
 6
6
-
 7
7
-
 8
8
-
 9
9
-
 10
10
-
 11
11
-
 12
12
-
 13
13
-
 14
14
-
 15
15
-
 16
16
-
 17
17
-
 18
18
-
 19
19
-
 20
20
-
 21
21
-
 22
22
-
 23
23
-
 24
24
-
 25
25
-
 26
26
-
 27
27
-
 28
28
-
 29
29
-
 30
30
-
 31
31
-
 32
32
-
 33
33
-
 34
34
-
 35
35
-
 36
36
-
 37
37
-
 38
38
-
 39
39
-
 40
40
-
 41
41
-
 42
42
-
 43
43
-
 44
44
-
 45
45
-
 46
46
-
 47
47
-
 48
48
-
 49
49
-
 50
50
-
 51
51
-
 52
52
-
 53
53
-
 54
54
-
 55
55
-
 56
56
-
 57
57
-
 58
58
-
 59
59
-
 60
60
-
 61
61
-
 62
62
-
 63
63
-
 64
64
-
 65
65
-
 66
66
-
 67
67
-
 68
68
-
 69
69
-
 70
70


