
Micro Hi-Fi
Component
System
© 2001 Sony Corporation
4-237-159-11 (2)
CMT-CP500MD
Operating Instructions
GB
CS

2
GB
WARNING
To prevent fire or shock hazard, do not
expose the unit to rain or moisture.
To avoid electrical shock, do not open the cabinet.
Refer servicing to qualified personnel only.
Do not install the appliance in a confined space,
such as a bookcase or built-in cabinet.
US and foreign patents licensed from Dolby
Laboratories.
This appliance is classified
as a CLASS 1 LASER
product. The CLASS 1
LASER PRODUCT
MARKING is located on
the rear exterior.
The following caution label is located inside the
apparatus.
To prevent fire, do not cover the ventilation of the
apparatus with news papers, table-cloths, curtains,
etc. And don’t place lighted candles on the apparatus.
To prevent fire or shock hazard, do not place objects
filled with liquids, such as vases, on the apparatus.
IN NO EVENT SHALL SELLER BE LIABLE
FOR ANY DIRECT, INCIDENTAL OR
CONSEQUENTIAL DAMAGES OF ANY
NATURE, OR LOSSES OR EXPENSES
RESULTING FROM ANY DEFECTIVE
PRODUCT OR THE USE OF ANY PRODUCT.
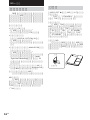
Don’t throw away the battery with
general house waste, dispose of it
correctly as chemical waste.
Shanghai Suoguang Electronice Co., Ltd.
930 Jian Chuan Road
Min Hang Shanghai

3
GB
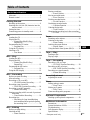
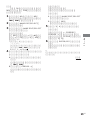
Table of Contents
Parts Identification
Main unit........................................................ 4
Remote control...............................................5
Getting Started
Hooking up the system .................................. 6
Inserting two size-AA (R6) batteries into the
remote control .........................................7
Setting the time .............................................. 7
Conserving power in standby mode .............. 8
CD
Loading the CD.............................................. 8
Playing the CD
— Normal Play/Shuffle Play/
Repeat Play ........................................ 9
Programming the CD tracks
— Program Play ................................... 10
Using the CD display ................................... 11
Labeling a CD
— Disc Memo ...................................... 11
MD — Play
Loading the MD........................................... 13
Playing the MD
— Normal Play/Shuffle Play/
Repeat Play ...................................... 13
Programing the MD tracks
— Program Play ................................... 14
Using the MD display .................................. 15
MD — Recording
Before you start recording ...........................16
After recording............................................. 16
Recording a CD on an MD
— CD-MD Synchro Recording ............17
Recording a tape on an MD
— TAPE-MD Synchro Recording ....... 18
Recording on an MD manually
— Manual Recording ........................... 19
Starting recording with 6 seconds of prestored
audio data
— Time Machine Recording ................ 19
Recording tips
— Recording for long times/Marking
track numbers/Smart space/Adjusting
the recording level ........................... 20
MD — Editing
Before you start editing ............................... 24
Labeling an MD
— Name Function ................................ 24
Erasing recordings
— Erase Function ................................. 27
Moving recorded tracks
— Move Function................................. 29
Dividing recorded tracks
— Divide Function ............................... 29
Combining recorded tracks
— Combine Function ........................... 30
Undoing the last edit
— Undo Function ................................. 31
Changing the recording level after recording
— S.F Edit ............................................ 32
Tuner
Presetting radio stations ...............................34
Listening to the radio
— Preset Tuning ...................................35
Labeling the preset stations
— Station Name ................................... 36
Using the Radio Data System (RDS)*......... 36
Tape — Play
Loading a tape.............................................. 37
Playing a tape............................................... 37
Tape — Recording
Recording a CD on a tape
— CD-TAPE Synchro Recording ........ 38
Recording an MD on a tape
— MD-TAPE Synchro Recording ....... 38
Recording on a tape manually
— Manual Recording ........................... 39
Sound Adjustment
Adjusting the sound ..................................... 40
Timer
Falling asleep to music
— Sleep Timer...................................... 40
Waking up to music
— Daily Timer...................................... 41
Timer recording radio programs ..................42
Optional Components
Hooking up the optional components .......... 43
Additional Information
Precautions................................................... 44
System limitations of MDs .......................... 46
Troubleshooting ...........................................47
Self-diagnosis display ..................................51
Specifications............................................... 53
* European model only
GB

4
GB
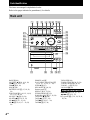
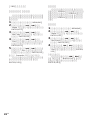
Parts Identification
The items are arranged in alphabetical order.
Refer to the pages indicated in parentheses () for details.
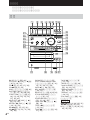
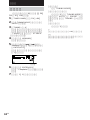
Main unit
BASS wd (40)
CD EJECT Z qh (8, 9, 16, 50)
CD x qj (9, 10, 17, 38)
CD u qk (9, 10)
DSG wh (40)
ENTER/START 5 (17, 18, 38,
39)
FUNCTION wf (9, 10, 13, 14, 19,
22, 23, 37, 39, 43)
MD EJECT Z ql (13, 24)
MD REC z qg (19, 22, 23)
MD u qd (13 – 15, 19)
MD x qf (13, 15, 17 – 20, 38,
39)
PHONES jack wa
PLAY MODE DIRECTION wj
(9, 10, 13 – 15, 24, 37 – 39)
PUSH Z 6 (37)
REC MODE 3 (20, 50)
Remote sensor 1
REPEAT 2 (9, 13, 34)
STEREO/MONO 2 (35)
SYNCHRO REC 4 (17, 18, 38)
TAPE REC z 0 (39)
TAPE Y 7 (37 –39)
TAPE x 8 (18, 37 – 39)
TAPE X 9 (37, 39)
1 2 5 863 47
wa
qjqkql
w;
9
q;
qd
qf
qg
qa
qs
qh
wf
wh
wd
wg
wj
ws
TREBLE ws (40)
TUNER BAND qs (34, 35, 50)
TUNING MODE wj (34, 35)
TUNING –/+ qa (34, 35)
VOLUME w; (41)
BUTTON DESCRIPTIONS
. > qa (9, 10, 13 – 15)
m M qa (9, 13, 37)
@/1 (power) wg (7, 16, 24, 35, 41,
43, 50)

Parts Identification
5
GB
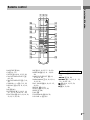
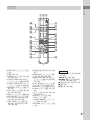
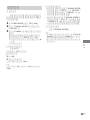
Remote control
BASS/TRE 5 (40)
CD qj (9 – 11)
CLEAR 8 (10, 14, 15, 25, 36)
CLOCK/TIMER SELECT 2
(42, 43)
CLOCK/TIMER SET 4 (7, 41,
42)
CURSOR T/t 9 (7, 12, 25)
DISPLAY wa (8, 10, 11, 15, 19,
36)
DSG qf (40)
ENTER/YES 6 (7, 10, 12, 14,
20 – 23, 25 – 34, 36, 41 – 43)
FUNCTION qg (9, 10, 13, 14, 19,
22, 23, 37, 39, 43)
MD qk (13, 14, 25, 27 – 30, 32)
MENU/NO wf (12, 21 – 24, 26 –
34)
NAME EDIT/SELECT wd (11,
12, 24, 25, 36)
Number buttons 7 (9, 10, 12, 14,
15, 25, 35)
PLAY MODE wh (9, 10, 13 – 15,
24, 32)
REPEAT wg (9, 13)
SCROLL ws (12, 15, 26)
SLEEP 1 (40)
TAPE qh
TUNER BAND ql (34, 35)
VOLUME +/– qd (41)
qh
qk
qg
qj
ql
w;
wa
ws
wh
wg
wf
wd
8
5
6
4
9
0
qa
qs
qd
qf
7
123
BUTTON DESCRIPTIONS
@/1 (power) 3 (7, 16, 24, 35, 41,
43)
m M 9 (28, 30)
. > 0 (7, 11, 12, 21 – 23,
25 – 34, 40 – 42)
N qa (9, 10, 13, 15, 23)
x qs (23)
X w; (9, 13, 28)

6
GB
Jack type A
F
M
7
5
Ω
A
M
U
ANTENN
A
Jack type B
FM75
Ω
A
M
ANTENNA
U
U
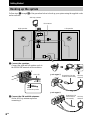
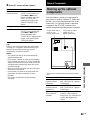
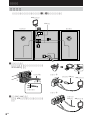
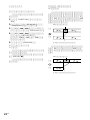
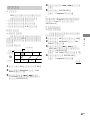
Getting Started
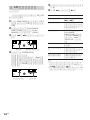
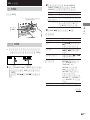
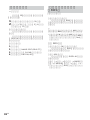
Hooking up the system
Follow steps 1 through 3 of the procedure below to hook up your system using the supplied cords
and accessories.
AM loop antenna
Left speaker
Right speaker
FM antenna
1 Connect the speakers.
Connect the right and left speaker cords to
the SPEAKER terminals as shown below.
3
L
#
#
R
3
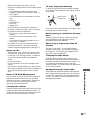
2 Connect the FM and AM antennas.
Set the AM loop antenna up before
connecting it.
Insert this portion
Black (#)
Gray (3)
AM loop
antenna
Extend the FM wire
antenna horizontally
AM loop
antenna
Extend the FM
wire antenna
horizontally

Getting Started
7
GB
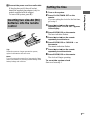
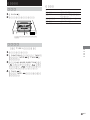
3 Connect the power cord to a wall outlet.
If the plug does not fit the wall socket,
detach the supplied plug adaptor (only for
models equipped with an adaptor).
To turn on the system, press @/1.
Inserting two size-AA (R6)
batteries into the remote
control
Tip
When the remote no longer operates the system,
replace both batteries with new ones.
Note
If you do not use the remote for a long period of time,
remove the batteries to prevent possible damage from
battery leakage and corrosion.
Setting the time
1 Turn on the system.
2 Press CLOCK/TIMER SET on the
remote.
If you are setting the clock for the first time,
go to step 5.
3 Press . or > on the remote
repeatedly until “CLOCK SET” appears
in the display.
4 Press ENTER/YES on the remote.
The hour indication flashes.
5 Press . or > on the remote
repeatedly to set the hour.
6 Press ENTER/YES or CURSORt on
the remote.
The minute indication flashes.
7 Press . or > on the remote
repeatedly to set the minute.
8 Press ENTER/YES on the remote.
The clock will begin operating.
To reset the system clock
Start over from step 1.

8
GB
CD
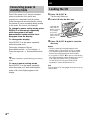
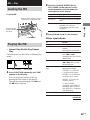
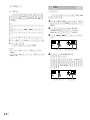
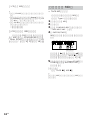
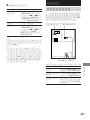
Loading the CD
1 Press CD EJECT Z.
The disc tray slides out.
2 Load a CD onto the disc tray.
3 Press CD EJECT Z again to close the
disc tray.
Notes
• The disc cannot be viewed through the front
window when a CD single (8 cm CD) is loaded.
• The characters printed on the disc appear upside
down when viewed through the front window.
• If you press CD EJECT Z to open or close the disc
tray while listening to another sound source, the CD
icon lights even if there is no CD in the tray.
To turn off the CD icon, press FUNCTION
repeatedly to switch the function to CD.
Tip
You can stand a CD case upright in the groove on top
of the system.
Load with the
label side up.
When you play
a CD single
(8 cm CD),
load it onto the
inner circle of
the tray.
Conserving power in
standby mode
Even if the system is off, the unit consumes
power to power the clock and to stay
responsive to commands from the remote.
Power saving mode was introduced to reduce
the amount of power consumed during standby.
In this mode, the clock is not displayed.
To change to power saving mode, press
DISPLAY on the remote repeatedly
while the system is off until
demonstration mode and the clock
disappear from the display.
To change the display
Press DISPLAY on the remote repeatedly
while the system is off.
The display changes as follows:
Demonstration mode t Clock display t
Power saving mode t Demonstration mode
t …
Tip
The timer continues to operate during power saving
mode.
To cancel power saving mode
Press DISPLAY on the remote repeatedly
while the system is off until demonstration
mode or the clock display appears in the
display.

CD
9
GB
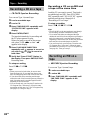
Other operations
To Do this
Stop playback Press CD x.
Pause Press CD u (or X on the
remote).
Press again to resume
playback.
Select a track During playback or pause,
press . or >
repeatedly until you find the
desired track.
Find a point in a track During playback, press and
hold down m or M until
you find the desired point.
Remove the CD Press CD EJECT Z.
Tip
You can start playing from the desired track in
Normal Play or Program Play.
Press . or > repeatedly until the desired track
appears after step 3.
Or, press the number buttons on the remote. The
playback automatically starts.
To enter track number over 10
(on the remote only)
1 Press >10.
2 Enter the corresponding digits.
To enter 0, press 10/0 instead.
Example:
To enter track number 30, press >10, then 3 and 10/0.
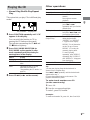
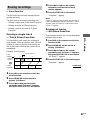
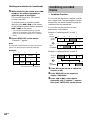
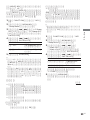
Play repeatedly
(Repeat Play)
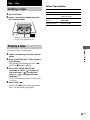
Track number Playing time
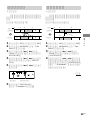
Playing the CD
— Normal Play/Shuffle Play/Repeat
Play
This system lets you play CDs in different play
modes.
1 Press FUNCTION repeatedly until “CD”
appears in the display.
You can switch the function to CD by
pressing the CD button on the remote.
The indicator surrounding the CD u and
CD x buttons lights up.
2 Press PLAY MODE DIRECTION (or
PLAY MODE on the remote) in stop
mode repeatedly until the mode you
want appears in the display.
Select
No display
SHUFFLE
PGM
3 Press CD u (or N on the remote).
Press REPEAT repeatedly
during playback until
“REPEAT” or “REPEAT
1” appears in the display.
REPEAT: For all the tracks
on the CD up to 5 times.
REPEAT 1: For only the
currently playing track.
To cancel playing
repeatedly, press REPEAT
repeatedly until “REPEAT”
and “REPEAT 1” disappear
from the display.
To play
The CD in original order.
The tracks on the CD in random
order.
The tracks on the CD in any
order that you want (see
“Programming the CD tracks” on
page 10).

10
GB
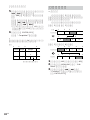
5 To program additional tracks, repeat
steps 3 and 4.
6 Press CD u (or N on the remote).
To
Check the program
order
Check the total
number of programed
tracks
Cancel Program Play
Add a track to the end
of the program
Erase the last
programed track
Select the desired
track using the
number buttons on
the remote
Tips
• The program you made remains after Program Play
finishes. To play the program again, switch the
function to CD, and then press CD u (or N on
the remote).
• “--.--” appears when the total CD program time
exceeds 100 minutes, or when you select a CD track
whose number is 21 or over.
Do this
Press . or >
repeatedly during Program
Play.
Press DISPLAY on the
remote in stop mode. The
total number of programed
steps appears, and then the
last programed track number
and the total playing time of
the program.
Press CD x, then press
PLAY MODE DIRECTION
(or PLAY MODE on the
remote) repeatedly until
“PGM” and “SHUFFLE”
disappear from the display.
Do steps 3 and 4 with
Program Play stopped.
Press CLEAR on the remote
in stop mode. Each time you
press the button, the last
programed track is erased.
Press number buttons instead
of performing steps 3 to 5.
To use number buttons, see
page 9.
Selected track
number
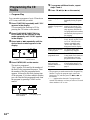
Programming the CD
tracks
— Program Play
You can make a program of up to 25 tracks on
a CD in any order that you want.
1 Press FUNCTION repeatedly until “CD”
appears in the display.
You can switch the function to CD by
pressing the CD button on the remote.
2 Press PLAY MODE DIRECTION (or
PLAY MODE on the remote) in stop
mode repeatedly until “PGM” appears
in the display.
3 Press . or > repeatedly until the
desired track number appears in the
display.
4 Press ENTER/YES on the remote.
The track is programed.
“Step” appears, followed by the number of
the track in the programed sequence. Then
the number of the last programed track
appears, followed by the total playing time
of the program. If you have made a mistake,
you can clear the last programed track from
the program by pressing CLEAR on the
remote.
Last programed
track number
Total playing time
Playing time of the
selected track

CD
11
GB
Using the CD display
Press DISPLAY on the remote repeatedly.
When a CD TEXT disc is loaded, you can
check the information recorded on the disc,
such as the titles.
The display changes as follows:
During normal playback
Current track number and elapsed playing time
of the track t Current track number and
remaining playing time of the track t
Remaining playing time of the entire CD t
Track title of the current track* t Clock
display t BASS level t TREBLE level t
Current track number and elapsed playing time
of the track t …
While the CD is stopped
Total number of tracks and total playing time
t CD disc title* t Clock display t BASS
level t TREBLE level t Total number of
tracks and total playing time t …
* If a CD that has no title is loaded, nothing appears.
When the CD contains 21 tracks or more, CD
TEXT is not displayed from track 21 on.
Labeling a CD
— Disc Memo
You can label up to 50 CDs with titles of up to
20 symbols and characters. Whenever you load
a labeled CD, the title appears in the display.
Notes
• You cannot label a CD for which “TEXT” appears
in the display.
• When labeling CDs for the first time, be
sure to first erase all disc titles using the
procedure “Erasing a disc title” on page 12.
1 Press CD on the remote to switch the
function to CD.
If “SHUFFLE” or “PGM” appears in the
display, press PLAY MODE DIRECTION
(or PLAY MODE on the remote) repeatedly
until both disappear.
2 Press NAME EDIT/SELECT on the
remote.
The cursor starts flashing.
3 Press NAME EDIT/SELECT on the
remote repeatedly to select the desired
type of character.
The display changes as follows:
Selected AB* (Upper cases) t Selected
ab* (Lower cases) t Selected 12
(Numbers) t Selected AB* (Upper cases)
t …
* Press number 1 repeatedly to display the
following symbols.
’ – / , . ( ) : ! ?
In addition, when the symbols above appear in
the display, press . or > on the remote
repeatedly to display the following symbols.
& + < > _ = ” ; # $ % @ `
continued

12
GB
4 Enter a character.
If you have selected uppercase or
lowercase letters
1 Press the corresponding letter button
repeatedly until the character to be
entered flashes.
Or, press the button once and press .
or > on the remote repeatedly.
2 Press CURSORt on the remote.
The flashing character is entered and the
cursor shifts to the right.
If you have selected numbers
Press the corresponding number button.
The number is entered and the cursor shifts
to the right.
To enter a blank space
1 Press NAME EDIT/SELECT on the
remote to select upper case or lower
case letters.
2 Press 10/0 on the remote.
A blank space is entered and the cursor
shifts to the right.
5 Repeat steps 3 and 4 to enter the rest
of the name.
To change a character
Press TCURSOR or CURSORt on the
remote repeatedly until the character to be
changed flashes, press CLEAR on the
remote to erase the character, then repeat
steps 3 and 4.
6 Press ENTER/YES on the remote to
complete the labelling procedure.
To cancel labeling
Press MENU/NO on the remote.
Labeling a CD (continued)
Checking the disc titles
1 Press MENU/NO on the remote in stop
mode.
2 Press . or > on the remote
repeatedly until “Name Check ?”
appears, then press ENTER/YES on the
remote.
3 Press . or > on the remote
repeatedly to select the disc titles
stored in the system memory between
01 and 50.
To check the current disc title
Press SCROLL on the remote in stop mode.
Erasing a disc title
1 Press MENU/NO on the remote in stop
mode.
2 Press . or > on the remote
repeatedly until “Name Erase ?”
appears, then press ENTER/YES on the
remote.
3 Press . or > on the remote
repeatedly to select the disc name to be
erased.
4 Press ENTER/YES on the remote again.
“Complete !” appears.
To erase all disc titles, press . or > on
the remote repeatedly until “All Erase ?”
appears in step 2, then press ENTER/YES on
the remote twice.
To cancel erasing
Press MENU/NO on the remote during steps 1
and 2.
Note
The disc titles are saved in the systems memory for
about a day even if you disconnect the power cord or
a power failure occurs.

MD — Play
13
GB
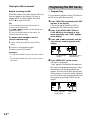
With the arrow
pointing toward
the deck
With the label side up, and the
shutter on the righthand side
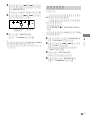
MD — Play
Loading the MD
Load an MD.
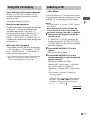
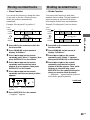
Playing the MD
— Normal Play/Shuffle Play/Repeat
Play
This system lets you play MDs in different play
modes.
Track number Playing time
1 Press FUNCTION repeatedly until “MD”
appears in the display.
You can switch the function to MD by
pressing the MD button on the remote.
The indicator surrounding the MD u and
MD x button lights up.
2 Press PLAY MODE DIRECTION (or
PLAY MODE on the remote) in stop
mode repeatedly until the mode you
want appears in the display.
Select To play
No display The MD in original order.
SHUFFLE The tracks on the MD in random
order.
PGM The tracks on the MD in any
order that you want (see
“Programming the MD tracks”
on page 14).
3 Press MD u (or N on the remote).
Other operations
To Do this
Stop play Press MD x.
Pause Press MD u (or X on the
remote).
Press again to resume play.
Select a track During playback or pause,
press . or >
repeatedly until you find the
desired track.
Find a point in a track During play, press and hold
m or M until you find
the desired point.
Play repeatedly (Repeat
Play)
Press REPEAT repeatedly
during playback until
“REPEAT” or “REPEAT
1” appears in the display.
REPEAT: For all the tracks
on the MD up to 5 times.
REPEAT 1: For only the
currently playing.
To cancel playing
repeatedly, press REPEAT
repeatedly until “REPEAT”
and “REPEAT 1” disappear
from the display.
Remove the MD Press MD EJECT Z.
continued

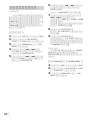
14
GB
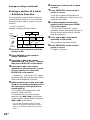
Programing the MD tracks
— Program Play
You can make a program of up to 25 tracks on
an MD in any order that you want.
1 Press FUNCTION repeatedly until “MD”
appears in the display.
You can switch the function to MD by
pressing the MD button on the remote.
2 Press PLAY MODE DIRECTION (or
PLAY MODE on the remote) in stop
mode repeatedly until “PGM” appears
in the display.
3 Press . or > repeatedly until the
desired track number appears in the
display.
4 Press ENTER/YES on the remote.
The track is programed.
“Step” appears, followed by the number of
the track in the programed sequence. Then
the number of the last programed track
appears, followed by the total playing time
of the program. If you have made a mistake,
you can clear the last programed track from
the program by pressing CLEAR on the
remote.
Selected track
number
Last programed
track number
Total playing
time
Before inserting an MD
When the system is on, make sure the MD icon
does not appear in the display. If it does, it
means an MD is already loaded. Press MD
EJECT Z to remove the MD.
Tip
You can start playing from the desired track in
Normal Play or Program Play.
Press . or > repeatedly until the desired track
appears after step 3.
Or, press the number buttons on the remote. The
playback automatically starts.
To enter track number over 10
(on the remote only)
1 Press >10 (Press twice to enter 100 or
over).
2 Enter the corresponding digits.
To enter 0, press 10/0 instead.
Examples:
• To enter track number 30, press >10, then 3 and 10/
0.
• To enter track number 108, press >10 twice, then 1,
10/0 and 8.
Playing the MD (continued)
Playing time of the
selected track

MD — Play
15
GB
5 To program additional tracks, repeat
steps 3 and 4.
6 Press MD u (or N on the remote).
To Do this
Select the desired track
using the number
buttons on the remote
Press . or >
repeatedly during Program
Play.
Press DISPLAY on the
remote in stop mode. The
last programed track
number appears, followed
by the total number of
programed steps.
Press MD x, then press
PLAY MODE
DIRECTION (or PLAY
MODE on the remote)
repeatedly until “PGM” and
“SHUFFLE” disappear
from the display.
Do steps 3 and 4 with
program play stopped.
Check the program
order
Check the total number
of programed tracks
Cancel Program Play
Add a track to the end
of the program
Erase the last
programed track
Press CLEAR on the
remote in stop mode. Each
time you press the button,
the last programed track is
erased.
Press number buttons
instead of performing steps
3 to 5. To use number
buttons, see page 14.
Tips
• The program you made remains after Program Play
finishes. To play the same program again, switch
the function to MD, and press MD u (or N on
the remote).
• “---.--” appears when the total MD program time
exceeds 1000 minutes.
Using the MD display
Press DISPLAY on the remote repeatedly.
The display changes as follows:
During normal playback
Current track number and elapsed playing time
of the track t Current track number and
remaining playing time of the track t
Remaining playing time of the entire MD t
MD track title*
1
t Clock display t BASS
level t TREBLE level t Current track
number and elapsed playing time of the track
t …
While the MD is stopped
Total number of tracks and total playing time*
2
t Remaining recordable time (only for a
recordable MD) t MD disc title*
1
t Clock
display t BASS level t TREBLE level t
Total number of tracks and total playing time*
2
t …
*
1
Nothing appears when no disc or track title is
labeled.
*
2
“---.--” appears when the total MD program time
exceeds 1000 minutes.
Tip
You can check a track title at any time during play. If
you press SCROLL on the remote, a track title
appears scrolling in the display.
Press SCROLL on the remote at any point during the
scroll display to stop the scrolling. Press SCROLL on
the remote again to restart the scrolling.

16
GB
MD — Recording
Before you start recording
MDs (Mini Disc) let you digitally record and
play music with high quality sound. Another
feature of MDs is track marking. The track
marking feature lets you quickly locate a
specific point or easily edit the recorded tracks.
However, depending on the source you record,
the recording method and the way the track
numbers are recorded differ.
When the source you record from is:
• This system’s CD player
– The MD deck performs digital recording.*
1
– Track numbers are automatically marked as
on the original CD.
• Other digital components
connected to the DIGITAL OPTICAL
IN jack
– The MD deck performs digital recording.*
1
– Track numbers are marked differently
depending on the source you record.
• This system’s tuner and other
components connected to the
ANALOG IN jack (e.g., a VCR)
– The MD deck performs analog recording.*
2
– A track number is marked at the beginning
of a recording, but when you turn on the
Level-Synchro Recording function (see page
21), track numbers are automatically marked
in sync with the level of the input signal.
*
1
For details on the limitations of digital recording,
see page 46.
*
2
Even if a digital component is connected to the
ANALOG IN jack, the MD deck performs analog
recording.
When you use a partially recorded
MD
Recording starts after the recorded tracks.
Note on MD track numbers
On an MD, the track numbers (track sequence), track
start and end point information, etc., are recorded in
the TOC*
3
area independent of the sound information.
You can edit recorded tracks quickly by modifying
the TOC information.
*
3
TOC: Table Of Contents
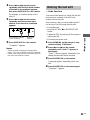
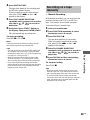
After recording
Press MD EJECT Z to remove the MD or
press ?/1 (power) to turn off the system.
“TOC” or “STANDBY” lights up or starts
flashing. The TOC is updated and recording is
completed.
Before pulling out the power cord
MD recording is completed when the MD
Table of Contents (TOC) is updated. The TOC
is updated when you eject the MD or press ?/1
to turn off the system. Do not pull out the
power cord before updating the TOC (while
“TOC” or “STANDBY” is lit) or while
updating the TOC (while “TOC” or
“STANDBY” is flashing) to ensure a complete
recording.
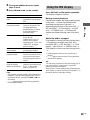
Protecting a recorded MD
To protect a recorded MD, slide the tab on the
side of the MD to open the slot. In this position,
the MD cannot be recorded. To record on the
MD, slide the tab to close the slot.
Tab
Slide the tab

MD — Recording
17
GB
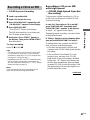
Recording a CD on an MD
— CD-MD Synchro Recording
1 Load a recordable MD.
2 Load a CD on the disc tray.
3 Press SYNCHRO REC repeatedly until
“CD-MD SYNC” appears in the display.
4 Press ENTER/START.
“Press START” flashes in the display.
The MD deck stands by for recording and
the CD player pauses for play.
5 Verify that “Press START” flashes in
the display. Then press ENTER/START.
Recording starts.
To stop recording
Press CD x or MD x.
Tips
• You can record only your favorite CD tracks with
CD Program Play. After step 2, follow the same
procedures as from step 1 to 5 in CD Program Play
(see page 10). Then go to step 3.
• Depending on the disc, CD TEXT information may
also be recorded (except when you record on an
MD and a tape at the same time). If “TEXT” flashes
during recording, see page 24.
Note
If the MD becomes full during recording, the CD
player and the MD deck stop automatically.
Recording a CD on an MD
with high speed
— CD-MD High-Speed Synchro
Recording
You can make a digital recording of a CD on
an MD at twice the speed of normal CD-MD
Synchro Recording.
In step 3 of “Recording a CD on an MD”,
press SYNCHRO REC repeatedly until
“HISPEED SYNC” appears in the display.
In step 4, “×2” appears in the display.
During high speed recording, you cannot listen
to the playback sound.
If “Retry” flashes in the display after
you press ENTER/START in step 5
A reading failure has occurred, and the MD
deck is trying to read the data again.
• If the retry was successful, the MD deck
continues with CD-MD High-Speed Synchro
Recording.
• If the condition of the loaded CD or the
system is poor, and retry fails, CD-MD
High-Speed Synchro Recording is disabled.
In this case, “×1” flashes in the display and
the MD deck automatically starts recording
in normal CD-MD Synchro Recording. Note
that monitoring of the recorded signal is not
possible when this occurs.
continued

18
GB
Notes
• You cannot pause recording during CD-MD High-
Speed Synchro Recording.
• If the play mode is set to the Repeat or Shuffle Play,
it automatically switches to normal play at step 3 of
“Recording a CD on an MD”.
• The following items are either inoperative or cannot
be used during CD-MD High-Speed Synchro
Recording:
—Auto Cut function.
—Recorded signal monitoring.
Recording a CD on an MD and
a tape at the same time
Load the CD you want to record. Then load a
blank tape and recordable MD. Press
SYNCHRO REC repeatedly until “DUAL
SYNC” appears, and then perform step 4
through 6 of “Recording a CD on a tape” (see
page 38).
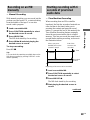
Recording a tape on an
MD
— TAPE-MD Synchro Recording
You can make an analog recording of a tape on
an MD.
You can use Type I (normal) tape.
1 Load a recordable MD.
2 Load a tape.
3 Press SYNCHRO REC repeatedly until
“TAPE-MD SYNC” appears in the
display.
4 Press ENTER/START.
The MD deck stands by for recording and
the tape deck pauses for play.
Tape playback side
N appears for the front side, and n for
the reverse side. To play the side not
indicated, press TAPE x and remove the
tape to reverse the tape side, then perform
steps 3 and 4 again.
5 Verify that “Press START” flashes in
the display. Then press ENTER/START.
Recording starts.
To stop recording
Press TAPE x or MD x.
Note
If the MD becomes full during recording, the tape
deck and the MD deck stop automatically.
Recording a CD on an MD (continued)

MD — Recording
19
GB
Recording on an MD
manually
— Manual Recording
With manual recording, you can record just the
portions you like from a CD, or start recording
from the middle of the tape. You can also
record a radio program.
1 Load a recordable MD.
2 Press FUNCTION repeatedly to select
the desired source to record.
3 Press MD REC z.
The MD deck stands by for recording.
4 Press MD NX and start playing the
desired source to record.
To stop recording
Press MD x.
Tip
You can check the remaining recordable time on the
MD during recording by pressing DISPLAY on the
remote repeatedly.
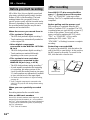
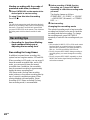
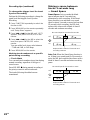
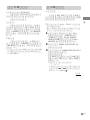
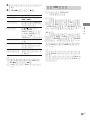
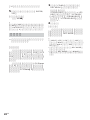
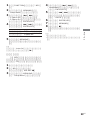
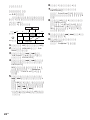
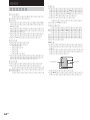
Starting recording with 6
seconds of prestored
audio data
— Time Machine Recording
When recording from an FM or satellite
broadcast, the first few seconds of material are
often lost due to the time it takes you to
ascertain the contents and press the record
button. To prevent the loss of this material, the
Time Machine Recording feature constantly
stores the most recent audio data in a buffer
memory. This lets you record the sound from 6
seconds before starting recording, as shown in
the illustration below:
Beginning of the source to be recorded
1 Load a recordable MD.
2 Press FUNCTION repeatedly to select
the desired source to record.
3 Press MD REC z.
The MD deck stands by for recording.
4 Start playing the desired source to
record.
continued
Time
6 seconds
Recorded
portion
When you press
ENTER/YES on the
remote in step 5
End of the
source to be
recorded

20
GB
5 Press ENTER/YES on the remote at the
desired point to start recording.
To stop Time Machine Recording
Press MD x.
Note
The MD deck starts storing audio data when the deck
stands by for recording in step 3 and you start playing
the source. If less than 6 seconds have passed when
you press ENTER/YES on the remote, Time Machine
Recording starts with less than 6 seconds of audio
data.
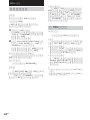
Recording tips
— Recording for long times/Marking
track numbers/Smart space/
Adjusting the recording level
Recording for long times
In addition to normal stereo recording, this
system has two long time modes: LP2 and LP4.
When recording in LP2 mode, you can record 2
times the normal recordable time, and in LP4
mode, you can record 4 times the normal
recordable time. In addition, the recordable
time for monaural recording is approximately
double the stereo recording time.
LP4 Stereo mode (4× long time recording
mode) achieves a long stereo recording time by
use of a special compression system. When
placing emphasis on sound quality, Stereo
recording or LP2 Stereo recording (2× long
time recording mode) is recommended.
1 Before recording (CD-MD Synchro
Recording, etc.), press REC MODE
repeatedly to select the recording mode
you want.
The display changes as follows:
STEREO REC t LP2 REC t LP4 REC
t MONO REC (Monaural) t STEREO
REC t …
2 Start recording.
Changing the recording mode
The selected recording mode is kept even after
recording has finished, so be sure to check the
recording mode before recording. To change
the recording mode, press REC MODE
repeatedly to switch to the recording mode you
want.
Notes
• MDs recorded in MDLP (LP2 or LP4) mode cannot
be played back on a system that does not support
MDLP mode. In addition, you cannot perform S.F
Edit, etc., for MDs recorded in MDLP mode.
• Even if you press REC MODE during recording or
recording pause, you cannot change the recording
mode.
• Even if you press REC MODE repeatedly to select
MONO, the monitor signal during recording does
not become monaural.
Starting recording with 6 seconds of
prestored audio data (continued)
ページが読み込まれています...
ページが読み込まれています...
ページが読み込まれています...
ページが読み込まれています...
ページが読み込まれています...
ページが読み込まれています...
ページが読み込まれています...
ページが読み込まれています...
ページが読み込まれています...
ページが読み込まれています...
ページが読み込まれています...
ページが読み込まれています...
ページが読み込まれています...
ページが読み込まれています...
ページが読み込まれています...
ページが読み込まれています...
ページが読み込まれています...
ページが読み込まれています...
ページが読み込まれています...
ページが読み込まれています...
ページが読み込まれています...
ページが読み込まれています...
ページが読み込まれています...
ページが読み込まれています...
ページが読み込まれています...
ページが読み込まれています...
ページが読み込まれています...
ページが読み込まれています...
ページが読み込まれています...
ページが読み込まれています...
ページが読み込まれています...
ページが読み込まれています...
ページが読み込まれています...
ページが読み込まれています...
ページが読み込まれています...
ページが読み込まれています...
ページが読み込まれています...
ページが読み込まれています...
ページが読み込まれています...
ページが読み込まれています...
ページが読み込まれています...
ページが読み込まれています...
ページが読み込まれています...
ページが読み込まれています...
ページが読み込まれています...
ページが読み込まれています...
ページが読み込まれています...
ページが読み込まれています...
ページが読み込まれています...
ページが読み込まれています...
ページが読み込まれています...
ページが読み込まれています...
ページが読み込まれています...
ページが読み込まれています...
ページが読み込まれています...
ページが読み込まれています...
ページが読み込まれています...
ページが読み込まれています...
ページが読み込まれています...
ページが読み込まれています...
ページが読み込まれています...
ページが読み込まれています...
ページが読み込まれています...
ページが読み込まれています...
ページが読み込まれています...
ページが読み込まれています...
ページが読み込まれています...
ページが読み込まれています...
ページが読み込まれています...
ページが読み込まれています...
ページが読み込まれています...
ページが読み込まれています...
ページが読み込まれています...
ページが読み込まれています...
ページが読み込まれています...
ページが読み込まれています...
ページが読み込まれています...
ページが読み込まれています...
ページが読み込まれています...
ページが読み込まれています...
ページが読み込まれています...
ページが読み込まれています...
ページが読み込まれています...
ページが読み込まれています...
ページが読み込まれています...
ページが読み込まれています...
ページが読み込まれています...
ページが読み込まれています...
-
 1
1
-
 2
2
-
 3
3
-
 4
4
-
 5
5
-
 6
6
-
 7
7
-
 8
8
-
 9
9
-
 10
10
-
 11
11
-
 12
12
-
 13
13
-
 14
14
-
 15
15
-
 16
16
-
 17
17
-
 18
18
-
 19
19
-
 20
20
-
 21
21
-
 22
22
-
 23
23
-
 24
24
-
 25
25
-
 26
26
-
 27
27
-
 28
28
-
 29
29
-
 30
30
-
 31
31
-
 32
32
-
 33
33
-
 34
34
-
 35
35
-
 36
36
-
 37
37
-
 38
38
-
 39
39
-
 40
40
-
 41
41
-
 42
42
-
 43
43
-
 44
44
-
 45
45
-
 46
46
-
 47
47
-
 48
48
-
 49
49
-
 50
50
-
 51
51
-
 52
52
-
 53
53
-
 54
54
-
 55
55
-
 56
56
-
 57
57
-
 58
58
-
 59
59
-
 60
60
-
 61
61
-
 62
62
-
 63
63
-
 64
64
-
 65
65
-
 66
66
-
 67
67
-
 68
68
-
 69
69
-
 70
70
-
 71
71
-
 72
72
-
 73
73
-
 74
74
-
 75
75
-
 76
76
-
 77
77
-
 78
78
-
 79
79
-
 80
80
-
 81
81
-
 82
82
-
 83
83
-
 84
84
-
 85
85
-
 86
86
-
 87
87
-
 88
88
-
 89
89
-
 90
90
-
 91
91
-
 92
92
-
 93
93
-
 94
94
-
 95
95
-
 96
96
-
 97
97
-
 98
98
-
 99
99
-
 100
100
-
 101
101
-
 102
102
-
 103
103
-
 104
104
-
 105
105
-
 106
106
-
 107
107
-
 108
108


