
S-DRIVE CS-DRIVE MS-DRIVE P

2
3
20
37
54
71
88
ENGLISH
繁體中文

3
IMPORTANT PRECAUTIONS
SAVE THESE INSTRUCTIONS
• When using a treadmill, basic precautions should always be followed, including the following: Read all instructions before using this treadmill. It is
the responsibility of the owner to ensure that all users of this treadmill are adequately informed of all warnings and precautions.
• This product is intended for commercial use. To ensure your safety and protect the equipment, read all instructions before operating.
• Incorrect or excessive exercise may cause injury. If you experience any kind of pain, including
but not limited to chest pains, nausea, dizziness, or shortness of breath, stop exercising
immediately and consult your physician before continuing.
• When exercising, always maintain a comfortable pace.
• Do not wear clothes that might catch on any part of the treadmill.
• Always wear athletic shoes while using this equipment.
• Emergency dismount can be done by grabbing the front or side handlebars and jumping with
both feet on the side rails.
• Do not jump on the treadmill.
• At no time should more than one person be on treadmill while in operation.
• This treadmill should not be used by persons weighing more than specied in the OWNER’S
MANUAL SPECIFICATIONS SECTION. Failure to comply will void the warranty.
• To clean, wipe surfaces down with soap and slightly damp cloth only; never use solvents. (See
MAINTENANCE)
• Do not operate under blanket or pillow. Excessive heating can occur and cause re or injury to
persons.
• At NO time should pets or children under the age of 14 be closer to the treadmill than 10 feet.
• At NO time should children under the age of 14 use the treadmill.
• Keep children under the age of 14 away from this equipment. Teenagers must be supervised
at all times while using this equipment.
• This equipment is not intended for use by persons with reduced physical, sensory or mental
capabilities, or lack of experience and knowledge, unless they have been given supervision or
instruction concerning use of the equipment by a person responsible for their safety.
• Use the treadmill only for its intended use as described in the treadmill guide and owner’s manual.
• Any and all part removal or replacement must be performed by a qualied service technician.
• Do not use other attachments that are not recommended by the manufacturer. Attachments may
cause injury.
• Never operate the treadmill if it is not working properly, if it has been dropped or damaged, or
immersed in water. Call Customer Tech Support for examination and repair.
• Do not use treadmill in any location that is not temperature controlled, such as but not limited to
garages, porches, pool rooms, bathrooms, car ports or outdoors. Failure to comply may void the
warranty.
• Over exercising may result in serious injury or death.
• If you feel faint, stop exercising immediately.
• Disconnect all power before servicing or moving the equipment. To clean, wipe surfaces down
with soap and slightly damp cloth only; never use solvents.
• Keep power cord away from heated surfaces. Do not carry this unit by its supply cord or use the
cord as a handle.
CAUTION!
CONSULT A PHYSICIAN BEFORE USING THIS EQUIPMENT. READ OWNER’S MANUAL BEFORE USE.
• It is essential that your treadmill is used only indoors, in a climate controlled room. If your treadmill has been exposed to colder temperatures or
high moisture climates, it is strongly recommended that the treadmill is warmed up to room temperature before rst time use.
WARNING!
TO REDUCE THE RISK OF INJURY TO PERSONS:
ENGLISH

4
S-DRIVE M
S-Drive M is self-powered. The power cord included is only used for charging the
battery. If low battery is displayed on the console, plug-in to charge.
S-DRIVE P
DEDICATED CIRCUIT AND ELECTRICAL INFO
A “Dedicated Circuit” means that each outlet you plug into should not have anything else running
on that same circuit. The easiest way to verify this is to locate the main circuit breaker box, and turn
off the breaker(s) one at a time. Once a breaker has been turned off, the only thing that should
not have power to it are the units in question. No lamps, vending machines, fans, sound systems,
or any other item should lose power when you perform this test.
Non-looped (isolated) neutral/grounding means that each circuit must have an individual
neutral/ground connection coming from it, and terminating at an approved earth
ground. You cannot “jumper” a single neutral/ground from one circuit to the next.
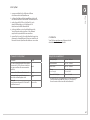
ELECTRICAL REQUIREMENTS
For your safety and to ensure good unit performance, the ground on this circuit must
be non-looped (isolated). Please refer to NEC article 210-21 and 210-23. Any alterations
to the standard power cord provided could void all warranties of this product.
110 V UNITS
Matrix S-Drive P requires the use of a 100-125 V, 60 Hz and a 15 A “Dedicated Circuit”,
with a non-looped (isolated) neutral/ground for power. This equipment can be
daisy-chained together with up to 4 units per 15 A circuit. This outlet should be a
NEMA 5-15R and have the same conguration as the plug. No adapter should be
used with this product. Matrix daisy-chain cord adapters are sold separately.
220 V UNITS
Matrix S-Drive P requires the use of a 216-250 V, 50 Hz and a 15 A “Dedicated Circuit”,
with a non-looped (isolated) neutral/ground for power. This equipment can be
daisy-chained together with up to 4 units per 15 A circuit. This outlet should be a
NEMA 6-20R and have the same conguration as the plug. No adapter should be
used with this product. Matrix daisy-chain cord adapters are sold separately.
GROUNDING INSTRUCTIONS
The unit must be grounded if connected to a power supply source. If it should
malfunction or breakdown, grounding provides a path of least resistance for electric
current to reduce the risk of electric shock. The unit is equipped with a cord having an
equipment-grounding conductor and a grounding plug. The plug must be plugged into
an appropriate outlet that is properly installed and grounded in accordance with all local codes and ordinances.
If the user does not follow these grounding instructions, the user could void the Matrix limited warranty.
ADDITIONAL ELECTRICAL INFO
In addition to the dedicated circuit requirement, the proper gauge wire
must be used from the circuit breaker box, to each outlet that will have
the maximum number of units running off of it. If the distance from the
circuit breaker box to each outlet, is 100 ft (30.5 m) or less, then 12 gauge
wire should be used. For distances greater than 100 ft (30.5 m) from the
circuit breaker box to the outlet, a 10 gauge wire should be used.
ENERGY SAVING / LOW-POWER MODE
All units are congured with the ability to enter into an energy
saving / low-power mode when the unit has not been in use for a
specied period of time. Additional time may be required to fully
reactivate this unit once it has entered the low-power mode.
WARNING!
• Connect this exercise product to a properly grounded outlet only.
• Never operate product with a damaged cord or plug even if it is working
properly. Never operate any product if it appears damaged, or has been
immersed in water. Contact Customer Tech Support for replacement or repair.
Failure to follow these specications can cause damage
to your product and can void the warranty:
• All video and power outlets must be functional the day of delivery
/ assembly of the product. The client is responsible for any
additional installation charges associated with return visits.
• Electrical supply may uctuate in your area. To ensure stable
performance of the product, use the proper gauge wire.
DANGER!
Improper connection of the equipment-grounding conductor can result in a risk
of electric shock. Disconnect the power cord from this equipment and check with
a qualied electrician or serviceman if you are in doubt as to whether the product
is properly grounded. Do not modify the plug provided with the product. If it
will not t the outlet, have a proper outlet installed by a qualied electrician.
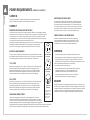
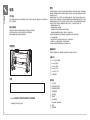
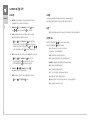
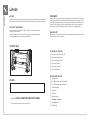
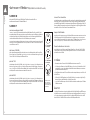
POWER REQUIREMENTS (S-DRIVE M / S-DRIVE P)
North American and
European power
cord plugs shown.
Depending on your
country, the plug
type may vary.
110 NEMA 5-15P
PLUG (N.A.)
220 NEMA 6-20P
PLUG (N.A.)
EURO PLUG
(EUROPE)
ENGLISH

5
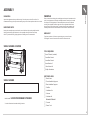
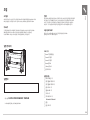
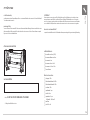
SERIAL NUMBER LOCATION
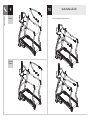
ASSEMBLY
UNPACKING
Unpack the equipment where you will be using it. Place the carton on a level at surface. It is
recommended that you place a protective covering on your oor. Never open box when it is on its side.
IMPORTANT NOTES
During each assembly step, ensure that ALL nuts and bolts are in place and partially threaded.
Several parts have been pre-lubricated to aid in assembly and usage. Please do not wipe
this off. If you have diculty, a light application of lithium grease is recommended.
SERIAL NUMBER
MODEL NAME: S-DRIVE PERFORMANCE TRAINER
* Use the information above when calling for service.
TOOLS REQUIRED:
F 8mm T-Wrench (included)
F 5mm Allen Wrench
F 6mm Allen Wrench
F 8mm Wrench x2
F 10mm Wrench x2
F Phillips Screwdriver
PARTS INCLUDED:
F 1 Base Frame
F 2 Front Handlebar Supports
F 2 Rear Handlebar Supports
F 1 Sled Bar
F 1 Handlebar Set
F 1 Harness
F 1 Hardware Kit
S-Drive M / S-Drive P:
F 1 Console
F 1 Power Cord
WARNING!
There are several areas during the assembly process that special attention must be
paid. It is very important to follow the assembly instructions correctly and to make
sure all parts are rmly tightened. If the assembly instructions are not followed
correctly, the equipment could have parts that are not tightened and will seem
loose and may cause irritating noises. To prevent damage to the equipment, the
assembly instructions must be reviewed and corrective actions should be taken.
NEED HELP?
If you have questions or if there are any missing parts, contact Customer
Tech Support. Contact information is located on the information card.
ENGLISH

6
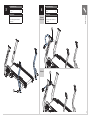
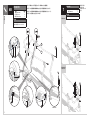
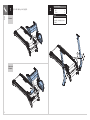
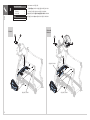
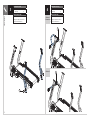
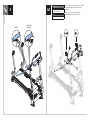
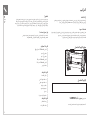
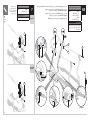
B
A
1
Black Hardware Bags (x2)
Description Qty
A
B
Bolt
Flat Washer
4
4
Torque Value
78.4 Nm / 57.8 ft-lb
Do not fully tighten hardware
until the step 7.
2
Note: There are no screws holding on the motor cover.
S-Drive C
S-Drive M
S-Drive P
ENGLISH

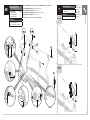
7
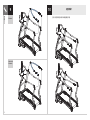
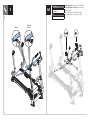
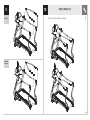
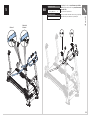
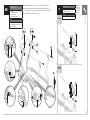
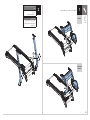
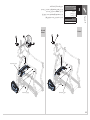
D
3 4
C
D
Red Hardware Bag
Description Qty
C Bolt 4
Torque Value
78.4 Nm / 57.8 ft-lb
Do not fully tighten hardware
until step 7.
White Hardware Bag
Description Qty
D Bolt 4
Torque Value
39.2 Nm / 28.9 ft-lb
Do not fully tighten hardware
until step 7.
S-Drive C
S-Drive M
S-Drive P
ENGLISH

8
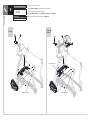
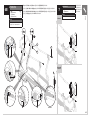
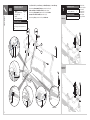
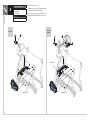
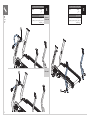
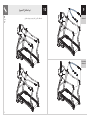
5 6A
Green Hardware Bag
Description Qty
E Bolt (M6x12L) 4
Torque Value
9.5 Nm / 7 ft-lb
E
1
S-Drive C
S-Drive M
S-Drive P
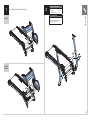
Carefully pull the CABLE (1) through the RIGHT
HANDLEBAR SUPPORT using the twist tie located
inside the RIGHT HANDLEBAR SUPPORT.
Repeat on other side.
NOTE: S-Drive M / S-Drive P models also have a console
cable to pull through the right handlebar support.
ENGLISH

9
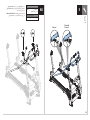
I
F
G
H
4
3
3
2
4
2
3
4
2
S-Drive P
6B
Attach HANDLEBAR SET using 4 BOLTS (F), 4 FLAT WASHERS (G) and 2 BOLTS (H).
Route SLED BRAKE CABLE (2) as shown and attach to
ADJUSTABLE PLASTIC WHEEL (set to level 8).
Route PARACHUTE BRAKE CABLE (3) as shown and attach to
ADJUSTABLE PLASTIC WHEEL (set to level 11).
Route CABLE (4) as shown and attach to LCB BOARD.
Black Hardware Bags (x2)
Red Hardware Bags (x1)
Description Qty
F
G
H
Bolt (M10x25L)
Flat Washer (M10)
Bolt (M10x100L)
4
4
2
Torque Value
F/H: 39.2 Nm / 28.9 ft-lb
Cable hex nuts: 5 Nm / 3.6 ft-lb
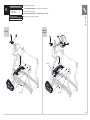
7
I
Green Hardware Bag
Description Qty
I Bolt (M8x20L) 2
Torque Value
9.5 Nm / 7 ft-lb
Completely
tighten hardware
from steps
2–6 according
to the Torque
Values specified
in each step.
S-Drive C
S-Drive M
S-Drive P
ENGLISH

10
J
5
4
K
J
K
5
Green / Yellow Hardware Bag
Description Qty
J
K
Screw (green)
Screw (yellow)
2
2
Torque Value
9.5 Nm / 7 ft-lb
8
S-Drive M / S-Drive P models only:
• Attach CONSOLE CABLES (4) and tuck cables into console mast.
• Reattach LCB cover using pre-installed screws.
Attach HANDLEBAR COVER (5) to the HANDLEBAR SUPPORT using 2 SCREWS (J).
Reattach covers using pre-installed screws and 2 SCREWS (K).
S-Drive C
S-Drive M
S-Drive P
Pre-installed screws Pre-installed screws
Pre-installed screws
ENGLISH

11
9 10
ASSEMBLY COMPLETE!
S-Drive C
S-Drive M
S-Drive P
NOTE: Verify harness connections are secure.
ENGLISH

12
BEFORE YOU BEGIN
TREADMILL LOCATION
Place the treadmill on a level and stable surface away from direct sunlight. The intense UV light can cause discoloration on the
plastics. Locate your treadmill in an area with cool temperatures and low humidity. Please leave a clear zone behind the treadmill
that is at least the width of the treadmill and at least 79” (2000 mm) long. This zone must be clear of any obstruction and provide
the user a clear exit path from the machine. For ease of access, there should be an accessible space on both sides of the treadmill
of at least 24” (600 mm) to allow a user access to the treadmill from either side. Do not place the treadmill in any area that will
block any vent or air openings. The treadmill should not be located in a garage, covered patio, near water or outdoors.
WARNING!
Our treadmills are heavy. To avoid injury and damage, use care and additional help if necessary when moving.
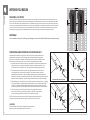
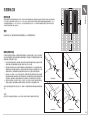
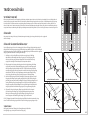
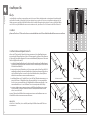
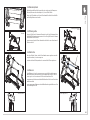
TENSIONING AND CENTERING THE RUNNING BELT
After placing the treadmill in the position it will be used, the belt must be checked for
proper tension and centering. The belt might need to be adjusted after the rst two
hours of use. Temperature, humidity, and use cause the belt to stretch at different rates.
If the belt starts to slip when a user is on it, be sure to follow the directions below.
1. Locate the two hex head bolts on the rear of the treadmill. The bolts are located at each
end of the frame at the back of the treadmill. These bolts adjust the rear belt roller.
Do not adjust until the treadmill is on. This will prevent over tightening of one side.
2. The belt should have equal distance on either side between the frame. If the belt
is touching one side, do not start the treadmill. Turn the bolts counter clockwise
approximately one full turn on each side. Manually center the belt by pushing the belt
from side to side until it is parallel with the side rails. Tighten the bolts the same amount as
when the user loosened them, approximately one full turn. Inspect the belt for damage.
3. While walking on the treadmill at 3 mph (~4.8 kph), observe the belt position. If it is moving
to the right, tighten the right bolt by turning it clockwise ¼ turn, and loosen the left bolt
¼ turn. If it is moving to the left, tighten the left bolt by turning it clockwise ¼ turn and
loosen the right ¼ turn. Repeat Step 3 until the belt remains centered for several minutes.
4. Check the tension of the belt. The belt should be very snug. When a person
walks or runs on the belt, it should not hesitate or slip. If this occurs, tighten
the belt by turning both bolts clockwise ¼ turn. Repeat if necessary.
NOTE: Use the front cover to conrm the belt is properly centered as shown. It is
necessary to adjust the belt until the edge of the belt is parallel to the cover.
CAUTION!
Do not run faster than 3 mph (~4.8 kph) while centering. Keep
fingers, hair and clothing away from belt at all times.
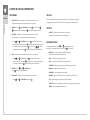
BELT IS TOO FAR TO THE RIGHT SIDE BELT IS TOO FAR TO THE LEFT SIDE
TIGHTENS RIGHT SIDE OF ROLLER TIGHTENS LEFT SIDE OF ROLLER
0.6 m
(2 ft)
0.6 m
(2 ft)
0.6 m
(2 ft)
2 m (79”)
0.3 m (1 ft)
ENGLISH

13
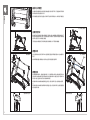
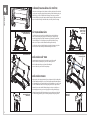
WALK / SPRINT
PROPER USAGE
SLED MODE
PROPER USAGE
PROPER USAGE
The treadmill can be used in two modes; sled or walk/sprint. To use the
treadmill in sled mode, remove the harness so the user has access to the
upper and lower sled handlebars. To use the treadmill in walk / sprint
mode, connect the harness and adjust by using the instructions below.
Emergency dismount can be done by grabbing the front or side
handlebars and jumping with both feet on the side rails.
ADJUSTING THE HARNESS
After stepping onto the treadmill, slowly walk into the harness to check for
proper height. The harness should sit comfortably at about waist height.
If the harness needs to be adjusted, release the front connection
point and reconnect the harness at the correct height.
ADJUSTING THE BRAKES
The treadmill is equipped with two brakes, a sled brake and a
parachute brake. The left hand side lever controls the sled brake and
the right hand lever controls the parachute brake. The sled brake has
8 resistance settings and the parachute brake has 11. The brakes are
designed to be used together or independently of each other.
The sled brake is designed to simulate the resistance created when pushing a
sled. When using this brake, resistance will be immediately applied to the belt.
The parachute brake is designed to simulate the resistance
created when running with a parachute. When using this brake,
resistance will increase as the user increases speed.
SLED MODE WALK / SPRINT MODE
HARNESS
PARACHUTE BRAKE
(RIGHT SIDE)
SLED BRAKE
(LEFT SIDE)
LEVELING THE EQUIPMENT
It is extremely important that the levelers are correctly adjusted
for proper operation. An unbalanced treadmill may cause belt
misalignment or other issues. Use of a level is recommended.
Once you have placed the treadmill where you intend to use it, raise or lower
one or both of the adjustable levelers located on the bottom-front of the frame.
ENGLISH

14
S-Drive M
S-Drive P
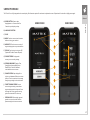
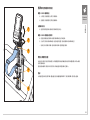
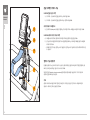
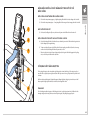
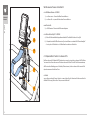
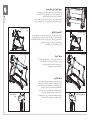
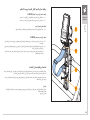
CONSOLE AND ADJUSTABLE SUPPORT HARNESS FUNCTION
ADJUSTING THE S-DRIVE CONSOLE MOUNT
1) Horizontal Adjustment — Tilt the console up or down as needed.
2) Vertical Adjustment — Rotate the console left or right as needed.
SUPPORT HARNESS STRAP HOOK
3) When performing sled pushes, always hang the adjustable harness strap on the strap hook.
ADJUSTING S-DRIVE USER SUPPORT HARNESS
4) Pull lever to release the locking pin on the adjustable harness lock assembly by pulling lever
forward towards the user.
5) Slide the adjustable harness lock assembly up or down until the desired position is reached,
and release the lever to lock the harness into place.
• If performed correctly, an audible click will be heard. If no click is heard, minor adjustments
may be needed.
USING THE HEART RATE FUNCTION
The heart rate function on this product is not a medical device. The heart rate reading is intended
only as an exercise aid in determining heart rate trends in general. Please consult your physician.
When used in conjunction with a wireless chest transmitter (sold separately), your heart rate can be
transmitted wirelessly to the unit and displayed on the console.
WARNING!
Heart rate monitoring systems may be inaccurate. Over exercising may result in serious injury or
death. If you feel faint, stop exercising immediately.
1
2
3
5
4
ENGLISH

15
ENGLISH
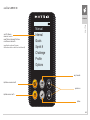
S-Drive M
Manual
Interval
Goals
Sprint 8
Challenge
Profile
Options
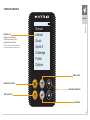
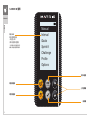
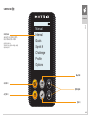
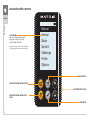
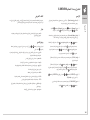
BACKLIT LCD
Displays Time, Distance,
Calories, Heart Rate, Pace,
Speed and Speed Graph
(Calories and heart rate will display with
use of non-coded heart rate strap only)
DISTANCE QUICK KEY
TIME QUICK KEY
MENU / BACK
NAVIGATION ARROWS
ENTER KEY
S-DRIVE M CONSOLE

16
S-Drive M
PROGRAMS
1. QUICK START – Begin running. Console will power up within a few
seconds and displays current user distance, time, and pace.
2. MANUAL - Press , select MANUAL and press to conrm. Use
to select desired time and press to conrm. Begin your workout.
3. INTERVAL - Allows user to set specic work to rest interval ratios
and total number of intervals based on performance goals.
• Press and to INTERVAL and press to conrm. Choose time or
distance using the arrow keys and to conrm; select work time and rest
time using the arrow keys and press to conrm; use to select
number of desired intervals, to conrm. Begin your interval workout.
4. GOAL – Allows user to set specic time, distance, or calorie goals
• Press and to GOAL and press to conrm. Choose time,
distance, or calorie, and press to conrm. Select specic time, distance,
or calorie goal and press to conrm. Begin your goal workout.
5. SPRINT 8 – Press and to SPRINT 8 and
press . Begin your Sprint 8 workout.
6. CHALLENGE – Allows user to set a distance within a time goal.
• Press and to CHALLENGE and press .
PROFILE
This menu option allows the user to enter personal data (i.e. gender, age, height,
weight) when wearing a HR strap to more accurately calculate calories burned.
OPTION
• SUPPORT – Shows console and frame serial number,
rmware version, hardware info, and model type.
MANAGER MODE
To enter manager mode, press and simultaneously for 3-5
seconds. To exit manager mode, press and hold for 3 seconds.
• WORKOUT – set desired max time, default time, pause
time, default calories and default distance
• USER – select age, weight, height, gender
• UNIT – set console to display metric or standard units
• SOFTWARE – displays version, used for troubleshooting and service
• GENERAL – shows total time and distance
• LANGUAGE – select language based on region
• MACHINE – type, serial number, out of order options used for service
• LCD – adjust backlight, brightness and contrast settings
• SLEEP TIME – sets the default time console will stay on before going to sleep
• BEEPER – turns countdown sound on or off
S-DRIVE M CONSOLE OPERATION
ENGLISH

17
ENGLISH
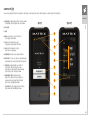
S-Drive P
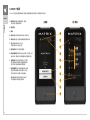
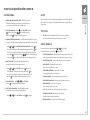
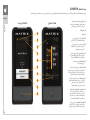
HOME SCREEN RUN SCREEN
A
I
E
H
B
F
J
C
G
D
A) POWER BUTTON: Press to wake
display/power on. Press and hold for
3 seconds to put display to sleep.
B) LANGUAGE SELECTION
C) CLOCK
D) MENU: Touch to access various functions
before or during your workout.
E) WORKOUTS: Touch to access a variety of
target training options or preset workouts.
F) SIGN IN: Touch to sign in using your XID
(Optional WiFi add on feature required).
G) CURRENT SCREEN: Displays what
screen you are currently viewing.
H) FEEDBACK WINDOWS: Displays Time,
Speed, Watts, Average Watts, Heart
Rate (BPM), or Distance. Feedback
varies based on current screen.
I) CHANGE SCREEN: Swipe display left or
right to cycle between different run screen
options. Or select a metric with an orange
triangle to go straight to a desired screen.
J) TARGET TRAINING SCREEN: Press to
return to target training screen when a
target training option has been set. Press
the target icon to set a specific training
goal and activate the LED color wrap.
• PERSONAL INFO: Enter weight, age and
gender to ensure caloric data and the
power-to-weight ratio is more accurate.
S-DRIVE P CONSOLE
The S-Drive P has a fully integrated touch screen display. All information required for workouts is explained on screen. Exploration of the interface is highly encouraged.

18
S-Drive P
HOME SCREEN
• Run/walk to START immediately. Or...
• Touch the WORKOUTS button to customize your workout.
• Touch the SIGN IN button to sign in using your XID.
SIGN IN
1) Enter your XID and touch .
2) Enter your PASSCODE and touch .
Consoles equipped with RFID will support logging in with RFID tag. To
log in, touch your RFID tag to the right side surface of the console.
REGISTER A NEW USER
1) Don’t have an xID account? Registration is easy.
2) Follow the on-screen prompts to create your free account.
3) Review your information and select the I ACCEPT THE TERMS AND
CONDITIONS box to review the Terms and Conditions.
4) Touch to complete registration. Your account
is now active and you are signed-in.
WORKOUT SETUP
5) After touching the WORKOUTS button, select
one of the WORKOUTS from the list.
6) Use the SLIDER CONTROLS to adjust your program settings.
7) Press GO to begin your workout.
CHANGE WORKOUT
During a workout, touch
and then touch CHOOSE
EXERCISE to access available workouts.
SUMMARY SCREENS
After your workout is complete, a workout summary will appear. You
can swipe up and down to scroll through the summary. Also, swipe the
display left and right to switch between the summary screens.
S-DRIVE P CONSOLE OPERATION
TARGET TRAINING WORKOUT
1) Start walking until the default screen appears.
2) Either swipe right or tap the metric box with an orange triangle to take you
directly to the desired screen.
3) Once on your desired screen, tap the large metric or the target icon to set your
training goal and then touch . The LED lights now become associated to that
target.
LED LIGHTS
Target training programming uses bright color lights on the top and sides of the
console to gauge effort and keep everyone on track of their goals. These lights may
be turned on or off in the workout setup by pressing LIGHTS ON or LIGHTS OFF. The
color indicators are: BLUE = below target, GREEN = on target, RED = above target.
MANAGER MODE
To enter manager mode, press and hold the MATRIX logo in the center of the screen
for 10 seconds. Then enter 1001 and touch .
WIRELESS HEART RATE
To connect your ANT+ or Bluetooth SMART heart rate device to the
console, touch
and then touch HEART RATE DEVICE PAIRING.
The heart rate function on this product is not a medical device. The heart rate reading is
intended only as an exercise aid in determining heart rate trends in general. Please consult
your physician.
When used in conjunction with a wireless chest strap or arm band, your heart rate can be
transmitted wirelessly to the unit and displayed on the console.
WARNING!
Heart rate monitoring systems may be inaccurate. Over exercising may result
in serious injury or death. If you feel faint, stop exercising immediately.
* Supported standards with carrier frequency of 13.56 MHz include; ISO 14443 A, ISO
15693, ISO 14443 B, Sony Felica, Inside Contact-less (HID iClass), and LEGIC RF.
ENGLISH

19
ENGLISH
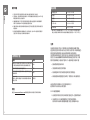
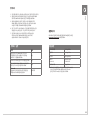
MAINTENANCE SCHEDULE
ACTION FREQUENCY
Clean entire machine using water and a
mild soap or other Matrix approved solution
(cleaning agents should be alcohol and
ammonia free).
DAILY
Check harness for wear and secure
connections.
DAILY
Remove the front cover. Check for debris and
clean with a dry cloth or small vacuum nozzle.
MONTHLY
S-Drive M ONLY:
If low battery is displayed on the console, use
included power cord to charge the battery.
AS NEEDED
MAINTENANCE
1. Any and all part removal or replacement must be
performed by a qualied service technician.
2. DO NOT use any equipment that is damaged and or
has worn or broken parts. Use only replacement parts
supplied by your country’s local MATRIX dealer.
3. MAINTAIN LABELS AND NAMEPLATES: Do not remove labels for
any reason. They contain important information. If unreadable
or missing, contact your MATRIX dealer for a replacement.
4. MAINTAIN ALL EQUIPMENT: Preventative maintenance is the key to
smooth operating equipment as well as keeping your liability to a
minimum. Equipment needs to be inspected at regular intervals.
5. Ensure that any person(s) making adjustments or performing
maintenance or repair of any kind is qualied to do so.
MATRIX dealers will provide service and maintenance
training at our corporate facility upon request.
PRODUCT SPECIFICATIONS
Max User Weight 181.4 kg / 400 lbs
Product Weight 141.2 kg / 312 lbs
Shipping Weight 158.2 kg / 349 lbs
Overall Dimensions
(L x W x H)*
193 x 88 x 150 cm /
76” x 34.6” x 59”
Max. Harness Loading 136 kg / 300 lbs
* Ensure a minimum clearance width of 0.6 meters (24”) for access to and
passage around MATRIX equipment. Please note, 0.91 meters (36”) is
the ADA recommended clearance width for individuals in wheelchairs.
WARRANTY
Please visit www.matrixtness.com for warranty information
along with warranty exclusions and limitations.

20
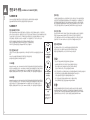
重要預防措施
保存以下說明
• 使用跑步機時,應始終遵循基本預防措施,包括以下內容:使用此跑步機前,請詳盡閱讀說明。跑步機持有者有責任確定所有使用者皆明確瞭解所有警告和預防措施。
• 本產品適於商業環境用途。為確保您的安全及保護器材,使用前請閱讀所有使用說明。
• 不正確或過量的運動可能導致受傷。如果您感到任何不適,其中包括但不限於胸痛、噁心、暈眩或呼吸急
促,請立即停止運動,並在繼續前先洽詢醫師。
• 運動時請維持合適的速度。
• 請勿穿著可能會被夾入跑步機任何部位的衣物。
• 使用本器材時請一律穿著運動鞋。
• 只要抓住前方或側邊的把手,雙腳跳在兩邊的裝飾護條上,即可緊急脫離機器。
• 請勿在跑步機上跳動。
• 在跑步機運轉時的任何時間點,跑步機上都不應超過一人。
• 體重超過使用手冊規格規範的人士,不得使用本跑步機。未遵守本預防措施會導致保固失效。
• 清潔時只能用肥皂和微濕布擦拭表面,切勿使用溶劑。(請參閱維修部分)
• 跑步機運作時請勿壓在地毯或枕頭上。如此可能會導致機體過熱並引發火災或造成人員受傷。
• 無論任何情況下,都不應該讓寵物或 14 歲以下兒童,接近跑步機周圍 3 公尺(10 英呎)內。
• 14 歲以下的孩童嚴禁使用跑步機。
• 14 歲以下的孩童不得接近本器材。青少年須在成人全程監督下使用本器材。
• 本器材不適用於體能、知覺或精神機能不佳或欠缺經驗及知識的人士;如欲使用,必須在他人監督下進
行,且須由可負責其人身安全者指導器材用途及使用方式。
• 請務必遵照跑步機指南和使用手冊的說明,將跑步機使用於指定的用途。
• 務必由合格的維修技術人員拆卸或更換部分及全部零件。
• 請勿使用製造商建議以外的其他配件。使用不當配件可能會導致人員受傷。
• 如果跑步機運作不正常,或是摔落或受損,或是曾經浸在水中,切勿使用跑步機。檢查和維修時請致電客戶技
術支援部門。
• 切勿在無法控制溫度的地點使用本器材,包含車庫、陽台、泳池區、浴室、露天車棚或戶外。未遵守規定可能導
致保固失效。
• 運動過量可能會導致嚴重受傷或死亡。
• 若您覺得頭暈,請立刻停止運動。
• 在維修或移動設備之前,請切斷所有電源連接。清潔時只能用肥皂和微濕布擦拭表面,切勿使用溶劑。
• 讓電源線遠離受熱表面。請勿透過電源線攜帶本設備或將電線用作手握把。
注意!
請在使用本器材前詢問醫師。使用前請閱讀使用手冊。
• 跑步機務必只能在可控制溫度的室內使用。如果您的跑步機曾暴露在低溫或高度潮濕的環境下,強烈建議您在初次使用前先讓跑步機暖機至室溫。
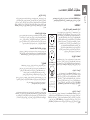
警 告!
為減少人身傷害風險:
繁體中文
ページが読み込まれています...
ページが読み込まれています...
ページが読み込まれています...
ページが読み込まれています...
ページが読み込まれています...
ページが読み込まれています...
ページが読み込まれています...
ページが読み込まれています...
ページが読み込まれています...
ページが読み込まれています...
ページが読み込まれています...
ページが読み込まれています...
ページが読み込まれています...
ページが読み込まれています...
ページが読み込まれています...
ページが読み込まれています...
ページが読み込まれています...
ページが読み込まれています...
ページが読み込まれています...
ページが読み込まれています...
ページが読み込まれています...
ページが読み込まれています...
ページが読み込まれています...
ページが読み込まれています...
ページが読み込まれています...
ページが読み込まれています...
ページが読み込まれています...
ページが読み込まれています...
ページが読み込まれています...
ページが読み込まれています...
ページが読み込まれています...
ページが読み込まれています...
ページが読み込まれています...
ページが読み込まれています...
ページが読み込まれています...
ページが読み込まれています...
ページが読み込まれています...
ページが読み込まれています...
ページが読み込まれています...
ページが読み込まれています...
ページが読み込まれています...
ページが読み込まれています...
ページが読み込まれています...
ページが読み込まれています...
ページが読み込まれています...
ページが読み込まれています...
ページが読み込まれています...
ページが読み込まれています...
ページが読み込まれています...
ページが読み込まれています...
ページが読み込まれています...
ページが読み込まれています...
ページが読み込まれています...
ページが読み込まれています...
ページが読み込まれています...
ページが読み込まれています...
ページが読み込まれています...
ページが読み込まれています...
ページが読み込まれています...
ページが読み込まれています...
ページが読み込まれています...
ページが読み込まれています...
ページが読み込まれています...
ページが読み込まれています...
ページが読み込まれています...
ページが読み込まれています...
ページが読み込まれています...
ページが読み込まれています...
ページが読み込まれています...
ページが読み込まれています...
ページが読み込まれています...
ページが読み込まれています...
ページが読み込まれています...
ページが読み込まれています...
ページが読み込まれています...
ページが読み込まれています...
ページが読み込まれています...
ページが読み込まれています...
ページが読み込まれています...
ページが読み込まれています...
ページが読み込まれています...
ページが読み込まれています...
ページが読み込まれています...
ページが読み込まれています...
ページが読み込まれています...
ページが読み込まれています...
ページが読み込まれています...
ページが読み込まれています...
-
 1
1
-
 2
2
-
 3
3
-
 4
4
-
 5
5
-
 6
6
-
 7
7
-
 8
8
-
 9
9
-
 10
10
-
 11
11
-
 12
12
-
 13
13
-
 14
14
-
 15
15
-
 16
16
-
 17
17
-
 18
18
-
 19
19
-
 20
20
-
 21
21
-
 22
22
-
 23
23
-
 24
24
-
 25
25
-
 26
26
-
 27
27
-
 28
28
-
 29
29
-
 30
30
-
 31
31
-
 32
32
-
 33
33
-
 34
34
-
 35
35
-
 36
36
-
 37
37
-
 38
38
-
 39
39
-
 40
40
-
 41
41
-
 42
42
-
 43
43
-
 44
44
-
 45
45
-
 46
46
-
 47
47
-
 48
48
-
 49
49
-
 50
50
-
 51
51
-
 52
52
-
 53
53
-
 54
54
-
 55
55
-
 56
56
-
 57
57
-
 58
58
-
 59
59
-
 60
60
-
 61
61
-
 62
62
-
 63
63
-
 64
64
-
 65
65
-
 66
66
-
 67
67
-
 68
68
-
 69
69
-
 70
70
-
 71
71
-
 72
72
-
 73
73
-
 74
74
-
 75
75
-
 76
76
-
 77
77
-
 78
78
-
 79
79
-
 80
80
-
 81
81
-
 82
82
-
 83
83
-
 84
84
-
 85
85
-
 86
86
-
 87
87
-
 88
88
-
 89
89
-
 90
90
-
 91
91
-
 92
92
-
 93
93
-
 94
94
-
 95
95
-
 96
96
-
 97
97
-
 98
98
-
 99
99
-
 100
100
-
 101
101
-
 102
102
-
 103
103
-
 104
104
-
 105
105
-
 106
106
-
 107
107
-
 108
108


