
Register your
new device on
MyBosch now and
get free benefits:
bosch-home.com/
welcome
MFQ35..GB
Accessories (Hand Mixer)
[en] Instruction manual
[ms] Arahan pengendalian
[zf] 使用說明書
[zh] 使用说明书
[ar]
Accessories (Hand Mixer) 5
Aksesori (Pengadun Tangan) 7
配件 (手提攪拌機) 9
附件 (手持式料理机) 11
14

a a
54
2 3
1
e
a
d
c
f
b
g
a
A

B
3
8
10
9
11 12 13
7
4 5
6
1
2
a b

200 - 600 g
1 - 8 x
2 - 6 x
600 - 1200 g
500 - 1500 g
∑
∑
350 - 500 g
1 - 8 min
30 s
5
2 - 5 min5
1
4 - 5 min5
30 s1
3 - 5 min5
30 s1
4 - 5 min5
250 - 500 g
30 s1
3 - 5 min5
C
D

5
en
Intended use
Intended use
This accessory is designed for the hand mixer MFQ35.. .
Follow the operating instructions for the hand mixer.
Do not use the stand for other hand mixers.
When using the stand, only use the tools supplied with the
appliance.
This accessory is only suitable for kneading dough, whisking egg
whites and beating cream and light dough.
The accessory must not be used for processing other objects or
substances.
Safety instructions
W Risk of injury!
■ Before attaching or removing the hand mixer, wait until the drive
has come to a standstill and pull out the mains plug.
■ Whenever the swivel arm is lowered, do not reach into the
housing to avoid your fingers or hands getting caught. Do not
adjust the swivel arm while the appliance is switched on.
W Important!
It is essential to clean the accessory thoroughly after each use or
after it has not been used for an extended period. X “Care and
daily cleaning” see page 6
Operation
For kneading dough, whisking egg whites
and beating cream and light dough.
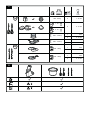
Always observe the maximum quantities
and processing times in the table. X Fig. C
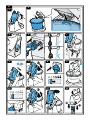
X Fig. B
1. Place the appliance stand on a smooth
and level work surface. Press the
release button and raise the swivel arm
to the stop.
2. Place the bowl on the base. The edge of
the bowl must completely cover the bowl
drive and the bowl should rotate easily.
3. Close the rear aperture on the hand
mixer before placing on the stand.
Overview
X Fig. A
1 Appliance stand with swivel arm
a Drive gear wheel
b Locking mechanism for hand mixer
c Lever for locking mechanism
d Opening for hand mixer
e Release button for swivel arm
f Base for bowl
g Bowl drive
2 Bowl
3 Hand mixer MFQ35..
a Opening for locking mechanism
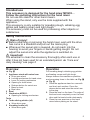
Tools
4 Turbo stirring whisks (x2)
a Worm drive gear
5 Kneading hooks (x2)
a Worm drive gear

6
en Care and daily cleaning
Care and daily cleaning
The accessories must be thoroughly
cleaned after each use. X Table D
Caution!
Follow the instructions in the manual for the
hand mixer without fail.
■ Wipe down the stand with a soft, damp
cloth and dry off.
■ Clean the bowl and tools with
dishwashing detergent and a soft brush
or put them in the dishwasher.
■ Allow all parts to dry.
Subject to change.
4. Insert required tool pair (stirring whisks
or kneading hooks) into the hand mixer
and press into position.
Important! Only use tools that came
with the stand.
a. Note the shape of the plastic parts
on the tools to avoid mixing them
up.
b. Insert tools one after the other to
stop them from getting caught!
5. Place the back of the hand mixer on the
support so that the hooks engage in the
ventilation slots of the hand mixer.
6. Hold the support and press the hand
mixer down until it locks into place.
Ensure that the worm gear and gear
wheel mesh together correctly!
7. Press the release button and push the
swivel arm down until it locks into place.
8. Insert the mains plug. Move the switch
to the desired setting.
9. Process the ingredients until you
achieve the required result.
10. Move the switch to 0. Wait until the drive
comes to a standstill. Disconnect the
mains plug.
11. Press the release button and raise the
swivel arm to the stop.
12. Pull the lever on the swivel arm
backwards and remove the hand mixer.
13. Press the ejector button on the hand
mixer and remove the tools.
■ Remove the bowl.
Note: To make dough, first put the flour and
then the other ingredients in the bowl and
mix briefly at the lowest setting. When the
flour is no longer dusty, change to a higher
setting. If the bowl and tools are rotated
in opposite directions, a loose dough is
formed after a short while.

7
Pengendalian yang betul
ms
Pengendalian yang betul
Aksesori ini dimaksudkan untuk alat pengadun tangan MFQ35.. .
Beri perhatian pada arahan pengendalian alat pengadun tangan.
Jangan gunakan tapak untuk alat pengadun tangan yang lain.
Gunakan tapak hanya dengan alatan yang dihantar bersama-sama
alat.
Aksesori ini hanya sesuai untuk mengadun doh dan juga untuk
memukul putih telur, krim dan doh yang lembut.
Aksesori ini tidak boleh digunakan bagi pemprosesan benda atau
bahan lain.
Arahan keselamatan
WRisiko kecederaan!
■ Hanya pasang atau tanggalkan pengadun tangan semasa pemacu
berhenti dan palam kuasa ditarik.
■ Semasa menurunkan lengan berayun, jangan pegang perumah
untuk mengelakkan jari atau tangan terkepit. Jangan laraskan
lengan berayun semasa alat dihidupkan.
WPenting!
Cuci aksesori secara menyeluruh selepas setiap penggunaan atau
selepas lama tidak menggunakannya. X “Penjagaan dan pencucian
harian” lihat halaman 8
Sepintas lalu
X Rajah A
1 Tapak alat dengan lengan berayun
a Gear pemacu
b Kunci untuk alat pengadun tangan
c Tuil untuk kunci
d Bukaan untuk alat pengadun tangan
e Butang pembuka kunci untuk lengan
berayun
f Tanjakan untuk mangkuk
g Pemacu mangkuk
2 Mangkuk
3 Alat pengadun tangan – MFQ35..
a Bukaan untuk kunci
Alat
4 Pemukul adunan turbo (2 unit)
a Skru pemacu
5 Penyangkuk doh (2 unit)
a Skru pemacu
Pengendalian
Untuk mengadun doh dan juga untuk
memukul putih telur, krim dan doh yang
lembut.
Sila beri perhatian terhadap kuantiti
maksimum dan masa pemprosesan seperti
dalam jadual. X Rajah C
X Rajah B
1. Letakkan tapak alat di atas permukaan
yang rata dan mendatar. Tekan butang
pembuka kunci dan angkat lengan
berayun hingga batasan.
2. Letakkan mangkuk di atas tanjakan. Sisi
mangkuk mestilah menutup keseluruhan
pemacu mangkuk dan mangkuk boleh
berputar dengan mudah.
3. Tutup bukaan belakang alat pengadun
tangan sebelum dipasang ke atas tapak.

8
Penjagaan dan pencucian harian
ms
4. Pasangkan pasangan alat yang diingini
(pemukul adunan atau penyangkuk doh)
ke alat pengadun tangan dan tekan.
Penting! Hanya gunakan alat yang
dihantar bersama-sama tapak.
a. Perhatikan bentuk bahagian
plastik pada alat untuk
mengelakkan pertukaran alat!
b. Masukkan alat satu demi satu
untuk mengelakkan daripada
tersangkut!
5. Pegang bahagian belakang pengadun
tangan pada pemegang supaya cangkuk
masuk ke slot pengudaraan pada
pengadun tangan.
6. Pegang pemegang dan tekan pengadun
tangan ke bawah sehingga terkunci
pada tempatnya. Pastikan skru dan gear
dikancing dengan betul!
7. Tekan butang pembuka kunci dan tekan
lengan berayun ke bawah sehingga
terkunci pada tempatnya.
8. Pasangkan palam kuasa. Tetapkan suis
ke tahap yang diinginkan.
9. Proses bahan selama mana sehingga
mencapai hasil yang diingini.
10. Tetapkan suis pada 0. Tunggu hingga
pemacu berhenti. Cabut palam kuasa.
11. Tekan butang pembuka kunci dan angkat
lengan berayun hingga batasan.
12. Tarik tuil pada lengan berayun ke
belakang dan tanggalkan alat pengadun
tangan.
13. Tekan butang lepas pada alat pengadun
tangan dan tanggalkan alat.
■ Tanggalkan mangkuk.
Petunjuk: Untuk membuat doh, masukkan
tepung terlebih dahulu, kemudian bahan-
bahan lain ke dalam mangkuk dan kacau
sebentar pada tahap kelajuan terendah.
Apabila tepung tidak lagi berdebu, tukarkan
ke tahap kelajuan yang lebih tinggi. Dengan
putaran mangkuk dan alat ke arah yang
bertentangan, doh yang ringan akan dibuat
dalam masa yang singkat.
Penjagaan dan pencucian
harian
Aksesori ini mesti dicuci dengan teliti selepas
setiap penggunaan. X Jadual D
Perhatian!
Sangat penting untuk mengikuti arahan
dalam manual alat pengadun tangan.
■ Lap dan keringkan tapak dengan kain
lembut serta lembap.
■ Cuci mangkuk dan alatan dengan
larutan pencuci dan berus lembut atau
masukkan ke dalam mesin basuh
pinggan mangkuk.
■ Biarkan semua bahagian kering.
Tertakluk pada perubahan.

9
使用須知
zf
使用須知
本配件需與手持式攪拌機 MFQ35.. 搭配使用。請注意手持式攪拌機的
使用說明書。
請勿將機座用於其他手持式攪拌機。
使用機座時,僅限使用與機器一同隨附的工具。
本配件僅適用於揉捏麵團以及攪打蛋白、鮮奶油和稀薄麵糊。
本配件不得用於處理其他物體或物質。
重要安全須知
W受傷危險!
■ 只有在驅動器完全停止,且已拔下電源插頭的情況下,才可安裝或取
下手持式攪拌機。
■ 降低旋轉臂時請勿將手伸到機殼內,以免夾住手指或雙手。本機啟動
後,請勿調整旋轉臂。
W重要!
請於每次使用後或長時間未使用重新使用之前,務必徹底清潔本配件。
X“維護和日常清潔” 參見第10頁
X 圖 B
1. 將機座放置在光滑、平坦的流理台上。按下
釋放按鈕,將旋轉臂提升到底。
2. 將攪拌盆放在擱放區上。攪拌盆邊緣必須
完全覆蓋攪拌盆驅動器,並且攪拌盆可以
輕鬆旋轉。
3. 將手持式攪拌機放到機座之前,應將其尾
部開口關上。
4. 將所需的工具(攪拌槳或攪麵鉤)裝入到手
持式攪拌機並壓緊。
重要!僅限使用與機座一同隨附的工具。
a. 注意工具上塑膠零件的形狀,以免工具
之間 相混淆!
b. 逐一將工具插入,以免卡住!
5. 將手持式攪拌機的後部放在托架上,使掛
鉤卡入手持式攪拌機的通風槽中。
6. 握住托架並向下按壓手持式攪拌機,直到
其卡入到位。確保蝸桿和齒輪正確嚙合!
7. 按下釋放按鈕,將旋轉臂向下按壓到鎖定
為止。
8. 插上電源插頭。將開關調至所需的段位。
9. 將配料處理至所需的程度。
10. 將開關調至 0 位置。請等到驅動器完全停
止運行。拔下電源插頭。
11. 按下釋放按鈕,將旋轉臂提升到底。
12. 向後拉動旋轉臂上的控制桿,然後取下手
持式攪拌機。
產品一覽
X 圖 A
1 配備旋轉臂的機座
a 驅動齒輪
b 手持式攪拌機鎖定裝置
c 鎖定裝置控制桿
d 手持式攪拌機開口
e 旋轉臂釋放按鈕
f 攪拌盆擱放區
g 攪拌盆驅動器
2 攪拌盆
3 MFQ35.. 手持式攪拌機
a 鎖定裝置開口
工具
4 脈衝攪拌槳(2 個)
a 驅動蝸桿
5 攪麵鉤(2 個)
a 驅動蝸桿
操作
適用於揉捏麵團以及攪打蛋白、鮮奶油和鬆軟
的麵團。
請務必注意表格中的最大處理量和處理時
間。X圖 C

10
維護和日常清潔
zf
13. 按下手持式攪拌機上的彈出按鈕並卸下
工具。
■ 取下攪拌盆。
提示說明:如需製作麵團,首先將麵粉,然後將
其他配料放入攪拌盆中,並用最低段位短暫攪
拌。在麵粉未揚起時,才調至更高的段位。透過
攪拌盆和工具的逆向旋轉,可以在短時間內製
作蓬鬆的麵團。
維護和日常清潔
在每次使用完以後,必須徹底清潔配件。
X表D
注意!
請務必遵照手持式攪拌機說明中的提示說明。
■ 請使用沾濕的軟布擦拭機座,並將其擦乾。
■ 請使用洗滌液和軟刷清潔攪拌盆和工具,
或者放入洗碗機洗滌。
■ 將所有零件晾乾。
保留資料隨時更改的權利。

11
使用范围
zh
使用范围
本配件适用于 MFQ35.. 手持式料理机。遵照手持式料理机的使用说明
书 。
请勿将机座用于其他手持式料理机。
使用机座时,仅限使用与机器一同随附的工具。
本附件仅适用于揉捏面团以及打发蛋白、奶油和稀薄面糊。
不得将本附件用于加工其他物体或物质。
安全注意事项
W受伤危险!
■ 只有在驱动器完全停止运行,且已拔下电源插头的情况下,才可安装
或取下手持式料理机。
■ 降低旋转臂时请勿将手伸到机壳内,以免夹住手指或双手。本机器启
动后,请勿调整旋转臂。
W重要!
请于每次使用后或长时间未使用重新使用之前,务必彻底清洁本附件。
X“维护和日常清洁” 参见第12页
X 图 B
1. 将机座放置在光滑、平坦的工作台面上。按
下释放按钮,将旋转臂提升到底。
2. 将搅拌碗放在搁放区上。搅拌碗边缘必须
完全覆盖搅拌碗驱动器,并且搅拌碗可以
轻松旋转。
3. 将手持式料理机放到机座之前,应将其尾
部开口关上。
4. 将所需的工具(搅拌桨或搅面钩)装入到手
持式料理机并压紧。
重要!仅限使用与机座一同随附的工具。
a. 注意工具上塑料部件的形状,以免工具
之间相混淆!
b. 逐一将工具插入,以免卡住!
5. 将手持式料理机的后部放在托架上,使挂
钩卡入手持式料理机的通风槽中。
6. 握住托架并向下按压手持式料理机,直到
其卡入到位。确保蜗杆和齿轮正确啮合!
7. 按下释放按钮,将旋转臂向下按压,直到其
卡入到位。
8. 将电源插头插上。将开关调至所需的档位。
9. 将配料加工至所需的程度。
10. 将开关调到 0 位置。请等到驱动器完全停
止运行。拔出电源插头。
11. 按下释放按钮,将旋转臂提升到底。
12. 向后拉动旋转臂上的控制杆,然后取下手
持式料理机。
产品概览
X 图 A
1 配备旋转臂的机座
a 驱动齿轮
b 手持式料理机装置锁
c 装置锁控制杆
d 手持式料理机开口
e 旋转臂释放按钮
f 搅拌碗搁放区
g 搅拌碗驱动器
2 搅拌碗
3 MFQ35.. 手持式料理机
a 装置锁开口
工具
4 脉冲搅拌桨(2 个)
a 驱动蜗杆
5 搅面钩(2 个)
a 驱动蜗杆
操作
用于揉捏面团以及搅打蛋白、奶油和稀薄面
糊。
请务必注意表格中的最大加工量和加工时间。
X图 C

12
维护和日常清洁
zh
13. 按下手持式料理机上的弹出按钮并卸下
工具。
■ 取出搅拌碗。
注意事项:如需制备面团,首先将面粉,然后将
其他配料放入搅拌碗中,并用最低档位短暂搅
拌。在面粉未扬起时,才调至更高的档位。通过
搅拌碗和工具的逆向旋转,可以在短时间内制
备蓬松的面团。
维护和日常清洁
在每次使用完以后,必须彻底清洁附件。
X 表 D
注意!
请务必遵照手持式料理机说明中的注意事项。
■ 请使用沾湿的软布擦拭机座,然后将其擦
干。
■ 请使用洗涤液和软刷清洁搅拌碗和工具,
或者放入洗碗机洗涤。
■ 将所有部件晾干。
保留随时更改的权利。

13
2 – ar
ﻲﻣوﯾﻟا فﯾظﻧﺗﻟاو ﺔﯾﺎﻧﻌﻟا
5 ﻰﻠﻋ ﻲﺋﺎﺑرﮭﻛﻟا طﻼﺧﻠﻟ ﺔﯾﻔﻠﺧﻟا ﺔﮭﺟﻟا ب
ّ
ﻛر
ﺔﯾوﮭﺗﻟا تﺎﺣﺗﻓ ﻲﻓ بﯾﻟﻼﻛﻟا لﺧدﺗ ثﯾﺣﺑ لﻣﺎﺣﻟا
.ﻲﺋﺎﺑرﮭﻛﻟا طﻼﺧﻟﺎﺑ
6 لﻔﺳﻷ ﻲﺋﺎﺑرﮭﻛﻟا طﻼﺧﻟا طﻐﺿاو لﻣﺎﺣﻟا تﺑﺛ
ﻰﻠﻋ قﺎﯾﺳﻟا اذھ ﻲﻓ صرﺣا .قﻼﻏﻹا مﻛﺣ
ُ
ﺗ ﻰﺗﺣ
!سرﺗﻟاو نوزﻠﺣﻠﻟ ﺢﯾﺣﺻﻟا كﺑﺎﺷﺗﻟا ةﺎﻋارﻣ
7 عارذﻟاو لﻔﻘﻟا رﯾرﺣﺗ رز ﻰﻠﻋ طﻐﺿﻟا ﻲﻓ رﻣﺗﺳا
.تﺑﺛﯾ نأ ﻰﻟإ لﻔﺳأ ﻰﻟإ حوارﺗﻣﻟا
8 حﺎﺗﻔﻣﻟا طﺑﺿا .سﺑﻘﻣﻟا ﻲﻓ زﺎﮭﺟﻟا سﺑﺎﻗ لﺧدأ
.ﺔﺑوﻏرﻣﻟا ﺔﺟردﻟا ﻰﻠﻋ راودﻟا
9 لوﺻوﻟا مﺗﯾ نأ ﻰﻟإ تﺎﻧوﻛﻣﻟا ﺔﺟﻟﺎﻌﻣ ﻲﻓ رﻣﺗﺳا
.ﺔﺑوﻏرﻣﻟا ﺔﺟﯾﺗﻧﻟا ﻰﻟإ
10 فﻗوﺗﯾ نأ ﻰﻟإ رظﺗﻧا .0 ﻊﺿوﻟا ﻰﻟإ حﺎﺗﻔﻣﻟا لﻘﻧا
.ﻲﺋﺎﺑرﮭﻛﻟا سﺑﺎﻘﻟا عزﻧا .كرﺣﻣﻟا
11 عارذﻟاو لﻔﻘﻟا رﯾرﺣﺗ رز ﻰﻠﻋ طﻐﺿﻟا ﻲﻓ رﻣﺗﺳا
.ﺔﯾﺎﮭﻧﻟا ﻰﺗﺣ حوارﺗﻣﻟا
12 فﻠﺧﻟا وﺣﻧ حوارﺗﻣﻟا عارذﻟا ﻲﻓ عارذﻟا بﺣﺳا
.ﻲﺋﺎﺑرﮭﻛﻟا طﻼﺧﻟا عزﻧاو ﺎ
ً
ﻣﺎﻣﺗ
13 ﻲﺋﺎﺑرﮭﻛﻟا طﻼﺧﻟا ﻲﻓ جارﺧﻹا رز ﻰﻠﻋ طﻐﺿا
.تاودﻷا جرﺧأو
■.ءﺎﻋوﻟا عزﻧا
ءﺎﻋوﻟا ﻲﻓ
ً
ﻻوأ نﯾﺣطﻟا ﻊﺿ نﯾﺟﻌﻟا دادﻋﻹ :ﮫﯾﺑﻧﺗ
.ﺔﺟرد ﻰﻧدأ ﻰﻠﻋ مﮭطﻠﺧاو ،ىرﺧﻷا تﺎﻧوﻛﻣﻟا مﺛ
ﺔﺟرد ﻰﻟإ لﻘﺗﻧا نﯾﺣطﻟا رﺎﺑﻏ رﯾﺎطﺗ فﻗوﺗﯾ ﺎﻣدﻧﻋو
ﺔطﺳاوﺑ ةرﯾﺻﻗ ةدﻣ ﻲﻓ وﺧرﻟا نﯾﺟﻌﻟا نوﻛﺗﯾو .ﻰﻠﻋأ
.نﯾﺳﻛﺎﻌﺗﻣ نﯾھﺎﺟﺗا ﻲﻓ ةادﻷاو ءﺎﻧﻹا فﻟ
ﻲﻣوﯾﻟا فﯾظﻧﺗﻟاو ﺔﯾﺎﻧﻌﻟا
.مادﺧﺗﺳا لﻛ دﻌﺑ ا
ً
دﯾﺟ ﻖﺣﻠﻣﻟا فﯾظﻧﺗ بﺟﯾ
D لودﺟﻟا
Y
!ﮫﯾﺑﻧﺗ
مادﺧﺗﺳا لﯾﻟد ﻲﻓ ةدراوﻟا تادﺎﺷرﻹا ةﺎﻋارﻣ نﻣ دﺑﻻ
.
ّ
ﻲﺋﺎﺑرﮭﻛﻟا طﻼﺧﻟا
■.ﺎﮭﻔﻔﺟ مﺛ ﺔﺑطر ﺔﻣﻋﺎﻧ شﺎﻣﻗ ﺔﻌطﻘﺑ ةدﻋﺎﻘﻟا ﺢﺳﻣا
■ ةﺎﺷرﻓو فطﺷ قوﺣﺳﻣﺑ تاودﻷاو ءﺎﻋوﻟا فظﻧ
.نوﺣﺻﻟا ﺔﻟﺎﺳﻏ ﻲﻓ ﺎﮭﻌﺿ وأ ﺔﻣﻋﺎﻧ
■.ءازﺟﻷا ﻊﯾﻣﺟ فﯾﻔﺟﺗﺑ مﻗو
تﺎﻔﺻو
تﺎﯾﻣﻛ ﻰﺻﻗأ تﺎﻔﺻوﻟا ﻲﻓ ﺔﻧﯾﺑﻣﻟا تﺎﯾﻣﻛﻟا لﺛﻣﺗ
.ﺎﮭﺗﺟﻟﺎﻌﻣ نﻛﻣﯾ
.تﻼﯾدﻌﺗ ﺔﯾأ ءارﺟإ ﻲﻓ ﺎﻧﻘﺣﺑ ظﻔﺗﺣﻧ

14
ar – 1
تﺎﻣﯾﻠﻌﺗﻠﻟ ﻖﺑﺎطﻣﻟا لﺎﻣﻌﺗﺳﻻا
تﺎﻣﯾﻠﻌﺗﻠﻟ ﻖﺑﺎطﻣﻟا لﺎﻣﻌﺗﺳﻻا
لﺎﻣﻌﺗﺳﻻا لﯾﻟد ةﺎﻋارﻣ ﻰﻠﻋ صرﺣا .MFQ35.. ﻲﺋﺎﺑرﮭﻛﻟا طﻼﺧﻠﻟ صﺻﺧﻣ ﻖﺣﻠﻣﻟا اذھ
.ﻲﺋﺎﺑرﮭﻛﻟا طﻼﺧﻟﺎﺑ صﺎﺧﻟا
.رﺧآ ﻲﺋﺎﺑرﮭﻛ طﻼﺧ يﻷ ةدﻋﺎﻘﻟا مدﺧﺗﺳﺗ ﻻ
.طﻘﻓ زﺎﮭﺟﻟﺎﺑ ﺔﻘﻓرﻣﻟا تاودﻷا مادﺧﺗﺳا ﻰﻠﻋ ةدﻋﺎﻘﻟا مادﺧﺗﺳا دﻧﻋ صرﺣا
.فﯾﻔﺧﻟا نﯾﺟﻌﻟاو ةدﺷﻘﻟاو ضﯾﺑﻟا لﻻز ﻖﻔﺧو نﯾﺟﻌﻟا نﺟﻌﻟ طﻘﻓ بﺳﺎﻧﻣ ﻖﺣﻠﻣﻟا اذھ
.ﺎﮭﻣادﺧﺗﺳا وأ ىرﺧأ رﺻﺎﻧﻋ وأ مﺎﺳﺟأ وأ ءﺎﯾﺷأ يأ ﺔﺟﻟﺎﻌﻣ ﻲﻓ ﻖﺣﻠﻣﻟا اذھ مادﺧﺗﺳﺎﺑ ﺢﻣﺳﯾ ﻻ
نﺎﻣﻷا تادﺎﺷرإ
W !تﺎﺑﺎﺻإ ثودﺣ رطﺧ
■ نوﻛﺳﻟا ﻊﺿو ﻲﻓ ةرادﻹا ةدﺣو نوﻛﺗ ﺎﻣدﻧﻋ ﻻإ ﻲﺋﺎﺑرﮭﻛﻟا طﻼﺧﻟا جارﺧإ وأ بﯾﻛرﺗ مدﻋ بﺟﯾ
.ءﺎﺑرﮭﻛﻟﺎﺑ ﺔﯾذﻐﺗﻟا سﺑﻘﻣ نﻣ ﮫﺟارﺧإ مﺗ دﻗ زﺎﮭﺟﻟا سﺑﺎﻗ نوﻛﯾو مﺎﺗﻟا
■ يدﯾﻷا وأ ﻊﺑﺎﺻﻷا ضﯾرﻌﺗﻟ ﺎ
ً
ﻌﻧﻣ ﺔﺑﻠﻌﻟا لﺧاد ﻰﻟإ كدﯾ دﻣﺗ ﻻ حوارﺗﻣﻟا عارذﻟا لازﻧإ دﻧﻋ
.لﯾﻐﺷﺗﻟا ﻊﺿو ﻲﻓ زﺎﮭﺟﻟا دوﺟو ءﺎﻧﺛأ حوارﺗﻣﻟا عارذﻟا ﻊﺿو رﯾﯾﻐﺗ مدﻋ بﺟﯾ .رﺎﺻﺣﻧﻼﻟ
W !مﺎھ
.مادﺧﺗﺳﻻا مدﻋ ةرﺗﻓ لوط دﻌﺑ وأ ﮫﻟ مادﺧﺗﺳا لﻛ دﻌﺑ ا
ً
دﯾﺟ ﻲﻓﺎﺿﻹا ﻖﺣﻠﻣﻟا فﯾظﻧﺗ بﺟﯾ
ar-2 ﺔﺣﻔﺻ رظﻧا «ﻲﻣوﯾﻟا فﯾظﻧﺗﻟاو ﺔﯾﺎﻧﻌﻟا»
Y
ﺔﻣﺎﻋ ةرظﻧ
A ةروﺻﻟا Y
1 حوارﺗﻣﻟا عارذﻟا ﻊﻣ زﺎﮭﺟﻟا لﻣﺎﺣ
a ﺔﻌﻓاد ﺔﻧﻧﺳﻣ ﺔﻠﺟﻋ
b ﻲﺋﺎﺑرﮭﻛﻟا طﻼﺧﻠﻟ لﻔﻘﻟا ك
َ
ﺑﺷ
ِ
ﻣ
c لﻔﻘﻟا ك
َ
ﺑﺷ
ِ
ﻣﻟ عارذ
d ﻲﺋﺎﺑرﮭﻛﻟا طﻼﺧﻟا ﺔﺣﺗﻓ
e حوارﺗﻣﻟا عارذﻠﻟ لﻔﻘﻟا رﯾرﺣﺗ رز
f ءﺎﻋوﻠﻟ زﺎﻛﺗرﻻا ﺢطﺳ
g ءﺎﻋوﻟا ﻊﻓاد
2 ءﺎﻋو
3 MFQ35.. ﻲﺋﺎﺑرﮭﻛﻟا طﻼﺧﻟا
a لﻔﻘﻟا ك
َ
ﺑﺷ
ِ
ﻣ ﺔﺣﺗﻓ
لﻣﻋ تاودأ
4 (ﺔﻌطﻗ 2) ﻲﻧﯾﺑروﺗﻟا ﻲﻧوزﻠﺣﻟا بﯾﻠﻘﺗﻟا عارذ
a ﻊﻓاد نوزﻠﺣ
5 (ﺔﻌطﻗ 2) نﯾﺟﻌﻟا بﻼﻛ
a ﻊﻓاد نوزﻠﺣ
لﺎﻣﻌﺗﺳﻻا
ةدﺷﻘﻟاو ضﯾﺑﻟا لﻻز ﻖﻔﺧو نﯾﺟﻌﻟا نﺟﻌﻟ بﺳﺎﻧﻣ
.فﯾﻔﺧﻟا نﯾﺟﻌﻟاو
ىوﺻﻘﻟا تﺎﯾﻣﻛﻟﺎﺑ مﺎﺗﻟا مازﺗﻟﻻا ةﺎﻋارﻣ بﺟﯾ
.لودﺟﻟا ﻲﻓ ﺎﮭﯾﻠﻋ صوﺻﻧﻣﻟا دادﻋﻹا ددﻣو
C ةروﺻﻟا
Y
B ةروﺻﻟا Y
1 .يوﺗﺳﻣو ﻲﻘﻓأ ﺢطﺳ ﻰﻠﻋ زﺎﮭﺟﻟا ةدﻋﺎﻗ ﻊﺿ
عارذﻟاو لﻔﻘﻟا رﯾرﺣﺗ رز ﻰﻠﻋ طﻐﺿﻟا ﻲﻓ رﻣﺗﺳا
.ﺔﯾﺎﮭﻧﻟا ﻰﺗﺣ حوارﺗﻣﻟا
2 ﻲطﻐﺗ نأ بﺟﯾ .زﺎﻛﺗرﻻا ﺢطﺳ ﻰﻠﻋ ءﺎﻋوﻟا ﻊﺿ
كﯾرﺣﺗ نﻛﻣﯾو لﻣﺎﻛﻟﺎﺑ ءﺎﻋوﻟا ﻊﻓاد ءﺎﻋوﻟا ﺔﻓﺎﺣ
.ﺔﻟوﮭﺳﺑ ءﺎﻋوﻟا
3 لﺑﻗ ﻲﺋﺎﺑرﮭﻛﻟا طﻼﺧﻠﻟ ﺔﯾﻔﻠﺧﻟا ﺔﺣﺗﻔﻟا ﻖﻠﻏأ
.ةدﻋﺎﻘﻟا ﻰﻠﻋ ﮫﺑﯾﻛرﺗ
4 بﯾﻠﻘﺗﻟا عارذ) ﺎھدﯾرﺗ ﻲﺗﻟا تاودﻷا جوز ب
ّ
ﻛر
طﻐﺿاو ﻲﺋﺎﺑرﮭﻛﻟا طﻼﺧﻟا ﻲﻓ (نﯾﺟﻌﻟا بﻼﻛ وأ
.ﺎﮭﯾﻠﻋ
.ةدﻋﺎﻘﻟا ﻊﻣ ةد
ﱠ
روﻣﻟا تاودﻷا ﻻإ مدﺧﺗﺳﺗ ﻻ !مﺎھ
a ﻲﻓ ﺔﯾﻛﯾﺗﺳﻼﺑﻟا ءازﺟﻷا لﺎﻛﺷأ ةﺎﻋارﻣ ﻰﺟرﯾ
!تاودﻷا نﯾﺑ طﻠﺧﻟا بﻧﺟﺗﻟ ،تاودﻷا
b وﻠﺗ ةدﺣاوﻟا ﺎ
�
ﯾدرﻓ لﻣﻌﻟا تاودأ بﯾﻛرﺗ بﺟﯾ
!رﺎﺷﺣﻧا ثودﺣ بﻧﺟﺗ لﺟأ نﻣ كﻟذو ىرﺧﻷا

6
6

Robert Bosch Hausgeräte GmbH
Carl-Wery-Straße 34
81739 München
GERMANY
www.bosch-home.com
Register your new device on MyBosch now and profit directly from:
• Expert tips & tricks for your appliance
• Warranty extension options
• Discounts for accessories & spare-parts
• Digital manual and all appliance data at hand
• Easy access to Bosch Home Appliances Service
Free and easy registration – also on mobile phones:
www.bosch-home.com/welcome
Expert advice for your Bosch home appliances, need help with problems
or a repair from Bosch experts.
Find out everything about the many ways Bosch can support you:
www.bosch-home.com/service
Contact data of all countries are listed in the attached service directory.
Thank you for buying a
Bosch Home Appliance!
Looking for help?
You´ll find it here.
8001199761
*8001199759*
(000701)
-
 1
1
-
 2
2
-
 3
3
-
 4
4
-
 5
5
-
 6
6
-
 7
7
-
 8
8
-
 9
9
-
 10
10
-
 11
11
-
 12
12
-
 13
13
-
 14
14
-
 15
15
-
 16
16


