
GC8700 series
© 2018 Koninklijke Philips N.V.
All rights reserved
4239 001 1394 1
User Manual
Manual pengguna
Hướng dẫn sử dụng
用户手册
使用手冊
사용 설명서

21 3
6 75
9 8
11 1012
4
13
1


6
Introduction
Congratulations on your purchase and welcome to Philips! To fully
benet from the support that Philips oers, register your product at
www.philips.com/welcome.
Read this user manual, the important information leaet, and the quick
start guide carefully before you use the appliance. Save them for future
reference.
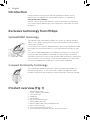
Exclusive technology from Philips
OptimalTEMP technology
The OptimalTEMP technology enables you to iron all types of ironable
fabrics, in any order, without adjusting the iron temperature and without
sorting your garments.
It is safe to just rest the hot soleplate directly on the ironing board without
putting back to the iron platform. This will help reduce the stress on your
wrist.
This iron has been approved by The Woolmark Company Pty Ltd for the
ironing of wool-only products, provided that the garments are ironed
according to the instructions on the garment label and those issued by the
manufacturer of this iron. R1602. In the United Kingdom, Eire, Hong Kong
and India, the Woolmark trademark is a certication trademark.
Compact ProVelocity Technology
This technology delivers continuous steam that penetrates deeply to
remove creases easily. At the same time, it keeps the appliance more
compact and lighter than traditional steam generators, for easier storage.
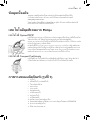
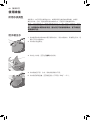
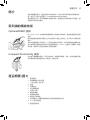
Product overview (Fig. 1)
1 Water supply hose
2 Steam trigger/Steam boost
3 'Iron ready' light
4 Soleplate
5 Iron platform
6 Carry lock release button
7 Detachable water tank
8 Water supply hose storage compartment
9 Mains cord with plug
10 CALC-CLEAN button with light
11 On/o button with power-on light and auto-o light
English

7
12 ECO button with light
13 Smart Calc-Clean container
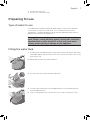
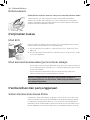
Preparing for use
Type of water to use
This appliance has been designed to be used with tap water. However,
if you live in an area with hard water, fast scale build-up may occur.
Therefore, it is recommended to use distilled or demineralized water to
prolong the lifetime of the appliance.
Warning: Do not use perfumed water, water from the tumble
dryer, vinegar, starch, descaling agents, ironing aids, chemically
descaled water or other chemicals, as they may cause water
spitting, brown staining or damage to your appliance.
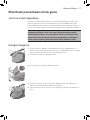
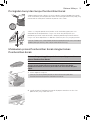
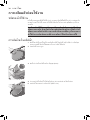
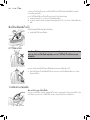
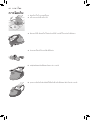
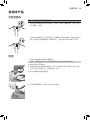
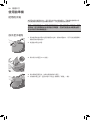
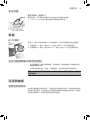
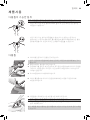
Filling the water tank
1 Fill the water tank before every use or when the water level in the water
tank drops below the minimum level. You can rell the water tank at any
time during use.
2 Remove the water tank from the base.
3 Fill the water tank up to the MAX indication.
4 Put the water tank back into the appliance by tting the bottom part
into the appliance rst.
5 Push in the top part of the water tank until it locks into place ('click').
English

8
Using the appliance
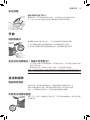
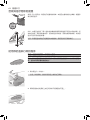
Ironable fabrics
Do not iron non-ironable fabrics.
Fabrics with these symbols are ironable, for example linen, cotton,
polyester, silk, wool, viscose and rayon.
Fabrics with this symbol are not ironable. These fabrics include synthetic
fabrics such as Spandex or elastane, Spandex-mixed fabrics and
polyolens (e.g. polypropylene). Prints on garments are not ironable either.
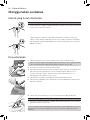
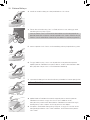
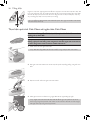
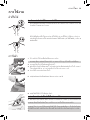
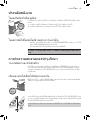
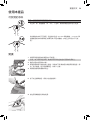
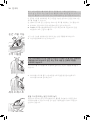
Ironing
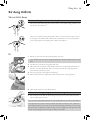
1 Place the steam generator on a stable and even surface.
Note: In order to ensure safe ironing we recommend to always place the
base on a stable ironing board.
2 Make sure that there is enough water in the water tank.
3 Put the mains plug in an earthed wall socket and press the on/o
button to switch on the steam generator. Wait until the 'iron ready' light
lights up continuously. This takes approx. 2 minutes.
4 Remove the water supply hose from the water supply hose storage
compartment.
5 Press the carry lock release button to unlock the iron from the iron
platform.
6 Press and hold the steam trigger to start ironing.
Warning: Never direct steam at people.
7 For best ironing results, after ironing with steam, perform the last
strokes without steam.
Note: When you use the appliance for the rst time, it may take 30 seconds
for steam to come out of the appliance.
Note: The pump is activated each time you press the steam trigger. It
produces subtle rattling sound, which is normal. When there is no water in
the water tank, the pump sound is louder. Fill up the water tank with water
when the water level drops below the minimum level.
English

9
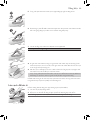
For more powerful steam, you can use the TURBO steam mode, which is
safe on all ironable fabrics.
For fabrics such as cotton, jeans and linen, you are recommended to use
the TURBO steam mode.
1 Press and hold the on/o button for 2 seconds until the light turns
white.
2 To deactivate the TURBO mode, press and hold the on/o button for 2
seconds again until the light turns blue.
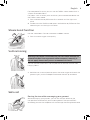
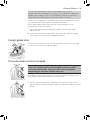
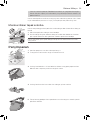
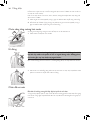
Steam boost function
Use the steam boost function to remove stubborn creases.
1 Press the steam trigger twice quickly.
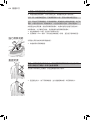
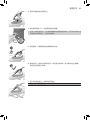
Vertical ironing
Warning: Hot steam is emitted from the iron. Never attempt to
remove wrinkles from a garment while someone is wearing it.
Do not apply steam near your or someone else's hand.
You can use the steam iron in vertical position to remove wrinkles from
hanging fabrics.
1 Hold the iron in vertical position, press the steam trigger and touch the
garment lightly with the soleplate and move the iron up and down.
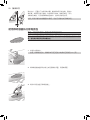
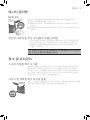
Safe rest
Resting the iron while rearranging your garment
While rearranging your garment, you can rest the iron either on the
iron platform or horizontally on the ironing board. The OptimalTEMP
technology ensures the soleplate will not damage the ironing board cover.
2x
English

10
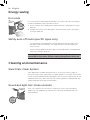
Energy saving
Eco mode
By using the ECO mode (reduced amount of steam), you can save energy
without compromising on the ironing result.
1 To activate the ECO mode, press the ECO button. The green ECO light
goes on.
2 To deactivate the ECO mode, press the ECO button again. The green
ECO light goes out.
Safety auto-o mode (specic types only)
- To save energy, the appliance switches o automatically when it has
not been used for 5 minutes. The auto-o light in the on/o button
starts to ash.
- To activate the appliance again, press the on/o button. The appliance
then starts to heat up again.
Warning: Never leave the appliance unattended when it is
connected to the mains. Always unplug the appliance after use.
Cleaning and maintenance
Smart Calc-Clean System
Your appliance has been designed with a Smart Calc-Clean system to
ensure that descaling and cleaning is done regularly. This helps to maintain
a strong steam performance and prevents dirt and stains coming out of the
soleplate over time. To ensure that the cleaning process is performed, the
steam generator gives regular reminders.
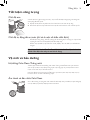
Sound and light Calc-Clean reminder
After 1 to 3 months of use, the Calc-Clean light starts ashing and the
appliance starts beeping to indicate that you have to perform the Calc-
Clean process.
English

11
Besides that, a second defense step to protect the steam generator from
scale is integrated: the steam function gets disabled if descaling is not
done. After descaling is done, the steam function will be restored. This
takes place regardless of the type of water used.
Note: The Calc-Clean process can be performed at any time, even when
the sound and light reminder is not activated yet.
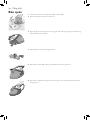
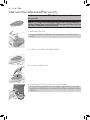
Performing the Calc-Clean process with the Calc-Clean
container
Warning: Do not leave the appliance unattended during the Calc-
Clean process.
Caution: Always perform the Calc-Clean process with the Calc-Clean
container. Do not interrupt the process by lifting the iron up from the
Calc-Clean container, as hot water and steam will come out of the
soleplate.
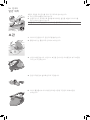
1 Fill up the water tank halfway.
Note: Make sure that the appliance is plugged in and switched ON
during the Calc-Clean process.
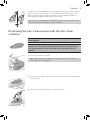
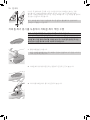
2 Place the Calc-Clean container on the ironing board or any other even,
stable surface.
3 Place the iron stably on the Calc-Clean container.
English

12
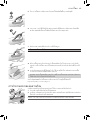
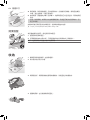
4 Press and hold the CALC-CLEAN button for 2 seconds until you hear
short beeps.
Note: The Calc-Clean container has been designed to collect scale
particles and hot water during the Calc-Clean process. It is perfectly
safe to rest the iron on this container during the entire process.
5 During the Calc-Clean process, you hear short beeps and a pumping
sound.
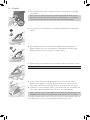
6 Wait approximately 2 minutes for the appliance to complete the
process. When the Calc-Clean process is completed, the iron stops
beeping and the CALC-CLEAN light stops ashing.
7 Wipe the iron with a piece of cloth and put it back on the base station.
Caution: The iron is hot.
8 As the Calc-Clean container becomes hot during the Calc-Clean
process, wait approx. 5 minutes before you touch it. Then carry the
Calc-Clean container to the sink, empty it and store it for future use.
9 If necessary, you can repeat steps 1 to 8. Make sure that you empty the
Calc-Clean container before you start the Calc-Clean process.
Note: During the Calc-Clean process, clean water may come out of the
soleplate if no scale has accumulated inside the iron. This is normal.
For more information on how to carry out the Calc-Clean process, refer to
the videos in this link: http://www.philips.com/descaling-iron.
2 sec.
2 min.
English

13
Cleaning the soleplate
To properly maintain your appliance, clean it regularly.
1 Clean the appliance with a moist cloth.
2 To easily and eectively remove stains, let the soleplate heat up and
move the iron over a moist cloth.
Tip: Clean the soleplate regularly to ensure smooth gliding.
Storage
1 Switch o the steam generator and unplug it.
2 Pour the water out of the water tank into the sink.
3 Fold the water supply hose. Wind the water supply hose inside the
water supply hose storage compartment and secure it inside the
storage hook.
4 Fold the mains cord and fasten it with the Velcro strip.
5 Push the carry lock release button to lock the iron onto the iron
platform.
English

14
6 You can carry the appliance with one hand by the handle of the iron
when the iron is locked on the iron platform.
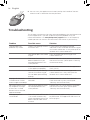
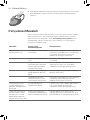
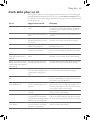
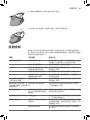
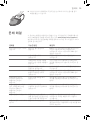
Troubleshooting
This chapter summarizes the most common problems you could encounter
with the appliance. If you are unable to solve the problem with the
information below, visit www.philips.com/support for a list of frequently
asked questions or contact the Consumer Care Center in your country.
Problem Possible cause Solution
The iron does not
produce any steam.
There is not enough water in
the water tank.
Fill the water tank beyond the MIN
indication. Press and hold the steam trigger
until steam comes out. It may take up to 30
seconds until steam comes out.
You did not press the steam
trigger.
Press and hold the steam trigger until
steam comes out.
The steam function has
been disabled until you
have performed the Calc-
Clean process.
Perform the Calc-Clean process to restore
the steam function. (see chapter ' Cleaning
and maintenance')
The water tank is not placed
in the appliance properly.
Fit the water tank back into the appliance
rmly ('click').
At the start of your ironing
session, the steam trigger
has not been pressed long
enough.
Press and hold the steam trigger until
steam comes out. It may take up to 30
seconds until steam comes out.
The light of the CALC-
CLEAN button ashes
and the appliance beeps.
This is the Calc-Clean
reminder.
Perform the Calc-Clean after the Calc-
Clean reminder is given (see chapter
'Cleaning and maintenance').
No steam comes out of
the soleplate, the light
of the CALC-CLEAN
button ashes and the
appliance beeps.
You have not done or have
not completed the Calc-
Clean process.
Perform the Calc-Clean process to enable
the steam function again (see chapter
'Cleaning and maintenance').
The appliance has
switched o.
The safety auto-o function
is activated automatically
when the appliance has not
been used for more than 5
minutes.
To activate the appliance again, press the
on/o button. The appliance then starts to
heat up again.
English

15
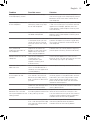
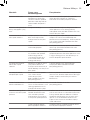
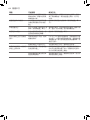
Problem Possible cause Solution
The appliance produces
a loud pumping sound.
The water tank is empty. Fill the water tank with water and press
the steam trigger until the pumping sound
becomes softer and steam comes out of
the soleplate.
Water droplets come out
of the soleplate.
After the Calc-Clean process
remaining water may drip
out of the soleplate.
Wipe the soleplate dry with a piece of cloth.
If the Calc-Clean light still ashes and the
appliance still beeps, perform the Calc-
Clean process (see chapter 'Cleaning and
maintenance').
The Calc-Clean process has
not been completed.
You have to perform the Calc-Clean
process again (see chapter 'Cleaning and
maintenance').
Steam condenses into water
in the hose when you use
steam for the rst time or
have not used it for a long
time.
This is normal. Hold the iron away from the
garment and press the steam trigger.Wait
until steam instead of water comes out of
the soleplate.
Dirty water and
impurities come out of
the soleplate.
Impurities or chemicals
present in the water have
deposited in the steam
vents and/or soleplate.
Perform the Calc-Clean process regularly
(see chapter 'Cleaning and maintenance').
Water ushes out of the
soleplate.
You have accidentally
started the Calc-
Clean process (see
chapter 'Cleaning and
maintenance').
Switch o the appliance. Then switch it
back on again. Let the iron heat up until the
'iron ready' light lights up steadily.
The Calc-Clean process
does not start.
You have not pressed the
CALC-CLEAN button for 2
seconds until the appliance
started beeping.
See chapter 'Cleaning and maintenance'.
The iron leaves a shine
or an imprint on the
garment.
The surface to be ironed
was uneven, for instance
because you were ironing
over a seam or a fold in the
garment.
PerfectCare is safe on all garments. The
shine or imprint is not permanent and will
come o if you wash the garment.Avoid
ironing over seams or folds or you can
place a cotton cloth over the area to be
ironed to avoid imprints.
There was not enough felt in
the ironing board cover.
Put an extra layer of felt material under the
ironing board cover.
The ironing board cover
becomes wet, or there
are water droplets on the
oor/garment.
Steam has condensed on
the ironing board cover after
a long ironing session.
Replace the ironing board cover if the
foam or felt material has worn out. You
can also add an extra layer of felt material
under the ironing board cover to prevent
condensation on the ironing board.
You have an ironing board
that is not designed to cope
with the high steam rate of
the appliance.
Put an extra layer of felt material under
the ironing board cover to prevent
condensation on the ironing board.
English

16
Pengenalan
Tahniah atas pembelian anda dan selamat menggunakan Philips! Untuk
memanfaatkan sepenuhnya sokongan yang ditawarkan oleh Philips, daftar
produk anda di www.philips.com/welcome.
Baca manual pengguna ini, risalah maklumat penting dan panduan mula
pantas dengan teliti sebelum anda menggunakan perkakas. Simpannya
untuk rujukan akan datang.
Teknologi eksklusif daripada Philips
Teknologi OptimalTEMP
Teknologi OptimalTEMP membolehkan anda menyeterika pelbagai jenis
fabrik boleh diseterika, dengan apa jua cara, tanpa perlu melaraskan suhu
seterika dan tanpa mengasingkan pakaian anda.
Adalah selamat untuk meletakkan plat tapak yang panas terus pada papan
seterika tanpa meletakkan kembali ke platform besi. Ini akan membantu
mengurangkan tekanan pada pergelangan anda.
Seterika ini telah diluluskan oleh syarikat Woolmark Company Pty Ltd
untuk menyeterika produk wul sahaja dengan syarat pakaian itu diseterika
mengikut arahan pada label pakaian dan yang telah dikeluarkan oleh
pengeluar seterika ini. R1602. Di United Kingdom, Eire, Hong Kong dan
India, tanda dagangan Woolmark adalah tanda dagangan perakuan.
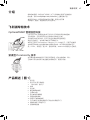
Compact ProVelocity Technology
Teknologi ini menyampaikan stim berterusan yang menembus dalam
untuk mengeluarkan lipatan dengan mudah. Pada masa yang sama, ia
memastikan perkakasan lebih mampat dan ringan berbanding penjana
stim tradisional, untuk storan lebih mudah.
Gambaran keseluruhan produk (Rajah 1)
1 Hos stim
2 Picu stim/Penggalak stim
3 Lampu 'seterika sedia'
4 Tapak seterika
5 Platform seterika
6 Butang pelepas kunci pembawa
7 Tangki air boleh tanggal
8 Ruang penyimpanan hos bekalan
9 Kord sesalur kuasa dengan palam
10 Butang CALC-CLEAN dengan lampu
11 Butang hidup/mati dengan lampu hidup kuasa dan mati auto
12 Butang ECO dengan lampu
13 Bekas Sistem Pembersihan Kerak
Bahasa Melayu

17
Membuat persediaan untuk guna
Jenis air untuk digunakan
Perkakas ini telah direka bentuk untuk digunakan dengan air paip. Jika
anda tinggal di kawasan yang mempunyai air liat, pembentukan skala
pantas boleh berlaku. Oleh itu, adalah disyorkan untuk menggunakan air
suling atau tanpa mineral untuk memanjangkan hayat perkakas tersebut.
Amaran: Jangan gunakan air berwangian, air dari mesin
pengering pakaian, cuka, kanji, agen penyahkerakan, bahan
bantu penyeterikaan, air yang dinyah kerak secara kimia atau
bahan kimia lain, kerana ini boleh menyebabkan air berdetus,
kesan kotoran perang atau kerosakan pada perkakas anda.
Mengisi tangki air
1 Isikan tangki air sebelum setiap penggunaan atau apabila paras air
dalam tangki jatuh bawah paras minimum. Anda boleh mengisi semula
tangki air pada bila-bila masa semasa penggunaan.
2 Tanggalkan tangki air daripada tapak.
3 Isikan tangki air sehingga penunjuk MAX.
4 Letakkan semula tangki air ke dalam perkakas dengan memasang
bahagian bawah ke dalam perkakasan dahulu.
5 Tekan bahagian atas tangki air stim sehingga ia terkunci di tempatnya
('klic').
Bahasa Melayu

18
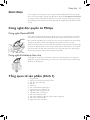
Menggunakan perkakas
Fabrik yang boleh diseterika
Amaran: Jangan seterika fabrik yang tidak boleh diseterika.
- Fabrik dengan simbol ini boleh diseterika, seperti linen, kapas, poliester,
sutera, wul, viskos dan rayon.
- Fabrik dengan simbol ini tidak boleh diseterika. Fabrik ini termasuk
fabrik sintetik seperti Spandex atau elastan, fabrik campuran Spandex
dan poliolen (seperti polipropilena). Cetakan pada pakaian juga tidak
boleh diseterika.
Penyeterikaan
1 Letakkan penjana stim di atas permukaan yang stabil dan rata.
Catatan: Untuk memastikan penyeterikaan selamat, kami syorkan anda
sentiasa meletakkan tapak pada papan seterika yang stabil.
2 Pastikan air di dalam tangki air mencukupi.
3 Masukkan palam sesalur kuasa ke dalam soket dinding yang dibumikan
dan tekan butang hidup/mati untuk menghidupkan penjana stim.
Tunggu sehingga lampu 'seterika sedia' menyala berterusan. Ini
mengambil masa lebih kurang 2 minit.
4 Tanggalkan hos bekalan daripada ruang penyimpanan hos.
5 Tekan butang pelepas kunci pembawa untuk melepaskan seterika dari
platform seterika.
6 Tekan dan tahan pencetus stim untuk memulakan penyeterikaan.
Amaran: Jangan sekali-kali menghalakan stim kepada sesiapa.
7 Untuk hasil seterika terbaik, selepas menyeterika dengan stim, lakukan
gosokan terakhir tanpa stim.
Catatan: Apabila anda menggunakan perkakas ini buat pertama kali, masa
selama 30 saat mungkin diperlukan untuk stim keluar sepenuhnya dari
perkakas.
Bahasa Melayu

19
Catatan: Pam diaktifkan setiap kali anda menekan picu stim. Ia
mengeluarkan bunyi bergetar yang rendah, yang merupakan kebiasaan.
Apabila tiada air dalam tangki air, pam berbunyi lebih kuat. Penuhkan
tangki dengan air apabila paras air ke bawah paras minimum.
Untuk stim yang lebih kuat, anda boleh menggunakan mod stim TURBO,
yang selamat pada semua fabrik yang boleh diseterika.
Untuk fabrik seperti kapas, jean dan linen, anda disyorkan untuk
menggunakan mod stim TURBO.
1 Tekan dan tahan butang hidup/mati selama 2 saat hingga lampu
bertukar putih.
2 Untuk menyahaktifkan mod TURBO, tekan dan tahan butang hidup/
mati selama 2 saat sehingga lampu bertukar biru.
Fungsi galak stim
Gunakan fungsi pancutan stim untuk menghilangkan kedutan yang degil.
1 Tekan picu stim dua kali dengan cepat.
Penyeterikaan secara menegak
Amaran: Stim panas dikeluarkan daripada seterika. Jangan
sekali-kali menghilangkan kedut daripada pakaian semasa
seseorang memakainya. Jangan gunakan stim berdekatan
dengan tangan anda atau tangan orang lain.
Anda boleh menggunakan seterika stim dalam keadaan menegak untuk
menyingkirkan kedut daripada baju yang digantung.
1 Pegang seterika dalam posisi menegak, tekan picu stim dan sentuh
pakaian dengan lembut pada plat tapak dan gerakkan seterika atas dan
bawah.
2x
Bahasa Melayu

20
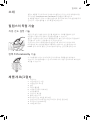
Rehat selamat
Meletakkan seterika semasa menyusun semula pakaian anda
Semasa menyusun semula pakaian anda, anda boleh meletakkan
seterika di atas platform seterika atau secara mendatar di atas papan
seterika. Teknologi OptimalTEMP memastikan tapak seterika tidak akan
merosakkan penutup papan seterika.
Penjimatan kuasa
Mod ECO
Dengan mod ECO (pengurangan jumlah stim), anda boleh menjimatkan
tenaga tanpa mengurangkan hasil penyeterikaan.
1 Untuk mengaktifkan mod ECO, tekan butang ECO. Lampu hijau ECO
bernyala.
2 Untuk menyahaktifkan mod ECO, tekan butang ECO sekali lagi. Lampu
hijau ECO terpadam.
Mod automati keselamatan (jenis tertentu sahaja)
- Untuk menjimatkan tenaga, perkakas akan dimatikan secara automatik
jika ia tidak digunakan selama 5 minit. Lampu pada butang mati secara
auto mula berkelip.
- Untuk mengaktifkan perkakas semula, tekan butang hidup/mati.
Perkakas kemudian mula menjadi panas semula.
Amaran: Jangan biarkan perkakas tanpa dijaga apabila ia
bersambung dengan sesalur kuasa. Cabut plag perkakas setiap
kali selepas digunakan.
Pembersihan dan penyenggaraan
Sistem Pembersihan Kerak Pintar
Perkakasan anda telah dipasang dengan sistem Smart Calc-Clean yang
memastikan penyahskalaan dan pembersihan dilakukan dengan kerap.
Ini membantu mengekalkan prestasi stim yang kuat dan mengelakkan
kekotoran keluar daripada plat tapak lama kelamaan. Untuk memastikan
proses pembersihan dilakukan, penjana stim memberi peringatan tetap.
Bahasa Melayu

21
Peringatan bunyi dan lampu Pembersihan Kerak
Selepas penggunaan selama 1 hingga 3 bulan, lampu Pembersihan Kerak
akan mula bernyala dan perkakas akan mula mengeluarkan bunyi bip yang
menandakan anda perlu melakukan proses Calc-Clean.
Selain itu, langkah pertahanan kedua untuk melindungi penjana stim
daripada kerak disepadukan: fungsi stim akan dinyahdayakan jika
pembuangan kerak tidak dilakukan. Selepas pembuangan kerak selesai,
fungsi stim akan dipulihkan. Ini berlaku tidak kira jenis air yang digunakan.
Catatan: Proses Calc-Clean boleh dilakukan pada bila-bila masa, walaupun
apabila peringatan bunyi dan lampu tidak diaktifkan lagi.
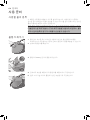
Melakukan proses Pembersihan Kerak dengan bekas
Pembersihan Kerak
Amaran: Jangan tinggalkan perkakas tanpa dijaga sewaktu
proses Pembersihan Kerak.
Awas: Sentiasa lakukan proses Calc-Clean dengan bekas Calc-Clean.
Jangan ganggu proses dengan mengangkat seterika dari bekas
Pembersihan Kerak, kerana air panas dan stim akan keluar dari plat
tapak.
1 Isikan separuh tangki air.
Catatan: Pastikan palam perkakas dimasukkan dan perkakas
DIHIDUPKAN ketika proses Pembersihan Kerak.
2 Letakkan bekas Pembersihan Kerak di papan seterika atau lain-lain
permukaan yang stabil dan rata.
Bahasa Melayu

22
3 Letakkan seterika dengan stabil pada bekas Calc-Clean.
4 Tekan dan tahan butang CALC-CLEAN selama 2 saat sehingga anda
mendengar bunyi bip singkat.
Catatan: Bekas CALC-CLEAN telah ditetapkan untuk mengumpulkan
partikel kerak dan air panas sewaktu proses Calc-Clean. Adalah sangat
selamat untuk meletakkan seterika di atas bekas ini sepanjang proses.
5 Semasa proses Calc-Clean, anda mendengar bunyi bip dan bunyi pam.
6 Tunggu lebih kurang 2 minit untuk perkakas menyelesaikan proses.
Apabila proses Pembersihan Kerak selesai, seterika akan berhenti ber-
bunyi bip dan lampu CALC-CLEAN berhenti berkelip.
7 Lap seterika dengan kain dan letakkannya kembali di stesen pangkalan.
Awas: Seterika panas.
8 Apabila bekas Pembersihan Kerak menjadi panas sewaktu proses
Pembersihan Kerak, tunggu kira-kira 5 minit sebelum anda
menyentuhnya. Kemudian bawa bekas Pembersihan Kerak ke singki,
kosongkannya dan simpan untuk kegunaan masa depan.
9 Jika perlu, anda boleh mengulangi langkah 1 hingga 8. Pastikan anda
mengosongkan bekas Calc-Clean sebelum anda memulakan proses
Calc-Clean.
2 sec.
2 min.
Bahasa Melayu
ページが読み込まれています...
ページが読み込まれています...
ページが読み込まれています...
ページが読み込まれています...
ページが読み込まれています...
ページが読み込まれています...
ページが読み込まれています...
ページが読み込まれています...
ページが読み込まれています...
ページが読み込まれています...
ページが読み込まれています...
ページが読み込まれています...
ページが読み込まれています...
ページが読み込まれています...
ページが読み込まれています...
ページが読み込まれています...
ページが読み込まれています...
ページが読み込まれています...
ページが読み込まれています...
ページが読み込まれています...
ページが読み込まれています...
ページが読み込まれています...
ページが読み込まれています...
ページが読み込まれています...
ページが読み込まれています...
ページが読み込まれています...
ページが読み込まれています...
ページが読み込まれています...
ページが読み込まれています...
ページが読み込まれています...
ページが読み込まれています...
ページが読み込まれています...
ページが読み込まれています...
ページが読み込まれています...
ページが読み込まれています...
ページが読み込まれています...
ページが読み込まれています...
ページが読み込まれています...
ページが読み込まれています...
ページが読み込まれています...
ページが読み込まれています...
ページが読み込まれています...
ページが読み込まれています...
ページが読み込まれています...
ページが読み込まれています...
ページが読み込まれています...
ページが読み込まれています...
ページが読み込まれています...
ページが読み込まれています...
ページが読み込まれています...
ページが読み込まれています...
ページが読み込まれています...
ページが読み込まれています...
ページが読み込まれています...
-
 1
1
-
 2
2
-
 3
3
-
 4
4
-
 5
5
-
 6
6
-
 7
7
-
 8
8
-
 9
9
-
 10
10
-
 11
11
-
 12
12
-
 13
13
-
 14
14
-
 15
15
-
 16
16
-
 17
17
-
 18
18
-
 19
19
-
 20
20
-
 21
21
-
 22
22
-
 23
23
-
 24
24
-
 25
25
-
 26
26
-
 27
27
-
 28
28
-
 29
29
-
 30
30
-
 31
31
-
 32
32
-
 33
33
-
 34
34
-
 35
35
-
 36
36
-
 37
37
-
 38
38
-
 39
39
-
 40
40
-
 41
41
-
 42
42
-
 43
43
-
 44
44
-
 45
45
-
 46
46
-
 47
47
-
 48
48
-
 49
49
-
 50
50
-
 51
51
-
 52
52
-
 53
53
-
 54
54
-
 55
55
-
 56
56
-
 57
57
-
 58
58
-
 59
59
-
 60
60
-
 61
61
-
 62
62
-
 63
63
-
 64
64
-
 65
65
-
 66
66
-
 67
67
-
 68
68
-
 69
69
-
 70
70
-
 71
71
-
 72
72
-
 73
73
-
 74
74


