
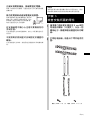
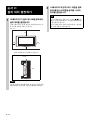
To Customers and Sony Dealers
3-452-742-23(1)
SU-WL50B
© 2008 Sony Corporation
Wall-Mount Bracket
Instructions
KR
GB
CT
TH

2 (EN)
Thank you for purchasing this product.
If the safety precautions are not observed or the product is
used incorrectly, it may result in serious injury or fire.
This instruction manual shows the correct handling of the
product and important precautions necessary to prevent
accidents. Be sure to read this manual thoroughly and use the
product correctly. Keep this manual available for future
reference.
To Sony dealers
Sufficient expertise is required for installing this product. Be
sure to read this instruction manual thoroughly to do the
installation work safely. Sony is not liable for any damages
or injury caused by mishandling or improper installation.
Please give this manual to the customer after installation.
Products by Sony are designed with safety in mind. If the
products are used incorrectly, however, it may result in a
serious injury through fire, electric shock, the product
toppling over, or the product dropping. Be sure to observe the
precautions for safety to prevent such accidents.
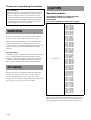
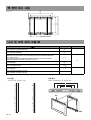
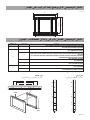
Specified products
The following products are subject to change
without notice, may be out of stock, or
discontinued.
Also, certain models are sold in some regions.
This product is designed for use with the products specified
above. For other TVs, refer to their operating instructions, or
the supplied leaflet to verify that this product can be used.
To Customers
Sufficient expertise is required for installing this product.
Be sure to subcontract the installation to Sony dealers or
licensed contractors and pay special attention to safety
during the installation. Sony is not liable for any damages
or injury caused by mishandling or improper installation,
or installing any other than the specified product. Your
Statutory Rights (if any) are not affected.
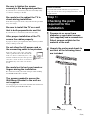
WARNING
On Safety
CAUTION
LCD Color TV
KDL-52XBR
KDL-52X3500
KDL-52X3100
KDL-52X3000
KDL-52W4000
KDL-52W3500
KDL-52W3100
KLV-52W400A
KLV-52X350A
KLV-52X300A
KLV-52W300A
KDL-46XBR
KDL-46X3500
KDL-46X3100
KDL-46X3000
KDL-46W4000
KDL-46W3500
KDL-46W3100
KDL-46W3000
KDL-46D3100
KDL-46V3100
KLV-46X350A
KLV-46X300A
KLV-46W400A
KLV-46W300A
KLV-46D300A
KLV-46V300A
KDL-40XBR
KDL-40X3100
KDL-40W4000
KDL-40W3500
KDL-40W3100
KDL-40W3000
KDL-40D3100
KDL-40V4000
KDL-40V3100
KLV-40X350A
KLV-40X300A
KLV-40W400A
KLV-40W300A
KLV-40D300A
KLV-40V300A
KLV-40S310A
KDL-37S3100
KDL-37U3100
KLV-37S310A
KLV-37U300A
KDL-32W4000
KDL-32D3100
KDL-32V4000
KDL-32V3100
KDL-32S3100
KDL-32U3100
KLV-32W400A
KLV-32D300A
KLV-32V300A
KLV-32S310A
KLV-32U300A

3 (EN)
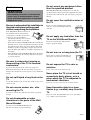
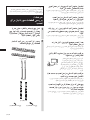
Be sure to subcontract the installation to
licensed contractors and keep small
children away during the installation.
If the Wall-Mount Bracket or the TV is
not installed correctly, the following
accidents may occur. Be sure licensed
contractors carry out installation.
• The TV may fall and cause a serious
injury such as a bruise or a fracture.
• If the wall on which the Wall-Mount Bracket is installed is
unstable, uneven, or not perpendicular to the floor, the unit
may fall and cause injury or property damage. The wall
should be capable of supporting a weight of at least four
times the TV weight. (Refer to your TV’s instructions for
its weight.)
• If the installation of the Wall-Mount Bracket on the wall is
not sufficiently sturdy, the unit may fall and cause injury
or property damage.
Be sure to subcontract moving or
dismounting of the TV to licensed
contractors.
If persons other than licensed contractors transport or
dismount the TV, it may fall and cause injury or property
damage. Be sure that two or more persons carry or dismount
the TV.
Do not spill liquid of any kind on the
TV.
If you allow the TV to get wet, this may result in a fire or an
electric shock.
Do not remove screws, etc., after
mounting the TV.
If you do so, the TV may fall and cause injury or property
damage.
Do not disassemble or make
alterations to the parts of the Wall-
Mount Bracket.
If you do so, the Wall-Mount Bracket may
fall and cause injury or property damage.
Do not mount any equipment other
than the specified product.
This Wall-Mount Bracket is designed for use with the
specified product only. If you mount equipment other than
specified, it may fall or break, and cause injury or property
damage.
Do not cover the ventilation holes of
the TV.
If you cover the ventilation holes (with a
cloth, etc.), heat may build up inside and
cause fire.
Do not apply any load other than the
TV on the Wall-Mount Bracket.
If you do so, the TV may fall and cause
injury or property damage.
Do not lean on or hang from the TV.
Do not lean on or hang from the TV as it
may fall on you and cause serious injury.
Do not expose the TV to rain or
moisture.
It may cause a fire or an electric shock.
Never place the TV in hot, humid or
excessively dusty places, or in a
place where the TV is subjected to
mechanical vibrations.
If you do so, it may cause a fire or an electric shock.
Keep flammable objects or open
flames (e.g., candles) away from the
TV.
To prevent a fire, keep flammable objects or open flames
(e.g., candles) away from the TV.
WARNING
If the following precautions are not observed,
serious injury or death through fire, electric
shock, the product toppling over, or the product
dropping can result.
To Customers
GB
English

4 (EN)
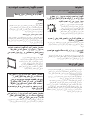
Do not install the Wall-Mount
Bracket on wall surfaces where the
corners or the sides of the TV
protrude away from the wall surface.
Do not install the Wall-Mount Bracket on
wall surfaces such as a pillar, where the
corners or the sides of the TV protrude
away from the wall surface. If a person or
object happens to hit the protruded corner
or side of the TV, it may cause injury or
property damage.
Do not handle the product with
excessive force during cleaning or
maintenance.
Do not apply excessive force on the topside of the TV. If you
do so, the TV may fall and cause injury or property damage.
Do not install the TV over or under
an air-conditioner.
If the TV is exposed to water leaks or air current from an air-
conditioner for a long time, it may cause a fire, an electric
shock or a malfunction of the TV.
• If you use the TV installed on the Wall-Mount Bracket for
a long time, the wall behind or above the TV may become
discolored or the wallpaper may come unstuck, depending
on the material of the wall.
• If the Wall-Mount Bracket is removed after installing it on
the wall, the screw holes are left.
• If you have routed 300-ohm feeder cables behind the wall,
we recommend that you change them to 75-ohm coaxial
cables. If it is necessary to continue to use 300-ohm feeder
cables, be sure there is sufficient space available between
the TV and the feeder cables behind the wall before
installing. Consult your licensed contractor regarding an
appropriate location (free from radio noise, etc.) before
installing.
Be sure to install the Wall-Mount
Bracket securely to the wall
following the instructions in this
instruction manual.
If any of the screws are loose or fall out, the
Wall-Mount Bracket may fall and cause
injury or property damage. Be sure to use
the appropriate screws for the material of
the wall and install the unit securely using
four or more 8 mm diameter (or equivalent)
screws.
Be sure to assemble the bracket
properly following the instructed
procedure explained in this
instruction manual.
If any of the screws are loose or fall out, the TV may fall and
cause bodily injury to someone or damage to the TV.
CAUTION
If the following precautions are not observed,
injury or property damage may occur.
Precautions
Installing the Wall-Mount
Bracket
WARNING
To Customers
Sufficient expertise is required for installing this product.
Be sure to subcontract the installation to Sony dealers or
licensed contractors and pay special attention to safety
during the installation.
To Sony Dealers
The following instructions are for Sony Dealers only. Be
sure to read safety precautions described above and pay
special attention to safety during the installation,
maintenance and checking of this product.
Be sure to use the supplied
screws and attachment parts
properly following the instructions
given in this instruction manual. If
you use substitute items, the TV
may fall and cause bodily injury to
someone or damage to the TV.
To Sony Dealers
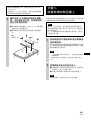
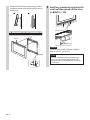
a
a
b
b
c
c

5 (EN)
Be sure to tighten the screws
securely in the designated position.
If you fail to do so, the TV may fall and cause bodily injury
to someone or damage to the TV.
Be careful not to subject the TV to
shock during installation.
If the TV is exposed to shock, it may fall or break apart. This
may cause injury.
Be sure to install the TV on a wall
that is both perpendicular and flat.
If you fail to do so, the TV may fall and cause injury.
After proper installation of the TV,
secure the cables properly.
If people or objects get tangled with cables, this may result in
injury or damage to the TV.
Do not allow the AC power cord or
the connecting cable to be pinched.
If the AC power cord or the connecting
cable is pinched between the unit and the
wall or is bent or twisted by force, the
internal conductors may become exposed
and cause a short circuit or an electrical
break. This may cause a fire or an electric
shock.
Be careful not to hurt your hands or
fingers during the installation.
Be careful not to hurt your hands or fingers when installing
the Wall-Mount Bracket or the TV.
The screws needed to secure the
Wall-Mount Bracket to the wall are
not supplied.
Use the appropriate screws for the wall material and structure
when mounting the Wall-Mount Bracket.
Before installation
If you intend to install a TV that is not specified on
page 2, be sure to refer to its operating instructions, or the
supplied leaflet.
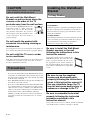
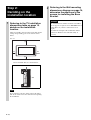
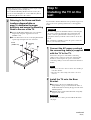
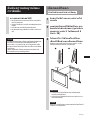
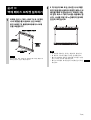
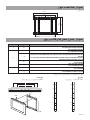
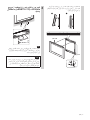
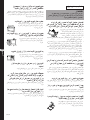
Step 1:
Checking the parts
required for the
installation
1
Prepare six or more 8 mm
diameter or equivalent screws
(not supplied) and a screwdriver.
Select screws suitable for the
material of the wall.
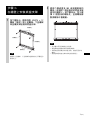
2
Unpack the carton and check to
see that all the following items
are included.
a
b
c
c
b
a
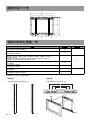
Upper Bracket(1)
Plate(2)
Screw (+BVST4 × 12) (6)
Screw (+PSW6 × 16) (4)
Mounting Hook(2)
Lower Bracket(1)

6 (EN)
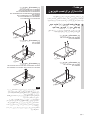
Step 2:
Deciding on the
installation location
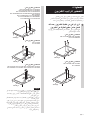
1
Referring to the TV installation
dimensions table on page 13,
decide on the installation
location.
Allow for suitable clearance between the TV and the
ceiling and protruding parts of the wall as shown
below.
Note
If you intend to route the cables in the wall, make a
hole in the wall to insert the cables before beginning
the installation.
Unit: mm
100 100
100
300
Never install the TV set as shown below:
Air circulation is blocked.
Wall
2
Referring to the Wall mounting
dimensions diagram on page 14,
determine the positions of the
screws for installing the Base
Bracket.
WARNING
The wall that the TV will be mounted on should be
able to support a weight of at least four times that of
the TV (Refer to your TV’s instructions for its
weight.).
Determine the strength of the wall the TV will be
mounted on. Reinforce the wall sufficiently, if
necessary.

7 (EN)
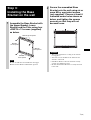
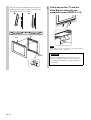
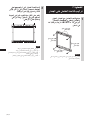
Step 3:
Installing the Base
Bracket on the wall
1
Assemble the Base Bracket with
the Upper Bracket, Lower
Bracket and the Plate using four
+BVST4 x 12 screws (supplied)
as below.
Note
Be sure to make the arrow marked on the Upper
Bracket, Lower Bracket and the Plate upward.
b
c
c
b
a
a
With the
arrow upward
With the arrow upward
With the
arrow upward
With the
arrow upward
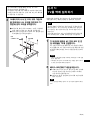
2
Secure the assembled Base
Bracket onto the wall using six or
more M8 or equivalent screws
(not supplied). Choose at least 6
indicated screw holes shown as
below, and tighten the screws
securely so that they will not
become loose.
a b
c
c
b
a
WARNING
• The screws required for securing to the wall are
not supplied.
• Select the screws suitable for the material and
structure of the wall.
• If the Base Bracket cannot be attached securely
enough, use additional screws.
• Be sure that the Base Bracket is securely attached
to the wall.

8 (EN)
Disconnect all the cables from the TV before you remove the
stand.
If you intend to install a TV that is not specified on page 2, be
sure to refer to its operating instructions, or the supplied
leaflet.
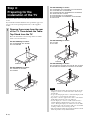
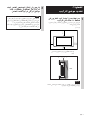
Step 4:
Preparing for the
installation of the TV
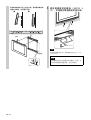
1
Remove the screws from the rear
of the TV. Then detach the Table-
Top Stand from the TV.
Place the TV with its screen facing down on a stable
cloth-covered work surface.
For the following TV users:
KDL-52/46/40W4000, KDL-40V4000,
KLV-52/46/40W400A
For the following TV users:
KDL-32W4000, KDL-32V4000,
KLV-32W400A
Soft cloth
Soft cloth
For the following TV users:
KDL-52/46/40XBR, KDL-52/46X3500, KDL-52/46/40X3100,
KDL-52/46X3000, KDL-52/46/40W3500,
KDL-52/46/40W3100, KDL-46/40W3000, KDL-46/40D3100,
KDL-46/40V3100, KDL-37S3100,
KLV-52/46/40X350A, KLV-52/46/40X300A,
KLV-52/46/40W300A, KLV-46/40D300A, KLV-46/40V300A,
KLV-40/37S310A
For the following TV users:
KDL-37U3100
KLV-37U300A
For the following TV users:
KDL-32D3100, KDL-32V3100, KDL-32S3100, KDL-32U3100,
KLV-32D300A, KLV-32V300A, KLV-32S310A, KLV-32U300A
Notes
• When removing the Table-Top Stand from the TV, lay the
display face down on a stable work surface that is larger
than the TV.
• To prevent damaging the surface of the LCD display, make
sure to place a soft cloth on the work surface.
• If pressure or shock is applied to the surface of the TV, the
LCD display may break or become damaged.
• Lay the display face down on a stable and level surface
with the Table-Top Stand hanging over the edge of the
surface. Having the display face and the base of the Table-
Top Stand on the same level surface will create an unstable
working condition and can damage the TV.
• When detaching the Table-Top Stand from the TV, hold the
Table-Top Stand securely with both hands.
Soft cloth
Soft cloth
Soft cloth

9 (EN)
If you intend to install a TV that is not specified on page 2, be
sure to refer to its operating instructions, or the supplied
leaflet.
When using an electric screwdriver, set the torque setting
to approximately 2 N·m {20 kgf·cm}.
Do not lift the Mounting Hook before the screws (two
screws each for left/right) are secured. This may distort
the Mounting Hook or the TV cabinet.
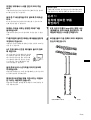
2
Referring to the Screw and Hook
locations diagram/table on
page 14, determine the screw
positions, and secure the Mounting
Hook to the rear of the TV.
1 Secure the Mounting Hook to the rear of the TV
temporarily, using the supplied four screws
(+PSW6 × 16).
2 Be sure that both screws are securely tightened with
equal torque strength to the rear of the TV.
Screw
(+PSW6 × 16)
Mounting
Hook
Step 5:
Installing the TV on the
wall
WARNING
Be sure to complete the installation before connecting the
AC power cord to the wall outlet. If you allow the AC
power cord to be pinched under or between pieces of
equipment, this may result in a short circuit or an electric
shock.
Be careful not to stumble over the AC power cord or the
TV, as you may hurt yourself.
1
Connect the AC power cord and
the connecting cable(s) supplied
with the TV to the TV.
Connect the AC power cord and the connecting
cable(s) to the connectors on the rear of the TV. For
details on connecting the AC power cord and the
connecting cable(s), refer to the instruction manual of
the TV.
Notes
• You cannot connect the cables to the TV after installing it
on the Base Bracket.
• Subcontract the cable routing in the wall to a licensed
contractor.
2
Install the TV onto the Base
Bracket.
1 Referring to the Screw and Hook locations
diagram/table on page 14, determine the holes of
the Base Bracket for latching the upper hooks of the
Mounting Hook.
2 Hold the TV securely with both hands, and gently
align it on the wall.
WARNING
Be sure that two or more persons hold the TV when
carrying it.
continued

10 (EN)
Hang the Hook of the Mounting Hook on the Base
Bracket first, then push the bottom of the TV to the
wall until the display is in position.
a
b
c
c
b
a
b
c
c
b
a
a
12
Hook
Base
Bracket
3
Firmly secure the TV and the
Base Bracket using the two
supplied screws (+BVST4 × 12).
Note
When using an electric screwdriver, set the torque setting to
approximately 1.5 N·m {15 kgf·cm}.
Screw
(+BVST4 × 12)
WARNING
Be sure to firmly tighten the securing screws on
both left and right of the bottom. If you fail to do
so, the TV may fall when it is pushed upward and
cause injury.

11 (EN)
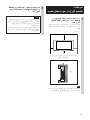
Confirming the
completion of the
installation
Check the following points.
• The two Hooks of the Mounting Hook are firmly
latched in the Base Bracket.
• The Mounting Hook is in the position indicated with
the triangle symbol.
• The cords and the cables are not twisted or pinched.
• The two securing screws on the Lower Bracket are
firmly tightened.
WARNING
7
Incomplete installation may cause the product to fall and
result in injury or property damage. Also, improper
placement of the AC power cord may cause a short
circuit resulting in fire or electric shock.
Be sure to confirm the completion of the installation for
safety.
When removing the TV
1
Unplug the AC power cord from
the wall outlet.
2
Remove the two screws which
secure the TV and the Base
Bracket. (Refer to 3 of Step 5 on
page 10 for the screw positions.)
3
Be sure to hold the TV and slide
it upward to remove the TV.
Move the bottom of the TV outward against the wall,
then lift the TV by sliding the top of it upward to
remove the TV.
Caution
• Be careful not to allow the cord and cables to get
caught when removing the TV.
• Be careful not to hurt your hands or fingers when
removing the TV.
WARNING
Be sure that two or more persons hold the TV when
carrying it.
To Sony Dealers
b
c
c
b
a
a
2
1
Hook

12 (EN)
Design and specifications are subject to change without
notice.
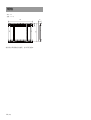
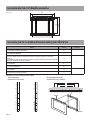
Specifications
a c
a
c
Unit: mm
Weight: 2.4 kg
62
440
60560

13 (EN)
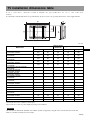
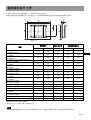
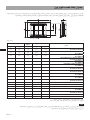
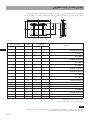
TV installation dimensions table
b
b
a c
a
c
b
b
Some models may not be available in certain regions.
Figures in the above table may differ slightly depending on the installation.
WARNING
The wall that the TV will be installed on should be capable of supporting a weight of at least four times that of the TV.
Refer to your TV’s instructions for its weight.
Model name
Display dimensions
Screen centre
dimension
Length after each installation
AB C DE
KDL-52XBR/ 52X3500/ 52X3100/ 52X3000/
KLV-52X350A/ 52X300A
1415 827 126 544 186
KDL-52W4000/
KLV-52W400A
1262 829 167 615 180
KDL-52W3500/ 52W3100/
KLV-52W300A
1278 832 126 572 184
KDL-46XBR/ 46X3500/ 46X3100/ 46X3000/
KLV-46X350A/ 46X300A
1262 734 156 528 184
KDL-46W4000/
KLV-46W400A
1120 742 212 615 176
KDL-46W3500/ 46W3100/ 46W3000/
KLV-46W300A
1135 734 156 547 183
KDL-46D3100/ 46V3100/
KLV-46D300A/ 46V300A
1114 730 134 533 176
KDL-40XBR/ 40X3100/
KLV-40X350A/ 40X300A
1111 657 204 537 184
KDL-40W4000/ 40V4000/
KLV-40W400A
986 646 175 527 171
KDL-40W3500/ 40W3100/ 40W3000/
KLV-40W300A
992 643 204 546 183
KDL-40D3100/ 40V3100/
KLV-40D300A/ 40V300A
981 643 185 533 171
KLV-40S310A 981 643 185 533 172
KDL-37S3100/ KLV-37S310A 920 626 185 533 176
KDL-37U3100/ KLV-37U300A 918 609 196 527 169
KDL-32W4000/ 32V4000/
KLV-32W400A
794 540 200 497 160
KDL-32D3100/ 32V3100/
KLV-32D300A/ 32V300A
790 530 165 452 160
KDL-32S3100/ KLV-32S310A 790 530 165 452 166
KDL-32U3100/ KLV-32U300A 796 544 224 525 160
T
h
e ta
bl
e
b
e
l
ow s
h
ows t
h
e
di
mens
i
ons o
f
t
h
e TV t
h
at
i
s mounte
d
on t
hi
s pro
d
uct. Re
f
er to t
hi
s ta
bl
e to
d
ec
id
e on t
h
e
i
nsta
ll
at
i
on
location.
If you intend to install a TV that is not specified below, be sure to refer to its operating instructions, or the supplied leaflet.
Screen centre point
385
Unit: mm

14 (EN)
Some models may not be available in certain regions.
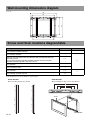
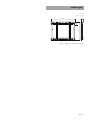
Wall mounting dimensions diagram
Screw and Hook locations diagram/table
Model name
Screw location Hook location
KDL-52XBR/ 52X3500/ 52X3100/ 52X3000/ 52W3500/ 52W3100
KLV-52X350A/ 52X300A/ 52W300A
d, i a
KDL-52W4000/ 46W4000
KLV-52W400A/ 46W400A
e, j
b
KDL-46XBR/ 46X3500/ 46X3100/ 46X3000/ 46W3500/ 46W3100/ 46W3000/
46D3100/ 46V3100/ 40XBR/ 40X3100/ 40W3500/ 40W3100/ 40W3000/ 40D3100/
40V3100/ 37S3100
KLV-46X350A/ 46X300A/ 46W300A/ 46D300A/ 46V300A/ 40X350A/ 40X300A/
40W300A/ 40D300A/ 40V300A/ 40S310A/ 37S310A
e, h
KDL-40W4000/ 40V4000
KLV-40W400A
d, i
KDL-37U3100/ 32U3100
KLV-37U300A/32U300A
d, g
KDL-32W4000/ 32V4000
KLV-32W400A
e, h
c
KDL-32D3100/ 32V3100/ 32S3100/
KLV-32D300A/ 32V300A/ 32S310A
f, j
a
c
a
c
Unit: mm
560
385
440
456
480
b
c
b
a
a
c
a
b
c
c
b
a
d
e
f
g
h
j
i
d
e
f
g
h
j
i
Hook location
When installing the TV onto the Base Bracket.
b
a
c
Base Bracket
Hook
Screw location
When installing the Hook on the TV.


2 (CT)
感謝您購買本產品。
如果不遵守安全事項或未正確使用本產品,將可能導致
嚴重傷害或引起火災。
本說明書介紹了正確使用本產品與防止事故發生需知的
重要事項。請務必詳讀本手冊,以確保正確使用本產品。
請妥善保管本手冊,以備將來參考。
致 Sony 經銷商
安裝本產品需要足夠的專業技術。請務必詳讀本說明書,
以確保安裝本產品時之安全。Sony 對因錯誤操作或不當
安裝所造成的任何損壞或傷害,概不承擔責任。請在安裝
後將本手冊交給用戶。
Sony 的產品設計非常注重安全。但是,如果使用不正確,
則可能因火災、電擊、產品傾倒或墜落而導致嚴重傷害。
請務必遵守安全事項,以防止此類事故發生。
特定產品
以下產品若有變更、無存貨或是已停產的情形,恕不另行
通知。
此外,部分機型在某些地區並未上市。
本產品專為以上指定電視機機型設計。對於其他電視機,
請參閲電視機的使用説明書或附帶的簡易説明書,以確
認能否使用本產品。
致用戶
安裝本產品需要足夠的專業技術。請務必委由 Sony 經
銷商或經授權的承包商進行安裝,且安裝期間需特別
注意安全。Sony 對操作不當或安裝不正確,或安裝任
何非指定産品而引起的任何損壞或傷害概不負責。任
何相關的法律權利將不受影響。
警告
安全事項
注意
LCD 彩色電視機
KDL-52XBR
KDL-52X3500
KDL-52X3100
KDL-52X3000
KDL-52W4000
KDL-52W3500
KDL-52W3100
KLV-52W400A
KLV-52X350A
KLV-52X300A
KLV-52W300A
KDL-46XBR
KDL-46X3500
KDL-46X3100
KDL-46X3000
KDL-46W4000
KDL-46W3500
KDL-46W3100
KDL-46W3000
KDL-46D3100
KDL-46V3100
KLV-46X350A
KLV-46X300A
KLV-46W400A
KLV-46W300A
KLV-46D300A
KLV-46V300A
KDL-40XBR
KDL-40X3100
KDL-40W4000
KDL-40W3500
KDL-40W3100
KDL-40W3000
KDL-40D3100
KDL-40V4000
KDL-40V3100
KLV-40X350A
KLV-40X300A
KLV-40W400A
KLV-40W300A
KLV-40D300A
KLV-40V300A
KLV-40S310A
KDL-37S3100
KDL-37U3100
KLV-37S310A
KLV-37U300A
KDL-32W4000
KDL-32D3100
KDL-32V4000
KDL-32V3100
KDL-32S3100
KDL-32U3100
KLV-32W400A
KLV-32D300A
KLV-32V300A
KLV-32S310A
KLV-32U300A

3 (CT)
請務必將安裝工作委託經授權的承包
商,並且避免安裝過程中讓孩童接近。
如果掛壁式支架或電視機安裝不正
確,則可能發生下列事故。因此請確
保安裝工作由經授權的承包商進行。
• 電視機可能會掉落,而造成嚴重的
傷害,如挫傷或骨折等。
• 如果安裝掛壁式支架的牆壁不穩
固、凹凸不平、或未與地面垂直,裝置可能會掉落,因
而造成傷害或財產損失。牆壁應能承受至少四倍於電
視機的重量。(有關您電視機的重量,請參考電視機的
說明書。)
• 如果牆壁上安裝的掛壁式支架不夠牢固,則裝置可能
會掉落,並造成傷害或財產損失。
請務必將搬動或拆卸電視機的工作委由
經授權的承包商進行。
如果由未經授權的承包商搬動或拆卸電視機,裝置可能
會掉落,造成傷害或財產損失。請務必要有兩個或以上的
人員處理運送或拆卸電視機的工作。
請勿將各種液體潑灑在電視機上。
如果弄濕電視機,可能會引發火災或是電擊。
安裝電視機之後請勿拆除任何螺絲等零
件。
否則,電視機可能會掉落,造成傷害或財產損失。
請勿拆解或修改掛壁式支架的零件。
否則,掛壁式支架可能會掉落,造成傷
害或財產損失。
請勿將指定產品之外的其他設備安裝到
支架上。
本掛壁式支架僅爲安裝特定產品而設計。如果您安裝非
特定設備,則設備可能會掉落或破裂,造成傷害或財產損
失。
請勿遮蔽電視機的通風孔。
如果您遮蔽通風孔 (用布等) ,則熱量
會積聚其中,因而造成火災。
除了電視機之外,請勿在掛壁式支架上
加掛其他重物。
否則,電視機可能會掉落,造成傷害或
財產損失。
請勿倚靠或攀爬電視機。
請勿倚靠或攀爬電視機,因爲裝置可能
會掉落在您身上,造成嚴重傷害。
請勿使電視機暴露於雨水或潮濕環境
中。
如此可能會引起火災或電擊。
絕對勿將電視機放置在炎熱、潮濕或灰
塵過多的地方,也不得將電視機放置在
會受機械震動影響的地方。
否則可能會引起火災或電擊。
易燃物件或明火 (如蠟燭)應遠離電視
機。
爲防止火災,請將易燃物件或明火 (如蠟燭)遠離電視
機。
警告
如果不注意遵守下列事項,則可能因火災、電擊、產
品傾倒或墜落而導致嚴重傷害或死亡。
致用戶
CT
中文 (繁)

4 (CT)
請勿將掛壁式支架安裝在會使電視機邊
角或側面突出於牆面的牆壁位置。
請勿將掛壁式支架安裝在柱子等會使電
視機邊角或側面突出於牆面的牆壁位
置。如果人或物品正巧撞到電視機的邊
角或側面,則會造成傷害或財產損失。
清潔或維修過程中,請勿對產品施加過
大的力量。
請勿在電視機頂部施加過大的力量。否則,電視機可能會
掉落,造成傷害或財產損失。
請勿將電視機安裝在冷氣機的上方或下
方。
如果電視機長期暴露於冷氣機的漏水或氣流中,可能造
成火災、電擊或電視機故障。
• 長期使用安裝於掛壁式支架的電視機時,視牆面的材
料而定,可能會造成電視機後方或上方的牆面褪色,
或是壁紙脫落。
• 在牆壁上安裝掛壁式支架後再將其拆下,牆壁上會留
下螺絲孔。
• 如果您在牆壁後以 300 歐姆的供電電纜佈線,建議您
將其換成 75 歐姆的同軸電纜。如果需要繼續使用
300 歐姆的供電電纜,請在安裝前確保電視機和牆後
供電電纜之間有足夠的空間。安裝前,請向經授權的
承包商諮詢適當的安裝位置 (遠離無線電干擾等)。
請務必依照本說明書中的指示,牢固地
將掛壁式支架安裝於牆上。
如果有螺絲鬆動或掉落,掛壁式支架可
能會掉落,造成人員受傷或財産損失。
針對不同牆壁材料,請務必使用正確的
螺絲,並使用四個或更多個直徑 8 mm
(或相當規格)螺絲牢固地安裝本裝置。
請務必按照本使用說明書中介紹的步
驟,正確安裝支架。
如果有螺絲鬆動或掉落,電視機可能會掉落,並造成人員
的受傷或損壞電視機本身。
請務必在指定的位置上,將螺絲安全地
鎖緊。
否則,電視機可能會掉落,造成人員的受傷或損壞電視機
本身。
安裝的過程中,請務必小心不要讓電視
機遭到衝撞。
如果電視機遭到衝撞,可能會掉落或破裂。並可能造成傷
害。
請務必將電視機安裝在垂直且平坦的牆
面上。
否則,電視機可能會掉落,並造成傷害。
注意
如果不注意遵守下列事項,則可能造成傷害或財產損
失。
注意事項
安裝掛壁式支架
警告
致用戶
安裝本產品需要足夠的專業技術。請務必委由 Sony
經銷商或經授權的承包商進行安裝,且安裝期間需特
別注意安全。
致 Sony 經銷商
下列說明僅適用於 Sony 經銷商。請務必閱讀上述安
全注意事項,並在安裝、維修和檢查本產品時特別注
意安全。
請務必按照本使用說明書中的指示,
正確使用所提供的螺絲和附件。如果
使用其他替代零件,電視機可能會掉
落,造成人員的受傷或損壞電視機本
身。
致Sony經銷商
a
a
b
b
c
c

5 (CT)
正確安裝電視機後,請確實固定電纜。
如果人或物品勾到電纜,可能會造成人員受傷或損壞電
視機本身。
請勿使電源線或連接電纜受到擠壓。
如果電源線或連接電纜被壓在裝置和
牆壁之間,或被用力彎曲或扭曲,其內
部導線可能會因裸露而短路或斷電。
如此可能會引起火災或電擊。
在安裝過程中請小心注意不要傷到您的
手或手指。
在安裝掛壁式支架或電視機時,請小心不要傷到您的手
或手指。
不提供用於將掛壁式支架固定於牆壁的
螺絲。
在安裝掛壁式支架時,請使用適合牆壁材料和結構的螺
絲。
安裝前
如果您想要安裝的電視機不是第 2 頁所指定的,則必
須參閱電視機的使用説明書或附帶的簡易説明書。
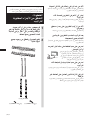
步驟 1:
檢查安裝所需的零件
1
請準備六個或更多個直徑 8 mm 或同
等規格的螺絲(不提供),以及一把
螺絲起子。請選擇適合牆壁材料的螺
絲。
2
打開包裝紙箱,檢查以下零件是否完
整。
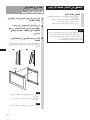
a
b
c
c
b
a
下金屬架 (1)
金屬支架 (2)
螺絲 (+BVST4 × 12)(6)
螺絲 (+PSW6 × 16)(4)
懸掛鉤 (2)
上金屬架 (1)

ページが読み込まれています...
ページが読み込まれています...
ページが読み込まれています...
ページが読み込まれています...
ページが読み込まれています...
ページが読み込まれています...
ページが読み込まれています...
ページが読み込まれています...
ページが読み込まれています...
ページが読み込まれています...
ページが読み込まれています...
ページが読み込まれています...
ページが読み込まれています...
ページが読み込まれています...
ページが読み込まれています...
ページが読み込まれています...
ページが読み込まれています...
ページが読み込まれています...
ページが読み込まれています...
ページが読み込まれています...
ページが読み込まれています...
ページが読み込まれています...
ページが読み込まれています...
ページが読み込まれています...
ページが読み込まれています...
ページが読み込まれています...
ページが読み込まれています...
ページが読み込まれています...
ページが読み込まれています...
ページが読み込まれています...
ページが読み込まれています...
ページが読み込まれています...
ページが読み込まれています...
ページが読み込まれています...
ページが読み込まれています...
ページが読み込まれています...
ページが読み込まれています...
ページが読み込まれています...
ページが読み込まれています...
ページが読み込まれています...
ページが読み込まれています...
ページが読み込まれています...
ページが読み込まれています...
ページが読み込まれています...
ページが読み込まれています...
ページが読み込まれています...
ページが読み込まれています...
ページが読み込まれています...
ページが読み込まれています...
ページが読み込まれています...
ページが読み込まれています...
ページが読み込まれています...
ページが読み込まれています...
ページが読み込まれています...
ページが読み込まれています...
ページが読み込まれています...
ページが読み込まれています...
ページが読み込まれています...
ページが読み込まれています...
ページが読み込まれています...
ページが読み込まれています...
ページが読み込まれています...
ページが読み込まれています...
ページが読み込まれています...
-
 1
1
-
 2
2
-
 3
3
-
 4
4
-
 5
5
-
 6
6
-
 7
7
-
 8
8
-
 9
9
-
 10
10
-
 11
11
-
 12
12
-
 13
13
-
 14
14
-
 15
15
-
 16
16
-
 17
17
-
 18
18
-
 19
19
-
 20
20
-
 21
21
-
 22
22
-
 23
23
-
 24
24
-
 25
25
-
 26
26
-
 27
27
-
 28
28
-
 29
29
-
 30
30
-
 31
31
-
 32
32
-
 33
33
-
 34
34
-
 35
35
-
 36
36
-
 37
37
-
 38
38
-
 39
39
-
 40
40
-
 41
41
-
 42
42
-
 43
43
-
 44
44
-
 45
45
-
 46
46
-
 47
47
-
 48
48
-
 49
49
-
 50
50
-
 51
51
-
 52
52
-
 53
53
-
 54
54
-
 55
55
-
 56
56
-
 57
57
-
 58
58
-
 59
59
-
 60
60
-
 61
61
-
 62
62
-
 63
63
-
 64
64
-
 65
65
-
 66
66
-
 67
67
-
 68
68
-
 69
69
-
 70
70
-
 71
71
-
 72
72
-
 73
73
-
 74
74
-
 75
75
-
 76
76
-
 77
77
-
 78
78
-
 79
79
-
 80
80
-
 81
81
-
 82
82
-
 83
83
-
 84
84


