
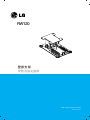
RW120
RW120
Wall Mounting Bracket
Installation and Setup Guide
P/NO : 3828TUL255E(1002-REV02)
Printed in Korea
벽걸이형 브라켓 사용설명서

2
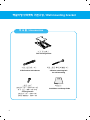
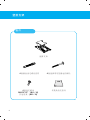
벽걸이형 브라켓의 기본구성 /
Wall mounting bracket
부속품/
Accessories
벽면 고정용 앵커 4개
고정용 스크류
26LE3**/5**: (M4×16) 4개
그 외 모델: (M4×10) 4개
벽면 고정용 와셔붙이 볼트 4개
LGTV
사용설명서
벽걸이형 브라켓
4-Wall anchor bolt sleeves
4-Fixing screws
26LE3**/5**: (M4×16)
Other Models: (M4×10)
4-Washer attaching bolt
for wall mounting
Installation and Setup Guide
Wall mounting bracket

3
차례/
Contents
첫걸음 /
First step
44
안전을 위한 주의사항
Safety Instructions
설치방법 /
Installation
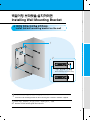
벽걸이형 브라켓을 설치하려면
Installing Wall monuting bracket
66
1. 제품을 분리하세요.
Detach the units
77
2. 제품에 제품 고정용 브라켓을 결합하세요
Assemble a product with the product fixing bracket
88
3. 제품이 결합될 벽면에 위치를 표시한 뒤 앵커를 삽입하세요.
Fix anchors after marking the positions where units are mounted on the wall.
99
4. 벽면에 벽면용 브라켓을 부착하세요
Install the wall mounting bracket on the wall
1100
5. 벽면용 브라켓에 제품을 결합하세요
Assemble a product with the wall mounting bracket
.
기타 /
Others
1111
각도를 조절하려면
Adjusting Tilt Angle
1111
제품과 벽면의 거리
Adequate installation space from wall
1122
제품규격
Product specification

4
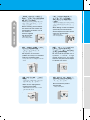
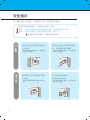
※ 주의사항은‘경고’와‘주의’두 가지로 구분되어 있으며, ‘경고’와‘주의’의 의미는 다음과 같습니다.
제품의 무게를 견디지 못하는 곳에는
설치하지 마세요.
- 설치하는 곳의 강도가 약하면 제품이 떨어져 부상의 원인
이 될 수 있습니다.
설치 후 제품에 매달리거나 심한 충격을 주지
마세요.
- 제품이 떨어져 부상의 원인이 됩니다.
지시사항을 위반하였을 때, 경미한 상해나 제품 손상이 발생할 가능성이 있는 경우
지시사항을 위반하였을 때, 심각한 상해나 사망이 발생할 가능성이 있는 경우
특정조건에서 위험이 발생할 우려가 있으므로 주의하라는 기호입니다.
반드시 사용설명서의 지시에 따라
제품을 설치하세요.
- 사용설명서의 지시를 따르지 않을 경우 잘못된
설치로 인해 심한 부상 및 제품 파손의 원인이
될 수 있습니다.
제품을 설치할 때나 설치된 제품의 각도를
조절할 때는 반드시 두사람 이상이 함께
하세요.
- 혼자서 하게 되면 제품이 떨어져 부상의
원인이 될 수 있습니다.
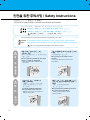
안전을 위한 주의사항 /
Safety Instructions
- 사고나 위험을 막기 위해 잘 읽고 꼭 지켜주세요!
경
고
주
의
- To prevent the accident danger, read this manual and follow the instructions
Do not install this product on the place
where it cannot be supported.
- It may cause the product to fall and could
cause injuries.
Do not hang on or impact on this
product.
-
It may cause the product to fall and could
cause injuries.
Install this product followed by
the instruction of the manual.
-
Otherwise it may cause serious injuries or
damage of the product.
Do not install this product by yourself.
Get some help from others.
-
It may cause the product to fall and
could cause injuries.
WARNING
NOTES
※ Safety instructions have two kinds of information, and each meaning of it is as blow.
WARNING
NOTES
The violation of this instruction may cause light injuries or damage of the product.
The violation of this instruction may cause serious injuries and even death.
Take care of danger that may happen under specific condition.

5
첫걸음 / First Step 설치방법 / Installation 기타 / Others
설치시에는 반드시 먼저 벽체 종류를
확인하고, 조건이 맞다면 동봉한 앵커와
볼트, 와셔를 사용하세요.
- 지정되지 않은 앵커와 볼트, 와셔를 사용할 경우
제품의 무게를 지탱하지 못해 안전상의 문제가
발생할 수도 있습니다.
주
의
제품이 설치된 장소 아래에서 열기구 및
가습기 등을 사용하지 마세요.
- 수증기나 열기로 인해 화재, 감전, 고장의
원인이 될 수 있습니다.
제품을 수직벽 이외의 스프링클러나
감지기 옆, 진동이나 충격이 미칠
우려가 있는 곳, 고압 전선이나 동력원
근처에는 설치하지 마세요.
제품 설치전 콘센트에서 전원코드를
빼세요.
- 전원코드가 꽂힌 상태에서 제품을 설치할 경우
감전, 화재의 원인이 될 수 있습니다.
제품 설치시 맨손으로 설치하지 말고,
반드시 작업용 장갑을 착용하세요.
- 부상의 원인이 될 수 있습니다.
벽에 천공시 반드시 지정된 직경의
드릴 비트 및 드릴을 사용하세요.
그리고 구멍 깊이도 지정된 사항을
따르세요.
- 지정되지 않은 방법으로 천공하여 설치할 경우에는
불안정하게 설치되어 안전상의 문제가 발생할 수도
있습니다.
Before installing, check whether
the material of wall satisfies the
specifications and make sure to
use enclosed
anchors supplied
with the product.
-
Otherwise it may
cause safety problem.
WARNING
Do not place a heat source
(radiator or heater) or a humidifier
under the installed product.
-
It may cause a fire or could give an electric
shock.
Do not install this product near a
sprinkler, a sensor, a high
voltage electric line, any power
source or the place where impact
or vibration can affect.
Make sure to unplug before
installing this product.
-
Otherwise it may cause a fire or could
give an electric shock.
Do not install this product
barehanded.
-
It may cause injuries.
When drilling use drill and drill bit
specified by the manufacturer.
And the depth of the hole should
satisfy the specifications.
-
Otherwise it may
cause safety problem.

6
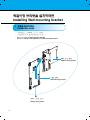
벽걸이형 브라켓을 설치하려면
1. 제품을 분리하세요.
Detach the units
Installing Wall mounting bracket
Detach the bolt from Wall mounting bracket.
Detach the Product fixing bracket from Wall mounting bracket.
벽면용 브라켓
브라켓 고정용 스크류
제품 고정용 브라켓
Wall mounting bracket
Bracket fixing screw
Product fixing bracket

7
첫걸음 / First Step 설치방법 / Installation 기타 / Others
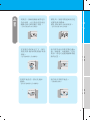
2. 제품에 제품 고정용 브라켓을 결합하세요.
1
2
1
2
테이블위나 바닥이 평평한 곳에 스크린이 아래로 향하도록 하여 놓으세요.
이때 스크린이 손상되지 않도록 방석이나 부드러운 천을 놓고 그 위에 두어야 합니다.
제품 고정용 브라켓을 고정용 스크류 (26LE3**/5**: (M4×16), 그 외 모델: (M4×10)) 4개를 이
용하여 제품과 결합시키세요.
Assemble a product with the product fixing bracket
Attach the Product fixing bracket to the product using the fixing screws provided.
Before installing, turn off the power and disconnect from all cables connected.
Carefully place the product screen side down on a cushioned surface that will protect the
product and screen from damage.
Place the product fixing bracket on the product as shown above.
Install the 4 fixing screws (
26LE3**/5**: (M4×16),Other Models: (M4×10)
) securely, in the back of
the product in the holes provided. Be sure the bracket hooks are at the top side of the product.

8
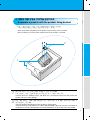
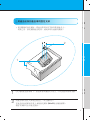
3. 제품이 결합될 벽면에 위치를 표시한 뒤 앵커를 삽입하세요.
그림과 같이 도면에 나타나 있는 앵커의 위치를 벽면에 표시하세요.
벽면에 표시된 앵커 위치에 드릴 비트 직경 8mm를 사용해 깊이 80mm~100mm 이내로 구멍을 뚫으세요.
2
뚫은 구멍을 청소한 뒤 구멍에 동봉된 앵커를 삽입하세요.
3
드릴 / Drill
벽면 / Wall
앵커 / Anchor
111100mmmm
114400mmmm
221166..55
mmmm
118866
mmmm
2
3
1
1
Fix anchors after marking the positions where units are
mounted on the wall
Mark the positions of the anchor holes in the wall as above Fig.
Drill the hole positions as above Fig. Using an 8mm drill appropriate for the material on the wall,
drill each hole to a depth of 80mm – 100mm.
Clean each drilled hole and Insert an anchor supplied into each hole.
The surface that the wall mounting bracket is to be mounted on should be of sufficient strength to
support the weight of the product and speakers typically; concrete, strong/weak natural rock, brick and
hollow block.
Plasterboard is not a sufficiently strong enough material; unless the bolts are anchored into standard
construction type studs capable of supporting the weight of the monitor and speakers.
anchors insertion position

9
첫걸음 / First Step 설치방법 / Installation 기타 / Others
벽걸이형 브라켓을 설치하려면
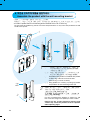
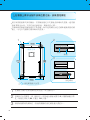
4. 벽면에 벽면용 브라켓을 부착하세요.
구멍 위치에 맞게 벽면용 브라켓을 벽쪽으로 밀착시키세요.
1
4개의 벽면 고정용 와서붙이 볼트를 각각의 구멍에 맞춰 체결하세요.
2
1
벽면 고정용 와셔붙이 볼트
2
Installing Wall Mounting Bracket
Install the wall mounting bracket on the wall
Place the wall mounting bracket on the wall using the 4 washers and bolts supplied.
Bolt the washer attaching bolt into each hole.
Washer attaching bolt for wall mounting

10
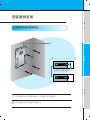
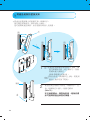
5. 벽면용 브라켓에 제품을 결합하세요.
제품에 결합된 제품 고정용 브라켓을 그림과 같이
기울여서 나사를 결합시키는 부분에 맞춰 거세요.
(아래 원 안
그림
)
제품을 위로 들어올려
의 걸이부에 구멍을 맞추
어 건 후 벽쪽으로 밀착시켜서 아래로 내리세요.
1
그림과 같이 제품을 결합 시켜 고정시킨 뒤, 고정용 스크류
(M4×12) 1개를 구멍에 맞춰 체결하세요.
고정용 스크류를 체결하지 않으면 각도
조절시 제품이 벽면용 브라켓에서 이탈 될 수 있으므로 필히
스크류를 체결하여 주세요.
2
1
그림과 같이 벽에 부착된 벽면용 브라켓에 제품을 결합하세요.
이때 반드시 두사람 이상이 함께 하세요. 혼자서 하게 되면 제품이 떨어져 제품 파손 및 부상의 원인이 될 수 있습니다.
벽면
2
Assemble the product with the wall mounting bracket
Tilt product fixing bracket assembled with product
as above Fig, and insert screw to the hole.
(Refer to Fig
in circle as shown)
Hang product on a hook(
) by lifting up product
and put down TV after mounting on the wall.
Fix after assembling the product as shown Fig. and
then insert one fixing screw (M4x12) to each of holes.
Entirely fix the screws otherwise loosely fixed
screws may cause the product to fall or seperate
while adjusting angle.
Assemble a product with the wall mounting bracket installed on the wall as shown Fig.
Do not install this product by yourself. Get some help from others. It may cause the product to fall and
could cause injuries.
Wall

11
첫걸음 / First Step 설치방법 / Installation 기타 / Others
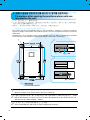
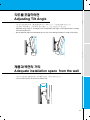
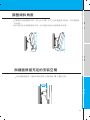
각도를 조절하려면
제품과 벽면의 거리
10°
15°
75mm
Adjusting Tilt Angle
Adequate installation space from the wall
Adjustable angle range is 10°(upside) and 15°(downside) (Tilt angle can be adjusted after installing
wall mounting bracket.)
Do not adjust Tilt angle with immoderate force. It may cause damage of product or could cause injuries.
Leave 75 mm between the TV screen and the wall.

12
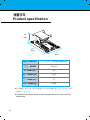
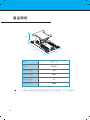
제품규격
제품명 /
PRODUCT
모델명 /
MODEL
폭/
Width
(mm)
높이 /
Height
(mm)
깊이 /
Depth
(mm)
무게 /
Weight
(kg)
벽걸이형 브라켓 /
Wall Mounting Bracket
RW120
140
216.5
75
0.908
● 본 사용설명서에 표시된 내용 (외관디자인 및 규격)은 제품의 품질향상을 위해 예고없이
변경되는 수도 있습니다.
높이
깊이
폭
Product specification
●
The specifications shown above may be changed without prior notice for quality
improvement.
Height
Depth
Width

RW120
RW120
壁掛支架
安裝及設定指南
P/NO : 3828TUL255E(1101-REV03)
Printed in Korea

2
壁掛支架
配件
LGTV
4 個牆面固定螺栓套筒
4 個固定螺絲
26LE3**/5**:(M4×16)
其他型號:(M4×10)
4 個壁掛專用墊圈連結螺栓
安裝及設定指南
壁掛支架

3
目錄
第一步
4 安全指示
安裝
安裝壁掛支架
6 1. 分離配件
7 2. 將產品組裝到產品專用固定支架
8 3. 在牆面上標示出配件安裝位置之後,安裝固定螺栓。
9 4. 將壁掛支架安裝到牆上
10 5. 將產品組裝到壁掛支架上。
其他
11 調整傾斜角度
11 與牆面預留充足的安裝空間
12 產品規格

4
安全指示
為了避免發生意外危險,請詳閱本手冊,並按照指示操作。
請勿將本產品安裝在支撐力不
足的位置。
- 這可能導致產品掉落,並可能因此
導致人員受傷。
請按照手冊中所載指示安裝
本產品。
- 否則可能導致嚴重受傷或產品受
損。
請勿在本產品上懸掛其他物
品,或是使其遭受撞擊。
- 這可能導致產品掉落,並可能因此
導致人員受傷。
請勿獨自安裝產品。
請尋求他人協助 。
- 這可能導致產品掉落,並可能因此
導致人員受傷。
警
告
注
意
安全指示提供兩種資訊,其意義分別如下所述。
警告
注意
違反此類指示可能導致輕微受傷,或是造成產品受損。
違反此類指示可能導致嚴重受傷,甚至死亡。
請慎防在特定情況下可能發生的危險。

5
第一步 安裝 其他
安裝前,請檢查牆壁材質是否
符合規格,並且務必使用產品
隨附的固定螺栓進行安裝。
- 否則可能會有安全疑慮。
在安裝完成的產品下方,請勿
放置熱源 (暖氣或電熱器) 或增
濕器。
- 這可能導致火災或觸電。
請勿徒手安裝本產品。
- 可能導致受傷。
安裝本產品前,務必先拔掉
插頭。
- 否則可能導致火災或觸電。
請勿將本產品安裝在靠近灑水
器、感應器、高壓線路、任何
電源,或是可能遭到撞擊或震
動的位置。
鑽孔時,請使用製造商所指定
的鑽孔機和鑽頭。
鑽孔深度應符合規格要求。
- 否則可能會有安全疑慮。
警
告

6
分離配件
安裝壁掛支架
從壁掛支架卸下螺栓。
從壁掛支架卸下產品專用固定支架。
壁掛支架
支架固定螺絲
產品專用固定支架

7
第一步 安裝 其他
將產品組裝到產品專用固定支架
1
2
1
2
使用隨附的固定螺絲,將產品專用固定支架安裝到產品上。
安裝之前,請先關閉產品電源,並拔掉所有連接的纜線。
小心地將產品螢幕朝下,放在鋪有保護墊的平面上,以免產品和螢幕受損。
將產品專用固定支架放在產品上,如上圖所示。
在產品背面的螺絲孔裝上 4 個固定螺絲 (M4x25) 並穩固鎖緊。
確認支架掛勾位於產品頂部。

8
在牆面上標示出配件安裝位置之後,安裝固定螺栓
2
3
鑽頭
牆壁
固定螺栓
2
3
1
1
在牆面上標示出固定螺栓孔的位置,如上圖所示。
在螺栓孔位置鑽孔,如上圖所示。使用適合牆面材質的 8 公釐鑽頭進行鑽
孔,每個孔深度為 80 公釐至 100 公釐。
清理每個鑽好的螺絲孔,然後將隨附的固定螺栓插入鑽孔中。
要用來安裝壁掛支架的牆面,其堅硬度應足以支撐產品和喇叭的重量,通常牆
壁材質應為水泥、天然石材 (強/弱岩)、磚頭和空心磚。
石膏板材質牆面的硬度通常不夠堅硬,除非是將螺栓固定在標準建築類型的螺
椿上,才足以支撐顯示器和喇叭的重量。
壁掛支架
固定螺栓插入位置
ページが読み込まれています...
ページが読み込まれています...
ページが読み込まれています...
ページが読み込まれています...
-
 1
1
-
 2
2
-
 3
3
-
 4
4
-
 5
5
-
 6
6
-
 7
7
-
 8
8
-
 9
9
-
 10
10
-
 11
11
-
 12
12
-
 13
13
-
 14
14
-
 15
15
-
 16
16
-
 17
17
-
 18
18
-
 19
19
-
 20
20
-
 21
21
-
 22
22
-
 23
23
-
 24
24


