
1
2
3
4
5
6
7
BEW200
English 4
10
繁體中文

2
3
2
11
3
4
48
2
9
A
8
9
3
10
C
D E
4
B
8
18
C1
2

2
3
2
11
3
4
48
2
9
A
8
9
3
10
C
D E
4
B
8
18
C1
2
3
3
4
1
F
1213
14
G
16
15
6
17
I J
15
5
16
H
8
18
F1

4
ENGLISH
4
ENGLISH
(Original instructions)
Intended use
Your BLACK+DECKER BEW200 sander has been designed
for sanding and polishing wood, metal, plastics and painted
surfaces. This tool is intended for consumer use only.
Safety instructions
General power tool safety warnings
@
Warning! Read all safety warnings, instructions,
power tool. Failure to follow the warnings and
instructions listed below may result in electric
Save all warnings and instructions for future reference.
The term "power tool" in all of the warnings listed below refers
to your mains operated (corded) power tool or battery oper-
ated (cordless) power tool.
1. Work area safety
a. Keep work area clean and well lit. Cluttered or dark
areas invite accidents.
b. Do not operate power tools in explosive atmospheres,
or dust. Power tools create sparks which may ignite the
dust or fumes.
c. Keep children and bystanders away while operating a
power tool. Distractions can cause you to lose control.
2. Electrical safety
a. Power tool plugs must match the outlet. Never modify
the plug in any way. Do not use any adapter plugs
with earthed (grounded) power tools.
and matching outlets will reduce risk of electric shock.
M
N
L
7 7a
K
Intended use
Your BLACK+DECKER BEW200 sander has been designed
for sanding and polishing wood, metal, plastics and painted
surfaces. This tool is intended for consumer use only.
Safety instructions
General power tool safety warnings
@
Warning! Read all safety warnings, instructions,
illustrations and specications provided with this
power tool. Failure to follow the warnings and
instructions listed below may result in electric
shock, re and/or serious injury.
Save all warnings and instructions for future reference.
The term "power tool" in all of the warnings listed below
refers to your mains operated (corded) power tool or battery
operated (cordless) power tool.
1. Work area safety
a. Keep work area clean and well lit. Cluttered or dark
areas invite accidents.
b. Do not operate power tools in explosive atmospheres,
such as in the presence of ammable liquids, gases
or dust. Power tools create sparks which may ignite the
dust or fumes.
c. Keep children and bystanders away while operating a
power tool. Distractions can cause you to lose control.
2. Electrical safety
a. Power tool plugs must match the outlet. Never modify
the plug in any way. Do not use any adapter plugs
with earthed (grounded) power tools. Unmodied plugs
and matching outlets will reduce risk of electric shock.

5
ENGLISH
b. Avoid body contact with earthed or grounded
surfaces such as pipes, radiators, ranges and
refrigerators. There is an increased risk of electric shock
if your body is earthed or grounded.
c. Do not expose power tools to rain or wet conditions.
Water entering a power tool will increase the risk of
electric shock.
d. Do not abuse the cord. Never use the cord for
carrying, pulling or unplugging the power tool. Keep
cord away from heat, oil, sharp edges or moving
parts. Damaged or entangled cords increase the risk of
electric shock.
e. When operating a power tool outdoors, use an
extension cord suitable for outdoor use. Use of a cord
suitable for outdoor use reduces the risk of electric shock.
f. If operating a power tool in a damp location is
unavoidable, use a residual current device (RCD)
protected supply. Use of an RCD reduces the risk of
electric shock.
3. Personal safety
a. Stay alert, watch what you are doing and use common
sense when operating a power tool. Do not use a
power tool while you are tired or under the inuence
of drugs, alcohol or medication. A moment of inattention
while operating power tools may result in serious personal
injury.
b. Use personal protective equipment. Always wear eye
protection. Protective equipment such as dust mask,
non-skid safety shoes, hard hat, or hearing protection
used for appropriate conditions will reduce personal
injuries.
c. Prevent unintentional starting. Ensure the switch is in
the off-position before connecting to power source
and/or battery pack, picking up or carrying the tool.
Carrying power tools with your nger on the switch or
energising power tools that have the switch on invites
accidents.
d. Remove any adjusting key or wrench before turning
the power tool on. A wrench or a key left attached to a
rotating part of the power tool may result in personal injury.
e. Do not overreach. Keep proper footing and balance at
all times. This enables better control of the power tool in
unexpected situations.
f. Dress properly. Do not wear loose clothing or
jewellery. Keep your hair, clothing and gloves away
from moving parts. Loose clothes, jewellery or long hair
can be caught in moving parts.
g. If devices are provided for the connection of dust
extraction and collection facilities, ensure these are
connected and properly used. Use of dust collection can
reduce dust-related hazards.
h. Do not let familiarity gained from frequent use of tools
allow you to become complacent and ignore tool
safety principles. A careless action can cause severe
injury within a fraction of a second.
4. Power tool use and care
a. Do not force the power tool. Use the correct power
tool for your application.
The correct power tool will do the job better and safer at
the rate for which it was designed.
b. Do not use the power tool if the switch does not turn it
on and off. Any power tool that cannot be controlled with
the switch is dangerous and must be repaired.
c. Disconnect the plug from the power source and/or the
battery pack from the power tool before making any
adjustments, changing accessories, or storing power
tools. Such preventive safety measures reduce the risk of
starting the power tool accidentally.
d. Store idle power tools out of the reach of children and
do not allow persons unfamiliar with the power tool or
these instructions to operate the power tool.
Power tools are dangerous in the hands of untrained
users.
e. Maintain power tools and accessories. Check for
misalignment or binding of moving parts, breakage of
parts and any other condition that may affect the
power tools operation. If damaged, have the power
tool repaired before use. Many accidents are caused by
poorly maintained power tools.
f. Keep cutting tools sharp and clean. Properly
maintained cutting tools with sharp cutting edges are less
likely to bind and are easier to control.
g. Use the power tool, accessories and tool bits etc. in
accordance with these instructions, taking into
account the working conditions and the work to be
performed. Use of the power tool for operations different
from those intended could result in a hazardous situation.
h. Keep handles and grasping surfaces dry, clean and
free from oil and grease.
Slippery handles and grasing surfaces do not allow for
safe handling and control of the tool in unexpected
situations.
5. Service
a. Have your power tool serviced by a qualied repair
person using only identical replacement parts.
This will ensure that the safety of the power tool is
maintained.
Additional power tool safety warnings
@
Warning! Additional safety warnings for
sanders

6
ENGLISH
u Hold the power tool by insulated gripping surfaces,
because the sanding surface may contact its own
cord. Cutting a "live" wire may make exposed metal parts
of the power tool "live" and could give the operator an
electric shock.
u Use clamps or another practical way to secure and
support the workpiece to a stable platform. Holding the
work by hand or against your body leaves it unstable and
may lead to loss of control.
u Warning! Contact with or inhalation of dusts arising
from sanding applications may endanger the health
of the operator and possible bystanders. Wear a dust
mask specically designed for protection against dust and
fumes and ensure that persons within or entering the work
area are also protected.
u Thoroughly remove all dust after sanding.
u Take special care when sanding paint which is
possibly lead based or when sanding some woods
and metal which may produce toxic dust:
u Do not let children or pregnant women enter the
work area.
u Do not eat, drink or smoke in the work area.
u Dispose of dust particles and any other debris
safely.
u The intended use is described in this instruction
manual.
The use of any accessory or attachment or performance
of any operation with this tool other than those
recommended in this instruction manual may present a
risk of personal injury and/or damage to property.
Safety of others
u This appliance is not intended for use by persons
(including children) with reduced physical, sensory or
mental capabilities, or lack of experience and knowledge,
unless they have been given supervision or instruction
concerning use of the appliance by a person responsible
for their safety.
u Children should be supervised to ensure that they do not
play with the appliance.
Residual risks.
Additional residual risks may arise when using the tool which
may not be included in the enclosed safety warnings. These
risks can arise from misuse, prolonged use etc.
Even with the application of the relevant safety regulations
and the implementation of safety devices, certain residual
risks can not be avoided. These include:
u Injuries caused by touching any rotating/moving parts.
u Injuries caused when changing any parts, blades or
accessories.
u Injuries caused by prolonged use of a tool. When using
any tool for prolonged periods ensure you take regular
breaks.
u Impairment of hearing.
u Health hazards caused by breathing dust developed when
using your tool (example:- working with wood, especially
oak, beech and MDF.)
Labels on tool
The following symbols are shown on the tool, along with the
date code:
:
Warning! To reduce the risk of injury, the user
must read the instruction manual.
Electrical safety
#
This tool is double insulated; therefore no
earth wire is required. Always check that the
power supply corresponds to the voltage on
the rating plate.
u If the supply cord is damaged, it must be replaced by the
manufacturer or an authorised BLACK+DECKER Service
Centre in order to avoid a hazard.
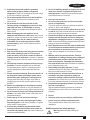
Features
This tool includes some or all of the following features.
1. On/off switch
2. Motor base
3. Random orbital sanding base
4. Large detail sanding base
5. Sanding base tip
6. Detail nger attachment
7. Dust canister
Assembly
Warning! Before assembly, make sure that the tool is
switched off and unplugged.
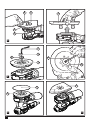
Removing sanding bases (g. A, B)
u To remove the sanding base, undo the locking screw (9)
from the sanding base using the alien key (8) provided as
shown in gure A.
u Pull the sanding base from the tool as shown in gure B.
Attaching the random orbit sanding base (g. C,
C1)
u Hold the tool and the sanding base (3) facing upwards as
shown in gure C.
u Press down on the sanding base until you hear it click into
place.

7
ENGLISH
u Replace the locking screw (9) and secure with the alien
key (8) provided as shown in gure C.
u Use a screwdriver (18) (not supplied) to lock the sanding
base in position while you tighten the locking screw (9) as
shown in gure C1.
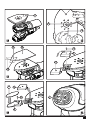
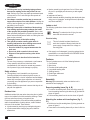
Fitting sanding sheets (g. D)
u Hold the tool with the sanding base (3) facing upwards.
u Place the sanding sheet (11) onto the sanding base (3)
making sure that the holes in the sheet (where applicable)
line up with the holes in the base as shown in gure D.
Large detail sanding base
With this sanding base, you can use the tool as a detail
sander or a ush sander.
Attaching the large detail sanding base (g. E, F,
F1)
For detail sanding, the pointed end should face forward (g.
E).
For sanding large areas, the pointed end should face to the
rear (g. F)
u Attach the sanding base as described above under
"Attaching the random orbit sanding base".
u Press down on the sanding base until you hear it click into
place.
u Replace the locking screw (9) and secure with the alien
key (8) provided.
u Use a screwdriver (18) (not supplied) to lock the sanding
base in position while you tighten the locking screw (9) as
shown in gure F1.
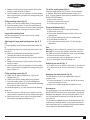
Fitting sanding sheets (g. G)
u Detach the two diamond-shaped tips (14) from the
sanding sheet (12).
u Hold the tool with the sanding base facing upwards.
u Place the sanding sheet (12) onto the sanding base,
making sure that the holes in the sheet (where applicable)
line up with the holes in the base.
The diamond-shaped tip (13) can be reversed and replaced
when worn.
u When the front part of the tip is worn, detach it from the
sheet, reverse it and press it onto the sanding base again.
u When the whole tip is worn, remove it from the sanding
base and t a new diamond shaped tip (13).
Tip of the sanding base (g. H)
When the sanding base tip (5) is worn, it can be reversed
or replaced. When the diamond shaped tip holder (15) is
worn, it can be replaced. Spare parts are available from your
BLACK+DECKER dealer.
u Remove the screw (16).
u Reverse or replace the worn part.
u Fit and tighten the screw (16).
Finger attachment (g. I)
The nger attachment is used for ne detail sanding.
u Remove the screw (16).
u Remove the diamond-shaped tip holder (15) from the
sanding base.
u Fit the nger attachment (6) onto the sanding base.
u Fit and tighten the screw (16).
u Fit the appropriate sanding sheet (17) onto the nger
attachment.
Use
Warning! Let the tool work at its own pace. Do not overload.
Warning! Do not cover the ventilation slots when using the
tool. Make sure that the sanding base is at on the workpiece.
u Store the tool with a base in place.
u Keep hands away from the spindle area on the tool.
u Do not rest ngers on the base during use.
Switching on and off (g. J)
u To switch the tool on, set the on/off switch (1) to position I.
u To switch the tool off, set the on/off switch (1) to position
O.
Emptying the dust canister (g. K)
The dust canister (7) should be emptied after every ten
minutes of use.
u Pull the dust canister (7) to the rear and off the tool away
from the connection port (7a).
u Empty into a suitable receptacle and replace on tool.
Accessories
The performance of your tool depends on the accessory used.
BLACK+DECKER accessories are engineered to high quality
standards and designed to enhance the performance of your
tool. By using these accessories you will get the very best
from your tool.
The accessories supplied with your sander depend upon the
model that you have purchased. If you require an accessory
that is listed below but is not supplied withyour sander please
visitour website at www.blackanddecker.eu

8
ENGLISH
Item Description Purpose
Largedetail sanding
base (4).
For medium to large areas.
Thelarge detail base can be
used to sand into corners
and to the edge of the
workpiece.
Random orbit sanding
base (3).
For largeareas. The
randomorbit base can be
used for curved surfaces
and when you need a high-
quality nish.
Detail nger (6). For small hard-to-reach
areas. The detail nger can
be used for light sanding
and for sanding into corners.
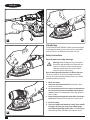
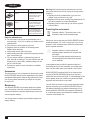
Hints for optimum use
u For user comfort, the tool can be operated with one or
two hands (g. L, M, N). Do not place your hands over the
ventilationslots.
u Do not exert too much pressure on the tool.
u Regularyl check the condition of the sanding sheet.
Replace when necessary.
u Always sand with the grain of the wood.
u When sanding new layers of paint before applying another
layer, use extra ne grit.
u On very uneven surfaces, or whenremoving layers of
paint, start with a coarse grit. On other surfaces, start with
a medium grit. In both cases, gradually change to a ne
grit for a smooth nish.
u Consult your retailer for more information on available
accessories.
Accessories
The performance of your tool depends on the accessory used.
BLACK+DECKER accessories are engineered to high quality
standards and designed to enhance the performance of your
tool. By using these accessories you will get the very best
from your tool.
Maintenance
Your BLACK+DECKER tool has been designed to operate
over a long period of time with a minimum of maintenance.
Continuous satisfactory operation depends upon proper tool
care and regular cleaning.
Your charger does not require any maintenance apart from
regular cleaning.
Warning! Before performing any maintenance on the tool,
remove the battery from the tool. Unplug the charger before
cleaning it.
u Regularyl clean the ventilationslots in your tool and
charger using a soft brush or dry cloth.
u Regularyl clean the motor housing using a damp cloth. Do
not use any abrasive or solvent-basedcleaner.
u Regularly open the chuck and tap it to remove any dust
from the interior.
Protecting the environment
Z
Separate collection. This product must not be
disposed of with normal household waste.
Should you find one day that your BLACK+DECKER product
needs replacement, or if it is of no further use to you, do not
dispose of it with household waste. Make this product avail·
able for separate collection.
z
Separate collection of used products and
packaging allows materials to be recycled and
used again.
Re-use of recycled materials helps prevent en·
vironmentalpollution and reduces the demand
for raw materials.
Local regulations may provide for separate collection of
electrical products from the household, at municipal waste
sites or by the retailer when you purchase a new product.
BLACK+DECKER providesa facility for the collection and
recycling of BLACK+DECKER products once they have
reached the end of their working life. To take advantage of this
service please return your product to any authorised repair
agent who will collect them on our behalf.
You can check the location of your nearest authorised repair
agent by contacting your local BLACK+DECKER ofce at
the address indicated in this manual. Alternatively, a list of
authorised BLACK+DECKER repair agents and full details
of our after-sales service and contacts are available on the
Internet at: www.2helpU.com

9
ENGLISH
Batteries
Z
There are no user servicable parts inside.
u At the end of your products life return the whole unit
to your service agent or to a local recycling station to
have the battery recycled. Do not throw the unit out with
household waste.
Service Information
BLACK+DECKER offers a full network of company-owned
and authorized service locations throughtout Asia. All
BLACK+DECKER Service Centers are staffed withtrained
personnel to provide customers with efcient and reliable
product service.
Whether you need technical advice, repair, or genuine factory
replacement parts, contact the BLACK+DECKER location
nearest to you.
NOTE
u BLACK+DECKER's policy is one of continuous
improvement to our products and, as such, we reserve the
right to change product specications without prior notice.
u Standard equipment and accessories may vary by country.
u Product specications may differ by country.
u Complete product range may not be available in all
countries. Contact your local BLACK+DECKER dealers for
range availabiliyt.
Technical data
BEW200
Input Voltage V
AC
110V, 60Hz
Power input W
200
No-load speed min
-1
12000
Weight kg 1.40 (with detali base),
1.34 (with ROS base)

10
繁體中文
5
繁體中文
請注意!各地區上市產品
/
配件不盡相同,請依台灣繁體中文說
明書的內容為主。
Warning!
Attachments
and
accessories
are
not
the
same
in
each
region
,
please
only
refer
to
Taiwan
Traditional
Chinese
description
in
this
manual.
設計用途
您 的
BLACK+DECKER
BEW200
砂磨機設計用於對木材、
金屬、塑料和涂漆表面進行砂磨和拋光。本工具僅供一般消費
者
DIY
家 庭 使 用,營 業 使 用 者 不 適 用百 得 一年 保 修 條 款。
安全說明
電 動 工 具 一 般 安 全 警 告
@
警 告! 請閱讀本電動工具隨附的所有安全警告、
指示、圖示和規格。不遵循下列的這些警告和指示
可 能 會 導 致 觸 電、火 災 及
/
或 嚴 重 傷 害 。
請 保 存 所 有 警 告 與 指 示 以 備 將 來 查 閱。 以 下 列 示 所 有 警 告 中
的術語「電動工具」是指電源驅動(插電)電動工具或電池驅動
( 充 電 )電 動 工 具 。
1.
工作場地安全
a.
保 持工作 場 地 清 潔 明 亮。 混 亂 或 黑 暗 的 場 地 會 引 發 事 故。
b.
請勿在易爆環境,如有易燃液體、氣體或粉塵的環境中操作
電 動 工 具。 電 動 工 具 產 生 的 火 花 會 點 燃 粉 塵 或 氣 體。
c.
請等待兒童和旁觀者離開之後才操縱電動工具。 分 心 會 導
致 您 疏 於 控 制 。
2.
電氣安全
a.
電動工具插頭必須與插座相符。切勿以任何方式改裝插
頭。需 接 地 的 電 動 工 具 不能 使 用任 何 配 接 器 插 頭。 未 經 改
裝的插頭和相符的插座可以減少觸電危險。
b.
避免人體接觸接地表面,如管道、散熱片、爐灶和冰箱。
若 您 的 身 體 接 地,可 增 加 觸 電 危 險。
c.
請勿將電動工具暴露在雨中或潮濕環境中。 水 進 入 電 動 工
具 會 增 加 觸 電 危 險。
d.
切勿濫用電線。請勿使用電線來搬運、拉動電動工具或拔
出插頭。讓電線遠離熱、油、銳邊和活動部件。 受 損 或 纏 繞
的電線可增加觸電危險。
e.
若要在戶外使用電動工具,請使用適合戶外使用的延長電
纜。 使用適合戶外使用的電線可減少觸電危險。
f.
若必須在潮濕場合使用電動工具,請使用漏電保護器
(
RCD
)。 使 用
RCD
可降低觸電危險。
3.
人身安全
a.
保持警覺;在操作電動工具時,請留意所執行的操作並按
照一般的程式執行。請勿在疲倦,或受到藥物、酒精或治療
的影響下操作電動工具。 操作電動工具期間注意力分散會
導致嚴重人身傷害。
b.
使用個人防護裝置。始終佩戴護目裝備。 防 護 裝 置,例 如 在
適當條件下可使用的防塵面具、防滑安全鞋、安全帽或聽力
保護等裝置可減少人身傷害。
c.
避 免意 外啟 動。連 接電 源 及
/
或電池組、撿取或搬運電動工
具之前,請確定開關處於關閉位置。 搬運電動工具時若將
手指放在開關上,或是在接通開關電源時插入插頭都會引
發 危 險。
d.
接通電動工具之前,請卸下所有的調整鑰匙或扳手。 遺 留
在電動工具旋轉部件上的扳手或鑰匙會導致人身傷害。
e.
不要過度伸張雙手。時刻注意腳下和身體的平衡。 如 此 即
可在發生意外的情況下更好地控制電動工具。
f.
適當穿著。請勿穿寬鬆衣服或佩戴飾品。讓您的頭髮、衣服
和手套遠離活動部件。 寬 鬆 衣 服、佩 飾 和 長 髮 可 能 會 捲 入
活 動 部 件。
g.
若配備用於連接排屑裝置、集塵設備的裝置,請確定正確
連 接 和 使 用 這 些 裝 置 。 使用集塵設備可減少與粉塵有關的
危 險。
h.
請勿因頻繁使用而對工具特別熟悉,讓你變得自滿而忽略
工 具 的安 全 原 則。 粗心操作可以在片刻間造成嚴重傷害。
4.
電動工具的使用與注意事項
a.
請勿超負荷使用電動工具。根據您的用途使用適當的電動
工 具。
若使用的電動工具正確無誤,該工具能以設計額定值更有
效、更 安 全 地 執 行 工 作。
b.
若開關不能開啟或關閉電源,切勿使用該電動工具。 不 能
用開關來控制的電動工具將存在危險,必須進行維修。
c.
在執行任何調整、更換配件或儲存電動工具之前,必須從
電源上拔掉插頭及
/
或 卸下 電 池 組。 這類防護性措施可降低
電動工具意外啟動的風險。
d.
將閒置的電動工具儲存在兒童無法接觸的地方,並且不要
讓不熟悉電動工具或對這些使用指示不瞭解的人員操作電
動 工 具。
電動工具在未經培訓的使用者手中會發生危險。
e.
維護工具與配件。檢查活動部件是否對準或卡住、是否存
在任何破損情況,或任何能影響電動工具運行的其他情
況。若 有 損 毀,必 須 在 使 用 之 前 修 理電 動 工 具。 許 多 事 故 都
是由於電動工具欠缺維護所導致。
f.
保 持 刀 具 鋒 利 和 清 潔。 妥善維護、切削鋒利的切割工具不會
輕易卡住並可更輕鬆控制。
g.
遵循使用指示、特定類型電動工具的專用方式,以及工作
條件和所要執行的工作來使用電動工具、配件和工具起子
頭 等。 不 按 照 設 計 目 使 用 電 動 工 具 將 會 導 致 危 險。
h.
手柄和抓握表面都應保持乾燥、清潔及遠離油脂。
溜滑的手柄和抓握表面不便於在意外情況下安全處理與控
制 工 具。
5
.
維修
a.
電動工具之修理,僅可由認證的技術人員執行。請勿交由
非百得認證服務中心的技術人員進行修理、維護、調整。
若產品經由非百得認證的維修工程師拆解、組裝、調整,
恕無法適用百得一年家用保修條款。為充份發揮其功能,
修理、維護、調整請務必使用原廠零件。百得認證服務中心
擁 有保 修 條 款 解 釋 權。

1
1
繁體中文
6
繁體中文
電動工具之附加安全警告
@
警 告! 砂 磨 機 之 附 加 安 全 警 告
請從絕緣手柄表面握住電動工具,因為砂磨表面可能會接
觸 到它 本 身的 電 線。若切削到「帶電」導線,電動工具金屬
部件表面就會「帶電」,從而導致操作人員觸電。
使用夾具或採取其他可行的方法,將工件固定、支撐到穩定
的 平台上。手持工件或用身體抵住工件會導致工件不穩定,
可能會 導 致 失 去控 制。
警告!接觸或吸入砂磨應用所產生的粉塵會危及操作人員
及可能出現的旁觀者的健康。請佩戴專為防範粉塵及煙霧
而設計的防塵面具,並確保工作場地內或進入工作場地的人
亦受到保護。
在執行砂磨操作後徹底清除所有粉塵。
砂磨鉛底的漆面或某些木材以及會產生有毒粉塵的金屬時
要 特 別 小 心:
請勿讓兒童或孕婦進入工作區。
請勿在工作區飲食或吸菸。
請以安全方式清理粉塵顆粒和任何其他碎片。
本說明手冊中描述了設計用途。
使用非本說明手冊所建議的任何其他配件或附件,或使用
本工具執行本說明手冊中所建議之外的任何其他操作,
可能會導致人身傷害及
/
或 財産 損 失 的風 險。
.
他 人 的 安 全
體力、感覺或智力不足,或者缺乏經驗及知識的人員(包括
小孩)不適合使用本器具,除非負責他們安全的人員已經為
他們提供關於使用此器具的監督或指示。
應 該 對 兒 童 予 以 監 督,以 確 保 他 們 不 會 玩 耍 本 工 具。
剩餘風險。
使用工具時可能會出現未包括於隨附安全警告中的其他剩餘風
險。濫 用、長 時 間 使 用等也 會 導 致 這 些風 險。
即使應用有關的安全規定並採用安全裝置,仍然還有一些無法
避免的剩餘風險。這些風險包括:
接 觸 旋 轉
/
活 動 部 件 引 起 的 傷 害 。
更 換 任 何 部 件、刀 片 或 配 件 引 起 的 傷 害 。
長時間使用工具引起的傷害。若長時間使用工具,請確保定
時 休 息。
聽 力 受 損。
吸入使用工具時產生的粉塵引起的健康危害(譬如:在木材
上使用時,尤其是櫟木、山毛櫸和中密度纖維板 (
MDF
) )。
工 具 上 的 標 籤
本工具上具有以下圖示與日期代碼:
:
警 告! 為 了 降 低 受 傷 的 風 險,使 用 者 必 須 仔 細
閱 讀 使 用 手 冊 。
製造年份及號碼(範例)
2016 23
BM
西元年份 週數 號碼
電 氣 安 全
#
本工具採用雙重絕緣,因此無需接地線。請務
必檢查電源電壓是否與銘牌一致。
若電源線損壞,必須送往製造廠商或授權的
BLACK+DECKER
服務中心更換以避免發生危險。
功 能 部 件
本工具包括以下部分或全部功能部件。
1. 電源開關
2. 電機底座
3. 偏心砂磨底座
4. 三角底盤
5. 三角底盤尖端
6. 指型底板
7. 集塵袋
組 裝
警 告!裝配之前,請確定已關閉工具電源並拔出插頭。
取 出 三 角 底 盤( 圖 A、B)
若要取出三角底盤,請使用所提供的內六角起子 (
8
) 擰鬆磨
砂底座上的鎖定螺絲 (
9
),如 圖
A
中所示。
將 三 角底 盤 從 工 具 拉 出,如 圖
B
中所示。
安 裝 偏 心 砂 磨 底 座( 圖 C、C1)
握住工具,讓砂磨底座 (
3
) 朝上,如圖
C
中所示。
向 下 按 壓 砂 磨 底 座,直 到 其卡 入 定 位 為 止。
放回鎖定螺絲 (
9
),並使用所提供的內六角起子 (
8
) 擰緊,
如圖
C
中所示。
擰緊鎖定螺絲 (
9
) 時,請使用起子 (
18
)( 未 提 供 )將 砂 磨 底
座鎖定到位,如圖
C1
中所示。
安 裝 砂 紙( 圖 D)
握住工具,讓砂磨底座 (
3
) 朝上。
將砂紙 (
11
) 放到砂磨底座 (
3
) 上,確保砂紙上的各孔(如果
有 )對 準 底 座 上 的 孔 ,如 圖
D
中所示。
三角底盤
藉由這個三角底盤,可以將工具用作超細砂磨機或偏心砂
磨機。
安 裝 三 角 底 盤( 圖 E、F、F1)
針對超細砂磨,指向端應該朝前(圖
E
)。
針對砂磨大面積區域,指向端應該朝後(圖
F
)。
按照上面的「安裝偏心砂磨底座」部分所述,安裝三角
底 盤。
向 下 按 壓 三 角 底 盤,直 到 其卡 入 定 位 為 止。
放回鎖定螺絲 (
9
),並使用所提供的內六角起子 (
8
) 擰緊。
擰緊鎖定螺絲 (
9
) 時,請使用起子 (
18
)( 未 提 供 )將 三 角 底
盤鎖定到位,如圖
F1
中所示。

12
繁體中文
7
繁體中文
安 裝 砂 紙( 圖 G)
從砂紙 (
12
) 取下兩個菱形尖端 (
14
)。
握住工具,讓三角底盤朝上。
將砂紙 (
12
) 放到三角底盤上,確保砂紙上的各孔(如果有)
對 準 底 座 上 的 孔。
菱形尖端 (
13
) 可以在發生磨損時反轉及更換。
當尖端的前面部分出現磨損時,則將其取下、反轉並再次將
其按到三角底盤上。
當整個尖端出現磨損時,則將其從三角底盤取下並安裝新
的菱形尖端 (
13
)。
三 角 底 盤 尖 端( 圖 H)
當三角底盤尖端 (
5
) 出現磨損時,可以將其反轉或更換。
當菱形尖端固定器 (
15
) 出現磨損時,可以將其更換。您的
BLACK+DECKER
代 理商 可為 您 提 供備件。
擰下螺絲 (
16
)。
反 轉或 更 換 磨 損 的 部件。
安裝並扭緊螺絲 (
16
)。
指 型 底 板( 圖 I)
指型 底 板 用於 細 微的 超 細砂 磨。
擰下螺絲 (
16
)。
從三角底盤取出菱形尖端固定器 (
15
)。
將指型底板 (
6
) 安裝在三角底盤上。
安裝並扭緊螺絲 (
16
)。
將合適的砂紙 (
17
) 安裝在指型底板上。
使 用
警 告!請讓工具以自身之速度工作。請勿使它過載。
警 告!使用工具時,請勿堵住通風槽。請確保將三角底盤平整
放 置 在 工件上。
將工具存放在固定底座上。
保持雙手遠離工具的軸心區域。
使用期間,切勿將手指放在底座上。
開啟與關閉電源(圖 J)
若要開啟工具,請將電源開關 (
1
) 撥到位置
I
。
若要關閉工具,請將電源開關 (
1
) 撥到位置
O
。
清 空 集 塵 袋( 圖 K)
應該每使用
10
分鐘就清空一次集塵袋 (
7
)。
向後拉集塵袋 (
7
),將其從工具的連接埠 (
7a
) 拉出。
將集塵袋內的垃圾倒入合適的容器並裝回到工具上。
配 件
本工具的效能取決於所使用的配件。
BLACK+DECKER
配件依據高品質標準進行規劃,並設計用
於增強電動工具的效能。透過使用這些配件,工具將提供極佳
效 能。
隨砂磨機提供的配件,依各地區不同,視您購買的型號而定。
項目 說明 用途
三角底盤 (
4
)。
適用於中等到大型區域。三角
底盤可用於砂磨尖角和工件
的 邊 角。
偏心砂磨底座 (
3
)。
適用於大型區域。偏心底座可
用於彎曲的表面,也適用於需
要高 品質 光 潔度 時。
指型底板 (
6
)。
適用於難以觸及的小型區域。
指 型 底 板可 用 於 輕 微 砂 磨,也可
用 於砂 磨尖 角。
最佳使用提示
為了提高使用舒適度,可以單手或雙手使用工具(圖
L
、
M
、
N
)。 請勿將手放在通風槽上。
不要對工具施加過大的壓力。
定期檢查砂紙的使用狀況。必要時進行更換。
一律沿木料的紋理進行砂磨。
請先使用特幼的砂紙砂磨新的油漆層,然後才塗上另一層
油漆。
在非常不平坦的表面上,或者去除油漆時,從最粗的砂紙開
始。在其他表面上,使用粗細適中的砂紙。請在砂磨的過程
中逐漸轉為使用細砂紙,以保持表面的光潔度。
如需進一步瞭解可用配件的相關資訊,請洽詢當地零售商。
配 件
本工具的效能取決於所使用的配件。
BLACK+DECKER
配件
依據高品質標準進行規劃,並設計用於增強電動工具的效能。
透過使用這些配件,工具將提供極佳效能。
維護
您的
BLACK+DECKER
工具採用卓越的設計,能夠長時間使
用,並且只需最少的維護。若要持續獲得滿意的操作效果,需進
行正確的工具維護和定期的清潔。
您的充電器除了定期清潔之外,並不需要執行任何維護操作。
警 告! 對工具執行任何維護之前,請卸下工具內的電池。清潔
之前請拔下充電器的插頭。
請定期使用軟刷或軟布清潔工具和充電器內的通風槽。
定期使用濕布清潔電動機外殼。請勿使用任何研磨性或溶
劑型 清 潔 劑。
請定期打開夾頭並輕敲以去除內部的任何塵埃。
保護環境
Z
分類收集。本產品必須與一般家庭廢物分開
處 置。

1
3
繁體中文
8
繁體中文
若 您 發 現 需 要 更 換
BLACK+DECKER
產品,或該產品對您再
無用處,請勿將其與家庭廢物一併處置。務必將本產品送往分
類 收 集處。
z
分類收集用過的產品和包裝允許材料循環再
生利 用。
重新使用回收的材料有助於防止環境污染,
並 降 低 對 原 材 料 的 需求。
當 地 法 規 可 能 要 求 由 市 政 廢 物 回 收 點,或 由 向 您 出 售 新 產 品 的
經銷商來提供將電子產品與家庭廢物分類收集的服務。
BLACK+DECKER
在其產品使用壽命結束時提供
BLACK+DECKER
產品收集和回收循環利用的便利。若要享
受此項服務,請將產品送回任一授權維修中心,由其代表我們
進 行收 集。
您可以根據本手冊上所提供的地址與當地
BLACK+DECKER
辦事處聯絡,查詢離您最近的授權維修代理商所在位置。亦可
瀏覽網站查詢
BLACK+DECKER
授權維修中心清單和售後服
務及聯絡資料之詳細資訊,網址是:
www.2helpU.com
電池
Z
裝置內不含使用者可檢修的部件。
產品使用壽命結束時,請將整個裝置送回維修代理處或當
地的回收站,以回收電池。請勿將本裝置連同生活垃圾一起
丟棄。
維 修 資 訊
BLACK+DECKER
提供遍佈亞洲的公司隸屬及授權服務地點。
所有的
BLACK+DECKER
服務中心都具有訓練有素的人員,
為客戶提供高效、可靠的產品服務。
不論您需要的是技術建議、維修服務還是原廠正品替換零件,
都可以聯絡距您最近的
BLACK+DECKER
服 務 地 點。
附註
BLACK+DECKER
的政策是持續改善我們的產品,因此,
我們保留隨時變更產品規格的權利,恕不另行通知。
標準裝置和配件可能會根據不同的國家
/
地區而 有所不 同。
產品規格可能會根據不同的國家而有所不同。
並非所有的國家
/
地區都將提供完整的產品系列。如需各產
品 系 列 的 供 應 情 況,請 聯 絡您 當 地 的
BLACK+DECKER
代
理 商。
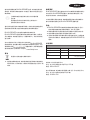
技術資料
BEW200
輸入電壓
伏特
交流
110V
,
60Hz
輸入功率
瓦特
200
空載轉速
轉
/
分
-1
12000
重量
kg 1.40
(含三角底盤),
1.34
(含偏心砂磨底座)
經 銷商:特 力 股 份有 限 公 司
地址:台北市內湖區新湖三路
23
號
1.2.5
樓
電 話:
0800-008-007
進口
/
委製廠商:新加坡商百得電動工具(股)公司台灣分公司
地 址:台 北 市 士 林 區 德 行 西 路
33
號
2
樓
電 話:
02-2834-1741

14
繁體中文
9
繁體中文
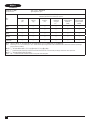
設 備 名 稱:砂 磨 機
Equipment name
型號(型式):
BEW200
Type designation
(
Type
)
單元
Unit
限用物質及其化學符號
Restricted substances and its chemical symbols
鉛
Lead
(
Pb
)
汞
Mercury
(
Hg
)
鎘
Cadmium
(
Cd
)
六價鉻
Hexavalent
chromium
(
Cr
+6
)
多溴聯苯
Polybrominated
biphenyls
(
PBB
)
多溴二苯醚
Polybrominated
diphenyl ethers
(
PBDE
)
機殼 ○ ○ ○ ○ ○ ○
馬達 ○ ○ ○ ○ ○ ○
開關 ○ ○ ○ ○ ○ ○
電源線 ○ ○ ○ ○ ○ ○
內部配線 ○ ○ ○ ○ ○ ○
備考
1.
"
超出
0.1 wt %"
及
"
超出
0.01 wt %"
係指限用物質之百分比含量超出百分比含量基準值。
Note 1:
"Exceeding 0.1 wt %" and "exceeding 0.01 wt %" indicate that the percentage content of the restricted substance exceeds the reference percentage
value of presence condition.
備考
2.
"
○
"
係指該項限用物質之百分比含量未超出百分比含量基準值。
Note 2:
"
○
" indicates that the percentage content of the restricted substance does not exceed the percentage of reference value of presence.
備考
3.
"
-
"
係 指 該 項 限 用物 質 為 排 除 項 目。
Note 3:
The "
-
" indicates that the restricted substance corresponds to the exemption.

8

N8295
61
03/2020
-
 1
1
-
 2
2
-
 3
3
-
 4
4
-
 5
5
-
 6
6
-
 7
7
-
 8
8
-
 9
9
-
 10
10
-
 11
11
-
 12
12
-
 13
13
-
 14
14
-
 15
15
-
 16
16


