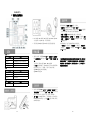
Escene ES410 は、高音質でクリアな通話を可能にする IP 電話機です。PC や LAN に接続して使用でき、ハンズフリー通話や通話履歴の確認、転送、保留などの基本的な電話機能に加え、BLF(Busy Lamp Field)機能や、SIP アカウントを複数登録できるなど、ビジネスユースに適した機能を備えています。また、RJ9 ヘッドセット端子を搭載しており、ヘッドセットを接続してハンズフリー通話をすることも可能です。さらに、USB ポートを搭載しており、DC 5V の電源供給が可能です。
Escene ES410 は、高音質でクリアな通話を可能にする IP 電話機です。PC や LAN に接続して使用でき、ハンズフリー通話や通話履歴の確認、転送、保留などの基本的な電話機能に加え、BLF(Busy Lamp Field)機能や、SIP アカウントを複数登録できるなど、ビジネスユースに適した機能を備えています。また、RJ9 ヘッドセット端子を搭載しており、ヘッドセットを接続してハンズフリー通話をすることも可能です。さらに、USB ポートを搭載しており、DC 5V の電源供給が可能です。


-
 1
1
-
 2
2


Escene ES410 は、高音質でクリアな通話を可能にする IP 電話機です。PC や LAN に接続して使用でき、ハンズフリー通話や通話履歴の確認、転送、保留などの基本的な電話機能に加え、BLF(Busy Lamp Field)機能や、SIP アカウントを複数登録できるなど、ビジネスユースに適した機能を備えています。また、RJ9 ヘッドセット端子を搭載しており、ヘッドセットを接続してハンズフリー通話をすることも可能です。さらに、USB ポートを搭載しており、DC 5V の電源供給が可能です。
他の言語で
- English: Escene ES410
関連論文
-
Escene ES220 Quick operation guide
-
 ESENE ES620-PEGv4 Quick User Manual
-
-
-
Escene ES320 Quick operation guide
-
-
-
-
Escene ES270-PG Quick operation guide
