–2
–1
–2
(c)
(d)
LA-EA2/LA-EA4
1
3
5
4
2
5 9
8
7
6
(a)
(b)
–4
電気製品は、安全のための注意事項を守ら
ないと、人身への危害や火災などの財産へ
の損害を与えることがあります。
この取扱説明書には、事故を防ぐための重要な注意事項と製品
の取り扱いかたを示しています。この取扱説明書をよくお読
みの上、製品を安全にお使いください。お読みになったあとは、
いつでも見られる所に必ず保管してください。
この「取扱説明書」ではレンズの使いかたを説明し
ています。使用上のご注意など、レンズに共通した
ご注意や説明については別冊の「使用前のご注意」
でご覧頂けます。
必ずご使用の前に、本書と合わせてよくお読みのう
えでご使用ください。
この取扱説明書は、複数のレンズを対象としています。
1.4X Teleconverter(SEL14TC)/2X Teleconverter
(SEL20TC)(以下、本機とする)は、対応レンズとソニー
製αカメラシステムEマウントカメラ(以下カメラとす
る)の間に取り付けると、レンズの焦点距離をそれぞれ
1.4倍(SEL14TC)、2.0倍(SEL20TC)にするテレコンバー
ジョンレンズです。
カメラ本体との互換情報については専用サポートサイ
トでご確認ください。
http://www.sony.jp/support/ichigan/
• 本書のイラストはSEL14TCを使用しています。
使用上のご注意
• レンズを絶対に太陽や強い光源に向けたままにしないで
ください。レンズの集光作用により、発煙や火災、ボディ・
レンズ内部の故障の原因になります。やむを得ず太陽光
下等におく場合は、前後レンズキャップを取り付けてく
ださい。
• 逆光撮影時は、太陽を画角から充分にずらしてください。
太陽光がカメラ内部で焦点を結び、発煙や火災の原因と
なることがあります。また、太陽を画角からわずかに外
しても発煙や火災の原因となることがあります。
• レンズを取り付けてカメラを持ち運ぶときは、カメラと
レンズの両方をしっかり持ってください。
• 本機はソニー製αカメラシステムEマウントカメラ専用
のレンズです。Aマウントカメラにはお使いになれませ
ん。
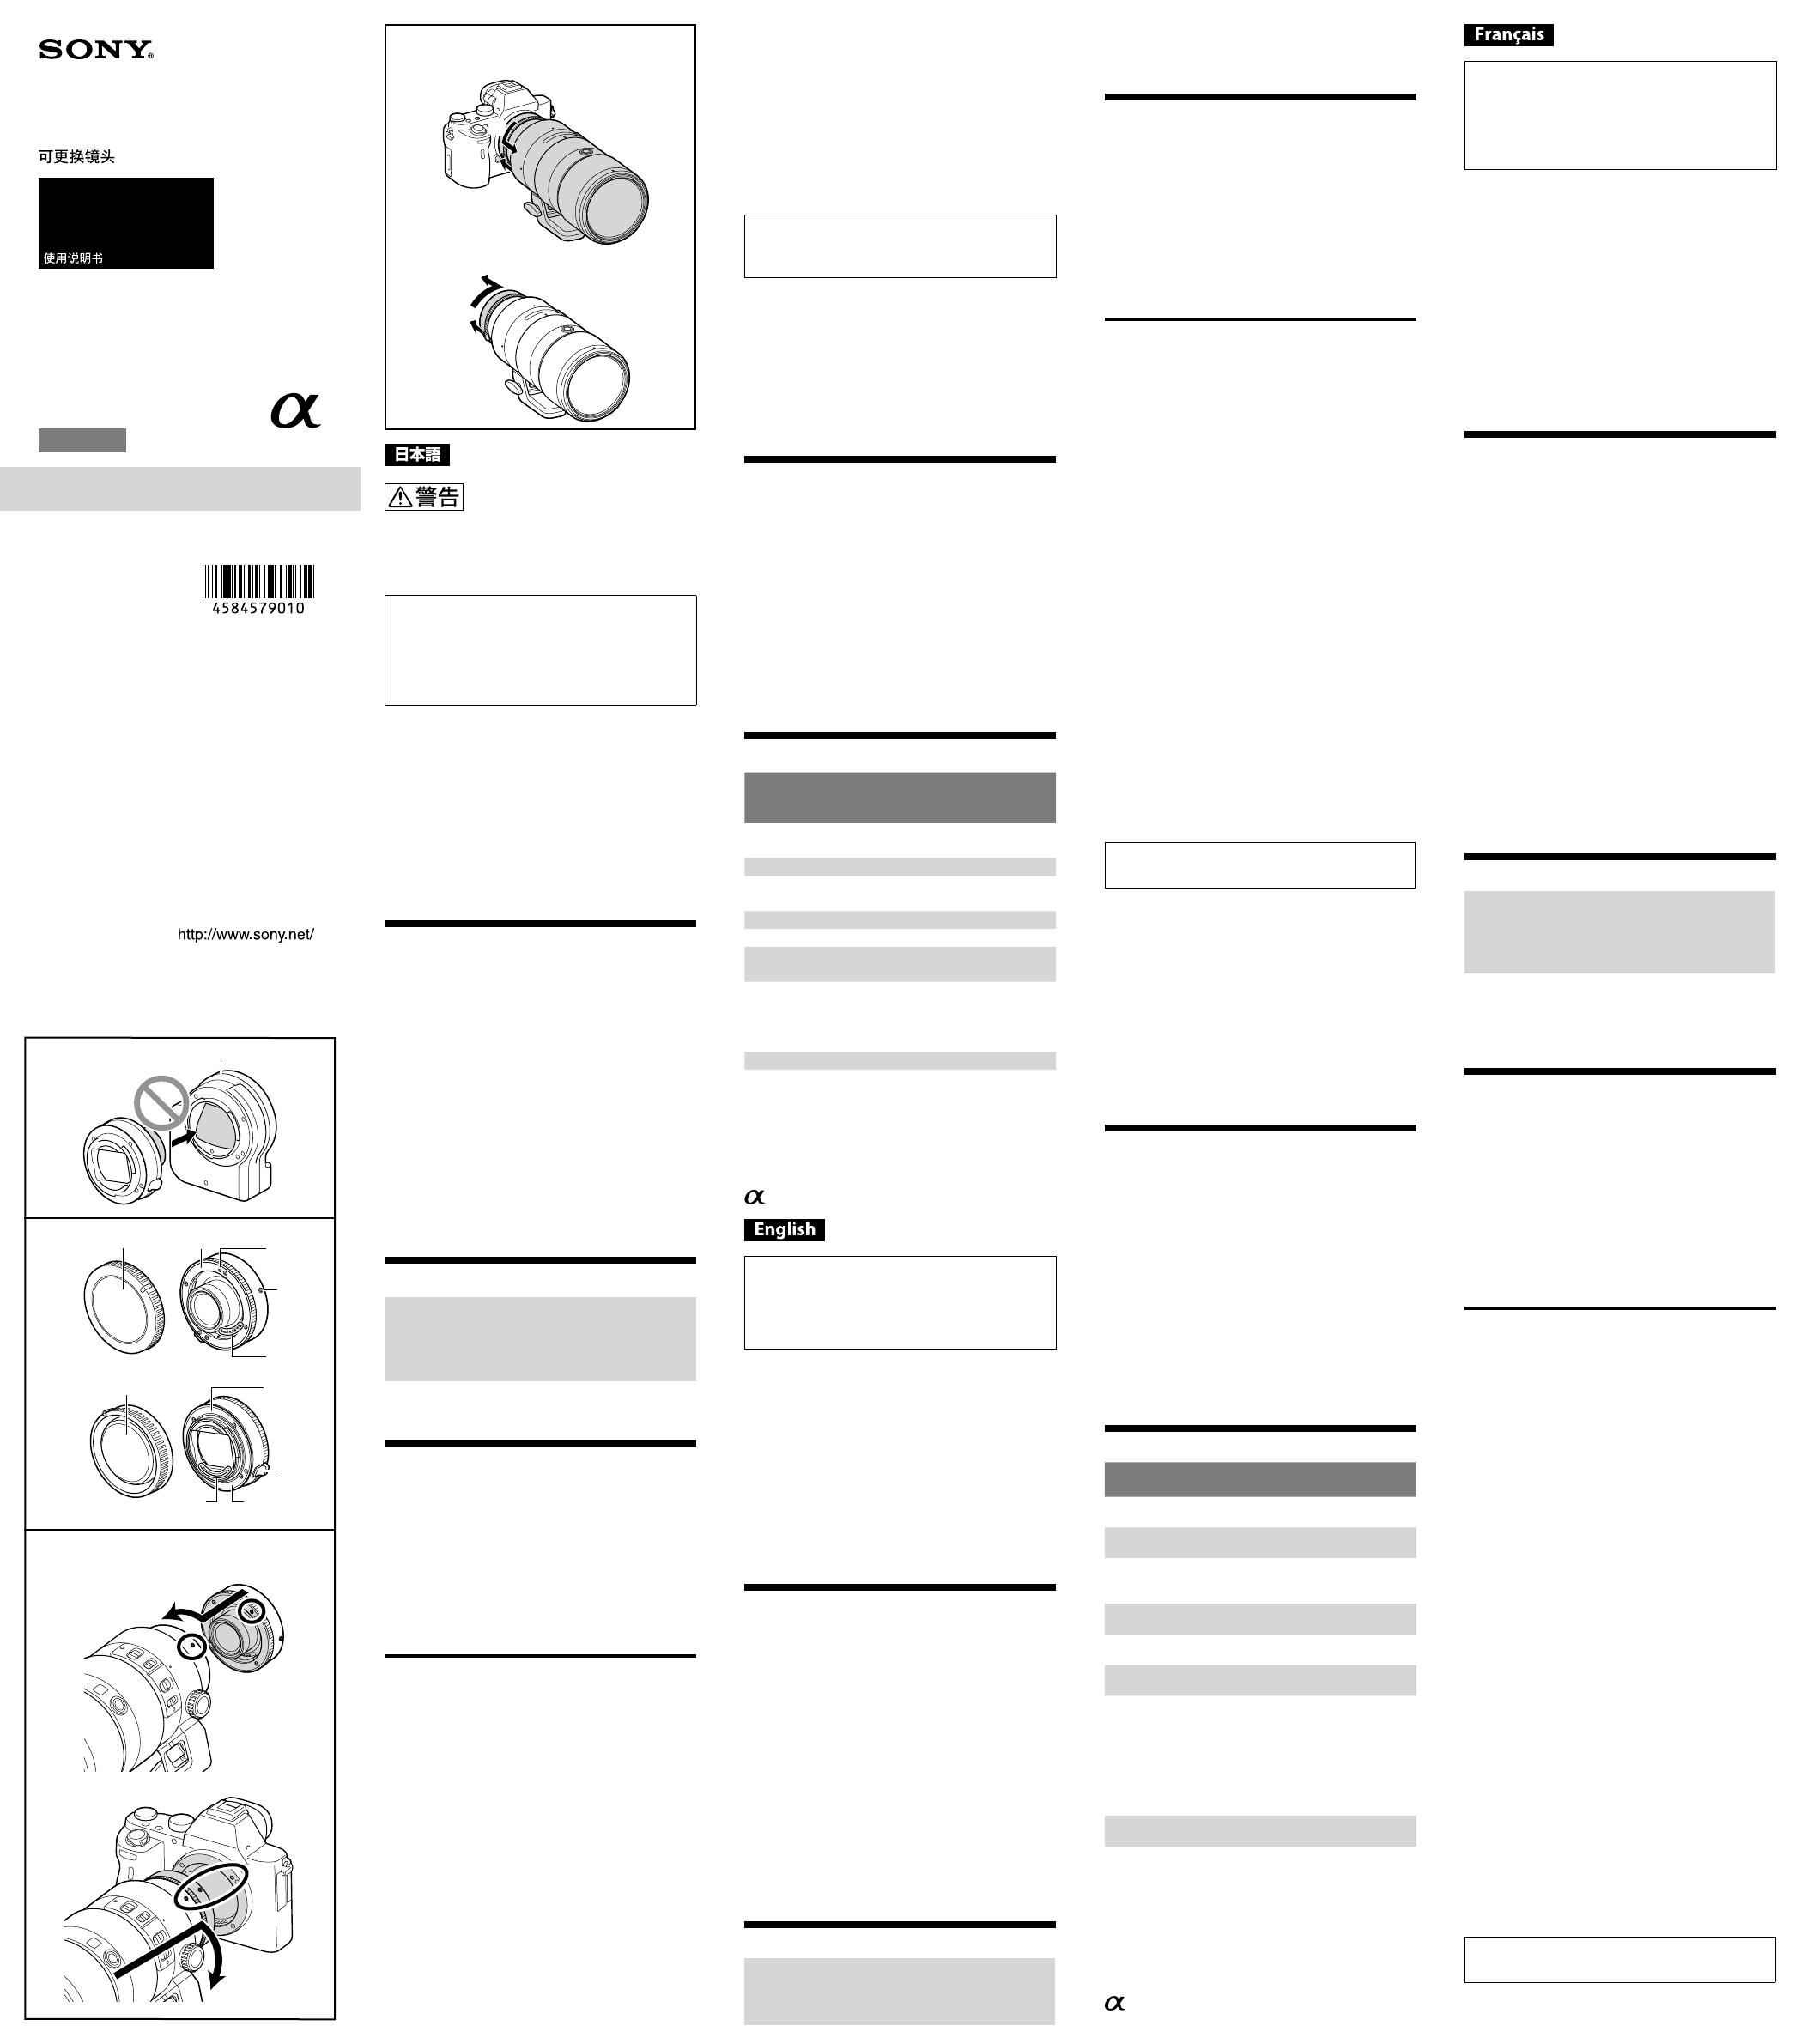
• LA-EA2/LA-EA4などのマウントアダプターを装着する
と、本機、対応レンズおよびマウントアダプターを破損す
る恐れがありますので、絶対に取り付けないでください。
(イラスト参照)
使用可能なレンズと機能
本機は、ソニー製Eマウントテレコンバーター対応レ
ンズ専用です。
その他のレンズを装着すると、本機およびレンズを
破損する恐れがありますので、絶対に取り付けない
でください。
最新のテレコンバーター対応レンズについては専用サ
ポートサイトでご確認ください。
http://www.sony.jp/support/ichigan/
各部のなまえ
1 フロントキャップ(前側キャップ)
2 Eマウント(レンズ装着側)
3 マウント指標
4 マウント標点
5 レンズ信号接点*
6 レンズリヤキャップ(後側キャップ)
7 Eマウント(カメラ装着側)
8 レンズ交換レバー
9 レンズマウントゴムリング
*直接手で触れないでください。
取り付けかた/取りはずしかた
取り付けかた(イラスト
–
参照)
1
本機のフロントキャップ(前側キャップ)と
レンズのリヤキャップをはずす。
本機のフロントキャップとレンズリヤキャップはそ
れぞれ反時計方向に回すとはずれます。
2
本機の白の点(マウント指標)を、レンズの白
の点(マウント標点)に合わせてはめ込み、本
機を軽くレンズに押し当てながら、図の矢印
(a)の方向に「カチッ」とロックがかかるまで
ゆっくり回す。
本機を取り付けるときに、レンズ交換レバーを押さ
ないでください。
本機をレンズに斜めに差し込まないようにしてくだ
さい。
3
本機のレンズリヤキャップ(後側キャップ)
とカメラのボディキャップをはずす。
4
レンズに取り付けた本機の白の点(マウント
標点)を、カメラの白の点(マウント指標)に
合わせてはめ込み、軽くカメラに押し当てな
がら、図の矢印(b)の方向に「カチッ」とロッ
クがかかるまでゆっくり回す。
本機を取り付けたレンズをカメラに取り付けるとき
に、カメラのレンズ取りはずしボタンを押さないで
ください。
本機を取り付けたレンズを斜めに差し込まないよう
にしてください。
本機は必ず1個でご使用ください。複数個の使用は
できません。無理に取り付けると、本機が破損する
恐れがあります。
取りはずしかた(イラスト
–
参照)
1
カメラのレンズ取りはずしボタンを押しな
がら、本機をレンズに取り付けたまま図の矢
印(c)の方向に回してはずす。
2
本機のレンズ交換レバーを矢印の方向に引
きながら、本機を図の矢印(d)の方向に回し
てレンズから取りはずす。
撮影上のご注意
本機を装着すると焦点距離は長くなりますが、装着し
たレンズの実効絞り値は暗くなります。*
カメラの測光により実効絞りは自動的に補正されま
す 。*
被写界深度は、本機を装着していない場合に比べて浅
くなります。*
* 詳細は「主な仕様」をご覧ください。
• 本機を装着すると、焦点距離が望遠になり、実効絞り値も
暗くなりますので、カメラぶれにご注意ください。三脚
のご使用をおすすめします。
• 本機装着後、蛍光灯照明の比較的暗いところでは、AFで
はピントが合いにくいことがあります。コントラスト
のはっきりしたものでピントを合わせるか、マニュアル
フォーカスに切り替えてピント合わせをしてください。
主な仕様
商品名
(型名)
1.4X
Teleconverter
(SEL14TC)
2X
Teleconverter
(SEL20TC)
対応撮像
画面サイズ
35mmフルサイズ 35mmフルサイズ
焦点距離倍率 使用レンズの1.4倍 使用レンズの2.0倍
絞り
使用レンズ
プラス1段
使用レンズ
プラス2段
レンズ群-枚 5-6 5-8
最大撮影倍率 使用レンズの1.4倍 使用レンズの2.0倍
被写界深度
使用レンズの
約1/1.4倍
使用レンズの
約1/2倍
外形寸法
(最大径×長さ*)
(約:mm)
62.4×17.2 62.4×27.2
*前後マウント面からの突出部を除く
質量(約:g) 167 207
同梱物(( )内の数字は個数)
テレコンバーター(1)、フロントキャップ(前側キャッ
プ)(1)、レンズリヤキャップ(後側キャップ)(1)、レン
ズケース(1)、印刷物一式
仕様および外観は、改良のため予告なく変更すること
がありますが、ご了承ください。
はソニー株式会社の商標です。
This instruction manual explains how to use
lenses. Precautions common to all lenses such
as notes on use are found in the separate
“Precautions before using”. Be sure to read both
documents before using your lens.
This manual is for several different lenses.
The 1.4X Teleconverter (SEL14TC)/2X Teleconverter
(SEL20TC) (referred to below as “this unit”) functions
to increase the focal length of the attached lens
by 1.4X (SEL14TC) or 2.0X (SEL20TC) when mounted
between a Sony α camera system E-mount camera
(referred to below as “camera”) and compatible
lens.
For further information on compatibility, visit the
web site of Sony in your area, or consult your dealer
of Sony or local authorized service facility of Sony.
The illustrations in this manual show the SEL14TC.
Notes on Use
Do not leave the lens exposed to the sun or a bright
light source. Internal malfunction of the camera body
and lens, smoke, or a fire may result due to the effect
of light focusing. If circumstances necessitate leaving
the lens in sunlight, be sure to attach the lens caps.
When shooting against the sun, keep the sun
completely out of the angle of view. Otherwise, solar
rays may be concentrated at a focal point inside
the camera, causing smoke or a fire. Keeping the
sun slightly out of the angle of view may also cause
smoke or a fire.
When carrying a camera with the lens attached,
always firmly hold both the camera and the lens.
This lens is designed for Sony α camera system
E-mount cameras. You cannot use it on A-mount
cameras.
Do not attach a mount adaptor (LA-EA2/LA-EA4
etc.). Otherwise this unit, lens or the mount
adaptor may be damaged. (See illustration )
Compatible Lenses and Functions
This unit is designed for the lenses compatible
with Sony E-mount teleconverter.
Do not attach other lenses, otherwise this unit or
lens may be damaged.
4-584-579-01(2)
SEL14TC/SEL20TC
交換レンズ
Interchangeable Lens
Objectif interchangeable
取扱説明書
Operating Instructions
Mode d’emploi
Manual de instrucciones
1.4X Teleconverter
2X Teleconverter
E-mount
For information on the latest lens model compatible
with the teleconverter, visit the web site of Sony in
your area, or consult your dealer of Sony or local
authorized service facility of Sony.
Identifying the Parts
1 Front cap (front side cap)
2 E-mount (lens attachment side)
3 Lens mounting index
4 Mounting index for camera body
5 Lens contacts*
6 Lens rear cap (rear side cap)
7 E-mount (camera attachment side)
8 Lens release lever
9 Lens mount rubber ring
* Do not touch the lens contacts on the front and rear
mounts.
Attaching and Detaching
To attach this unit
(See illustration
–
)
1
Remove the front cap (front side cap) of
this unit and rear cap of the lens.
To remove this unit’s caps, turn the front cap and
lens rear cap counterclockwise.
2
Align the white lens mounting index on
this unit with the white mounting index
on the lens barrel. Insert this unit into the
lens mount, and turn it in the direction of
the arrow (a) until it clicks into place.
Do not press the lens release lever on this unit
when mounting this unit.
Do not mount this unit at an angle.
3
Remove the lens rear cap (rear side cap)
of this unit and body cap of the camera.
4
Align the white mounting index for
camera body on this unit attached to the
lens, with the white index on the camera.
Insert this unit into the camera mount,
and turn it in the direction of the arrow
(b) until it clicks into place.
Do not press the lens release button on the
camera when mounting the lens attached this
unit.
Do not insert the lens attached to this unit at an
angle.
Do not use more than one of this unit with a
lens. Damage may result.
To remove the lens
(See illustration
–
)
1
While holding down the lens release
button on the camera, rotate the lens
and this unit attached to the lens in the
direction of the arrow (c) until they stop,
then detach them.
2
While pulling the lens release lever on
this unit in the arrow’s direction, rotate
this unit in the direction of the arrow (d)
until it stops, then detach this unit.
Notes on Shooting
While this unit increases the focal length of the
attached lens, it reduces the effective aperture of
the attached lens.*
The camera’s photometry compensates for the
effective aperture automatically.*
The lens’ depth of field is shallower when using this
unit.*
* See the following specifications for further
information.
Because of the increase in focal length and decrease
in effective aperture, use a tripod to reduce camera
shake when this unit is attached.
In low light conditions, such as with dim fluorescent
light, the camera may not be able to focus in AF. Use
focus lock on high contrast subject or manual focus
after attaching this unit.
Specifications
Product name
(Model name)
1.4X Teleconverter
(SEL14TC)
2X Teleconverter
(SEL20TC)
Shooting
screen size
35mm FULL FRAME
size
35mm FULL FRAME
size
Effective focal
length
1.4X the attached
lens
2.0X the attached
lens
f-stop
1 f-stop higher
than the attached
lens
2 f-stop higher
than the attached
lens
Lens groups-
elements
5–6 5–8
Maximum
magnification
1.4X the attached
lens
2.0X the attached
lens
Depth of field
Approx. 1/1.4 the
attached lens
Approx. 1/2 the
attached lens
Dimensions
(maximum
diameter ×
height*)
(approx., mm
(in.))
62.4 × 17.2
(2 1/2 × 11/16)
62.4 × 27.2
(2 1/2 × 1 1/8)
* Excluding the parts projecting from the front and rear
mounts
Mass (approx.,
g (oz))
167 (5.9) 207 (7.4)
Included items
(The number in parentheses indicates the number
of pieces.)
Teleconverter (1), Front cap (front side cap) (1), Lens
rear cap (rear side cap) (1), Lens case (1), Set of
printed documentation
Design and specifications are subject to change
without notice.
is a trademark of Sony Corporation.
©2016 Sony Corporation
Printed in Thailand
Cette notice explique comment se servir des
objectifs. Les précautions communes à tous
les objectifs, par exemple les remarques sur
l’emploi, se trouvent sur la feuille « Précautions
avant toute utilisation ». Veuillez lire les deux
documents avant d’utiliser votre objectif.
Ce mode d’emploi couvre différents objectifs.
Le téléconvertisseur 1.4X (SEL14TC)/2X (SEL20TC)
(appelé ci-dessous « cet article ») fonctionne pour
augmenter la longueur focale de l’objectif fixé par
un facteur de 1,4 fois (SEL14TC) ou 2,0 fois (SEL20TC)
lorsqu’il est installé entre un appareil photo à
monture E de type Sony α (appelé ci-dessous
«appareil photo») et un objectif compatible.
Pour plus d’informations sur la compatibilité,
consultez le site de Sony de votre pays, ou
adressez-vous à un revendeur Sony ou à un service
après-vente agréé Sony.
Les illustrations de ce mode d’emploi présentent le
SEL14TC.
Remarques sur l’emploi
Ne laissez pas la lentille orientée vers le soleil ou une
source de lumière intense. Cela risque de provoquer
un problème de fonctionnement interne du boîtier
de l’appareil photo et de l’objectif, de dégager de la
fumée, voire de provoquer un incendie. Si toutefois
vous ne pouvez pas faire autrement, veillez à fixer les
capuchons sur l’objectif.
Lors d’une prise de vue en direction du soleil, veillez
à ce que le soleil ne soit pas dans l’angle de vue.
Dans le cas contraire, les rayons solaires peuvent être
concentrés vers le point focal dans l’appareil photo,
et provoquer un incendie ou dégager de la fumée.
Vous pouvez provoquer un incendie ou dégager de la
fumée même si le soleil est légèrement en dehors de
l’angle de vue.
Lorsque vous portez un appareil photo sur lequel est
installé l’objectif, tenez toujours fermement l’appareil
photo et l’objectif.
Votre objectif est conçu pour les appareils photo à
monture E de type Sony α. Il ne peut pas être utilisé
sur un appareil photo à monture A.
Ne fixez pas un adaptateur pour monture (LA-EA2/
LA-EA4, etc.). Dans le cas contraire, cet article,
l’objectif ou l’adaptateur pour monture risque d’être
endommagé. (Voir l’illustration
)
Fonctions et objectifs compatibles
Cet article est conçu pour les objectifs
compatibles avec un téléconvertisseur à monture
E de type Sony.
Ne fixez pas d’autres types d’objectifs, sinon, cet
article ou l’objectif risque d’être endommagé.
Pour plus d’informations sur les derniers modèles
d’objectif compatibles avec le téléconvertisseur,
consultez le site de Sony de votre pays, ou
adressez-vous à un revendeur Sony ou à un service
après-vente agréé Sony.
Identification des éléments
1 Capuchon avant (capuchon de l’avant)
2 Monture E (côté de fixation de l’objectif)
3 Repère de montage de l’objectif
4 Repère de montage de l’appareil photo
5 Contacts d’objectif*
6 Capuchon arrière de l’objectif (capuchon de
l’arrière)
7 Monture E (côté de fixation de l’appareil photo)
8 Bouton de libération de l’objectif
9 Bague en caoutchouc de montage de l’objectif
* Ne touchez pas les contacts d’objectif sur les
montures avant et arrière.
Pose et dépose
Pour poser cet article
(Voirl’illustration
–
.)
1
Retirez le capuchon avant (capuchon
de l’avant) de cet article et le capuchon
arrière de l’objectif.
Pour retirer les capuchons de cet article, tournez-
les dans le sens contraire des aiguilles d’une
montre.
2
Alignez le repère de montage de
l’objectif blanc de cet appareil sur le
repère de montage blanc du barillet
d’objectif. Insérez cet appareil dans la
monture d’objectif, puis tournez-le dans
le sens de la flèche (a) jusqu’à ce que
vous entendiez un déclic.
N’appuyez pas sur le bouton de libération de
l’objectif de cet article pendant sa pose.
N’introduisez pas cet article de biais.
3
Retirez le capuchon arrière d’objectif
(capuchon de l’arrière) de cet article et le
capuchon de l’appareil photo.
4
Alignez le repère de montage blanc pour
appareil photo de cet appareil fixé à
l’objectif sur le repère blanc de l’appareil
photo. Insérez cet appareil dans la
monture d’appareil photo, puis tournez-
le dans le sens de la flèche (b) jusqu’à ce
que vous entendiez un déclic.
N’appuyez pas sur le bouton de libération de
l’objectif de l’appareil photo lorsque vous posez
l’objectif fixé à cet article.
N’introduisez pas l’objectif fixé à cet article de
biais.
N’utilisez pas plusieurs articles sur un seul
objectif. Des dommages peuvent se produire.
(Suite à la page arrière)
