
SVA520B
English 6
11
繁體中文
www.blackanddecker.com

2
2
1
4
12
11
5
6
7
7a
8
23
10
9
3
2
3
1
A
11
12
B
C
8
7
E
7
F
6
7
6
7
13
D

3
2
1
4
12
11
5
6
7
7a
8
23
10
9
3
2
3
1
A
11
12
B
C
8
7
E
7
F
6
7
6
7
13
D

4
4
4
6
5
G
3
2
H
1
14
2
I
J
3
15
K
15
16
L
5
M
N
L1
13
18
17

5
4
4
6
5
G
3
2
H
1
14
2
I
J
3
15
K
15
16
L
5
M
N
L1
13
18
17

6
ENGLISH
6
ENGLISH
(Original instructions)
Intended use
Your BLACK+DECKER SVA520B 2 in 1 Stick vac has
been designed for vacuum cleaning purposes. These
appliances are intended for household use only.
Read all of this manual carefully
before operating the appliance.
Safety instructions
@
Warning! Read all safety
warnings and all instructions
.
Failure to follow the warnings
and instructions listed below may
serious injury.
u The intended use is described in this
manual. The use of any accessory
or attachment or the performance
of any operation with this appliance
other than those recommended in this
instruction manual may present a risk
of personal injury.
u Retain this manual for future
reference.
Using your appliance
u Do not use the appliance to pick up
liquids or any materials that could
u Do not use the appliance near water.
u Do not immerse the appliance in water.
u Never pull the charger lead to
disconnect the charger from the
socket. Keep the charger lead away
from heat, oil and sharp edges.
u This appliance can be used by
children aged from 8 years and above
and persons with reduced physical,
sensory or mental capabilities or
lack of experience and knowledge
if they have been given supervision
or instruction concerning use of
the appliance in a safe way and
understand the hazards involved.
Children shall not play with the
appliance. Cleaning and user
maintenance shall not be made by
children without supervision.
Inspection and repairs
Before use, check the appliance for
damaged or defective parts. Check for
breakage of parts, damage to switches
and any other conditions that may affect
its operation.
u Do not use the appliance if any part is
damaged or defective.
u Have any damaged or defective parts
repaired or replaced by an authorized
repair agent.
u Regularly check the charger lead for
damage. Replace the charger if the
lead is damaged or defective.
u Never attempt to remove or replace
this manual.
Additional safety instructions
After use
u Unplug the charger before cleaning the
charger or charging base.
u When not in use, the appliance should
be stored in a dry place.
u Children should not have access to
stored appliances.
7
ENGLISH
(Original instructions)
Chargers
Your charger has been designed for a
mains voltage corresponds to the voltage
on the rating plate.
Warning! Never attempt to replace the
charger unit with a regular mains plug.
u Use your BLACK+DECKER charger
only to charge the battery in the
appliance with which it was supplied.
Other batteries could burst, causing
personal injury and damage.
u Never attempt to charge non-
rechargeable batteries.
u If the supply cord is damaged, it must
be replaced by the manufacturer or an
authorised BLACK+DECKER Service
Centre in order to avoid a hazard.
u Do not expose the charger to water.
u Do not open the charger.
u Do not probe the charger.
u The appliance/battery must be
placed in a well ventilated area when
charging.
Batteries
u Never attempt to open for any reason.
u Do not expose the battery to water.
u Do not expose the battery to heat.
u Do not store in locations where the
temperature may exceed 40°C.
u Charge only at ambient temperatures
between 10°C and 40°C.
u Charge only using the charger provid-
ed with the appliance. Using the wrong
charger could result in an electric
shock or overheating of the battery.
u When disposing of batteries, follow
the instructions given in the section
"Protecting the environment".
u Do not damage/deform the battery
pack either by puncture or impact, as
this may create a risk of injury and fire.
u Do not charge damaged batteries.
u Under extreme conditions, battery
leakage may occur. When you notice
liquid on the batteries carefully wipe
the liquid off using a cloth. Avoid skin
contact.
u In case of skin or eye contact, follow
the instructions below.
Warning!
personal injury or damage to property. In
case of skin contact, immediately rinse
with water. If redness, pain or irritation
occurs seek medical attention. In case of
eye contact, rinse immediately with clean
water and seek medical attention.
The battery fluid may cause

7
ENGLISH
6
ENGLISH
(Original instructions)
Intended use
Your BLACK+DECKER SVA520B 2 in 1 Stick vac has
been designed for vacuum cleaning purposes. These
appliances are intended for household use only.
Read all of this manual carefully
before operating the appliance.
Safety instructions
@
Warning! Read all safety
warnings and all instructions
.
Failure to follow the warnings
and instructions listed below may
serious injury.
u The intended use is described in this
manual. The use of any accessory
or attachment or the performance
of any operation with this appliance
other than those recommended in this
instruction manual may present a risk
of personal injury.
u Retain this manual for future
reference.
Using your appliance
u Do not use the appliance to pick up
liquids or any materials that could
u Do not use the appliance near water.
u Do not immerse the appliance in water.
u Never pull the charger lead to
disconnect the charger from the
socket. Keep the charger lead away
from heat, oil and sharp edges.
u This appliance can be used by
children aged from 8 years and above
and persons with reduced physical,
sensory or mental capabilities or
lack of experience and knowledge
if they have been given supervision
or instruction concerning use of
the appliance in a safe way and
understand the hazards involved.
Children shall not play with the
appliance. Cleaning and user
maintenance shall not be made by
children without supervision.
Inspection and repairs
Before use, check the appliance for
damaged or defective parts. Check for
breakage of parts, damage to switches
and any other conditions that may affect
its operation.
u Do not use the appliance if any part is
damaged or defective.
u Have any damaged or defective parts
repaired or replaced by an authorized
repair agent.
u Regularly check the charger lead for
damage. Replace the charger if the
lead is damaged or defective.
u Never attempt to remove or replace
this manual.
Additional safety instructions
After use
u Unplug the charger before cleaning the
charger or charging base.
u When not in use, the appliance should
be stored in a dry place.
u Children should not have access to
stored appliances.
7
ENGLISH
(Original instructions)
Chargers
Your charger has been designed for a
mains voltage corresponds to the voltage
on the rating plate.
Warning! Never attempt to replace the
charger unit with a regular mains plug.
u Use your BLACK+DECKER charger
only to charge the battery in the
appliance with which it was supplied.
Other batteries could burst, causing
personal injury and damage.
u Never attempt to charge non-
rechargeable batteries.
u If the supply cord is damaged, it must
be replaced by the manufacturer or an
authorised BLACK+DECKER Service
Centre in order to avoid a hazard.
u Do not expose the charger to water.
u Do not open the charger.
u Do not probe the charger.
u The appliance/battery must be
placed in a well ventilated area when
charging.
Batteries
u Never attempt to open for any reason.
u Do not expose the battery to water.
u Do not expose the battery to heat.
u Do not store in locations where the
temperature may exceed 40°C.
u Charge only at ambient temperatures
between 10°C and 40°C.
u Charge only using the charger provid-
ed with the appliance. Using the wrong
charger could result in an electric
shock or overheating of the battery.
u When disposing of batteries, follow
the instructions given in the section
"Protecting the environment".
u Do not damage/deform the battery
pack either by puncture or impact, as
this may create a risk of injury and fire.
u Do not charge damaged batteries.
u Under extreme conditions, battery
leakage may occur. When you notice
liquid on the batteries carefully wipe
the liquid off using a cloth. Avoid skin
contact.
u In case of skin or eye contact, follow
the instructions below.
Warning!
personal injury or damage to property. In
case of skin contact, immediately rinse
with water. If redness, pain or irritation
occurs seek medical attention. In case of
eye contact, rinse immediately with clean
water and seek medical attention.
The battery fluid may cause

8
ENGLISH
8
ENGLISH
(Original instructions)
Use
Switching on and off (Fig. A)
u To switch on, press the on/off switch (1) located on the
handle of the main unit (1), or alternatively on the chassis
handle (4).
u To switch off, press the on/off switch (1) or (4).
Using Accessories (Fig. B)
u The appliance is supplied with a brush tool (11) and a
crevice tool (12).
u Fit the chosen accessory into the front of the appliance as
shown in Figure B.
Fitting the upper handle to the main chassis
(Fig. C, D)
u The stick vac chassis is supplied in 2 parts, the upper han-
dle (6) and the lower chassis (7), but they are connected
by a wire.
u Slide the upper handle (6) into the main chassis (7) as
u Ensure the wire is not trapped.
u
(Fig. E)
u
Fitting the vacuum to the Chassis
(Fig. F, G)
u
u To release the vacuum
from the chassis press the chassis
release button (7a) and lift clear.
u The appliance can now be operated via the on/off button
(4) on the handle (6). This also allows you to utilise the
beater bars via the ‘brush on’ control (5) as shown in
Charging (Fig. H, I)
u
u Make sure the appliance is switched off. The battery will
not be charged with the on/off switch in the on position.
u Plug the jack end of the charger (10) into the back of the
vacuum, then plug the charger into an outlet as shown.
u While charging, if the battery is fully discharged, only
the bottom led will flash the charging indicator (14) . As
the battery charges the LEDs will illuminate one by one
and remain lit until all four will be lit. They will remain lit
for 10 seconds when fully charged and then turn OFF.
If the battery is not fully discharged when charging begins
the LED nearest the fully lit LED on the charging indicator
Electrical safety
Symbols on the charger
Read all of this manual carefully before using
the appliance
#
This tool is double insulated; therefore no
earth wire is required. Always check that the
power supply corresponds to the voltage on
the rating plate.
Indication of polarity.
$
The charging base is intended for indoor use
only.
Labels on appliance
The following symbols appear on this appliance along with the
date code
Read all of this manual carefully before
using the appliance
Features
This tool includes some or all of the following features.
1. On/off power switch
2. Dust bowl release button
3. Dust bowl
4. Chassis on/off power switch
5. Brush control switch
6. Upper handle
7. Main chassis
7a. Chassis release button
8. Floor head
9. Wall Mount
10. Charger
11. Brush tool accessory
12. Crevice tool accessory
9
ENGLISH
(Original instructions)
Protecting the environment
Z
Separate collection. This product must not be
disposed of with normal household waste.
needs replacement, or if it is of no further use to you, do not
dispose of it with household waste. Make this product avail-
-
able for separate collection.
z
Separate collection of used products and packaging
allows materials to be recycled and used again.
Re-use of recycled materials helps prevent environ
mental pollution and reduces the demand for raw
materials.
Local regulations may provide for separate collection of elec-
trical products from the household, at municipal waste sites or
by the retailer when you purchase a new product.
Maintenance
Your BLACK+DECKER cordless appliance has been designed
to operate over a long period of time with a minimum of main-
tenance. Continuous satisfactory operation depends upon
proper tool care and regular cleaning.
Warning! Before performing any maintenance on cordless
appliances:
u Run the battery down completely if it is integral and then
switch off.
u Unplug the charger before cleaning it. Your charger does
not require any maintenance apart from regular cleaning.
u Regularly clean the ventilation slots in your appliance/
charger using a soft brush or dry cloth.
u Regularly clean the motor housing using a damp cloth. Do
not use any abrasive or solvent-based cleaner.
-
your BLACK+DECKER dealer.
u
u
u Press the dust bowl release button (2) and lift out the dust
bowl (3) (Fig.J)
u
u Empty the dust bowl by lightly shaking over a dustbin.
u
u
u
u
u
u
u Close the dust-bowl. Make sure the release latch (2)
clicks into place.
From time to time wipe the appliance with a damp cloth.
Do not use any abrasive or solvent-based cleaner. Do not
immerse the appliance in water.
Removing and cleaning the beater bar (Fig. M)
u Pinch and lift the plastic tab on the pivoting clip (17) away
u
u Ensure the beater bar and pivoting clip are replaced
before using the vacuum.
(14) will flash. This indicates that there is a partial charge
left in the battery.
u Leave the appliance plugged in for at least 5 hours to
initially charge the battery. While charging, the charger
may get warm, this is perfectly normal and safe. It is safe
to leave the appliance connected to the charger
indefinitely. The charger automatically reduces power
consumption when charging is complete.
Wall mounting (Fig. N)
The product can be wall mounted, if desired, using the wall
mount bracket (13).
u Mark the location of the screw holes (within reach of an
electrical outlet for charging the vac while it is on the wall
bracket).
u Install appropriate anchors/screws to secure wall mount
bracket to the wall.
u Hang the vac on the wall by placing the hang hook (located
on the back of the vac) over the catch on the wall mount
bracket.

9
ENGLISH
8
ENGLISH
(Original instructions)
Use
Switching on and off (Fig. A)
u To switch on, press the on/off switch (1) located on the
handle of the main unit (1), or alternatively on the chassis
handle (4).
u To switch off, press the on/off switch (1) or (4).
Using Accessories (Fig. B)
u The appliance is supplied with a brush tool (11) and a
crevice tool (12).
u Fit the chosen accessory into the front of the appliance as
shown in Figure B.
Fitting the upper handle to the main chassis
(Fig. C, D)
u The stick vac chassis is supplied in 2 parts, the upper han-
dle (6) and the lower chassis (7), but they are connected
by a wire.
u Slide the upper handle (6) into the main chassis (7) as
u Ensure the wire is not trapped.
u
(Fig. E)
u
Fitting the vacuum to the Chassis
(Fig. F, G)
u
u To release the vacuum
from the chassis press the chassis
release button (7a) and lift clear.
u The appliance can now be operated via the on/off button
(4) on the handle (6). This also allows you to utilise the
beater bars via the ‘brush on’ control (5) as shown in
Charging (Fig. H, I)
u
u Make sure the appliance is switched off. The battery will
not be charged with the on/off switch in the on position.
u Plug the jack end of the charger (10) into the back of the
vacuum, then plug the charger into an outlet as shown.
u While charging, if the battery is fully discharged, only
the bottom led will flash the charging indicator (14) . As
the battery charges the LEDs will illuminate one by one
and remain lit until all four will be lit. They will remain lit
for 10 seconds when fully charged and then turn OFF.
If the battery is not fully discharged when charging begins
the LED nearest the fully lit LED on the charging indicator
Electrical safety
Symbols on the charger
Read all of this manual carefully before using
the appliance
#
This tool is double insulated; therefore no
earth wire is required. Always check that the
power supply corresponds to the voltage on
the rating plate.
Indication of polarity.
$
The charging base is intended for indoor use
only.
Labels on appliance
The following symbols appear on this appliance along with the
date code
Read all of this manual carefully before
using the appliance
Features
This tool includes some or all of the following features.
1. On/off power switch
2. Dust bowl release button
3. Dust bowl
4. Chassis on/off power switch
5. Brush control switch
6. Upper handle
7. Main chassis
7a. Chassis release button
8. Floor head
9. Wall Mount
10. Charger
11. Brush tool accessory
12. Crevice tool accessory
9
ENGLISH
(Original instructions)
Protecting the environment
Z
Separate collection. This product must not be
disposed of with normal household waste.
needs replacement, or if it is of no further use to you, do not
dispose of it with household waste. Make this product avail-
-
able for separate collection.
z
Separate collection of used products and packaging
allows materials to be recycled and used again.
Re-use of recycled materials helps prevent environ
mental pollution and reduces the demand for raw
materials.
Local regulations may provide for separate collection of elec-
trical products from the household, at municipal waste sites or
by the retailer when you purchase a new product.
Maintenance
Your BLACK+DECKER cordless appliance has been designed
to operate over a long period of time with a minimum of main-
tenance. Continuous satisfactory operation depends upon
proper tool care and regular cleaning.
Warning! Before performing any maintenance on cordless
appliances:
u Run the battery down completely if it is integral and then
switch off.
u Unplug the charger before cleaning it. Your charger does
not require any maintenance apart from regular cleaning.
u Regularly clean the ventilation slots in your appliance/
charger using a soft brush or dry cloth.
u Regularly clean the motor housing using a damp cloth. Do
not use any abrasive or solvent-based cleaner.
-
your BLACK+DECKER dealer.
u
u
u Press the dust bowl release button (2) and lift out the dust
bowl (3) (Fig.J)
u
u Empty the dust bowl by lightly shaking over a dustbin.
u
u
u
u
u
u
u Close the dust-bowl. Make sure the release latch (2)
clicks into place.
From time to time wipe the appliance with a damp cloth.
Do not use any abrasive or solvent-based cleaner. Do not
immerse the appliance in water.
Removing and cleaning the beater bar (Fig. M)
u Pinch and lift the plastic tab on the pivoting clip (17) away
u
u Ensure the beater bar and pivoting clip are replaced
before using the vacuum.
(14) will flash. This indicates that there is a partial charge
left in the battery.
u Leave the appliance plugged in for at least 5 hours to
initially charge the battery. While charging, the charger
may get warm, this is perfectly normal and safe. It is safe
to leave the appliance connected to the charger
indefinitely. The charger automatically reduces power
consumption when charging is complete.
Wall mounting (Fig. N)
The product can be wall mounted, if desired, using the wall
mount bracket (13).
u Mark the location of the screw holes (within reach of an
electrical outlet for charging the vac while it is on the wall
bracket).
u Install appropriate anchors/screws to secure wall mount
bracket to the wall.
u Hang the vac on the wall by placing the hang hook (located
on the back of the vac) over the catch on the wall mount
bracket.

10
ENGLISH
Technical Data
Service Information
Black & Decker offers a full network of company-owned and
authorized service locations throughtout Asia. All Black &
Decker Service Centers are staffed with trained personnel to
provide customers with efficient and reliable product service.
Whether you need technical advice, repair, or genuine factory
replacement parts, contact the Black & Decker location nearest
to you.
NOTE
u Black & Decker's policy is one of continuous improvement to
our products and, as such, we reserve the right to change
product specifications without prior notice.
u Standard equipment and accessories may vary by country.
u Product specifications may differ by country.
u Complete product range may not be available in all countries.
Contact your local Black & Decker dealers for range
availability.
10
ENGLISH
(Original instructions)
Voltage: 18V
Battery Type: Li-lon
Battery Capacity: 2.0Ah
Approx Run time: 18min
Suction power : 14.8AW
Bowl Capacity: 500ml
Weight: 2.5kg
Approximate Charge Time: 4h
Accessories: Charger, Crevice Tool,
Bursh Tool, Filter 2pcs, Wall Mount
11
繁體中文
請注意! 各地區上市產品/配件不盡相同, 請依台灣繁
體中文說明書的內容為主。
Warning! Attachments and accessories are not the same in
each region, please only refer to Taiwan Traditional Chinese
description in this manual.
設計用途
BLACK+DECKER SVA520B 二合一直立式插電吸塵器專
為進行真空除塵而設計。這些工具僅供一般家用。
操作本工具前,請仔細閱讀本手冊全部內容。
安全說明
警告!請閱讀所有安全警告及使用指示。
若不遵循以下所示警告及指示,可能會導致
觸電、火災及/或嚴重傷害。
器具的設計用途在本手冊中進行了描述。若使用
並非本使用手冊中所建議的配件或附件,或者使
用本器具執行並非本使用手冊中所建議的操作,
可能會有人身傷害的風險。
請保留本手冊以供日後參考。
使用工具
請勿使用本工具吸取任何液體或任何易燃材料。
請勿在靠近水的地方使用本工具。
請勿將工具浸入水中。
請勿拉扯充電器引線以將充電器從插座上拔下。
讓充電器遠離熱、油和銳邊。
年滿 8 歲的兒童,以及身體、感覺或心理機能不
健全的人員或缺乏經驗及知識的人員,若在針對
安全使用本器具的監督或指示之下,並已瞭解所
涉及的危險,則可以使用本器具。兒童不得玩耍
本器具。請勿在沒有監督的情況下讓小孩對本工
具進行清潔和維護。
檢查和維修
使用前,請檢查器具是否有損壞或有故障的零件。
檢查零件破損情況以及可能影響操作的開關損壞和
任何其他狀況。
若發現任何零件已損壞或有故障,請勿使用器具。
將所有受損或有故障的零件送往授權的維修中心
進行維修或更換。
定期檢查充電器引線是否損壞。如有任何損壞或
出現故障,請立即替換。
電動工具之修理,僅可由認證的技術人員執行。
請勿交由非百得認證服務中心的認證技術人員進
行修理、維護、調整。若產品經由非百得認證的
6
ENGLISH
(Original instructions)
Intended use
Your BLACK+DECKER SVA520B 2 in 1 Stick vac has
been designed for vacuum cleaning purposes. These
appliances are intended for household use only.
Read all of this manual carefully
before operating the appliance.
Safety instructions
@
Warning! Read all safety
warnings and all instructions
.
Failure to follow the warnings
and instructions listed below may
serious injury.
u The intended use is described in this
manual. The use of any accessory
or attachment or the performance
of any operation with this appliance
other than those recommended in this
instruction manual may present a risk
of personal injury.
u Retain this manual for future
reference.
Using your appliance
u Do not use the appliance to pick up
liquids or any materials that could
u Do not use the appliance near water.
u Do not immerse the appliance in water.
u Never pull the charger lead to
disconnect the charger from the
socket. Keep the charger lead away
from heat, oil and sharp edges.
u This appliance can be used by
children aged from 8 years and above
and persons with reduced physical,
sensory or mental capabilities or
lack of experience and knowledge
if they have been given supervision
or instruction concerning use of
the appliance in a safe way and
understand the hazards involved.
Children shall not play with the
appliance. Cleaning and user
maintenance shall not be made by
children without supervision.
Inspection and repairs
Before use, check the appliance for
damaged or defective parts. Check for
breakage of parts, damage to switches
and any other conditions that may affect
its operation.
u Do not use the appliance if any part is
damaged or defective.
u Have any damaged or defective parts
repaired or replaced by an authorized
repair agent.
u Regularly check the charger lead for
damage. Replace the charger if the
lead is damaged or defective.
u Never attempt to remove or replace
this manual.
Additional safety instructions
After use
u Unplug the charger before cleaning the
charger or charging base.
u When not in use, the appliance should
be stored in a dry place.
u Children should not have access to
stored appliances.
Residual risks
Additional residual risks may arise when
using the tool which may not be included
in the enclosed safety warnings. These
risks can arise from misuse, prolonged
use etc. Even with the application of
the relevant safety regulations and the
implementation of safety devices, certain
residual risks can not be avoided.
維修工程師拆解、組裝、調整,恕無法適用百得
一年家用保修條款。
為充份發揮其功能,修理、維護、調整請務必使
用原廠零件。
除了本手冊中指定的零件之外,切勿嘗試卸下或
更換任何其他零件。
額外安全指示
使用後
清潔充電器或充電底座之前先拔下充電器插頭。
不使用時,應將工具儲存在乾燥的地方。
切勿讓兒童接觸存放的器具。
充電器
您的充電器設計用於特定電壓。請務必檢查主電壓
是否與銘牌一致。
警告!切勿嘗試使用一般的電源插頭取代充電器裝
置。
只能使用工具隨附的 BLACK+DECKER 充電器為工
具內的電池充電。其他電池可能會爆裂,導致人
身傷害和損害。
切勿嘗試對非可充電電池進行充電。
若電源線損壞,必須送往製造廠商或授權的
BLACK+DECKER 服務中心更換以避免發生危險。
請勿將充電器置於水中。
請勿打開充電器。
請勿刺破充電器。
充電時,必須將工具/電池組置放在一個通風良好
的地方。
電池
無論什麼原因,都不要嘗試打開電池。
請勿將電池暴露在水中。
請勿將電池置於灼熱的位置。
請勿儲存在溫度可能超過 40°C 的地方。
請僅在環境溫度介於 10°C 與 40°C 之間時充電。
只能使用本工具隨附的充電器為電池充電。使用
不適當的充電器可能會導致觸電或電池過熱.。
處置電池時,請遵循「保護環境」部份所提供的
指示執行。
請勿穿刺或撞擊電池組導致其損壞/變形,這將產
生傷害及火災的風險。
請勿為損壞的電池組充電。
在極端情形下,可能會出現電池漏電。當電池上
出現液體時,請用布小心將其擦掉。避免與液體
接觸。
若液體與皮膚或眼睛接觸,請遵循以下指示。
警告!電池液體可能會導致個人傷害或財產損失。如
果電池液體接觸到皮膚,請立即以清水沖洗。如皮膚出
現紅腫、疼痛或刺激反應,請尋求醫療協助。如電池液
體接觸到眼睛,請立即以清水沖洗並尋求醫療協助。

11
ENGLISH
Technical Data
Service Information
Black & Decker offers a full network of company-owned and
authorized service locations throughtout Asia. All Black &
Decker Service Centers are staffed with trained personnel to
provide customers with efficient and reliable product service.
Whether you need technical advice, repair, or genuine factory
replacement parts, contact the Black & Decker location nearest
to you.
NOTE
u Black & Decker's policy is one of continuous improvement to
our products and, as such, we reserve the right to change
product specifications without prior notice.
u Standard equipment and accessories may vary by country.
u Product specifications may differ by country.
u Complete product range may not be available in all countries.
Contact your local Black & Decker dealers for range
availability.
10
ENGLISH
(Original instructions)
Voltage: 18V
Battery Type: Li-lon
Battery Capacity: 2.0Ah
Approx Run time: 18min
Suction power : 14.8AW
Bowl Capacity: 500ml
Weight: 2.5kg
Approximate Charge Time: 4h
Accessories: Charger, Crevice Tool,
Bursh Tool, Filter 2pcs, Wall Mount
11
繁體中文
請注意! 各地區上市產品/配件不盡相同, 請依台灣繁
體中文說明書的內容為主。
Warning! Attachments and accessories are not the same in
each region, please only refer to Taiwan Traditional Chinese
description in this manual.
設計用途
BLACK+DECKER SVA520B 二合一直立式插電吸塵器專
為進行真空除塵而設計。這些工具僅供一般家用。
操作本工具前,請仔細閱讀本手冊全部內容。
安全說明
警告!請閱讀所有安全警告及使用指示。
若不遵循以下所示警告及指示,可能會導致
觸電、火災及/或嚴重傷害。
器具的設計用途在本手冊中進行了描述。若使用
並非本使用手冊中所建議的配件或附件,或者使
用本器具執行並非本使用手冊中所建議的操作,
可能會有人身傷害的風險。
請保留本手冊以供日後參考。
使用工具
請勿使用本工具吸取任何液體或任何易燃材料。
請勿在靠近水的地方使用本工具。
請勿將工具浸入水中。
請勿拉扯充電器引線以將充電器從插座上拔下。
讓充電器遠離熱、油和銳邊。
年滿 8 歲的兒童,以及身體、感覺或心理機能不
健全的人員或缺乏經驗及知識的人員,若在針對
安全使用本器具的監督或指示之下,並已瞭解所
涉及的危險,則可以使用本器具。兒童不得玩耍
本器具。請勿在沒有監督的情況下讓小孩對本工
具進行清潔和維護。
檢查和維修
使用前,請檢查器具是否有損壞或有故障的零件。
檢查零件破損情況以及可能影響操作的開關損壞和
任何其他狀況。
若發現任何零件已損壞或有故障,請勿使用器具。
將所有受損或有故障的零件送往授權的維修中心
進行維修或更換。
定期檢查充電器引線是否損壞。如有任何損壞或
出現故障,請立即替換。
電動工具之修理,僅可由認證的技術人員執行。
請勿交由非百得認證服務中心的認證技術人員進
行修理、維護、調整。若產品經由非百得認證的
6
ENGLISH
(Original instructions)
Intended use
Your BLACK+DECKER SVA520B 2 in 1 Stick vac has
been designed for vacuum cleaning purposes. These
appliances are intended for household use only.
Read all of this manual carefully
before operating the appliance.
Safety instructions
@
Warning! Read all safety
warnings and all instructions
.
Failure to follow the warnings
and instructions listed below may
serious injury.
u The intended use is described in this
manual. The use of any accessory
or attachment or the performance
of any operation with this appliance
other than those recommended in this
instruction manual may present a risk
of personal injury.
u Retain this manual for future
reference.
Using your appliance
u Do not use the appliance to pick up
liquids or any materials that could
u Do not use the appliance near water.
u Do not immerse the appliance in water.
u Never pull the charger lead to
disconnect the charger from the
socket. Keep the charger lead away
from heat, oil and sharp edges.
u This appliance can be used by
children aged from 8 years and above
and persons with reduced physical,
sensory or mental capabilities or
lack of experience and knowledge
if they have been given supervision
or instruction concerning use of
the appliance in a safe way and
understand the hazards involved.
Children shall not play with the
appliance. Cleaning and user
maintenance shall not be made by
children without supervision.
Inspection and repairs
Before use, check the appliance for
damaged or defective parts. Check for
breakage of parts, damage to switches
and any other conditions that may affect
its operation.
u Do not use the appliance if any part is
damaged or defective.
u Have any damaged or defective parts
repaired or replaced by an authorized
repair agent.
u Regularly check the charger lead for
damage. Replace the charger if the
lead is damaged or defective.
u Never attempt to remove or replace
this manual.
Additional safety instructions
After use
u Unplug the charger before cleaning the
charger or charging base.
u When not in use, the appliance should
be stored in a dry place.
u Children should not have access to
stored appliances.
Residual risks
Additional residual risks may arise when
using the tool which may not be included
in the enclosed safety warnings. These
risks can arise from misuse, prolonged
use etc. Even with the application of
the relevant safety regulations and the
implementation of safety devices, certain
residual risks can not be avoided.
6
ENGLISH
(Original instructions)
Intended use
Your BLACK+DECKER SVA520B 2 in 1 Stick vac has
been designed for vacuum cleaning purposes. These
appliances are intended for household use only.
Read all of this manual carefully
before operating the appliance.
Safety instructions
@
Warning! Read all safety
warnings and all instructions
.
Failure to follow the warnings
and instructions listed below may
serious injury.
u The intended use is described in this
manual. The use of any accessory
or attachment or the performance
of any operation with this appliance
other than those recommended in this
instruction manual may present a risk
of personal injury.
u Retain this manual for future
reference.
Using your appliance
u Do not use the appliance to pick up
liquids or any materials that could
u Do not use the appliance near water.
u Do not immerse the appliance in water.
u Never pull the charger lead to
disconnect the charger from the
socket. Keep the charger lead away
from heat, oil and sharp edges.
u This appliance can be used by
children aged from 8 years and above
and persons with reduced physical,
sensory or mental capabilities or
lack of experience and knowledge
if they have been given supervision
or instruction concerning use of
the appliance in a safe way and
understand the hazards involved.
Children shall not play with the
appliance. Cleaning and user
maintenance shall not be made by
children without supervision.
Inspection and repairs
Before use, check the appliance for
damaged or defective parts. Check for
breakage of parts, damage to switches
and any other conditions that may affect
its operation.
u Do not use the appliance if any part is
damaged or defective.
u Have any damaged or defective parts
repaired or replaced by an authorized
repair agent.
u Regularly check the charger lead for
damage. Replace the charger if the
lead is damaged or defective.
u Never attempt to remove or replace
this manual.
Additional safety instructions
After use
u Unplug the charger before cleaning the
charger or charging base.
u When not in use, the appliance should
be stored in a dry place.
u Children should not have access to
stored appliances.
Residual risks
Additional residual risks may arise when
using the tool which may not be included
in the enclosed safety warnings. These
risks can arise from misuse, prolonged
use etc. Even with the application of
the relevant safety regulations and the
implementation of safety devices, certain
residual risks can not be avoided.
維修工程師拆解、組裝、調整,恕無法適用百得
一年家用保修條款。
為充份發揮其功能,修理、維護、調整請務必使
用原廠零件。
除了本手冊中指定的零件之外,切勿嘗試卸下或
更換任何其他零件。
額外安全指示
使用後
清潔充電器或充電底座之前先拔下充電器插頭。
不使用時,應將工具儲存在乾燥的地方。
切勿讓兒童接觸存放的器具。
充電器
您的充電器設計用於特定電壓。請務必檢查主電壓
是否與銘牌一致。
警告!切勿嘗試使用一般的電源插頭取代充電器裝
置。
只能使用工具隨附的 BLACK+DECKER 充電器為工
具內的電池充電。其他電池可能會爆裂,導致人
身傷害和損害。
切勿嘗試對非可充電電池進行充電。
若電源線損壞,必須送往製造廠商或授權的
BLACK+DECKER 服務中心更換以避免發生危險。
請勿將充電器置於水中。
請勿打開充電器。
請勿刺破充電器。
充電時,必須將工具/電池組置放在一個通風良好
的地方。
電池
無論什麼原因,都不要嘗試打開電池。
請勿將電池暴露在水中。
請勿將電池置於灼熱的位置。
請勿儲存在溫度可能超過 40°C 的地方。
請僅在環境溫度介於 10°C 與 40°C 之間時充電。
只能使用本工具隨附的充電器為電池充電。使用
不適當的充電器可能會導致觸電或電池過熱.。
處置電池時,請遵循「保護環境」部份所提供的
指示執行。
請勿穿刺或撞擊電池組導致其損壞/變形,這將產
生傷害及火災的風險。
請勿為損壞的電池組充電。
在極端情形下,可能會出現電池漏電。當電池上
出現液體時,請用布小心將其擦掉。避免與液體
接觸。
若液體與皮膚或眼睛接觸,請遵循以下指示。
警告!電池液體可能會導致個人傷害或財產損失。如
果電池液體接觸到皮膚,請立即以清水沖洗。如皮膚出
現紅腫、疼痛或刺激反應,請尋求醫療協助。如電池液
體接觸到眼睛,請立即以清水沖洗並尋求醫療協助。

12
ENGLISH
12
繁體中文
電氣安全
充電器上的符號
使用器具前,請仔細閱讀本手冊全部內
容。
本工具採用雙重絕緣,因此無需接地
線。請務必檢查電源電壓是否與銘牌一
致。
指示極性。
充電底座僅供室內使用。
器具上的標籤
本器具上具有以下圖示與日期代碼:
使用器具前,請仔細閱讀本手冊全部內
容。
功能部件
本工具包括以下部分或全部功能部件。
1. 電源開關
2. 集塵筒釋放按鈕
3. 集塵筒
4. 主底盤電源開關
5. 電刷控制開關
6. 上手柄
7. 主底盤
7a. 主底盤釋放按鈕
8. 地板吸塵頭
9. 壁掛架
10. 充電器
11. 刷頭工具配件
12. 細縫吸嘴配件
使用
開啟和關閉電源(圖 A)
若要開啟工具電源,請按下處於主要裝置 (1) 手柄
上的電源開關 (1),或主底盤手柄 (4) 的電源開關。
若要關閉工具電源,請按下電源開關 (1) 或 (4)。
安裝配件(圖 B)
本裝置隨附刷頭工具 (11) 和細縫吸嘴 (12)。
將所選配件安裝到裝置前面,如圖 B 所示。
8
ENGLISH
(Original instructions)
Use
Switching on and off (Fig. A)
u To switch on, press the on/off switch (1) located on the
handle of the main unit (1), or alternatively on the chassis
handle (4).
u To switch off, press the on/off switch (1) or (4).
Using Accessories (Fig. B)
u The appliance is supplied with a brush tool (11) and a
crevice tool (12).
u Fit the chosen accessory into the front of the appliance as
shown in Figure B.
Fitting the upper handle to the main chassis
(Fig. C, D)
u The stick vac chassis is supplied in 2 parts, the upper han-
dle (6) and the lower chassis (7), but they are connected
by a wire.
u Slide the upper handle (6) into the main chassis (7) as
u Ensure the wire is not trapped.
u
(Fig. E)
u
Fitting the vacuum to the Chassis
(Fig. F, G)
u
u To release the vacuum
from the chassis press the chassis
release button (7a) and lift clear.
u The appliance can now be operated via the on/off button
(4) on the handle (6). This also allows you to utilise the
beater bars via the ‘brush on’ control (5) as shown in
Charging (Fig. H)
u
u Make sure the appliance is switched off. The battery will
not be charged with the on/off switch in the on position.
u Plug the jack end of the charger (10) into the back of the
vacuum, then plug the charger into an outlet as shown.
u While charging, if the battery is fully discharged, only
the bottom led will flash the charging indicator (9) . As
the battery charges the LEDs will illuminate one by one
and remain lit until all four will be lit. They will remain lit
for 10 seconds when fully charged and then turn OFF.
If the battery is not fully discharged when charging begins
the LED nearest the fully lit LED on the charging indicator
Electrical safety
Symbols on the charger
Read all of this manual carefully before using
the appliance
#
This tool is double insulated; therefore no
earth wire is required. Always check that the
power supply corresponds to the voltage on
the rating plate.
Indication of polarity.
$
The charging base is intended for indoor use
only.
Labels on appliance
The following symbols appear on this appliance along with the
date code
Read all of this manual carefully before
using the appliance
Features
This tool includes some or all of the following features.
1. On/off power switch
2. Dust bowl release button
3. Dust bowl
4. Chassis on/off power switch
5. Brush control switch
6. Upper handle
7. Main chassis
7a. Chassis release button
8. Floor head
9. Charging indicator
10. Charger
11. Brush tool accessory
12. Crevice tool accessory
將上手柄安裝至主底盤(圖 C 和 D)
地板用真空吸塵器底盤隨附兩個部分,上手柄 (6)
和下主底盤 (7),但它們透過電線連接。
將上手柄 (6) 滑入主底盤 (7) 內,如圖 C 所示。
確保電線未發生移動受限。
使用固定螺絲 (13) 鎖緊,如圖 D 所示。
將地板吸塵頭安裝到主底盤(圖 E)
將主底盤 (7) 滑入地板吸塵頭 (8),直到聽見卡嗒
聲,如圖 E 所示。
將真空吸塵器安裝至主底盤(圖 F、G)
將真空吸塵器(先滑入卡槽)滑入主底盤 (7),直
到聽見一聲清晰的卡嗒聲,如圖 F 所示。
按下主底盤釋放按鈕 (7a) 並提起,以從主底盤卸
下真空吸塵器。
本裝置可以透過立即按下手柄 (6) 上的電源開關
按鈕 (4) 來操作。這也讓您可以透過按下「刷頭
開啟」控制鈕 (5) 來使用地板刷,如圖 G 所示。
充電(圖 H、I)
確保工具電源已關閉。若工具開關處於「開啟」
的位置,電池是無法充電的。
將充電器 (10) 的插頭端插入真空吸塵器的背面,
然後將充電器插入插座,如圖所示。
充電期間,若電池已經完全放電,則只有底部
LED 會閃爍正在充電指示燈 (14)。隨著電池充
電,LED 將逐個亮起,並保持亮起直到四個 LED
全部亮起。它們將在完全充電後保持亮起 10 秒
鐘,然後關閉。如果電池在充電開始時未完全放
電,則充電指示燈 (14) 上最靠近全亮 LED 的 LED
開始閃爍。這表示電池內有剩餘部分電量。
第一次為電池充電時,請讓工具插電至少 5 個
小時。充電時,充電器溫度會升高,這是完全正
常且安全的。工具一直與充電器保持連接是安全
的。充電完成後,充電器會自動降低功耗。
清潔濾心(圖 J、K、L)
按下集塵筒釋放按鈕 (2) 並提出集塵筒 (3)(圖 J)
從集塵筒 (3) 拉起濾心組件 (15)(圖 K)。
在垃圾桶上輕輕晃動,清空集塵筒。
濾心 (16) 現在可以逆時針旋轉從外濾心 (15) 取下
(圖 L)。
輕拍以清空濾心、外濾心以及集塵筒上過多灰塵
和碎屑(圖 L1)。
用溫肥皂水沖洗集塵筒(圖 L1)。
用溫肥皂水清洗濾心(圖 L1)。
確保濾心和集塵筒乾燥。
將濾心重新安裝到本工具內。
關閉集塵筒。確保集塵筒釋放按鈕 (2) 卡入到位。
13
繁體中文
時常用濕布擦拭工具。請勿使用任何研磨性或基於
溶劑的清潔劑。請勿將器具浸入水中。
移除和清潔地板刷(圖 M)
提捏旋轉夾 (17) 上的塑膠片,以與地板吸塵頭分開。
從地板頭上提起地板吸塵頭 (18)。
確保在使用真空吸塵器前更換地板刷和旋轉夾。
牆面安裝(圖 N)
本產品可以在需要時使用牆面支架 (13) 來進行壁
裝。
標記螺絲洞的位置(確保將器具置放在牆面支架
上時,附近有電源插座可充電)。
安裝適當的錨栓/螺絲來將牆面支架固定到牆壁上。
透過將套鉤(位於真空吸塵器背面)置於牆面支
架的鎖扣上,將真空吸塵器懸掛到牆上。
維護
您的 BLACK+DECKER 充電式工具採用卓越的設計,
能夠長時間使用,並且只需最少的維護。若要持續
獲得滿意的操作效果,需進行正確的工具維護和定
期的清潔。
警告!在充電式工具上執行任何維護工作之前:
若電池屬於內建電池,請使電池完全放電,然後
再關閉電源。
請在清潔充電器之前拔出充電器的插頭。您的充
電器除了定期清潔之外,並不需要執行任何維護
操作。
定期使用軟刷或乾布清潔工具/充電器內的通風槽。
定期使用濕布清潔電動機外殼。請勿使用任何研
磨性或溶劑型清潔劑。
更換濾心
濾心應在出現磨損或損壞時予以更換。您的
BLACK+DECKER 代理商為您提供濾心更換服務。
依照上述說明取下舊濾心。
依照上述說明安裝新濾心。
保護環境
分開收集。本產品必須與一般家庭廢物分
開處置。
若您發現需要更換 Black & Decker 產品,或該產品對
您再無用處,請勿將其與家庭廢物一併處置。務必
將本產品送往分類收集處。
透過分開收集用過的產品與包裝,可以實
現材料的循環再生利用。重新使用回收的
材料有助於防止環境污染,並降低對原材
料的需求。
9
ENGLISH
(Original instructions)
Protecting the environment
Z
Separate collection. This product must not be
disposed of with normal household waste.
needs replacement, or if it is of no further use to you, do not
dispose of it with household waste. Make this product avail-
-
able for separate collection.
z
Separate collection of used products and packaging
allows materials to be recycled and used again.
Re-use of recycled materials helps prevent environ
mental pollution and reduces the demand for raw
materials.
Local regulations may provide for separate collection of elec-
trical products from the household, at municipal waste sites or
by the retailer when you purchase a new product.
Maintenance
Your BLACK+DECKER cordless appliance has been designed
to operate over a long period of time with a minimum of main-
tenance. Continuous satisfactory operation depends upon
proper tool care and regular cleaning.
Warning! Before performing any maintenance on cordless
appliances:
u Run the battery down completely if it is integral and then
switch off.
u Unplug the charger before cleaning it. Your charger does
not require any maintenance apart from regular cleaning.
u Regularly clean the ventilation slots in your appliance/
charger using a soft brush or dry cloth.
u Regularly clean the motor housing using a damp cloth. Do
not use any abrasive or solvent-based cleaner.
-
your BLACK+DECKER dealer.
u
u
u Press the dust bowl release button (2) and lift out the dust
bowl (3) (Fig.J)
u
u Empty the dust bowl by lightly shaking over a dustbin.
u
u
u
u
u
u
u Close the dust-bowl. Make sure the release latch (2)
clicks into place.
From time to time wipe the appliance with a damp cloth.
Do not use any abrasive or solvent-based cleaner. Do not
immerse the appliance in water.
Removing and cleaning the beater bar (Fig. M)
u Pinch and lift the plastic tab on the pivoting clip (17) away
u
u Ensure the beater bar and pivoting clip are replaced
before using the vacuum.
(9) will flash. This indicates that there is a partial charge
left in the battery.
u Leave the appliance plugged in for at least 5 hours to
initially charge the battery. While charging, the charger
may get warm, this is perfectly normal and safe. It is safe
to leave the appliance connected to the charger
indefinitely. The charger automatically reduces power
consumption when charging is complete.
Wall mounting (Fig. N)
The product can be wall mounted, if desired, using the wall
mount bracket (13). (anchors/screws are not supplied)
u Mark the location of the screw holes (within reach of an
electrical outlet for charging the vac while it is on the wall
bracket).
u Install appropriate anchors/screws to secure wall mount
bracket to the wall.
u Hang the vac on the wall by placing the hang hook (located
on the back of the vac) over the catch on the wall mount
bracket.
當地法規可能要求由市政廢物回收點,或由向您出
售新產品的經銷商來提供將電子產品與家庭廢物分
類收集的服務。
服務資訊
Black & Decker 提供遍佈亞洲的公司隸屬及授權服務
地點。所有的 Black & Decker 服務中心都具有訓練有
素的人員,為客戶提供高效、可靠的產品服務。
不論您需要的是技術建議、維修服務還是原廠正品替換
部件,都可以聯絡距您最近的 Black & Decker 服務地點。
附註
Black & Decker 的政策是持續改善我們的產品,因
此,我們保留隨時變更產品規格的權利,恕不另
行通知。
標準裝置和配件可能會根據不同的國家/地區而有
所不同。
產品規格可能會視國家/地區而有所不同。
並非所有的國家/地區都將提供完整的產品系列。
如需各產品系列的供應情況,請聯絡您當地的
Black & Decker 代理商。
技術資料
經銷商: 特力股份有限公司
地址: 台北市內湖區新湖三路 23 號 1.2.5 樓
電話: 0800-552888
進口/委製廠商: 新加坡商百得電動工具 (股) 公司台
灣分公司
地址: 台北市北投區裕民六路 120 號 4 樓
電話: 02-2820-1065
電壓
18V
電池種類: 鋰電池
電池容量: 2.0Ah
可連續使用時間: 約18分
吸力: 14.8AW
集塵容量:
500ml
重量 (kg): 2.5kg
充電時間: 約4小時
配件:充電器,細縫吸嘴,毛刷吸嘴,濾芯2個,
壁掛架

13
ENGLISH
12
繁體中文
電氣安全
充電器上的符號
使用器具前,請仔細閱讀本手冊全部內
容。
本工具採用雙重絕緣,因此無需接地
線。請務必檢查電源電壓是否與銘牌一
致。
指示極性。
充電底座僅供室內使用。
器具上的標籤
本器具上具有以下圖示與日期代碼:
使用器具前,請仔細閱讀本手冊全部內
容。
功能部件
本工具包括以下部分或全部功能部件。
1. 電源開關
2. 集塵筒釋放按鈕
3. 集塵筒
4. 主底盤電源開關
5. 電刷控制開關
6. 上手柄
7. 主底盤
7a. 主底盤釋放按鈕
8. 地板吸塵頭
9. 壁掛架
10. 充電器
11. 刷頭工具配件
12. 細縫吸嘴配件
使用
開啟和關閉電源(圖 A)
若要開啟工具電源,請按下處於主要裝置 (1) 手柄
上的電源開關 (1),或主底盤手柄 (4) 的電源開關。
若要關閉工具電源,請按下電源開關 (1) 或 (4)。
安裝配件(圖 B)
本裝置隨附刷頭工具 (11) 和細縫吸嘴 (12)。
將所選配件安裝到裝置前面,如圖 B 所示。
8
ENGLISH
(Original instructions)
Use
Switching on and off (Fig. A)
u To switch on, press the on/off switch (1) located on the
handle of the main unit (1), or alternatively on the chassis
handle (4).
u To switch off, press the on/off switch (1) or (4).
Using Accessories (Fig. B)
u The appliance is supplied with a brush tool (11) and a
crevice tool (12).
u Fit the chosen accessory into the front of the appliance as
shown in Figure B.
Fitting the upper handle to the main chassis
(Fig. C, D)
u The stick vac chassis is supplied in 2 parts, the upper han-
dle (6) and the lower chassis (7), but they are connected
by a wire.
u Slide the upper handle (6) into the main chassis (7) as
u Ensure the wire is not trapped.
u
(Fig. E)
u
Fitting the vacuum to the Chassis
(Fig. F, G)
u
u To release the vacuum
from the chassis press the chassis
release button (7a) and lift clear.
u The appliance can now be operated via the on/off button
(4) on the handle (6). This also allows you to utilise the
beater bars via the ‘brush on’ control (5) as shown in
Charging (Fig. H)
u
u Make sure the appliance is switched off. The battery will
not be charged with the on/off switch in the on position.
u Plug the jack end of the charger (10) into the back of the
vacuum, then plug the charger into an outlet as shown.
u While charging, if the battery is fully discharged, only
the bottom led will flash the charging indicator (9) . As
the battery charges the LEDs will illuminate one by one
and remain lit until all four will be lit. They will remain lit
for 10 seconds when fully charged and then turn OFF.
If the battery is not fully discharged when charging begins
the LED nearest the fully lit LED on the charging indicator
Electrical safety
Symbols on the charger
Read all of this manual carefully before using
the appliance
#
This tool is double insulated; therefore no
earth wire is required. Always check that the
power supply corresponds to the voltage on
the rating plate.
Indication of polarity.
$
The charging base is intended for indoor use
only.
Labels on appliance
The following symbols appear on this appliance along with the
date code
Read all of this manual carefully before
using the appliance
Features
This tool includes some or all of the following features.
1. On/off power switch
2. Dust bowl release button
3. Dust bowl
4. Chassis on/off power switch
5. Brush control switch
6. Upper handle
7. Main chassis
7a. Chassis release button
8. Floor head
9. Charging indicator
10. Charger
11. Brush tool accessory
12. Crevice tool accessory
8
ENGLISH
(Original instructions)
Use
Switching on and off (Fig. A)
u To switch on, press the on/off switch (1) located on the
handle of the main unit (1), or alternatively on the chassis
handle (4).
u To switch off, press the on/off switch (1) or (4).
Using Accessories (Fig. B)
u The appliance is supplied with a brush tool (11) and a
crevice tool (12).
u Fit the chosen accessory into the front of the appliance as
shown in Figure B.
Fitting the upper handle to the main chassis
(Fig. C, D)
u The stick vac chassis is supplied in 2 parts, the upper han-
dle (6) and the lower chassis (7), but they are connected
by a wire.
u Slide the upper handle (6) into the main chassis (7) as
u Ensure the wire is not trapped.
u
(Fig. E)
u
Fitting the vacuum to the Chassis
(Fig. F, G)
u
u To release the vacuum
from the chassis press the chassis
release button (7a) and lift clear.
u The appliance can now be operated via the on/off button
(4) on the handle (6). This also allows you to utilise the
beater bars via the ‘brush on’ control (5) as shown in
Charging (Fig. H)
u
u Make sure the appliance is switched off. The battery will
not be charged with the on/off switch in the on position.
u Plug the jack end of the charger (10) into the back of the
vacuum, then plug the charger into an outlet as shown.
u While charging, if the battery is fully discharged, only
the bottom led will flash the charging indicator (9) . As
the battery charges the LEDs will illuminate one by one
and remain lit until all four will be lit. They will remain lit
for 10 seconds when fully charged and then turn OFF.
If the battery is not fully discharged when charging begins
the LED nearest the fully lit LED on the charging indicator
Electrical safety
Symbols on the charger
Read all of this manual carefully before using
the appliance
#
This tool is double insulated; therefore no
earth wire is required. Always check that the
power supply corresponds to the voltage on
the rating plate.
Indication of polarity.
$
The charging base is intended for indoor use
only.
Labels on appliance
The following symbols appear on this appliance along with the
date code
Read all of this manual carefully before
using the appliance
Features
This tool includes some or all of the following features.
1. On/off power switch
2. Dust bowl release button
3. Dust bowl
4. Chassis on/off power switch
5. Brush control switch
6. Upper handle
7. Main chassis
7a. Chassis release button
8. Floor head
9. Charging indicator
10. Charger
11. Brush tool accessory
12. Crevice tool accessory
8
ENGLISH
(Original instructions)
Use
Switching on and off (Fig. A)
u To switch on, press the on/off switch (1) located on the
handle of the main unit (1), or alternatively on the chassis
handle (4).
u To switch off, press the on/off switch (1) or (4).
Using Accessories (Fig. B)
u The appliance is supplied with a brush tool (11) and a
crevice tool (12).
u Fit the chosen accessory into the front of the appliance as
shown in Figure B.
Fitting the upper handle to the main chassis
(Fig. C, D)
u The stick vac chassis is supplied in 2 parts, the upper han-
dle (6) and the lower chassis (7), but they are connected
by a wire.
u Slide the upper handle (6) into the main chassis (7) as
u Ensure the wire is not trapped.
u
(Fig. E)
u
Fitting the vacuum to the Chassis
(Fig. F, G)
u
u To release the vacuum
from the chassis press the chassis
release button (7a) and lift clear.
u The appliance can now be operated via the on/off button
(4) on the handle (6). This also allows you to utilise the
beater bars via the ‘brush on’ control (5) as shown in
Charging (Fig. H)
u
u Make sure the appliance is switched off. The battery will
not be charged with the on/off switch in the on position.
u Plug the jack end of the charger (10) into the back of the
vacuum, then plug the charger into an outlet as shown.
u While charging, if the battery is fully discharged, only
the bottom led will flash the charging indicator (9) . As
the battery charges the LEDs will illuminate one by one
and remain lit until all four will be lit. They will remain lit
for 10 seconds when fully charged and then turn OFF.
If the battery is not fully discharged when charging begins
the LED nearest the fully lit LED on the charging indicator
Electrical safety
Symbols on the charger
Read all of this manual carefully before using
the appliance
#
This tool is double insulated; therefore no
earth wire is required. Always check that the
power supply corresponds to the voltage on
the rating plate.
Indication of polarity.
$
The charging base is intended for indoor use
only.
Labels on appliance
The following symbols appear on this appliance along with the
date code
Read all of this manual carefully before
using the appliance
Features
This tool includes some or all of the following features.
1. On/off power switch
2. Dust bowl release button
3. Dust bowl
4. Chassis on/off power switch
5. Brush control switch
6. Upper handle
7. Main chassis
7a. Chassis release button
8. Floor head
9. Charging indicator
10. Charger
11. Brush tool accessory
12. Crevice tool accessory
8
ENGLISH
(Original instructions)
Use
Switching on and off (Fig. A)
u To switch on, press the on/off switch (1) located on the
handle of the main unit (1), or alternatively on the chassis
handle (4).
u To switch off, press the on/off switch (1) or (4).
Using Accessories (Fig. B)
u The appliance is supplied with a brush tool (11) and a
crevice tool (12).
u Fit the chosen accessory into the front of the appliance as
shown in Figure B.
Fitting the upper handle to the main chassis
(Fig. C, D)
u The stick vac chassis is supplied in 2 parts, the upper han-
dle (6) and the lower chassis (7), but they are connected
by a wire.
u Slide the upper handle (6) into the main chassis (7) as
u Ensure the wire is not trapped.
u
(Fig. E)
u
Fitting the vacuum to the Chassis
(Fig. F, G)
u
u To release the vacuum
from the chassis press the chassis
release button (7a) and lift clear.
u The appliance can now be operated via the on/off button
(4) on the handle (6). This also allows you to utilise the
beater bars via the ‘brush on’ control (5) as shown in
Charging (Fig. H)
u
u Make sure the appliance is switched off. The battery will
not be charged with the on/off switch in the on position.
u Plug the jack end of the charger (10) into the back of the
vacuum, then plug the charger into an outlet as shown.
u While charging, if the battery is fully discharged, only
the bottom led will flash the charging indicator (9) . As
the battery charges the LEDs will illuminate one by one
and remain lit until all four will be lit. They will remain lit
for 10 seconds when fully charged and then turn OFF.
If the battery is not fully discharged when charging begins
the LED nearest the fully lit LED on the charging indicator
Electrical safety
Symbols on the charger
Read all of this manual carefully before using
the appliance
#
This tool is double insulated; therefore no
earth wire is required. Always check that the
power supply corresponds to the voltage on
the rating plate.
Indication of polarity.
$
The charging base is intended for indoor use
only.
Labels on appliance
The following symbols appear on this appliance along with the
date code
Read all of this manual carefully before
using the appliance
Features
This tool includes some or all of the following features.
1. On/off power switch
2. Dust bowl release button
3. Dust bowl
4. Chassis on/off power switch
5. Brush control switch
6. Upper handle
7. Main chassis
7a. Chassis release button
8. Floor head
9. Charging indicator
10. Charger
11. Brush tool accessory
12. Crevice tool accessory
8
ENGLISH
(Original instructions)
Use
Switching on and off (Fig. A)
u To switch on, press the on/off switch (1) located on the
handle of the main unit (1), or alternatively on the chassis
handle (4).
u To switch off, press the on/off switch (1) or (4).
Using Accessories (Fig. B)
u The appliance is supplied with a brush tool (11) and a
crevice tool (12).
u Fit the chosen accessory into the front of the appliance as
shown in Figure B.
Fitting the upper handle to the main chassis
(Fig. C, D)
u The stick vac chassis is supplied in 2 parts, the upper han-
dle (6) and the lower chassis (7), but they are connected
by a wire.
u Slide the upper handle (6) into the main chassis (7) as
u Ensure the wire is not trapped.
u
(Fig. E)
u
Fitting the vacuum to the Chassis
(Fig. F, G)
u
u To release the vacuum
from the chassis press the chassis
release button (7a) and lift clear.
u The appliance can now be operated via the on/off button
(4) on the handle (6). This also allows you to utilise the
beater bars via the ‘brush on’ control (5) as shown in
Charging (Fig. H)
u
u Make sure the appliance is switched off. The battery will
not be charged with the on/off switch in the on position.
u Plug the jack end of the charger (10) into the back of the
vacuum, then plug the charger into an outlet as shown.
u While charging, if the battery is fully discharged, only
the bottom led will flash the charging indicator (9) . As
the battery charges the LEDs will illuminate one by one
and remain lit until all four will be lit. They will remain lit
for 10 seconds when fully charged and then turn OFF.
If the battery is not fully discharged when charging begins
the LED nearest the fully lit LED on the charging indicator
Electrical safety
Symbols on the charger
Read all of this manual carefully before using
the appliance
#
This tool is double insulated; therefore no
earth wire is required. Always check that the
power supply corresponds to the voltage on
the rating plate.
Indication of polarity.
$
The charging base is intended for indoor use
only.
Labels on appliance
The following symbols appear on this appliance along with the
date code
Read all of this manual carefully before
using the appliance
Features
This tool includes some or all of the following features.
1. On/off power switch
2. Dust bowl release button
3. Dust bowl
4. Chassis on/off power switch
5. Brush control switch
6. Upper handle
7. Main chassis
7a. Chassis release button
8. Floor head
9. Charging indicator
10. Charger
11. Brush tool accessory
12. Crevice tool accessory
將上手柄安裝至主底盤(圖 C 和 D)
地板用真空吸塵器底盤隨附兩個部分,上手柄 (6)
和下主底盤 (7),但它們透過電線連接。
將上手柄 (6) 滑入主底盤 (7) 內,如圖 C 所示。
確保電線未發生移動受限。
使用固定螺絲 (13) 鎖緊,如圖 D 所示。
將地板吸塵頭安裝到主底盤(圖 E)
將主底盤 (7) 滑入地板吸塵頭 (8),直到聽見卡嗒
聲,如圖 E 所示。
將真空吸塵器安裝至主底盤(圖 F、G)
將真空吸塵器(先滑入卡槽)滑入主底盤 (7),直
到聽見一聲清晰的卡嗒聲,如圖 F 所示。
按下主底盤釋放按鈕 (7a) 並提起,以從主底盤卸
下真空吸塵器。
本裝置可以透過立即按下手柄 (6) 上的電源開關
按鈕 (4) 來操作。這也讓您可以透過按下「刷頭
開啟」控制鈕 (5) 來使用地板刷,如圖 G 所示。
充電(圖 H、I)
確保工具電源已關閉。若工具開關處於「開啟」
的位置,電池是無法充電的。
將充電器 (10) 的插頭端插入真空吸塵器的背面,
然後將充電器插入插座,如圖所示。
充電期間,若電池已經完全放電,則只有底部
LED 會閃爍正在充電指示燈 (14)。隨著電池充
電,LED 將逐個亮起,並保持亮起直到四個 LED
全部亮起。它們將在完全充電後保持亮起 10 秒
鐘,然後關閉。如果電池在充電開始時未完全放
電,則充電指示燈 (14) 上最靠近全亮 LED 的 LED
開始閃爍。這表示電池內有剩餘部分電量。
第一次為電池充電時,請讓工具插電至少 5 個
小時。充電時,充電器溫度會升高,這是完全正
常且安全的。工具一直與充電器保持連接是安全
的。充電完成後,充電器會自動降低功耗。
清潔濾心(圖 J、K、L)
按下集塵筒釋放按鈕 (2) 並提出集塵筒 (3)(圖 J)
從集塵筒 (3) 拉起濾心組件 (15)(圖 K)。
在垃圾桶上輕輕晃動,清空集塵筒。
濾心 (16) 現在可以逆時針旋轉從外濾心 (15) 取下
(圖 L)。
輕拍以清空濾心、外濾心以及集塵筒上過多灰塵
和碎屑(圖 L1)。
用溫肥皂水沖洗集塵筒(圖 L1)。
用溫肥皂水清洗濾心(圖 L1)。
確保濾心和集塵筒乾燥。
將濾心重新安裝到本工具內。
關閉集塵筒。確保集塵筒釋放按鈕 (2) 卡入到位。
13
繁體中文
時常用濕布擦拭工具。請勿使用任何研磨性或基於
溶劑的清潔劑。請勿將器具浸入水中。
移除和清潔地板刷(圖 M)
提捏旋轉夾 (17) 上的塑膠片,以與地板吸塵頭分開。
從地板頭上提起地板吸塵頭 (18)。
確保在使用真空吸塵器前更換地板刷和旋轉夾。
牆面安裝(圖 N)
本產品可以在需要時使用牆面支架 (13) 來進行壁
裝。
標記螺絲洞的位置(確保將器具置放在牆面支架
上時,附近有電源插座可充電)。
安裝適當的錨栓/螺絲來將牆面支架固定到牆壁上。
透過將套鉤(位於真空吸塵器背面)置於牆面支
架的鎖扣上,將真空吸塵器懸掛到牆上。
維護
您的 BLACK+DECKER 充電式工具採用卓越的設計,
能夠長時間使用,並且只需最少的維護。若要持續
獲得滿意的操作效果,需進行正確的工具維護和定
期的清潔。
警告!在充電式工具上執行任何維護工作之前:
若電池屬於內建電池,請使電池完全放電,然後
再關閉電源。
請在清潔充電器之前拔出充電器的插頭。您的充
電器除了定期清潔之外,並不需要執行任何維護
操作。
定期使用軟刷或乾布清潔工具/充電器內的通風槽。
定期使用濕布清潔電動機外殼。請勿使用任何研
磨性或溶劑型清潔劑。
更換濾心
濾心應在出現磨損或損壞時予以更換。您的
BLACK+DECKER 代理商為您提供濾心更換服務。
依照上述說明取下舊濾心。
依照上述說明安裝新濾心。
保護環境
分開收集。本產品必須與一般家庭廢物分
開處置。
若您發現需要更換 Black & Decker 產品,或該產品對
您再無用處,請勿將其與家庭廢物一併處置。務必
將本產品送往分類收集處。
透過分開收集用過的產品與包裝,可以實
現材料的循環再生利用。重新使用回收的
材料有助於防止環境污染,並降低對原材
料的需求。
9
ENGLISH
(Original instructions)
Protecting the environment
Z
Separate collection. This product must not be
disposed of with normal household waste.
needs replacement, or if it is of no further use to you, do not
dispose of it with household waste. Make this product avail-
-
able for separate collection.
z
Separate collection of used products and packaging
allows materials to be recycled and used again.
Re-use of recycled materials helps prevent environ
mental pollution and reduces the demand for raw
materials.
Local regulations may provide for separate collection of elec-
trical products from the household, at municipal waste sites or
by the retailer when you purchase a new product.
Maintenance
Your BLACK+DECKER cordless appliance has been designed
to operate over a long period of time with a minimum of main-
tenance. Continuous satisfactory operation depends upon
proper tool care and regular cleaning.
Warning! Before performing any maintenance on cordless
appliances:
u Run the battery down completely if it is integral and then
switch off.
u Unplug the charger before cleaning it. Your charger does
not require any maintenance apart from regular cleaning.
u Regularly clean the ventilation slots in your appliance/
charger using a soft brush or dry cloth.
u Regularly clean the motor housing using a damp cloth. Do
not use any abrasive or solvent-based cleaner.
-
your BLACK+DECKER dealer.
u
u
u Press the dust bowl release button (2) and lift out the dust
bowl (3) (Fig.J)
u
u Empty the dust bowl by lightly shaking over a dustbin.
u
u
u
u
u
u
u Close the dust-bowl. Make sure the release latch (2)
clicks into place.
From time to time wipe the appliance with a damp cloth.
Do not use any abrasive or solvent-based cleaner. Do not
immerse the appliance in water.
Removing and cleaning the beater bar (Fig. M)
u Pinch and lift the plastic tab on the pivoting clip (17) away
u
u Ensure the beater bar and pivoting clip are replaced
before using the vacuum.
(9) will flash. This indicates that there is a partial charge
left in the battery.
u Leave the appliance plugged in for at least 5 hours to
initially charge the battery. While charging, the charger
may get warm, this is perfectly normal and safe. It is safe
to leave the appliance connected to the charger
indefinitely. The charger automatically reduces power
consumption when charging is complete.
Wall mounting (Fig. N)
The product can be wall mounted, if desired, using the wall
mount bracket (13). (anchors/screws are not supplied)
u Mark the location of the screw holes (within reach of an
electrical outlet for charging the vac while it is on the wall
bracket).
u Install appropriate anchors/screws to secure wall mount
bracket to the wall.
u Hang the vac on the wall by placing the hang hook (located
on the back of the vac) over the catch on the wall mount
bracket.
9
ENGLISH
(Original instructions)
Protecting the environment
Z
Separate collection. This product must not be
disposed of with normal household waste.
needs replacement, or if it is of no further use to you, do not
dispose of it with household waste. Make this product avail-
-
able for separate collection.
z
Separate collection of used products and packaging
allows materials to be recycled and used again.
Re-use of recycled materials helps prevent environ
mental pollution and reduces the demand for raw
materials.
Local regulations may provide for separate collection of elec-
trical products from the household, at municipal waste sites or
by the retailer when you purchase a new product.
Maintenance
Your BLACK+DECKER cordless appliance has been designed
to operate over a long period of time with a minimum of main-
tenance. Continuous satisfactory operation depends upon
proper tool care and regular cleaning.
Warning! Before performing any maintenance on cordless
appliances:
u Run the battery down completely if it is integral and then
switch off.
u Unplug the charger before cleaning it. Your charger does
not require any maintenance apart from regular cleaning.
u Regularly clean the ventilation slots in your appliance/
charger using a soft brush or dry cloth.
u Regularly clean the motor housing using a damp cloth. Do
not use any abrasive or solvent-based cleaner.
-
your BLACK+DECKER dealer.
u
u
u Press the dust bowl release button (2) and lift out the dust
bowl (3) (Fig.J)
u
u Empty the dust bowl by lightly shaking over a dustbin.
u
u
u
u
u
u
u Close the dust-bowl. Make sure the release latch (2)
clicks into place.
From time to time wipe the appliance with a damp cloth.
Do not use any abrasive or solvent-based cleaner. Do not
immerse the appliance in water.
Removing and cleaning the beater bar (Fig. M)
u Pinch and lift the plastic tab on the pivoting clip (17) away
u
u Ensure the beater bar and pivoting clip are replaced
before using the vacuum.
(9) will flash. This indicates that there is a partial charge
left in the battery.
u Leave the appliance plugged in for at least 5 hours to
initially charge the battery. While charging, the charger
may get warm, this is perfectly normal and safe. It is safe
to leave the appliance connected to the charger
indefinitely. The charger automatically reduces power
consumption when charging is complete.
Wall mounting (Fig. N)
The product can be wall mounted, if desired, using the wall
mount bracket (13). (anchors/screws are not supplied)
u Mark the location of the screw holes (within reach of an
electrical outlet for charging the vac while it is on the wall
bracket).
u Install appropriate anchors/screws to secure wall mount
bracket to the wall.
u Hang the vac on the wall by placing the hang hook (located
on the back of the vac) over the catch on the wall mount
bracket.
當地法規可能要求由市政廢物回收點,或由向您出
售新產品的經銷商來提供將電子產品與家庭廢物分
類收集的服務。
服務資訊
Black & Decker 提供遍佈亞洲的公司隸屬及授權服務
地點。所有的 Black & Decker 服務中心都具有訓練有
素的人員,為客戶提供高效、可靠的產品服務。
不論您需要的是技術建議、維修服務還是原廠正品替換
部件,都可以聯絡距您最近的 Black & Decker 服務地點。
附註
Black & Decker 的政策是持續改善我們的產品,因
此,我們保留隨時變更產品規格的權利,恕不另
行通知。
標準裝置和配件可能會根據不同的國家/地區而有
所不同。
產品規格可能會視國家/地區而有所不同。
並非所有的國家/地區都將提供完整的產品系列。
如需各產品系列的供應情況,請聯絡您當地的
Black & Decker 代理商。
技術資料
經銷商: 特力股份有限公司
地址: 台北市內湖區新湖三路 23 號 1.2.5 樓
電話: 0800-552888
進口/委製廠商: 新加坡商百得電動工具 (股) 公司台
灣分公司
地址: 台北市北投區裕民六路 120 號 4 樓
電話: 02-2820-1065
電壓
18V
電池種類: 鋰電池
電池容量: 2.0Ah
可連續使用時間: 約18分
吸力: 14.8AW
集塵容量:
500ml
重量 (kg): 2.5kg
充電時間: 約4小時
配件:充電器,細縫吸嘴,毛刷吸嘴,濾芯2個,
壁掛架
-
 1
1
-
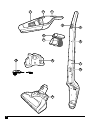 2
2
-
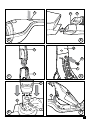 3
3
-
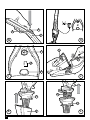 4
4
-
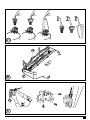 5
5
-
 6
6
-
 7
7
-
 8
8
-
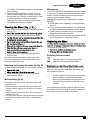 9
9
-
 10
10
-
 11
11
-
 12
12
-
 13
13


他の言語で
- English: BLACK+DECKER SVA520B User manual
関連論文
-
BLACK+DECKER LGC120B ユーザーマニュアル
-
BLACK+DECKER HVFE2150L ユーザーマニュアル
-
-
BLACK+DECKER NVC215WA ユーザーマニュアル
-
BLACK+DECKER SVFV3250L ユーザーマニュアル
-
-
-
-
BLACK+DECKER ADV1220 ユーザーマニュアル
-
BLACK+DECKER PD1820LF ユーザーマニュアル