
42PFD5519/30
48PFD5519/30
32PFD5319/30
Register your product and get support at
www.philips.com/welcome
EN User Manual
ZH-HK 用戶手冊


1EN-GB
English
Contents
1 NOTICE 2
2 IMPORTANT 3
3 TV Overview 5
Control Pannel 5
Remote Control 5
Use Remote Control 6
4 Using TV 7
Turn on the TV or switch to standby 7
Change Channel 7
To view the connected device(s) 8
Adjust the TV volume 8
5 USING MORE FEATURES OF YOUR
TV 9
Accessing TV Menus 9
Changing the Language 9
Switching the TV to standby automatically
(Sleep Time) 9
Changing Picture and Sound Settings 9
Using the Options Menu 12
Creating and Using List of Favourite
Channels 12
Using TV Locks 12
Accessing the USB Storage Device to
view photos and play Music or Video 13
Changing TV Preferences 14
Starting a TV Demo 14
6 INSTALLING CHANNELS 15
Installing Channels Automatically 15
Installing Channels Manually 15
Installing Digital Channels 15
Renaming Channels 16
Rearranging Channels 16
7 NETWORK SETTINGS 17
Network Type 17
Wired Installation 17
Wireless Installation 17
Viewing Network Settings 18
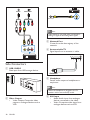
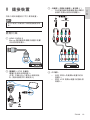
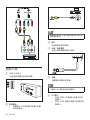
8 CONNECTING DEVICES 19
Bottom Connectors 19
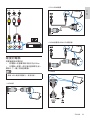
Side Connectors 20
Connecting a Computer 21
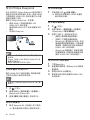
Using Philips EasyLink 22
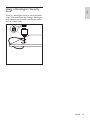
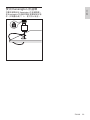
Using a Kensington Security Lock 23
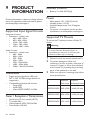
9 PRODUCT INFORMATION 24
Supported Input Signal Formats 24
Multimedia 24
Tuner / Reception / Transmission 24
Remote Control 24
Power 24
Supported TV Mounts 24
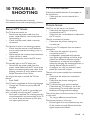
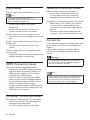
10 TROUBLESHOOTING 25
General TV Issues 25
TV Channel Issues 25
Picture Issues 25
Sound Issues 26
HDMI Connection Issues 26
Computer Connection Issues 26
Network Connection Issues 26
Contact Us 26

2 EN-GB
Copyright
All other registered and unregistered
trademarks are the property of their respective
owners.
® Kensington and Micro Saver are registered US
trademarks of ACCO World Corporation with
issued registrations and pending applications in
other countries throughout the world.
© The FreeType Project (www.freetype.org)
owns the copyright to the software.
Manufactured under license from Dolby
Laboratories. Dolby and the double D symbol
are trademarks of Dolby Laboratories.
HDMI, the HDMI logo and High-Denition
Multimedia Interface are trademarks or
registered trademarks of HDMI Licensing LLC.
Philips and the Philips Shield Emblem are
registered trademarks of Koninklijke Philips N.V.
and are used under licence from Koninklijke
Philips N.V.
1 NOTICE
2014 © TP Vision Europe B.V. All Right Is
Reserved. Specications are subject to change
without notice. Trademarks are the property
of Koninklijke Philips N.V or their respective
owners. TP Vision Europe B.V. reserves the right
to change products at any time without being
obliged to adjust earlier supplies accordingly.
The material in this manual is believed
adequate for the intended use of the system.
If the product, or its individual modules or
procedures, are used for purposes other than
those specied herein, conrmation of their
validity and suitability must be obtained. TP
Vision Europe B.V. warrants that the material
itself does not infringe any United States
patents. No further warranty is expressed
or implied. TP Vision Europe B.V. will not be
responsible for any errors in the content of this
document, nor any issues caused by the content
of this document. Errors reported to Philips will
be adapted and published on the Philips support
website as soon as possible.
Pixel Characteristics
This LCD product has a high number of colour
pixels. Although it has effective pixels of 99.999%
or more, black dots or bright points of light
(red, green or blue) may still appear constantly
on the screen. This is a structural property of
the display (within common industry standards)
and is not a malfunction.
Warranty
You cannot replace any components. DO NOT
open or remove the rear chassis of the TV to
expose the product’s interior. Always contact
Philips Service Centre or its authorised repair
shops for service or repairs. Otherwise, all
express or implied warranties will become void.
Any operation expressly prohibited in this
manual, or any adjustment or assembly
procedure not recommended or authorised in
this manual, is not covered under warranty.

3EN-GB
• When wall mounting the TV, use only a wall
mount that can support the weight of the
TV. Secure the wall mount to a wall that
can support the combined weight of the
TV and wall mount. TP Vision Europe B.V.
bears no responsibility for improper wall
mounting that result in accident, injury or
damage.
• Parts of this product may be made of
glass. Handle with care to avoid injury and
damage.
Risk of injury to children!
Follow these precautions to prevent the TV
from toppling over and causing
injury to children:
• Never place the TV on a surface covered
by a cloth or other material that can be
pulled away.
• Ensure that no part of the TV hangs over
the edge of the surface.
• Never place the TV on tall furniture (such
as a bookcase) without anchoring both the
furniture and TV to the wall or a suitable
support.
• Educate children about the dangers of
climbing on furniture to reach the TV.
Risk of swallowing batteries!
• The product/remote control may contain a
coin-type battery, which can be swallowed.
Keep the battery out of reach of children
at all times!
Beware of overheating!
• Never install the TV in a conned space.
Always leave a space of at least 4 inches or
10 cm around the TV for ventilation. Ensure
curtains or other objects never cover the
ventilation slots on the TV.
Risk of damage to the TV!
• Before you connect the TV to the power
outlet, ensure that the power voltage
matches the value printed on the back of
the TV. Never connect the TV to the power
outlet if the voltage is different.
• If you need to store the TV, disassemble the
stand from the TV. Never lay the TV on its
back with the stand installed.
2 IMPORTANT
Read and understand all instructions before you
use your TV. If damage is caused by failure to
follow instructions, the warranty does not apply.
Safety
Risk of electric shock or re!!
• Never expose the TV to rain or water.
Never place liquid containers, such as
vases, near the TV. If liquids are spilt on or
into the TV, disconnect the TV from the
power outlet immediately. Contact Philips
Consumer Care to have the TV checked
before use.
• Never place the TV, remote control or
batteries near naked ames or other heat
sources, including direct sunlight.
To prevent the spread of re, keep candles
or other ames away from the TV, remote
control and batteries at all times.
• Never insert objects into the ventilation
slots or other openings on the TV.
• When the TV is swivelled ensure that no
strain is exerted on the power cord. Strain
on the power cord can loosen connections
and cause arcing.
Risk of short circuit or re!
• Never expose the remote control or
batteries to rain, water or excessive heat.
• Avoid force coming onto power plugs.
Loose power plugs can cause arcing or re.
Risk of injury or damage to the TV!
• Two people are required to lift and carry a
TV that weighs more than 25 kg or 55 lbs.
• When stand mounting the TV, use only the
supplied stand. Secure the stand to the TV
tightly. Place the TV on a at, level surface
that can support the combined weight of
the TV and the stand.
English

4 EN-GB
Disposal of Your Old Product and
Batteries
Your product is designed and manufactured with
premium materials and elements,
which can be recycled and reused.
If the product comes with crossed recycle bin
lable, it means the European Directive 2002/96/
EC is applicable to the product. Please check
the local electronics and electronic products
separate collection system for information.
Please dispose according to the local
regulations; please do not dispose the products
with other household waste.
Proper disposal of the product can help reduce
the negative impacts on the environment and
mankind health.
Your product contains the batteries that are
compliance to Eurioean Directive 2006/66/EC,
and may not be disposed together with other
household waste.
Please note the local regulations related to
batteries separate collection as proper disposal
of the product can help reduce the negative
impacts on the environment and mankind
health.
Risk of injury, re or power cord damage!
• Never place the TV or any objects on the
power cord.
• To easily disconnect the TV power cord
from the power outlet, ensure that you
have full access to the power cord at all
times.
• When you disconnect the power cord,
always pull the plug, never the cable.
• Disconnect the TV from the power outlet
and antenna before lightning storms. During
lightning storms, never touch any part of
the TV, power cord or antenna cable.
Risk of hearing damage!
• Avoid using earphones or headphones at
high volumes or for prolonged periods of
time.
Low temperatures
• If the TV is transported in temperatures
below 5°C or 41°F, unpack the TV and wait
until the TV temperature matches room
temperature before connecting the TV to
the power outlet.
Screen Care
• Avoid stationary images as much as
possible. Stationary images are images that
remain on-screen for extended periods of
time. Examples include: on-screen menus,
black bars and time displays. If you must use
stationary images, reduce screen contrast
and brightness to avoid screen damage.
• Unplug the TV before cleaning.
• Clean the TV and frame with a soft, damp
cloth. Never use substances such as alcohol,
chemicals or household cleaners on the TV.
• Risk of damage to the TV screen! Never
touch, push, rub or strike the screen with
any object.
• To avoid deformations and colour fading,
wipe off water drops as soon as possible.

5EN-GB
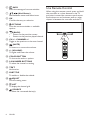
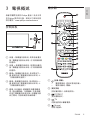
Remote Control
a (Standby-Power On)
• When the TV is on, switch it to standby.
• Power on when the TV is in standby
mode.
b Play Button
Control the play of the image, music and
video.
c
FORMAT
Changes the Picture Format.
d
TV
Toggle the source of the signal to watch TV.
e
(Home)
Visit Main Menu
3 TV Overview
congratulations for purchasing and using Philips
product! In order to enjoy all the supports
provided by Philips, please register your TV at
www.philips.com/welcome
Control Pannel
1
2
3
4
5
a Volume -: Used to lower the volume when
there is no keyboard menu available; when
the keyboard menu is displayed, move the
reective options left or right.
b Volume +: Used to higher the volume when
there is no keyboard menu available; when
the keyboard menu is displayed, move the
reective options left or right.
c Channel +: Used to toggle to the next
channel when there is no keyboard menu
available; when the keyboard menu is
displayed, move the reective options up or
down.
d Channel -: Used to toggle to the previous
channel when there is no keyboard menu
available; when the keyboard menu is
displayed, move the reective options up or
down.
e Menu: When in standby, the menu key
is used as the power button; press this
key to power up. After powering up, the
menu key is used to open the keyboard
menu function. When the keyboard
menu is opened, the menu key is used as
conrmation key.
English

6 EN-GB
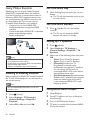
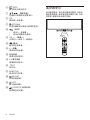
Use Remote Control
When using the remote control, press and hold
the controller at a close distance to the TV
and point it toward the remote control sensor.
Ensure there are no furnitures, walls or other
objects in between the controller and the TV.
~5m
~30˚
f INFO
Show the message of current activities.
g
(Navi Button)
Navi between menus and select items.
h OK
Confrim the entry or selection.
i
OPTIONS
Visits the current activities or available
options.
j
(BACK)
• Return to the previoius screen.
• Return to the previous played channel.
k CH + / -CHANNEL+/-
Toggle to the previous or the next channel.
l
(MUTE)
To mute or to restore the volume.
m +/- (VOLUME)
To higher and lower the volume.
n COLOR BUTTON
To choose the tasks or options.
o 0-9 NUMBER BUTTONS
To select the channel or setting.
p TEXT
No function.
q SUBTITLE
To enable or disable the subtitle.
r
ADJUST
Visit the setting menu.
s
LIST
To display the channel grid.
t
SOURCE
To select the connected device(s).

7EN-GB
English
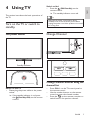
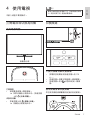
4 Using TV
This section introduces the basic operations of
the TV.
Turn on the TV or switch to
standby
Use power switch
Standby Indicator
Switch on the TV
• Please plug the power cable to the power
sucket.
» If the standby indicator is red, press
the
(Standby-ON) on the remote
control.
Switch to Idel
• Press the
(ON-Standby) on the
remote control.
» The standby indicator turns red.
Tip
•
Although the power consumption during
standby is low, it still consumes power. Please
unplug the power cord if the product is not used
for a long time.
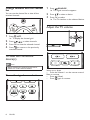
Change Channel
1
2
3
4
5
Change channel without using the
channel list
• Press CH +/- on the TV control panel or
the remote control.
• Use the number buttons on the remote
control to enter the channel number.
• Press the
on the remote controler to
switch back to the previous channel.

8 EN-GB
1 Press SOURCE.
» The signal source list appears.
2 Press to select a device.
3 Press OK to select.
» The TV siwtches to the selected device.
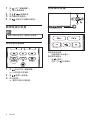
Adjust the TV volume
1
2
3
4
5
Volum up or down
• Press the Volume+/- on the remote control.
Mute or unmute
• Press
(Mute).
• Press
again to unmute.
Change channels with the channel
list
You can use the channel list to view all the
received channels.
1 Press LIST.
» To display the channel grid.
2 Press to select channels.
3 Press OK to view the selected channel.
4 Press to return to the previously
watched channel.
To view the connected
device(s)
Note
•
Before selecting the external signal source,
please turn on the external device.
To use the signal source button

9EN-GB
English
2 Select Settings > TV Settings >
General Settings > Menu Language,
and press
.
3 Select your desired language and press OK.
Switching the TV to standby
automatically (Sleep Time)
Sleep time switches the TV to standby after a
pre-dened period of time.
Note
•
You can switch off your TV earlier or reset the
sleep time during the countdown.
1 Press (Home).
2 Select Settings > TV Settings >
General Settings > Sleep Time.
» The sleep time displays.
3 Select a valune bwtween 0 to 180 minutes.
» The setting unit of the sleep time is 5
minutes. If set to zero, the sleep time is
switched off.
4 Press OK to open timer.
» The TV switches to standby after the
specied time.
Changing Picture and Sound
Settings
Change picture and sound settings to suit your
preferences. You can apply pre-dened settings
or change settings manually.
Quick picture and sound settings
This feature helps you congure picture and
sound settings quickly.
1 Press (Home).
2 Select Settings > Quick Picture and
Sound, and press OK.
5 USING MORE
FEATURES
OF YOUR TV
Accessing TV Menus
Menus help you to install channels, change
picture and sound settings and access other
features.
1 Press (Home).
» The menu screen appears.
Watching TV
TV Program Guide
Signal Source
Settings Help
2 Please press OK after selecting the
following options:
• [Watch TV]: When other signal
sources have been selected, select
this option to switch back to the TV
channel.
• [TV Program Guide]: Displays the
TV Program Guide.
• [Signal Source]: Enters the signal
source menu.
• [Setup]: Changes the picture
, sound
and other settings.
• [Help]: Entrs the TV User Manual.
Changing the Language
You can choose to change the language of the
menu.
Changing the menu language
1 Press (Home).

10 EN-GB
3 Select Continue, and press OK.
4 Select your favourite settings according
to the on-screen instructions.
Use Picture Style
Use Picture Style to apply pre-dened picture
settings.
1 Press OPTIONS, select
Picture and Audio > Picture Style,
and press OK.
2 Select one of the following settings and
OK.
• [Personal]: Uses Quick Setting
picture settings.
• [Vivid]: Applies rich and dynamic
settings, ideal for daylight use.
• [Natural]: Applies a natural setting.
• [Cinema]: Applies settings for
watching movies.
• [Game]: Applies settings for gaming.
• [Energy saving]: Applies low-
energy settings.
• [Standard]: Adjusts picture settings
to suit most environments and types
of video.
• [Photo]: Applicable to viewing of
photos.
• [Custom]: Customises and stores
your personal settings.
Adjusting picture settings manually
1 Press (Home).
2 Select Settings > TV Settings, and
press OK.
3 Select Picture, select one of the
following settings and press OK.
• [Picture Style]: Selects pre-
dened settings.
• [Reset]: Resets all settings to their
factory default values.
• [Manul Backlight]: Adjusts the
lightness of the backlight.
• [Brightness]: Adjusts the intensity
and details of darker areas.
• [Contrast]: Adjusts the contrast
to enhance the strength difference
between the light and the shadow.
• [Colour]: Adjusts colour saturation.
• [Tine]: Compensates the YUV. It is
displayed under NTSC System.
• [Sharpness]: Adjusts sharpness of
the image.
• [Noise Reduction]: Filters and
reduces noise in an image.
• [Color Temperature]: Adjusts the
colour balance in an image.
• [Pixel Plus]: Fine tunes each pixel
to match the surrounding pixles
in order to prduce the perfect HD
picture.
• [Advanced Sharpness]: Enables
superb picture clarity.
• [Dynamic Contrast]: Enhances
contrast dynamically according to
changes in the picture.
• [Dynamic backlight]: Adjusts
brightness of the TV backlight to
match lighting conditions.
• [Colour enhancement]: Makes
colours more vivid and rich.
• [Gamma]: Makes colours more
vivid and rich.
• [HDMI Mode]: When the picture is
not functioning properly or the signal
source format is uncertain, the display
can sometimes be enhanced through
manual setting in HDMi mode.
• The option is only available
when the HDMI input signal is
480P/576P/720P/1080P.
• Please select Vido when connecting
DVD; please select PC when
connecting PC.
• The compatibility cannot be
guaranteed 100% valid as the signal
source equipments may be different.
• [Picture format]: Changes the
picture format.
• [Screen Edges]: Adjusts the size of
the viewing area. (When set to the
minimum, you might see noise or a
rough edge of an image.)
• [Picture Shift]: Adjusts the position
of the picture for various picture
formats.

11EN-GB
English
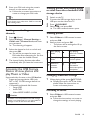
Changes the Picture Format
1 Press (Home).
2 Select Settings > TV Settings > Picture
> Picture Format, and press
.
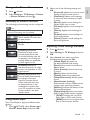
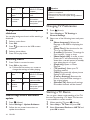
Summary of Picture Formats
The following picture settings can be congured.
Note
•
Depending on the format of the picture source,
some picture settings are not available.
[Wide Screen]: Adjusts the
classic standard format ratio
to wide screen.
[4:3]: Displays classic picture
format.
[Zoom1]: Horizontal
extension of wide screen
picture display. Both sides
on the left and the right will
be partially cut off using this
picture mode; not applicable
to VGA signal source.
[Zoom2]: Adjusts the
standard proportion to wide
screen; not applicable to VGA
signal source.
[Dot by Dot]: Adjusts the
picture display automatically
according to the input
signal for the best clarity.
Some mild distortion may
be presented due to the
broadcaster’s systems. Set
your PC resolution to wide-
screen mode for the best
display results.
Using Sound Style
Uses Sound Style to apply pre-dened audio
settings.
1 Press OPTIONS, select Picture and
Sound > Audio Style, and press OK.
2 Select one of the following settings and
OK.
• [Personal]: Applies the custom sound
settings set up in sound options.
• [Standard]: Adjusts sound settings
to suit most environments and types
of audio.
• [News]: Applies sound settings for
spoken audio, such as news.
• [Cinema]: Applies sound settings for
movies.
• [Game]: Applies sound settings for
games.
• [Drama]: Applies sound settings for
drama programmes.
• [Sports]: Applies sound settings for
sports programmes.
Adjusting sound settings manually
1 Press (Home).
2 Select Settings > TV Settings, and press
OK.
3 Select Sound, then select one of the
following settings and press OK.
• [Sound Style]: Accesses the
pre-dened Sound Style setting.
• [Reset]: Revert back to the factory
default values.
• [Clear Sound]: Enhance the clarity
of sound.
• [Bass]: Adjusts the bass level.
• [Treble]: Adjusts the treble level.
• [Virtual Surround]: Enables spatial
sound.
• [Auto Volume leveling]:
Automatically reduces sudden volume
changes when switching channels.
• [Balance]: Adjusts the balance of the
right and left speakers.
• [Digital Output]: Selects the audio
type via digital audio output interface.
• [PCM]: Transfers the non-PCM
audio type to PCM audio format.
• [RAW]: Exports the original audio
data to home stereo devices.

12 EN-GB
Using the Options Menu
Accesses options relating to the current activity
or selection.
1 When watching TV, press OPTIONS.
» The options menu appears.
2 Select one of the following items and press
OK:
• [Subtitles]: Sets DTV channel
subtitles. (Displayed when the subtitles
can be adjusted in DTV channels)
• [Show Remote Control]: Opens
EasyLink remote control menu.
(Displayed when HDMI opens
EasyLink remote control)
• [Status]: Shows the status of the
currently viewed program.
• [Video Track]: Sets DTV channel
video track. (Displayed when the
video tracks can be adjusted in DTV
channels).
Tip
•
Press OPTIONS on the remote control to
enter the menu.
Creating and Using List of
Favourite Channels
You can create a list of your preferred TV channels
so that you can nd those channels easily.
Viewing channels in the favourite
list
1 When watching TV, press LIST.
» The channel grid appears.
2 Press OPTIONS, select Select List >
Favourite, and press OK.
» Only channels in the favourite list
appear in the channel grid.
Note
•
The favourite channel grid is empty until you add
channels into the favourite lists.
Viewing all channels
1 When watching TV, press LIST.
» The channel grid appears.
2 Press OPTIONS, select Select List >
All, and press OK.
» All channels are displayed in the
channel grid.
Note
•
All favourite channels are marked by an asterisk
when you view the channel grid.
Adding or removing channels to a
favourite list
1 When watching TV, press LIST.
» The channel grid appears.
2 Press OPTIONS, select Select List >
All, and press OK.
» All channels are displayed in the
channel grid.
3 Press Select Channel, and press
OPTIONS.
4 Select Mark as Favourite or Unmark as
Favourite, and press OK.
» This channel is added to or removed
from the favourite list.
Using TV Locks
You can prevent your children from watching
certain programmes or channels by locking the
TV controls.
Setting or changing your code
1 Press (Home).
2 Press Settings > Channel Settings >
Child Lock > Password Settings.

13EN-GB
3 Enter your PIN code using the numeric
buttons on the remote control.
» Follow the on-screen instructions to
create or change your PIN code.
Tip
•
If you forget your code, enter ‘3448’ to override
any existing codes.
Locking or unlocking one or more
channels
1 Press (Home).
2 Select Settings > Channel Settings >
Child Lock > Channel Lock, and enter
your password.
» The channel grid appears.
3 Select the channel to lock or unlock and
then press OK.
» You will be prompted to enter your
PIN code when attempting for the rst
time to view the locked channel.
4 The channel locking function takes effect
immediately after you leave the home menu.
Accessing the USB Storage
Device to view photos and
play Music or Video
Supported video formats on the USB device:
• Supported storage device: USB (only
FAT or FAT 32 USB storage devices are
supported.)
• Compatible multimedia le formats:
• Image: JPEG
• Audio: MP3
• Video: MPEG 2/MPEG 4, H.264
Caution
•
TP Vision is not responsible if the USB storage
device is not supported nor is it responsible for
damage or loss of data from the device.
Viewing photos and playing music
or video from the connected USB
storage device
1 Switch on the TV.
2 Connect the USB storage device to the
USB port on the side of the TV.
3 Press SOURCE.
4 Select USB , and press OK.
» The USB content browser opens.
Viewing photos
1 Select Folders in USB content browser
and press OK.
2 Select a photo and press OK.
• The photo will be enlarged to ll up
the entire screen.
Start playing
slides.
Stop playing,
return to content
browser.
Pause playing
slides.
CH+/- Viewing the next/
previous photo.
Return to
content
browser.
For more
information
please see option
description.
Changing slideshow settings
1 When playing slides, press OPTIONS.
» Displays the option list of the slides;
please follow the instructions on
screen to browse photos.
Listening to music
1 Select Folders in USB content browser
and press
OK.
» Follow the instructions on screen to
change the settings of music playing.
English

14 EN-GB
Start playing
music.
Stop playing,
return to content
browser.
Starts playing
music.
CH+/- Previous/Next
track.
Returns
to content
browser.
For more
information
please see option
description.
Playing music while watching
slideshow
You can play background music while watching a
slideshow.
1 Select a music album.
2 Press OK.
3 Press to return to the USB content
browser.
4 Select a photo album.
5 Press OK to play slides.
Watching videos
1 Press Folder in content browser.
2 Press OK to play video.
» Follow the instructions on screen to
change the settings of video playing.
Start playing
video.
Stop playing,
return to content
browser.
Pause playing
video.
CH+/- View the next/
previous video.
Return to
content
browser.
For more
information
please see option
description.
USB storage device automatic
update
1 Press (Home).
2 Select Settings > Update Software.
3 Follow the on-screen instructions to
update the software
.
Caution
•
The TV reboots automatically after the software
update is completed.
• Please ensure that power and internet
connection are not interrupted during software
updates.
Changing TV Preferences
1
Press (Home).
2 Select Settings > TV Settings >
General Settings.
3 Select one of the following items and press
OK.
• [Menu Language]: Selects the
language to be used for displaying the
menu.
• [Sleep Time]: Sets the time for the
TV to go on hibernation.
• [Location]: Optimises TV settings for
your location - home or shop.
• [Auto Switch Off]: In order to save
power, the TV will automatically shut
down after a certain period of standby
time when there is no signal.
• [EasyLink]: Opens or closes
EasyLink.
• [TV position]: Select your TV
mounting method.
• [VGA]: Automatically adjusts picture
settings in VGA mode.
• [Factory Settings]: Restores the
picture sound and other settings to
the original values.
• [Reinstall TV]: Restores all settings;
all installed channels will be cleared.
Starting a TV Demo
You can gain a better understanding of the TV’s
functions by watching a TV demo. This function
is not available in certain models.
1 When watching TV, press (Home).
2 Select Help > TV Tour and press OK.
3 Select Connected Devices or HD TV and
press OK to watch.

15EN-GB
6 INSTALLING
CHANNELS
The rst time you set up your TV, you are
prompted to select a menu language and
to install TV channels. This section provides
instructions on how to re-install and ne-tune
channels.
Installing Channels
Automatically
Finding Channels Automatically
1 Press (Home).
2 Select Settings > Auto Search and
press OK.
3 Press OK to start searching for channels
automatically.
Installing Channels Manually
Step 1 Select your system
Note
•
Skip this step if your system settings are correct.
1 Press (Home).
2 Select Settings > Channel Settings >
Channel Settings > Analog TV.
3 Select your Color System and Sound
System.
Step 2 Search and store new TV
channels
1 Press (Home).
English
2 Select Settings > Channel Settings
> Channel Settings > Analog TV >
Search.
•
You can enter the channel frequency
directly.
• Select Search, press OK and start
searching.
3 When the search is completed, select
Done to exit the menu.
• Select Save as New Channel to
store the channel search results.
• Select Save as Current Channel
to override the existing channel
number with the channel search
results.
Step 3 Fine-tune analogue
channels
1 Press (Home).
2 Select Settings > Channel Settings
> Channel Settings > Analog TV >
AFC.
3 Press Select "Off" or "On".
4 Select Done and press OK.
Installing Digital Channels
1
Press (Home).
2 Select Settings > Channel Settings >
Channel Settings > Digital TV, and
press OK.
3 Press to adjust the channel
frequency or enter the channel frequency
directly.
4 Select Search and press OK to start
searching.
5 When the channel is found, select Save
and press OK.
6 Press to exit.

16 EN-GB
Renaming Channels
You can rename channels. The name appears
when you select the channel.
1 When watching TV, press LIST.
» The channel grid appears.
2 Select the channel to be renamed and
press
OPTIONS, then select Rename
Channel.
» The screen for entering the channel
name appears.
3 Press OK.
» A dynamic keyboard for entering texts
appears.
4 Press to select characters and
enter the channel name, then select Done
and press OK.
Rearranging Channels
After you install channels, you can rearrange the
order in which they appear.
1 When watching TV, press LIST.
» The channel
grid appears.
2 Press OPTIONS.
» The channel options menu appears.
3 Select Reorder and press OK.
4 Select the channel to rearrange and then
press OK.
» The selected channel is highlighted.
5 Move the highlighted channel to the
desired location and press OK.
6 Press OPTIONS.
7 Select Done Reordering and press OK.

17EN-GB
English
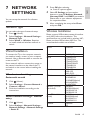
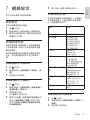
7 NETWORK
SETTINGS
You can set up the network for software
updates.
Network Type
You can select the type of network setup.
1 Press (Home).
2 Select Settings > Network Settings >
Network Type.
3 Select Wired or Wireless. Requires
to install wired and wireless network to
switch.
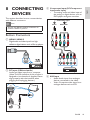
Wired Installation
To connect the TV to the computer network,
you need to install a router in your computer
network. Use an Ethernet cable to connect the
router to the TV.
Use a network cable to connect the router to
the network interface on the side of the TV,
and switch on the router before installing the
network.
Wired network settings -
Automatic search
1 Click (Home ).
2 Select Settings > Connect Network >
Connect > Wired.
3 Finish the installation according to the
instructions.
Wired network settings - Manual
entry
1 Click (Home).
2 Select Settings > Network Settings >
Network Settings > Network Settings
> Static IP.
3 Press OK after selecting.
» Static IP options appear.
4 Select IP Settings, and use number
buttons to enter IP Address, Netmask,
Gateway, DNS 1 and DNS 2 parameters.
Please refer to your telecom equipments
for respective values.
5 After completing the entry, select Done
and press OK.
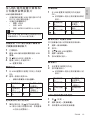
Wireless Installation
Please connect USB wireless network interface
card (NIC) before the installation. This
machine does not include built-in wireless NIC;
Please purchase USB wireless NIC first. The
recommended models are as follow:
Brand Model No.
Netcore NW362(V2)
MTN MT-WN711N
MT-WN716N
MT-WN712N-F1
MT-WN718N-F1
MT-WN811N
MT-WN819N
D-Link DWA-130
DWA-133
DWL-G122
TP-Link TL-WN723N 2.0
TL-WN821N
TL-WN823N(mini)
MU3-WN823N
TL-WN723N
Mercury (TP-Link
Sub-brand)
MW300U
MW300UM(mini)
MW150UM 1.0
MW300UM 1.0
Fast (TP-Link Sub-
brnad)
FW300U
FW300UM(mini)
FW150UM 1.0
FW300UM 1.0
Totolink N150UM
215

18 EN-GB
Wireless network settings -
Automatic search
1 Press (Home ).
2 Select Settings > Connect Network >
Connect > Wireless.
3 Finish the installation according to the
instructions
Viewing Network Settings
You can see the status of the current network
setup.
1 Press (Home).
2 Select Settings > Network Settings >
View Network Settings.
» The current network settings will be
displayed on the screen.
ページが読み込まれています...
ページが読み込まれています...
ページが読み込まれています...
ページが読み込まれています...
ページが読み込まれています...
ページが読み込まれています...
ページが読み込まれています...
ページが読み込まれています...
ページが読み込まれています...
ページが読み込まれています...
ページが読み込まれています...
ページが読み込まれています...
ページが読み込まれています...
ページが読み込まれています...
ページが読み込まれています...
ページが読み込まれています...
ページが読み込まれています...
ページが読み込まれています...
ページが読み込まれています...
ページが読み込まれています...
ページが読み込まれています...
ページが読み込まれています...
ページが読み込まれています...
ページが読み込まれています...
ページが読み込まれています...
ページが読み込まれています...
ページが読み込まれています...
ページが読み込まれています...
ページが読み込まれています...
ページが読み込まれています...
ページが読み込まれています...
ページが読み込まれています...
ページが読み込まれています...
ページが読み込まれています...
ページが読み込まれています...
ページが読み込まれています...
ページが読み込まれています...
ページが読み込まれています...
-
 1
1
-
 2
2
-
 3
3
-
 4
4
-
 5
5
-
 6
6
-
 7
7
-
 8
8
-
 9
9
-
 10
10
-
 11
11
-
 12
12
-
 13
13
-
 14
14
-
 15
15
-
 16
16
-
 17
17
-
 18
18
-
 19
19
-
 20
20
-
 21
21
-
 22
22
-
 23
23
-
 24
24
-
 25
25
-
 26
26
-
 27
27
-
 28
28
-
 29
29
-
 30
30
-
 31
31
-
 32
32
-
 33
33
-
 34
34
-
 35
35
-
 36
36
-
 37
37
-
 38
38
-
 39
39
-
 40
40
-
 41
41
-
 42
42
-
 43
43
-
 44
44
-
 45
45
-
 46
46
-
 47
47
-
 48
48
-
 49
49
-
 50
50
-
 51
51
-
 52
52
-
 53
53
-
 54
54
-
 55
55
-
 56
56
-
 57
57
-
 58
58


他の言語で
- English: Philips 32PFD5319/30 User manual