
STR-DA3200ES 2-681-807-71(1) GB/CT
2-681-807-71(1)
Sony Corporation © 2006 Printed in Malaysia
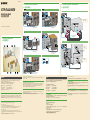
1: Installing speakers/
1: 安裝揚聲器
STR-DA3200ES
Quick Setup Guide
快速設定指南
2: Connecting the speakers/
2: 連接揚聲器
3: Connecting other components/
3: 連接其他組件
10 mm (13/32")
Super Audio CD player/ 超級音訊CD播放機
Video components/ 視頻組件
Audio cord (not supplied)/
音頻線(非附件)
TV monitor/
電視監視器
HDMI cable (not supplied)/
HDMI電纜(非附件)
HDMI cable (not supplied)/
HDMI電纜(非附件)
English
This Quick Setup Guide describes how to connect a Super Audio CD/CD player, DVD player, TV monitor,
speakers, and a sub woofer so that you can enjoy multi-channel surround sound. Refer to the operating
instructions supplied with the receiver for details.
Instructions are explained with illustrations of the STR-DA3200ES model.
The illustrations in the guide designate speakers as
through
.
Front left speaker
Surround right speaker
Front right speaker
Surround back left speaker*
Center speaker
Surround back right speaker*
Surround left speaker
Sub woofer
1: Installing speakers
The illustrations above show an example of a 7.1 channel speaker system (seven speakers and one sub woofer)
configuration. Refer to the operating instructions supplied with the receiver and the other side of this guide.
* The surround back speakers (left/right) are compliant with the zone 2 operation. Refer to the operating instructions supplied
with the receiver.
2: Connecting the speakers
Connect the speakers according to the number and kind of your speakers.
About speaker cords
• Use speaker cords, which are appropriate for the width of the room.
• By deciding on the color or mark of the speaker cord to be connected to the plus (+) or minus (–) connector,
you can always be sure of connecting the cord correctly without mistaking plus or minus.
About speaker jacks
• Connect the
jack to the
jack of the receiver and connect the
jack to the
jack of the receiver.
• Refer to the illustration or the operating instructions supplied with the receiver for details of connecting speaker
cords.
• Turn the locking knob until the speaker cord is connected securely.
About the FRONT SPEAKERS button
You can select the speaker system. Refer to “6: Setting the speakers” in the operating instructions supplied with
the receiver for details.
3: Connecting other components
This is an example of how to connect this receiver and your components. Refer to step 3 of “Getting Started” of
the operating instructions supplied with this receiver for details on other connections and other components.
This receiver is equipped with function for converting video signals. Refer to “3b:Connecting the video
components” in the operating instructions supplied with the receiver.
4: Connect all power cords last
Connect the supplied AC power cord (mains lead) to the AC IN terminal on the receiver, then connect the AC
power cord (mains lead) to a wall outlet.
The configuration, shape, and number of AC outlets vary according to the area code. Refer to “Connecting the AC
power cord (mains lead)” in the operating instructions supplied with the receiver.
Audio cord (not supplied)/
音頻線(非附件)
Speaker cord (not supplied)/
揚聲器線(非附件)
Speaker cord (not supplied)/
揚聲器線(非附件)
Speaker cord (not supplied)/
揚聲器線(非附件)
DVD player/
DVD播放機
Super Audio CD player/
超級音訊CD播放機
Speaker cord (not supplied)/
揚聲器線(非附件)
中文
本快速設定指南說明如何連接超級音訊CD/CD播放機、DVD播放機、電視監視器、揚聲器以及超低音
揚聲器,以便享受多聲道環繞音效。詳情請參考收音擴大機所附的操作說明。
使用說明以STR-DA3200ES機型的圖解為解說依據。
指南中的圖解以
至
來稱呼揚聲器。
左前方揚聲器
右方環繞揚聲器
右前方揚聲器
左後方環繞揚聲器*
中央揚聲器
右後方環繞揚聲器*
左方環繞揚聲器
超低音揚聲器
1: 安裝揚聲器
上圖顯示的是7.1聲道揚聲器系統(七支揚聲器和一支超低音揚聲器)的配置範例。請參考收音擴
大機所附的操作說明以及本指南的另一面。
* 後方環繞揚聲器(左/右)符合第二區的操作。請參考收音擴大機的操作說明。
2: 連接揚聲器
請根據您的揚聲器數目和種類連接揚聲器。
關於揚聲器線
• 請使用適合房間寬度的揚聲器線。
• 根據揚聲器線上的顏色或標誌決定要連接在正極(+)或負極(-)接頭,便可以正確的連接揚聲器
線而不會把正負極搞錯。
關於揚聲器插孔
• 將
插孔連接到收音擴大機的
插孔,而將
插孔連接到收音擴大機的
插孔。
• 關於連接揚聲器線的詳情,請參考圖或收音擴大機所附的操作說明。
• 轉動固定旋鈕直到揚聲器線穩固的連接上去為止。
關於FRONT SPEAKERS按鈕
您可以從選擇揚聲器系統。詳情請參考收音擴大機所附的操作說明中的“6:設定揚聲器”。
3: 連接其他組件
這是一個連接本收音擴大機和您的組件的範例。關於其他連接方式和其他組件的詳情,請參考本收
音擴大機所附的操作說明中的“簡介”的步驟3。
本收音擴大機配備有轉換視頻訊號的功能。請參考收音擴大機所附的操作說明中的“3b:連接視頻
組件”。
4: 最後連接所有電源線
將所附的交流電源線連接到收音擴大機上的AC IN端子,然後將交流電源線連接到牆上的電源插
座。
交流電源插座的配置、形狀和數目會因為區碼而有所不同。請參考收音擴大機所附的操作說明中
的“連接交流電源線”。

STR-DA3200ES 2-681-807-71(1) GB/CT
English
Calibrating the appropriate settings automatically
(AUTO CALIBRATION)
You can set up the speakers to obtain the desired sound from all connected speakers automatically by using
the auto calibration function.
1: Before you perform the auto calibration
Notes
• During the calibration, the sound that comes out of the speakers is very loud. Pay attention to the presence of children or
to the effect on your neighborhood.
• Perform the auto calibration in a quiet environment to avoid the effect of noise and get a more accurate measurement.
• If there are any obstacles in the path between the optimizer microphone and the speakers, the calibration cannot be
performed correctly. Remove any obstacles from the measurement area to avoid measurement error.
• The auto calibration function does not work in the following cases.
– MULTI IN is selected.
– The ANALOG DIRECT function is being used.
– Headphones are connected.
1
Install and connect the speakers.
For details, see the front page.
2
Connect the supplied optimizer microphone to the AUTO CAL MIC jack.
The AUTO CAL MIC jack is used for the supplied optimizer microphone only. Do not connect other
microphones to this jack. Doing so may damage the receiver and the microphone.
3
Set up the optimizer microphone.
Place the optimizer microphone at your listening position. Use a stool or tripod so that the optimizer
microphone remains at the same height as your ears.
On setting up the active subwoofer
• When a sub woofer is connected, turn on the sub woofer and turn up the volume beforehand. Turn the
VOLUME knob to just before the mid-point.
• If you connect a sub woofer with a crossover frequency function, set the value to the maximum.
• If you connect a sub woofer with an auto standby function, set this function to off (deactivated).
Note
Depending on the characteristics of the sub woofer you are using, the setup distance value may be further away from the
actual position.
2: Performing the auto calibration
The Auto Calibration function allows you to measure the following:
Whether or not speakers are connected, polarity of speakers, distance of each speaker to your listening
position, speaker size, speaker level, frequency level.
2
4,5
3
1
3
1
Turn on the receiver and TV.
2
Press ON SCREEN to display the setting menu on TV.
Switch the input of the TV so that the setting menu is displayed on the TV screen connected to this
receiver.
3
Press RECEIVER, and then press MENU.
The list of setting menus appears.
4
Press
/
repeatedly to select “Auto Calibration,”
then press to enter.
5
Press
/
repeatedly to select “AUTO CAL START,”
then press to start the measurement.
Measurement starts in five seconds. A countdown appears on the
TV screen. While the time is counting down, stand away from the
measurement area to avoid measurement error.
6
Measurement starts.
The measurement process will take approximately 30 seconds. Wait
until the measurement process completes.
To cancel the auto calibration
Auto calibration is cancelled when you change the volume, switch functions, change the speaker setting of
the receiver, or connect headphones.
3: Confirming/saving the measurement results
1
Confirm the measurement result.
When the measurement ends, a beep sounds and the measurement result appears on the display.
Measurement results Display Explanation
When the measurement process
completes properly
COMPLETE Proceed to the step 2.
When the measurement process
fails
ERROR CODE
See “When error codes appear.”
2
Save the measurement result.
Press
/
to select “SAVE EXIT,” then press to enter.
For details on the measurement results, refer to “7: Calibrating the
appropriate settings automatically (AUTO CALIBRATION)” in the
operating instructions.
Results Parameter
When error codes appear
Try remedies and re-perform the auto calibration.
• CODE 31
Press , then retry the measurements from step 1 of “Performing
auto calibration.”
• CODE 32, 33
Press , then press
/
to select “YES,” then press .
Re-perform the measurements from step 5 of “Performing the
auto calibration.”
Error Code Cause and remedies
CODE 31 SPEAKERS (OFF/A/B/A+B) is set to OFF.
Set it to others and re-perform the auto calibration.
CODE 32 None of the speakers were detected. Make sure that the optimizer microphone is
connected properly and reperform the auto calibration.
If the optimizer microphone is connected properly but the error code appears, the
optimizer microphone cable may be damaged or improperly connected.
CODE 33 (F) None of the front speakers are connected or only one surround speaker is connected.
CODE 33 (SR) • Either the left or right surround speakers is not connected.
• Surround back speakers are connected even though surround speakers are not connected.
Connect the surround speaker to the SURROUND terminal.
CODE 33 (SB) The surround back speaker is connected only to the SURROUND BACK SPEAKERS
R terminal. When you connect only one surround back speaker, connect it to the
SURROUND BACK SPEAKERS L terminal.
Setting up other components
You should set up each component so that take out sound is output from speakers correctly when you
play back a connected component. The following case describes Sony components. Refer to the operating
instructions supplied with each component.
Sony Super Audio CD player
Select a suitable playback area (multi-channel or 2 channel). Sound may come out from only the front
speaker left/right when 2 channel is selected.
Sony DVD player
1
Select “AUDIO SETUP” on the setup display of the DVD player.
2
Set “AUDIO DRC” to “WIDE RANGE.”
3
Set “DIGITAL OUT” to “ON.”
4
Set “DOLBY DIGITAL” to “DOLBY DIGITAL.”
5
Set “DTS” to “ON” or “DTS.” (Select the setting depending on the model)
Note
Set up the audio format of the playback disc to listen to multi channel sound.
After the setting
The receiver is now ready to use. Refer to the operating instructions supplied with the receiver for details.
中文
自動校正適當的設定值(AUTO CALIBRATION)
您可以利用自動校正功能設定揚聲器,以便自動從所有連接的揚聲器獲得您要的聲音。
1: 執行自動校正之前
附註
• 進行校正時,揚聲器會發出非常大的聲音。請注意在場的小孩或者對於鄰居的影響。
• 自動校正要在安靜的環境中進行,以避免噪音的影響,而且可以得到更精確的測量。
• 如果揚聲器與優化麥克風之間有任何障礙物,將無法正確的執行校正。請將障礙物從測量區域移開,以免測量
錯誤。
• 自動校正功能不適用於下列情況。
– 選擇MULTI IN時。
– 使用ANALOG DIRECT功能時。
– 連接耳機時。
1
安裝和連接揚聲器。
詳情請參閱標題頁。
2
將附件中的優化麥克風連接到AUTO CAL MIC插孔。
AUTO CAL MIC插孔只能用於所附的優化麥克風。請勿將其他麥克風連接在這個插孔。那樣做可能
會損壞收音擴大機和麥克風。
3
設定優化麥克風。
將優化麥克風擺在您的聆聽位置。利用凳子或三腳架將優化麥克風擺在與您的耳朵一樣高的地
方。
設定主動式超低音
• 連接超低音時,要先打開超低音電源並調高音量。將VOLUME旋鈕轉到中點前面一點。
• 如果連接的超低音有分隔頻率功能,請將數值設定為最大值。
• 如果連接的超低音有自動待機功能,請將這個功能關閉(停用)。
附註
設定距離值可能比實際位置遠,要視您所用的超低音的規格而定。
2: 執行自動校正
自動校正功能可以讓您測定下列項目:
是否有連接揚聲器、揚聲器的極性、各揚聲器與您的聆聽位置之間的距離、揚聲器的尺寸、揚
聲器的電平、頻率的電平。
2
4,5
3
1
3
1
打開收音擴大機和電視機。
2
按ON SCREEN將設定選單顯示在電視機上。
切換電視機的輸入,使得設定選單顯示於連接在本收音擴大機的電視機上。
3
按RECEIVER,然後按MENU。
設定選單的清單出現。
4
反複按
/
以選擇“Auto Calibration”,然後按 輸
入。
5
反複按
/
以選擇“AUTO CAL START”,然後按 開始測
量。
測量會在五秒鐘內開始。電視螢幕上出現倒數計時。倒數計時進
行時,請離開測量區域以免造成測量錯誤。
6
測量開始。
測量程序大約需要30秒鐘。等到測量程序完成。
若要取消自動校正
當您變更音量、切換功能、變更收音擴大機的揚聲器設定、或者連接耳機時,自動校正會被取
消。
3: 確認/儲存測量結果
1
確認測量結果。
測量結束時會發出嗶聲,測量結果會出現在顯示器上。
測量結果 顯示 說明
測量程序正確的完成時
COMPLETE
前往步驟2。
測量程序失敗時
ERROR CODE
請參閱“錯誤代碼出現時”。
2
儲存測定結果。
按
/
選擇“SAVE EXIT”,然後按 輸入。關於測定結果的詳細
資料,請參考操作說明中的“7:自動校正適當的設定值 (AUTO
CALIBRATION)”。
結果
參數
出現錯誤代碼時
嘗試解決方法,然後重新執行自動校正。
• CODE 31
按 ,然後從“執行自動校正”的步驟1開始重試測定。
• CODE 32, 33
按 ,然後按
/
選擇“YES”,然後按 。
從“執行自動校正”的步驟5開始重新執行測定。
錯誤代碼 原因和解決方法
CODE 31
SPEAKERS(OFF/A/B/A+B)被設定為OFF。
進行不同的設定,然後重新執行自動校正。
CODE 32
沒有偵測到這些揚聲器。確認優化麥克風已經正確的連接好,然後重新執行自動校
正。
如果優化麥克風已經正確的連接好,但是出現錯誤代碼,可能是優化麥克風的纜線
損壞或者沒有連接好。
CODE 33 (F)
前方揚聲器都沒有連接,或者只連接一支環繞揚聲器。
CODE 33 (SR) • 沒有連接左方或右方環繞揚聲器。
• 雖然沒有連接環繞揚聲器,卻連接了後方環繞揚聲器。
將環繞揚聲器連接到SURROUND端子。
CODE 33 (SB)
後方環繞揚聲器只連接到SURROUND BACK SPEAKERS R端子。只連接一支後方環繞揚
聲器時,要將其連接到SURROUND BACK SPEAKERS L端子。
設定其他組件
您應該設定各組件,使得聲音能夠在您播放連接的組件時正確的從揚聲器輸出。底下的例子說
明的是Sony的組件。請參考各組件所附的操作說明。
Sony超級音訊CD播放機
選擇一個合適的播放區域(多聲道或2聲道)。選擇2聲道時,聲音可能只從前方的揚聲器左/右
出來。
Sony DVD播放機
1
選擇DVD播放機設定顯示畫面上的“AUDIO SETUP”。
2
將“AUDIO DRC”設定為“WIDE RANGE”。
3
將“DIGITAL OUT”設定為“ON”。
4
將“DOLBY DIGITAL”設定為“DOLBY DIGITAL”。
5
將“DTS”設定為“ON”或“DTS”。(請根據型號選擇設定)
附註
設定播放光碟的音頻格式以便聆聽多聲道的聲音。
設定之後
現在收音擴大機可以使用了。詳情請參考收音擴大機所附的操作說明。
-
 1
1
-
 2
2

