BIXOLON SRP-S300は、コンパクトで高速なサーマルプリンターです。レシート、ラベル、チケットの印刷に最適で、小売、ホスピタリティ、医療など、幅広い業界で使用されています。
その主な機能は次のとおりです。
- 高速印刷速度:最大200mm/秒の高速印刷が可能なので、忙しい環境でも効率的に印刷できます。
- コンパクトで省スペース:幅205mm、奥行き136mm、高さ153mmのコンパクト設計なので、スペースの限られた場所にも設置できます。
- さまざまなインターフェース:USB、シリアル、パラレル、イーサネット、Bluetooth、Wi-Fiなど、さまざまなインターフェースを備えているので、さまざまなデバイスと接続できます。
- 用紙の自動検出機能:用紙の有無を自動的に検出するので、用紙切れの心配がありません。
- 黒

◈ Information
This installation guide contains quick information required for the product installation.
Please refer to the Software and Documents provided on the Download section of the
BIXOLON Website(http://www.bixolon.com) for more information on how to setup.
1. Manual: User’s Manual, Code Table, Control Commands, Software manuals
2. Driver: Windows, OPOS, CUPS(Linux, Mac), VCOM(USB, Ethernet)
3. SDK: UPOS SDK(iOS)
4. Utility: Unified POS Utility, Net Configuration Tool, Android Utility, iOS Utility
We at BIXOLON maintain ongoing efforts to enhance and upgrade the functions and quality
of all our products. In following, product specifications and/or user manual content may be
changed without prior notice.
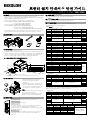
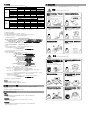
◈ Components
SRP-S300
Power cord
Partition 2ea
Procuct Installation CDProcuct Installation CD
Procuct Installation CD
CD
Installation Guide
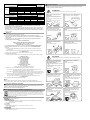
◈ Cable Connection
1. Turn off the printer and peripheral devices.
2. Connect the power cord to the adapter and connect the adapter to the power supply
connector of the printer.
3. Check the type of the interfaces at the back of the printer (USB, Serial, Parallel, Ethernet,
Powered USB, Bluetooth, Wireless LAN) and connect the interface cable.
4. Connect the drawer kick-out cable to the drawer kick-out connector of the printer.
※ Do not use an adapter that was not supplied with the printer.
◈ Installing Paper Roll
1. Press the Cover-Open button to open the cover.
2. Insert new roll paper in the correct direction.
3. Pull the paper out slightly and close the cover.
4. After the paper is rolled about 70mm, it switches
to the black mark mode if there is a black mark,
otherwise, it is automatically set to the continuous
paper mode.
※ Note
When closing the cover, press down on the center of
the cover to ensure that the paper is in contact with
the roller. Printing quality may not be optimum if
recommended paper is not used.
(Refer to the User's Manual.)
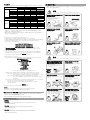
◈ Using Control Panel
• POWER LED
The POWER light is on whenever the printer is on.
• ERROR LED
This indicates an error.
• PAPER LED
This light indicates the near end of the paper roll. Install a new paper
roll and the printer will continue printing. When the light blinks, it
indicates the self-test printing standby state or macro execution Standby
state when the macro execution command is used.
• FEED Button
Press the FEED button once to advance paper one line.
You can also hold down the FEED button to feed paper continuously.
◈ Mounting Partition(40, 58, 62mm)
Refer to the user manual for detailed instruction.
◈ Using of 83mm Paper Roll
Refer to the user manual for detailed instruction.
◈ DIP Switch Setting
DIP switch settings should be changed when the printer power is turned off.
Any changes made while printer power is on are not recognized.
1. DIP Switch 1
• Serial Interface Setting
Switch Function ON OFF Default
1-1 Auto Line Feed Enabled Disabled OFF
1-2 Flow Control XON/XOFF DTR/DSR OFF
1-3 Data Length 7 bits 8 bits OFF
1-4 Parity Check Yes No OFF
1-5 Parity Selection EVEN ODD OFF
1-6
Baud Rate(bps) Refer to the following Table 1
OFF
1-7 ON
1-8 OFF
• Parallel / USB / Ethernet / Wireless LAN / Powered USB Interface Setting
Switch Function ON OFF Default
1-1 Auto Line Feed Enabled Disabled OFF
1-2~6 Reserved - - OFF
1-7 Reserved - - ON
1-8 Reserved - - OFF
• Bluetooth Interface Setting
Switch Function ON OFF Default
1-1 Auto Line Feed Enabled Disabled OFF
1-2 Reserved - - OFF
1-3 SSP Mode Enable Disable OFF
1-4~6 Reserved - - OFF
1-7 Reserved - - O
N
1-8 Reserved - - OFF
• Table 1 – Baud Rate(bps) Selection
Baud Rate Speed 1-6 1-7 1-8 Default
2400 ON OFF OFF
9600
4800 ON OFF ON
9600 OFF ON OFF
19200 OFF OFF OFF
38400 OFF ON ON
57600 OFF OFF ON
115200 ON ON ON
2. DIP Switch 2
• SRP-S300L/T
Switch Function ON OFF Default
2-1 Reserved - - OFF
2-2 Black Mark Sensor Disable Enable OFF
2-3 Internal Bell Control Disabled Enabled OFF
2-4 Taken Sensor
*1)
Disable Enable OFF
2-5
Printing Density Refer to the following Table 2
OFF
2-6 OFF
2-7 OFF
2-8 Auto External Buzz Enabled Disabled OFF
*1)
Dip Switch 2-4 is only valid for Taken Sensing Model (SRP-S300T).
And then both taken sensing and back feeding are disabled when 2-4 is on.
• SRP-S300R
Switch Function ON OFF Default
2-1 Reserved - - OFF
2-2
Near End Sensor
Control
Disabled Enabled OFF
2-3 Internal Bell Control Disabled Enabled OFF
2-4 Reserved - - OFF
2-5
Printing Density Refer to the following Table 2
OFF
2-6 OFF
2-7 OFF
2-8 Auto External Buzz Enabled Disabled OFF
• Table 2 – Printing Density Selection
Printing
Density
2-5 2-6 2-7 Default
Level 1 OFF OFF OFF
- Level 1 is Default
- Level 6 is Darkest
Level 2 O
N
OFF OFF
Level 3 OFF ON OFF
Level 4 ON ON OFF
Level 5 OFF OFF ON
Level 6 ON OFF ON
※ Print Density
The print density can be set to one of eighteen different levels through virtual memory
switches.
Printer Installation Guide & Safet
y
Guide
KN04-00132A (Rev.1.1)
THERMAL PRINTER SRP-S300
Interface cable
(USB, Serial, Parallel, Ethernet, Powered USB, Bluetooth, Wireless LAN)
Drawer kick-out connector
Power
Interface connector
Power cord
Drawer kick-out cable

Dip Switch
Density
Density
Level
Light Dark
Speed
6(High Speed)
3 Level 1
5 6 Level 2
4 9 Level 3
3 12 Level 4
2 15 Level 5
1(Low Speed) 18 Level 6
Memory Switch
Density
Density
Level
Light Dark
Speed
6(High Speed) 1 2
3 Level 1
5 4 5 6 Level 2
4 7 8 9 Level 3
3 10 11 12 Level 4
2 13 14 15 Level 5
1(Low Speed) 16 17 18 Level 6
* Choose Unified Utility or Self-Test mode to set the print density using the VMSM.
(Virtual Memory Switch Management)
* Change in DIP Switch settings are recognized only when the printer power is turned on or
when the printer is reset by using the interface. If the DIP Switch setting is changed after
the printer power is turned on, the change does not take effect until the printer is turned on
again or is reset.
◈ Self-Test
1. Check whether the paper is inserted correctly.
2. Turn on the printer while depressing the Feed button. Self-diagnostics will begin.
3. The printer prints the current status of the printer such as the version of the ROM and DIP
switch setting.
4. The printer prints the current status and stops after printing the following statement.
(PAPER indicator keeps blinking.)
SELF-TEST PRINTING.
SELECT MODES BY PRESSING FEED BUTTON.
Continuous SELF-TEST : Less than 1 second
VMSM Selection : 1second or more
5. Press the FEED button for less than 1 second to perform “Continuous SELF-TEST”.
Hold down the FEED button for 1 second or longer to perform “VMSM Selection”.
1) Self-Test
1-1) If you press the FEED button for less than 1 second, the printer will print in the preset
character type.
1-2) The self-test completes automatically and cuts the paper after printing the following line.
*** COMPLETED ***
1-3) The printer goes into standby mode when the self-test is complete.
2) Virtual Switch Setting Mode
2-1) When the printer goes into virtual switch-setting mode, the following lines will be printed.
** VMSM Selection **
0: Exit and Reboot Printer
1: Print Current Settings
2: Set Print Density
3: Set Print Speed
4: Set Cutting Mode
5: Beep-once Alarm
6: Continuous Alarm
7: Set Black Mark Cut Position
*1)
8 or more: None
*1)
Sticky, Re-stick, Linerless Extreme Model only
2-2) Make sure to press the FEED button to perform the above functions.
2-2-1) Step 1: The number indicates the number of times the FEED button needs to be
pressed. Make sure to press it for less than 1 second.
2-2-2) Step 2: Hold down the FEED button for 1 second or longer to enter the selected item.
If there is no selected item in Step 1, select “0: Exit and reboot printer” to exit.
2-3) When the new settings are applied, hold down the FEED button for 1 second or longer to
save the changes. Cut the paper when the following line is printed.
(If “0: Exit and reboot printer” is not performed, the new settings will not be saved.)
*** COMPLETED ***
6. The settings will take effect after the printer reboots.
※ Note
You can check whether the printer operates normally or not through self-diagnostics.
You can check printing quality, ROM version, and DIP switch settings through self-diagnostics.
◈ Using of Taken Sensor Function
When it comes to Taken Sensor, it will detect the paper not to feed next paper before user
detach it. This function will be supported by SRP-S300T.
Refer to the user manual for detailed instruction.
◈ WEEE(Waste Electrical and Electric Equipment)
This marking shown on the product or its literature, indicates that is should not be disposed with other household
wastes at the end of its working life, To prevent possible harm to the environment or human health from uncontrolled
waste disposal, please separate this from other types of wastes and recycle it responsibly to promote the sustainable
reuse of material resources. Household users should contact either the retailer where they purchased this product, or
their local government office, for details of where and how they can take this item for environmentally safe recycling.
Business users should contact their supplier and check the terms and conditions of the purchase contract. This product
should not be mixed with other commercial wastes for disposal.
☎ BIXOLON Co., Ltd.
● Website http://www.bixolon.com
● Korea Headquarters
(Add) 7~8F, (Sampyeong-dong), 20, Pangyoyeok-ro241beon-gil, Bundang-gu, Seongnam-si,
Gyeonggi-do, 13494, Korea (ROK)
(Tel.) +82-31-218-5500
● U.S. Office
(Add) BIXOLON America Inc., 3171 Fujita St, Torrance, CA 90505
(Tel.) +1-858 764 4580
● Europe Office
(Add) BIXOLON Europe GmbH, Tiefenbroicher Weg 35 40472 Düsseldorf
(Tel.) +49 (0)211 68 78 54 0
◈ Safety Precautions
In using the present appliance, please keep the following safety regulations in order to
prevent any hazard or material damage.
WARNING
Violating following instructions can cause serious injury or death.
CAUTION
Violating following instructions can cause slight wound or damage the appliance.
Do not use the printer when it is out
of order. This can cause a fire or an
electrocution.
• Switch off and unplug the printer
before calling your dealer.
Do not let water or other foreign objects
in the printer.
• If this happened, switch off and unplug
the printer before calling your dealer.
Use only approved accessories and do not
try to disassemble, repair or remodel it
for yourself.
• Call your dealer when you need these services.
• Do not touch the blade of auto cutter.
Install the printer on the stable surface.
• If the printer falls down, it can be
broken and you can hurt yourself.
Keep the desiccant out of children’s
reach.
• If not, they may eat it.
If you observe a strange smoke, odor or
noise from the printer, unplug it before
taking following measures.
• Switch off the printer and unplug the set from the
mains.
• After the disappearance of the smoke, call your
dealer to repair it.
Do not bend the cable by force or leave it
under any heavy object.
• A damaged cable can cause a fire.
Do not plug in or unplug with your
hands wet.
• You can be electrocuted.
Keep the plastic bag out of children’s
reach.
• If not, a child may put the bag on his head.
Do not pull the cable to unplug.
• This can damage the cable, which is the
origin of a fire or a breakdown of the printer.
You must use only the supplied adapter.
• It is dangerous to use other adapters.
Do not plug several products in one
multi-outlet.
• This can provoke over-heating and a fire.
• If the plug is wet or dirty, dry or wipe it before
usage.
• If the plug does not fit perfectly with the outlet,
do not plug in.
• Be sure to use only standardized multi-outlets.
PROHIBITED
PROHIBITED
PROHIBITED
ONLY SUPPLIED ADAPTER
TO UNPLUG
PROHIBITED
DISASSEMBLIN
G
PROHIBITED
PROHIBITED
PROHIBITED
TO UNPLU
G
PRINTER
PRINTER
PRINTER
PRINTER
DEALER
PRINTER
PROHIBITED
PROHIBITED
PROHIBITED

◈ 안내
본 설치 안내서는 제품 설치에 필요한 간단한 정보만 기록하고 있습니다.
자세한 설치 안내는 빅솔론 홈페이지(http://www.bixolon.com)의 다운로드 페이지에서
제공되는 Software 및 Document 를 참고하십시오.
1. 매뉴얼: 사용자 매뉴얼, 코드표, 제어명령, 소프트웨어 매뉴얼
2. 드라이버(Driver): Windows , OPOS , JavaPOS, CUPS(Linux, Mac),
가상 시리얼포트 (USB 및 Ethernet 용)
3. 소프트웨어 개발도구(SDK): UPOS SDK(iOS, Android)
4. 유틸리티(Utility): 통합 POS 유틸리티(Unified POS Utility),
네트워크 설정 도구(Net Configuration Tool),
안드로이드 유틸리티(Android Utility), iOS 유틸리티(iOS Utility)
저희 (주)빅솔론은 제품의 기능과 품질 향상을 위하여 지속적인 개선을 하고 있습니다.
이로 인하여 제품의 사양과 매뉴얼의 내용은 사전 통보 없이 변경될 수 있습니다.
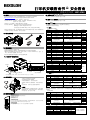
◈ 내용물 확인
SRP-S300
전원코드
파티션 2 개
Procuct Installation CDProcuct Installation CD
Procuct Installation CD
CD
설치 안내서
◈ 케이블 연결
1. 프린터와 주변 기기의 전원을 끕니다.
2. 전원 코드를 어댑터에 연결하고, 어댑터를 프린터의 전원 커넥터에 연결하십시오.
3. 프린터 뒷면에 있는 인터페이스 종류(USB, 시리얼, 패러럴, 이더넷, Powered USB,
블루투스, 무선랜) 를 확인하시고, 인터페이스 커넥터에 케이블을 연결합니다.
4. 프린터의 드로어 킥아웃 커넥터에 드로어 킥아웃 케이블을 연결합니다.
※ 어댑터는 반드시 공급된 제품만을 사용하십시오.
◈ 롤 용지 설치
1. 커버 열림 레버를 올려 커버를 엽니다.
2. 새로운 롤 용지를 올바른 방향으로
삽입합니다.
3. 약간의 용지를 당긴 다음, 커버를 닫습니다.
4. 용지가 약 70mm 이송 후 블랙마크가 있을
경우 블랙마크 모드로 전환되며, 없을 경우
에는 연속용지 모드로 자동설정 됩니다.
※ 참고
커버를 닫을 때에는 용지가 롤러에 밀착되도록
커버의 가운데를 눌러주십시오.
권장용지를 사용하지 않을 경우 인쇄품질이
저하될 수 있습니다. (사용자 매뉴얼 참고)
◈ 조작부 사용
• POWER(전원) LED
전원 표시등은 프린터에 전원이 켜져 있을 경우 켜집니다.
• ERROR(오류) LED
오류가 발생하였을 때 켜집니다.
• PAPER(종이) LED
이 표시등이 켜지면 용지가 거의 다 소모되었거나 용지가 없음을
나타냅니다. 새 용지로 교환하거나 용지를 넣으십시오.
이 표시등이 깜빡 거리면 SELF TEST 대기 상태이거나 매크로 실행
대기중임을 나타냅니다.
• FEED(이송) 버튼
용지 한 라인을 배출하기 위해서는 이송버튼을 한 번 누르십시오.
이송버튼을 계속 누르고 있으면 용지를 연속적으로 배출 할 수
있습니다.
◈ 파티션 장착(40, 58, 62mm)
세부 사용 방법에 대한 설명은 유저 매뉴얼을 참조하십시요
◈ 83mm 롤 용지 사용
세부 사용 방법에 대한 설명은 유저 매뉴얼을 참조하십시요
◈ DIP 스위치 설정
DIP 스위치 설정 변경은 프린터 전원을 끈 상태에서 해야 합니다.
켠 상태에서의 변경은 인식되지 않습니다.
1. DIP 스위치 1
• 시리얼(Serial) 인터페이스 설정
스위치 기능
ON OFF
기본값
1-1
자동 라인 피딩 동작 해제
OFF
1-2
흐름제어
XON/XOFF DTR/DSR OFF
1-3 데이터 길이 7비트 8비트 OFF
1-4
패리티 체크여부 체크함 체크안함
OFF
1-5
패리티
EVEN ODD OFF
1-6
전송속도(bps) 아래 표 1 참조
OFF
1-7 ON
1-8 OFF
•
패러럴
(Parallel) / USB /
이더넷
(Ethernet) /
무선랜
(Wireless LAN) / Powered USB
인터페이스
설정
스위치 기능
ON OFF
기본값
1-1
자동 라인 피딩 동작 해제
OFF
1-2~6
없음
- - OFF
1-7
없음
- -
ON
1-8
없음
- -
OFF
• 블루투스(Bluetooth) 인터페이스 설정
스위치 기능
ON OFF
기본값
1-1
자동 라인 피딩 동작 해제
OFF
1-2
없음
- -
OFF
1-3 SSP Mode
동작 해제
OFF
1-4~6
없음
- - OFF
1-7
없음
- -
ON
1-8
없음
- -
OFF
• 표 1 – 전송속도(bps) 선택
전송속도
1-6 1-7 1-8
기본값
2400 ON OFF OFF
9600
4800 ON OFF ON
9600 OFF ON OFF
19200 OFF OFF OFF
38400 OFF ON ON
57600 OFF OFF ON
115200 ON ON ON
2. DIP 스위치 2
• SRP-S300L/T
스위치 기능
ON OFF
기본값
2-1
없음
- -
OFF
2-2
블랙마크 센서 해제 동작
OFF
2-3
내부 벨 제어 내부 벨 해제 내부 벨 동작
OFF
2-4
Taken 센서
*1)
해제 동작
OFF
2-5
인쇄농도 아래 표 2 참조
OFF
2-6 OFF
2-7 OFF
2-8 외부 부저 제어 외부 부저 동작 외부 부저 해제 OFF
*1)
DIP 스위치 2-4 설정 기능은 Taken 센서 모델(SRP-S300T/TX) 전용 기능입니다.
만약, Taken 센서 기능을 사용하지 않을 경우에는 DIP 스위치 2-4 를 ON 하면 기능이
해제되고 동시에 Back Feeding 기능도 자동으로 해제됩니다.
• SRP-S300R
스위치 기능
ON OFF
기본값
2-1
없음
- -
OFF
2-2
용지 부족 감지 기능 해제 정상 동작
OFF
2-3
내부 벨 제어 내부 벨 해제 내부 벨 동작
OFF
2-4
없음
- -
OFF
2-5
인쇄농도 아래 표 2 참조
OFF
2-6 OFF
2-7 OFF
2-8
외부 부저 제어 외부 부저 동작 외부 부저 해제
OFF
• 표 2 – 인쇄농도 선택
인쇄 농도
2-5 2-6 2-7
기본값
Level 1 OFF OFF OFF
- Level 1 is Default
- Level 6 is Darkest
Level 2 ON OFF OFF
Level 3 OFF ON OFF
Level 4 ON ON OFF
Level 5 OFF OFF ON
Level 6 ON OFF ON
프린터 설치 안내서 & 안전 가이드
감열식 프린터 SRP-S300
드로어 킥아웃 커넥터
전원
인터페이스 커넥터
전원
코드
드로어 킥아웃 케이블
인터페이스 케이블(USB, 시리얼, 패러럴, 이더넷, Powered USB, 블루투스, 무선랜)

※ 인쇄농도
인쇄농도는 가상메모리 스위치를 통해 총 18 단계로 세분화 하여 사용 할 수 있습니다.
Dip 스위치
농도
인쇄농도
Light Dark
Speed
6(고속)
3
Level 1
5 6 Level 2
4 9 Level 3
3 12 Level 4
2 15 Level 5
1(저속)
18
Level 6
메모리 스위치
농도
인쇄농도
Light Dark
Speed
6(고속)
1 2
3
Level 1
5 4 5 6 Level 2
4 7 8 9 Level 3
3 10 11 12 Level 4
2 13 14 15 Level 5
1(저속)
16 17 18
Level 6
* 가상 메모리 스위치로 인쇄농도를 변경하기 위해서는 Unified Utility 또는 Self-
Test 모드를 사용하시길 바랍니다.
* DIP 스위치 설정 변경은 프린터 전원을 끈 상태에서 해야 합니다. 켠 상태에서의
변경은 인식되지 않습니다
1. 용지가 정상적으로 설치되어 있는지 확인하십시오.
2. 이송버튼을 누른 상태에서 전원을 켜십시오. 자가 진단이 시작됩니다.
3. 프린터는 ROM 의 버전과 DIP 스위치 설정 상태와 같은 프린터의 현재 상태를 인쇄합니다.
4. 프린터의 현재 상태를 인쇄하고 난 후, 다음과 같은 문구를 인쇄한 후 멈춥니다.
(종이 표시등은 계속 깜빡입니다).
SELF-TEST PRINTING.
다음을 실행하려면 버튼으로 선택하시오.
테스트인쇄 계속 수행 : 버튼을 짧게 누름
메모
리 스위치 설정모드 : 버튼을 길게 누름
5. “테스트인쇄 계속 수행” 을 진행하기 위해서는 이송버튼을 1 초 이하로 누르시고,
“메모리 스위치 설정모드” 를 진행하기 위해서는 이송버튼을 1 초 이상 누르십시오.
1) 자가 진단
1-1) 이송버튼을 1 초 이하로 누르면 프린터는 미리 제작된 문자 형식을 인쇄합니다.
1-2) 자가 진단은 자동으로 끝나고 다음과 같은 문구를 인쇄
한 후 용지를 절단합니다.
*** 설정 완료 ***
1-3) 프린터는 자가 진단이 끝나면 바로 정상 상태가 됩니다.
2) 가상 메모리 스위치 설정 모드
2-1) 가상 메모리 스위치 관리(VMSM) 에 진입하면 다음과 같은 문구를 인쇄 합니다.
** 가상 메모리 스위치 관리(VMSM) **
0: 설정 저장 및 종료
1: 현재 메모리 스위치 정보 인쇄
2: 인쇄농도 설정
3: 인쇄속도 설정
4: 용지
절단 모드 설정
5: 1 회 알람
6: 연속 알람
7: 용지절단 위치 설정
*1)
8 or more: None
*1)
스티키, 리스틱, 라이너리스 익스트림 모델 전용 기능
2-2) 위의 기능을 실행하기 위해서는 아래와 같이 이송버튼을 동작시켜 주십시오.
2-2-1) 단계 1: 위의 항목 앞의 숫자는 이송버튼을 누르는 횟수를 의미합니다.
원하는 항목의 숫자 횟수만큼 이송버튼을 1 초 이하로 짧게 누르십시오.
2-2-2) 단계 2: 1 초 이상 버튼을 길게 누르면 선택한 항목으로 진입합니다.
단계 1 에서 선택한 항목이 없으면 “0: 설정 저장 및 종료”를 선택
하고
취소합니다.
2-3) 기능 변경이 완료되면 변경된 기능을 저장하기 위해 이송버튼을 1 초 이상 길게 눌러
주십시오. 다음과 같은 문구를 인쇄 한 후 용지를 절단합니다.
(“ 0: 설정 저장 및 종료” 기능이 실행되지 않으면 설정정보는 프린터에
저장되지 않습니다.)
*** 설정 완료 ***
6. 프린터가 재부팅 하며 변경된 설정 정보가 반영됩니다.
※ 참고
자가 진단을 통해 프린터가 제대로 작동되고 있는지 확인할 수 있습니다.
자가 진단으로 인쇄 품질, ROM 버전, DIP 설정을 확인합니다.
◈ Taken Sensor 기능 사용
Taken Sensor 기능은 인쇄물을 회수해 가지 않으면 다음 장 인쇄가 되지 않게 하는
기능으로 전용모델명은 SRP-S300T 입니다.
세부 사용 방법에 대한 설명은 유저 매뉴얼을 참조하십시오.
☎ BIXOLON Co., Ltd.
● 웹사이트 http://www.bixolon.com
● 한국 본사
(주소) 13494, 경기도 성남시 분당구 판교역로 241 번길 20 (삼평동) 7~8 층
(전화) +82-31-218-5500
● 미주 지사
(주소) BIXOLON America Inc., 3171 Fujita St, Torrance, CA 90505
(전화) +1-858 764 4580
● 유럽 지사
(주소) BIXOLON Europe GmbH, Tiefenbroicher Weg 35 40472 Düsseldorf
(전화) +49 (0)211 68 78 54 0
◈ 안전상의 경고
제품을 올바르게 사용하여 위험이나 물적 손해를 미리 방지하기 위한 내용이므로
반드시 지켜 사용해 주세요.
경고
표시사항 위반시 심각한 상해나 사망이 발생할 가능성이 있습니다.
주의
표시사항 위반시 경미한 상해나 제품손상이 발생할 가능성이 있습니다.
제품을 고장난 상태에서 사용하지
마세요. 화재, 감전의 원인이 됩니다.
• 바로 본체의 전원스위치를 끄고
전원플러그를 콘센트에서 뺀 다음
구입처로 연락해 주세요.
프린터의 본체 내부에 물이나 이물질이
들어가지 않도록 주의하세요.
• 본체 내부에 물이나 이물질이 들어간
경우에는 먼저 프린터 본체의 전원스
위치를 끄고 전원플러그를 콘센트에서
뺀 다음 구입처로 연락해 주세요.
승인된
부품을
사용하
고
함부
로
분해
,
수리, 개조하지 마세요.
• 제품이 손상될 수 있으므로
구입처에 문의하세요.
• 자동 절단기 날은 날카로우므로
손대지 마십시오.
안정된 장소에 설치하세요.
• 넘어지면 제품이 파손되거나 다칠 수
있습니다.
방습제는 어린이의 손에 닿지 않는
곳에 잘 보관하세요.
• 어린이가 방습제를 먹으면 위험합니다.
제품에서
연기가
나거나
이상한
냄새
또는
소리가 나는 등의 이상 발생시는 바로
전원을 끈 후 아래의 조치를 취해 주세요.
• 제품에 이상이 발생시는 바로 프린터 본체의
전원을 끈 다음 반드시 전원 플러그를
콘센트에서 뽑아주세요.
• 연기가 나지 않는 것을 확인하고 구입처로
수리를 의뢰해 주세요.
전원코드를 무리하게 구부리거나 무거운
물건을 눌러 파손되지 않도록 하세요.
• 화재의 원인이 됩니다.
젖은 손으로 전원플러그를 꽂거나
뽑지 마세요.
• 감전의 위험이 있습니다.
비닐팩은 어린이의 손에 닿지 않는
곳에 잘 보관하세요.
• 어린이가 비닐팩을 머리에 쓰면
위험합니다.
전원플러그를 뺄때는 전원코드를
잡아 당기지 마세요.
• 코드가 상처를 입어 화재나 고장의
원인이 됩니다.
어댑터는 공급된 제품만을 사용하세요.
• 다른 어댑터를 사용하면 위험합니다.
한 콘센트에 여러 제품의 전원플러그를
동시에 꽂지 마세요.
•
• 발열 및 발화되어 위험합니다.
• 전원플러그에서 이물질이나 물기가
묻어있으면 잘 닦아 사용하세요.
• 전원콘센트의 구멍이 헐거울 때는 전원
플러그를 꽂지 마세요.
• 멀티콘센트는 규격제품을 사용하세요.
금지
금지
금지
반드시 공급품만
플러그 금지
금지
분해 금지
금지
금지
플러그 금지
프린터
프린터
프린터
프린터 구입처
프린터
금지
금지
금지

◈ 指南
本安装手册仅收录有安装产品所需的简单信息。详情请参考毕索龙网站
(http://www.bixolon.com)下载页面中提供的 Software 和 Document。
1. 手册:使用说明书、代码表、控制命令、软件手册
2. 驱动器 (Driver):Windows、OPOS、JavaPOS、CUPS(Linux、Mac)、
虚拟串口(U 盘及以太网用)
3. 软件开发工具(SDK):UPOS SDK(iOS、Android)
4. 实用程序(Utility):整合 POS 实用程序(Unified POS Utility)、
网络设置工具(Net Configuration Tool)、
安卓实用程序(Android Utility)、iOS 实用程序(iOS Utility)
毕索龙人始终坚持不懈,努力提高和改进所有产品的功能和质量。因此产品规格和用
户手册的内容可能会有所变动,恕不另行通知。
◈ 确认内容物
SRP-S300
电源线
2 个分区板
Procuct Installation CDProcuct Installation CD
Procuct Installation CD
光盘
安装指南书
◈ 连接电缆
1.关闭打印机和周边设备的电源。
2.请将电源线连接至适配器,再将适配器连接至打印机的电源连接器。
3.确认打印机后面的接口类型(U 盘、串联、并联、以太网、Powered U 盘、蓝牙、无
线),然后在接口连接器上接入电缆。
4.在打印机的现金抽屉连接器上接入现金抽屉电缆。
※ 只能使用原厂提供的连接器。
◈ 安装纸卷
1.提起开启盖罩拉杆打开盖罩。
2.沿正确的方向插入新纸卷。
3.将纸张略微拉出一些后关闭盖罩。
4.送纸约 70mm 后出现黑标时,转换为黑标模
式;
没有黑标时,自动设定为连续送纸模式。
※ 参考
关闭盖罩时请按下盖罩的中间部位,使纸卷辊
筒确实被卡住。未使用建议用纸,可能导致打
印质量不佳。(参考用户手册)
◈ 操作部分的使用
• POWER(电源)LED
电源指示灯在开启打印机电源时亮起。
• ERROR(错误)LED
出错时亮起。
• PAPER(纸张)LED
此显示灯亮起时表示纸张即将耗尽或缺纸。请更换新纸或装纸。此显示灯闪烁时表
示处于等待 SELF TEST 状态或者正在等待执行宏。
• FEED(送纸)键
按一次送纸键即可送出一行纸。按住送纸键可以连续送纸。
◈ 安装分区板(40、58、62mm)
具体使用方法的有关说明请参考用户手册。
◈ 使用 83mm 的纸卷
具体使用方法的有关说明请参考用户手册。
◈ 设置 DIP 开关
应在关闭打印机电源的状态下变更 DIP 开关的设置。
不识别在开启状态下的变更。
1. DIP 开关 1
• 设置串联(Serial)接口
开关 功能
ON OFF
基本值
1-1
自动换行 运行 解除
OFF
1-2
流动控制
XON/XOFF DTR/DSR
OFF
1-3
数据长度 7字节 8字节
OFF
1-4
是否核对奇偶 核对 不核对
OFF
1-5
奇偶
EVEN ODD
OFF
1-6
传送速度(bps) 参考下表 1
OFF
1-7 ON
1-8 OFF
• 设置并联(Parallel)/U 盘/以太网(Ethernet)/无线网(Wireless LAN)/Powered U 盘接口
开关 功能
ON OFF
基本值
1-1
自动换行 运行 解除
OFF
1-2~6
无
- - OFF
1-7
无
- -
ON
1-8
无
- -
OFF
• 设置蓝牙(Bluetooth)接口
开关 功能
ON OFF
基本值
1-1
自动换行 运行 解除
OFF
1-2
无
- -
OFF
1-3 SSP Mode
运行 解除
OFF
1-4~6
无 - - OFF
1-7
无
- -
ON
1-8
无
- -
OFF
• 表 1 – 选择传送速度(bps)
传送速度
1-6 1-7 1-8
基本值
2400 ON OFF OFF
9600
4800 ON OFF ON
9600 OFF ON OFF
19200 OFF OFF OFF
38400 OFF ON ON
57600 OFF OFF ON
115200 ON ON ON
2. DIP 开关 2
• SRP-S300L/T
开关 功能
ON OFF
基本值
2-1
无
- -
OFF
2-2
黑标传感器 解除 运行
OFF
2-3
内部铃控制 内部铃解除 内部铃运行
OFF
2-4
Taken 传感器
*1)
解除 运行
OFF
2-5
打印浓度 参考下表 2
OFF
2-6 OFF
2-7 OFF
2-8
外部蜂鸣器控制 外部蜂鸣器运行 外部蜂鸣器解除
OFF
*1)
DIP 开关 2-4 设置是一种 Taken 传感器型号(SRP-S300T/TX)的专用功能。如不需
使用 Taken 传感器功能,开启 DIP 开关 2-4,即可解除该功能,Back Feeding 功能也随之
自动解除。
• SRP-S300R
开关 功能
ON OFF
基本值
2-1
无
- -
OFF
2-2
感测纸张不足 解除功能 正常运行
OFF
2-3
内部铃控制 内部铃解除 内部铃运行
OFF
2-4
无
- -
OFF
2-5
打印浓度 参考下表 2
OFF
2-6 OFF
2-7 OFF
2-8
外部蜂鸣器控制 外部蜂鸣器运行 外部蜂鸣器解除
OFF
• 表 2 – 选择打印浓度
打印浓度
2-5 2-6 2-7
基本值
Level 1 OFF OFF OFF
- Level 1 is Default
- Level 6 is Darkest
Level 2 ON OFF OFF
Level 3 OFF ON OFF
Level 4 ON ON OFF
Level 5 OFF OFF ON
Level 6 ON OFF ON
打印机安装指南书 & 安全指南
热敏式打印机 SRP-S300
现金抽屉连接器
电源
接口连接器
电源插头
现金抽屉电缆
接口电缆(U 盘、串联、并联、以太网、Powered U 盘、蓝牙、无线网)

※ 打印浓度
通过虚拟内存开关细分为 18 级打印浓度使用。
Dip 开关
浓度
打印浓度
Light Dark
Speed
6(高速)
3
Level 1
5 6 Level 2
4 9 Level 3
3 12 Level 4
2 15 Level 5
1(低速) 18
Level 6
内存开关
浓度
打印浓度
Light Dark
Speed
6(高速)
1 2
3
Level 1
5 4 5 6 Level 2
4 7 8 9 Level 3
3 10 11 12 Level 4
2 13 14 15 Level 5
1(低速)
16 17 18
Level 6
* 如需用虚拟内存开关变更打印浓度,请使用 Unified Utility 或 Self-Test 模式。
* 应在关闭状态下变更 DIP 开关设置。不识别在开启状态下的变更。
1. 请确认是否正常装纸。
2. 请在按下送纸键的状态下开启电源,开始自检。
3. 打印机打印 ROM 的版本与 DIP 开关设定状态相同的打印机当前状态。
4. 打印机打印当前状态后,打印如下语句并停止打印。
(纸张指示灯持续闪烁)。
SELF-TEST PRINTING.
SELECT MODES BY PRESSING FEED BUTTON. (如要执行下一个,请用按钮选择。)
Continuous SELF-TEST :Less than 1 second (持续执行测试打印:短暂按下按钮)
VMSM Selection :1second or more (内存开关设置模式:较长按住按钮)
5. 如要进行“Continuous SELF-TEST”,请按下送纸按钮 1 秒;
如要进行“VMSM Selection”,请按住送纸按钮 1 秒以上。
1) 自检
1-1) 按下送纸按钮 1 秒以下,按照打印机预先编制的字符形式打印。
1-2) 自动结束自检并打印如下语句后切断纸张。
*** COMPLETED *** (*** 设置完毕 ***)
1-3) 打印机在自检完毕后立即返回正常状态。
2) 虚拟内存开关设置模式
2-1) 进入虚拟内存开关管理(VMSM)后打印如下语句。
** VMSM Selection ** (** 虚拟内存开关管理 **)
0:Exit and Reboot Printer (保存设置及结束)
1:Print Current Settings (打印当前内存开关信息)
2:Se
t Print Density (设置打印浓度)
3:Set Print Speed (设置打印速度)
4:Set Cutting Mode (设置切割纸张模式)
5:Beep-once Alarm (提醒一次)
6:Continuous Alarm (连续提醒)
7:Set Black Mark Cut Position (设置切割纸张位置)
*1)
8 or more:None (或更多:无)
*1)
Sticky、Ristic、Linerless Extreme 型号产品的专用功能
2-2) 请按照如下内容运行送纸按钮,以执行上述功能。
2-2-1) 第一步:上述项目前面的数字指按下送纸按钮的次数。
请根据所需项目的数字,按照相应次数短暂按下按钮 1 秒以下。
2-2-2) 第二步:按住按钮 1 秒以上,进入所选的项目。
没有第一步所选的项目时选择“0:Exit and reboot printer”后取消。
2-3) 功能变更完毕后请按住送纸按钮 1 秒以上,保存变更后的功能。
打印如下语句后切断纸张。
(不执行“0:Exit and reboot printer”功能,打印机将无法保存设置信息。)
*** COMPLETED *** (*** 设置完毕 ***)
6. 重启打印机,适用变更后的设置信息。
※ 参考
可以通过自检确认打印机是否正常运行
可以通过自检确认打印质量、ROM 版本、DIP 设定。
◈ 使用 Taken Sensor 功能
Taken Sensor 是 SRP-S300T 型号产品的专用功能,不收起已打印的纸张
就不打印下一张。
具体使用方法的有关说明请参考用户手册。
☎ BIXOLON Co., Ltd.
● 网址 http://www.bixolon.com
● 韩国总部
(
地址) 京畿道城南市盆塘区板桥站路 241 街 20(三坪洞)7-8 楼 邮编 13494
(
电话) +82-31-218-5500
● 美洲分公司
(
地址) BIXOLON America Inc., 3171 Fujita St, Torrance, CA 90505
(
电话) +1-858 764 4580
● 欧洲分公司
(
地址) BIXOLON Europe GmbH, Tiefenbroicher Weg 35 40472 Düsseldorf
(
电话) +49 (0)211 68 78 54 0
◈ 安全注意警告
如下是正确使用打印机,预防危险和财物损失的有关内容,请务必遵守。
警告
违反以下事项可能会导致严重的伤亡事故。
注意
违反以下事项可能造成轻伤或损坏设备。
操作失灵时请勿使用打印机,可能会导
致火灾或者触电。
• 请关机并拔下打印机的插头,电话联
系经销商。
不要将水或者其他物品倒入打印机。
• 如果发生此类事件,请关机并拔下打
印机的插头,电话联系经销商。
请只使用经批准的零部件
,
请勿擅自拆
卸、修理或者改装。
• 可能损坏产品,请电话联系经销商。
• 请勿触摸自动切纸器的锋利刀片。
将打印机安装在稳固之处。
• 打印机坠落,可能导致机器损坏或人员受伤。
请将干燥剂放在儿童触及不到之处妥善
保管。
• 否则会有吞食危险。
如果发现打印机不明原因地冒烟、发出
异味或者噪音,请立即关闭电源,采取
下列急救措施。
• 产品发生异常时,请立即关闭打印机主机电
源,从插座上拔下设备的插头。
• 请在烟消失后,电话联系经销商进行维修。
不要用力弯曲连接线,或者将其置于重
物之下。
• 可能导致火灾。
请勿用湿手插拔电源插头。
• 这可能导致触电。
请将塑料袋放在儿童触及不到之处妥善
保管。
• 否则儿童会将袋子套在头上发生危
险。
不要通过拉掉连接线的方式拔插头。
• 可能损坏连接线,造成火灾或者打印
机故障。
只能使用原厂包装中提供的适配器。
• 使用其它适配器十分危险。
请勿将几个插头同时插入一个多孔电源
插座中。
• 连接多个插头会导致过热和火灾。
• 如果插头潮湿或者肮脏,请在使用前烘干或者
擦拭干净。
• 电源插座规格不符时,请不要插上电源。
• 只能使用标准化的多孔电源插座。
禁止
禁止
禁止
必须只用提供品
拔下插头
禁止
禁止拆卸
禁止
禁止
拔下插头
打印机
打印机
打印机
打印机 经销处
打印机
禁止
禁止
禁止

◈ Information
This installation guide contains quick information required for the product installation.
Please refer to the Software and Documents provided on the Download section of the
BIXOLON Website(http://www.bixolon.com) for more information on how to setup.
1. Manual: User’s Manual, Code Table, Control Commands, Software manuals
2. Driver: Windows, OPOS, CUPS(Linux, Mac), VCOM(USB, Ethernet)
3. SDK: UPOS SDK(iOS)
4. Utility: Unified POS Utility, Net Configuration Tool, Android Utility, iOS Utility
We at BIXOLON maintain ongoing efforts to enhance and upgrade the functions and quality
of all our products. In following, product specifications and/or user manual content may be
changed without prior notice.
◈ Components
SRP-S300
Power cord
Partition 2ea
Procuct Installation CDProcuct Installation CD
Procuct Installation CD
CD
Installation Guide
◈ Cable Connection
1. Turn off the printer and peripheral devices.
2. Connect the power cord to the adapter and connect the adapter to the power supply
connector of the printer.
3. Check the type of the interfaces at the back of the printer (USB, Serial, Parallel, Ethernet,
Powered USB, Bluetooth, Wireless LAN) and connect the interface cable.
4. Connect the drawer kick-out cable to the drawer kick-out connector of the printer.
※ Do not use an adapter that was not supplied with the printer.
◈ Installing Paper Roll
1. Press the Cover-Open button to open the cover.
2. Insert new roll paper in the correct direction.
3. Pull the paper out slightly and close the cover.
4. After the paper is rolled about 70mm, it switches
to the black mark mode if there is a black mark,
otherwise, it is automatically set to the continuous
paper mode.
※ Note
When closing the cover, press down on the center of
the cover to ensure that the paper is in contact with
the roller. Printing quality may not be optimum if
recommended paper is not used.
(Refer to the User's Manual.)
◈ Using Control Panel
• POWER LED
The POWER light is on whenever the printer is on.
• ERROR LED
This indicates an error.
• PAPER LED
This light indicates the near end of the paper roll. Install a new paper
roll and the printer will continue printing. When the light blinks, it
indicates the self-test printing standby state or macro execution Standby
state when the macro execution command is used.
• FEED Button
Press the FEED button once to advance paper one line.
You can also hold down the FEED button to feed paper continuously.
◈ Mounting Partition(40, 58, 62mm)
Refer to the user manual for detailed instruction.
◈ Using of 83mm Paper Roll
Refer to the user manual for detailed instruction.
◈ DIP Switch Setting
DIP switch settings should be changed when the printer power is turned off.
Any changes made while printer power is on are not recognized.
1. DIP Switch 1
• Serial Interface Setting
Switch Function ON OFF Default
1-1 Auto Line Feed Enabled Disabled OFF
1-2 Flow Control XON/XOFF DTR/DSR OFF
1-3 Data Length 7 bits 8 bits OFF
1-4 Parity Check Yes No OFF
1-5 Parity Selection EVEN ODD OFF
1-6
Baud Rate(bps) Refer to the following Table 1
OFF
1-7 ON
1-8 OFF
• Parallel / USB / Ethernet / Wireless LAN / Powered USB Interface Setting
Switch Function ON OFF Default
1-1 Auto Line Feed Enabled Disabled OFF
1-2~6 Reserved - - OFF
1-7 Reserved - - ON
1-8 Reserved - - OFF
• Bluetooth Interface Setting
Switch Function ON OFF Default
1-1 Auto Line Feed Enabled Disabled OFF
1-2 Reserved - - OFF
1-3 SSP Mode Enable Disable OFF
1-4~6 Reserved - - OFF
1-7 Reserved - - O
N
1-8 Reserved - - OFF
• Table 1 – Baud Rate(bps) Selection
Baud Rate Speed 1-6 1-7 1-8 Default
2400 ON OFF OFF
9600
4800 ON OFF ON
9600 OFF ON OFF
19200 OFF OFF OFF
38400 OFF ON ON
57600 OFF OFF ON
115200 ON ON ON
2. DIP Switch 2
• SRP-S300L/T
Switch Function ON OFF Default
2-1 Reserved - - OFF
2-2 Black Mark Sensor Disable Enable OFF
2-3 Internal Bell Control Disabled Enabled OFF
2-4 Taken Sensor
*1)
Disable Enable OFF
2-5
Printing Density Refer to the following Table 2
OFF
2-6 OFF
2-7 OFF
2-8 Auto External Buzz Enabled Disabled OFF
*1)
Dip Switch 2-4 is only valid for Taken Sensing Model (SRP-S300T).
And then both taken sensing and back feeding are disabled when 2-4 is on.
• SRP-S300R
Switch Function ON OFF Default
2-1 Reserved - - OFF
2-2
Near End Sensor
Control
Disabled Enabled OFF
2-3 Internal Bell Control Disabled Enabled OFF
2-4 Reserved - - OFF
2-5
Printing Density Refer to the following Table 2
OFF
2-6 OFF
2-7 OFF
2-8 Auto External Buzz Enabled Disabled OFF
• Table 2 – Printing Density Selection
Printing
Density
2-5 2-6 2-7 Default
Level 1 OFF OFF OFF
- Level 1 is Default
- Level 6 is Darkest
Level 2 O
N
OFF OFF
Level 3 OFF ON OFF
Level 4 ON ON OFF
Level 5 OFF OFF ON
Level 6 ON OFF ON
※ Print Density
The print density can be set to one of eighteen different levels through virtual memory
switches.
Printer Installation Guide & Safet
y
Guide
THERMAL PRINTER SRP-S300
Interface cable
(USB, Serial, Parallel, Ethernet, Powered USB, Bluetooth, Wireless LAN)
Drawer kick-out connector
Power
Interface connector
Power cord
Drawer kick-out cable

Dip Switch
Density
Density
Level
Light Dark
Speed
6(High Speed)
3 Level 1
5 6 Level 2
4 9 Level 3
3 12 Level 4
2 15 Level 5
1(Low Speed) 18 Level 6
Memory Switch
Density
Density
Level
Light Dark
Speed
6(High Speed) 1 2
3 Level 1
5 4 5 6 Level 2
4 7 8 9 Level 3
3 10 11 12 Level 4
2 13 14 15 Level 5
1(Low Speed) 16 17 18 Level 6
* Choose Unified Utility or Self-Test mode to set the print density using the VMSM.
(Virtual Memory Switch Management)
* Change in DIP Switch settings are recognized only when the printer power is turned on or
when the printer is reset by using the interface. If the DIP Switch setting is changed after
the printer power is turned on, the change does not take effect until the printer is turned on
again or is reset.
◈ Self-Test
1. Check whether the paper is inserted correctly.
2. Turn on the printer while depressing the Feed button. Self-diagnostics will begin.
3. The printer prints the current status of the printer such as the version of the ROM and DIP
switch setting.
4. The printer prints the current status and stops after printing the following statement.
(PAPER indicator keeps blinking.)
SELF-TEST PRINTING.
SELECT MODES BY PRESSING FEED BUTTON.
Continuous SELF-TEST : Less than 1 second
VMSM Selection : 1second or more
5. Press the FEED button for less than 1 second to perform “Continuous SELF-TEST”.
Hold down the FEED button for 1 second or longer to perform “VMSM Selection”.
1) Self-Test
1-1) If you press the FEED button for less than 1 second, the printer will print in the preset
character type.
1-2) The self-test completes automatically and cuts the paper after printing the following line.
*** COMPLETED ***
1-3) The printer goes into standby mode when the self-test is complete.
2) Virtual Switch Setting Mode
2-1) When the printer goes into virtual switch-setting mode, the following lines will be printed.
** VMSM Selection **
0: Exit and Reboot Printer
1: Print Current Settings
2: Set Print Density
3: Set Print Speed
4: Set Cutting Mode
5: Beep-once Alarm
6: Continuous Alarm
7: Set Black Mark Cut Position
*1)
8 or more: None
*1)
Sticky, Re-stick, Linerless Extreme Model only
2-2) Make sure to press the FEED button to perform the above functions.
2-2-1) Step 1: The number indicates the number of times the FEED button needs to be
pressed. Make sure to press it for less than 1 second.
2-2-2) Step 2: Hold down the FEED button for 1 second or longer to enter the selected item.
If there is no selected item in Step 1, select “0: Exit and reboot printer” to exit.
2-3) When the new settings are applied, hold down the FEED button for 1 second or longer to
save the changes. Cut the paper when the following line is printed.
(If “0: Exit and reboot printer” is not performed, the new settings will not be saved.)
*** COMPLETED ***
6. The settings will take effect after the printer reboots.
※ Note
You can check whether the printer operates normally or not through self-diagnostics.
You can check printing quality, ROM version, and DIP switch settings through self-diagnostics.
◈ Using of Taken Sensor Function
When it comes to Taken Sensor, it will detect the paper not to feed next paper before user
detach it. This function will be supported by SRP-S300T.
Refer to the user manual for detailed instruction.
◈ WEEE(Waste Electrical and Electric Equipment)
This marking shown on the product or its literature, indicates that is should not be disposed with other household
wastes at the end of its working life, To prevent possible harm to the environment or human health from uncontrolled
waste disposal, please separate this from other types of wastes and recycle it responsibly to promote the sustainable
reuse of material resources. Household users should contact either the retailer where they purchased this product, or
their local government office, for details of where and how they can take this item for environmentally safe recycling.
Business users should contact their supplier and check the terms and conditions of the purchase contract. This product
should not be mixed with other commercial wastes for disposal.
☎ BIXOLON Co., Ltd.
● Website http://www.bixolon.com
● Korea Headquarters
(Add) 7~8F, (Sampyeong-dong), 20, Pangyoyeok-ro241beon-gil, Bundang-gu, Seongnam-si,
Gyeonggi-do, 13494, Korea (ROK)
(Tel.) +82-31-218-5500
● U.S. Office
(Add) BIXOLON America Inc., 3171 Fujita St, Torrance, CA 90505
(Tel.) +1-858 764 4580
● Europe Office
(Add) BIXOLON Europe GmbH, Tiefenbroicher Weg 35 40472 Düsseldorf
(Tel.) +49 (0)211 68 78 54 0
◈ Safety Precautions
In using the present appliance, please keep the following safety regulations in order to
prevent any hazard or material damage.
WARNING
Violating following instructions can cause serious injury or death.
CAUTION
Violating following instructions can cause slight wound or damage the appliance.
Do not use the printer when it is out
of order. This can cause a fire or an
electrocution.
• Switch off and unplug the printer
before calling your dealer.
Do not let water or other foreign objects
in the printer.
• If this happened, switch off and unplug
the printer before calling your dealer.
Use only approved accessories and do not
try to disassemble, repair or remodel it
for yourself.
• Call your dealer when you need these services.
• Do not touch the blade of auto cutter.
Install the printer on the stable surface
.
• If the printer falls down, it can be
broken and you can hurt yourself.
Keep the desiccant out of children’s
reach.
• If not, they may eat it.
If you observe a strange smoke, odor or
noise from the printer, unplug it before
taking following measures.
• Switch off the printer and unplug the set from the
mains.
• After the disappearance of the smoke, call your
dealer to repair it.
Do not bend the cable by force or leave it
under any heavy object.
• A damaged cable can cause a fire.
Do not plug in or unplug with your
hands wet.
• You can be electrocuted.
Keep the plastic bag out of children’s
reach.
• If not, a child may put the bag on his head.
Do not pull the cable to unplug.
• This can damage the cable, which is the
origin of a fire or a breakdown of the printer.
You must use only the supplied adapter.
• It is dangerous to use other adapters.
Do not plug several products in one
multi-outlet.
• This can provoke over-heating and a fire.
• If the plug is wet or dirty, dry or wipe it before
usage.
• If the plug does not fit perfectly with the outlet,
do not plug in.
• Be sure to use only standardized multi-outlets.
PROHIBITED
PROHIBITED
PROHIBITED
ONLY SUPPLIED ADAPTER
TO UNPLUG
PROHIBITED
DISASSEMBLIN
G
PROHIBITED
PROHIBITED
PROHIBITED
TO UNPLU
G
PRINTER
PRINTER
PRINTER
PRINTER
DEALER
PRINTER
PROHIBITED
PROHIBITED
PROHIBITED
-
 1
1
-
 2
2
-
 3
3
-
 4
4
-
 5
5
-
 6
6
-
 7
7
-
 8
8


BIXOLON SRP-S300は、コンパクトで高速なサーマルプリンターです。レシート、ラベル、チケットの印刷に最適で、小売、ホスピタリティ、医療など、幅広い業界で使用されています。
その主な機能は次のとおりです。
- 高速印刷速度:最大200mm/秒の高速印刷が可能なので、忙しい環境でも効率的に印刷できます。
- コンパクトで省スペース:幅205mm、奥行き136mm、高さ153mmのコンパクト設計なので、スペースの限られた場所にも設置できます。
- さまざまなインターフェース:USB、シリアル、パラレル、イーサネット、Bluetooth、Wi-Fiなど、さまざまなインターフェースを備えているので、さまざまなデバイスと接続できます。
- 用紙の自動検出機能:用紙の有無を自動的に検出するので、用紙切れの心配がありません。
- 黒
他の言語で
- English: BIXOLON SRP-S300 Installation guide