
Register your product and get support at
www.philips.com/welcome
FC9236, FC9220


1


6
Introduction
Congratulations on your purchase and welcome to Philips!
To fully benet from the support that Philips offers, register
your product at www.philips.com/welcome.
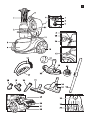
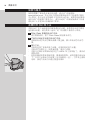
General description (Fig. 1)
1 Filter cylinder
2 Filter cylinder case
3 Dust bucket release button
4 Dust bucket
5 Hose connection opening
6 Suction power buttons (MIN and MAX)
7 Suction power lights
8 Filter-Clean button
9 On/off button
10 Cover
11 Motor protection lter
12 Wheel
13 Cord rewind button
14 Hose release button
15 Hose connector
16 Handgrip
17 Accessory holder
18 Small brush (specic types only)
19 Small nozzle
20 Crevice tool
21 Parquet nozzle (specic types only)
22 Tri-Active nozzle
23 Parking/storage ridge
24 Rocker switch for carpet/hard oor settings
25 Side brush
26 Combination nozzle (specic types only)
27 Rocker switch for carpet/hard oor settings
28 Telescopic tube
29 Ultra Clean Air HEPA 13 lter
30 Filter grille
31 Mains cord
32 Parking slot
33 Swivel wheel
34 Storage slot
35 Type plate
Important
Read this user manual carefully before you use the appliance and save it for
future reference.
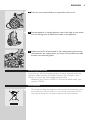
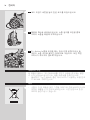
Danger
- Never suck up water or any other liquid. Never suck up ammable
substances and do not suck up ashes until they are cold.
ENGLISH

Warning
- Check if the voltage indicated on the appliance corresponds to the
local mains voltage before you connect the appliance.
- Do not use the appliance if the plug, the mains cord or the appliance
itself is damaged.
- If the mains cord is damaged, you must have it replaced by Philips, a
service centre authorised by Philips or similarly qualied persons in
order to avoid a hazard.
- This appliance is not intended for use by persons (including children)
with reduced physical, sensory or mental capabilities, or lack of
experience and knowledge, unless they have been given supervision or
instruction concerning use of the appliance by a person responsible for
their safety.
- Children should be supervised to ensure that they do not play with
the appliance.
- Do not point the hose, the tube or any other accessory at the eyes
or ears nor put it in your mouth when it is connected to the vacuum
cleaner and the vacuum cleaner is switched on.
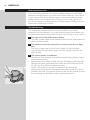
Caution
- Do not suck up large objects, as this may cause the air passage in the
tube or hose to become obstructed.
- When you use the vacuum cleaner to vacuum ashes, ne sand, lime,
cement dust and similar substances, the pores of the lter cylinder
become clogged. If you notice a strong decrease in suction power, clean
the lter cylinder.
- Sucking up large objects may cause the air passage in the tube or
hose to become obstructed. If this happens, the obstruction needs
to be removed.
- Never use the appliance without the motor protection lter. This
damages the motor and shortens the life of the appliance.
- The lter cylinder is not waterproof and cannot be cleaned with water
or cleaning agents. Only clean the lter with the Filter-Clean system.
- Only use the Philips lter cylinder supplied with the appliance.
- During vacuum cleaning, especially in rooms with low air humidity,
your vacuum cleaner builds up static electricity. As a result you can
experience electric shocks when you touch the tube or other steel
parts of your vacuum cleaner. These shocks are not harmful to you and
do not damage the appliance. To reduce this inconvenience we advise
you:
1 to discharge the appliance by frequently holding the tube against other
metal objects in the room (for example legs of a table or chair, radiator
etc.);
2 to raise the air humidity level in the room by placing water in the room.
For example, you can hang containers lled with water from your
radiators or place bowls lled with water on or near your radiators.
- Noise level: Lc = 78 dB(A)
ENGLISH 7

Electromagnetic elds (EMF)
This Philips appliance complies with all standards regarding electromagnetic
elds (EMF). If handled properly and according to the instructions in this
user manual, the appliance is safe to use based on scientic evidence
available today.
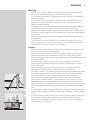
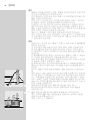
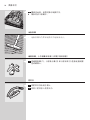
Preparing for use
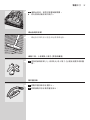
Hose
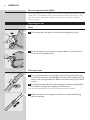
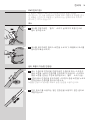
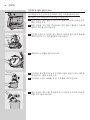
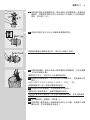
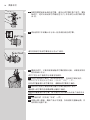
1 Toconnectthehose,pushitrmlyintotheappliance(‘click’).
2 Todisconnectthehose,pressthereleasebutton(1)andpullthe
hoseoutoftheappliance(2).
Telescopic tube
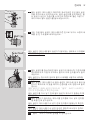
1 To connect the tube to the handgrip of the hose, press the spring-
loadedlockbuttononthehandgripandinsertthehandgripintothe
tube.Fitthespring-loadedlockbuttonintotheopeninginthetube
(‘click’).
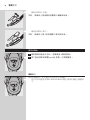
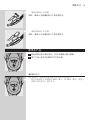
2 To disconnect the tube from the handgrip, press the spring-loaded
lockbuttonandpullthehandgripoutofthetube.
Use the same method to connect and disconnect the nozzles.
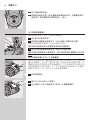
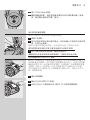
3 Adjustthetubetothelengthyoundmostcomfortableduring
vacuum cleaning.
ENGLISH8

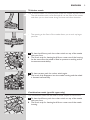
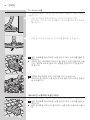
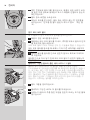
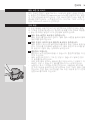
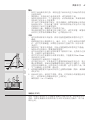
Tri-Active nozzle
The Tri-Active nozzle is a multi-purpose nozzle for carpets and hard oors.
- The side brushes catch more dust and dirt at the sides of the nozzle
and allow you to clean better along furniture and other obstacles.
- The opening at the front of the nozzle allows you to suck up larger
particles.
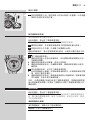
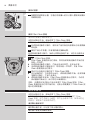
1 Tocleanhardoors,pushtherockerswitchontopofthenozzle
with your foot.
, Thebrushstripforcleaninghardoorscomesoutofthehousing.
At the same time, the wheel is lifted to prevent scratching and to
increase manoeuvrability.
2 Tocleancarpets,pushtherockerswitchagain.
, Thebrushstripdisappearsintothenozzlehousingandthewheel
is lowered automatically.
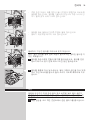
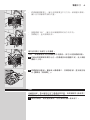
Combination nozzle (specic types only)
The combination nozzle can be used on either carpets or hard oors.
1 Tocleanhardoors,pushtherockerswitchontopofthenozzle
with your foot.
, Thebrushstripforcleaninghardoorscomesoutofthenozzle
housing.
ENGLISH 9

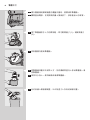
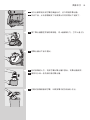
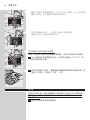
2 Tocleancarpets,pushtherockerswitchagain.
, Thebrushstripdisappearsintothenozzlehousing.
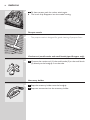
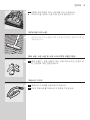
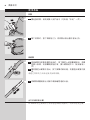
Parquet nozzle
- The parquet nozzle is designed for gentle cleaning of parquet oors.
Crevice tool, small nozzle and small brush (specic types only)
1 Connectthecrevicetool(1),thesmallnozzle(2)orthesmallbrush
(3)directlytothehandgriportothetube.
Accessory holder
1 Snap the accessory holder onto the handgrip.
2 Snap two accessories into the accessory holder:
ENGLISH10

- Crevice tool and small nozzle.
Note: Make sure the suction opening of the small nozzle points away from
the holder.
- Crevice tool and small brush.
Note: Make sure the suction opening of the small brush points towards
the holder.
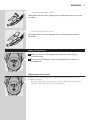
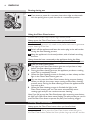
Using the appliance
1 Pull the cord out of the appliance and put the mains plug in
thewallsocket.
2 Press the on/off button on top of the appliance to switch on
the appliance.
Adjusting suction power
During vacuum cleaning, you can adjust the suction power to one of
5 different settings.
- You can adjust the suction power with the MIN and MAX buttons
(specic types only) on top of the appliance.
ENGLISH 11

Pausing during use
1 Ifyouwanttopauseforamoment,inserttheridgeonthenozzle
intotheparkingslottoparkthetubeinaconvenientposition.
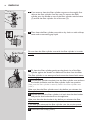
Using the Filter-Clean button
A clean lter cylinder helps maintain high suction power.
AlwayspresstheFilter-Cleanbuttonwhenyouhavenished
vacuum cleaning.
The lter-cleaning process only needs to be performed once to guarantee
proper cleaning of the lter.
1 Switchofftheapplianceandleavethemainspluginthewallsocket
duringthelter-cleaningprocess.
2 Keeptheapplianceinhorizontalposition,withallwheelstouching
theoor.
Alwaysleavethehoseconnectedtotheapplianceduringthelter-
cleaning process to prevent dust from being blown out of the appliance.
3 Press the Filter-Clean button.
, The light in the Filter-Clean button goes on and you hear a beep
beforethelter-cleaningprocessstarts.
, Duringthelter-cleaningprocess,theapplianceproducesarattling
noise. This is completely normal.
, Whenthelter-cleaningprocessisnished,youhearabeepandthe
light in the Filter-Clean button goes out.
4 You can also press the Filter-Clean button during vacuum cleaning.
, Whenyoudothis,themotorstopsrunningandtheltercleaning-
processstarts.Duringthelter-cleaningprocess,theappliancedoes
notsuckupdirt.
, Whenthelter-cleaningprocessisnished,thelightinthe
Filter-Clean button goes out. The motor automatically starts
running again and you can continue vacuum cleaning.
Note: If you fail to press the Filter-Clean button after vacuuming several times,
the light in the Filter-Clean button starts ashing. This tells you that you need to
press the Filter-Clean button to prevent the lter from becoming clogged.
Cleaning and maintenance
AlwayspresstheFilter-Cleanbuttonwhenyouhavenished
vacuum cleaning.
If you persistently fail to press the Filter-Clean button when the light in
the Filter-Clean button ashes, the lter cylinder clogs up with dirt and the
ENGLISH12

suction power becomes insufcient. If this happens, clean the lter cylinder
as described below.
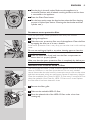
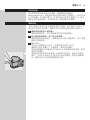
Cleaning the dust bucket and lter cylinder
Alwaysunplugtheappliancebeforeyouemptythedustbucket.
Thedustbucketisnotdishwasher-proof.
1 Emptythedustbucketassoonasthedustlevelhasreached
therounddiscoftheltercylindercase.
2 Switchofftheappliance,removethemainsplugfromthewallsocket
and disconnect the hose from the appliance.
3 Unlockthecoverbypressingthereleasebuttonontopof
thehandleofthedustbucket(1).Swingopenthecover(2).
4 Liftthedustbucketoutoftheappliance.
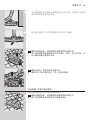
5 Holdthedustbucketoveradustbinandlifttheltercylindercase
outofthebucket.Emptythebucket.
6 Cleanthedustbucketwithcoldtapwaterandsomewashing-up
liquid.
7 Gentlytaptheltercylindercaseagainstthedustbintoreleaseall
nedustfromthecase.
ENGLISH 13

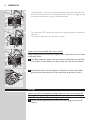
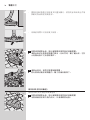
8 Ifyouwanttocleantheltercylindercasemorethoroughly,rst
removetheltercylinderfromthecase.Toremovethelter
cylinder,turnthehandleontopoftheltercylinderanticlockwise
(1)andlifttheltercylinderoutofthecase(2).
9 Thencleantheltercylindercasewithadryclothorwithcoldtap
water and some washing-up liquid.
Donotcleantheltercylindercasewiththeltercylinderinitunder
the tap.
10 Tocleantheltercylinder,gentlytaptheplasticrimofthelter
cylinderagainstthedustbintoreleaseallnedustfromthelter.
Theltercylinderisnotwaterproofandcannotbecleanedwithwater
or cleaning agents.
11 Puttheltercylindercasebackintotheltercylindercaseandturn
thehandleclockwiseuntiltheltercylinderlocksintoposition.
Make sure the lter cylinder is securely xed in the lter cylinder case
(‘click’).
Makesurethattheltercylindercaseisdrybeforeyoureinsertthe
ltercylinderintoit.
12 Putthecasewiththeltercylinderinitbackintothedustbucket
andputthedustbucketbackintotheappliance.
Makesurethatthedustbucketisdrybeforeyoureinsertthelter
cylinder case.
Ifyouhavenotreinsertedtheltercylindercase,thesuctionpower
lightsstartashingandtheappliancecannotbeswitchedon.
13 Closethecoverrmly(‘click’).
ENGLISH14

14 Putthepluginthewallsocket.Makesuretheapplianceisin
horizontalposition,withallwheelstouchingtheoor,andthehose
is connected to the appliance.
15 Press the Filter-Clean button.
16 Forthebestresult,emptythedustbucketwhenthelter-cleaning
processisnished(seesection‘Cleaningthedustbucketandlter
cylindercase’).
Permanent motor protection lter
Clean the permanent motor protection lter every two months.
1 Unplug the appliance.
2 Takethemotorprotectionlteroutoftheappliance.Cleanthelter
by tapping the dust out of it over a dustbin.
If the motor protection lter is very dirty, you can also rinse it with cold tap
water.
Do not use washing-up liquid or any other cleaning agent to clean the
motorprotectionlter.
3 Pressthecleanlterrmlybackintotheltercompartmentto
ensure that it is properly placed.
Makesurethatthemotorprotectionlteriscompletelydrybeforeyou
putitbackintotheltercompartment.
Washable Ultra Clean Air HEPA 13 lter
The Ultra Clean Air HEPA 13 lter is able to remove 99.95% of all particles
down to 0.0003mm in size from the outlet air. This not only includes
normal house dust, but also harmful microscopic vermin, such as dust mites
and their excrements, which are well-known causes of respiratory allergies.
Clean the washable Ultra Clean Air HEPA 13 lter every 6 months. You can
clean the washable Ultra Clean Air HEPA 13 lter max. 4 times. Replace
the lter after it has been cleaned 4 times.
1 Removetheltergrille.
2 TakeoutthewashableHEPA13lter.
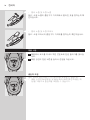
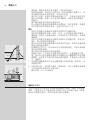
3 RinsethepleatedsideoftheHEPA13lterunderahotslow-
running tap.
ENGLISH 15

- Hold the lter in such a way that the pleated side points upwards and
the water ows parallel to the pleats. Hold the lter at an angle so that
the water washes away the dirt inside the pleats.
- Turn the lter 180° and let the water ow along the pleats in opposite
direction.
- Continue this process until the lter is clean.
Nevercleanthewashablelterwithabrush.
Note: Cleaning does not restore the original colour of the lter, but does restore
its ltration power.
4 Carefullyshakethewaterfromthesurfaceofthelter.Letthelter
dryatleast2hoursbeforeyouputitbackintothevacuumcleaner.
5 Putthelterbackintotheappliance.Reattachthetopofthelter
grilleandpushthebottomcornersuntiltheysnaphome(‘click’).
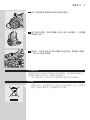
Storage
Beforeyoustoretheappliance,alwaysmakesureyouhavecleanedthe
ltercylinderbypressingtheFilter-Cleanbutton(seesection‘Usingthe
Filter-Cleanbutton’inchapter‘Usingtheappliance’).
1 Switch off the appliance and remove the mains plug from the wall
socket.
ENGLISH16

2 Press the cord rewind button to rewind the mains cord.
3 Puttheapplianceinuprightposition.Inserttheridgeonthenozzle
intothestorageslottoattachthenozzletotheappliance.
4 AlwaysputtheTri-Activenozzleinthecarpetsetting(brushstrip
retractedintothenozzle)whenyoustoreit.Alsopreventtheside
brushes from becoming bent
Ordering accessories
If you have any difculties obtaining lters or other accessories for this
appliance, please contact the Philips Customer Care Centre in your
country or consult the worldwide guarantee leaet.
- Washable Ultra Clean Air HEPA 13 lters are available under type
number FC8038.
Environment
- Do not throw away the appliance with the normal household waste
at the end of its life, but hand it in at an ofcial collection point for
recycling. By doing this, you help to preserve the environment.
ENGLISH 17

Guarantee & service
If you need information or if you have a problem, please visit the Philips
website at www.philips.com or contact the Philips Customer Care Centre
in your country. You nd its phone number in the worldwide guarantee
leaet. If there is no Customer Care Centre in your country, go to your
local Philips dealer or contact the Service Department of Philips Domestic
Appliances and Personal Care BV.
Troubleshooting
This chapter summarises the most common problems you could
encounter with the appliance. If you are unable to solve the problem with
the information below, contact the Customer Care Centre in your country.
1 ThelightintheFilter-Cleanbuttonashes.
- The lter cylinder needs to be cleaned. Press the Filter-Clean button to
clean the lter cylinder.
2 The appliance cannot be switched on and the suction power lights
ash.
- The lter cylinder case with the lter cylinder in it has not been
inserted into the dust bucket. Insert the lter cylinder case with the
lter cylinder.
3 Thesuctionpowerisinsufcient.
- Perhaps you have selected a low suction power setting. Select a higher
suction power setting.
- Perhaps the lter cylinder is lled with dirt. If necessary, clean this lter.
- Perhaps the motor protection lter and/or the Ultra Clean Air HEPA
13 lter are dirty. Clean or replace the lters.
- Check if the nozzle or the hose is blocked up. To remove the
obstruction, disconnect the blocked-up item and connect it (as far as
possible) the other way around. Switch on the vacuum cleaner to force
the air through the blocked-up item in opposite direction
ENGLISH18

19
소개
필립스 제품을 구입해 주셔서 감사합니다! 필립스가 드리는 지원
혜택을 받으실 수 있도록 www.philips.co.kr에서 제품을 등록하십
시오.
각 부의 명칭 (그림 1)
1 필터 실린더
2 필터 실린더 케이스
3 먼지통 분리 버튼
4 먼지통
5 호스 연결 구멍
6 흡입력 버튼(MIN, MAX)
7 흡입력 표시등
8 필터 청소 버튼
9 전원 버튼
10 덮개
11 모터 보호 필터
12 바퀴
13 코드 되감기 버튼
14 호스 릴리스 버튼
15 호스 연결부
16 손잡이
17 액세서리 거치대
18 소형 브러시(특정 모델만 해당)
19 소형 노즐
20 틈새 노즐
21 파케 노즐(특정 모델만 해당)
22 Tri-Active 노즐
23 임시보관/보관 걸이
24 카펫/일반 바닥재 설정을 위한 로커 스위치
25 측면 브러시
26 콤비네이션 노즐(특정 모델만 해당)
27 카펫/일반 바닥재 설정을 위한 로커 스위치
28 길이 조절이 가능한 연장관
29 울트라 클린 에어 HEPA 13 필터
30 필터 그릴
31 전원 코드
32 임시보관용 홈
33 회전식 바퀴
34 보관용 홈
35 명판
주의 사항
본 제품을 사용하기 전에 이 사용 설명서를 주의 깊게 읽고 나중에
참조할 수 있도록 잘 보관하십시오.
위험
- 물, 다른 용액 또는 가연성 물질은 절대 흡입하지 마십시오. 타
고 남은 재는 완전히 꺼져서 식기 전까지는 절대 흡입하지 마
십시오.
한국어

경고
- 제품에 전원을 연결하기 전에, 제품에 표시된 전압과 사용 지역
의 전압이 일치하는지 확인하십시오.
- 만약 플러그나 전원 코드 또는 제품이 손상되었을 경우에는 제
품을 사용하지 마십시오.
- 전원 코드가 손상된 경우, 안전을 위해 필립스 서비스 센터 또
는 필립스 서비스 지정점에 의뢰하여 교체하십시오.
- 신체적인 감각 및 정신적인 능력이 떨어지거나 경험과 지식이
풍부하지 않은 성인 및 어린이는 혼자 제품을 사용하지 말고,
제품 사용과 관련하여 안전에 책임 질 수 있도록 지시사항을 충
분히 숙지한 사람의 도움을 받으십시오.
- 어린이가 제품을 가지고 놀지 못하도록 지도해 주십시오.
- 호스, 연장관 또는 기타 액세서리가 진공 청소기가 연결되어 있
고 진공 청소기의 전원이 켜져 있을 때 이를 눈, 귀에 갖다 대거
나 입에 넣지 마십시오.
주의
- 연장관이나 호스의 공기 통로가 막힐 수 있으므로 큰 물체를 흡
입하지 마십시오.
- 이 진공 청소기를 사용하여 재, 미세 모래, 석회, 시멘트 먼지
및 유사 물질을 청소하면 필터 실린더의 구멍이 막히게 됩니
다. 흡입력이 상당히 감소했다고 판단되면 필터 실린더를 청소
하십시오.
- 큰 물체를 흡입하면 튜브나 호스의 공기 통로가 막힐 수 있습니
다. 이러한 일이 발생하면 이물질을 제거해야 합니다.
- 모터 보호 필터 없이 제품을 사용하지 마십시오. 모터가 손상되
고 제품의 수명이 단축될 수 있습니다.
- 본 필터 실린더는 방수되지 않으므로 물이나 세제로 세척할 수
없습니다. 반드시 필터 청소 시스템을 사용하여 필터를 청소하
십시오.
- 반드시 제품과 함께 제공된 필립스 필터 실린더만 사용하십시
오.
- 특히 습도가 낮은 실내에서 진공 청소기를 사용할 경우 진공 청
소기에 정전기가 축적됩니다. 이로 인해 진공 청소기의 연장관
이나 다른 철제 부분을 만질 때 경미한 감전이 발생할 수 있습
니다. 이러한 감전은 인체에 해롭지 않으며 제품도 손상시키지
않습니다. 하지만 불편을 최소화하기 위해 진공 청소기 사용 시
다음 사항을 권장합니다.
1 실내에서 연장관을 금속 물체(예: 테이블, 의자 또는
라디에이터 등의 다리)와 수시로 접촉하도록 하여 제품을
방전시킵니다.
2 물을 채운 용기를 라디에이터에 걸쳐놓거나 라디에이터
위나 근처에 물을 채운 그릇을 놓는 방법으로 실내에 수분을
공급하여 습도를 높입니다.
- 소음 수준: Lc = 78dB(A)
한국어20
ページが読み込まれています...
ページが読み込まれています...
ページが読み込まれています...
ページが読み込まれています...
ページが読み込まれています...
ページが読み込まれています...
ページが読み込まれています...
ページが読み込まれています...
ページが読み込まれています...
ページが読み込まれています...
ページが読み込まれています...
ページが読み込まれています...
ページが読み込まれています...
ページが読み込まれています...
ページが読み込まれています...
ページが読み込まれています...
ページが読み込まれています...
ページが読み込まれています...
ページが読み込まれています...
ページが読み込まれています...
ページが読み込まれています...
ページが読み込まれています...
ページが読み込まれています...
ページが読み込まれています...
ページが読み込まれています...
ページが読み込まれています...
ページが読み込まれています...
ページが読み込まれています...
ページが読み込まれています...
ページが読み込まれています...
ページが読み込まれています...
ページが読み込まれています...
ページが読み込まれています...
ページが読み込まれています...
ページが読み込まれています...
ページが読み込まれています...
ページが読み込まれています...
ページが読み込まれています...
ページが読み込まれています...
ページが読み込まれています...
ページが読み込まれています...
ページが読み込まれています...
-
 1
1
-
 2
2
-
 3
3
-
 4
4
-
 5
5
-
 6
6
-
 7
7
-
 8
8
-
 9
9
-
 10
10
-
 11
11
-
 12
12
-
 13
13
-
 14
14
-
 15
15
-
 16
16
-
 17
17
-
 18
18
-
 19
19
-
 20
20
-
 21
21
-
 22
22
-
 23
23
-
 24
24
-
 25
25
-
 26
26
-
 27
27
-
 28
28
-
 29
29
-
 30
30
-
 31
31
-
 32
32
-
 33
33
-
 34
34
-
 35
35
-
 36
36
-
 37
37
-
 38
38
-
 39
39
-
 40
40
-
 41
41
-
 42
42
-
 43
43
-
 44
44
-
 45
45
-
 46
46
-
 47
47
-
 48
48
-
 49
49
-
 50
50
-
 51
51
-
 52
52
-
 53
53
-
 54
54
-
 55
55
-
 56
56
-
 57
57
-
 58
58
-
 59
59
-
 60
60
-
 61
61
-
 62
62


他の言語で
- English: Philips FC9222/01 User manual