
FC9079-FC9050

2

3
1

4

FC9079-FC9050
ENGLISH 6
한국어 13
繁體中文 20

6
Introduction
Congratulations on your purchase and welcome to Philips! To fully benet from the support that
Philips offers, register your product at www.philips.com/welcome.
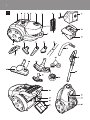
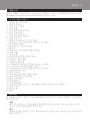
General description (Fig. 1)
1 Active Fragrance cartridge
2 Suction power knob
3 Cord rewind button
4 On/off button
5 Dustbag-full indicator
6 Hose connection opening
7 Dust cover release tab
8 Motor protection lter holder
9 Front handle
10 Removable strip (some countries only)
11 Reusable dustbag (some countries only)
12 Dustbag holder
13 Synthetic dustbag
14 Rear wheel
15 Accessory holder (specic types only)
16 Small nozzle
17 Crevice tool
18 Small brush (specic types only)
19 Spring-loaded lock button
20 Hose with handgrip
21 Combination nozzle
22 Rocker switch for carpet/hard oor settings
23 Tri-Active nozzle (specic types only)
24 Rocker switch for carpet/hard oor settings
25 Parking/storage ridge
26 Side brush
27 Accessory clip (specic types only)
28 Telescopic tube
29 Filter grille (open)
30 Mains plug
31 Parking slot
32 Super Clean Air HEPA 12 lter/Ultra Clean Air HEPA 13 lter
33 Swivel wheel
34 Storage slot
35 Type plate
Important
Read this user manual carefully before you use the appliance and save it for future reference.
Danger
Never suck up water or any other liquid. Never suck up ammable substances and do not suck
up ashes until they are cold.
Warning
Check if the voltage indicated on the appliance corresponds to the local mains voltage before
you connect the appliance.
Do not use the appliance if the plug, the mains cord or the appliance itself is damaged.
-
-
-
ENGLISH

If the mains cord is damaged, you must have it replaced by Philips, a service centre authorised by
Philips or similarly qualied persons in order to avoid a hazard.
This appliance is not intended for use by persons (including children) with reduced physical,
sensory or mental capabilities, or lack of experience and knowledge, unless they have been given
supervision or instruction concerning use of the appliance by a person responsible for their
safety.
Children should be supervised to ensure that they do not play with the appliance.
Do not point the hose, the tube or any other accessory at the eyes or ears nor put it in your
mouth when it is connected to the vacuum cleaner and the vacuum cleaner is switched on.
Caution
When you use the vacuum cleaner to vacuum ashes, ne sand, lime, cement dust and similar
substances, the pores of the dustbag become clogged. As a result, the dustbag-full indicator will
indicate that the dustbag is full. Replace the disposable dustbag and empty the reusable dustbag,
even if it is not full yet (see chapter ‘Replacing/emptying the dustbag’).
Never use the appliance without the motor protection lter. This could damage the motor and
shorten the life of the appliance.
Only use Philips s-bag ` synthetic dustbags or the reusable dustbag provided (some countries
only).
The translucent display panel is made of recyclable polycarbonate (>PC<).
Electromagnetic elds (EMF)
This Philips appliance complies with all standards regarding electromagnetic elds (EMF). If handled
properly and according to the instructions in this user manual, the appliance is safe to use based on
scientic evidence available today.
Preparing for use
Hose
1 Toconnectthehose,pushitrmlyintotheappliance(‘click’)(Fig.2).
2 Todisconnectthehose,pushthebuttons(1)andpullthehoseoutoftheappliance
(2)(Fig.3).
Tube
1 Toconnectthetubepartstoeachotherandtothehandgripofthehose,pressthespring-
loadedlockbutton.Theninsertthepartwiththelockbuttonintothepartwiththeholeand
tthelockbuttonintothehole(‘click’)(Fig.4).
2 Todisconnectthetubefromthehandgrip,pressthespring-loadedlockbuttonandpullthe
handgripoutofthetube.
Note: Use the same method to connect and disconnect the accessories.
Telescopic tube (specic types only)
1 Adjustthetubetothelengthyoundmostcomfortableduringvacuumcleaning(Fig.5).
Tri-Active nozzle (specic types only)
The Tri-Active nozzle is a multi-purpose nozzle for carpets and hard oors.
The side brushes catch more dust and dirt at the sides of the nozzle and allow you to clean
better along furniture and other obstacles (Fig. 6).
The opening at the front of the nozzle allows you to suck up larger particles (Fig. 7).
1 Tocleanhardoors,pushtherockerswitchontopofthenozzlewithyourfoot(Fig.8).
-
-
-
-
-
-
-
-
-
-
ENGLISH 7

Thebrushstripforcleaninghardoorscomesoutofthehousing.Atthesametime,the
wheelisliftedtopreventscratchingandtoincreasemanoeuvrability.
2 Tocleancarpets,pushtherockerswitchagain(Fig.9).
Thebrushstripdisappearsintothenozzlehousingandthewheelisloweredautomatically.
Combination nozzle (specic types only)
The combination nozzle can be used on either carpets or hard oors.
1 Tocleanhardoors,pushtherockerswitchontopofthenozzlewithyourfoot(Fig.10).
Thebrushstripforcleaninghardoorscomesoutofthenozzlehousing.
2 Tocleancarpets,pushtherockerswitchagain(Fig.11).
Thebrushstripdisappearsintothenozzlehousing.
Crevice tool, small nozzle and small brush
1 Connectthecrevicetool(1),thesmallnozzle(2)orthesmallbrush(specictypesonly)(3)
directlytothehandgriportothetube(Fig.12).
Accessory clip (specic types only)
1 Snapthecrevicetoolandthesmallnozzleintotheclip.
2 Snaptheaccessoryclipontothetube(Fig.13).
Accessory holder (specic types only)
1 Snaptheaccessoryholderontothehandgrip(Fig.14).
2 Snaptwoaccessoriesintotheaccessoryholder:
Crevice tool and small nozzle (Fig. 15).
Note: Make sure the suction opening of the small nozzle points away from the holder.
Crevice tool and small brush (Fig. 16).
Note: Make sure the suction opening of the small brush points towards the holder.
Using the appliance
1
Pullthecordoutoftheapplianceandputthemainspluginthewallsocket.
2 Presstheon/offbuttonontopoftheappliancewithyourfoottoswitchonthe
appliance(Fig.17).
3 Duringvacuumcleaning,youcanadjustthesuctionpowerwiththeknobontopofthe
appliance(Fig.18).
Use maximum suction power to vacuum very dirty carpets and hard oors.
Use minimum suction power to vacuum curtains, table carpets, etc.
4 Ifyouwanttopauseforamoment,inserttheridgeonthenozzleintotheparkingslotto
parkthetubeinaconvenientposition(Fig.19)
Active Fragrance Control (specic types only)
The scent granules have been specially developed for use in your Philips vacuum cleaner. Only use
the Philips s-fresh ` scent granules in your vacuum cleaner.
IfthevacuumcleanerisequippedwithActiveFragranceControl,keepitoutofthereachof
children,bothduringandafteruse.Storethevacuumcleanerinalockedcupboardifthereare
smallchildreninthehouse.
Thescentgranulesarenotedible.
,
,
,
,
-
-
-
-
ENGLISH8

Incaseofeyecontact,ushimmediatelywithplentyofwater.
Filling the cartridge
1 Placeyourthumbandindexngeronthesidesofthecartridge.Pressonthedisc(1)andlift
thecartridgeoutoftheholder(2)(Fig.20).
2 Toremovethecapofthecartridge,applypressureonthesmallpressingpoints(1)andthen
pullthecapupwards(2)(Fig.21).
3 Openthepackageatthesmallopeningatthetop.
4 Fillthecartridgewiththecontentsofonewholepackageofscentgranules.
5Closethecartridgebyputtingthecapbackontoit(‘click’).
6 Re-insertthecartridgeintotheholder(‘click’).Itonlytsintotheholderinone
way(Fig.22).
Replace the granules when the cartridge no longer emits any fragrance.
Setting the fragrance level
You can set the fragrance level by turning the cartridge forwards (maximum emission) and
backwards (minimum emission) (Fig. 23).
When you store the vacuum cleaner or do not want any fragrance to be emitted, close the
cartridge by turning it backwards until the openings of the cartridge are no longer visible.
Storage
1
Switchofftheapplianceandremovethemainsplugfromthewallsocket.
2 Pressthecordrewindbuttontorewindthemainscord(Fig.24).
3 Puttheapplianceinuprightposition.Toattachthenozzletotheappliance,inserttheridgeon
thenozzleintothestorageslot(Fig.25).
4 AlwaysputtheTri-Activenozzleinthecarpetsettingwhenyoustoreit.Alsopreventtheside
brushesfrombecomingbent(Fig.8).
Replacing/emptying the dustbag
Alwaysunplugtheappliancebeforeyoureplacethedisposabledustbagoremptythereusable
dustbag.
Replacing the disposable dustbag
Replace the dustbag as soon as the dustbag-full indicator has changed colour permanently, i.e.
even when the nozzle is not placed on the oor (Fig. 26).
1 Pullthecoverupwardstoopenit(Fig.27).
2 Liftthedustbagholderoutoftheappliance(Fig.28).
Makesureyouholdthedustbaguprightwhenyouliftitoutoftheappliance.
3 Pullatthecardboardtagtoremovethefulldustbagfromtheholder(Fig.29).
Whenyoudothis,thedustbagissealedautomatically.
4 Slidethecardboardfrontofthenewdustbagintothetwogroovesofthedustbagholderas
faraspossible.(Fig.30)
5Putthedustbagholderbackintothevacuumcleaner(Fig.31).
Note: If no dustbag has been inserted, you cannot close the cover.
-
-
-
,
ENGLISH 9

Emptying the reusable dustbag (some countries only)
In some countries, this vacuum cleaner also comes with a reusable dustbag that can be used and
emptied repeatedly. You can use the reusable dustbag instead of disposable dustbags.
To remove and insert the reusable dustbag, simply follow the instructions in ‘Replacing the
disposable dustbag’.
To empty the reusable dustbag:
1 Slidetheclipoffthedustbagsideways.
2 Shakeoutthecontentsintoadustbin.
3 Toclosethedustbag,slidetheclipbackontothebottomedgeofthedustbag.
Cleaning and maintenance of lters
Alwaysunplugtheappliancebeforeyoucleanorreplacethelters.
Permanent motor protection lter
Clean the permanent motor protection lter every time you replace the dustbag.
1 Removethedustbagholderwiththedustbag(Fig.28).
2 Takethemotorprotectionlterholderoutoftheappliance.Takethelteroutofthe
holder.(Fig.32)
3 Shakethelteroveradustbintocleanit.
4 Putthecleanlterbackintothelterholder.Fitthetwolugsofthelterholderbehindthe
ridgeatthebottomtoensurethatittsproperlyatthetop.Thenpressthelterholder
home(‘click’)(Fig.33).
5Placethedustbagholderwiththedustbagbackintotheappliance.
Super Clean Air lter (specic types only)
The Super Clean Air Filter located in the back of the appliance has electrostatically charged bres.
These bres lter a large part of the smaller particles from the exhaust air.
Replace the Super Clean Air lter every six months.This lter is not washable.
1 Opentheltergrille(Fig.34).
2 Removetheoldlter(Fig.35).
3 Insertthenewlterintotheappliance.
4 Closetheltergrille(‘click’)(Fig.36).
Super Clean Air HEPA 12 lter/Ultra Clean Air HEPA 13 lter
This appliance is equipped with either the Super Clean Air HEPA 12 llter or the Ultra Clean Air
HEPA 13 lter. These lters are located in the back of the appliance. They are able to remove 99.5%
and 99.95% respectively of all particles down to 0.0003mm in size from the outlet air. This not only
includes normal house dust, but also harmful microscopic vermin such as dust mites and their
excrements, which are well-known causes of respiratory allergies.
Note: To guarantee optimal dust retention and performance of the vacuum cleaner, always replace the
HEPA lter with an original Philips lter of the correct type (see chapter ‘Ordering accessories’).
Super Clean Air HEPA 12 lter
Replace the Super Clean Air HEPA 12 lter every six months. This lter is not washable.
1 Opentheltergrille(Fig.34).
ENGLISH10

2 Removetheoldlter(Fig.35).
3 Insertthenewlterintotheappliance.
4 Closetheltergrilleandpushthebottomcornersuntiltheysnaphome(Fig.36).
Washable Ultra Clean Air HEPA 13 lter
Clean the washable Ultra Clean Air HEPA 13 lter every 6 months. You can clean the washable
Ultra Clean Air HEPA 13 lter max. 4 times. Replace the lter after it has been cleaned 4 times.
1 Opentheltergrille(Fig.34).
2 TakeoutthewashableHEPA13lter(Fig.35).
3 RinsethepleatedsideoftheHEPA13lterunderahotslow-runningtap.
Hold the lter in such a way that the pleated side points upwards and the water ows parallel
to the pleats. Hold the lter at an angle so that the water washes away the dirt inside the
pleats (Fig. 37).
Turn the lter 180° and let the water ow along the pleats in opposite direction (Fig. 38).
Continue this process until the lter is clean.
Nevercleanthewashablelterwithabrush(Fig.39).
Note: Cleaning does not restore the original colour of the lter, but does restore its ltration power.
4 Carefullyshakethewaterfromthesurfaceofthelter.Letthelterdryatleast2hours
beforeyouputitbackintothevacuumcleaner.
5Putthelterbackintotheappliance.Closetheltergrilleandpushthebottomcornersuntil
theysnaphome(Fig.36).
Ordering accessories
If you have any difculties obtaining dustbags, lters or other accessories for this appliance, please
contact the Philips Customer Care Centre in your country or consult the worldwide guarantee
leaet.
Ordering dustbags
Philips Classic s-bag ` synthetic dustbags are available under type number FC8021.
Philips Clinic s-bag ` high ltration synthetic dustbags are available under type number FC8022.
Philips Anti-odour s-bag ` synthetic dustbags are available under type number FC8023.
Ordering lters
Super Clean Air lters are available under type number FC8030.
Non-washable Super Clean Air HEPA 12 lters are available under type number FC8031.
Washable Ultra Clean Air HEPA 13 lters are available under type number FC8038.
Ordering scent granules
Replacement kits with 4 packages of scent granules are available under type number FC8025.
Environment
Do not throw away the appliance with the normal household waste at the end of its life, but
hand it in at an ofcial collection point for recycling. By doing this, you help to preserve the
environment (Fig. 40).
Guarantee & service
If you need information or if you have a problem, please visit the Philips website at www.philips.com
or contact the Philips Customer Care Centre in your country (you nd its phone number in the
worldwide guarantee leaet). If there is no Customer Care Centre in your country, go to your local
-
-
-
-
-
-
-
-
-
-
-
ENGLISH 11

Philips dealer or contact the Service Department of Philips Domestic Appliances and Personal Care
BV.
Troubleshooting
This chapter summarises the most common problems you could encounter with the appliance. If
you are unable to solve the problem with the information below, contact the Customer Care
Centre in your country.
1 Thesuctionpowerisinsufcient.
A Check if the dustbag is full.
If necessary, replace the disposable dustbag or empty the reusable dustbag (some countries only).
B Check if the lters need to be cleaned or replaced.
If necessary, clean or replace the lters.
C Check if the suction power knob is in maximum position.
D Check if the nozzle, tube or hose is blocked up.
To remove the obstruction, disconnect the blocked-up item and connect it (as far as possible)
the other way around. Switch the vacuum cleaner on to force the air through the blocked-up
item in opposite direction (Fig. 41).
-
ENGLISH12

13
제품 소개
필립스 제품을 구입해 주셔서 감사합니다! 필립스가 드리는 지원 혜택을 받으실 수 있도
록 www.philips.com/welcome에서 제품을 등록하십시오.
각 부의 명칭 (그림 1)
1 액티브 향기 카트리지
2 흡입력 조절기
3 코드 되감기 버튼
4 전원 버튼
5 먼지 봉투 교체 표시등
6 호스 연결 구멍
7 먼지 덮개 분리 탭
8 모터 보호 필터 거치대
9 앞면 손잡이
10 착탈식 스트립(일부 국가만 해당)
11 재사용이 가능한 먼지 봉투(일부 국가만 해당)
12 먼지 봉투 거치대
13 합성섬유로 만든 먼지 봉투
14 뒷바퀴
15 액세서리 거치대(특정 모델만 해당)
16 소형 노즐
17 틈새 노즐
18 소형 브러시(특정 모델만 해당)
19 스프링식 잠금 버튼
20 손잡이가 달린 호스
21 콤비네이션 노즐
22 카페트/일반 바닥재 설정을 위한 로커 스위치
23 Tri-Active 노즐(특정 모델만 해당)
24 카페트/일반 바닥재 설정을 위한 로커 스위치
25 임시보관/보관 걸이
26 측면 브러시
27 액세서리 클립(특정 모델만 해당)
28 길이 조절이 가능한 연장관
29 필터 커버(열림)
30 전원 플러그
31 임시보관용 홈
32 수퍼 클린 에어 HEPA 12 필터/울트라 클린 에어 HEPA 13 필터
33 회전식 바퀴
34 보관용 홈
35 명판
중요사항
본 제품을 사용하기 전에 이 사용 설명서를 주의 깊게 읽고 나중에 참조할 수 있도록 잘
보관하십시오.
위험
물, 다른 용액 또는 가연성 물질은 절대 흡입하지 마십시오. 타고 남은 재는 완전히
꺼지기 전까지 절대 흡입하지 마십시오.
경고
제품에 전원을 연결하기 전에, 제품에 표시된 전압과 사용 지역의 전압이 일치하는지
확인하십시오.
-
-
한국어

만약 플러그나 전원 코드 또는 제품이 손상되었을 경우에는 제품을 사용하지 마십시
오.
전원 코드가 손상된 경우, 안전을 위해 필립스 서비스 센터 또는 필립스 서비스 지정
점에 의뢰하여 교체하십시오.
신체적인 감각 및 정신적인 능력이 떨어지거나 경험과 지식이 풍부하지 않은 사용자
(어린이 포함)는 혼자 제품을 사용하지 말고 제품 사용과 관련하여 안전에 책임 질 수
있도록 지시사항을 충분히 숙지한 사람의 도움을 받으십시오.
어린이가 제품을 가지고 놀지 못하도록 지도해 주십시오.
호스, 연장관 또는 기타 액세서리가 진공 청소기가 연결되어 있고 진공 청소기의 전
원이 켜져 있을 때 이를 눈, 귀에 갖다 대거나 입에 넣지 마십시오.
주의
진공 청소기를 사용하여 재, 미세한 모래, 석회, 시멘트 가루 및 유사한 물질을 청소
하면 먼지 봉투 구멍이 막히게 됩니다. 이로 인해 먼지 봉투 교체 표시등에 먼지 봉투
가 가득 찬 것으로 표시됩니다. 먼지 봉투가 가득 차지 않은 경우에도 교체형 먼지 봉
투는 교체하고 재사용이 가능한 먼지 봉투는 비우십시오(‘먼지 봉투 교체/비우
기’란 참조).
모터 보호 필터 없이 제품을 사용하지 마십시오. 모터가 손상되고 제품의 수명이 단
축될 수 있습니다.
반드시 제품과 함께 제공되는 필립스 S-bag ` 합성섬유 먼지 봉투 또는 재사용 먼
지 봉투를 사용하십시오(특정 모델만 해당).
반투명 표시창은 재활용 가능한 폴리카보네이트(>PC<)로 만들어졌습니다.
EMF(전자기장)
이 필립스 제품은 EMF(전자기장)와 관련된 모든 기준을 준수합니다. 이 사용 설명서의
지침에 따라 적절하게 취급할 경우 이 제품은 안전하게 사용할 수 있으며 이는 현재까지
의 과학적 증거에 근거하고 있습니다.
사용 전 준비
호스
1 호스를 연결하려면 ‘찰칵’ 소리가 날 때까지 제품 안으로 밀어 넣으십시오 (그
림 2).
2 호스를 분리하려면 (1)버튼을 누르고 (2)제품에서 호스를 잡아당겨 빼십시오 (그
림 3).
연장관
1 연장관과 손잡이를 서로 연결하려면 스프링식 잠금 버튼을 누르십시오. 그런 다음 잠
금 버튼이 있는 부분을 구멍이 있는 부분에 넣고 잠금 버튼을 구멍에 맞추십시오 (그
림 4).
2 손잡이에서 연장관을 분리하려면 스프링식 잠금 버튼을 누르고 연장관에서 손잡이를
잡아당기십시오.
참고: 액세서리를 연결하고 분리할 때에도 같은 방법으로 하십시오.
길이 조절이 가능한 연장관(특정 모델만 해당)
1 진공 청소기를 사용하는 동안 연장관을 사용하기 편한 길이로 조절하십시오 (그
림 5).
Tri-Active 노즐(특정 모델만 해당)
Tri-Active 노즐은 카페트 및 일반 바닥에서 사용할 수 있는 다용도 노즐입니다.
노즐 옆 부분의 측면 브러시는 먼지와 더러움을 더 잘 잡아주며, 가구 및 기타 장애물
의 가장자리를 따라 효과적으로 청소합니다 (그림 6).
-
-
-
-
-
-
-
-
-
-
한국어14

노즐 앞 부분의 구멍은 더 큰 입자를 흡입할 수 있습니다 (그림 7).
1 일반 바닥재를 청소하려면 노즐 상단의 로커 스위치를 발로 누르십시오 (그림 8).
그러면 일반 바닥재용 브러시의 솔 부분이 외장 바깥으로 나옵니다. 동시에 바퀴도
올라가서 긁힘을 방지하고 더 잘 움직이게 됩니다.
2 카페트를 청소하려면 로커 스위치를 다시 누르십시오 (그림 9).
브러시의 솔 부분이 노즐 외장 안으로 들어가고 바퀴도 자동으로 내려옵니다.
콤비네이션 노즐(특정 모델만 해당)
콤비네이션 노즐은 카페트나 일반 바닥에서 사용할 수 있습니다.
1 일반 바닥재를 청소하려면 노즐 상단의 로커 스위치를 발로 누르십시오 (그림 10).
일반 바닥재용 브러시의 솔 부분이 노즐 외장 바깥으로 나옵니다.
2 카페트를 청소하려면 로커 스위치를 다시 누르십시오 (그림 11).
브러시의 솔 부분이 노즐 외장 안으로 들어갑니다.
틈새 청소 도구, 소형 노즐 및 소형 브러시
1 (1)틈새 청소 도구, (2)소형 노즐 또는 (3)소형 브러시(특정 모델만 해당)를 연장관
또는 손잡이에 직접 연결하십시오 (그림 12).
액세서리 클립(특정 모델만 해당)
1 틈새 노즐과 소형 노즐을 클립 위에 끼우십시오.
2 액세서리 클립을 연장관 위에 끼우십시오 (그림 13).
액세서리 거치대(특정 모델만 해당)
1 액세서리 거치대를 손잡이에 끼우십시오 (그림 14).
2 2개의 액세서리를 액세서리 거치대에 끼우십시오.
틈새 청소 도구 및 소형 노즐 (그림 15)
참고: 소형 노즐의 흡입구가 거치대에서 떨어진 곳을 향하는지 확인하십시오.
틈새 청소 도구 및 소형 브러시 (그림 16)
참고: 소형 브러시의 흡입구가 거치대를 향하는지 확인하십시오.
제품 사용
1
제품에서 코드를 꺼내고 벽면 콘센트에 전원 플러그를 꽂으십시오.
2 제품 상단의 전원 버튼을 발로 눌러서 전원을 켜십시오 (그림 17).
3 청소 중에도 제품 상단의 조절기를 이용해 흡입력을 조절할 수 있습니다 (그림 18).
매우 더러운 카페트 및 일반 바닥을 청소할 때는 흡입력을 최대로 하여 사용하십시
오.
커튼, 식탁보 등을 청소할 때는 흡입력을 최저로 하여 사용하십시오.
4 청소를 잠시 중단하려면 노즐 걸이를 임시 보관용 홈에 끼워서 연장관을 편리한 위치
에 세워두십시오 (그림 19)
향기조절 기능(특정 모델만 해당)
필립스 진공 청소기에서 사용할 수 있는 향기 알갱이가 특수 제작되었습니다. 진공 청소
기에 필립스 s-fresh ` 향기 알갱이만 사용하십시오.
-
,
,
,
,
-
-
-
-
한국어 15

진공 청소기에 향기조절 기능이 장착되어 있으면 사용 도중 및 사용 직후 제품을 어린이
의 손이 닿지 않도록 하십시오. 집안에 어린이가 있으면 진공 청소기를 어린이의 손이 닿
지 않는 안전한 곳에 보관하십시오.
향기 알갱이는 식용불가입니다.
눈에 들어간 경우 즉시 물로 씻어내십시오.
카트리지 물 보충
1 엄지손가락과 집게손가락으로 카트리지를 받칩니다. (1)디스크를 눌러 (2)거치대에
서 카트리지를 들어냅니다 (그림 20).
2 (1)한 지점을 살짝 누르면서 (2)카트리지의 뚜껑을 위로 잡아 당겨 카트리지의 뚜껑
을 엽니다 (그림 21).
3 상단의 작은 주입구의 패키지를 엽니다.
4 카트리지에 향기 알갱이를 넣습니다.
5 뚜껑을 ‘찰칵’ 소리가 날 때까지 닫습니다.
6 카트리지를 거치대에 ‘찰칵’ 소리가 날 때까지 다시 끼웁니다. 카트리지는 거치대
에 한쪽 방향으로만 끼울 수 있습니다 (그림 22).
카트리지에서 더 이상 향기가 나지 않으면 알갱이를 교체합니다.
향기 레벨 설정
카트리지를 앞으로(최대 방출) 또는 뒤로(최소 방출) 돌려서 향기 레벨을 설정할 수
있습니다 (그림 23).
진공 청소기를 보관하거나 향기 방출 기능을 사용하지 않으려면 카트리지의 주입구
가 보이지 않을 때까지 카트리지를 뒤쪽으로 돌려서 카트리지를 닫습니다.
보관
1
제품 전원을 끄고 벽면 콘센트에서 전원 플러그를 뽑으십시오.
2 코드 되감기 버튼을 눌러 전원 코드를 되감으십시오 (그림 24).
3 제품을 똑바로 세워놓으십시오. 노즐 걸이를 보관 홈에 끼워서 노즐을 제품에 부착하
십시오 (그림 25).
4 청소기를 보관할 때는 Tri-Active 노즐을 항상 카페트 설정에 두십시오. 또한 측면
브러시가 휘어지지 않도록 하십시오 (그림 8).
먼지 봉투 교체/비우기
교체형 먼지 봉투를 교체하거나 재사용이 가능한 먼지 봉투를 비우기 전에 항상 전원 플
러그를 뽑으십시오.
교체형 먼지 봉투를 교체
먼지 봉투 교체 표시등의 색깔이 바뀌면 즉시 먼지 봉투를 교체하십시오(예를 들어,
노즐을 바닥에 대고 있지 않은 경우도 해당) (그림 26).
1 먼지 봉투를 열려면 덮개를 위로 올리십시오 (그림 27).
2 제품에서 먼지 봉투 거치대를 들어내십시오 (그림 28).
제품에서 먼지 봉투를 들어올릴 때 똑바로 세워서 잡으십시오.
3 거치대에서 가득 찬 먼지 봉투를 분리하려면 딱딱한 판지 손잡이를 당기십시오 (그
림 29).
-
-
-
한국어16

이렇게 하면 먼지 봉투가 자동으로 밀봉됩니다.
4 새 먼지 봉투의 판지 앞면을 먼지 봉투 거치대의 2개 홈으로 최대한 밀어 넣으십시
오. (그림 30)
5 먼지 봉투 거치대를 진공 청소기 안에 다시 넣으십시오 (그림 31).
참고: 먼지 봉투가 끼워져 있지 않으면 덮개를 닫을 수 없습니다.
재사용이 가능한 먼지 봉투 비우기(일부 국가만 해당)
일부 국가에서는 반복해서 사용하고 비울 수 있는 재사용이 가능한 먼지 봉투가 이 진공
청소기와 함께 제공됩니다. 교체형 먼지 봉투 대신 재사용이 가능한 먼지 봉투를 사용할
수 있습니다.
재사용이 가능한 먼지 봉투를 끼우고 뺄 때에는 ‘교체형 먼지 봉투를 교체’에 있는 지
침을 따르십시오.
재사용이 가능한 먼지 봉투를 비우려면:
1 클립을 먼지 봉투를 옆으로 미십시오.
2 내용물을 휴지통에 털어 버리십시오.
3 클립을 다시 먼지 봉투 아래 가장자리로 밀어서 먼지 봉투를 닫으십시오.
필터 청소 및 유지관리
필터를 청소하거나 교체하기 전에는 항상 제품 코드를 뽑으십시오.
영구 모터 보호 필터
먼지 봉투를 교체할 때마다 영구 모터 보호 필터를 청소하십시오.
1 먼지 봉투가 들어있는 먼지 봉투 거치대를 분리하십시오 (그림 28).
2 제품에서 모터 보호 필터 거치대를 꺼내십시오. 필터를 거치대에서 꺼내십시오. (그
림 32)
3 휴지통 위에서 필터를 털어내 필터를 청소하십시오.
4 깨끗해진 필터를 다시 필터 거치대에 끼우십시오. 필터 거치대의 두 돌출부를 아래쪽
홈에 맞추어 윗부분이 잘 맞도록 하십시오. 그 다음 필터 거치대를 ‘찰칵’ 소리가
날 때까지 눌러서 끼우십시오 (그림 33).
5 먼지 봉투가 들어있는 먼지 봉투 거치대를 제품에 다시 넣으십시오.
수퍼클린 에어 필터(특정 모델만 해당)
제품 뒤편에 있는 수퍼클린 에어 필터에는 정전기로 충전되는 섬유가 들어있습니다. 이
섬유는 배출 공기에서 나오는 미세한 입자의 대부분을 걸러줍니다.
수퍼클린 에어 필터는 6개월마다 교체하십시오. 이 필터는 물세척할 수 없습니다.
1 필터 커버를 여십시오 (그림 34).
2 오래된 필터를 빼내십시오 (그림 35).
3 제품에 새 필터를 끼우십시오.
4 필터 커버를 닫으십시오(‘찰칵’소리가 남) (그림 36).
수퍼 클린 에어 HEPA 12 필터/울트라 클린 에어 HEPA 13 필터
본 제품에는 수퍼 클린 에어 HEPA 12 필터 또는 울트라 클린 에어 HEPA 13 필터가 장
착되어 있습니다. 이 필터는 제품 뒤편에 있습니다. 본 필터는 배출 공기에서 나오는
0.0003 mm 크기의 미립자를 각각 99.5% 및 99.95%까지 제거할 수 있습니다. 여기에
,
한국어 17

는 일반 가정 먼지 뿐 아니라 호흡기 알레르기를 유발하는 먼지 진드기 및 진드기 배설물
과 같은 해로운 미세 해충도 포함됩니다.
참고: 진공 청소기의 최상의 먼지 제거 성능을 위해 HEPA 필터는 반드시 정품 필립스
필터로 교체하십시오(‘액세서리 주문’란 참조).
수퍼 클린 에어 HEPA 12 필터
클린 에어 HEPA 12 필터는 6개월마다 교체하십시오. 이 필터는 물세척할 수 없습니다.
1 필터 커버를 여십시오 (그림 34).
2 오래된 필터를 빼내십시오 (그림 35).
3 제품에 새 필터를 끼우십시오.
4 필터 커버를 닫고 하단 모서리를 밀어서 제자리에 끼우십시오 (그림 36).
물 세척이 가능한 울트라 클린 에어 HEPA 13 필터
물 세척이 가능한 울트라 클린 에어 HEPA 13 필터는 6개월마다 청소하십시오. 이 제품
은 최고 4번 까지 청소하여 사용할 수 있습니다. 이후에는 필터를 교체하십시오.
1 필터 커버를 여십시오 (그림 34).
2 물 세척이 가능한 HEPA 13 필터를 꺼내십시오 (그림 35).
3 HEPA 13 필터의 주름 잡힌 부분을 천천히 흐르는 뜨거운 물에 헹구십시오.
주름 잡힌 부분이 위를 향하고 물이 주름과 평행하여 흐르도록 필터를 잡으십시오.
필터를 기울어지게 잡아서 주름 사이의 먼지가 물에 씻겨 내려 가도록 잡으십시오 (그
림 37).
필터를 뒤로 돌려서 반대쪽 주름도 물에 씻으십시오 (그림 38).
필터가 깨끗해질 때 까지 계속 씻으십시오.
물 세척이 가능한 필터를 브러시로 씻지 마십시오 (그림 39).
참고: 필터 세척을 통해 원래 색깔이 돌아오지는 않지만 필터링 기능은 회복됩니다.
4 필터를 조심스럽게 흔들어 물기를 털어내십오. 필터를 진공 청소기에 다시 넣기 전에
최소 2시간 동안 말리십시오.
5 필터를 제품에 다시 넣으십시오. 필터 그릴을 닫고 하단 모서리를 밀어서 제자리에
끼우십시오 (그림 36).
액세서리 주문
본 제품의 필터나 기타 액세서리를 구하기 어려운 경우에는 필립스 고객 상담실로 문의
하거나 제품 보증서를 참조하십시오.
먼지 봉투 구매
필립스 클래식 S-bag ` 합성섬유 먼지 봉투는 모델 번호 FC8021로 구매하십시오.
필립스 클리닉 S-bag ` 강력한 필터 합성섬유 먼지 봉투는 모델 번호 FC8022로 구
매하십시오.
필립스 냄새 제거 S-bag ` 합성섬유 먼지 봉투는 모델 번호 FC8023으로 구매하십
시오.
필터 구매
슈퍼 클린 에어 필터는 모델 번호 FC8030으로 구매하십시오.
물 세척이 불가능한 수퍼 클린 에어 HEPA 12 필터는 모델 번호 FC8031로 구매하십
시오.
물 세척이 불가능한 수퍼 클린 에어 HEPA 13 필터는 모델 번호 FC8038로 구매하십
시오.
-
-
-
-
-
-
-
-
-
한국어18

향기 알갱이 주문
향기 알갱이 4 가지가 들어있는 교체형 키트는 모델 번호 FC8025로 구매하십시오.
환경
수명이 다 된 제품은 일반 가정용 쓰레기와 함께 버리지 마시고 지정된 재활용 수거
장소에 버리십시오. 이런 방법으로 환경 보호에 동참하실 수 있습니다 (그림 40).
품질 보증 및 서비스
보다 자세한 정보가 필요하시거나, 사용상의 문제가 있을 경우에는 필립스전자 홈페이지
(www.philips.co.kr)를 방문하시거나 필립스 고객 상담실로 문의하십시오. 전국 서비스
센터 안내는 제품 보증서를 참조하십시오. *(주)필립스전자: (02)709-1200 *고객 상담
실: (080)600-6600(수신자부담)
문제 해결
이 란은 제품을 사용하면서 가장 일반적으로 경험하게 되는 문제와 그 해결 방법을 제시
합니다. 발생한 문제를 아래 정보로 해결할 수 없는 경우에는 필립스 고객 상담실로 문의
하십시오.
1 흡입력이 약합니다.
A 먼지 봉투가 가득 차 있는지 확인하십시오.
필요한 경우, 교체형 먼지 봉투를 교체하거나 재사용이 가능한 먼지 봉투를 비우십시오
(일부 국가만 해당).
B 필터 청소나 교체가 필요한지 확인하십시오.
필요한 경우 필터를 청소하거나 교체하십시오.
C 흡입력 조절기가 최대 위치에 있는지 확인하십시오
D 노즐, 연장관 또는 호스가 막혔는지 확인하십시오.
이물질을 제거하려면 막힌 부분을 분리하여 반대 방향으로 가능한 멀리 연결하십시
오. 진공 청소기의 전원을 켜서 막힌 부분에 공기가 반대 방향으로 통하도록 하십시
오 (그림 41).
-
-
-
한국어 19

20
簡介
恭喜您購買本產品並歡迎加入飛利浦!請於 www.philips.com/welcome 註冊您的產品,
來善用飛利浦提供的支援。
一般說明(圖1)
1 自動芳香補充匣
2 吸力旋鈕
3 收線鈕
4 開/關按鈕
5 集塵袋已滿指示燈
6 軟管接口開口
7 集塵蓋釋放拉片
8 馬達防護濾網支托架
9 前端握柄
10 可拆式的帶子 (僅限部分國家)
11 可重複使用的集塵袋 (僅限部分國家)
12 集塵袋支托架
13 合成集塵袋
14 後輪
15 配件置放架 (限特定機型)
16 小吸頭
17 縫隙吸頭
18 小刷頭 (限特定機型)
19 彈簧鎖定按鈕
20 附握柄的軟管
21 兩用吸頭
22 地毯/硬質地板設定之搖動開關
23 Tri-Active 全方位三效合一吸頭 (限特定機型)
24 地毯/硬質地板設定之搖動開關
25 安置/收藏突起部位
26 側刷毛
27 配件夾 (限特定機型)
28 伸縮軟管
29 濾網罩 (開放式)
30 電源線插頭
31 安置槽
32 超淨空氣 HEPA 12 抗敏濾網/極淨空氣 HEPA 13 抗敏濾網
33 轉輪
34 收藏槽
35 機型標籤
重要事項
在使用本產品前,請先仔細閱讀本使用手冊,並保留說明以供日後參考。
危險
請勿用來吸水或任何其它液體。請勿吸取易燃性物質,且請勿吸取尚未完全冷卻的灰
燼。
警示
在您連接電源之前,請檢查本地的電源電壓是否與產品所標示的電源電壓相符。
當插頭、電線或產品本身受損時,請勿使用產品。
-
-
-
繁體中文
ページが読み込まれています...
ページが読み込まれています...
ページが読み込まれています...
ページが読み込まれています...
ページが読み込まれています...
ページが読み込まれています...
ページが読み込まれています...
ページが読み込まれています...
-
 1
1
-
 2
2
-
 3
3
-
 4
4
-
 5
5
-
 6
6
-
 7
7
-
 8
8
-
 9
9
-
 10
10
-
 11
11
-
 12
12
-
 13
13
-
 14
14
-
 15
15
-
 16
16
-
 17
17
-
 18
18
-
 19
19
-
 20
20
-
 21
21
-
 22
22
-
 23
23
-
 24
24
-
 25
25
-
 26
26
-
 27
27
-
 28
28


