
FC9066-FC9060

2

3
1

4

FC9066-FC9060
ENGLISH 6
简体中文 12

6
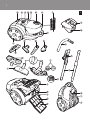
General description (Fig. 1)
1 Active Fragrance cartridge
2 Suction power knob
3 Cord rewind button
4 On/off button
5 Dustbag-full indicator
6 Hose connection opening
7 Release tab of dustbag compartment cover
8 Motor Protection Filter holder
9 Front handle
10 Dustbag holder
11 Paper dustbag
12 Rear wheel
13 Accessory holder (FC9066 only)
14 Small nozzle
15 Crevice tool
16 Small brush (FC9066 only)
17 Hose with handgrip
18 Super Parquet nozzle (FC9066 only))
19 Super Parquet nozzle polishing pads
20 Tri-Active nozzle
21 Parking/storage ridge
22 Rockerswitchforcarpet/hardoorsettings
23 Side brush
24 Accessory clip (FC9060 only)
25 Telescopic tube
26 Filter grille (open)
27 Mains plug
28 Parking slot
29 Super Clean Air HEPA Filter (FC9066 only)
30 Super Clean Air Filter (FC9060 only)
31 Swivel wheel
32 Storage slot
33 Type plate
Important
Read this user manual carefully before you use the appliance and save it for future reference.
Check if the voltage indicated on the appliance corresponds to the local mains voltage before
you connect the appliance.
Do not use the appliance if the plug, the cord or the appliance itself is damaged.
If the mains cord is damaged, you must have it replaced by Philips, a service centre authorised by
Philipsorsimilarlyqualiedpersonsinordertoavoidahazard.
This appliance is not intended for use by persons (including children) with reduced physical,
sensory or mental capabilities, or lack of experience and knowledge, unless they have been given
supervision or instruction concerning use of the appliance by a person responsible for their
safety.
Children should be supervised to ensure that they do not play with the appliance.
Neversuckupwateroranyotherliquid.Neversuckupammablesubstancesanddonotsuck
up ashes until they are cold.
Do not point the hose, the tube or any other accessory at the eyes or ears nor put it in your
mouth when it is connected to the vacuum cleaner and the vacuum cleaner is switched on.
-
-
-
-
-
-
-
ENGLISH

Whenyouusethevacuumcleanertovacuumashes,nesand,lime,cementdustandsimilar
substances, the pores of the dustbag become clogged. As a result, the dustbag-full indicator will
indicate that the dustbag is full. Replace the dustbag, even if it is not full yet (see chapter
‘Replacement’).
Never use the appliance without the Motor Protection Filter. This damages the motor and
shortens the life of the appliance.
Only use Philips s-bag
` double-layer paper dustbags.
The translucent display panel is made of recyclable polycarbonate (>PC<).
Electromagnetic elds (EMF)
ThisPhilipsappliancecomplieswithallstandardsregardingelectromagneticelds(EMF).Ifhandled
properly and according to the instructions in this user manual, the appliance is safe to use based on
scienticevidenceavailabletoday.
Preparing for use
Connecting accessories
Hose
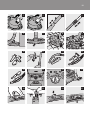
Toconnectthehose,pushitrmlyintotheappliance(‘click’)(Fig.2).
To disconnect the hose, push the buttons and pull the hose out of the appliance (Fig. 3).
Telescopic tube
1 To connect the tubes to each other and to the handgrip of the hose, press the spring-loaded
lock button. Then insert the part with the lock button into the part with the hole and t
the lock button into the hole (‘click’) (Fig. 4).
2 To disconnect the tubes from each other and from the handgrip, press the spring-loaded lock
button and pull the part with the lock button out of the part with the hole.
Use the same method to connect and disconnect the nozzles.
3 Adjust the tube to the length you nd most comfortable during vacuum cleaning (Fig. 5.)
Tri-Active nozzle
TheTri-Activenozzleisamulti-purposenozzleforcarpetsandhardoors.
The side brushes catch more dust and dirt at the sides of the nozzle and allow you to clean
better along furniture and other obstacles (Fig. 6).
The opening at the front of the nozzle allows you to suck up larger particles (Fig. 7).
1 Connect the Tri-Active nozzle to the tube.
2 Hard oor setting: push the rocker switch on top of the nozzle with your foot to make the
brush strip come out of the housing. At the same time the wheel is lifted to prevent
scratching and to increase manoeuvrability (Fig. 8).
3 Carpet setting: push the rocker switch again to make the brush strip disappear into the
nozzle housing. The wheel is lowered automatically (Fig. 9).
Small nozzle, crevice tool and small brush (FC9066 only)
1 Connect the crevice tool (1), the small nozzle (2) or the small brush (3) (specic types only)
directly to the handgrip or to the tube (Fig. 10).
Accessory clip (FC9060 only)
The accessory clip can simply be snapped onto the tube.
The crevice tool and the small brush can be snapped onto the clip (Fig. 11).
-
-
-
-
-
-
-
-
-
ENGLISH 7

Accessory holder (FC9066 only)
The accessory holder can simply be snapped onto the handgrip.
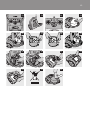
You can store accessories in the accessory holder by pushing them into the holder. To detach
the accessories, pull them out of the holder (Fig. 12).
You can store two accessories at a time in the accessory holder:
Crevice tool and small nozzle (Fig. 13).
Please note the way in which the small nozzle must be placed in the accessory holder.
Crevice tool and small brush (Fig. 14).
Using the appliance
Vacuuming
1 Pull the cord out of the appliance and put the mains plug in the wall socket.
2 Push the on/off button on top of the appliance with your foot to switch on the appliance
(Fig. 15).
Adjusting suction power
While you are vacuuming, you can adjust the suction power with the knob on top of the appliance.
Turn the knob to MAX for maximum suction power (Fig. 16).
Usemaximumsuctionpowertovacuumverydirtycarpetsandhardoors.
Turn the knob to MIN for minimum suction power.
Use minimum suction power to vacuum curtains, table carpets, etc.
Parking the tube
If you want to pause for a moment, insert the ridge on the nozzle into the parking slot to park
the tube in a convenient position (Fig. 17).
Active Fragrance Control
The scent granules have been specially developed for use in your Philips vacuum cleaner. Only use
the Philips s-fresh
` scent granules in your vacuum cleaner.
If the vacuum cleaner is equipped with Active Fragrance Control, keep it out of the reach of
children, both during and after use. Store the vacuum cleaner in a locked cupboard if there are
small children in the house.
The scent granules are not edible.
In case of eye contact, ush immediately with plenty of water.
Filling the cartridge
1 Place your thumb and index nger on the sides of the cartridge. Press on the disc to remove
the cartridge from the holder (Fig. 18).
2 To remove the cap of the cartridge, pull while applying pressure on the small pressing
points (Fig. 19).
3 Open the sachet at the small opening at the top.
4 Fill the cartridge with the contents of one whole sachet of scent granules.
5 Put the cap back onto the cartridge (‘click’).
6 Reinsert the cartridge into the holder (‘click’). It only ts into the holder in one way (Fig. 20).
Replace the granules when the cartridge no longer emits any fragrance.
-
-
-
-
-
-
ENGLISH8

Setting the fragrance level
1 To set the fragrance level, turn the cartridge forwards (maximum emission) or backwards
(minimum emission) (Fig. 21).
2 Close the cartridge when you store the vacuum cleaner or do not want any fragrance to be
emitted. Turn the cartridge backwards until the openings of the cartridge are no longer
visible.
Storage
1
Switch off the appliance and remove the mains plug from the wall socket.
2 Press the cord rewind button to rewind the mains cord (Fig. 22).
3 Put the appliance in upright position and insert the ridge on the nozzle into the slot to attach
the nozzle to the appliance (Fig. 23).
4 Always put the Tri-Active nozzle in the carpet setting when you store it. Also prevent the side
brushes from becoming bent (Fig. 9).
Replacing/emptying the dustbag
Always unplug the appliance before you replace or empty the dustbag,
Replacing the paper dustbag
Replace the dustbag as soon as the dustbag-full indicator has changed colour permanently, i.e.
evenwhenthenozzleisnotplacedontheoor(Fig.24).
1 Pull at the release tab to open the dustbag compartment cover (Fig. 25).
2 Lift the dustbag holder out of the appliance (Fig. 26).
Make sure you hold the dustbag upright when you lift it out of the appliance.
3 Pull at the cardboard tag to remove the full dustbag from the holder (Fig. 27).
When you do this, the dustbag is sealed automatically.
4 Slide the cardboard front of the new dustbag into the two grooves of the dustbag holder as
far as possible (Fig. 28).
5 Reinsert the dustbag holder into the vacuum cleaner (Fig. 29).
If you have not inserted a dustbag, you cannot close the dustbag compartment cover.
Cleaning/replacing lters
Always unplug the appliance before you clean or replace the lters.
Cleaning the Motor Protection Filter
Clean the Permanent Motor Protection Filter every time you replace the dustbag.
1 Remove the dustbag holder with the dustbag (Fig. 26).
2 Take the Motor Protection Filter holder out of the appliance and shake it over a
dustbin (Fig. 30).
3 Put the clean lter back into the lter holder. Fit the two lugs of the lter holder behind the
ridge at the bottom to ensure that it ts properly at the top. Then press the lter holder
home (‘click’) (Fig. 31).
4 Place the dustbag holder with the dustbag back into the appliance.
-
,
ENGLISH 9

Replacing the Super Clean Air Filter
TheSuperCleanAirFilterlocatedinthebackoftheappliancehaselectrostaticallychargedbres.
Thesebreslteralargepartofthesmallerparticlesfromtheexhaustair.
Replace the Super Clean Air Filter every six months.
1 Open the lter grille (Fig. 32).
2 Remove the old lter (Fig. 33).
3 Insert the new lter into the appliance.
4 Close the lter grille and push the bottom corners until they snap home (Fig. 34).
Replacing the Super Clean Air HEPA Filter
Instead of with the Super Clean Air Filter, this appliance can also be equipped with the special Super
CleanAirHEPAFilter.Thislterisabletoremove99.5%ofallparticlesdownto0.0003mminsize
from the outlet air. This not only includes normal house dust, but also harmful microscopic vermin
such as house dust mites and their excrements, which are well-known causes of respiratory allergies.
Replace the Super Clean Air HEPA Filter every six months.
1 The Super Clean Air HEPA Filter can be replaced in the same way as the Super Clean Air
Filter.
Obtaining replacement items
Ifyouhaveanydifcultiesobtainingreplacementitemsforthisappliance,pleasecontactthePhilips
CustomerCareCentreinyourcountryorconsulttheworldwideguaranteeleaet.
Dustbags
Philips Classic s-bag
` paper dustbags are available under type number FC8021.
Philips Clinic s-bag
`high-ltrationdustbagsareavailableundertypenumberFC8022.
Filters
Super Clean Air Filters are available under type number FC8030.
Super Clean Air HEPA Filters are available under type number FC8031.
Scent granules
Replacement kits with 4 sachets of scent granules are available under type number FC8025.
Guarantee & service
If you need information or if you have a problem, please visit the Philips website at www.philips.com
orcontactthePhilipsCustomerCareCentreinyourcountry(younditsphonenumberinthe
worldwideguaranteeleaet).IfthereisnoCustomerCareCentreinyourcountry,gotoyourlocal
Philips dealer or contact the Service Department of Philips Domestic Appliances and Personal
Care BV.
Environment
Do not throw away the appliance with the normal household waste at the end of its life, but
handitinatanofcialcollectionpointforrecycling.Bydoingthis,youhelptopreservethe
environment (Fig. 35).
-
-
-
-
-
-
ENGLISH10

Troubleshooting
1 Thesuctionpowerisinsufcient.
Make sure the suction power knob is in maximum position.
Perhaps the dustbag is full. Replace the paper dustbag or empty the reusable dustbag.
Perhapstheltersaredirty.Replacethelters.
The nozzle, tube or hose may be blocked up. To remove the obstruction, disconnect the
blocked-up item and connect it (as far as possible) the other way around. Switch on the vacuum
cleaner to force the air through the blocked-up item in opposite direction (Fig. 36).
-
-
-
-
ENGLISH 11

12
一般说明(图1)
1 活性香气颗粒筒
2 吸力控制旋钮
3 电源线回卷按钮
4 开/关钮
5 集尘袋已满指示灯
6 软管连接孔
7 集尘袋仓盖的释放钮
8 马达保护滤网固定架
9 前方握把
10 集尘袋固定架
11 纸质集尘袋
12 后轮
13 附件存放架(仅限FC9066)
14 小号吸嘴
15 缝隙工具
16 小号毛刷(仅限FC9066)
17 带握把软管
18 洁旋风吸嘴(仅限FC9066)
19 洁旋风吸嘴纤维软垫
20 全方位清洁吸尘嘴
21 放置/存放夹片
22 地毯/硬地面转换开关
23 边刷
24 附件夹(仅限FC9060)
25 伸缩管
26 过滤器栅格(打开状态)
27 电源插头
28 摆放固定槽
29 HEPA高效能过滤网(仅限FC9066)
30 高效能过滤网(仅限FC9060)
31 转轮
32 插槽
33 型号牌
注意事项
使用产品之前,请仔细阅读本用户手册,并妥善保管以供日后参
考。
在将产品连接电源之前,请先检查产品所标电压与当地的供电电
压是否相符。
如果插头、电源线或产品本身受损,请勿再使用本产品。
如果电源软线损坏,为避免危险,必须由制造厂或其维修部或类
似的专职人员来更换。
本产品不可由肢体不健全、感觉或精神上有障碍或缺乏相关经验
和知识的人(包括儿童)使用,除非有负责他们安全的人员对他
们使用本产品进行监督或提供相关指导。
-
-
-
-
简体中文

应照看好儿童,确保他们不会玩弄本产品。
切勿吸取水或其它液体。切勿吸取易燃物质,并且不要吸取未冷
却的灰烬。
当连接到真空吸尘器并且真空吸尘器已打开时,请勿将软管、硬
管或任何其它附件指向眼睛或耳朵,也不要放在口中。
在使用真空吸尘器吸收灰尘、细沙、石灰、水泥灰和类似的物质
时,集尘袋的的袋孔可能发生阻塞。因此,集尘袋已满指示灯将
显示集尘袋已满。这时,请更换集尘袋,即使集尘袋并未装满
(见“更换”一章)。
切勿在未安装马达保护滤网的情况下使用本产品。这将使马达受
损,并缩短产品的使用寿命。
请仅使用飞利浦s-bag
`双层纸质集尘袋。
半透明的显示面板使用可回收的聚碳酸酯制成(>PC<)。
电磁场(EMF)
这款飞利浦产品符合关于电磁场(EMF)的相关标准。据目前的科学证明,如果正确使用并
按照本用户手册中的说明进行操作,本产品是安全的。
使用准备
连接附件
软管
要连接软管,请将其推入到产品中(会听到咔哒一声)。(图2)
要卸下软管,请按下按钮并将软管从产品拉出。(图3)
伸缩管
1 将硬管互相连结或与握把连结时,按下弯管上的弹簧锁按钮,然后将带有锁定钮的部
分插入带有小孔的部分,将锁定钮对准,牢固地插入小孔内(听到咔哒一声)。 (图 4)
2 要将硬管互相分离或与握把分离时,请按下弹簧锁按钮,将带有按钮的部分从带有小
孔的部分拉出。
请通过同样的方法来连接及拆卸吸嘴。
3 将硬管调整到吸尘过程中感觉最舒适的长度。 (图 5)
全方位清洁吸尘嘴
Tri-Active吸尘嘴是用于清洁地毯和硬质地板的一种多用途吸尘嘴。
吸尘嘴侧面的侧毛刷可以清洁更多灰尘和污垢,让您可以沿家具和其他障碍物边缘进
行清洁。(图6)
吸尘嘴正面的开口允许吸取体积较大的灰尘微粒。(图7)
1 将 Tri-Active 吸嘴连接到硬管上。
2 硬质地板设置:用脚推动吸尘嘴顶部的按钮使刷条外翻,同时,轮子将伸出,以防止
擦伤地板并提高灵活性。 (图 8)
-
-
-
-
-
-
-
-
-
-
-
简体中文 13

3 地毯设置:再次推动吸尘嘴顶部的按鈕使刷条没入吸尘嘴机壳中。轮子将自动降
低。 (图 9)
小号吸嘴、缝隙吸嘴和小号毛刷(仅限FC9066)
1 将缝隙吸嘴 (1)、小号吸嘴 (2) 或小号毛刷 (3)(仅限特定型号)直接连接到握把或硬管
上。 (图 10)
附件夹(仅限FC9060)
附件夹可简单地扣合在硬管上。
缝隙吸嘴和小号毛刷可扣合在附件夹上。(图11)
附件存放架(仅限FC9066)
附件架可简单地钩挂到握把上。
只需将附件推入附件存放架,就可将其放在附件存放架中。要卸下附件,将其拉出附
件存放架即可。(图12)
附件支架上可同时存放两个附件:
缝隙吸嘴和小号吸嘴。(图13)
请注意小号吸嘴必须放在附件存放架上的特定方向。
缝隙吸嘴和小号毛刷(图14)
使用本产品
吸尘
1 将电源线从吸尘器中拉出,并将电源插头插入插座。
2 用脚推动产品上的 on/off(开/关)按钮来开启机器。 (图 15)
调整吸力
吸尘过程中,您可以使用产品顶端的吸力控制旋钮来调节吸力强度。
将旋钮调到MAX时,是最大吸力。(图16)
对于特别脏的地毯和硬地板,可用最大吸力吸尘。
将旋钮调到MIN时,是最小吸力。
清洁门帘、台布或其他物品时,可用最小吸力。
放置硬管
如要暂停使用吸尘器,可通过将吸嘴上的夹片插入摆放固定槽以将硬管放妥。(图17)
活性香气控制
特别研制的香味颗粒专用于您的飞利浦真空吸尘器。只能使用飞利浦s-fresh`香味颗
粒。
如果吸尘器装备了活性香气控制,那么无论在使用过程中还是使用
后,都不要让儿童接触到它。如果房间中有小孩子,请将吸尘器存
放在带锁的橱柜中。
香味颗粒不可食用。
-
-
-
-
-
-
-
简体中文14

如果接触到眼睛,请立即用大量的水清洗。
填充香味颗粒筒
1 将您的拇指和食指放在筒的两侧。按下圆盘从支架上取下香味颗粒筒。 (图 18)
2 要取下筒盖,可在小按压点上施加压力并拉动。 (图 19)
3 打开香袋包装顶部的小开口。
4 用香袋中的全部香味颗粒填充香味颗粒筒。
5 将筒盖放回香味颗粒筒上(会听到咔哒一声)。
6 将香味颗粒筒重新插入支架(会听到咔哒一声)。只有一个位置可以固定到支架
中。 (图 20)
请在香味颗粒筒不能再散发出香味时更换颗粒。
设置香味浓度
1 要设置香味浓度,请向前旋转香味颗粒筒(最浓)或向后旋转香味颗粒筒(最
淡)。 (图 21)
2 当您要存放吸尘器或不需要它发出任何香味时,请关闭香味颗粒筒。将香味颗粒筒向
后旋转,直到看不见筒口为止。
存放
1 关闭吸尘器的电源,从插座中拔下电源插头。
2 按下电源线回卷按钮将电线回卷到吸尘器中。 (图 22)
3 将产品竖立存放并将吸嘴安装到产品上,而后将吸嘴上的夹片插入产品背面的插槽
中。 (图 23)
4 存放前,必须先将全方位清洁吸嘴处于地毯设置。以避免侧面的毛刷被弯曲。 (图 9)
更换/清空集尘袋
更换或清空集尘袋前,切记拔下电器插头。
更换纸质集尘袋
在集尘袋已满指示灯的颜色改变时(在吸嘴没有紧贴地板的情况下),请立即更换集
尘袋。(图24)
1 按释放钮并将机盖向上拉,可打开集尘袋仓盖。 (图 25)
2 取出集尘袋固定架。 (图 26)
将集尘袋拉出吸尘器时, 请确保以向上方向拉出集尘袋。
3 拉起纸板片将装满灰尘的集尘袋取掉。 (图 27)
这时,集尘袋会自动封闭。
4 将新集尘袋前面的纸板片套入集尘袋固定架上的两个狭槽中。尽量向下按。 (图 28)
5 将集尘袋固定架插回真空吸尘器。 (图 29)
如果尚未插入集尘袋,将无法关闭集尘袋仓盖。
清洁或更换滤尘网
在清洁或更换滤尘网之前,请拔掉产品插头。
-
,
简体中文 15

清洁马达保护滤网
每次更换集尘袋时,都应清洁永久性马达保护滤网。
1 取下集尘袋固定架和集尘袋。 (图 26)
2 将马达保护滤网固定架从产品中拉出并在垃圾箱上方晃动以抖落上面的灰尘。 (图 30)
3 将干净的过滤网放回滤网固定架中。将滤网固定架的两个连接片与放在底部的夹件对
好,以确保它们与顶部正确对齐。然后将滤网固定架按回到位(会听到咔哒一
声)。 (图 31)
4 将集尘袋固定架和集尘袋放回吸尘器。
更换高效能过滤网
位于产品背面的高效能过滤网具有带静电的充电纤维。这些纤维可以从排气中过滤大量微
小颗粒。
应每6个月更换高效能过滤网。
1 打开过滤器栅格。 (图 32)
2 取出旧的滤网。 (图 33)
3 将新的滤网插入吸尘器。
4 关闭过滤器栅格,推下面的角,直到卡住其位置。 (图 34)
更换HEPA高效能过滤网
如果不安装高效能过滤网,本产品还可以安装特殊的HEPA高效能过滤网。这种滤网可以
从排出空气中过滤99.5%的最小为0.0003毫米的颗粒。这不仅能过滤正常的室内灰尘,
而且还能过滤显微级别的寄生虫和它们的排泄物。众所周知,这些排泄物能引起呼吸道过
敏。
每6个月更换一次HEPA高效能过滤网。
1 HEPA 高效能过滤网的更换方法与高效能过滤网的更换方法一样。
订购附件或替代品
如果您在购买本产品的附件或替换品时遇到任何困难,请和您所在国家的飞利浦客户服务
中心联系,或参阅全球保证书。
集尘袋
飞利浦Classics-bag`纸质集尘袋的型号是FC8021。
飞利浦Clinics-bag
`高过滤集尘袋的型号是FC8022。
过滤网
高效能过滤网的型号为FC8030。
可提供型号为FC8031的HEPA高效能过滤网。
香味颗粒
包含4袋香味颗粒的更换套件型号是FC8025。
-
-
-
-
-
简体中文16

17
保修与服务
如果您需要详细信息或有任何问题,请浏览飞利浦网站,地址为www.philips.com。您也
可以与贵国的飞利浦顾客服务中心联系(您可以从全球保修卡中找到电话号码)。如果贵
国没有飞利浦顾客服务中心,请与当地的飞利浦经销商或与飞利浦家庭小电器的维修中心
联系。
环保
弃置产品时,请不要将其与一般生活垃圾堆放在一起;应将其交给官方指定的回收中
心。这样做有利于环保。(图35)
故障种类和处理方法
1 吸力不足。
确保吸力控制旋钮在最大位置。
可能集尘袋已满。更换纸质集尘袋或清空循环使用集尘袋。
可能过滤网脏了。请更换过滤网。
检查吸嘴、硬管、软管是否被阻塞。要清除阻塞物,请将阻塞的部分拆下,并将它反
向连接(尽可能离远一些)。打开吸尘器的电源,强迫气流反方向通过阻塞的部
位。(图36)
-
-
-
-
-
简体中文
2007/04/26
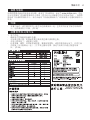
FC9060
FC9066
1600W
1600W
2005/04/12

18
2
1
1
2
3
4
5
6 7 8 9
10 11 12 13
14
15 16 17
18
19
20
21

19
22 23 24 25
26 27 28 29
1
2
30 31 32 33
34
35 36

4222.003.3361.2
-
 1
1
-
 2
2
-
 3
3
-
 4
4
-
 5
5
-
 6
6
-
 7
7
-
 8
8
-
 9
9
-
 10
10
-
 11
11
-
 12
12
-
 13
13
-
 14
14
-
 15
15
-
 16
16
-
 17
17
-
 18
18
-
 19
19
-
 20
20


Philips FC9060/01 ユーザーマニュアル
- カテゴリー
- 掃除機
- タイプ
- ユーザーマニュアル
他の言語で
- English: Philips FC9060/01 User manual
