
在烹煮过程中,将产品的电源插头从插座中拔掉仅是关
闭了产品。如果将插头重新插入插座,产品将继续烹煮,
直到盛水箱无水为止。
9 当所有的水都流过过滤网后,可将保温壶从热盘上
取走。 (图 14)
使 用 热 水 壶
保持咖啡热度的理想方法是在烹煮之前用热水冲洗保
温壶,以便烹煮一满壶的咖啡。
1 要将咖啡倒出,请通过翼片向右转动壶盖,直到壶盖
上的箭头对准“倾倒”符号 e 。 (图 15)
始终在倾倒咖啡之后合上壶盖,以保持咖啡热度。
2 要合上壶盖,请通过翼片向左转动壶盖,直到壶盖上
的箭头对准“已关闭/正在冲煮”符号 r 。 (图 16)
3 要将壶盖从热水壶上取下,请通过翼片向左转动壶
盖,直到壶盖上的箭头对准“取下壶盖”符号 t 。
(图 17)
4 卸下过滤网架并将过滤纸丢弃。 (图 18)
5 如果您使用的是永久性过滤器,请将其倒空,并用水
冲洗。
清洁
清洁产品前,务必先将电源插头拔掉。
切勿将本产品或保温壶浸入水中。
1 可用湿布清洁咖啡机和保温壶的外表面。
2 拆下过滤网架。 (图 19)
3 用已加入洗涤剂的温水或放入洗碗机清洗过滤网架。
可以在洗碗机中清洁塑料过滤网架 (HD7544)。不可在
洗碗机中清洁金属过滤网架 (HD7546)。
4 用软毛刷、热水和一些洗涤剂清洁热水壶的内侧。
请勿在洗碗机中清洁热水壶。
5 清洁后,用洁净的热水冲洗保温壶。
注意: 要去除顽固的褐色污垢,请先将热水注入水壶,
然后添加一勺苏打水。让苏打水在水壶中泡一会儿。
然后,倒空水壶并用软毛刷去除污垢。用洁净的热水冲
洗保温壶。
除水垢
定期去除水垢既可延长产品的使用寿命,又可保证长时
间得到理想咖啡烹煮效果。
在正常使用情况下(每天两满壶咖啡),可按以下方法
除去产品的水垢:
- 如果使用软水(18dH 或以下),每年除垢2 到 3 次;
- 如果使用硬水(18dH 以上),每年除垢4 到 5 次。
您可以使用醋酸度为 4% 的白醋或适当的除垢剂。
如果使用液体除垢剂,请按照包装上的说明执行操作。
不要使用醋酸度为 8% 或以上的白醋、
天然醋、粉状除垢剂或片状除垢剂给本产品除垢,
否则可能会造成损坏。
1 向水箱中注入白醋(醋酸度为 4%),
直至最高水位线。
2 将过滤纸或永久性过滤网放在过滤网架内,
以便收集水垢。
3 打开产品并使其完成两个冲煮周期。两个冲煮周期
之间,请让产品冷却大约 3 分钟。
注意: 您可以将在第一个周期使用的醋在第二个周期重
复使用。
注意: 我们建议您将新的过滤纸放入过滤网架,或在第
一次冲煮周期后彻底冲洗永久性过滤网。
4 向水箱中注入干净的冷水,取出过滤纸或永久性过
滤网。
5 使用干净的冷水让产品完成两个冲煮周期,以便清除
所有残留的白醋或除垢剂。在两个冲煮周期间,让产
品冷却大约 3 分钟。
注意: 切勿在下一个冲煮周期重复使用从产品排出的水。
请始终使用清水。
注意: 如有必要,请重复步骤 5,直至从产品中倒出的
水尝起来或闻起来不再有醋的味道。
6 清洁永久性过滤网(如果使用)、保温壶和过滤网架
(见“清洁”一章)。
订购配件
要购买附件或备件,请访问
www.shop.philips.com/
service 或联系您的飞利浦经销商。 您还可以联系所在
国家/地区的飞利浦客户服务中心(请参阅全球保修卡了
解详细联系信息)。
保修和支持
如果您需要信息或支持,请访问 www.philips.com/
support 或阅读单独的全球保修卡。
回收
- 弃置产品时,请不要将其与一般生活垃圾堆放在一
起; 应将其交给官方指定的回收点。这样做有利于
环保。
- 请遵守您所在国家/地区的电器和电子产品专门回收
规定。 正确处置废弃产品有助于避免对环境和人类
健康造成不良后果。
故障种类和处理方法
本章归纳了使用本产品时最常见的一些问题。如果您无
法根据以下信息解决问题,请访问 www.philips.com/
support 查阅常见问题列表,或联系您所在国家/地区的
客户服务中心。
问题 解决方法
指示灯亮起并且
无法关闭。
产品设有自动关熄功能并且无法手
动关闭。产品将在烹煮完成后自动
关闭(水箱为空)并且指示灯熄
灭。如果在烹煮过程中出现问题,
只有将电源插头从插座中拔下,
才可以关闭产品。
烹煮咖啡的时间
要比平常所用时
间长。
需要为产品去除水垢
(请参阅“除水垢”一章)。
咖啡壶在水箱无
水之前就自动关
闭。
需要为产品去除水垢
(请参阅“除水垢”一章)。
咖啡不够热。 在烹煮之前需要用热水冲洗保温壶。
如果烹煮一满壶(至少半壶),
则咖啡保温时间将更长。
玻璃壶无法放置
在产品中。
玻璃壶放置在产品中时,壶的把手
应当指向正前方或正右方,而不应
指向正左方。应确保壶盖处于
“已关闭/正在烹煮”位置 r 。
如果在烹煮过程
中将保温壶从产
品上移开,则水
可能会从过滤网
溢出。
请勿将保温壶移开超过
30 秒,以防水从过滤网溢出。
简体中文
简介
感谢您的惠顾,欢迎光临飞利浦!为了您能充分享受飞
利浦提供的支持,请在 www.philips.com/welcome 上注
册您的产品。
本产品专为您的方便和长久享受而精心设计。
下面的信息有助于您以最恰当的方法使用咖啡壶,烹煮出
美味香浓的咖啡。尽情享用吧!
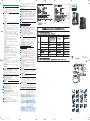
基本说明 (图 1)
1 带有指示灯的开关按钮
2 电 源 线
3 咖 啡 壶
4 水 位 计
5 水 箱
6 水 箱 盖
7 可拆卸过滤网架
8 热 水 壶 盖
9 热 水 壶
注 意 事 项
使用本产品之前,请仔细阅读本使用说明书,
并妥善保管以备日后参考。
危 险
- 切勿将本产品浸入水中或任何其它液体中。
警 告
- 在将产品连接电源之前,请先检查产品所标电
压与当地的供电电压是否相符。
- 如果插头、电源线或产品本身受损,请勿再使
用本产品。
- 如果电源软线损坏,为避免危险,必须由制造
厂或其维修部或类似的专职人员来更换。
- 肢体不健全、精神有障碍及缺乏相关经验和知
识的人(包括儿童)必须在监护人的监督及指
导下使用。
- 不要让儿童在无人监督的情况下对本产品进行
清洁和保养。
- 将产品及其线缆放在儿童接触不到的地方。
- 不要将电源线悬挂在放置产品的桌子或工作台
的边缘上。
- 只能将本产品用于预期用途,以避免潜在的危
险或伤害。
注 意
- 使用咖啡机时,切勿将其置于柜中。
- 切勿将本产品放在热的表面上,并防止电源线
与热的表面接触。
- 在清洁前或在煮咖啡期间出现问题时,
拔下产品的电源插头。
- 请勿拆卸热水壶。
- 切勿将热水壶浸泡在水或任何其它液体中,
因为这将导致水进入壶壁之间。
- 当保温壶装满咖啡时,请将其保持直立以防溢出。
- 在冲煮过程中,产品下部和保温壶底部会变得
很烫。
- 本产品仅打算用于家用及类似用途,如:
- 商店、办公场所及其它工作环境的厨房;
- 农 庄 ;
- 由旅店、旅馆及其它住宿型环境中的客人使用;
- 提供住宿和早餐的场所。
自动关熄
为带给您更多的方便和安全,本产品配备了自动关熄功
能。首次接入电源插座时,本产品可能会启动且电源指
示灯可能会亮起。在此情况下,产品将在约 30 秒钟内
自动关闭电源。
电磁场 (EMF)
本飞利浦产品符合所有有关暴露于电磁场的适用标准和
法规。
使用准备
1 将产品放在一个水平,稳固的表面上。
2 将插头插入有接地的电源插座。
当插头插入插座时,产品可能已打开(指示灯亮起)。
在这种情况下,将无法手动关闭产品。产品将在大约
30 秒之后自动关闭(指示灯熄灭)。
- 可将多余的电源线推入咖啡壶背后的收藏格中。 (图 2)
冲 洗 产 品
1 将清水注入水箱一半的容量,并将玻璃壶放入到位。
(图 3)
2 按电源按钮启动产品。指示灯亮起。让产品运转,
直到水箱完全耗尽。 (图 4)
, 产品将在冲水之后自动关闭。
3 冲煮咖啡前,请让产品至少冷却 3 分钟。
使用本产品
烹 煮 咖 啡
1 将水注入水箱。 (图 5)
- 左侧的刻度适用于大杯(120 毫升)。 (图 6)
- 右侧的刻度适用于小杯(80 毫升)。
2 打开过滤网架。 (图 7)
3 取一张过滤纸(1X4 型或 4 号),将密封边折起,
以防撕破或折叠。 (图 8)
4 将过滤网放在过滤网架内。 (图 9)
注意: 有些咖啡壶带有永久性过滤网。
在此种情况下,您无需过滤纸。
5 将研磨过的咖啡粉(适合过滤的粒度)
放入过滤网。 (图 10)
- 使用较大的杯子:每杯需一满量匙或汤匙的研磨咖
啡粉。
- 使用较小的杯子:每杯需一平量匙或汤匙的研磨咖
啡粉。
6 关闭过滤网架。 (图 11)
7 保温壶入到位。 (图 12)
将保温壶放入产品中,让把手方向向前或向右。
应确保保温壶盖处于“已关闭/正在烹煮”位置 r 。
8 按电源按钮以启动产品。产品将在冲煮完成后自动
关闭。 (图 13)
11/01/2018
保留备用
1
2 3 4 5
6
7 8 9
10 11 12 13
14 15 16 17
18 19
4222.200.0729.3
HD7547, HD7546,
HD7544
>75% recycled paper
>75%
4222_200_0729_3_DFU-Leaflet_A6_v2.indd 1-5 15/01/18 09:09

ENGLISH
Introduction
Congratulations on your purchase and welcome to
Philips! To fully benet from the support that Philips
offers, register your product at
www.philips.com/welcome.
This appliance has been designed for your convenience
and long-lasting enjoyment. The information below will
help you use your coffee maker in the best way to brew
delicious coffee. Enjoy!
General description (Fig. 1)
1 Power-on button with light
2 Mains cord
3 Coffee maker
4 Water level indicator
5 Water tank
6 Lid of water tank
7 Detachable lter holder
8 Lid of thermos jug
9 Thermos jug
Important
Read this user manual carefully before you use the
appliance and save it for future reference.
Danger
- Never immerse the appliance in water or any other
liquid.
Warning
- Check if the voltage indicated on the appliance
corresponds to the local mains voltage before you
connect the appliance.
- Do not use the appliance if the plug, the cord or the
appliance itself is damaged.
- If the mains cord is damaged, you must have it
replaced by Philips, a service centre authorised by
Philips or similarly qualied persons in order to avoid
a hazard.
- This appliance is not intended for use by persons
(including children) with reduced physical, sensory
or mental capabilities, or lack of experience and
knowledge, unless they have been given supervision or
instruction concerning use of the appliance by a person
responsible for their safety.
- Cleaning and user maintenance shall not be made
by children without supervision.
- Keep the appliance and its cord out of the reach of
children.
- Do not let the mains cord hang over the edge of the
table or worktop on which the appliance stands.
- Only use this appliance for its intended purpose to
avoid potential hazard or injury.
Caution
- Do not place the coffeemaker in a cabinet when in use
- Do not place the appliance on a hot surface and
prevent the mains cord from coming into contact
with hot surfaces.
- Unplug the appliance before you clean it and if problems
occur during brewing.
- Do not disassemble the thermos jug.
- Never immerse the thermos jug in water or any
other liquid, as this could cause water to enter
between the walls of the jug.
- When the jug is lled with coffee, keep it in upright
position to prevent leakage.
- During brewing, the lower part of the appliance and
the bottom of the thermos jug become hot.
- This appliance is intended to be used in household
and similar applications such as:
- staff kitchen areas in shops, ofces and other working
environments;
- farm houses;
- by clients in hotels, motels and other residential type
environments;
- bed and breakfast type environments.
Automatic shut-off
For your convenience and for extra safety, this appliance
is equipped with an automatic shut-off function. When
you put the plug in the wall socket for the rst time, it is
possible that the appliance and the power-on light go on.
In this case, the appliance switches off automatically within
approximately 30 seconds.
Electromagnetic elds (EMF)
This Philips appliance complies with all applicable standards
and regulations regarding exposure to electromagnetic
elds.
Preparing for use
1 Puttheapplianceonaatandstablesurface.
2 Putthepluginanearthedwallsocket.
It is possible that the appliance is switched on (light goes
on) when you put the plug in the wall socket. If this is the
case, the appliance cannot be switched off manually but
switches off automatically after approximately
30 seconds (light goes out).
- You can store excess cord by pushing it into the
opening at the back of the coffee maker (Fig. 2).
Flushing the appliance
1 Fillthewatertankhalffullwithwaterandputthe
jug in place. (Fig. 3)
2
Pressthepower-onbuttontoswitchontheappliance.
Thelightgoeson.Lettheapplianceoperateuntilthe
watertankiscompletelyempty(Fig.4).
, Theapplianceswitchesoffautomaticallyafter
ushing.
3 Lettheappliancecooldownforatleast3minutes
beforeyoustartbrewingcoffee.
Using the appliance
Brewing coffee
1 Fillthewatertankwithwater(Fig.5).
- The graduations on the left are for large cups (120
ml) (Fig. 6).
- The graduations on the right are for small cups (80
ml).
2 Openthelterholder(Fig.7).
3 Takeapaperlter(type1x4orno.4)andfoldthe
sealededgestopreventtearingandfolding(Fig.8).
4 Putthelterinthelterholder(Fig.9).
Note: Some versions come with a permanent lter. In this
case you do not need a paper lter.
5 Putpre-groundcoffee(lter-negrind)inthe
lter(Fig.10).
- For large cups: use one heaped measuring spoon or
tablespoon of ground coffee for each cup.
- For small cups: use one level measuring spoon or
tablespoon of ground coffee for each cup.
6 Closethelterholder.(Fig.11)
7 Put the jug in place (Fig. 12).
Put the jug in the appliance with the handle pointing
straight forward or to the right. Make sure the lid of the
jug is in ‘closed/brewing’ position
r.
8 Pressthepower-onbuttontoswitchonthe
appliance.Theapplianceswitchesoffautomatically
afterbrewing(Fig.13).
During brewing, you can only switch off the appliance
by removing the mains plug from the wall socket. When
you reinsert the plug into the wall socket, the appliance
continues brewing until the water tank is empty.
9 Whenallthewaterhaspassedthroughthelter,
youcanremovethejugfromtheappliance(Fig.14).
Using the thermos jug
The best way to keep the coffee hot is to rinse the jug
with hot water before brewing and to brew a full jug.
1 Topouroutcoffee,turnthelidtotherightby
meansofthenuntilthearrowonthelidpoints
towardsthe‘pour’symbol
e. (Fig. 15)
Always close the lid after pouring coffee to keep the
coffee hot.
2 Toclosethelid,turnittotheleftbymeansofthe
nuntilthearrowonthelidpointstowardsthe
‘closed/brewing’symbolr. (Fig. 16)
3 Toremovethelidfromthethermosjug,turnit
totheleftbymeansofthenuntilthearrowon
thelidpointstowardsthe‘removelid’symbol
t. (Fig. 17)
4 Removethelterholderandthrowawaythepaper
lter(Fig.18).
5 Ifyouhaveusedthepermanentlter,emptyand
rinseit.
Cleaning
Alwaysunplugtheappliancebeforeyoucleanit.
Neverimmersetheapplianceorthejuginwater.
1 Cleantheoutsideofthecoffeemakerandthejug
withamoistcloth.
2 Detachthelterholder.(Fig.19)
3 Cleanthelterholderinhotwaterwithsome
washing-upliquidorinthedishwasher.
The plastic lter holder (HD7544) can be cleaned in
the dishwasher. Do not clean the metal lter holder
(HD7546) in the dishwasher.
4 Cleantheinsideofthethermosjugwithasoftbrush,
hotwaterandsomewashing-upliquid.Donotclean
thethermosjuginthedishwasher.
5 Aftercleaning,rinsethethermosjugwithfreshhot
water.
Note: To remove stubborn brown deposits, ll the jug with hot
water and add a spoonful of soda. Leave the soda in the jug
for some time. Then empty the jug and remove the deposits
with a soft brush. Rinse the thermos jug with fresh hot water.
Descaling
Regular descaling prolongs the lifetime of your
coffeemaker and guarantees optimal brewing results for
a long time.
In case of normal use (two full jugs of coffee every day),
descale the appliance:
- 2 or 3 times a year if you use soft water (up to
18dH);
- 4 or 5 times a year if you use hard water (over
18dH).
You can use white vinegar with 4% acetic acid or an
appropriate liquid descaler. If you use a liquid descaler,
follow the instructions on the package.
Neverusevinegarwithanaceticacidcontentof8%
ormore,naturalvinegar,powderdescalersortablet
descalerstodescaletheappliance,asthismaycause
damage.
1 Fillthewatertankuptothemaximumlevelwith
whitevinegar
(4%aceticacid).
2 Putapaperlterorthepermanentlterinthe
lterholdertocollectthescale.
3 Switchontheapplianceandletitcompletetwo
brewingcycles.Lettheappliancecooldownfor
about3minutesbetweenthebrewingcycles.
Note: You can reuse the vinegar of the rst cycle for the
second cycle.
Note: We advise you to put a new paper lter in the lter
holder or to rinse the permanent lter thoroughly after the
rst brewing cycle.
4 Fillthewatertankwithfreshcoldwaterand
removethepaperlterorthepermanentlter.
5 Lettheappliancecompletetwobrewingcycleswith
freshcoldwatertoremoveallvinegarordescaler
residues.Lettheappliancecooldownforabout3
minutesbetweenthebrewingcycles.
Note: Do not reuse water that comes out of the appliance
for the next brewing cycle. Always use fresh water.
Note: If necessary, repeat step 5 until the water that comes
out of the appliance no longer tastes or smells of vinegar.
6 Cleanthepermanentlter(ifused),thejugandthe
lterholder
(seechapter‘Cleaning’).
Ordering accessories
To buy accessories or spare parts, visit
www.shop.philips.com/service or go to your Philips
dealer. You can also contact the Philips Consumer Care
Centre in your country (see the worldwide guarantee
leaet for contact details).
Warranty and support
If you need information or support, please visit
www.philips.com/support or read the separate
international warranty leaet.
Recycling
- Do not throw away the appliance with the normal
household waste at the end of its life, but hand it in at
an ofcial collection point for recycling. By doing this,
you help to preserve the environment.
- Follow your country’s rules for the separate collection
of electrical and electronic products. Correct disposal
helps prevent negative consequences for the environ-
ment and human health.
Troubleshooting
This chapter summarises the most common problems
you could encounter with the appliance. If you are
unable to solve the problem with the information below,
visit
www.philips.com/support for a list of frequently asked
questions or contact the Consumer Care Centre in your
country.
Problem Solution
The light is on
and cannot be
switched off.
The appliance is equipped with an
automatic shut-off function and
cannot be switched off manually. The
appliance switches off automatically
after brewing (when the water tank
is empty) and the light goes out. If
problems occur during brewing, you
can only switch off the appliance by
removing the mains plug from the
wall socket.
Brewing coffee
takes longer
than usual.
The appliance needs to be descaled
(see chapter ‘Descaling’).
The coffee mak-
er switches off
before the water
tank is empty.
The appliance needs to be descaled
(see chapter ‘Descaling’).
The coffee is
not hot enough.
Rinse the jug with hot water before
brewing.
The coffee stays warm longer if you
brew a full jug (or at least half a jug).
The jug cannot
be placed in
the appliance.
The jug can be placed in the appli-
ance with the handle pointing straight
forward or completely
to the right, but not with the handle
pointing completely to the left. Make
sure the lid of the jug is in ‘closed/
brewing’ position
r.
The lter over-
ows when the
jug is removed
from the ap-
pliance during
brewing.
Do not remove the jug for more
than 30 seconds, to prevent the lter
from overowing.
繁體中文
簡介
感謝您購買本產品。歡迎來到飛利浦的世界! 為充分享受飛利
浦為您提供的好處,請至下列位址註冊產品:www.philips.com/
welcome。
一般說明 (圖 1)
1 電源開啟按鈕附指示燈
2 電源線
3 咖啡機
4 水位顯示
5 水箱
6 水箱蓋
7 可拆式濾網座
8 電熱咖啡壺蓋
9 電熱咖啡壺
重要事項
使用本機器前,請先仔細閱讀使用手冊,並保留說明以供日後參考。
危險
- 切勿讓產品浸入水或其他液體中。
警示
- 在您連接電源之前,請檢查本地的電源電壓是否與產品所標示的
電壓相符。
- 當插頭、電線或產品本身受損時,請勿使用產品。
- 如果電線損壞,則必須交由飛利浦、飛利浦授權之服務中心,
或是具備相同資格的技師更換,以免發生危險。
- 本產品不適合供下列人士 (包括孩童) 使用:身體官能或心智能力
退化者,或是經驗與使用知識缺乏者。他們需要有負責其安全的
人員在旁監督,或指示產品的使用方法,方可使用。
- 若無人監督,請勿讓兒童進行清潔和使用者維護。
- 請勿讓孩童接觸產品與電線。
- 請勿讓電源線懸掛在產品放置的餐桌或流理台邊緣。
- 本產品儘限用於相關用途,以免造成意外風險或受傷。
警告
- 請勿將使用中的咖啡機放置於櫥櫃內。
- 請勿將本產品置於高溫的表面,並請確定電源線不會與高溫表面
接觸。
- 清洗前先將產品的插頭拔掉,或沖咖啡期間如有問題,也請將插
頭拔掉。
- 請勿自行拆卸電熱咖啡壺。
- 請勿將電熱咖啡壺浸入水中或任何液體中,避免壺壁間隙進水。
- 咖啡壺裝滿咖啡時,請將它直立擺放,以免咖啡滲漏。
- 煮咖啡時,本產品底部以及電熱咖啡壺的壺底會發燙。
- 本產品可供居家與類似用途使用,例如:農舍、供應早餐與床位
的住宿空間;店家、辦公室和其他工作場所的員工廚房區域;以
及飯店、汽車旅館與其他居住場所的房間。
自動電源關閉
為了您的方便與安全著想,本產品擁有自動斷電功能。 首次將插頭
接上電源時,產品可能會啟動且電源開啟指示燈會亮起。 在此情況
下,產品會在 30 秒左右自動斷電。
電磁波 (EMF)
本飛利浦產品符合所有電磁波暴露的相關適用標準和法規。
使用前準備
1 將產品置於穩固的平面上。
2 將插頭插入接地插座中。
將插頭插進插座時,產品可能會啟動 (指示燈會亮
起)。 如遇到這種情況,您無法手動關閉電源,但
產品會在 30 秒左右自動斷電 (指示燈會熄滅)。
- 您可以將多餘的電源線壓入咖啡機後方的開孔中
(圖 2)。
沖洗產品
1 水箱注滿半箱水,並將咖啡壺歸位。 (圖 3)
2 按下電源開關,開啟產品電源。 指示燈會亮起。讓產品持續運轉
直到水箱完全沒水為止 (圖 4)。
, 沖洗完畢之後本產品會自動關閉電源。
3 在您再次開始煮咖啡前,請先讓產品斷電至少 3 分鐘。
使用本產品
1 將水箱注滿水 (圖 5)。
- 左側的刻度表示大杯的容量 (120 毫升) (圖 6)。
- 右側的刻度表示小杯的容量 (80 毫升)。
2 打開濾網座 (圖 7)。
3 取一張濾紙 (1x4 型或 4 號) 並折疊濾紙的密封邊緣以避免綻開及
翻折 (圖 8)。
4 將濾紙放入濾網座中 (圖 9)。
注意: 某些型號的產品配備有永久濾網。 此時即無需濾紙。
5 將預先研磨好的咖啡粉 (濾紙級之細研磨) 放到濾紙中 (圖 10)。
- 大杯量: 每杯咖啡請使用一滿匙或一大匙的研
磨咖啡。
- 小杯量: 每杯咖啡請使用一平匙或一大匙的研
磨咖啡。
6 蓋上濾網座。 (圖 11)
7 放好咖啡壺 (圖 12)。
將咖啡壺放入裝置中,把手朝前或朝右。 請確認壺
蓋轉到「closed/brewing」位置。
8 按下電源開關,開啟產品電源。 烹煮完畢後,產品會自動關閉電
源 (圖 13)。
產品開始烹煮咖啡後,只能以從插座拔下電源插頭
的方式關閉電源。 當您重新將電源插頭插上插座,
產品會持續烹煮直至水箱沒水為止。
9 當所有的水通過濾紙滴漏完畢後,即可將咖啡壺取出 (圖 14)。
咖啡壺使用方法
讓咖啡保持熱度最好的方法,就是在烹煮咖啡前用
熱水清洗咖啡壺並烹煮一整壺咖啡。
1 要倒出咖啡,請拉住蓋子的突出片,將蓋子向右旋轉,直到咖啡
壺上的箭頭對準蓋子上的「pour」符號。(圖 15)
倒完咖啡後,請務必蓋上蓋子,以保持咖啡的熱
度。
2 要將蓋子蓋好,請拉住蓋子的突出片,將蓋子向左旋轉,直到蓋
子上的箭頭指向「closed/brewing」符號。(圖 16)
3 要取下電熱咖啡壺的蓋子,請拉住蓋子的突出片,將蓋子向左旋
轉,直到蓋子上的箭頭指向「remove lid」符號。(圖 17)
4 拆下濾網座,將濾紙丟棄 (圖 18)。
5 如果你使用的是永久濾網,請加以清空及沖洗。
清潔
進行清潔前,請務必先拔離電源插頭。
切勿將本產品或咖啡壺浸泡於水中。
1 請用濕布清潔咖啡機與咖啡壺表面。
2 拆下濾網座。 (圖 19)
3 用熱水加些許洗碗精清潔濾網座,或置入洗碗機中清洗。
塑膠濾網座 (HD7544) 可以放入洗碗機清洗。 請勿
將金屬濾網座 (HD7546) 放入洗碗機中清洗。
4 使用軟刷子、熱水和少量清潔劑來清洗電熱咖啡壺的內部。
請勿將電熱咖啡壺放入洗碗機清洗。
5 清洗後,用乾淨的熱水沖洗電熱咖啡壺。
注意: 想要去除頑強的棕色沉澱物,可以在咖啡壺
內倒入熱水並加入一匙蘇打粉。 讓蘇打粉在咖啡壺
中靜置一段時間。 然後將水倒出並用軟刷除去沈澱
物。 用乾淨的熱水沖洗電熱咖啡壺。
除垢
定期去除水垢可以延長咖啡機的使用壽命,且可以
長時間確保
咖啡烹煮的效果。 正常使用下 (每天兩滿壺的咖啡)
去除產品水垢:
- 如果您使用軟水 (18dH 以下),請每年進行 2 至
3 次;
- 如果您使用硬水 (18dH 以上),請每年進行 4 至
5 次。
您可以使用白醋 (4% 醋酸) 或適當的水垢清除劑。
如果使用水垢清除劑,請遵循清潔劑包裝的指示。
警告:請勿使用醋酸高於8%的醋類、天然醋、粉
狀除垢劑或除垢錠為產品除垢,如此可能會損害產
品。
1 將白醋 (4% 醋酸) 注入水箱至最高刻度。
2 把濾紙或永久濾網放入濾網座,以承接流出的水垢。
3 開啟本產品電源並讓它完成兩次烹煮程序。 兩次烹煮程序之間,
請間隔 3 分鐘以讓產品冷卻。
注意: 您可將第一次烹煮時使用的白醋重複用於第
二次。
注意: 第一次烹煮程序完成後,建議您將新的濾紙
放入濾網座,
或徹底沖洗永久濾網。
4 在水箱裝入乾淨的冷水,並移除濾紙或永久濾網。
5 使用乾淨的冷水讓產品進行兩次烹煮程序,以去除任何殘留的醋
味及水垢。 兩次烹煮程序之間,請間隔 3 分鐘以讓產品冷卻。
注意: 進行下一次烹煮程序時,請勿重複使用自產
品流出的水。
每次都務必使用乾淨的水。
注意: 如有需要,請重複步驟 5,直到產品流出的
水不再有白醋的味道。
6 請清潔永久濾網 (如有使用)、咖啡壺及濾網座 (請參閱「清潔」
單元)。
訂購配件
若要購買配件或備用零件,請造訪 www.shop.philips.
com/service,
或洽詢您的飛利浦經銷商。 您也可以聯絡您所在國
家/地區的飛利浦客戶服務中心 (詳細聯絡資料請參
閱全球保證書)。
保固與支援
如需資訊或支援,請造訪:www.philips.com/sup-
port,或參閱全球保固說明書。
回收
- 本產品使用壽命結束時請勿與一般家庭廢棄物一
併丟棄。請將該產品放置於政府指定的回收站,
此舉能為環保盡一份心力。
- 請按照您所在國家/地區的規定,分類與回收電
子電器產品。正確處理廢棄物有助避免對環境和
人類健康的負面影響。
疑難排解
本章概述了使用本產品最常遇到的問題。 如果無法
利用以下資訊解決遇到的問題,請造訪 www.philips.
com/support 瀏覽常見問題清單,或聯絡您所在國
家/地區的飛利浦客戶服務中心。
問題 解決方法
電源指示燈持續發亮,無
法關閉。
本產品配備自動電源關閉功能,無法
以手動關閉電源。 烹煮完畢後 (水箱沒
水時),產品會自動關閉電源,指示燈
會熄滅。 如果在烹煮時發生此問題,
只能以從插座拔下電源插頭的方式關
閉電源。
烹煮咖啡時間比平常長。 本裝置需要除垢 (請參閱「除垢」單元)。
咖啡機在水箱中的水用盡
之前就會關機。
本裝置需要除垢 (請參閱「除垢」單元)。
咖啡不夠燙。 沖煮咖啡前,先用熱水沖洗咖啡壺。
如果您一次烹煮一整壺咖啡 (或至少半
壺),咖啡就能保溫較久。
咖啡壺無法放入裝置。 咖啡壺只能在把手朝前或完全朝右時
才放得進本裝置中,如果完全朝左則
無法放入。 請確認壺蓋轉到「closed/
brewing」位置
在烹煮過程中移開水壺
時,濾網溢出。
請勿移開水壺超過 30 秒,以避免濾網
溢出。
+6
HD7547
4222_200_0729_3_DFU-Leaflet_A6_v2.indd 6-10 15/01/18 09:09
-
 1
1
-
 2
2


Philips HD7544/55 ユーザーマニュアル
- カテゴリー
- コーヒーメーカーのアクセサリー
- タイプ
- ユーザーマニュアル
他の言語で
- English: Philips HD7544/55 User manual