
STR-DG910 2-899-903-91(1) GB/CT/KR
2-899-903-91(1)
Sony Corporation © 2007 Printed in Malaysia
Video components/ 視頻組成機/ 비디오 컴포넌트
�
1: Installing speakers/1: 安裝揚聲器/
1: 스피커 설치하기
STR-DG910
Quick Setup Guide
簡易設定指南
빠른 셋업 안내
2: Connecting the speakers/2: 連接揚聲器/2: 스피커 구성하기
3: Connecting other components/3: 連接其它組成機/
3: 다른 컴포넌트 연결하기
English
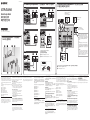
This Quick Setup Guide describes how to connect a
DVD player, satellite tuner or set-top box, Blu-ray
disc player, TV, speakers, and a sub woofer so that you
can enjoy multi channel surround sound. Refer to the
operating instructions supplied with the receiver for
details.
The illustrations in the guide designate speakers as
A
through
H
.
A
Front speaker (Left)
B
Front speaker (Right)
C
Center speaker
D
Surround speaker (Left)
E
Surround speaker (Right)
F
Surround back speaker (Left)
G
Surround back speaker (Right)
H
Sub woofer
1: Installing speakers
The illustrations above show an example of a 7.1
channel speaker system (seven speakers and one
sub woofer) configuration. Refer to the operating
instructions supplied with the receiver.
2: Connecting the speakers
The illustrations above are example of how to connect
the speakers. Connect the speakers according to the
number and type of your speakers.
About speaker cords
Use speaker cords, which are appropriate for the
width of the room.
By deciding on the color or mark of the speaker
cord to be connected to the plus (+) or minus ( )
terminal, you can always be sure of connecting the
cord correctly without mistaking plus or minus.
About speaker terminals
• Connect the
3
terminal to the
3
terminal of the
receiver and connect the
#
terminal to the
#
terminal of the receiver.
• Refer to the illustration above for details of
connecting speaker cords.
• Turn the locking knob until the speaker cord is
connected securely.
About the SPEAKERS (OFF/A/B/A+B) button
You can select the speaker system. Refer to “6: Selecting
the speaker system” in the operating instructions supplied
with the receiver for details.
3: Connecting other components
This is an example of how to connect this receiver
and your components. Refer to step 3 of “Getting
started” of the operating instructions supplied with
this receiver for details on other connections and other
components.
10 mm
4: Connect all power cords last
Connect the AC power cord to a wall outlet.
Refer to “Connecting the AC power cord” in the
operating instructions supplied with the receiver.
中文
本簡易設定指南介紹如何連接 DVD 播放機、衛
星調諧器或機上盒、藍色光芒光碟播放機、電視
機、揚聲器和超低音揚聲器,以便欣賞多聲道環
繞聲音。有關詳細内容,請參閱隨本接收機附帶
的使用說明書。
本指南的圖示以字母
A
到
H
標示各揚聲器。
A
前置揚聲器(左)
B
前置揚聲器(右)
C
中置揚聲器
D
環繞揚聲器(左)
E
環繞揚聲器(右)
F
後置環繞揚聲器(左)
G
後置環繞揚聲器(右)
H
超低音揚聲器
1: 安裝揚聲器
以上圖示為 7.1 聲道揚聲器系統(七個揚聲器和
一個超低音揚聲器)配置的示例。請參閱隨本接
收機附帶的使用說明書。
2: 連接揚聲器
以上圖例顯示如何連接揚聲器。按照揚聲器的數量
和種類連接揚聲器。
關於揚聲器線
請使用與房間尺吋相符的揚聲器線。
通過決定要連接在正極(+)或負極(-)連接器
上的揚聲器線的顏色或標志,可以確保您能夠正
確連接導線,而不會弄錯正負極。
關於揚聲器端子
將
3
端子連接到接收機的
3
端子,將
#
端
子連接到接收機的
#
端子。
有關連接揚聲器線的詳細内容,請參考以上圖
解。
轉動鎖定旋鈕直至揚聲器線穩固地連接好。
關於SPEAKERS(OFF/A/B/A+B)按鈕
您可以選擇揚聲器系統。有關詳細内容,請參閱
隨本接收機附帶的使用說明書中的“6:選擇揚聲
器系統”。
3: 連接其它組成機
此部份介紹如何連接本接收機和其它組成機。
有關其它連接方法和其它組成機的詳細内容,
請參閲隨本接收機附帶的使用説明書的“準備工
作”的步驟 3。
4: 最後連接所有電源線
把 AC(交流)電源線連接到牆上電源插座。
請參閱隨本接收機附帶的使用說明書中的“連接
交流電源線”。
한국어
본 빠른 셋업 안내에서는 멀티채널 서라운드 사
운드를 즐길 수 있도록 DVD 플레이어, 위성 튜
너 또는 셋톱 박스, Blu-ray 디스크 플레이어,
TV, 스피커 및 서브우퍼를 연결하는 방법에 대
해 설명합니다. 자세한 내용은 리모컨과 함께 제
공된 사용설명서를 참조하여 주십시오.
본 안내에 나온 그림은
A
-
H
까지의 스피커를
나타냅니다.
A
프론트 스피커(L)
B
프론트 스피커(R)
C
센터 스피커
D
서라운드 스피커(L)
E
서라운드 스피커(R)
F
서라운드 후면 스피커(L)
G
서라운드 후면 스피커(R)
H
서브우퍼
1: 스피커 설치하기
위의 그림은 7.1 채널 스피커 시스템(스피커 7개
및 서브우퍼 1개) 구성을 보여줍니다. 자세한 내
용은 리모컨과 함께 제공된 사용설명서를 참조하
여 주십시오.
A
A
TV/
電視機
/TV
Cords used for connection (not supplied)/用於連接的導線(無附帶)/연결에 사용되는 코드(별매품)
C
HDMI cable/HDMI 電纜/HDMI 케이블
D
Audio cord/音頻線/오디오 코드
A
B
DVD player/DVD 播放機/
DVD 플레이어
Satellite tuner or Set-top box/
衛星調諧器或機上盒/
위성 튜너 또는 셋톱 박스
Cords used for connection (not supplied)/
用於連接的導線(無附帶)/
연결에 사용되는 코드(별매품)
A
Speaker cord/揚聲器線/스피커 코드
B
Monaural audio cord/單聲音頻線/모노 오디오 코드
Blu-ray disc player/
藍色光芒光碟播放機/
Blu-ray 디스크 플레이어
Note
Be sure to change the factory setting of the
VIDEO 2 input button on the remote so that
you can use the button to control your Blu-ray
disc player. For details, see “Programming the
remote” in the operating instructions of the
receiver.
註
確保更改遙控器上的VIDEO 2輸入按鈕的
廠家設置以便您可以使用有關按鈕控制您
的藍色光芒光碟播放機。有關細節請參閲
接收機的使用說明書的“對遙控器進行編
程”。
주의점
Blu-ray 디스크 플레이어를 제어하는 버
튼을 사용하려면 리모컨에 있는 VIDEO
2 입력 버튼의 공장 출하 시 설정을 변경
해야 합니다. 자세한 내용은 "리모컨 프로
그램하기" 를 참조하여 주십시오.
A
2: 스피커 구성하기
위의 그림은 스피커 연결 방법에 대한 예를 보여
줍니다. 스피커 번호 및 유형에 따라 스피커를 연
결합니다.
스피커 코드에 대하여
• 스피커 설치 장소의 너비에 적합한 스피커 코드
를 사용해야 합니다.
• 양(+) 또는 음(-)의 단자에 연결될 스피커 코
드의 색상이나 표시를 확인하여 양/음극을 혼
동하지 않고 올바르게 코드를 연결할 수 있도록
항상 주의하십시오.
스피커 단자에 대하여
•
3
단자를 리시버의
3
단자에 연결하고
#
단자
를 리시버의
#
단자에 연결합니다.
• 스피커 코드를 연결하는 방법에 대해서는 위의
그림을 참조하여 주십시오.
• 스피커 코드가 단단하게 연결될 때까지 잠금 손
잡이를 돌립니다.
SPEAKERS(OFF/A/B/A+B) 버튼에 대하여
스피커 시스템을 선택할 수 있습니다. 자세한 내
용은 리시버와 함께 제공된 사용설명서에서 "6:
스피커 시스템 선택 하기" 를 참조하여 주십시오.
3: 다른 컴포넌트 연결하기
여기서는 본 리시버를 컴포넌트에 연결하는 예
를 보여줍니다. 다른 연결 및 컴포넌트에 대한 자
세한 내용은 리시버와 함께 제공된 사용설명서에
서 "시작하기" 부분의 단계 3 을 참조하여 주십
시오.
4: 마지막으로 모든 전원 코
드 연결하기
AC 전원 코드를 콘센트에 연결합니다.
본 리시버와 함께 제공된 사용설명서에서 "AC
전원 코드를 연결하기" 를 참조하여 주십시오.

STR-DG910 2-899-903-31(1) GB/CT/KR
English
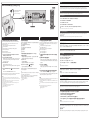
Calibrating the speaker settings automatically
You can set up the speakers to obtain the sound you want from all connected
speakers automatically by using the Auto Calibration function. The Auto
Calibration function will:
Check the connection between each speaker and the receiver.
Adjust the speaker level.
Measure the distance of each speaker from your listening position.
Measure the speaker polarity.
Measure the speaker size.
Measure the frequency characteristics.
1 Connect the supplied optimizer microphone to the AUTO
CAL MIC jack on the receiver.
2 Set up the optimizer microphone.
Place the optimizer microphone at your listening position.You can also
use a stool or tripod so that the optimizer microphone remains at the
same height as your ears.
3 Press AUTO CAL.
The Auto Calibration function starts.
When the measurement ends, a beep sounds and “SAVE” appears on the
display.
4 Press RECEIVER, then press to save the measurement
result.
You can also use MEMORY/ENTER on the receiver.
For details on measurement results, refer to “Confirming/saving the measurement
results” in the operating instructions supplied with this receiver.
Notes
If there are any obstacles in the path between the optimizer microphone and the speakers, the
calibration cannot be performed correctly. Remove any obstacles from the measurement area to avoid
measurement error.
During the calibration, the sound that comes out of the speakers is very loud. Pay attention to the
presence of children or to the effect on your neighborhood.
Perform the Auto Calibration in a quiet environment to avoid the effect of noise and get a more
accurate measurement.
The auto calibration function does not work in the following cases.
The ANALOG DIRECT function is selected.
Headphones are connected.
English
Setting up other components
You should set up each component so that the sound is output from the speakers correctly when you play back a connected
component. The following case describes Sony components. Refer to the operating instructions supplied with each component.
Sony TV
Switch the input of the TV so that an image of the video component you selected is displayed on the TV.
Sony DVD player
1 Select “AUDIO SETUP” on the setup display of the DVD player.
2 Set “AUDIO DRC” to “WIDE RANGE”.
3 Set “DIGITAL OUT” to “ON”.
4 Set “DOLBY DIGITAL” to “DOLBY DIGITAL”.
5 Set “DTS” to “ON” or “DTS”. (Select the setting depending on the model.)
Note
Set up the audio format of the playback disc to listen to multi channel sound.
Sony Super Audio CD player
Select a suitable playback area (multichannel or 2 channel). Sound may come out from only the front speaker left/right when
2 channel is selected.
After the setting
The receiver is now ready to use. Refer to the operating instruction supplied with the receiver for details.
中文
設定其它組成機
應該對所連接的各个組成機進行設定,以便在播放某个連接組成機時能够從揚聲器正確輸出聲音。下文介紹 Sony 組成機
的設定方法。請參閱隨各組成機附帶的使用說明書。
Sony 電視機
轉換電視機的輸入以便您所選的視頻組成機的圖像顯示於電視機。
Sony DVD 播放機
1 在 DVD 播放機的設定顯示中選擇“AUDIO SETUP”。
2 將“AUDIO DRC”設定為“WIDE RANGE”。
3 將“DIGITAL OUT”設定為“ON”。
4 將“DOLBY DIGITAL”設定為“DOLBY DIGITAL”。
5 將“DTS”設定為“ON”或“DTS”。(請根據機型選擇設置。)
註
設定播放光碟的音頻格式以收聽多聲道聲音。
Sony 超級音頻 CD 播放機
選擇適當的播放區域(多聲道或2聲道)。選擇2聲道时,聲音可能只從左/右前揚聲器發出。
設定後
接收機已可以使用。有關詳細内容,請參閱隨本接收機附帶的使用說明書。
한국어
다른 컴포넌트 설정하기
연결된 컴포넌트를 재생할 때 스피커에서 사운드가 올바르게 나오도록 하려면 각 컴포넌트를 설정해야 합니다. 다음에
서는 Sony 컴포넌트에 대해 설명합니다. 각각의 컴포넌트와 함께 제공된 사용설명서를 참조하여 주십시오.
Sony TV
선택한 비디오 컴포넌트의 영상이 TV에 표시되게 하려면 TV 입력을 전환합니다.
Sony DVD 플레이어
1 DVD 플레이어의 셋업 표시장에서 "AUDIO SETUP" 을 선택합니다.
2 "AUDIO DRC" 를 "WIDE RANGE" 로 설정합니다.
3 "DIGITAL OUT" 를 "ON" 로 설정합니다.
4 "DOLBY DIGITAL" 를 "DOLBY DIGITAL" 로 설정합니다.
5 "DTS" 를 "ON" 또는 "DTS" 로 설정합니다. (모델에 따라 알맞은 설정을 선택하십시오.)
주의점
멀티채널 사운드를 감상하려면 재생 디스크의 오디오 형식을 설정하십시오.
Sony Super Audio CD 플레이어
적합한 재생 영역을 선택합니다(멀티채널 또는 2 채널). 2 채널을 선택한 경우 좌/우측의 프론트 스피커에서만 사운드가
출력될 수 있습니다.
설정한 후에
이제 리시버를 사용할 준비가 완료되었습니다. 자세한 내용은 리시버와 함께 제공된 사용설명서를 참조하여 주십시오.
Auto Calibration/自動校準/자동 보정
中文
自動校準揚聲器設定
您可以使用自動校準功能設定揚聲器來自動從所有連接的揚聲器獲得您想要
的聲音。自動校準功能會:
檢查每個揚聲器和接收機之間的連接。
調整揚聲器電平。
從您的聆聽位置測量與每個揚聲器的距離。
測量揚聲器極性。
測量揚聲器尺寸。
測量頻率特性。
1
將附帶的優化器麥克風連接到接收機的 AUTO CAL MIC 插孔。
2 裝設優化器麥克風。
將優化器麥克風裝設在您的聆聽位置。您也可使用椅凳或三腳架,
使優化器麥克風維持在與您耳朵等高的高度。
3 按下 AUTO CAL。
自動校準功能即開始。
測量完畢後,嗶聲響起和“SAVE”出現在顯示上。
4 按下 RECEIVER,然後按下 儲存測量結果。
您也可以使用接收機上的 MEMORY/ENTER。
有關測量結果的詳細内容,請參閱隨本接收機附帶的使用說明書中的
“確認/儲存測量結果”。
註
如果優化器麥克風和揚聲器通道之間具有任何阻礙物,便無法準確進行校準。請移開測量區域
內的任何阻礙物,以避免出現測量錯誤的情況。
進行校準時,揚聲器發出的聲音會非常大。請注意小孩子是否在場或會否影響您的鄰居。
在安靜的環境進行自動校準以避免噪音影響幷獲得比較準確的測量。
自動校準功能在以下情况無效。
選擇了 ANALOG DIRECT 功能。
連接了耳機。
한국어
스피커 설정을 자동으로 보정하기
자동 보정 기능을 사용하여 연결된 모든 스피커에서 자동으로 사운드가 출
력되도록 스피커를 설정할 수 있습니다. 자동 보정 기능은 다음과 같은 기
능을 수행합니다:
각 스피커와 리시버 간의 연결을 확인합니다.
스피커 레벨을 조절합니다.
청취 위치로부터 각 스피커의 거리를 측정합니다.
스피커 극성을 측정합니다.
스피커 크기를 측정합니다.
주파수 특성을 측정합니다.
1
부속된 옵티마이저 마이크를 리시버의 AUTO CAL MIC 단자에 연
결합니다.
2 옵티마이저 마이크를 설정합니다.
옵티마이저 마이크를 감상 위치에 놓아둡니다. 옵티마이저 마이
크의 위치를 귀 높이로 맞추기 위해 스툴이나 삼각대를 사용할 수
있습니다.
3 AUTO CAL 을 누릅니다.
자동 보정 기능이 시작됩니다.
측정이 끝나면 경고음이 울리고 표시창에 "SAVE" 가 나타납니
다.
4 RECEIVER 를 누른 다음 을 눌러 측정 결과를 저장합니다.
리시버의 MEMORY/ENTER를 사용할 수도 있습니다.
측정 결과에 대한 자세한 내용은 본 리시버와 함께 제공된 사용설명서에서
"측정 결과 확인/저장하기" 를 참조하여 주십시오.
주의점
옵티마이저 마이크와 스피커 사이에 방해물이 놓여 있으면 보정이 잘못될 수 있습니다. 측정
중에서 방해물을 치워서 측정 에러가 나지 않도록 하십시오.
보정 중에는 스피커에서 매우 큰 사운드가 출력됩니다. 어린이나 이웃에게 피해가 가지 않도
록 주의하십시오.
노이즈가 섞이지 않게 하고 좀더 정확하게 측정하려면 조용한 환경에서 자동 보정을 하십시
오.
다음과 같은 경우에는 자동 보정 기능이 작동되지 않습니다.
ANALOG DIRECT가 선택된 경우.
헤드폰이 연결된 경우.
Optimizer microphone (supplied)/
優化器麥克風(附帶)/
옵티마이저 마이크(제공됨)
-
 1
1
-
 2
2

