
Register your
new device on
MyBosch now and
get free benefits:
bosch-home.com/
welcome
MUZ45MX1
玻璃調理機
[zf] 使用說明書
[en] Instruction manual
玻璃調理機 7
Glas blender attachment 12


b
1
2 3
a
a
c
b
a
b
c
c
d
d
A

OFF
y
ON
1...7
(1...4)
B
4
65 7
2 3
1
5
6 8
7
C
1
2
3 4

ON
1...4
OFF
y
ON
OFF
y
1
5
6 8
7
D
2
3 4
E F
3
1
2
G

40%60%
800 ml
60 秒
7 (4) 4
<70°C
400 ml
10-20 秒
7 (4) 4
30%70%
800 ml
60 秒
7 (4) 4
5 x 10 g
(each)
5 x 6 秒
M 4
1x1 cm
100 g
10 秒
7 (4) 4
100 g
20 秒
7 (4) 4
50 g
3 x 1 秒
M 4
H

7
zf
用途
用途
本配件專為萬用廚師機 MUM4 / MUM5 所設計。請遵照萬用廚師機的
操作說明書。
切勿將本配件用於其他電器。僅限與搭配的零件一同使用。
本配件適用於攪拌液體或半固體食物、將新鮮水果和蔬菜切塊或切碎以
及將食物打成泥,並用於切碎冷凍食物(如水果)或打碎冰塊。
本配件不得用於處理其他物體或物質。
重要安全須知
W受傷危險!
■ 切勿將手伸入已安裝的專業蔬果調理機內!切勿在未蓋上蓋子的情況
下操作專業蔬果調理機。
■ 處理鋒利的切割刀片、清空容器和清潔時應格外小心。
■ 請勿徒手觸碰專業蔬果調理機的刀片。使用刷子進行清潔。
■ 使用前必須完全組裝好配件。切勿在底座上組裝配件。配件僅限用於
預期的操作位置。請等到傳動器靜止且拔下插頭後,再裝上或取下本
配 件 。
W燙傷危險!
■ 處理高溫食材時需格外小心。當您在調理壺中處理高溫食材時,蒸氣
將通過蓋子的食材投入口逸出。
■ 最多可添加0.4公升的高溫或冒泡的液體。
■ 操作期間,請務必用手將蓋子按住,但勿將手放在食材投入口上!
W小心!
■ 切勿在無密封環的情況下使用刀組。
■ 確保專業蔬果調理機調理壺內無任何異物。切勿將物體(如刀具、勺子)
插入調理壺內。
W重要!
每次使用完後或長時間未使用重新使用時,必須徹底清潔本配件。
X“清潔和保養”參見第9頁

8
zf
總覽
總覽
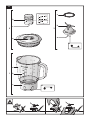
專業蔬果調理機配件
X 圖 A
1 玻璃專業蔬果調理機調理壺
a ThermoSafe耐温玻璃調理壺
b 刻度
c 刀片固定裝置
d 標記
2 蓋子
a 食材投入口
b 鎖帽╱
量杯(含刻度)
c 刀組扣位
3 刀組
a 刀片傳動器
b 專業蔬果調理機調理刀
c 密封環
d 標記
首次使用前
使用新配件前,請務必將其整個從包裝中取
出、清潔並加以檢查。
小心!
請勿運行損壞的配件!
■ 請從包裝中取出所有配件,並除去所有的
包材。
■ 檢查所有零件是否完整以及是否有明顯
損壞現象。X圖 A
■ 首次使用前,請先徹底清潔並晾乾所有零
件 。 X“清潔和保養”參見第9頁
符號和標記
符號 涵義
刀組上有插入刀片固定裝置時
的標記。
刀片固定裝置上有插入萬用廚
師機時的標記。
玻璃專業蔬果調理機調理壺
“ThermoSafe”耐溫玻璃調理壺是由特殊的
硼矽酸鹽玻璃製成,特別耐高溫,因此,可處理
非常高溫,甚至煮沸的食材。玻璃專業蔬果調
理機調理壺適用以下的處理量:
最大處理量
固體食物 最多100公
克
液體 最多0.8公
升
高溫或冒泡的液體 最多0.4公
升
準備事項
W 受傷危險
切勿將手伸到專業蔬果調理機調理刀內。僅可
握住刀組的塑膠部分。
小心!
切勿在無密封環的情況下使用插入式刀片。
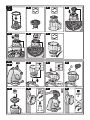
X 圖示順序 B
1. 請將密封環安裝到刀組上。
2. 將刀組翻轉過來。
3. 將專業蔬果調理機調理壺翻轉過來。
4. 將刀組安裝到刀片固定裝置內。進行此操
作時請請注意標記(,)。
5. 安裝蓋子鎖帽。進行此操作時請請注意扣
位。
6. 使用鎖帽將刀組朝順時針旋轉到止動位
置(;)。
7. 取下鎖帽。

9
zf
使用事項
使用事項
W 受傷危險
– 請等到傳動器靜止且拔下插頭後,再裝上
或取下本配件。
– 切勿將手伸入已安裝的專業蔬果調理機
內!
– 切勿在沒有蓋上蓋子的情況下使用專業
蔬果調理機。
W 燙傷危險
當您在調理壺中處理高溫食材時,蒸氣將通過
蓋子的食材投入口逸出。
X 圖示順序 C (MUM5)
X 圖示順序 D (MUM4)
1. 僅限按照主要操作說明書所述準備底座。
取下專業蔬果調理機的傳動器保護蓋。
2. 如圖所示,將專業蔬果調理機放在傳動器
上。進行此操作時請請注意標記(,)。
3. 將專業蔬果調理機朝逆時針旋轉到止動
位置(;)。
4. 準備食物,並將其加入專業蔬果調理機的
調理壺內。
5. 蓋上蓋子。插入鎖帽並朝順時針方向旋轉。
6. 插上主電源插頭。將旋轉開關轉到建議的
段 位 。
7. 一旦達到所需的濃度,即可關閉。
8. 將旋轉開關設為f。等到傳動器靜止
為止。拔下主電源插頭。
■ 朝順時針方向旋轉專業蔬果調理機,然後
將其取下。
■ 所有零件在使用過後應立即清潔。
X“清潔和保養”參見第9頁
加入更多食材
處理期間,還可加入更多食材。鎖帽在此可以
當作量杯使用。
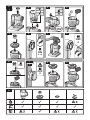
X 圖 E
■ 當本電器運行時,請取下鎖帽,並小心地透
過蓋子上的食材投入口加入更多食材。
W 受傷危險!
請勿將任何物體(例如刀子,勺子)放入蓋子
上的食材投入口內。本電器運行時切勿取下
蓋子!
X 圖示順序 F
1. 如需添加大量食材或配料,請將旋轉開關
調至f,並等到機器完全停止運行。
W 受傷危險!
請先檢查傳動器是否完全停止運行,才可將
蓋子取下。請勿在未蓋上蓋子的情況下開啟
電器!
2. 取下蓋子。
3. 加入額外的食材。
■ 將附有鎖帽的蓋子放回原位。繼續處理您
的食材。
清潔和保養
建議在每次使用後徹底清潔使用過的配件。
W 受傷危險
切勿將手伸到專業蔬果調理機調理刀內。僅可
握住刀組的塑膠部分。
小心!
– 請勿使任何含酒精或苯的清潔劑。
– 切勿使用尖銳、鋒利或金屬物體。
– 請勿使用具研磨性的抹布或清潔劑。
– 請勿將刀片固定裝置或刀組浸泡在水中。
– 請勿將塑膠零件放入洗碗機清洗,因為可
能會造成永久變形。
注意事項:
– 拆卸專業蔬果調理機調理壺之前,請添加
少量水和洗碗精,按「使用事項」章節所述,
將本電器調至最高速的段位短暫開啟。
– 將洗滌水倒出,再用清水沖洗零件。
■ 請按照「準備事項」章節所述,按相反的順
序拆開所有零件。
■ 按圖G所示,清潔並晾乾所有零件。然後,
按照「準備事項」章節所述,重新組裝所有
零件以備存放。

10
zf
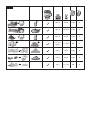
食譜
食譜
X 圖 H
重要!
在這些使用說明中,建議的操作速度參考值是
指有7段旋轉開關的電器。至於4段旋轉開
關的電器,您可以在提供給7段旋轉開關數
值後的括號內查看該數值。
美乃滋
注意事項:美乃滋在專業蔬果調理機中只能用
全蛋加以製作。
基本食譜:
– 1個雞蛋
– 1滿茶匙芥末
– 1湯匙檸檬汁或醋
– 1撮鹽
– 1撮糖
– 200-250毫升食用油
所有食材的溫度須一致。
■ 用1段將食材(食用油除外)攪拌數秒鐘。
■ 將旋轉開關調至7 (4)段,將食用油緩慢
地倒入食材投入口內。攪拌至美乃滋乳化
為止。
熱可可
– 60公克冰凍的烹飪巧克力
– 400毫升熱牛奶
– 鮮奶油和巧克力碎片(視需要)
■ 將烹飪巧克力切成小塊(約1公分),用7
(4)段將其在專業蔬果調理機中完全攪
碎。
■ 關閉專業蔬果調理機,然後添加牛奶。
■ 用7 (4)段攪拌1分鐘。
■ 將熱可可倒入玻璃杯中,並視需要將其連
同鮮奶油和巧克力碎片一起端上桌。
香蕉奶昔
– 160公克香蕉
– 50公克香草或檸檬冰淇淋
– 1包香草糖
– 250毫升牛奶
■ 將香蕉切成小塊,用7 (4)段攪碎5-10
秒。
■ 關閉專業蔬果調理機,然後添加剩餘食材。
■ 用7 (4)段攪拌1分鐘。
葡萄冰沙
– 250公克綠葡萄
– 25公克嫩菠菜
– 100公克冷凍香蕉片
– 200毫升冷綠茶
(適合孩童)
■ 將少許綠茶倒入專業蔬果調理機調理壺
內。
■ 將葡萄、菠菜和香蕉切片放入專業蔬果調
理機調理壺內,然後倒入剩下的綠茶。
■ 用7 (4)段攪拌至冰沙準備就緒。
紅莓果凍
– 300公克水果(去核的酸櫻桃、覆盆子、黑
╱紅醋栗、草莓,黑莓)
– 75毫升酸櫻桃汁
– 75毫升紅葡萄酒
– 60公克糖
– 1包香草糖
– 1湯匙檸檬汁
– 1大撮丁香(粉)
– 1小撮肉桂(粉)
– 4片吉利丁
■ 將吉利丁放入冷水浸泡約10分鐘。
■ 將所有食材(吉利丁除外)煮沸。
■ 擠壓吉利丁,並放入微波爐微波融化,不
需烹煮。
■ 用1段將高溫水果和吉利丁攪拌約1分
鐘。
■ 將果凍倒入冷水沖洗過的小碗內並加以
冷藏。
請勿在調理壺中處理超過 400 毫升的高溫
液體!
提示:搭配鮮奶油或香草醬,可讓紅莓果凍更
具風味。

11
zf
故障排除
南瓜湯
– 320公克黃肉南瓜
– 100公克馬鈴薯
– 500公克蔬菜高湯
– 1個洋蔥
– 1瓣大蒜
– 胡椒粉和鹽
– 15公克牛油
– 1湯匙特級初榨橄欖油
– 4片羅勒葉
– 1片鼠尾草葉
– 1根歐芹
– 1根百里香
– 1根馬鬱蘭
– ¼湯匙肉桂粉
– 切碎的帕瑪森乳酪(視個人口味添加)
■ 將南瓜切成薄片,去皮和去籽。將南瓜切
成小塊。
■ 將馬鈴薯去皮,也切成小塊。
■ 將洋蔥去皮、切碎,然後一同與加入牛油、
橄欖油和切碎的大蒜在炒鍋中輕炒。
■ 加入南瓜和馬鈴薯切塊,然後煮到軟,連續
攪拌。逐步倒入蔬菜高湯,加入香草束。
■ 小火慢煮約25-30分鐘,如有需要,可以
添加更多高湯。
■ 取出香草束。
■ 加入鹽和胡椒調味,再加上少許肉桂和少
許特級初榨橄欖油即完成。
■ 每次將400毫升的湯倒入專業蔬果調理
機調理壺中打成糊狀。
請勿在調理壺中處理超過 400 毫升的高溫
液體!
■ 將細碎的帕瑪森乳酪撒在湯上端上桌。
故障排除
故障
液體從專業蔬果調理機的刀片固定裝置中滲
漏。
排除方式
■ 密封環是否安裝在刀組上?
■ 檢查密封環安裝是否正確。
故障
專業蔬果調理機無法開始進行運作或在使用
期間停止,傳動器發出「嗡嗡聲」。刀片卡住。
排除方式
■ 關閉本電器的電源,然後拔下主電源插頭。
■ 卸下專業蔬果調理機並取出阻礙物。
■ 重新裝上專業蔬果調理機。
■ 開啟本電器的電源。
重要:若無法排除故障,請聯絡客戶服務。
可隨時更改。

12
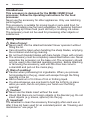
en Intended use
Intended use
This accessory is designed for the MUM4 / MUM 5 food
processor. Follow the operating instructions for the food
processor.
Never use the accessory for other appliances. Only use matching
parts together.
This accessory is suitable for mixing liquid or semi-solid food, for
cutting or chopping raw fruit and vegetables, for puréeing food and
for chopping up frozen food (such as fruit) or crushing ice cubes.
The accessory must not be used for processing other objects or
substances.
Safety instructions
W Risk of injury!
■ Never reach into the attached blender! Never operate it without
fitting the lid.
■ Care should be taken when handling the sharp blades, emptying
the container and during cleaning.
■ Do not touch blender blades with bare hands. Clean with a brush.
■ The accessory must be completely assembled before use. Never
assemble the accessory on the base unit. The accessory should
only be used in the intended operating position. Before attaching
or removing the accessory, wait until the drive has come to
a standstill and pull out the mains plug.
W Risk of scalding!
■ Caution when processing hot ingredients. When you process
hot ingredients in the jug, steam will escape through the filling
opening in the lid.
■ Add a maximum of 0.4 litres of hot or frothing liquid.
■ You should always use one hand to hold the lid firmly in place
while you work, but do not place your hand over the filling
opening!
W Caution!
■ Never use the blade insert without the seal.
■ Check that there are no foreign objects in the blender jug. Do not
insert objects (e.g. knives, spoons) into the jug.
W Important!
It is essential to clean the accessory thoroughly after each use or
after it has not been used for an extended period. X “Cleaning and
maintenance” see page 14

13
en
Overview
Overview
Blender attachment
X Fig. A
1 Glass blender jug
a Container made of ThermoSafe glass
b Scale
c Blade holder
d Marking
2 Lid
a Filling opening
b Locking cap /
measuring jug with scale
c Notch for blade insert
3 Blade insert
a Blade drive
b Blender knife
c Seal
d Marking
Before using the appliance
for the first time
Before the new accessory can be used,
it must be fully unpacked, cleaned and
checked.
Caution!
Never operate a damaged accessory!
■ Remove all accessories from the
packaging and dispose of all packing
materials.
■ Check that all parts are present and
examine them for obvious damage.
X Fig. A
■ Thoroughly clean and dry all parts
before using for the first time.
X “Cleaning and maintenance” see
page 14
Symbols and markings
Symbol Meaning
Marking on the blade insert
when inserting in the blade
holder.
Marking on the blade holder
when inserting on the food
processor.
Glass blender jug
The “ThermoSafe” glass blender jug is
made of special, highly heat-resistant
borosilicate glass. This lets you process
very hot, even boiling ingredients. The glass
blender jug is suitable for processing the
following quantities:
Maximum processing quantities
Solid food max. 100 g
Liquids max. 0.8 l
Hot or frothing liquids max. 0.4 l
Preparation
W Risk of injury
Do not reach into the blender knife. Grip the
blade insert by the plastic only.
Caution!
Never use the blade insert without the seal.
X Image sequence B
1. Fit the seal on the blade insert.
2. Turn the blade insert over.
3. Turn the blender jug over.
4. Fit the blade insert into the blade
holder. Observe the marking (,) when
doing so.
5. Fit the locking cap of the lid. When
doing so, observe the notch.
6. Use the locking cap to rotate the blade
insert clockwise to the stop (;).
7. Remove the locking cap.

14
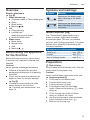
en Use
Use
W Risk of injury
– Before attaching or removing the
accessory, wait until the drive has come
to a standstill and pull out the mains
plug.
– Never reach into the attached blender!
– Never use the blender without the lid in
place.
W Risk of scalding
When you process hot ingredients in the
jug, steam will escape through the filling
opening in the lid.
X Image sequence C (MUM5)
X Image sequence D (MUM4)
1. Only prepare the base unit as described
in the main operating instructions.
Remove the blender drive cover.
2. Position the blender as shown on the
drive. Observe the marking (,) when
doing so.
3. Rotate the blender anticlockwise to the
stop (;).
4. Prepare your food and add to the
blender jug.
5. Attach the lid. Insert the locking cap and
rotate clockwise.
6. Insert the mains plug. Turn the rotary
switch to the recommended setting.
7. Leave switched on until the required
consistency is achieved.
8. Set the rotary switch to f. Wait
until the drive comes to a standstill.
Disconnect the mains plug.
■ Rotate the blender clockwise and
remove.
■ Clean all parts directly after use.
X “Cleaning and maintenance” see
page 14
Adding more ingredients
More ingredients can also be added during
processing. The locking cap can be used
here as a measuring jug.
X Fig. E
■ While the appliance is running, remove
the locking cap and carefully add more
ingredients through the filling opening in
the lid.
W Risk of injury!
Do not insert any objects (e.g. knives,
spoons) in the filling opening in the lid.
Never remove the lid while the appliance is
running!
X Image sequence F
1. To add large quantities or ingredients,
turn the rotary switch to f and wait
for the machine to come to a standstill.
W Risk of injury!
Before removing the lid, check the drive
has come to a standstill. Never switch on
without the lid!
2. Remove the lid.
3. Add the extra ingredients.
■ Put the lid with the locking cap back
in place. Continue processing your
ingredients.
Cleaning and maintenance
The accessories used must be thoroughly
cleaned after each use.
W Risk of injury
Do not reach into the blender knife. Grip the
blade insert by the plastic only.
Caution!
– Do not use cleaning agents containing
alcohol or spirits.
– Do not use any sharp, pointed or metal
objects.
– Do not use abrasive cloths or cleaning
agents.
– Do not leave the blade holder or blade
insert in water.
– Do not wedge plastic parts in the
dishwasher as they could become
permanently deformed.

15
en
Recipes
Notes:
– Before dismantling the blender jug,
fill with a little water and detergent,
proceed as described under Use and
switch on briefly at the highest setting.
– Pour out the water and rinse the parts
with clean water.
■ Take all parts apart in reverse order as
described under “Preparation”.
■ Clean all parts as shown in Fig. G and
allow to dry. Then re-assemble all parts
as described under Preparation before
putting away.
Recipes
X Fig. H
Important!
In these instructions for use the
recommended reference values for the
operating speed refer to appliances with
a 7-setting rotary switch. For appliances
with a 4-setting rotary switch you can find
the values in brackets after the values for
a 7-setting rotary switch.
Mayonnaise
Note: In the blender mayonnaise can only
be prepared with whole eggs.
Basic recipe:
– 1 egg
– 1 heaped tsp mustard
– 1 tbsp vinegar or lemon juice
– 1 pinch salt
– 1 pinch sugar
– 200-250 ml oiI
Ingredients must all be at the same
temperature.
■ Mix ingredients (except the oil) for
several seconds at setting 1.
■ Turn the rotary selector to setting 7 (4)
and slowly pour the oil through the filling
opening. Blend until the mayonnaise
emulsifies.
Hot chocolate
– 60 g frozen cooking chocolate
– 400 ml hot milk
– Whipped cream and grated chocolate as
required
■ Cut the cooking chocolate into pieces
(approx. 1 cm) and chop up completely
in the blender at setting 7 (4).
■ Switch off the blender and add the milk.
■ Blend for 1 minute at setting 7 (4).
■ Pour the hot chocolate into glasses and
serve with whipped cream and grated
chocolate as required.
Banana ice shake
– 160 g bananas
– 50 g vanilla or lemon ice cream
– 1 sachet vanilla sugar
– 250 ml milk
■ Cut the bananas into pieces and chop
up at setting 7 (4) for 5-10 seconds.
■ Switch off the blender and add the rest
of the ingredients.
■ Blend for 1 minute at setting 7 (4).
Grape smoothie
– 250 g green grapes
– 25 g baby spinach
– 100 g pieces frozen banana
– 200 ml cold green tea
(suitable for children)
■ Put a little of the tea in the blender jug.
■ Put grapes, spinach and pieces of
banana in the blender jug and fill up with
the rest of the tea.
■ Blend at setting 7 (4) until the smoothie
is ready.

16
en Troubleshooting
Red fruit pudding
– 300 g fruit (pitted sour cherries,
raspberries, black/red currants,
strawberries, blackberries)
– 75 ml sour cherry juice
– 75 ml red wine
– 60 g sugar
– 1 sachet vanilla sugar
– 1 tbsp. lemon juice
– 1 generous pinch cloves (ground)
– 1 pinch cinnamon (ground)
– 4 sheets gelatine
■ Soak the gelatine in cold water for
approx. 10 minutes.
■ Bring all ingredients (except the
gelatine) to the boil.
■ Squeeze out the gelatine and melt in the
microwave, but do not cook.
■ Blend the hot fruit and gelatine at setting
1 for approx. 1 minute.
■ Pour the pudding into small bowls rinsed
out with cold water and chill.
Do not process more than 400 ml of hot
liquid in the blender jug!
Tip: Red fruit pudding tastes good with
whipped cream or vanilla sauce.
Pumpkin soup
– 320 g yellow-flesh pumpkin
– 100 g potatoes
– 500 g vegetable stock
– 1 onion
– 1 clove garlic
– Ground pepper and salt
– 15 g butter
– 1 tbs extra virgin olive oil
– 4 basil leaves
– 1 sage leaf
– 1 sprig parsley
– 1 sprig thyme
– 1 sprig marjoram
– ¼ tsp ground cinnamon
– Grated Parmesan to taste
■ Cut the pumpkin into slices and remove
the peel and pips. Cut the pumpkin into
small pieces.
■ Peel the potatoes and also cut into small
pieces.
■ Peel the onions, chop finely and fry
gently in a frying pan with butter, olive oil
and chopped garlic.
■ Add the pumpkin and pieces of
potato and steam until soft, stirring
continuously. Gradually pour in the
vegetable stock and add the bouquet
garni.
■ Leave to simmer on a low heat for
approx. 25-30 minutes and add more
stock if required.
■ Take out the bouquet garni.
■ Add salt and pepper to taste and finish
with a pinch of cinnamon and a dash of
extra virgin olive oil.
■ Pour 400 ml of the soup into the blender
jug at a time and purée.
Do not process more than 400 ml of hot
liquid in the blender jug!
■ Serve with finely grated Parmesan
sprinkled on top.
Troubleshooting
Fault
Liquid is leaking from the blender at the
blade holder.
Remedy
■ Is the seal fitted to the blade insert?
■ Check the seal is fitted properly.
Fault
Blender does not start working or stops
during use, the drive is “humming”. Blade
is blocked.
Remedial action
■ Switch off the appliance and pull out the
mains plug.
■ Detach the blender and remove the
obstruction.
■ Re-attach the blender.
■ Switch on the appliance.
Important: If a fault cannot be eliminated,
please contact customer service.
Subject to change.

6

6

6
6

Robert Bosch Hausgeräte GmbH
Carl-Wery-Straße 34
81739 München
GERMANY
www.bosch-home.com
Register your new device on MyBosch now and profit directly from:
• Expert tips & tricks for your appliance
• Warranty extension options
• Discounts for accessories & spare-parts
• Digital manual and all appliance data at hand
• Easy access to Bosch Home Appliances Service
Free and easy registration – also on mobile phones:
www.bosch-home.com/welcome
Expert advice for your Bosch home appliances, need help with problems
or a repair from Bosch experts.
Find out everything about the many ways Bosch can support you:
www.bosch-home.com/service
Contact data of all countries are listed in the attached service directory.
Thank you for buying a
Bosch Home Appliance!
Looking for help?
You´ll find it here.
8001134897
*8001134897*
(980926)
-
 1
1
-
 2
2
-
 3
3
-
 4
4
-
 5
5
-
 6
6
-
 7
7
-
 8
8
-
 9
9
-
 10
10
-
 11
11
-
 12
12
-
 13
13
-
 14
14
-
 15
15
-
 16
16
-
 17
17
-
 18
18
-
 19
19
-
 20
20


