
FC8219 - FC8200

2
23

3
1
2
3
4
5
6
7
9
8
10
11
12
13
16
17
25
26
27
21
22
24
18
19
20
14
15
23
1

4

6
简体中文 11

6
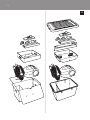
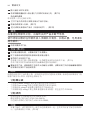
1 Cover
2 Paper dustbag
3 Motor Protection Filter
4 Dustbag holder
5 Hose connection opening
6 Hose connector
7 Dustbag-full indicator
8 Top handle
9 Cord rewind button
10 Electronic suction power control (specic types only)
11 Mains plug
12 On/off button
13 Parking slot
14 HEPA Filter (specic types only)
15 Filter grille
16 Micro Filter (specic types only)
17 Rear wheel
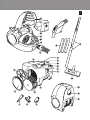
18 Crevice nozzle
19 Small nozzle (specic types only)
20 Brush nozzle (specic types only)
21 Hose with handgrip and suction power slide
22 Plastic tube parts (specic types only)
23 Telescopic tube (specic types only)
24 Combination nozzle
25 Front handle
26 Swivel wheel
27 Type plate
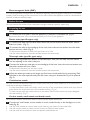
Read this user manual carefully before you use the appliance and save it for future reference.
- Check if the voltage indicated on the appliance corresponds to the local mains voltage before
you connect the appliance.
- Do not use the appliance if the plug, the cord or the appliance itself is damaged.
- If the mains cord of this appliance is damaged, you must have it replaced by Philips, a service
centre authorised by Philips or similarly qualied persons in order to avoid a hazard.
- Keep the appliance out of the reach of children.
- Never suck up water or any other liquid. Never suck up ammable substances and do not suck
up ashes until they are cold.
- Do not point the hose, the tube or any other accessory at the eyes or ears nor put it in your
mouth when it is connected to the vacuum cleaner and the vacuum cleaner is switched on.
- When you use the appliance to vacuum ashes, ne sand, lime, cement dust and similar
substances, the pores of the paper dustbag become clogged. As a result, the dustbag-full
indicator will indicate that the dustbag is full. Replace the dustbag, even if is not full yet.
- Never use the appliance without the Motor Protection Filter. This damages the motor and
shortens the life of the appliance.
- Never use this appliance without a dustbag.
- It is highly recommended that you use Philips s-bag ` double-layer paper dustbags.

This Philips appliance complies with all standards regarding electromagnetic elds (EMF). If handled
properly and according to the instructions in this user manual, the appliance is safe to use based on
scientic evidence available today.
You can remove the stickers from the plastic storage container (specic types only).
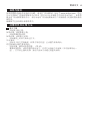
1 To connect the hose, push it into the appliance (1) and turn it clockwise (2) (Fig. 2).
To disconnect the hose, turn it anticlockwise and pull it out of the appliance.
1 To connect the tube parts to each other, insert the narrow section into the wider section
and turn a little. (Fig. 3)
2 To connect the tube to the handgrip of the hose, insert the narrow section into the wider
section and turn a little (Fig. 4).
- To disconnect the tube or tube parts, pull and turn a little.
- Use the same method to connect and disconnect the accessories.
1 Press the spring-loaded lock button on the telescopic tube part and slide the lock button
into the opening in the other tube part.
2 Connect the telescopic tube part to the handgrip of the hose. Insert the narrow section into
the wider section and turn a little.
- To disconnect the tube, pull and turn a little.
- Use the same method to connect and disconnect the accessories.
3 Adjust the telescopic tube to the length you nd most comfortable during vacuuming. Push
the slide on the tube upwards and push the lower tube part downwards or pull it upwards
(Fig. 5).
You can use the combination nozzle on carpet (with the brush strips folded in) or on hard oors
(with the brush strips folded out).
- To clean hard oors, push the rocker switch on top of the combination nozzle with your foot to
make the brush strips come out of the nozzle housing. (Fig. 6)
- To clean carpet, push the rocker switch on the other side to make the brush strips disappear
into the housing. (Fig. 7)
Your vacuum cleaner comes with one or more of these three accessories.
1 Connect the small nozzle, crevice nozzle or brush nozzle directly to the handgrip or to the
tube (Fig. 8).
1 Use the small nozzle to vacuum clean small areas, e.g. the seats of chairs and sofas.
2 Use the crevice nozzle to clean narrow corners or hard-to-reach places.
3 Use the small brush nozzle to clean computers, bookshelves etc.
7

- You can carry the vacuum cleaner by the handle at the front or on top of the appliance (Fig. 9).
1 Pull the cord out of the appliance and insert the mains plug into the wall socket.
2 Press the on/off button on top of the appliance with your foot to switch on the appliance.
- If you want to pause for a moment, insert the ridge on the nozzle into the parking slot to park
the tube in a convenient position (Fig. 10).
You can adjust the suction power with:
- the suction power slide on the handgrip or (Fig. 11)
- the electronic suction power control on the vacuum cleaner (specic types only) (Fig. 12).
Always unplug the appliance before you replace the dustbag.
Replace the dustbag as soon as the dustbag-full indicator on top of te appliance has changed colour
permanently.
1 Open the cover (Fig. 13).
2 Push the cardboard tag of the dustbag backwards (Fig. 14).
3 Pull the cardboard tag upwards to lift the dustbag out of the appliance. (Fig. 15)
, The dustbag is sealed automatically.
4 Place the bottom edge of the new dustbag in front of the ridge on the bottom of the
appliance (1). Pull the cardboard front of the dustbag towards you (‘click’) (2). (Fig. 16)
5 Close the cover.
Always unplug the appliance before you replace a lter.
Your vacuum cleaner is equipped with either a Micro Filter or a HEPA Filter.
Replace the Micro Filter every 6 months.
1 To remove the lter grille, turn it anticlockwise (1) and pull it out (2) (Fig. 17).
2 Remove the lter holder from the grille.
3 Remove the old lter from the grille.
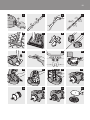
4 Put the new lter on the grille and lock it into place with the lter support (Fig. 18).
5 Put the lter grille back into the appliance (1) and turn it clockwise (2) (Fig. 19).
Replace the HEPA Filter every 6 months.
1 To remove the lter grille, turn it anticlockwise (1) and pull it out (2) (Fig. 17).
2 Remove the HEPA Filter (Fig. 20).
3 Insert a new HEPA Filter.
8

4 Put the lter grille back into the appliance (1) and turn it clockwise (2) (Fig. 19).
Replace the Motor Protection Filter once a year.
1 Open the cover and pull the lter holder out of the appliance.
2 Insert a new lter into the holder (Fig. 21).
3 Put the lter holder back into the appliance (‘click’) (Fig. 22).
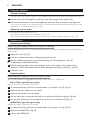
Always switch off and and unplug the appliance before you clean any parts.
Do not clean any part of the vacuum cleaner in the dishwasher. If necessary, clean the parts with
a moist cloth.
1 Clean the appliance with a damp cloth.
1 Switch off the appliance and remove the mains plug from the wall socket.
2 Press the cord rewind button to rewind the cord.
3 You can store the appliance in two ways:
- Insert the ridge on the nozzle into the parking slot to park the tube and then put the appliance
away (Fig. 10).
- Store the appliance and its accessories in the box or plastic storage container supplied.
4 To store the appliance, look at the storage gure at the beginning of this user manual. This
gure shows you how to store the appliance and its accessories in the box or plastic storage
container.
If you have any difculties obtaining dustbags, lters or other accessories for this appliance, please
contact the Philips Customer Care Centre in your country or consult the worldwide guarantee
leaet.
- Philips Classic s-bag` paper dustbags are available under type number FC8021.
- Philips Clinic s-bag` high ltration dustbags are available under type number FC8022.
- Philips Anti-odour s-bag` paper dustbags are available under type number FC8023.
- Philips Long Performance s-bag` dustbags for extra long cleaning performance are available
under type number FC8024.
- HEPA Filters are available under type number FC8029.
- Micro Filters are available under service number 4322 000 38900.
- Motor Protection Filters are available under service number 4322 000 38890.
- Do not throw away the appliance with the normal household waste at the end of its life, but
hand it in at an ofcial collection point for recycling. By doing this, you help to preserve the
environment (Fig. 24).
9

If you need information or if you have a problem, please visit the Philips website at www.philips.com
or contact the Philips Customer Care Centre in your country (you nd its phone number in the
worldwide guarantee leaet). If there is no Customer Care Centre in your country, turn to your
local Philips dealer or contact the Service Department of Philips Domestic Appliances and Personal
Care BV.
The storage box is not covered by the terms of the international guarantee.
1 The suction power is insufcient
- Perhaps the dustbag is full.
If necessary, replace the dustbag.
- Perhaps the lters need to be replaced.
If necessary, replace the lters.
- Perhaps the suction power slide on the handgrip is open.
Close the slide.
- Perhaps the electronic suction power control (specic types only) has been set to a low setting.
Set the control to a higher setting.
- Perhaps the nozzle, tube or hose is blocked up. (Fig. 25)
- To remove the obstruction, disconnect the blocked-up item and connect it (as far as possible)
the other way round. Switch on the vacuum cleaner to force the air through the blocked-up
item in opposite direction.
10

11
一般说明 (图 1)
1 上盖
2 纸质集尘袋
3 马达保护滤网
4 集尘袋固定架
5 软管连接孔
6 软管接口
7 集尘袋已满指示灯
8 顶部把手
9 电源线回卷按钮
10 通过电子吸力控制旋钮即可调整吸力(仅限于特定机型)
11 电源插头
12 开/关钮
13 摆放固定槽
14 HEPA 滤网(仅限特定型号)
15 过滤器栅格
16 微型滤网(仅限于特殊型号)
17 后轮
18 缝隙吸嘴
19 小号吸嘴(仅限于特定机型)
20 毛刷吸嘴(仅限于特定机型)
21 带握把和吸力控制滑块的软管
22 塑料硬管两端(仅限于特定机型)
23 伸缩管(仅限于特定机型)
24 组合吸嘴
25 前方握把
26 转轮
27 型号牌
注意事项
使用产品之前,请仔细阅读本用户手册,并妥善保管以供日后参考。
- 在将产品连接电源之前,请先检查产品所标电压与当地的供电电
压是否相符。
- 如果插头、电源线或产品本身受损,请勿再使用本产品。
- 如果产品的电源线损坏,为避免危险,必须由制造厂或其维修部
或厂方认可的专职人员来更换。
- 请将产品放置在儿童接触不到的地方。
- 切勿吸取水或其它液体。切勿吸取易燃物质,并且不要吸取未冷
却的灰烬。
- 当连接到真空吸尘器并且真空吸尘器已打开时,请勿将软管、硬
管或任何其它附件指向眼睛或耳朵,也不要放在口中。
- 在使用本产品吸收灰尘、细沙、石灰、水泥灰和类似的物质时,
纸质集尘袋的的袋孔可能发生阻塞。因此,集尘袋已满指示灯将
显示集尘袋已满。这时,请更换集尘袋,即使集尘袋并未装满。
简体中文

- 切勿在没有马达保护滤网的情况下使用本产品。这会损坏马达并
缩短产品的使用寿命。
- 切勿在没有集尘袋的情况下使用本产品。
- 强烈推荐您使用飞利浦 s-bag` 双层纸质集尘袋。
电磁场 (EMF)
这款飞利浦产品符合关于电磁场 (EMF) 的相关标准。据目前的科学证明,如果正确使用并
按照本用户手册中的说明进行操作,本产品是安全的。
初次使用之前
您可以撕掉塑料存放箱上的不干胶标签(仅限于特定机型)。
使用准备
软管
1 要将软管连接,将软管推入吸尘器 (1) 并以顺时针方向旋转即可 (2)。 (图 2)
要将软管从吸尘器上拆下,请将管端逆时针方向转动,并拉出软管。
塑料硬管(仅限于特定机型)
1 要将硬管的两端相互连接,请将窄的部分插入宽的部分,同时稍加旋转。 (图 3)
2 要将硬管与软管的握把连接起来,应将窄的部分插入宽的部分并且稍微转一
下。 (图 4)
- 要断开硬管或硬管两端,请向外拉并且稍微转一下。
- 请通过同样的方法来连接及拆卸吸嘴。
伸缩管(仅限于特定机型)
1 按伸缩管部件上的弹簧式锁定钮,将锁定钮滑入另一个管部件的开口。
2 将伸缩管与软管的握把连接起来。将窄的部分插入宽的部分并且稍微转一下。
- 要断开硬管,请向外拉并且稍微转一下。
- 请通过同样的方法来连接及拆卸吸嘴。
3 将伸缩管调节至在吸尘中感觉最舒适的长度。向上推硬管上的滑块,并且向下推或向
上拉下侧硬管。 (图 5)
组合吸嘴
您可以在地毯(刷条内翻)或硬地板(刷条外翻)上使用组合吸嘴。
- 要清洁硬地板,请用脚推动组合吸嘴上的刷毛转换块,让刷条从吸嘴外壳中伸出
来。 (图 6)
- 要清洁地毯,请用脚按动转换块的另一面,使刷条缩入吸嘴中。 (图 7)
缝隙吸嘴、小号吸嘴和毛刷吸嘴
吸尘器至少随附这三个附件中的一个。
1 把小号吸嘴、缝隙工具或毛刷吸嘴直接连接到握把或硬管上使用。 (图 8)
1 使用小号吸嘴清洁较小的区域,例如椅子和沙发的座位。
2 使用缝隙吸嘴清洁狭窄角落或难以触及的部位。
3 使用小号毛刷吸嘴清洁电脑、书架等等。
简体中文12

使用本产品
使用吸尘器
- 您可以手握前方或顶部的把手提起吸尘器。 (图 9)
1 将电源线从产品中拉出,插入电源插座。
2 用脚按下产品上的 on/off(开/关)按钮来开启电源。
- 如要暂停使用吸尘器,可通过将吸嘴上的夹片插入摆放固定槽以将硬管放妥。 (图 10)
调整吸力
您可以使用下列部件调节吸力:
- 握把上的吸力滑块或 (图 11)
- 吸尘器上的电子吸力控制旋钮(仅限于特定机型)。 (图 12)
更换
更换集尘袋
更换集尘袋前,切记拔下电器插头。
当产品顶部的集尘袋已满指示灯永久变色时,需尽快更换集尘袋。
1 打开上盖。 (图 13)
2 向后推集尘袋的纸板片。 (图 14)
3 向上拉纸板片以将集尘袋从产品中取出。 (图 15)
, 集尘袋会自动封闭。
4 将新集尘袋的底部边缘放在产品底部夹片的正前方 (1)。拉动您面前集尘袋的纸板片的
正面(听到咔哒声) (2)。 (图 16)
5 将机罩关闭。
更换过滤网
更换过滤网前,切记拔下电器插头。
吸尘器配有微型滤网或 HEPA 滤网。
微型滤网(仅限于特殊型号)
每 6 个月更换一次微型滤网。
1 要取出滤网栅格,请逆时针方向转动 (1) 并拉出栅格 (2)。 (图 17)
2 从栅格中取出滤网架。
3 从栅格上取下旧的滤网。
4 将新的滤网放在栅格上并使用滤网支架将其锁定到位。 (图 18)
5 将滤网栅格重新放入吸尘器 (1) 并顺时针转动 (2)。 (图 19)
HEPA 滤网(仅限特定型号)
每 6 个月更换一次 HEPA 滤网。
1 要取出滤网栅格,请逆时针方向转动 (1) 并拉出栅格 (2)。 (图 17)
2 取出 HEPA 滤网。 (图 20)
简体中文 13

3 插入新的 HEPA 滤网。
4 将滤网栅格重新放入吸尘器 (1) 并顺时针转动 (2)。 (图 19)
马达保护滤网
每年更换一次马达保护滤网。
1 打开产品外壳并将过滤网支架从产品中拉出。
2 将新的滤网放入支架。 (图 21)
3 把过滤网支架放回产品中(听到咔哒声)。 (图 22)
清洁
在清洁任何部件之前,应始终关闭产品并断开电源。
请勿将吸尘器的任何部件放入洗碗机中清洗。如有必要,可用湿布
清洁部件。
1 用湿布擦拭本产品。
存放 (图 23)
1 关闭吸尘器的电源,从插座中拔下电源插头。
2 按下电源线回卷按钮将电源线回卷到吸尘器中。
3 有两种方法存放本产品:
- 将吸嘴上的夹片插入摆放固定槽,以将硬管放妥然后存放本产品。 (图 10)
- 将本产品及其附件储存在随附的储藏箱或塑料存放箱中。
4 要储存本产品,请查看用户手册开头的储存示意图。该图说明了如何在储藏箱或塑料
存放箱中存放本产品及其附件。
附件
如果您在购买本产品的集尘袋、滤网或其他附件时遇到任何困难, 请和您所在国家的飞利
浦客户服务中心联系, 或参阅全球保证书。
订购集尘袋
- 飞利浦 Classic s-bag` 纸质集尘袋的型号是 FC8021。
- 飞利浦 Clinic s-bag` 高过滤集尘袋的型号是 FC8022。
- 飞利浦去味 s-bag` 纸制集尘袋适用于 FC8023 型。
- 飞利浦高效能 s-bag` 集尘袋具有超强的清洁性能,供应型号为 FC8024。
订购滤网
- 可提供适用于 FC8029 型号的 HEPA 滤网。
- 微型滤网的订购号码为 4322 000 38900。
- 马达保护滤网的订购号码为 4322 000 38890。
环保
- 弃置产品时,请不要将其与一般生活垃圾堆放在一起;应将其交给官方指定的回收中
心。这样做有利于环保。 (图 24)
简体中文14

保修与服务
如果您需要详细信息或有任何问题,请浏览飞利浦网站,地址为 www.philips.com。您也
可以与贵国的飞利浦顾客服务中心联系(您可以从全球保修卡中找到电话号码)。如果贵
国没有飞利浦顾客服务中心,请与当地的飞利浦经销商或与飞利浦家庭小电器的售后服务
部联系。
储藏箱不包括在国际保修条款中。
故障种类和处理方法
1 吸力不够
- 可能集尘袋已满。
如果必要,请更换集尘袋。
- 可能需要更换滤网。
如果必要,请更换过滤网。
- 可能握把上的吸力滑块已打开。
关闭滑块。
- 可能电子吸力控制旋钮(仅限于特定机型)已设置为较低的档。
将控制旋钮设置为更高的档。
- 可能吸嘴、硬管或软管阻塞。 (图 25)
- 要清除阻塞物,请将阻塞的部分拆下,并将它以相反方向连接(尽可能离的远一
些)。打开吸尘器的电源,强迫气流反方向通过阻塞的部位。
简体中文 15

16
2009/05/20

17

18
1
2
2 3 4 5
6 7 8 9
10 11 12 13
14
15 16 17
18
19
20 21

19
22 24 25

4222.003.3350.4
-
 1
1
-
 2
2
-
 3
3
-
 4
4
-
 5
5
-
 6
6
-
 7
7
-
 8
8
-
 9
9
-
 10
10
-
 11
11
-
 12
12
-
 13
13
-
 14
14
-
 15
15
-
 16
16
-
 17
17
-
 18
18
-
 19
19
-
 20
20


