
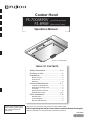
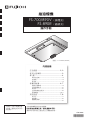
FS-700/890V
(Ventilating Type)
FS-890R
(Recycling Type)
(Illustration: FS-890V/890R)
TABLE OF CONTENTS
1F02 0982
Thank you very much for your purchase of our cooker hood.
Before operating the cooker hood, please read this Manual thoroughly.
Keep this manual in a convenient place for future reference.
To the sales shop/installer:
After installing, please give
this manual to the user
without fail.
Cooker Hood
Operation Manual
*1F020982*
Safety Precautions .............................2,
3
Cautions on Use .....................................3
Preparation .............................................4
Name of Parts ................................................ 4
Prior to Use .................................................... 4
Switches ......................................................... 4
Care and Maintenance .......................4
~
7
Caution for Maintenance ................................ 4
Detaching Cleaning Parts ............................... 5
Cleaning ......................................................... 5
Attaching Cleaned Parts ................................. 6
Replacing the Lamp ................................... 6, 7
Other Information ................................7, 8
Specifications ................................................. 7
Circuit Diagram ............................................... 8
Service and Warranty ..................................... 8

2
Alerts possible risk of death or
serious injury, if not observed.
Alerts possible risk of injury or
physical damage, if not observed.
WARNING
CAUTION
Safety Precautions
Read the following safety instructions before operating, and use the cooker hood properly and securely.
These instructions are for correct operation of the product to prevent any risk of hazards or damages inflicting on
you or others. The instructions are classified into 2 categories as "WARNING" and "CAUTION" depending on their
emergency and severity. Pay attention and strictly observe the instructions as they are critical for safety.
means prohibition. It indicates actions, if any, that mustn't be done.
(Left symbol: Disassembly prohibited)
means forcible execution. It indicates actions, if any, that must be done.
(Left symbol: Disconnect the plug from the wall outlet)
Example
Be sure to disconnect the power plug
from the wall outlet, or switch off the
breaker when care and maintenance.
Also, don’t handle the power plug or
breaker with wet hand.
Electric shock or injury may result in.
Disconnect the
plug
Never attempt to disassemble, repair, or
modify.
Entrust them to the qualified technician,
otherwise fire, electric shock, or abnormal
performance may occur.
Disassembly,
repair, or
modification
prohibited
Using prohibited
WARNING
When dust accumulated on the blades
of the power plug or on their roots, wipe
off well.
Fire may result in.
Don’t pour water on the electric parts.
Fire or electric shock may result in.
When there may be a gas leak in your gas
hob, don’t switch on or off the cooker hood.
Gas explosion may result in.
Choose a mounting location where
sufficient air flow is maintained.
CO poisoning may result if not ventilated
adequately while using a natural vent type
stove, etc.
Wipe off dust
Pouring water
prohibited
Operation
prohibited
Air supply
cautioned
There shall be adequate ventilation of the
room when the range hood is used at the
same time as appliances burning gas or
other fuels.
(Not applicable to appliances that only
discharge the air back into the room.)
Air supply
cautioned
There is a fire risk if cleaning is not carried
out in accordance with the instructions.
Clean frequently
This appliance is not intended for use by
person (including children) with reduced
physical, sensory or mental capabilities, or
lack of experience and knowledge, unless
they have been given supervision or
instruction concerning use of the appliance
by a person responsible for their safety.
Children should be supervised to ensure that
they do not play with the appliance.
Supervision
requested
Don’t connect to the power voltage other
than 220V/230V/240V AC.
Fire or electric shock may result in.
The range hood is intended to be installed
over a hob with up to four hob elements or
burners, no more than total 7.0kW.
Less than
4 burners
(7.0kW)
Do not flambé under the range hood.
Flambé
prohibited

3
1F02 0982
CAUTION
Be sure to disconnect the power plug from
the wall outlet, or switch off the breaker
when not using for a long time.
Insulation may be deteriorated, and fire or
electric shock may result in.
Disconnect the
plug
Accessible parts may become hot when
used with cooking appliances. Don’t touch
the filter or parts around it while cooking.
The filter or parts may drop, and burn or injury
may result in.
Mounting
cautioned
Using prohibited
Assemble component parts securely.
Injury by dropping may result in.
Assembly
cautioned
Contact
prohibited
If the power cord is damaged, it must be
replaced by the manufacturer, its service
agent or similarly qualified persons in order
to avoid a hazard.
Switch off the cooker hood at once when oil
caught fire while cooking.
It’s dangerous if not stop as fire is built up.
Mount the product securely after selecting
a solid place.
Dropping may result in injury.
Operation
prohibited
Wear gloves
Prohibited
Replace the cord
if it’s damaged
Assembly
cautioned
Contact
prohibited
Contact
prohibited
Be sure to wear gloves when care and
maintenance.
Injury by the sharp edges or corners may result
in.
Ensure that electric wiring is made safely
according to the standard or regulations
related.
Incorrect wiring may result in fire or electrical
shock.
Don’t touch the lamp cover or around it.
As it becomes high temperature, burning may
result in.
During operation, never insert fingers or
other objects.
Failure or injury may result in.
Do not put anything on the cooker hood.
It may be cause of fire, failure, or injury by
dropping.
Never use the product in a wet place such
as bath room, etc. (Use a ventilation fan for
bath room.)
It may be cause of fire or failure if used.
Disconnect by
holding
the plug
When disconnecting the power plug, hold
the plug itself.
Don’t pull the cord anyway.
The cord may be damaged, and fire or electric
shock may result in.
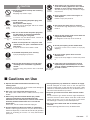
Cautions on Use
Operate the cooker hood without fail when using
cooking wares.
Otherwise, it may be cause of the cooker hood damage or
failure by increased temperature.
Don’t use a gas range with nothing put on it.
The body of the cooker hood is heated, and it may cause
trouble.
When using with the Induction Heater (IH), smoke
capturing performance may be deteriorated by
influence of cross wind. Also, the surface of the cooker
hood may be dew condensation if it is used in low
temperature.
In this case, use the cooker hood after wiping off.
Prevent influence of direct wind from air conditioner.
Smoke capturing performance may be deteriorated if
influenced. Especially, as the Induction Heater (IH) provides
nearly no ascending air current, it is easily influenced in
open place.
During operation, pay attention to sufficient air supply.
Provide adequate air intake slots on the wall opposite
from the cooker hood, or open the door of the room a little.
Otherwise, ventilation performance may be deteriorated, or
abnormal noise/vibration may result in.
Separate gas heater more than 50cm from the cooker
hood.
As the around of gas heater becomes high temperature,
separate more than 50cm. Never install the cooker hood
above gas heater. If not, it may be cause of the cooker
hood damage or failure by increased temperature.
Do not use the cooker hood with its rectifier panel
removed.
Smoke capturing performance may be deteriorated.

4
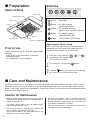
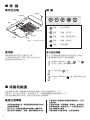
Name of Parts
Preparation
Power plug
Push-button switch
Lamp cover
Slot filter
Body
Fan
Oil tray
Rectifier panel
Button .....Stop FAN
Button .....For light cooking
(steaming, and etc.)
Button .....For medium cooking
(light stir-fry of vegetable, and etc.)
Button .....For heavy cooking
(deep fried fish, etc.)
Button .....Turn ON and OFF the light
1
Push one of the switches ( ,
, or
)
according to your cooking need.
The fan will start rotating.
2
To stop the fan, just push the button.
3
Push the button if you want to turn the light
on. To turn it off, push the button again.
Operating the Cooker Hood
Before operating, make sure that the power plug is
connected to the wall outlet. The cooker hood has
five push-button switches on its front panel.
Check that the oil tray is set in the right position
correctly.
* If the oil tray is not set correctly, oil won't be
collected properly.
For setting the oil tray, see page 6.
(Illustration: FS-890V/890R)
Prior to Use
Switches
Care and Maintenance
• Beforecleaningthecookerhood,besureto
disconnect the power plug from the receptacle, or
switch off the breaker.
• For safety, always wear a pair of rubbergloves
while cleaning the filter, etc.
• Donotspraywatertoelectricpartssuchasthe
motor, switch, connectors or the like.
Do not spray liquid of any type detergent to the
electric parts. It’s cause trouble.
Clean the cooker hood as many times as possible (especially, clean the slot filter once every month) as it will
become very dirty. For a family size of 4 to 5 people and cooking twice a day, clean the filter once every two
weeks. If the cooker hood is left unattended for a long time, much oil is accumulated and it will become difficult
to remove the hardened grease.
Caution for Maintenance
• Donotusesolventssuchasthinner,benzine,
polishing powder or the like for cleaning the
painted surfaces, facing plates, etc. as these parts
may become lusterless or scored.
• Donotwashpartswithahardbrushorthelikefor
cleaning as it can be damaging.

5
1F02 0982
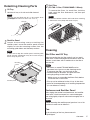
Detaching Cleaning Parts
Note
Be sure to hold the slot filter with hand when removing
it. Otherwise, it may drop and result in injury.
To remove the filters, for each filter, hold the
knob, push the filter backwards, and then pull
downwards.
3
Slot Filter
(FS-700: 1 filter, FS-890V/890R: 2 filters)
Oil tray
Rectifier panel
Mounting
screws
Catch
Slot filter
Catch
1
Oil Tray
Hold the oil tray at its tab and slide forward.
Note
The tray may be filled with oil,
so be careful when
removing it.
Note
In order not to drop the rectifier panel, hold it by both
hands securely. If dropped, it may be a cause of injury,
flaw or warp of parts, etc.
2
Rectifier Panel
Loosen the mounting screws attaching the
rectifier panel, move the rectifier panel forward
slightly to free the mounting screws from the
mounting guide holes and the body catches.
Slot Filter and Oil Tray
After immersing the slot filter and oil tray in a tepid
water with a neutral detergent dissolved for 30 to 40
minutes, wash them with a toothbrush or the like to
remove dirt.
Cleaning
Note
Slot filters on model FS-890V/890R can be
separated into 2 parts to make cleaning easier.
To separate the filter, turn the knob in the
counterclockwise direction and open the filter
casing by pulling on the knob side.
* Make sure to re-assemble the filters filmly before
install the filter to the hood.
Oil may not be collected to the oil tray in the short
period of time depending on oil cooking frequencies
(it’s not defects or failure).
Enclosure and Rectifier Panel
After wiping the cooker hood enclosure and rectifier
panel with a cloth immersed in a neutral detergent
and wring tightly, wipe off moisture thoroughly with a
dry cloth.
Note
When cleaning the rectifier panel, perform it on a flat
surface in order not to deform it.
Fan
As for cleaning of the fan, please consult
Fujioh/Agent.

6
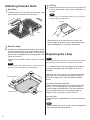
1
Slot Filter
Place the rear of the slot filter on the catch, then
push it back and upward to install firmly.
2
Rectifier Panel
Holding the rectifier panel with both hands, place
the rear of the panel in front of the catches and in
line with the mounting guide holes. Then slide the
panel back to engage the mounting guides and
attach the catches.
Tighten the mounting screw to attach the panel
firmly.
Attaching Cleaned Parts
Catch
Rectifier panel
Catch
Mounting guide hole
Oil tray
Note
Make sure that the rectifier panel is fixed securely. It
may be a cause of dropping if not fixed firmly.
3
Oil Tray
Hold the tab and set the oil tray on the guide rail
of the cooker hood, then push it completely to
the end.
Note
If the oil tray is not installed properly, it may result in
oil-drip, injury by dropping, etc.
* When cleaning is finished, be sure to return the
power supply as before; connect the power plug to
the wall receptacle, or switch on the breaker.
Replacing the Lamp
This range hood is fitted with Philips Tornado Spiral
energy-saving light bulbs (8W [40W], E14, Cool
daylight).
When the lamp in use burns out, please replace the
light bulb with a commercially purchased compact
fluorescent light bulb or mini light bulb described
below.
Compact Fluorescent light bulb:
Philips Tornado Spiral energy-saving light bulb (8W
[40W], E14, Cool daylight) or equivalent product
(rated voltage: 220/230/240V; in the base diameter
14mm) (dimension limits for mounting: length of
100mm or less; diameter of 47mm or less).
Mini light bulb:
Rated voltage of 220/230/240V; in the base diameter
14mm.
Note
Before replacing the lamp, be sure to disconnect the power
plug from the wall receptacle,
or switch off the breaker.
Note
When replacing, be sure to use a same voltage bulb
with the power voltage supplied.

7
1F02 0982
1
Open the lamp cover
Loosen 2 screws fixing the lamp cover and
open it.
Loosen Tighten Loosen Tighten
Lamp cover
Install
Uninstall
Note
To avoid burns, wait until the lamp
is cooled off when replacing it.
2
Replace the lamp
Turn the lamp counter-clockwise to remove, and
replace it with a new one.
3
Close the lamp cover
Close the lamp cover and fix it with the screw.
* When replacing the lamp is finished, be sure to
return the power supply as before;
connect the power plug to the wall receptacle, or
switch on the breaker.
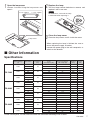
Specifications
Other Information
*Power consumption, air-flow, and noise level are measured according to JIS C 9603.
Rated Voltage
(V)
Revolution
Frequency
(Hz)
Power
Consumption
(W)
Power Consumption
with Lamp (W)
Air Flow
(m
3
/h)
Noise
(dB)
FS-700V
220V
Hi
50
105 113 580 51
Me
75 83 435 44
Lo
55 63 345 38
230V
Hi
50
115 123 595 52
Me
80 88 460 45
Lo
60 68 365 39
240V
Hi
50
120 128 610 52
Me
85 93 480 46
Lo
65 73 380 41
FS-890V
220V
Hi
50
105 113 550 52
Me
75 83 420 45
Lo
55 63 330 40
230V
Hi
50
110 118 565 53
Me
80 88 445 47
Lo
60 68 350 41
240V
Hi
50
115 123 575 53
Me
85 93 460 48
Lo
60 68 370 42
FS-890R
220V
Hi
50
105 113 525 53
Me
75 83 405 46
Lo
55 63 320 40
230V
Hi
50
110 118 545 54
Me
80 88 425 47
Lo
60 68 340 42
240V
Hi
50
115 123 550 54
Me
85 93 440 49
Lo
60 68 355 43

8
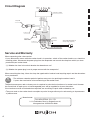
Black
Black
White
Red
Blue
Orange
Brown Brown
Blue
White
Orange
Blue
Brown Red
Red
Brown
Orange
Black
Blue
Red
Brown
Green/Yellow
Blue
Blue Black
Black
M
50Hz 220V/230V/240V AC
5A 3pin Plug (Type-BF)
Motor 50Hz 220V/230V/240V
LIGHT Hi Me Lo OFF
Connector
Push Button Switch
Connector
Connector
Lamp
8W
Capacitor
3.0mF 450V
Circuit Diagram
Service and Warranty
When requesting after sales service:
•Ifanyabnormalityoccurswhilethecookerhoodisinoperation,switchoffthecookerhoodtorun,checkthe
following points, disconnect the power plug from the receptacle and consult the shop from which you have
purchased your cooker hood.
(1) Whether the fuse in the circuit breaker has been burnt out?
(2) Whether the power plug is not in proper contact with the receptacle?
When consulting the shop, inform the shop the type/model of cooker hood requiring repair and the date when
it was purchased.
•Theminimumretentionperiodofperformancepartsforrepairingthecookerhoodis
5 years after termination of manufacturing of the cooker hood.
The performance parts refer to those parts for required to maintain the functions of a cooker hood. However
the same kinds of repair parts or interchangeable parts will be supplied for 4 years thereafter.
If the functions can be maintained when repaired, we are willing to repair when ordered by you.
•Thepartsusedonthecookerhoodaresubjecttopartialchangewithoutpriornoticeowingtoimprovement
ofperformance.
5
years
FUJI INDUSTRIAL CO., LTD.
2-1-9 Fuchinobe Chuo-ku Sagamihara-shi,
Kanagawa-ken JAPAN 252-0206
Manufacturer:

FS-700/890V
(排煙式)
FS-890R
(循環式)
(圖示
:FS-890V/890R
)
內容目錄
1F02 0982
非常感謝購買我們的抽油煙機。
在安裝抽油煙機之前,請先通讀本手冊。
請將本手冊保存在方便的地方以備隨時參考。
代銷店 / 安裝人員請注意:
安裝後,請務必把本手冊
交給用戶。
抽油煙機
操作手冊
*1F020982*
安全措施
.............................................2, 3
使用注意事項
..........................................3
準 備
.......................................................4
零件的名稱
..................................................... 4
使用前
............................................................. 4
開關
............................................................... 4
保養和維護
..........................................4~7
維修注意事項
.................................................. 4
拆卸清潔配件
.................................................. 5
清潔
............................................................... 5
安裝清潔後的配件
........................................... 6
更換電燈
..................................................... 6, 7
其他信息
.............................................7, 8
規格
............................................................... 7
線路圖
............................................................. 8
維修和保修
..................................................... 8

2
在爐具有漏氣的可能性時,
不要開動或關上抽油煙機。
會有引起氣體爆炸的危險。
請在安裝前仔細閱讀下述安全事項,正確安全地安裝抽油煙機。
下述安全事項是為了正確地安裝本產品,以免使您和其他人遭受危險或負傷。
安全事項根據緊急性和重要性的程度分為“警告”和“注意”2 類。
請予以重視並嚴格按照說明指示操作。
知會如果不遵守將有機會發生
死亡或受重傷的危險。
知會如果不遵守將有機會發生
受傷或人體損害的危險。
表示禁止。所述的行為(如果有)是絕對不能做的。
(左圖:禁止拆卸)
表示強制執行。所述的行為(如果有)是必須做的。
(左圖:把插頭從牆上的插座中拔出)
例
安全措施
警告
注意
維修保養時必須把插頭從牆上的插座中拔
出,或切斷電源開關。同時,請不要用濕
手摸插頭或電源開關。
會有導致觸電或受傷的危險。
拔出插頭
不要嘗試拆卸、修理、或改裝。
必須請技術人員操作,否則會有起火、
觸電、或異常事故發生。
禁止拆卸、
修理、或改裝
禁止使用
警告
插頭的插件或插頭坐上有灰塵時,
請清潔乾淨。
會有導致起火的危險。
務必安裝在空氣流通順暢的地方。
在使用自然通風型爐灶等時,如果通風
不暢會引起煤氣中毒。
清潔灰塵
禁止運行
注意
空氣流通
抽油煙機與燃氣或其他燃具同時使用時,
必須保持通風順暢。
(只將空氣排放到室內的家電除外)
注意
空氣流通
請按照說明指示時常清潔本產品,
否則會有發生火災的危險。
時常清潔
不得在抽油煙機下做馥蘭(加酒燃燒)。
禁止馥蘭
本設備不是為殘疾人、有生理或精神障礙
者、以及缺乏相關知識經驗者(包括兒童)
設計的產品。因此上述對象者在使用本產
品時必須有監護人給與指導和說明,保證
安全使用。
請不要讓兒童玩耍本產品。
監護要求
本抽油煙機用於安裝在 1 個不超過有 4 個
電熱元件或燃燒器的爐盤上方,總電力在
7.0kW 以下。
少於4個燃
燒器(7.0kW)
不要灑水到通電部分。
會有導致起火、觸電的危險。
禁止灑水
不 要 連 接到 220V /230V /240V 以外
的電壓電源上。
會有導致起火、觸電的危險。

3
1F02 0982
在拔出插頭時,請拿著插頭拔,
不要拉電線部分。
電線如破損,會有導致起火或觸
電的危險。
如果電源線有破損,必須由製造商、
製造商的代理或具備相同資格的人來
更換,以免出現危險。
在使用炊具時,一些可接觸部分有可能被
烤熱。做飯時不要觸動過濾網或其周圍的
部分。
過濾網或其周圍的部分可能會滴油,從而
造成燒傷或傷害。
注意
長期不使用時務必把插頭從牆上的插座中
拔出,或切斷電源開關。
可能因絕緣體的劣化而導致起火或觸電的
危險。
拔出插頭
拿住插頭
拔出
安裝時注意
禁止使用
裝配時注意
禁止觸摸
在做飯時發生油著火的情況,
請立即關掉抽油煙機。
如果不立即關掉會有助長火勢
的危險。
禁止運行
戴手套
禁止
更換破損
電線
裝配時注意
禁止觸摸
禁止觸摸
在維修保養時務必戴上手套。
銳利的邊緣或拐角可能引起受傷。
必須保證電線是按照相關的標準或規定
佈線的。
不正確的佈線會導致起火或觸電的危險。
不要觸摸燈罩或其周圍的部分。
可能因高溫導致燙傷。
運行時,絕對不要把手指或其他
物體插進去。
會有導致破損或受傷的危險。
請不要把東西放置在抽油煙機上。
東西落下會有引起起火、破損、
或受傷的危險。
絕對不要在浴室等潮濕的地方使用本產品。
(浴室請使用排氣扇。)
會有導致起火或觸電的危險。
使用注意事項
使用炊具時務必開動抽油煙機。
否則會因昇溫過高導致抽油煙機損壞或不能使用。
不要在沒有使用炊具的情況下打開燃氣爐灶。
抽油煙機的機體會被烤熱,引起故障。
與電磁烹調爐一起使用時,可能會因側風的影響而導
致抽油煙性能減弱。同時,如果在低溫環境中使用,
抽油煙機的表面可能結露。
如果出現上述現象,請擦掉後再使用抽油煙機。
不要受讓空調的直風吹到。
否則會導致抽油煙的性能減弱。特別是電磁烹調爐幾
乎沒有上昇氣流,在開放的地方很容易受到影響。
在運行時,注意空氣流通。
在抽油煙機對面的牆上提供讓足夠空氣流通的進氣口,
或是把房間門敞開一些。否則會出現通風不夠,或異
常噪音 / 振動的現象。
保持燃氣熱水器距離抽油煙機 50 厘米以上。
燃氣熱水器周圍溫度會變得很高,保持 50 厘米以上
的距離。絕對不要把抽油煙機安裝在燃氣熱水器上方。
否則會因高溫而造成破損或不能使用。
不要在整流板拆下的狀態下使用抽油煙機。
否則會導致抽油煙的性能低下。
選擇牢固的地方安全地安裝本產品。
如果掉下會造成傷害。
要牢固地組裝配件。
如果掉落會有受傷的危險。

4
ຏ⸲⼭
ᡯ⃨
⯮ᝎ‗
፯
チฉ
ᓻᮾ
ဵᕦᆏ
⿌ᙁ༗ゑ
按 鍵
.........
停止排氣扇
按 鍵
.........
弱檔(蒸汽等)
按 鍵
.........
中檔(輕炒蔬菜等)
按 鍵
.........
高檔(烤魚等)
按 鍵
.........
照明開關
1
根據烹飪的需要按( ,
,或
)
其中的一個鍵。排氣扇開始旋轉。
2
停止排氣扇按
鍵。
3
如果想打開照明按
鍵。關閉時再按此鍵
一次。
運行抽油煙機
運行之前請檢查電源插頭是否插在牆上的插座。
在抽油煙機的前面有 5 個按鍵開關。
(圖示:FS-890V/890R)
零件的名稱
準備
開關
使用前
保養和維護
抽油煙機容易髒,請盡量經常清潔抽油煙機(特別是過濾網每月一次)。
如果是 4 到 5 個人的家庭,每天做飯 2 次,則過濾網需要兩個星期清潔一次。
如果抽油煙機長期不清潔,附著的油垢會硬化很難擦掉。
在清潔抽油煙機之前,請把電源插頭從插座中拔出,
或切斷電源開關。
為了安全,在清潔過濾網等時始終戴上橡膠手套。
特別注意不要讓摩打、開關、插頭等電器部分沾水。
維修注意事項
不要使用任何種類的液體清潔電器部分,以免
引起故障。
不要使用溶劑,如稀釋劑,揮發油,拋光粉等
清潔噴塗表面,面板等部分,以免使這些部分
失去光澤或留下擦痕。
• 不要用硬刷子等清潔用具,以免受到損傷。
請檢查儲油盤安裝的位置是否正確。
* 如果儲油盤的安裝不正確,將無法正常起作用。
儲油盤的安裝請參考第 6 頁。

5
1F02 0982
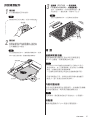
儲油盤
1
儲油盤
抓住儲油盤的把手向後滑。
注
儲油盤可能已經充滿油,在取下時請注意。
拆卸清潔配件
注
在取下過濾網時抓牢,以免滑落引起受傷。
3
過濾網(FS-700:1個過濾網 ,
FS-890V/890R:2個過濾網)
在拆下過濾網時,各個過濾網都要一邊
抓住旋鈕,一邊往後推,然後向下拉出。
整流板
裝配螺絲
扣拴
扣拴
過濾網
注
為了避免整流板掉下,請用兩手緊緊抓牢。如果
掉下可能引起負傷、碰傷或彎曲等事故。
2
整流板
鬆開安裝整流板的裝配螺絲,稍稍向
前移動整流板,讓裝配螺絲從裝配導
孔和機體扣拴中脫出。
注
FS-890V/890R 機型的過濾網可以分解成 2 部分,
更容易清洗。為了分解過濾網,按逆時針方向轉動
旋鈕,拉動旋鈕側打開過濾網罩。
* 在重新安裝時請務必保證先把過濾網組裝牢固。
因使用頻度的不同,在較短的使用時間內儲油量可
能很少(這不是產品的缺陷或故障)。
清潔
注
在清潔時,請把整流板放在平坦的地方,以免變形。
排風扇
清潔排風扇請向 Fujioh 或者代理商諮詢。
過濾網和儲油盤
把過濾網和儲油盤放在溫水中用洗滌液浸泡
30-40 分鐘後,用軟刷清洗掉污物。
外殼和整流器
先用中性洗滌劑浸泡並扭乾抹布,
然
後擦拭油煙機
的外殼和整流板,再用乾布徹底擦乾水份。

6
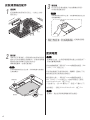
扣拴
整流板
扣拴
裝配導孔
儲油盤
1
過濾網
把過濾網的後部放到扣拴上,往後上方推,
固定到位。
安裝清潔後的配件
2
整流板
用兩手抓牢整流板,把整流板的後部放到扣拴
的前方和有安裝導孔的線軌中。然後向後滑動
整流板銜接安裝導孔並與扣拴咬合。
擰緊裝配螺絲,安裝好整流板。
注
必須保證整流板的安全安裝,如果有鬆動可能會發
生滑落事故。
3
儲油盤
抓住把手把儲油盤放入抽油煙機的滑道,
然後往裡面推到底。
注
如果儲油盤安裝得不正確,可能會導致儲油流出造
成損傷等事故。
* 清潔作業結束後,務必把電源還原;把電源插頭插
到牆上的插座裡,或打開電源開關。
更換電燈
該抽油煙機配備了飛利浦 Tornado 螺旋節能燈泡(8W
〔40W〕,E14 冷感日光)。
所使用的電燈已到使用壽命時,請購買、更換以下市
售的燈泡型熒光燈或者迷你燈泡。
燈泡型熒光燈……飛利浦 Tornado 螺旋節能燈泡(
8W〔40W〕,E14 冷感日光)或者同等產品【額定
220V/230V/240V 燈口 E14】
(可安裝尺寸:長 100 毫米以下,直徑 47 毫米以下)
迷你燈泡……額定 220V/230V/240V 燈口 E14
注
更換燈泡之前,必須把電源插頭從牆上的插座拔下,
或者切斷電源開關。
注
更換時,務必使用與電源電壓相同的燈泡。

7
1F02 0982
㈉㈉
ᡯ⃨
ҹ
❽
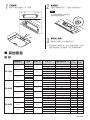
規格
其他信息
3
重新裝上燈罩
重新裝上燈罩,並用螺絲固定好。
*
燈泡更換作業結束後,務必把電源還原;把電
源插頭插到牆上的插座裡,或打開電源開關。
2
更換燈泡
逆時針旋轉燈泡取下,更換一個新的燈泡。
注
為了避免燒傷,請等燈泡
溫度降低後再更換。
1
打開燈罩
鬆開 2 個固定螺絲,取下燈罩。
* 功耗、風速和噪音為依據 JIS C9603 的測定值。
額定電壓 (V) 迴轉 頻率 (Hz) 功耗(W) 點燈時的耗電功率(W)
風速
(m
3
/h)
噪音
(dB)
FS-700V
220V
Hi
50
105 113 580 51
Me
75 83 435 44
Lo
55 63 345 38
230V
Hi
50
115 123 595 52
Me
80 88 460 45
Lo
60 68 365 39
240V
Hi
50
120 128 610 52
Me
85 93 480 46
Lo
65 73 380 41
FS-890V
220V
Hi
50
105 113 550 52
Me
75 83 420 45
Lo
55 63 330 40
230V
Hi
50
110 118 565 53
Me
80 88 445 47
Lo
60 68 350 41
240V
Hi
50
115 123 575 53
Me
85 93 460 48
Lo
60 68 370 42
FS-890R
220V
Hi
50
105 113 525 53
Me
75 83 405 46
Lo
55 63 320 40
230V
Hi
50
110 118 545 54
Me
80 88 425 47
Lo
60 68 340 42
240V
Hi
50
115 123 550 54
Me
85 93 440 49
Lo
60 68 355 43

8
5
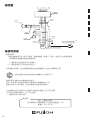
M
50Hz 220V/230V/240V
njᕦ
5A
ܪƆ⠘༗ゑ
(Type-BF)
⿌፯
50Hz 220V/230V/240V
ຏ⸲⼭
⭇ƘȬ ⼭
⯗ڄ
⯗ڄ
⯗ڄ
㏺
⿌ڄ
3.0mF 450V
ᡯ
8
᪁
⯗ڄ
ᾖ
፪
ቦ
㐁
╅
ᾖ
ᾖ
ቦ
㐁
㐁
╅
╅
ᮁ
ᮁ
㐁
㐁
ᾖ
፪
ቦ
ቦ
╅
፪
ቦ
╅
╅
維修和保修
需要維修時:
當抽油煙機運行時出現任何異常,請關掉開關,檢查以下各點,從插座上拔掉電源插頭,
與您購買抽油煙機的銷售店聯繫查詢。
(1) 斷路器中的保險絲是否已被燒毀?
(2) 電源插頭是否正確地插在插座上?
在與銷售店查詢時,請知會需要修理的抽油煙機類型 / 型號以及購買的日期。
最短維修配件提供期限為抽油煙機停止生產後 5 年。
維修配件是指維持抽油煙機性能的配件。
但是,具有相同功能的維修配件或更換配件將繼續提供 4 年。
維修後功能可以得以維持,我們將竭誠為您提供維修服務。
抽油煙機中使用的零部件可能會因改善性能而變更,恕不另行通知。
本手冊如有錯漏或更改,恕不另行通知。
一切翻譯以英文版本為準。
富士工業株式會社
日本國神奈川縣相模原市中央區淵野邊 2-1-9
郵編:252-0206
製造商:
線路圖
-
 1
1
-
 2
2
-
 3
3
-
 4
4
-
 5
5
-
 6
6
-
 7
7
-
 8
8
-
 9
9
-
 10
10
-
 11
11
-
 12
12
-
 13
13
-
 14
14
-
 15
15
-
 16
16


他の言語で
その他のドキュメント
-
 FOTILE JQG7502.G インストールガイド
-
FOTILE JQG7501.G インストールガイド
-
FOTILE JQG7505 インストールガイド
-
Fisher & Paykel FISHER PAYKEL OB60SDPTX1 60cm 16 Function Self Cleaning Oven ユーザーガイド
-
-
Siemens LI15021HK/01 ユーザーマニュアル
-
Candy CBT60A ユーザーマニュアル
-
AEG F99705VI1P ユーザーマニュアル
-
Ariston HNP 9.5 CM X ユーザーガイド
-
