TABLE OF CONTENTS
1F02 2482
*1F022482*
Safety Precautions ..................2~5
Maintenance ................................4
Cleaning ....................................... 5
Precautions on Use......................5
Preparation ..............................6, 7
Name of Parts ..........................6, 7
Switch ..........................................7
Installation .............................8~13
Preparation and Check
before Installation .....................8, 9
Cooker Hood Installation .......9~12
Operation Check ........................13
Maintenance ........................13~15
Caution for Maintenance ............ 13
Detaching
/
Attaching
Cleaned Parts ......................14, 15
Cleaning ..................................... 15
Other Information .................16, 17
Specifications ............................. 16
Circuit Diagram ..........................17
Service and Warranty.................17
Cooker Hood
Thank you very much for your purchase of our cooker hood.
Before installing/operating the cooker hood, please read
this Manual thoroughly.
Keep this manual in a convenient place for future reference.
To the sales shop/installer:
After installation, please
give this manual to the user
without fail.
Installation/Operation Manual
FR-FS1870/1890V (Ventilating Type)
FR-FS1870/1890VP (Ventilating Type)
FR-FS1890R (Recycling Type)

2
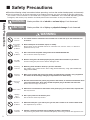
Safety Precautions
WARNING
Mounting work should be done by 2 persons minimum.
The weight of the cooker hood is about 19kg (FR-FS1870V/VP), 21kg (FR-FS1890V/VP),
20kg (FR-FS1890R).
Make sure to follow the wiring instructions and disconnect all poles using equipment
that meets the Overvoltage Category III requirements for fixed wiring.
Mounting
cautioned
Mounting
cautioned
Read the following safety instructions before operating, and use the cooker hood properly and securely.
These instructions are for correct operation of the product to prevent any risk of hazards or damages inflicting on
you or others. The instructions are classified into 2 categories as "WARNING" and "CAUTION" depending on their
emergency and severity. Pay attention and strictly observe the instructions as they are critical for safety.
Safety Precautions
Never attempt to disassemble, repair, or modify.
Entrust them to the qualified technician, otherwise fire, electric shock, or abnormal
performance may occur.
Disassembly,
repair, or
modification
prohibited
The cooker hood is intended to be installed over a hob with up to four hob elements
or burners.
Less than
4 burners
Don’t connect to the power voltage other than 220V/230V/240V AC.
Fire or electric shock may result in.
Using
prohibited
Be sure to disconnect the power plug from the wall outlet, or switch off the breaker when
care and maintenance. Also, don’t handle the power plug or breaker with wet hand.
Electric shock or injury may result in.
Disconnect
the plug
When dust accumulated on the blades of the power plug or on their roots, wipe off well.
Fire may result in.
Wipe off dust
When there may be a gas leak in your gas hob, don’t switch on or off the cooker hood.
Gas explosion may result in.
Operation
prohibited
Don’t spray water on the electric parts.
Fire or electric shock may result in.
Spraying
water
prohibited
Choose a mounting location where sufficient air flow is maintained.
CO poisoning may result if not ventilated adequately while using a natural vent type stove, etc.
Air supply
cautioned
Electric wiring must be made properly by the professional installer or personnel.
Incorrect wiring may be cause of electric leakage or fire.
Assembly
cautioned
WARNING
CAUTION
Alerts possible risk of death or serious injury, if not observed.
Alerts possible risk of injury or physical damage, if not observed.

3
Safety Precautions
1F02 2482
Be sure to disconnect the power plug from the wall outlet, or switch off the breaker
when not using for a long time.
Insulation may be deteriorated, and fire or electric shock may result in.
Disconnect
the plug
Disconnect
by holding
the plug
Accessible parts may become hot when used with cooking appliances.
Don’t touch the filter or parts around it while cooking.
The filter or parts may drop, and burn or injury may result in.
Using
prohibited
Ensure that electric wiring is made safely according to the standard or
regulations related.
Incorrect wiring may result in fire or electrical shock.
Assemble the fan or component parts securely.
Injury by dropping may result in.
When disconnecting the power plug, hold the plug itself. Don’t pull the cord anyway.
The cord may be damaged, and fire or electric shock may result in.
Assembly
cautioned
Assembly
cautioned
Contact
prohibited
Never use the product in a wet place such as bath room, etc. (Use a ventilation fan for
bath room.)
It may be cause of fire or failure if used.
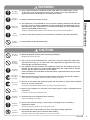
CAUTION
There shall be adequate ventilation of the room when the cooker hood is used
at the same time as appliances burning gas or other fuels. (Not applicable to
appliances that only discharge the air back into the room.)
Air supply
cautioned
Mounting
cautioned
Mount the product securely after selecting a solid place.
Dropping may result in injury.
Mounting
cautioned
Improper
discharge
prohibited
The minimum distance between the supporting surface for the cooking vessels on
the hob and the lowest part of the cooker hood. When the cooker hood is located
above a hob, this distance shall be at least 750mm.
If the instructions for installation for the hob specify a greater distance, this has to be
taken into account.
The air must not be discharged into a flue that is used for exhausting fumes from
appliances burning gas or other fuels (not applicable to appliances that only
discharge the air back into the room).
WARNING
This appliance is not intended for use by person (including children) with reduced
physical, sensory or mental capabilities, or lack of experience and knowledge, unless
they have been given supervision or instruction concerning use of the appliance by
a person responsible for their safety.
Children should be supervised to ensure that they do not play with the appliance.
Supervision
requested
Exhaust adjustment must be ensured.
Ensure
adjustment
There is a fire risk if cleaning is not carried out in accordance with the instructions.
Clean
frequently
Do not flambé under the cooker hood.
Flambé
prohibited

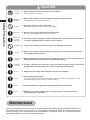
4
Safety Precautions
CAUTION
Caution
Caution
Caution
Caution
Caution
Mounting
cautioned
Mounting
cautioned
When the oil reaches one half of the oil tray, it must be cleaned to prevent overflow
and oil dripping during removal.
During installation, the hook and plastic expansion pipe (on the concrete wall) must be
matched with the product to prevent the product from falling.
In order to prevent the product from falling, the plastic expansion pipe used must be
equipped with a corresponding drill bit with a minimal gap between them.
Regulations concerning the discharged of air have to be fulfilled.
Use attachment screws only.
If you fail to follow the instructions provided in this manual when installing other screws
or fixed equipment, it may cause an electrical hazard.
Contact FUJIOH or an agent when changing LED lamps in this product.
Disconnect the power supply before cleaning, repairing, replacing light bulb
or dismantling the range hood.
Prohibited
To avoid eye damage, do not look directly at the LED light while it is on.
If the power cord is damaged, it must be replaced by the manufacturer, its service agent
or similarly qualified persons in order to avoid a hazard.
Replace the
cord if it’s
damaged
Wear gloves
Be sure to wear gloves when care and maintenance.
Injury by the sharp edges or corners may result in.
Prohibited
Do not put anything on the cooker hood.
It may be cause of fire, failure, or injury by dropping.
Operation
prohibited
Switch off the cooker hood at once when oil caught fire while cooking.
It’s dangerous if not stop as fire is built up.
Contact
prohibited
During operation, never insert fingers or other objects.
Failure or injury may result in.
Maintenance
Clean the cooker hood as many times as possible (especially, clean the filter once every month) as it
will become very dirty. For a family size of 4 to 5 people and cooking twice a day, clean the filter once
every two weeks. If the cooker hood is left unattended for a long time, much oil is accumulated and it
will become difficult to remove the hardened grease.

5
Safety Precautions
1F02 2482
Operate the cooker hood without fail when using cooking wares.
Otherwise, it may be cause of the cooker hood damage or failure by increased temperature.
Don’t use a gas range with nothing put on it.
The body of the cooker hood is heated, and it may cause trouble.
Prevent influence of direct wind from air conditioner.
Smoke capturing performance may be deteriorated if influenced. Especially, as the Induction
Heater (IH) provides nearly no ascending air current, it is easily influenced in open place.
When using with the Induction Heater (IH), smoke capturing performance may be
deteriorated by influence of cross wind. Also, the surface of the cooker hood may be
dew condensation if it is used in low temperature.
In this case, use the cooker hood after wiping off.
During operation, pay attention to sufficient air supply.
Provide adequate air intake slots on the wall opposite from the cooker hood, or open the door
of the room a little. Otherwise, ventilation performance may be deteriorated, or abnormal noise/
vibration may result in.
Separate gas heater more than 500mm from the cooker hood.
As the around of gas heater becomes high temperature, separate more than 500mm.
Never install the cooker hood above gas heater. If not, it may be cause of the cooker hood
damage or failure by increased temperature.
Do not use the cooker hood with its rectifier panel removed.
Smoke capturing performance may be deteriorated.
Precautions on Use
Cleaning
Fan
As for cleaning of the fan, please consult Fujioh/Agent.
Hood body
When cleaning, use a neutral detergent and soft cloth.
Do not use an organic solvent. After cleaning, wipe the hood well with a wet cloth dipped in water to
remove any remaining detergent, and finally thoroughly wipe any moisture off using a dry cloth.
Note
When cleaning the rectifier panel, perform it on a flat surface in order not to deform it.
Oil tray/Rectifier panel/Filter
When cleaning, use a neutral detergent and soft cloth.
Do not use an organic solvent. After cleaning, wash off with water to remove all remaining detergent,
and finally thoroughly wipe any moisture off using a dry cloth.

6
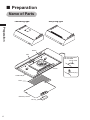
Preparation
Preparation
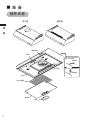
Name of Parts
Ventilating type Recycling type
LED
Switch
Filter
Rectifier panel
Oil tray
Fan
Hood body
Power plug
FR-FS1870/1890VP
FR-FS1870/1890V
FR-FS1890R
Power cord

7
Preparation
1F02 2482
FR-FS1870V/VP, FR-FS1890V/VP (Ventilating type)
Name Usage Usage Quantity
Main unit
—
1
Exhaust port Connecting the main unit and the duct 1
Soft tape Sealing the exhaust port and the duct 1
Washer-head wood screw (
∅
5.1×45) Mounting the main unit 4
Mounting bracket Mounting the main unit 2
Oil tray
—
1
FR-FS1890R
(Recycling type)
Name Usage Usage Quantity
Main unit
—
1
Washer-head wood screw (
∅
5.1×45) Mounting the main unit 4
Mounting bracket Mounting the main unit 2
Oil tray
—
1
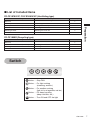
Switch
List of Included Items
Button .....Stop FAN
Button .....For light cooking
(steaming, and etc.)
Button .....For medium cooking
(light stir-fry of vegetable, and etc.)
Button .....For heavy cooking
(deep fried fish, etc.)
Button .....Turn ON and OFF the light

8
Installation
Installation
1. Mount the cooker hood carefully and avoid contact with any metal parts (the lath in the wall or the
like) of the building.
2. Never embed the body of the cooker hood in the wall. Otherwise, leakage current in the wall, if any,
flows to the body of the cooker hood.
3. The air must not be discharged into a flue that is used for exhausting fumes from appliances burning
gas or other fuels (not applicable to appliances that only discharge the air back into the room).
4. The minimum distance between the supporting surface for the cooking vessels on the hob and the
lowest part of the cooker hood. When the cooker hood is located above a hob, this distance shall be
at least 750mm.
If the instructions for installation for the hob specify a greater distance, this has to be taken into
account.
5. Use a gas range having a narrower width than that of the cooker hood.
6. Avoid using the cooker hood with changes in the specification, for instance, with modifying the
switch.
7. Do not install the cooker hood in a wet area or in other wet rooms since it may result in electric
shock or damage.
8. Do not install the cooker hood at a place where its ambient temperature exceeds 40°C, otherwise it
may result in failure.
9. To protect your hands from injury, wear working gloves when installing the cooker hood.
10. If the power cord is damaged, it must be replaced by the manufacturer or its service agent or a
similarly qualified person in order to avoid a hazard.
Preparation and Check before Installation
CAUTION
Checking mounting surface strength
The mounting surface should have sufficient strength enough to support the cooker hood.
Mount the cooker hood on a place durable to support the weight of the cooker hood.
[Product weight 19kg (FR-FS1870V/VP), 21kg (FR-FS1890V/VP), 20kg (FR-FS1890R)]
In the case of boarded wall
If the thickness is more than 20mm, mount the cooker hood directly to the wall.
If the thickness is less than 20mm, embed a reinforcing board and mount the cooker hood to
this board.
In the case of a concrete/tile faced wall
Embed a reinforcing board in the wall in advance, or use a curl plug or the like.
Power supply
This product does not include a power plug. Please have a qualified technician attach a power plug to the
power cord. (FR-FS1870/1890V, FR-FS1890R only)
Be sure to use tha wall outlet only for the cooker hood.
Checking accessory parts
Take out the main unit and accessory parts from the packing box, and check whether there is any shortage.

9
Installation
1F02 2482
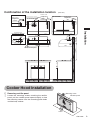
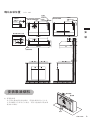
(Unit: mm)
Confirmation of the installation location
Cooker hood
mounting hole detailed
Power
Length:1m
270/365
FR-FS1890R
FR-FS1870/1890VP
FR-FS1870/1890V
145
R4
R9
12
18.4
170
610/800
700/890
170
30
2-9
148
550
180
75
(750)
270/365165
110
365
Body Mounting Hole
Power cord
Length:1m
Power cord
Length:1m
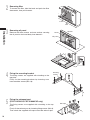
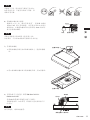
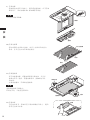
Cooker Hood Installation
Catch
Rectifier panel
Mounting screw
1
Removing rectifier panel
Loosen the mounting screws attaching the rectifier
panel, pull the rectifier panel upward slightly to free
the mounting screws from the mounting guide holes
and the body catches.

10
Installation
Soft tape
Catch
filter
Mounting
bracket
Oil panel
Washer
Screw
2
Removing filter
To remove the filter, hold the knob and push the filter
downwards, then pull forwards.
3
Removing oil panel
Remove the three screws and one washer securing
the oil panel to the hood body, then detach it.
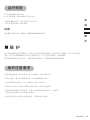
4
Fixing the mounting bracket
The fixing screws are supplied with attaching to the
top plate.
Firmly fix the mounting brackets by fastening truss
head machine screws (M5
×
10).
5
Fixing the exhauset port
(FR-FS1870V/VP, FR-FS1890V/VP only)
The fixing screws are supplied with attaching to the top
plate.
Firmly fix the exhaust port by fastening fixing screws (M4
×
8).
Then attach the supplied soft tape around the exhaust port.

11
Installation
1F02 2482
Correct
Wrong
Note
When attaching the exhaust port, pay
attention to its shutter opening direction.
If it's installed incorrectly, it may cause
bad discharge, abnormal noise, etc.
Note
Please use suitable accessories during installation (refer to page 7).
May add or opt for other accessories as reinforcement when necessary.
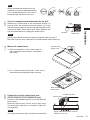
6
Screw in washer-head wood screws on the wall
Referring to "Confirmation of the installation location" on
page 9, insert the washer-head wood screws (
∅
5.1×45)
into the mounting wall for the left and right keyholes of the
mounting bracket. Allow about 5mm space between the
wall and screwheads for hanging the cooker hood.
Washer-head
wood screw
Ke
yhole
5mm
7
Mount the cooker hood
1) Hook the keyholes of the cooker hood on
the washer-head wood screws, and tighten
the screws.
W
asher-head
W
ood screw
W
asher-head
W
ood screw
2) Put 2 washer-head wood screws to the rear of
the cooker hood and tighten them securely.
8
Connection of duct and exhaust port
(FR-FS1870V/VP, FR-FS1890V/VP only)
Connect
∅
150 flexible tube duct or the like with the
exhaust port.
Make the exhaust port secure and air-tight using
non-flammable tape such as aluminium tape, etc.
(not supplied)
Note
The longer the exhaust duct, the lower the ventilation.
Exhaust por
t
Flexible tube duct
Ta ping with nonflammable materials
(Aluminum tape, etc.)

12
Installation
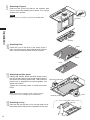
12
Attaching oil tray
Hold the tab and set the oil tray on the guide rail of
the cooker hood, then push it completely to the end.
Oil tray
Mounting guide hole
Catch
Rectifier panel
11
Attaching rectifier panel
Holding the rectifier panel with both hands, place
the rear of the panel in front of the catches and in
line with the mounting guide holes. Then slide the
panel back to engage the mounting guides and
attach the catches.
Tighten the mounting screw to attach the panel
firmly.
Note
Make sure that the rectifier panel is fixed securely.
It may be a cause of dropping if not fixed firmly.
9
Attaching oil panel
Hook the rear of the oil panel on the catches, then
raise its front. With holding the oil panel, fix it using 3
screws and 1 washer.
Oil panel
Washer
Note
Make sure that a washer is used at the middle hole.
Catch
Filter
Hook
10
Attaching filter
Place the rear of the filter in the catch, push it
back and upward and then slide forward until the
filter is firmly hold by the hook and set in place.

13
Maintenance
1F02 2482
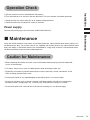
1) Please install the oil tray matched with the product.
2) Turn the breaker to on and start the test operation. Turn on a breaker and check operation.
•
Check that the fan rotates normally at all speeds during operation.
•
Check that there are no abnormal sound or vibration.
Operation Check
Caution for Maintenance
Maintenance
Clean the cooker hood as many times as possible (especially, clean the filter once every month) as it
will become very dirty. For a family size of 4 to 5 people and cooking twice a day, clean the filter once
every two weeks. If the cooker hood is left unattended for a long time, much oil is accumulated and it
will become difficult to remove the hardened grease.
• Before cleaning the cooker hood, be sure to disconnect the power plug from the receptacle,
or turn off the breaker.
• For safety, always wear a pair of rubber gloves while cleaning the filter, etc.
• Especially, be careful to prevent electric parts such as the motor, switch, connectors or the
like from being splashed with water.
• Do not spray liquid of any type detergent to the electric parts. It’s cause trouble.
• Do not use solvents such as thinner, benzine, polishing powder or the like for cleaning the
painted surfaces, facing plates, etc. as these parts may become lusterless or scored.
• Do not wash parts with a hard brush or the like for cleaning as it can be damaging.
Installation
Power supply
Connect the power plug to the wall outlet (220V/230V/240V AC).

14
Maintenance
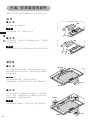
Attaching
Rectifier Panel
Detaching
Loosen the mounting screws attaching the rectifier
panel, move the rectifier panel forward slightly to free the
mounting screws from the mounting guide holes and the
body catches.
Note
Make sure that the rectifier panel is fixed securely. It
may be a cause of dropping if not fixed firmly.
Note
In order not to drop the rectifier panel, hold it by both
hands securely. If dropped, it may be a cause of injury,
flaw or warp of parts, etc.
Holding the rectifier panel with both hands, place the
rear of the panel in front of the catches and in line with
the mounting guide holes. Then slide the panel back to
engage the mounting guides and attach the catches.
Tighten the mounting screw to attach the panel firmly.
Catch
Mounting screw
Rectifier panel
Mounting guide hole
Catc
h
Rectifier panel
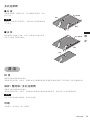
Install all parts using the opposite procedure as that for removing the parts.
Oil Tray
Detaching
/
Attaching Cleaned Parts
Note
The tray may be filled with oil, so be careful when removing it.
Note
If the oil tray is not installed properly, it may result in oil-drip,
injury by dropping, etc.
Attaching
Hold the tab and set the oil tray on the guide rail of the cooker
hood, then push it completely to the end.
Detaching
Hold the oil tray at its tab and slide forward.
Oil tray
Oil tray

15
Maintenance
1F02 2482
Attaching
Note
Be sure to hold the filter with hand when removing it.
Otherwise, it may drop and result in injury.
Filter
Place the rear of the filter in the catch, push it back and
upward and then slide forward until the filter is firmly
hold by the hook and set in place.
Detaching
To remove the filter, hold the knob and push the filter
backwards, then pull downwards.
Spring
Knob
Filter
Catch
Filter
Hook
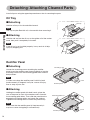
Cleaning
Fan
As for cleaning of the fan, please consult Fujioh/Agent.
Hood body
When cleaning, use a neutral detergent and soft cloth.
Do not use an organic solvent. After cleaning, wipe the hood well with a wet cloth dipped in water to
remove any remaining detergent, and finally thoroughly wipe any moisture off using a dry cloth.
Note
When cleaning the rectifier panel, perform it on a flat surface in order not to deform it.
Oil tray/Rectifier panel/Filter
When cleaning, use a neutral detergent and soft cloth.
Do not use an organic solvent. After cleaning, wash off with water to remove all remaining detergent,
and finally thoroughly wipe any moisture off using a dry cloth.

16
Other Information
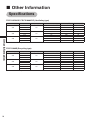
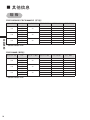
Specifications
Rated Voltage (V) Speed Frequency (Hz)
Power Consumption
(W) Air Flow (m
3
/h) Sound (dB)
220
Hi
50
92 500 57
Med 67 425 53
Low 52 350 47
230
Hi
50
97 505 58
Med 71 435 54
Low 56 365 48
240
Hi
50
103 510 59
Med 75 450 54
Low 59 380 49
FR-FS1870V/VP, FR-FS1890V/VP (Ventilating type)
Rated Voltage (V) Speed Frequency (Hz)
Power Consumption
(W) Air Flow (m
3
/h) Sound (dB)
220
Hi
50
92 500 56
Med 67 430 52
Low 52 355 47
230
Hi
50
97 505 57
Med 71 440 53
Low 56 370 48
240
Hi
50
103 510 57
Med 75 450 54
Low 59 385 49
FR-FS1890R (Recycling type)
*
with 3.5 watts for lamp
*
with 3.5 watts for lamp
Other Information

17
Other Information
1F02 2482
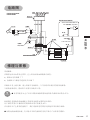
Green/Yellow
Rod terminal
50Hz
220V/230V/240V
Black
Black
White
Red
Blue
Orange
Brown Brown
Blue
White
Orange
Blue
Brown Red
Red
Brown
Orange
Black
Blue
Red
Brown
Green/Yellow
Blue
Blue Black
Red
Black
Red
Black
Black
M
Motor
50Hz 220V/230V/240V
LED power
supply
LED light
Brown
Green
Blue
Brown
Blue
FUSE2
FUSE1
Fuse board
Fuse box
50Hz 220V/230V/240V AC
13A 3pin Plug (Type-BF)
LIGHT Hi Me Lo OFF
FR-FS1870/1890VP
FR-FS1870/1890V
FR-FS1890R
Connector
Push Button Switch
Connector
Connector
Connector
Capacitor
3.0µF 450V
Circuit Diagram
Service and Warranty
When requesting after sales service:
• If any abnormality occurs while the cooker hood is in operation, switch off the cooker hood to run,
check the following points, disconnect the power plug from the receptacle and consult the shop from
which you have purchased your cooker hood.
(1) Whether the fuse in the circuit breaker has been burnt out?
(2) Whether the power plug is not in proper contact with the receptacle?
When consulting the shop, inform the shop the type/model of cooker hood requiring repair and the date
when it was purchased.
• The minimum retention period of performance parts for repairing the cooker hood is
5 years after termination of manufacturing of the cooker hood.
The performance parts refer to those parts for required to maintain the functions of a cooker hood.
However the same kinds of repair parts or interchangeable parts will be supplied for 4 years thereafter.
If the functions can be maintained when repaired, we are willing to repair when ordered by you.
• The parts used on the cooker hood are subject to partial change without prior notice owing to
improvement of performance.
5
years


朕 村
1F02 2482
*1F022482*
芦畠廣吭並㍻ ...........................2~5
略 擦 ..................................................4
賠 準 ..................................................5
聞喘倬岑 ...........................................5
彈 姥 ........................................6, 7
何周兆各 .......................................6, 7
荷恬梓囚 ...........................................7
芦 廾 ......................................8~13
芦廾念議彈姥才殊臥 ...................8, 9
芦廾簾嗟冖字 ............................ 9~12
塰佩殊臥 .........................................13
略 擦 ....................................13~15
略擦廣吭並㍻ .................................13
蛍宣 / 芦廾勣賠牢何周 ............14, 15
賠 準 ................................................15
凪麿佚連 ..............................16, 17
号 鯉 ................................................16
窮揃夕 .............................................17
俐尖嚥隠俐 .....................................17
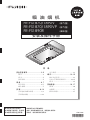
簾 嗟 冖 字
湖仍杭択云巷望簾嗟冖字。
芦廾 / 荷恬簾嗟冖字岻念,萩宥響緩傍苧慕。
堋響朔,萩要鋲隠砿緩傍苧慕。
彰御巣弁糾式芦廾汽了:
壓芦廾仏垢潤崩朔,暦駅萩
繍云聞喘傍苧慕格住綱人。
芦廾式荷恬返過
FR-FS1870/1890V
(電賑侏)
FR-FS1870/1890VP
(電賑侏)
FR-FS1890R
(儉桟侏)

2
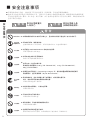
少 御
哘崛富喇 2 繁序佩芦廾垢恬。
簾嗟冖字議嶷楚埃葎 19kg(FR-FS1870V/VP), 21kg(FR-FS1890V/VP),
20kg(FR-FS1890R)。
委諾怎狛窮儿嶽窃Ⅲ(Overvoltage category Ⅲ)訳周議廾崔梓孚塘㌔号夸怏廾崛
耕協塘㌔嶄,序佩曾自侯僅(all pole disconnection)。
廣吭芦廾
廣吭芦廾
芦廾式聞喘云恢瞳念,哘堋響參和芦畠廣吭並㍻,參宴屎鳩、芦畠仇芦廾簾嗟冖字。
宸乂芦畠廣吭並㍻崋壓屎鳩芦廾云恢瞳,參契斤徭失賜麿繁夛撹裡⑫賜彬墾。功象裡⑫來才鱒墾殻業,
芦畠廣吭並㍻蛍葎 " 少御 " 才 " 廣吭 " 曾倖吉雫。 喇噐宸乂廣吭並㍻斤噐芦畠崛購嶷勣,咀緩暦駅紗參廣
吭旺冢鯉嚠參恆便。
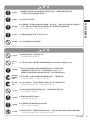
■ 芦畠廣吭並㍻
俳齢徭佩介亢、俐尖賜個強。
哘萩栽鯉室宝繁埀序佩荷恬,倦夸辛嬬夛撹諮墻、窮似賜呟械秤趨。
冢鋤介亢、
俐尖賜個強
云簾嗟冖字議譜柴哘芦廾噐俗尺岻貧,拝乎俗尺貧恷謹音階狛膨倖窮夥遊賜俗徨。
4 凛俗夥參和
窮儿階狛 220V/230V/240V AC 議仇圭鋤峭聞喘。
倦夸辛嬬夛撹諮墻賜窮似。
鋤峭聞喘
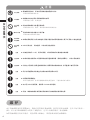
隠劍才略擦扮,暦駅貫峨恙貧偉和窮坿峨遊,賜購液僅窮匂蝕購。
緩翌,萩齢喘物返俊乾窮坿峨遊賜僅窮匂。
倦夸氏擬崑窮似賜繁附彬墾。
偉和窮坿
峨遊
哘将械賠準窮坿峨遊,參窒子馨持詔。
倦夸氏擬崑諮墻。
価茅子馨
炭賑亶息扮,冢鋤荷恬簾嗟冖字議蝕購。
倦夸氏夛撹炭賑卯姆。
冢鋤荷恬
冢鋤㏍販採窮徨何周島邦。
倦夸氏夛撹諮墻賜窮似。
冢鋤島邦
僉夲宥欠措挫議了崔序佩芦廾。
聞喘徭隼電賑塀俗醤吉扮,泌惚宥欠算賑音措氏夛撹匯剳晒娘嶄蕎。
廣吭宥欠
駅倬喇廨匍芦廾繁埀屎鳩下㌔。
下㌔音輝辛嬬夛撹息窮賜諮墻。
廣吭怏廾
少 御 廣 吭
燕幣氏擬崑嶷寄
繁附彬蘭。
燕幣氏擬崑繁附
彬墾賜麗瞳鱒撒。
ページが読み込まれています...
ページが読み込まれています...
ページが読み込まれています...
ページが読み込まれています...
ページが読み込まれています...
ページが読み込まれています...
ページが読み込まれています...
ページが読み込まれています...
ページが読み込まれています...
ページが読み込まれています...
ページが読み込まれています...
ページが読み込まれています...
ページが読み込まれています...
ページが読み込まれています...
ページが読み込まれています...
ページが読み込まれています...
-
 1
1
-
 2
2
-
 3
3
-
 4
4
-
 5
5
-
 6
6
-
 7
7
-
 8
8
-
 9
9
-
 10
10
-
 11
11
-
 12
12
-
 13
13
-
 14
14
-
 15
15
-
 16
16
-
 17
17
-
 18
18
-
 19
19
-
 20
20
-
 21
21
-
 22
22
-
 23
23
-
 24
24
-
 25
25
-
 26
26
-
 27
27
-
 28
28
-
 29
29
-
 30
30
-
 31
31
-
 32
32
-
 33
33
-
 34
34
-
 35
35
-
 36
36