
使用说明..........................................5
Operating Instructions.....................8
170 26 8310 - 1208
FSR 200 Intec

2
FSR 200 Intec
mm (in) 114 x 102 (3
1
/2 x 4)
14
A
W200
P
1
W80
P
2
min
-1
(rpm) 26.000
s
0
min
-1
(rpm) 22.000
s
1
mm (in) 1,4 (
1
/16)
S
-
Intec
kg (lbs) 1,25 (2.76)
m
m/s
2
a
hw
dB(A) 76 / 3
3,5
L
pA
/K
pA
EN 60745
98/37EG, 89/336/EWG
Erhard Krauß, Geschäftsführung
© 2006 Metabowerke GmbH, Postfach 1229, 72602 Nürtingen, Germany
麦太保有限公司,德国约廷根
D-72602

3
1
2
3
4
6
8
3
75

4
E
GF
6.25657
6.25601
6.25602
A
CB
D
10 x P 40 . . . . 6.25619
10 x P 60 . . . . 6.25620
10 x P 80 . . . . 6.25621
10 x P 100 . . . . 6.25622
10 x P 120 . . . . 6.25623
10 x P 180 . . . . 6.25624
10 x P 240 . . . . 6.25625
10 x P 320. . . . 6.25626
10 x P 400 . . . . 6.25627
2 x P 40 +
2 x P 80 +
2 x P 120 +
2 x P 180 +
2 x P 240 . . . . 6.25628
10 x P 40 . . . . 6.25629
10 x P 60 . . . . 6.25630
10 x P 80 . . . . 6.25631
10 x P 100 . . . . 6.25632
10 x P 120 . . . . 6.25633
10 x P 180 . . . . 6.25634
10 x P 240 . . . . 6.25635
10 x P 320. . . . 6.25636
10 x P 400 . . . . 6.25637
2 x P 40 +
2 x P 80 +
2 x P 120 +
2 x P 180 +
2 x P 240 . . . . 6.25638
10 x P 40 . . . . 6.25639
10 x P 60 . . . . 6.25640
10 x P 80 . . . . 6.25641
10 x P 100 . . . . 6.25642
10 x P 120 . . . . 6.25643
10 x P 180 . . . . 6.25644
10 x P 240 . . . . 6.25645
10 x P 320. . . . 6.25646
2 x P 40 +
2 x P 80 +
2 x P 120 +
2 x P 180 +
2 x P 240 . . . . 6.25647
10 x P 40 . . . . 6.25648
10 x P 60 . . . . 6.25649
10 x P 80 . . . . 6.25650
10 x P 100 . . . . 6.25651
10 x P 120 . . . . 6.25652
10 x P 180 . . . . 6.25653
10 x P 240 . . . . 6.25654
10 x P 320. . . . 6.25655
2 x P 40 +
2 x P 80 +
2 x P 120 +
2 x P 180 +
2 x P 240 . . . . 6.25656
6.26996
I
H

5
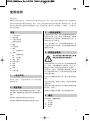
使用说明
亲爱的用户:
感谢您对本公司的信任,并购买本公司的麦太保电动工具!每一台麦太保的工具都已经过麦太保质保部门
详细的检验测试及严格的品质控制。然而,电动工具的使用寿命与您如何来使用它是息息相关的。因此请
您务必注意本说明书及附带文献所提供的信息。当您使用麦太保电动工具时越细心、越得法,它为您效力
的时间也就越长。
内容
1
一致性声明
2
规定用途
3
一般安全规则
4
特殊安全规则
5
概述
6
产品特性
7
调试
7.1
安装砂轮片
8
使用
8.1
接通和切断
8.2
吸尘器
9 清洁,维护
10 提示与技巧
11 配件
12
修理
13
环保
14
技术规格
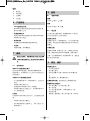
1 一致性声明
作为唯一责任人,我们特此声明,本产品符合第
2
页所列标准。
2 规定用途
本机器适用于对平面和椭圆表面以及木料,塑料,
有色金属,薄钢板等其它类似的实心涂漆表面的干
打磨。
因使用不当造成的损坏责任由用户自负。
必须遵守通用事故预防规章和附带的安全资料。
3 一般安全规则
在使用本电动工具前,请先仔细通读和熟悉附带的
所有安全资料(红色小手册)和使用说明。妥善保
管所有附带文件以备参考,如需转交电动工具,必
须将这些文件一同转交。
对于Y型连接的工具,当有必要更换电源线时,为
了避免对安全性产生危害,必须由制造商或其他代
理商进行更换。
4 特殊安全规则
为了您的安全及保护您的电动工具,请
特别注意有此警示标志的地方!
在操作过程中所产生的粉尘对人的身体健康是有害
的,(例如:在处理橡树和山毛榉木材、石头、金
属或进行油漆工作时所包含的铅或其它有毒料。)
是不能进入人体的。请使用吸尘装置并戴上防尘面
罩。彻底清除所有积尘,例如用带有适当吸入装置
的吸尘器来清洁。
在进行任何调整或保养工作前,请先从插座中拔出
插头。
对于长时间作业,请戴上护耳器。长时间的高噪音
会影响听力。
请勿采用在处理过程中会产生有害粉尘或蒸气的物
料(例如:石棉)。
请保持工件稳固以防滑落,例如使用紧固设备。
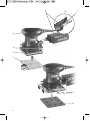
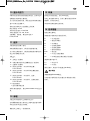
5 概述
参见第
3
页(请翻到第
3
页)。
1
砂轮片
2
支承盘
3
紧固柄
4
开关

6
5
储尘盒
6
清洁折板
7
过滤槽
8
打孔器
6 产品特性
•
Intec
组合吸尘系统
拥有
Intec
过滤系统的组合吸尘系统无须吸尘管
便可完成吸尘工作。
• 快速更换砂轮片
适用于具有
velcro
型紧固以及不具有
velcro
型紧
固砂轮片的支承盘。
• 使用寿命长
高质量防尘滚珠轴承连续使用寿命长。
• 功效学
柄部有减振,防滑橡胶层。
7 调试
在接上电源前,请查看额定主电压及主频率
(标明在额定值标签上)是否与供应电源相吻
合。
7.1
安装砂轮片
具有
velcro
型紧固的打磨片
由于具有
velcro
型紧固,安装和拆卸都很简单。
按住砂轮片,并使砂轮片(
1
)上的孔与支承盘(
2
)上
的孔相吻合。
不具有
velcro
型紧固的打磨片
- 向下旋转紧固柄(
3
)(见第
3
页图示)。以此打开
夹轨。
- 将砂轮片滑至夹轨下方。
- 用紧固柄(
3
)将砂轮片从另一侧夹紧。
- 将砂轮片紧贴于支承盘上方,并用紧固柄(
3
)从
另一侧将其固定。
打孔器
打孔器可对无孔砂轮片进行打孔,以达到吸尘的效
果。
- 将砂轮片安装在打磨机上。
- 将打磨机放置在打孔器(
8
)上,并向下按压(见
第
3
页图示)。
8 使用
8.1
接通和切断
接通:
将开关(
4
)移至 "
I
" 位置。
切断:
将开关(
4
)移至 "
O
" 位置。
8.2
吸尘器
为了优化吸尘器的性能,请调整砂轮片(
1
)使其上
的孔与支承盘(
2
)上的孔相吻合。
组合吸尘系统:
安装储尘盒(
5
)(见第
3
页图示)。为了优化吸尘器
的性能,请在适当的时候清空储尘盒(
5
)并清洁过
滤槽(
7
)。
外接吸尘器:
安装吸尘喷嘴(见配件这一章)。连接适合的吸尘
设备。请使用直径为
35 mm
的吸嘴。见配件部分。
注意:在打磨研磨材料(例如塑料等)时,建议连
接上适当的吸尘器。
9 清洁,维护
清空储尘盒(
5
)。
- 打开清洁折板(
6
)。
- 清空储尘盒(
5
)。
- 拆除过滤槽(
7
)并敲下或用刷子刷下附着的灰
尘。
- 插过滤槽(
7
)时,确保横向插入。
定期清洁本机器。包括对电机上通风槽的清洁。
更换损坏的支承盘(
2
)
- 卸下固定螺钉(位于支承盘下侧)。
- 取下支承盘。
- 关于支承盘(更换用),请参阅配件这一章。
- 安装支承盘。
- 重新装上固定螺钉(位于支承盘下侧)并拧紧。

7
10 提示与技巧
不要将设备与要打磨的表面压得太紧。这样不但不
会增强反而会降低打磨性能。
为了优化吸尘器的性能,请在适当的时候清空储尘
盒(
5
)并清洁过滤槽(
7
)。
使用合适的砂轮片以达到最佳工作效果:
除去旧漆层 = P 40
对木料的前打磨 = P 60, P80
木料打磨结束 = P 100, P 120
打磨薄板,密封胶,填充剂和油漆 =
P 180, P 240
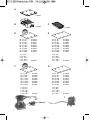
11 配件
只能使用麦太保原厂配件。
如果您需要任何配件,请与您的经销商协商。
为了购买正确的配件,请告知经销商您所拥有的电
动工具的准确型号名称。
见第
4
页。
A
支承盘(更换用)
B
可做多重清洁的带过滤槽储尘盒(更换用)
C
过滤槽(更换用)
D
穿孔粘合砂轮片(用于木料和金属),
115 x 103 mm
E
穿孔粘合砂轮片(用于木料和金属及紧固),
115 x 140 mm
F
穿孔粘合砂轮片(用于涂料,油漆),
115 x 103 mm
G
穿孔粘合砂轮片(用于涂料,油漆及紧固),
115 x 140 mm
H
吸尘器连接
I
麦太保通用吸尘器
如需了解全部配件,请见
www.metabo.com
或主目
录。
12 修理
只能由具有资质的电工修理电动工具!
任何需要修理的麦太保电动工具都可送到备件清单
中列出的某个地址进行修理。
请随电动工具附上一份故障说明。
13 环保
所有麦太保的包装品,皆可
100%
回收。
电动工具或配件用坏后,含有大量有价值的材料和
塑胶等,皆可回收再生。
本说明书使用无氯再生纸印刷。
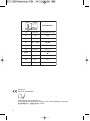
14 技术规格
规格注释见第
2
页。
保留因技术发展而进行变更的权利。
D = 支承盘直径
P1 = 额定功率输入
P
2 = 功率输出
s0 = 空载轨道频率
s
1 = 负载轨道频率
S=振动电路直径
Intec = 储尘盒
m=不含主电缆的重量
ahw = 手臂范围区的典型预估计加速度
典型
A
荷重声音水平:
L
pA = 声压水平
K
pA = 不安全
操作过程中,噪音水平可能超过
85 dB (A)
。
戴护耳器!
测量值依据
EN 60745
确定。
引用的技术资料皆含有公差值在内(依据相关有效
标准)。

8
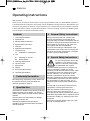
Operating Instructions
Dear Customer,
Thank you for the trust you have placed in us by buying a Metabo power tool. Each Metabo power tool
is carefully tested and subject to strict quality controls by Metabo's quality assurance. Nevertheless, the
service life of a power tool depends to a great extent on you. Please observe the information contained
in these instructions and the enclosed documentation. The more carefully you treat your Metabo power
tool, the longer it will provide dependable service.
Contents
1 Conformity Declaration
2 Specified Use
3 General Safety Instructions
4 Special Safety Instructions
5 Overview
6 Special Product Features
7 Commissioning
7.1 Installation of sanding disc
8 Use
8.1 Switching On and Off
8.2 Dust extraction
9 Cleaning, Maintenance
10 Tips and Tricks
11 Accessories
12 Repairs
13 Environmental Protection
14 Technical Specifications
1 Conformity Declaration
We, being solely responsible, hereby declare that
this product conforms to the standards and
directives specified on page 2.
2 Specified Use
The machine is suitable for dry sanding of flat and
elliptical surfaces, wood, plastics, non-ferrous
metals, sheet metal and similar filled and painted
surfaces.
The user bears sole responsibility for damage
caused by improper use.
Generally accepted accident prevention
regulations and the enclosed safety information
must be observed.
3 General Safety Instructions
Before using this power tool, carefully read
through and familiarise yourself with all the
enclosed safety information (red booklet) and the
instructions. Keep all enclosed documentation for
future reference, and pass on your power tool
only together with this documentation.
For power tools with type Y attachment: if the
replacement of the supply cord is necessary, this
has to be done by the manufacturer or his agent
in order to avoid a safety hazard.
4 Special Safety Instructions
For your own protection and for the
protection of your power tool, pay
attention to all parts of the text that
are marked with this symbol!
The dust created when work is in progress can
often be damaging to health (e.g. during
processing of oak and beech wood, stone, metal
and paintwork which can contain lead or other
harmful materials). This dust should not be
allowed to penetrate the body. Use vacuum
extraction appliances and wear suitable masks to
provide additional protection from dust. Remove
any accumulation of dust thoroughly, e.g. by
vacuuming with the appropriate special suction
unit.
Pull the plug out of the plug socket before any
adjustments or servicing are performed.
Wear ear protectors when working for long
periods of time. High noise levels over a
prolonged period of time may affect your hearing.
Materials that generate dusts or vapours that may
be harmful to health (e.g. asbestos) must not be
processed.
Secure the workpiece against slipping, e.g. with
the help of clamping devices.
ENGLISH

9
5 Overview
See page 3 (please unfold).
1
Sanding disc
2
Sanding plate
3
Clamping lever
4
On/off switch
5
Dust collection box
6
Cleaning flap
7
Fluted filter
8
Hole punch
6 Special Product Features
•
Intec integrated extraction system
The integrated dust extraction system with the
Intec filter system permits dust-free work
without an extraction hose.
• Quick sanding disc change
Sanding plate suitable for sanding discs with
and without velcro-type fastening.
• Long service life
Dust-protected quality ball bearings for a long
service life in continuous use.
• Ergonomics
Vibration-damping, non-slip rubber coating in
grip area.
7 Commissioning
Before plugging in, check to see that the
rated mains voltage and mains frequency,
as stated on the rating label, match your
power supply.
7.1
Installation of sanding disc
Sanding sheet with velcro-type fastening
Simple attachment and removal thanks to the
velcro-type fastening.
Simply press on the sanding disc such that the
holes in the sanding disc (1) are aligned with the
support plate (2).
Sanding sheet without velcro-type fastening
- Swivel clamping lever (3) downwards as shown
in illustration on page 3. This opens the clamp
rail.
- Slide sanding disc under clamp rail.
- Clamp sanding disc on other side with
clamping lever (3).
- Pull sanding disc tightly over the sanding plate
and clamp to the other side with clamping lever
(3).
Hole punch
In non-perforated sanding discs, the hole punch
can be used to punch your own holes for dust
extraction.
- Install sanding disc on sander.
- Place sander on hole punch (8) as shown in the
illustration on page 3 and press downwards.
8 Use
8.1 Switching On and Off
Switching on:
Move switch (4) to "I" position.
Switching off:
Move switch (4) to "O" position.
8.2 Dust Extraction
To optimise the dust extraction performance, fit
the sanding disc such that the holes on the
sanding disc (1) and sanding plate (2) are
aligned.
Integrated extraction system:
Install the dust collection box (5) (see illustration,
page 3). To optimise the extraction performance,
empty the dust collection box (5) in good time and
clean the filter (7).
External extraction system:
Fit dust extraction nozzle (see chapter on
Accessories). Connect a suitable extraction
device. Use a suction hose with a 35 mm
connector diameter. See Accessories section.
Note:
When sanding abrasive material (e.g.
plaster, etc.) we recommend connecting a
suitable dust extractor.
9 Cleaning, Maintenance
Empty dust collection box (5).
- Open cleaning flap (6).
- Empty dust collection box (5).
- Remove fluted filter (7) and knock off dust
stuck to filter or remove with brush.
- When inserting, ensure that the fluted filter (7)
is inserted in the lateral guides.
Clean the machine regularly. This includes
vacuum cleaning the ventilation louvres on the
motor.
Replacing worn sanding plate (2)
- Remove fixing screws (on lower side of
sanding plate).
- Take off sanding plate.
- For sanding plate (as replacement), refer to the
Accessories chapter.
- Mount sanding plate.
- Refit fixing screws (on lower side of sanding
plate) and tighten.
ENGLISH

10
10 Tips and Tricks
Do not press the device too firmly against the
surface being sanded. This does not improve, but
rather impairs, the sanding performance.
To optimise the extraction performance, empty
the dust collection box (5) in good time and clean
the fluted filter (7).
Use a suitable sanding disc to achieve the best
possible work results: Removal of old paint
layers = P 40
Pre-sanding of wood = P 60, P 80
Finishing of wood = P 100, P 120
Sanding of veneers, sealing primer,
filler, paint = P 180, P 240
11 Accessories
Use only genuine Metabo accessories.
If you need any accessories, check with your
dealer.
For dealers to select the correct accessory, they
need to know the exact model designation of your
power tool.
See page 4.
A Sanding plate (as replacement)
B Dust collection box with fluted filter for
multiple cleaning (as replacement)
C Fluted filter (as replacement)
D Perforated adhesive sanding discs for wood
and metal, 115 x 103 mm
E Perforated adhesive sanding discs for wood
and metal, for clamping 115 x 140 mm
F Perforated adhesive sanding discs for paint,
lacquer, spattle, 115 x 103 mm
G Perforated sanding discs for paint, lacquer,
spattle, for clamping, 115 x 140 mm
H Dust extraction connection
I Metabo universal vacuum cleaner
For complete range of accessories, see
www.metabo.com or the main catalogue.
12 Repairs
Repairs to electrical tools must be carried out by
qualified electricians ONLY!
Any Metabo power tool in need of repair can be
sent to one of the addresses listed in the spare
parts list.
Please enclose a description of the fault with the
power tool.
13 Environmental Protection
Metabo's packaging can be 100% recycled.
Scrap power tools and accessories contain large
amounts of valuable resources and plastics that
can be recycled.
These instructions are printed on chlorine-free
bleached paper.
Only for EU countries: Never dispose of
power tools in your household waste! In
accordance with European Guideline
2002/ 96/EC on used electronic and
electric equipment and its implementation in
national legal systems, used power tools must be
collected separately and handed in for
environmentally compatible recycling.
14 Technical Specifications
Explanatory notes on the specifications on page 2.
Changes due to technological progress reserved.
D = Dimensions of sanding plate
P
1
= Nominal power input
P
2
= Power output
s
0
= orbital frequency at no load
s
1
= orbital frequency at nominal load
S = Oscillating circuit diameter
Intec = Dust collection box
m = Weight without mains cable
a
hw
= Typical estimated acceleration in the
hand/arm area
Typical A-effective perceived sound levels:
L
pA
= Sound pressure level
K
pA
= Unsafe
During operation the noise level can exceed
85 dB(A).
Wear ear protectors!
Measured values determined in conformity with
EN 60745.
The technical specifications quoted are subject to
tolerances (in compliance with the relevant valid
standards).
ENGLISH


Metabowerke GmbH,
72622 Nürtingen, Germany
www.metabo.com
-
 1
1
-
 2
2
-
 3
3
-
 4
4
-
 5
5
-
 6
6
-
 7
7
-
 8
8
-
 9
9
-
 10
10
-
 11
11
-
 12
12


その他のドキュメント
-
Samsung DIGIMAX 300 取扱説明書
-
Bosch 550, 55-225 GTR Professional Drywall Sander ユーザーマニュアル
-
-
 Minebea Intec Floor platform Puro® 取扱説明書
-
Electrolux EW975W FOR APPROVAL ユーザーマニュアル
-
Panasonic SJ-MR220 ユーザーマニュアル
-
-
 Minebea Intec Puro®案秤:基本型应用程序 取扱説明書
-
 Minebea Intec Floor scale Puro® 取扱説明書
-
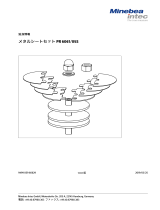 Minebea Intec Set of metal sheets PR 6061/05S 取扱説明書


