Hitachi RH600T Handling Instructions Manual
- カテゴリー
- パワーツール
- タイプ
- Handling Instructions Manual

Heat Gun
RH 600T
Handling instructions
Keep for future reference
English

2

3

4

5

6
○
○
○
○
○
○
○
○
○

7
I
II
○
○

8
○
○
I
I II

9

10

11
25
502 503501
504 505
506
2
1
3
4
5
6
7
8
9
7
10
11
12
13
14
15
16
17
18
19
20
21
22
23
24
26

12

English
13
GENERAL POWER TOOL SAFETY WARNINGS
WARNING
Read all safety warnings and all instructions.
Failure to follow the warnings and instructions may result in electric shock, fi re and/or serious
injury.
Save all warnings and instructions for future reference.
The term “power tool” in the warnings refers to your mains-operated (corded) power tool or
battery-operated (cordless) power tool.
1) Work area safety
a) Keep work area clean and well lit.
Cluttered or dark areas invite accidents.
b) Do not operate power tools in explosive atmospheres, such as in the presence
of fl ammable liquids, gases or dust.
Power tools create sparks which may ignite the dust or fumes.
c) Keep children and bystanders away while operating a power tool.
Distractions can cause you to lose control.
2) Electrical safety
a) Power tool plugs must match the outlet.
Never modify the plug in any way.
Do not use any adapter plugs with earthed (grounded) power tools.
Unmodifi ed plugs and matching outlets will reduce risk of electric shock.
b) Avoid body contact with earthed or grounded surfaces, such as pipes,
radiators, ranges and refrigerators.
There is an increased risk of electric shock if your body is earthed or grounded.
c) Do not expose power tools to rain or wet conditions.
Water entering a power tool will increase the risk of electric shock.
CONTENTS
GENERAL POWER TOOL SAFETY WARNINGS ........................................13
HEAT GUN SAFETY WARNINGS ................................................................15
SYMBOL .......................................................................................................16
SPECIFICATIONS ........................................................................................ 17
STANDARD ACCESSORIES .......................................................................17
APPLICATIONS ............................................................................................17
PRIOR TO OPERATION ...............................................................................18
BASIC FUNCTIONS .....................................................................................18
WORK EXAMPLE ......................................................................................... 20
MAINTENANCE AND INSPECTION ............................................................ 21
SERVICE PARTS LIST ................................................................................. 22

English
14
d) Do not abuse the cord. Never use the cord for carrying, pulling or unplugging
the power tool.
Keep cord away from heat, oil, sharp edges or moving parts.
Damaged or entangled cords increase the risk of electric shock.
e) When operating a power tool outdoors, use an extension cord suitable for
outdoor use.
Use of a cord suitable for outdoor use reduces the risk of electric shock.
f) If operating a power tool in a damp location is unavoidable, use a residual
current device (RCD) protected supply.
Use of an RCD reduces the risk of electric shock.
3) Personal safety
a) Stay alert, watch what you are doing and use common sense when operating a
power tool.
Do not use a power tool while you are tired or under the infl uence of drugs,
alcohol or medication.
A moment of inattention while operating power tools may result in serious personal
injury.
b) Use personal protective equipment. Always wear eye protection.
Protective equipment such as dust mask, non-skid safety shoes, hard hat, or hearing
protection used for appropriate conditions will reduce personal injuries.
c) Prevent unintentional starting. Ensure the switch is in the off position before
connecting to power source and/or battery pack, picking up or carrying the
tool.
Carrying power tools with your fi nger on the switch or energising power tools that have
the switch on invites accidents.
d) Remove any adjusting key or wrench before turning the power tool on.
A wrench or a key left attached to a rotating part of the power tool may result in
personal injury.
e) Do not overreach. Keep proper footing and balance at all times.
This enables better control of the power tool in unexpected situations.
f) Dress properly. Do not wear loose clothing or jewellery. Keep your hair,
clothing and gloves away from moving parts.
Loose clothes, jewellery or long hair can be caught in moving parts.
g) If devices are provided for the connection of dust extraction and collection
facilities, ensure these are connected and properly used.
Use of dust collection can reduce dust-related hazards.
4) Power tool use and care
a) Do not force the power tool. Use the correct power tool for your application.
The correct power tool will do the job better and safer at the rate for which it was
designed.
b) Do not use the power tool if the switch does not turn it on and off .
Any power tool that cannot be controlled with the switch is dangerous and must be
repaired.

English
15
c) Disconnect the plug from the power source and/or the battery pack from the
power tool before making any adjustments, changing accessories, or storing
power tools.
Such preventive safety measures reduce the risk of starting the power tool
accidentally.
d) Store idle power tools out of the reach of children and do not allow persons
unfamiliar with the power tool or these instructions to operate the power tool.
Power tools are dangerous in the hands of untrained users.
e) Maintain power tools. Check for misalignment or binding of moving parts,
breakage of parts and any other condition that may aff ect the power toolʼs
operation.
If damaged, have the power tool repaired before use.
Many accidents are caused by poorly maintained power tools.
f) Keep cutting tools sharp and clean.
Properly maintained cutting tools with sharp cutting edges are less likely to bind and
are easier to control.
g) Use the power tool, accessories and tool bits etc. in accordance with these
instructions, taking into account the working conditions and the work to be
performed.
Use of the power tool for operations diff erent from those intended could result in a
hazardous situation.
5) Service
a) Have your power tool serviced by a qualifi ed repair person using only identical
replacement parts.
This will ensure that the safety of the power tool is maintained.
CAUTION
Keep children and infi rm persons away.
When not in use, tools should be stored out of reach of children and infi rm persons.
HEAT GUN SAFETY WARNINGS
WARNING
1. Do not use the tool or touch the power plug with wet hands.
Failure to observe this may result in electric shocks.
2. Always check the work area prior to use, and do not use the tool if safety cannot be
guaranteed.
Failure to observe this may result in infl ammable articles concealed in or behind
invisible areas (cases, ceilings, fl oors, hollow areas) being ignited.
3. Do not use the tool in the vicinity of volatile substances (thinner, gasoline, etc.)
Failure to observe this may result in the outbreak of fi re or explosions.
4. Do not stand underneath when using the tool in elevated locations.
Also, do not catch the power cord on anything, or allow it to be pulled.
Failure to observe this may result in accidents.

English
16
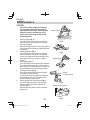
5. Do not point the hot wind directly at people or animals. Do not look into the nozzle.
Do not use it as a hair dryer under any circumstances.
Failure to observe this may result in accidents or injury.
6. There are cases in which highly toxic gas will be emitted if used on plastic, lacquer
or similar materials.
Always ensure that the work area is fully ventilated, and wear a dust-protection
mask.
7. Apply heat gently while moving the Heat Gun up, down, left and right.
Aiming it constantly at a single location may result in the outbreak of smoke or fi re.
8. Check the tool for damage, cracks or malformation in the event of it being
accidently dropped or subject to impact.
Damage, cracks and malformation may result in injury.
9. Cease operations immediately in the event of the tool not operating properly or
if abnormal noises or vibrations are noticed, and contact a Hitachi Authorized
Service Center to request inspections and repairs.
Continued use may result in injury.
10. Do not get away from the unit while it is switched on. Failure to observe this may
result in accidents.
CAUTION
1. Parts of the nozzle supplied are sharp, so use gloves when removing them from the
case and when attaching or detaching them.
2. The hot wind release nozzle, the tip of the nozzle and the material that was heated
are extremely hot during and immediately after using the tool, so use gloves and
avoid touching them directly.
3. Do not use inside boxes, drawers or other enclosed spaces.
Aiming it constantly at a single location may result in the outbreak of smoke or fi re.
4. Make sure the nozzle is at least 5cm away from the item being heated when using
the tool. Also, do not cover or otherwise block the nozzle.
Failure to observe this may result in the Heat Gun overheating, leading to
malfunctions.
5. Do not switch the tool on and off repeatedly. Also, do not use the tool with the
power cord folded or twisted.
Failure to observe this may result in malfunctions.
6. Do not point the heat-wind release nozzle downwards immediately after use.
Failure to observe this may result in the tool overheating, leading to malfunctions.
7. Make sure that the Heat Gun has cooled completely before storing it away.
Failure to observe this may result in burns or malformation of the storage case.
SYMBOL
WARNING
The following show symbols used for the machine. Be sure that you understand their
meaning before use.
To reduce the risk of injury, user must read instruction manual.

English
17
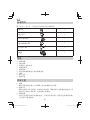
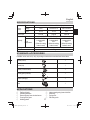
SPECIFICATIONS
Power
supply
Type Can be used with both 50 Hz and 60 Hz single-phase current
Voltage 110 V 120 V to 127 V 220 V to 240 V
Rated electrical
current
12.9 A 12.2 A 8.8 A
Power Input 1375 W 1500 W 2000 W
Capacity
Wind volume 0.25 m
3
/min to 0.5 m
3
/min (2-stage switch)
Wind
temperature
250 – 500°C
2-stage switch
50°C
(When the cooling
button is used)
350 – 500°C
2-stage switch
50°C
(When the cooling
button is used)
450 – 600°C
2-stage switch
50°C
(When the cooling
button is used)
Motor type Direct current motor
Weight 0.57 kg
STANDARD ACCESSORIES
In addition to the main unit (1 unit), the package contains the accessories listed in the below.
Nozzle (round) 1
Nozzle (fl at)
1
Nozzle (curved surface)
1
Nozzle (glass protector)
1
Scraper (with grip)
1
Case
1
APPLICATIONS
○
Peeling off paint
○
Softening adhesive
○
Removing putty from window frames
○
Forming resin pipes
○
Welding plastic
○
Heat wrapping using heat-shrink fi lm
○
Soldering
○
Drying work
○
Defrosting work

English
18
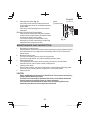
PRIOR TO OPERATION
1. Power source
Ensure that the power source to be utilized conforms to the power requirements specifi ed on
the product nameplate.
2. Power switch
Ensure that the power switch is in the OFF position.
If the plug is connected to a receptacle while the power switch is in the ON position, the
power tool will start operating immediately, which could cause a serious accident.
3. Extension cord
When the work area is removed from the power source, use an extension cord of suffi cient
thickness and rated capacity. The extension cord should be kept as short as practicable.
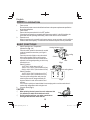
BASIC FUNCTIONS
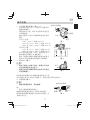
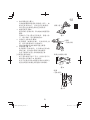
1. Switch Operations and Temperature
Adjustments (Fig. 1, 2)
Press the switch upward or downward to enable
continual operations even when your fi nger is
removed.
Press the protrusion lightly to return the switch
to the central position and turn off the power.
The wind temperature and wind volume can be
adjusted in two stages depending on which way
the switch is set.
Switch [I] position:
110 V: 250°C (wind volume 0.25 m
3
)
120 V to 127 V: 350°C (wind volume 0.25 m
3
)
220 V to 240 V: 350°C (wind volume 0.25 m
3
)
Switch [II] position:
110 V to 127 V: 500°C (wind volume 0.5 m
3
)
220 V to 240 V: 600°C (wind volume 0.5 m
3
)
Press the quick cooling button and press the
switch to blow warm air at approximately 50
degrees Celsius for each of the switch’s wind
volumes.
This is used to quickly cool material that is heat-warping and to cool the nozzle when it
reaches high temperatures after using the tool.
2. Using the Hook (Fig. 3)
CAUTION
○
When pointing the tool upward to work, make sure that
it is placed on a stable block that does not tilt.
○
Do not hang the tool from your wrist or waist when
moving around with the nozzle still hot.
Switch
Quick cooling button
Fig. 2
Switch
Quick cooling
button
Hot wind release nozzle
Hook
Fig. 1
Hook
Fig. 3

English
19
Support the tool fi rmly when pointing the heat-wind release nozzle
upward.
Also, it is possible to suspend the tool from a wrist, etc., with
a cord to prevent it from being dropped when working in high
locations, etc.
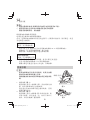
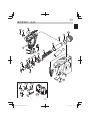
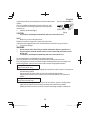
3. Attaching the Nozzle (Fig. 4)
CAUTION
The nozzle is extremely hot immediately after use, so do not touch it.
NOTE
Make sure you do not drop the nozzle.
Replace the nozzle for a type that is suited to the job in hand.
Insert the nozzle supplied fi rmly into the hot wind release nozzle until it can go no further.
4. Temperature Settings
WARNING
○
Do not use the tool in the vicinity of volatile substances (thinner, gasoline, etc.)
○
Do not bring the hot wind release nozzle in close contact with your hands or face
during use.
The nozzle is extremely hot immediately after use, so do not touch it.
Set the temperature in consideration of the article to be heated.
Also, pay attention to the surrounding material that will be heated at the same time.
First of all, apply the hot wind from a distance while checking that there are no changes in the
article being heated, and then move it closer until it reaches an appropriate distance.
Heating infl ammable substances
(paper, wood, plastic, etc.)
Set the switch to the [I] position and apply the heat with the nozzle at least 10 cm away from
the article being heated.
Gently move the tip of the nozzle up, down, left and right to apply the heat.
Applying heat constantly to one location may result in malformation or the outbreak of
smoke.
Heating non-fl ammable substances
(metal, stone, concrete, etc.)
Set the switch to the [I] position, and if there are no problems, move it to the [II] position.
Apply the heat with the nozzle at least 5 cm away from the article being heated.
Holding the nozzle too close may result in the tool overheating, leading to malfunctions.
Nozzle (Plane)
Hot wind release nozzle
Fig. 4

English
20
WORK EXAMPLE
CAUTION
Parts of the nozzles supplied are sharp, so
use gloves when removing them from the
case and when attaching or detaching them.
Select the nozzle in consideration of the
shape of the article being heated and the
area being heated.
1. Peeling off paint (Fig. 5)
Use nozzle (fl at) or nozzle (round) to soften the
paint with the hot wind, and then remove it with
the scraper supplied.
Note that heating the paint too much may result in it
scorching and becoming harder, making it diffi cult
to scrape off .
2. Softening adhesive (Fig. 6)
Use nozzle (fl at) or nozzle (round) to soften the
surface and make it easy to peel, and then pull
up one of the edges, blow heat underneath it and
gently peel it off so that none of the adhesive
remains.
3. Heat wrapping (Fig. 7)
Use nozzle (fl at) to heat-wrap shrink fi lm and tubes.
The material will change color or crack if hot air is
blown onto it from a close distance, so maintain an
appropriate distance while monitoring progress.
4. Forming resin pipes (Fig. 8)
Use nozzle (curved surface) to evenly heat the
circumference of the resin pipe.
To prevent the inside of the pipe from narrowing
when bending it, etc., pour sand inside, block
both ends and then gently bend it.
5. Removing putty from window frames (Fig. 9)
Use nozzle (glass protector) to soften the putty
with heat, and then remove the putty with the
scraper supplied.
Note that glass may crack if heat is continually
applied to it.
Nozzle (Plane)
Scraper
Fig. 5
Nozzle (Round)
Fig. 6
Nozzle (Plane)
Fig. 7
Nozzle
(Curved surface)
Fig. 8
Nozzle (Glass protector)
Scraper
Fig. 9
ページが読み込まれています...
ページが読み込まれています...
ページが読み込まれています...
ページが読み込まれています...
-
 1
1
-
 2
2
-
 3
3
-
 4
4
-
 5
5
-
 6
6
-
 7
7
-
 8
8
-
 9
9
-
 10
10
-
 11
11
-
 12
12
-
 13
13
-
 14
14
-
 15
15
-
 16
16
-
 17
17
-
 18
18
-
 19
19
-
 20
20
-
 21
21
-
 22
22
-
 23
23
-
 24
24


Hitachi RH600T Handling Instructions Manual
- カテゴリー
- パワーツール
- タイプ
- Handling Instructions Manual
他の言語で
- English: Hitachi RH600T
関連論文
-
Hitachi P 20SF Handling Instructions Manual
-
-
-
-
Hikoki DH 14DSL ユーザーマニュアル
-
-
Hikoki DH 36DBML ユーザーマニュアル
-
-
Hikoki WR 14DSDL ユーザーマニュアル
-
その他のドキュメント
-
Stanley STEL670 ユーザーマニュアル
-
Hikoki DH 18DPA Cordless Rotary Hammer 取扱説明書
-
-
-
-
 Pro sKit SS-615 Adjustable Temperature Heat Gun ユーザーマニュアル
-
Hikoki WR 16SE ユーザーマニュアル
-
 Atten AT-2190 ユーザーマニュアル
-
-
ESAB Tig 2200i TA33 ユーザーマニュアル

