Hitachi FD 10SA Handling Instructions Manual
- カテゴリー
- パワーツール
- タイプ
- Handling Instructions Manual
このマニュアルも適しています

Drill
FD 10SA
•
FD 10VA
Handling instructions
Keep for future reference
FD10VA
English

2

3

4

5
○
○

6
○

7
○
○
○
○
○
○
○
○

8

9
21
3A
4
5
6
7
8
9A
10A
11
12
13A
14
15
16A
17
18
19
20
21
22
23
26
27
24
28
25
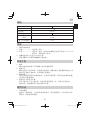
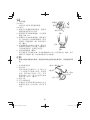
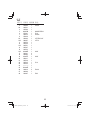
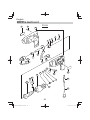
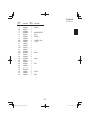
FD10SA

10
1 ———— 1
2 994806 7 D4×20
3A 994731 1
4 954789 1
5 608VVM 1 608VVC2PS2L
6 876031 1 S-16
7 959154 1 D5.556
8 954166 1
9A 950292 1 10TLRA “10A”
10A 980057 1 10TL2
11 987072 1
12 994720 1
13A 994721 1
14 987047 1
15 994734 1
16A 360038E 1 220V
17 999041 2
18 930483 2
19 340071E 1 220V
20 959141 1
21 987106 1
22 987105 1 S-10
23 994722 1
24 ———— 1
25 500409Z 1
26 994810 2 D4×16
27 960266 1
28 930487 1 D8.2

11
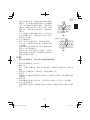
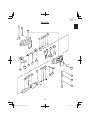
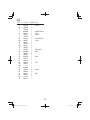
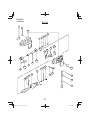
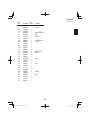
FD10VA
3A
9A
1
2
4
5
6
7
8
10A
11
12
13A
14
15
32
31C
16
17
18
19
20
21
22
23
24A
26
27
29
28
25

12
1 ———— 1
2 994806 7 D4×20
3A 994808 1
4 954789 1
5 608VVM 1 608VVC2PS2L
6 876031 1 S-16
7 959154 1 D5.556
8 954166 1
9A 950292 1 10TLRA “10A”
10A 980057 1 10TL2
11 987072 1
12 994807 1
13A 994721 1
14 987078 1
15 987095 1 220V-240V
16 360044E 1 220V
17 999041 2
18 930483 1
19 340073E 1 220V
20 959141 1
21 987106 1
22 987105 1 S-10
23 994722 1
24A ———— 1
25 500409Z 1
26 994810 2 D4×16
27 960266 1
28 930487 1 D8.2
29 981373 2
31C 317126 1
32 981373 1

English
13
GENERAL POWER TOOL SAFETY WARNINGS
WARNING
Read all safety warnings and all instructions.
Failure to follow the warnings and instructions may result in electric shock, fi re and/or serious
injury.
Save all warnings and instructions for future reference.
The term “power tool” in the warnings refers to your mains-operated (corded) power tool or
battery-operated (cordless) power tool.
1) Work area safety
a) Keep work area clean and well lit.
Cluttered or dark areas invite accidents.
b) Do not operate power tools in explosive atmospheres, such as in the presence
of fl ammable liquids, gases or dust.
Power tools create sparks which may ignite the dust or fumes.
c) Keep children and bystanders away while operating a power tool.
Distractions can cause you to lose control.
2) Electrical safety
a) Power tool plugs must match the outlet.
Never modify the plug in any way.
Do not use any adapter plugs with earthed (grounded) power tools.
Unmodifi ed plugs and matching outlets will reduce risk of electric shock.
b) Avoid body contact with earthed or grounded surfaces, such as pipes,
radiators, ranges and refrigerators.
There is an increased risk of electric shock if your body is earthed or grounded.
c) Do not expose power tools to rain or wet conditions.
Water entering a power tool will increase the risk of electric shock.
d) Do not abuse the cord. Never use the cord for carrying, pulling or unplugging
the power tool.
Keep cord away from heat, oil, sharp edges or moving parts.
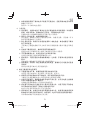
CONTENTS
GENERAL POWER TOOL SAFETY WARNINGS ........................................13
PRECAUTIONS ON USING DRILL ..............................................................15
SYMBOL .......................................................................................................16
SPECIFICATIONS ........................................................................................ 16
APPLICATION ..............................................................................................16
PRIOR TO OPERATION ...............................................................................16
HOW TO USE ...............................................................................................17
MAINTENANCE AND INSPECTION ............................................................ 19
SERVICE PARTS LIST .................................................................................20

English
14
Damaged or entangled cords increase the risk of electric shock.
e) When operating a power tool outdoors, use an extension cord suitable for
outdoor use.
Use of a cord suitable for outdoor use reduces the risk of electric shock.
f) If operating a power tool in a damp location is unavoidable, use a residual
current device (RCD) protected supply.
Use of an RCD reduces the risk of electric shock.
3) Personal safety
a) Stay alert, watch what you are doing and use common sense when operating a
power tool.
Do not use a power tool while you are tired or under the infl uence of drugs,
alcohol or medication.
A moment of inattention while operating power tools may result in serious personal
injury.
b) Use personal protective equipment. Always wear eye protection.
Protective equipment such as dust mask, non-skid safety shoes, hard hat, or hearing
protection used for appropriate conditions will reduce personal injuries.
c) Prevent unintentional starting. Ensure the switch is in the off position before
connecting to power source and/or battery pack, picking up or carrying the
tool.
Carrying power tools with your fi nger on the switch or energising power tools that have
the switch on invites accidents.
d) Remove any adjusting key or wrench before turning the power tool on.
A wrench or a key left attached to a rotating part of the power tool may result in
personal injury.
e) Do not overreach. Keep proper footing and balance at all times.
This enables better control of the power tool in unexpected situations.
f) Dress properly. Do not wear loose clothing or jewellery. Keep your hair,
clothing and gloves away from moving parts.
Loose clothes, jewellery or long hair can be caught in moving parts.
g) If devices are provided for the connection of dust extraction and collection
facilities, ensure these are connected and properly used.
Use of dust collection can reduce dust-related hazards.
4) Power tool use and care
a) Do not force the power tool. Use the correct power tool for your application.
The correct power tool will do the job better and safer at the rate for which it was
designed.
b) Do not use the power tool if the switch does not turn it on and off .
Any power tool that cannot be controlled with the switch is dangerous and must be
repaired.
c) Disconnect the plug from the power source and/or the battery pack from the
power tool before making any adjustments, changing accessories, or storing
power tools.
Such preventive safety measures reduce the risk of starting the power tool
accidentally.

English
15
d) Store idle power tools out of the reach of children and do not allow persons
unfamiliar with the power tool or these instructions to operate the power tool.
Power tools are dangerous in the hands of untrained users.
e) Maintain power tools. Check for misalignment or binding of moving parts,
breakage of parts and any other condition that may aff ect the power toolʼs
operation.
If damaged, have the power tool repaired before use.
Many accidents are caused by poorly maintained power tools.
f) Keep cutting tools sharp and clean.
Properly maintained cutting tools with sharp cutting edges are less likely to bind and
are easier to control.
g) Use the power tool, accessories and tool bits etc. in accordance with these
instructions, taking into account the working conditions and the work to be
performed.
Use of the power tool for operations diff erent from those intended could result in a
hazardous situation.
5) Service
a) Have your power tool serviced by a qualifi ed repair person using only identical
replacement parts.
This will ensure that the safety of the power tool is maintained.
CAUTION
Keep children and infi rm persons away.
When not in use, tools should be stored out of reach of children and infi rm persons.
PRECAUTIONS ON USING DRILL
1. Hold power tool by insulated gripping surfaces, when performing an operation
where the cutting accessory may contact hidden wiring or its own cord. Cutting
accessory contacting a “live” wire may make exposed metal parts of the power tool
“live” and could give the operator an electric shock.
2. When mounting the drill bit or driver bit, insert it fully into the drill chuck and
completely tighten the drill chuck with the chuck wrench.
If mounting is not done porperly, it is very dangerous as the drill bit may slip or
loosen during operation.
3. Do not wear gloves made of stuff liable to roll up such as cotton, wool, cloth or
string, etc.
4. Do not touch the bit during or immediately after operation. The bit becomes very
hot during operation and could cause serious burns.
5. When placing the drill on the fl oor, make sure that the drill has stopped completely.
6. Hold the drill fi rmly with both hands when using.
7. Before drilling into a wall, fl oor or ceiling, thoroughly confi rm that no items such as
electric cables or conduits are buried inside.
8. When working in high position, take care of downword direction.

English
16
SYMBOL
WARNING
The following show symbols used for the machine. Be sure that you understand their
meaning before use.
To reduce the risk of injury, user must read instruction manual.
SPECIFICATIONS
Model
FD10SA FD10VA
Voltage 220V
Power Input 285 W
No-load speed 2300 /min
0 - 2300 /min
Capacity: steel
wood
10 mm
18 mm
Weight (without cord) 1.1 kg
APPLICATION
1. Drilling various materials
○
Drilling metal
Use an iron-working drill bit
○
Drilling wood
Use a wood-working drill bit (However, an iron-working drill bit to make pilot holes for wood
screws or holes smaller than 6.5 mm.)
2. Tightening the wood screw (Only FD10VA model)
Use the driver bit. Use a Phillips screw for easy tightening.
PRIOR TO OPERATION
1. Power source
Ensure that the power source to be utilized conforms to the power requirements specifi ed
on the product nameplate.
2. Power switch
Ensure that the power switch is in the OFF position. If the plug is connected to a receptacle
while the power switch is in the ON position, the power tool will start operating immediately,
which could cause a serious accident.
3. Extension cord
When the work area is removed from the power source, use an extension cord of suffi cient
thickness and rated capacity. The extension cord should be kept as short as practicable.

English
17
4. Check the tightening of the drill chuck
The drill chuck has been tightened at the factory, but check again that it is in order before
use. Turn the drill chuck clockwise to tighten.
HOW TO USE
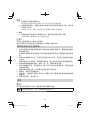
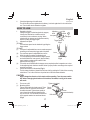
1. Operation of switch
Pulling the trigger of switch and push the stopper,
it keeps, the switched-on condition and it is
convenient for the continuous running. When
switched off , the stopper can be disconnected by
means of pulling the trigger again.
2. Adjustment of speed
[FD10SA]
The maximum speed can be obtained by pulling the
trigger switch.
[FD10VA]
(1) The speed is adjustable from zero to maximum speed
according to the extent the trigger switch is pulled.
(2) The maximum speed is adjustable from zero to
2300 /min with the rotation of adjusting knob.
(3) Turn the adjusting knob clockwise for higher speed
and anticlockwise for lower speed. (Approximately
three rotations consist one full rotation of the
adjustment knob.) (Fig. 1)
(4) The switch can be locked with the stopper at any required position irrespective as to how
far the adjusting knob has been rotated. Select a proper position according to the required
speed for each work.
3. Confi rm the direction of bit rotation (Fig. 2)
The bit rotates clockwise (viewed from the rear side) by pushing the R-side of the reversing
switch lever. The L-side of the lever is pushed to turn the bit counterclockwise.
CAUTION
Never change the direction of bit rotation while operatihg. Turn the power switch
OFF before changing the direction of bit rotation; otherwise, burning of the motor
will result.
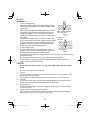
4. For use as a drill
(1) Mounting drill bit
Tighten drill bit with the chuck wrench. There
are three holes in which the chuck wrench
should be inserted. Tighten them equally in
turn at three holes, without tightening them
only at one hole. The drill bit can be removed
in the opposite method as mentioned above.
(Fig 3)
Trigger switch
Adjusting
knob
High
speed
Low speed
Stopper
Fig. 1
Lever
Left Right
Fig. 2
Drill chuck
Chuck
wrench
Tighten (clockwise)
Loosen
(counterclockwise)
Fig 3

English
18
(2) How to drill
1
To use for drilling lumber
○
Apply the point of the drill bit to the desired drilling position,
hold the drill perpendicular to the workpiece surface and turn
on the switch.
○
When drilling a through hole in lumber, remove the drill from
the material as soon as the tip of the drill bit protrudes from
the opposite surface. Then, turn the workpiece over and
complete the drilling from the opposite side to obtain a clean
hole. (Fig. 4)
If extra lumber is applied under the lumber you want to drill
and it is drilled together, a fi ne hole will also be made. (Fig. 5)
○
A wood-working drill need not be pressed strongly since it
penetrates using the screw at the point. Even if excessive
force is used, a hole will not be made quickly.
2
To use for drilling metal
○
In case you drill metal with an iron-working drill, apply in
advance a center punch in the drilling position. You can drill
metal stably since the point of the drill does not slip.
○
If you apply sewing machine oil or soapy water to the drill with a brush or an old tooth brush,
the drill will last long.
○
Even if more-than-necessary force is used, a hole will not be made quickly.
On the contrary, the edge of the drill will be damaged. This will decrease operational
effi ciency and shorten the life of this too.
CAUTION
Do not expose the motor to water as it may cause motor malfunction and electric
shock.
5. To use the driving wood screws (FD10VA)
(1) Driver bit
○
For driving a minus wood screw, the driver bit detaches easily. So use wood screws with a
plus groove as often as possible.
○
Select a driver bit matching the plus groove and the minus groove of the wood screw.
(2) Pilot hole
If a pilot hole is made with a drill a little thinner than the diameter of the wood screw, the
lumber will not be split and the wood screw will be driven with ease.
(3) Driving operation
○
Put the wood screw lightly in the pilot hole, apply the bit to the groove, turn on the switch
and drive the screw.
6. Caution to be taken immediately after operation
When placing the drill in dusty places before the rotating parts has stopped completely,
make sure the machine does not suck in dust and swarf.
When the point appears,
turn lumber over
Fig. 4
Lumber to
be drilled
Extra lumber
Fig. 5

English
19
MAINTENANCE AND INSPECTION
CAUTION
Be sure to switch power OFF and disconnect the plug from the receptacle during
maintenance and inspection.
1. Inspecting the drill bit and driver bit
Since use of an abraded drill bit will cause motor malfunctioning and degraded effi ciency,
replace the drill bit with a new one or resharpening without delay when abrasion is noted.
If you use a driver bit of which point is worn or broken, it will be dangerous since it slips. So
replace it with a new one.
2. Inspecting the mounting screws
Regularly inspect all mounting screws and ensure that they are properly tightened. Should
any of the screws be loosened, retighten them immediately, Failure to do so could result in
serious hazard.
3. Replacing supply cord
If the replacement of the supply cord is necessary, this has to be done by Hitachi
Authorized Service Center in order to avoid a safety hazard.
If the supply cord of this power tool is damaged, it must be replaced by a specially prepared
cord available through the service organization.
4. Servicing
Consult an authorized Service Center in the event of power tool failure.
5. Service parts list
CAUTION
Repair, modifi cation and inspection of Hitachi Power Tools must be carried out by
a Hitachi Authorized Service Center.
This Parts List will be helpful if presented with the tool to the Hitachi Authorized
Service Center when requesting repair or other maintenance.
In the operation and maintenance of power tools, the safety regulations and
standards prescribed in each country must be observed.

English
20
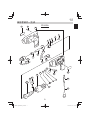
SERVICE PARTS LIST
21
3A
4
5
6
7
8
9A
10A
11
12
13A
14
15
16A
17
18
19
20
21
22
23
26
27
24
28
25
FD10SA
ページが読み込まれています...
ページが読み込まれています...
ページが読み込まれています...
ページが読み込まれています...
-
 1
1
-
 2
2
-
 3
3
-
 4
4
-
 5
5
-
 6
6
-
 7
7
-
 8
8
-
 9
9
-
 10
10
-
 11
11
-
 12
12
-
 13
13
-
 14
14
-
 15
15
-
 16
16
-
 17
17
-
 18
18
-
 19
19
-
 20
20
-
 21
21
-
 22
22
-
 23
23
-
 24
24


Hitachi FD 10SA Handling Instructions Manual
- カテゴリー
- パワーツール
- タイプ
- Handling Instructions Manual
- このマニュアルも適しています
他の言語で
- English: Hitachi FD 10SA
関連論文
-
Hitachi D 6SH Handling Instructions Manual
-
-
-
-
Hikoki DH 14DSL ユーザーマニュアル
-
-
Hikoki DH 36DBML ユーザーマニュアル
-
-
Hikoki WR 14DSDL ユーザーマニュアル
-
その他のドキュメント
-
Hikoki DH 18DPA Cordless Rotary Hammer 取扱説明書
-
-
-
-
Hikoki WR 16SE ユーザーマニュアル
-
-
-
-
Husqvarna AUTOMOWER 310 ユーザーマニュアル
-
Mitsubishi Electric Sensing Module インストールガイド