H3C S7500E Series Installation, Quick Start
- タイプ
- Installation, Quick Start

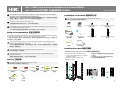
Installation accessories 安装附件介绍
1
Flat-blade screwdriver
一字螺丝刀
Phillips screwdriver
十字螺丝刀
Needle-nose pliers
尖嘴钳
Wire-stripping pliers
剥线钳
ESD wrist strap
防静电腕带
Diagonal pliers
斜口钳
Claw hammer
羊角锤
Marker
记号笔
Grounding cable
接地线
Removable cable tie
可拆卸式扎带
M4 countersunk-head screw
M4沉头螺钉
BOM: 3104A0KB
Tool list 工具参考
H3C S7500E Switch Series Installation Quick Start-6PW101
H3C S7500E系列交换机 快速安装指南-6PW101
Mounting brackets
挂耳
Console cable
配置口电缆
M6 screw
M6 螺钉
M3 countersunk-head screw
M3沉头螺钉
Floating nut
浮动螺母
2
This document provides a brief guide for installing H3C S7500E switch series. For more installation
information, see H3C S7500E Switch Series Installation Guide.
本文档用于为H3CS7500E系列交换机的硬件安装提供简明快捷的操作指导,关于安装过程及注意事项
更全面、完整的介绍,请您参见《H3CS7500E系列交换机安装指导》。
The installation procedure is similar for the S7500E switches. The following uses an S7506E switch
as an example unless otherwise specified.
S7500E系列交换机各模块安装步骤类似,如无特殊说明,均以S7506E为例。
The figures in this document are for illustration only.
设备及各模块外观请以实际发货为准,本文中的图片仅供参考。
Safety recommendations 安全注意事项
To avoid equipment damage or bodily injury, read the following safety recommendations before installation.
Note that the recommendations do not cover every possible hazardous condition.
为了避免在安装交换机过程中对人和设备造成伤害,请您在安装前仔细阅读本节的安全建议。实际情况中包
括但不限于以下安全注意事项:
To prevent ESD damage, always wear an ESD wrist strap and make sure it is reliably grounded
before you touch the switch, cards, or PCB.
为防止人体静电损坏敏感元器件,请您在接触设备、单板、IC芯片等之前佩戴防静电腕带,并将防静电
腕带的另一端良好接地。
!
Do not install the switch, FRUs, or cables when the switch is powered on.
禁止带电安装设备、模块和线缆。
!
To avoid equipment damage or bodily injury, make sure the switch is reliably grounded before
powering on the switch.
请确保设备接地后再接通电源,以免危及人身和设备安全。
!
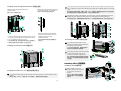
Attaching cage nuts to the rack 安装浮动螺母到机柜
Installing the switch 安装交换机
3
1. Determine the cage nut installation holes
based on the mounting bracket and slide rail
installation positions.
2. Mark the cage nut installation holes.
3. Install cage nuts.
2
Cable management bracket
走线架
Prepare the following installation tools yourself as required.
请您根据实际安装需求自己准备安装工具。
1. 根据挂耳孔位及滑道的安装位置确定浮动螺母的
安装孔位。
2. 用记号笔在方孔条上标出浮动螺母的安装孔位。
3. 在对应位置安装浮动螺母组件。
1
1
1
1
This section only lists the most commonly used installation accessories.
本节介绍了安装过程中最常用的安装附件。

4
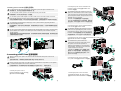
Installing cable management brackets 安装走线架
Attaching cable management brackets to the
S7506E-V switch
安装S7506E-V机型的走线架
Installing the switch in a rack 安装交换机到机柜
After placing the switch on the slide rails, do not leave go of your hands immediately because this
might tip the switch. Tipping the switch might cause switch damage and even bodily injury.
将机箱放至滑道后,请确保机箱放置平稳后再松手,以免机箱倾倒而损坏设备,甚至伤害您的身体。
!
Installing mounting brackets 安装挂耳
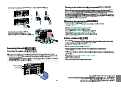
Grounding the switch 交换机接地
1
2
3
1
2
2
1
1
2
2
1. Place the cable management bracket against the chassis
and align the screws with the screw holes in the chassis.
2. Use a screwdriver to fasten the screws.
1. 将走线架紧贴机箱,同时将螺钉对准机箱上对应的螺钉孔。
2. 用螺丝刀沿顺时针方向拧紧螺钉,固定住走线架。
Attach the cable management bracket
to the left mounting bracket, which has
installation holes for the cable
management bracket.
将走线架安装到带有走线架安装螺孔的
左挂耳上。
Attaching the cable management bracket to
S7500E switch models except S7506E-V
安装S7500E系列其他机型的走线架
Use a minimum of two people to move the switch. For heavy models, use a mechanical lift as a best
practice.
要求多人配合(不少于2人)搬运设备,对于较重机型, 推荐您使用机械设备搬运。
3
To ensure the grounding effect, use the
yellow-green grounding cable provided with
the switch to ground the switch.
为了保证良好的接地效果,请使用随机附带
的接地线(黄绿双色保护接地电缆)。
Connect the grounding cable to the grounding
system in the equipment room. Do not
connect it to a fire main or lightning rod.
消防水管和建筑物的避雷针接地都不是正确的
接地位置,交换机的接地线应该连接到机房的
工程接地。
Do not try to move the chassis by holding an FRU handle, air vents of chassis, or the handle on the
rear. Any attempt to carry the switch with these parts might cause equipment damage or even bodily
injury.
请勿试图通过抓握设备模块(风扇框、电源)把手、机箱通风孔或机箱后面板拉手来进行设备的搬运,
否则可能因该部件无法承重而引起设备损坏,甚至会伤害到您的身体。
!
1
2
2
2
2
2
2
2
2
1
!
Installing FRUs 安装模块
Before installing a card in the
chassis, make sure the connectors
on the card are not broken or
blocked.
安装前,请检查单板的连接器是否
有破损和堵塞,以免对机箱背板造
成损坏。
!
Installing cards 安装单板
2
1
3
4

6
5
Connecting power cords 连接电源线
Installing power modules 安装电源模块
Before connecting an AC power cord, make sure the circuit breaker at the power source end is
turned off.
连接交流电源线前,请您确保连接电源线的输入端空气开关置于断开状态。
!
Before connecting a DC power cord, make sure the circuit breakers for the positive (+) and negative
(–) terminals at the power source end are switched off.
连接直流电源线时,请您确保电源输入端的断路器处于完全断开状态(+、-两路均已断开)。
!
To use two power modules, provide a circuit breaker for each power module.
双电源供电时,每个电源必须单独配一个断路器。
!
Connecting the power cord for a PSR1400-A/PSR2800-ACV power module
连接PSR1400-A/PSR2800-ACV电源线
The PSR2800-ACV power module has a
system power socket and a PoE power socket.
The power cord connection procedure is
similar for the PSR2800-ACV and PSR1400-A
power modules. The figures use the PSR1400-
A power module as an example.
PSR2800-ACV电源模块上有1个系统输入电源
插口和1个PoE输入电源插口,电源线连接方法
都与PSR1400-A电源线的连接方法类似,本节
以PSR1400-A举例。
1
2
2
To avoid power module damage or bodily injury, move a power module by supporting its bottom
instead of holding its handle.
搬运电源模块时,请您用手托住模块的底部,切勿提着模块拉手进行搬运,以免损坏电源模块甚至伤害
您的身体。
!
For dual-grid input, the input voltage, phase, and frequency for the two grids must be the same.
双电网输入时,输入电压的幅值和频率需要保持一致。
!
Do not install a power module adapter and a 3RU module on the same switch. Make sure the two
power module slots have the same power modules and power modules adapters.
不同型号电源模块不能混插,不同型号的电源适配器不能混插,且电源适配器和3RU电源模块不能混插。
!
1
6
A
1
2
3
4
5
6
To use a power module adapter, first install the power module adapter in the chassis, and then install
power modules in the adapter. The installation procedure is similar for power modules and power
module adapters.
有的电源模块必须配合电源模块适配器使用,在安装电源模块前请先安装电源适配器,电源模块适配器
与电源模块的安装方法类似。
Connecting the power cord for a PSR650C-12A/
PSR1200-A power module 连接PSR650C-12A/
PSR1200-A电源线
Connecting the power cord for a
PSR320-A/PSR650-A power module 连
接PSR320-A/PSR650-A电源线
1
2
3
4
5
1
0
A
10A
1
2
3
4
Connecting the power cord for a PSR2500-12AHD
power module 连接PSR2500-12AHD
Connecting the power cord for a PSR6000-
ACV power module 连接PSR6000-ACV电源线
1
1
6
A
2
3
Connecting the power cord for a PSR320-
D/PSR650-D/PSR650C-12D power module
连接PSR320-D/PSR650-D/PSR650C-12D电源线
1 3
2
The PSR650C-12A power module uses a 10A AC
power cord. The PSR1200-A uses a 16A AC power
cord. The power cord connection procedure is similar
for the two power modules. This procedure uses the
PSR650C-12A as an example.
PSR650C-12A电源模块使用10A交流电源线,
PSR1200-A电源模块使用16A交流电源线,电源线连
接方法类似,本节以连接PSR650C-12A电源线为例。
1
6
A
The PSR2500-12AHD power module uses a 16A AC
power cord or a high-voltage DC power cord. This
procedure uses a 16A AC power cord as an example.
PSR2500-12AHD电源模块使用16A交流电源线或者
高压直流电源线,本节以连接16A交流电源线为例。

-
 1
1
-
 2
2
-
 3
3
-
 4
4


H3C S7500E Series Installation, Quick Start
- タイプ
- Installation, Quick Start
他の言語で
- English: H3C S7500E Series