


Terima kasih Anda telah memilih pengisap debu Electrolux
UltraOne. Petunjuk Pengoperasian ini mencakup semua model
UltrOne. Ini berarti, bahwa pada model tertentu, beberapa
aksesori/fitur mungkin tidak disertakan. Untuk mendapatkan
hasil terbaik, gunakan selalu aksesori asli Electrolux.
Aksesori tersebut dirancang khusus untuk penghisap debu
Anda.
Bahasa Indonesia ........................................30–42
感谢您选择 Electrolux UltraOne 真空吸尘器。这些
操作说明适用于 UltraOne 的所有型号。也就是说,操
作说明中有可能没有包含具体型号的某些配件/功能。
为确保获得最佳使用效果,请务必使用 Electrolux 原
装配件。
简体中文 ..........................................................16–28
感謝您選擇使用 Electrolux UltraOne 吸塵機。這
些「操作說明」涵蓋所有的 UltraOne 型號。這表
示您所選用的特定型號的某些配件/功能可能不包含
在內。為了確保最佳的使用效果,請一律使用原廠的
Electrolux 配件。
這些配件是專門針對您的吸塵機而設的。
中文 .......................................................................16–28
Thank you for choosing an Electrolux UltraOne vacuum
cleaner. These Operating Instructions cover all UltraOne
models. This means that with your specific model, some
accessories/features may not be included. In order to ensure
the best results, always use original Electrolux accessories.
They have been designed especially for your vacuum cleaner.
English ................................................................... 2–14
ขอขอบคุณที่เลือกใช้เครื่องดูดฝุ่น UltraOne
ของอีเลคโทรลักซ์ คู่มือการใช้เครื่องดูดฝุ่นเล่มนี้ใช้กับเครื่อง
ดูดฝุ่น UltraOne ได้ทุกรุ่น ดังนั้น อุปกรณ์ประกอบ/คุณสมบัติ
บางประการอาจไม่รวมอยู่ในเครื่องดูดฝุ่นของท่าน เพื่อรับประ
กันถึงประสิทธิภาพสูงสุดในการทำางาน ท่านควรใช้อุปกรณ์ปร
ะกอบของแท้ของอีเลคโทรลักซ์เสมอ
อุปกรณ์ประกอบเหล่านี้ออกแบบมาเป็นพิเศษสำาหรับเครื่องดู
ดฝุ่นของท่าน
ไทย ......................................................................30-42
일렉트로룩스 울트라 원을 구입해주셔서 대단히
감사합니다. 본 사용설명서는 모든 울트라 원
시리즈 모델들에 적용 됩니다. 따라서, 특정 모델 중
일부 부속품에 대해서는 적용되지 않을 수 있으니
자세한 문의사항은 당사 서비스 센터로 문의하시기
바랍니다. 최상의 청소기 성능을 유지하시려면 항상
각 제품에 맞게 제작된 일렉트로룩스 고유의 부속품을
사용해주시기 바랍니다.
한국어 ....................................................................2–14

2
17 18 19 20 25
21 22 23 24 26
4
10
11
16
13
15
14
3
2
1
5
46789
12

eng
cho
tha
ind
chn
chn
3
한국어
사용하기 전에
•
울트라 원 박스와 에어로프로 시스템 포장을 열어 모든 액세서리가 들어있는지
확인합니다*.
•
호스, 핸들, 튜브와 노즐을 포함한 에어로프로 시스템은 울트라 원에 맞게
디자인되어 있으며 이는 모델에 따라 차이가 있을 수 있습니다.
•
사용 설명서를 읽으십시오.
• 안전에 관한 내용을 더욱 주의 깊게 읽어주시기 바랍니다.
당신이 선택한 일렉트로룩스 울트라 원을 즐기세요.
목차
진공 청소기 사용 법
.......................................4-5
효율적인 사용을 위하여
.....................................6-7
필터 교체하기
...........................................8-9
에어로프로 노즐 청소하는 법 및 리모콘 핸들 배터리 교체하는 법
....... 10-11
문제 해결
...............................................12
안전을 위하여
............................................13
소비자 정보 및 지속가능 정책
..................................14
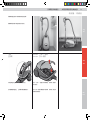
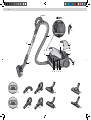
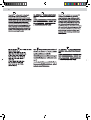
울트라 원 구조 및 부속품
1 디스플레이
2 헤파 필터 덮개
3 헤파 필터
4 가로/세로 보관용 거치대
5 전원 코드
6 모터 보호 필터
7 모터 보호 필터 홀더
8 S-bag® 먼지봉투
9 먼지칸 덮개
10 에어로프로 3in1 거치대 및 먼지칸 덮개 버튼
11 에어로프로 3in1 거치대
12 에어로프로 3in1 노즐(액세서리)
13 에어로프로 호스
14 핸들
15 에어로프로 연장관
16 노즐 보관용 클립
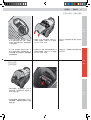
17 수동작동형 디스플레이
18 에어로프로 클래식 핸들
19 에어로프로 에르고 핸들
20 에어로프로 노즐
21 리모콘 작동형 디스플레이
22 에어로프로 리모콘 핸들
23 에어로프로 모터 노즐용 리모콘 핸들
24 에어로프로 모터 노즐
25 에어로프로 터보 노즐*
26 에어로프로 파케토 노즐*
* 표시된 부분은 일부 모델에만 해당 됩니다.
Content
English
Before starting
•
Unpack your UltraOne model and the Aeropro system and check that all accessories are
included*.
•
The Aeropro system consists of a hose, handle, tube and nozzle specically designed
for your UltraOne and which may vary from model to model.
•
Read the Operating Instructions.
• Pay special attention to the Safety advice chapter.
Enjoy your Electrolux UltraOne!
Table of contents:
How to use the vacuum cleaner
......................................................4-5
Tips on how to get the best results
...................................................6-7
Replacing the lters
..................................................................8-9
Cleaning the Aeropro nozzle and changing the battery in remote handle
...........10-11
Troubleshooting
.....................................................................12
Safety advice
........................................................................13
Consumer information and sustainability policy. . . . . . . . . . . . . . . . . . . . . . . . . . . . . . . . . . . . . . . 14
Description of your UltraOne:
1 Display
2 Hepa lter cover
3 Hepa lter
4 Parking slot
5 Power cord
6 Motor lter
7 Motor lter holder
8 S-bag®
9 Dust compartment cover
10 Button for Aeropro 3in1 compartment and dustbag comparment
11 Aeropro 3in1 compartment
12 Aeropro 3in1 nozzle
13 Aeropro hose
14 Handle
15 Aeropro telescopic tube
16 Parking clip
17 Display for models with manual control
18 Aeropro classic handle
19 Aeropro ergo handle
20 Aeropro nozzle
21 Display for models with remote control
22 Aeropro remote control handle
23 Aeropro remote control handle for motorized nozzle
24 Aeropro motorized nozzle
25 Aeropro turbo nozzle*
26 Aeropro parketto nozzle*
* Accessories may vary from model to model.
내용

4
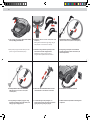
Click!
Click!
Click!
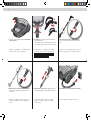
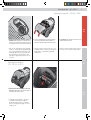
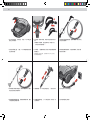
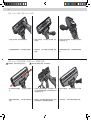
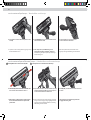
1. 버튼을 당겨 덮게를 엽니다. S-bag® 먼지봉투가
제대로 장착되어 있는지 확인 하십시오.
2. 호스를 삽입합니다. (호스를 분리하기 위해서는
양쪽의 잠금 버튼을 누르고 호스를 당기십시오.)
호스를 호스 핸들에 삽입하고 딸깍 소리가 날
때까지 밀어 고리에 연결되도록 합니다(호스를
분리하려면 버튼을 누르면서 당김).
3. 연장관을 바닥 브러쉬에 연결하십시오. (분리하기
위해서는 잠금버튼을 누르고 노즐을 당겨 뺍니다.)
4. 연장관을 호스 핸들에 연결하십시오. (분리하기
위해서는 잠금버튼을 누르고 호스 핸들을 당겨
뺍니다.)
5. 연장관 길이를 조절하기 위해서는 길이조절
버튼을 누른 상태에서 다른 한 손으로 핸들을
잡아당기십시오.
6. 전원 코드를 뽑아 전원 콘센트에 꽂으십시오.
1. Open the cover by pulling the button. Check that the
s-bag® is in place.
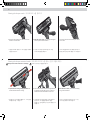
4. Attach the telescopic tube to the hose handle (to
remove it, press the lock button and pull the hose
handle out).
5. Adjust the telescopic tube by holding the lock with
one hand and pulling the handle with the other hand.
6. Pull out the power cord and plug it into the mains.
2. Insert the hose (to remove it, press the lock buttons
and pull the hose out).
Insert the hose into the hose handle until the catches
click to engage (press the catches to release the hose).
3. Attach the telescopic tube to the oor nozzle (to
remove it, press the lock button and pull the nozzle
o).

eng
cho
tha
ind
chn
chn
5
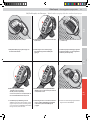
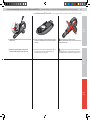
7. 전원버튼을 눌러 전원을 켜고 끕니다. 8. 리모콘이 장착된 모델의 경우. 핸들 리모콘 중앙
버튼을 눌러 전원을 켜고 끌 수 있습니다.
9. 본체에 흡입력 조절버튼이 있는 모델의 경우.
본체에 있는 +/- 버튼을 눌러 흡입력을 조절합니다.
7. Switch on/o the vacuum cleaner by pushing the
ON/OFF button.
10. Adjust suction power. Models with remote control.
The cleaner starts in auto-function (automatic suction
power regulation). To regulate manually press MIN/
MAX button.To go back to auto-function, press AUTO
button.
11. Models with remote control and Aeropro
motorized nozzle. To turn the motorized nozzle on
and o, press BRUSH button on the handle.
12. After vacuuming rewind the cable by pushing the
REWIND button.
8. Models with remote control can also be operated by
the ON/OFF button on the handle.
9. Adjust suction power. Models with manual
regulation. Push +/- button with your hand to adjust
suction power.
Start/stop the vacuum cleaner and adjust suction power / 진공 청소기 사용 시작/중지 및 흡입력 조절
How to use the vacuum cleaner / 진공 청소기 사용 방법
10. 리모콘으로 흡입력을 조절하는 모델의 경우.
자동 흡입력 조절 버튼(AUTO)을 눌러 청소를
시작합니다. 수동 조절을 위해서는 MIN/MAX
버튼을 눌러 조정합니다. 다시 자동 조절을 원할
경우 AUTO 버튼을 누릅니다.
11. 리모콘으로 에어로프로 모터노즐을 조절하는
모델의 경우. 모터 노즐을 켜고 끄기 위해 핸들
리모콘의 BRUSH 버튼을 누릅니다.
12. 청소가 끝나면 자동 전선감개 버튼을 눌러 전선을
되감습니다.

6
1.
2.
3.
3.
4.
5.
6.
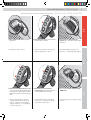
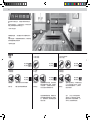
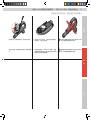
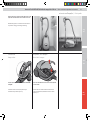
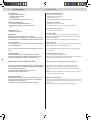
흡입력 수동 조절시 : 최상의 청소 효과를 위하여
그래픽에 따라 흡입력을 조절합니다.
자동 흡입력 조절시 :* 최상의 청소 효과와 모든
바닥에서의 편안한 청소를 위하여 자동으로 흡입력이
조절됩니다.
* 표시 부분은 일부 모델에만 해당됩니다
1.
패브릭, 침구 청소시 2. 틈새, 코너 청소시 3. 책장, 가구 청소시
4.
일반 바닥 청소시 5. 러그 청소시 6. 카펫 청소시
브러쉬를 아래로
내립니다.
브러쉬를 위로
올립니다.
브러쉬를 위로
올립니다.
원하는 대로 브러쉬 롤러를
장착하거나 분리할 수 있습니다.*
(일부 모델에만 해당)
먼지 흡착력이 좋은 모터 노즐은 카펫
청소 시 브러쉬 롤러를 사용하여
카펫을 털어 먼지를 꼼꼼하게
제거합니다. 브러시 롤러가 작동할
때에는 모터 노즐을 고정하지
마십시오.*(일부 모델에만 해당)
주의 사항: 모피 러그, 긴 술이 달린
러그 또는 털 길이가 15mm 이상인
러그를 청소할 경우에는 모터
노즐에서 브러시 롤러를 사용하지
않아야 합니다. BRUSH(브러시)
단추를 눌러 브러시 롤러 기능을
해제합니다.*(일부 모델에만 해당)
Models with manual regulation: follow graphics for
optimal performance.
Models with autofunction:* automatically adjust the
suction power in order to give an optimal cleaning
performance and comfort on every surface.
* Certain models only.
1.
Curtains
4.
Hard oors 5. Rugs 6. Delicate carpets
2.
Crevices, corners 3. Bookshelves, upholstery
Power setting
흡입력 조절
Power setting
흡입력 조절
Power setting
흡입력 조절
Power setting
흡입력 조절
Power setting
흡입력 조절
Power setting
흡입력 조절
Brushes down. Brushes up. Brushes up.Brush roller on or o as preferred. Motorized nozzle gives the best dust
pick-up and deep cleaning of carpets
through the rotating brush roller
agitating the carpet. Do not leave the
motorized nozzle stationary with brush
roller on.
Attention: on fur rugs, rugs with long
fringes or deep pile exceeding 15 mm
the motorized nozzle should have the
brush roller o. Press BRUSH button to
turn the brush roller o.

eng
cho
tha
ind
chn
chn
7
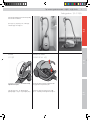
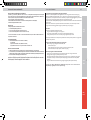
청소기 옆면 또는 뒷면에 있는 가로 / 세로 보관용
거치대에 노즐을 끼워 보관합니다.
공기 밸브 에어로프로 3in1 노즐
수동 조정 모델의 경우, 공기 밸브를 사용하여
흡입력을 조절할 수 있습니다.*(일부 모델에만 해당)
본체의 3in1 버튼을 눌러 액세서리 보관 덮개를
엽니다. 사용 후에는 액세서리를 제자리에 끼웁니다.
Insert the nozzle parking clip into one of the two parking
slots on the side or on the back.
On manually controlled models, the air valve can help
adjust the suction power.
Press the 3in1 button to open the compartment. After
usage, put the accessory back in its place.
Tips on how to get the best results / 효율적인 사용을 위해서
Parking positions / 청소기 보관법
Air valve Aeropro 3in1 nozzle

8
®
®
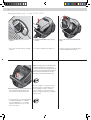
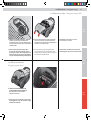
1. 본체 “S-BAG” 표시에 불이 들어오면 먼지봉투를
교체합니다.
2. 3in1 버튼을 당겨 본체의 먼지칸 커버를 엽니다. 3. 먼지봉투의 카드보드를 당겨 먼지봉투 입구를 닫고,
S-bag® 먼지봉투를 본체에서 분리합니다.
주의 사항 : 먼지봉투가 다 차지 않더라고 S-BAG
표시에 불이 들어오거나 카펫 청소용 파우더 사용
후에는 먼지봉투를 바꾸어줍니다.(막혀있을 수
있습니다.) 최상의 청소 성능을 위하여 울트라 원
모델을 위해 개발된 울트라 롱 퍼포먼스 먼지봉투를
사용하여 주십시오.
4. 카드보드를 수직으로 눌러 먼지봉투 홀더에 새로운
S-bag® 먼지봉투를 삽입합니다. 먼지봉투를
삽입 후 본체 덮개를 닫습니다. 만약 S-bag®
먼지봉투가 제대로 장착되지 않거나 없는 경우
뚜껑이 닫히지 않습니다.
Replacing the dustbag, s-bag® / S-bag® 먼지봉투 교체하기
1. Change the dustbag when the s-bag® indicator is
illuminated.
2. Open the dust compartment cover by pulling the
3in1 button.
3. Pull the cardboard handle to close and remove the
s-bag®
4. Insert a new s-bag® by pushing the cardboard straight
down in its tracks. Close the lid. If the s-bag® is not
properly placed or is missing, the lid will not close.
NB: Always change the s-bag® when the indicator signal
is illuminated even if the s-bag® is not full (it may be
blocked) and after using carpet cleaning powder. For best
performance use the Ultra Long Performance bag which
has been developed specically for your UltraOne or
alternatively any Electrolux original synthetic s-bag®.

eng
cho
tha
ind
chn
chn
9
Click!
Click!
1. 본체 “FILTER” 표시에 불이 들어오면 헤파필터를
교체합니다. 물세척이 불가능한 헤파필터를 사용한
경우 새 필터로 교체해주십시오. 물세척이 가능한
헤파필터를 사용한 경우에는 필터의 안쪽(먼지가
묻은 쪽)을 흐르는 차가운 물에 헹굽니다. 필터
테두리를 잡고 물기를 완전히 건조시킨 다음 다시
끼우십시오.
2. 본체 뒷면 아래쪽의 “FILTER”라고 표시된 두 개의
날개부분을 들어올린 후 뒤쪽으로 당겨 덮개를 열고
필터를 교체합니다. 일렉트로룩스 전용 필터를
사용해주십시오.
3. 덮개를 닫기 위해서 덮개 앞쪽 걸쇠를 먼저 밀어서
끼우고 딸깍 소리가 나도록 덮개 뒤쪽을 누릅니다.
1. 먼지봉투를 5회 갈아끼울 때마다, 혹은 필터가
더러워졌을 때 모터보호필터를 교체합니다.
필터폴더를 아래쪽으로 밀면서 당겨 본체에서
분리하고, 필터를 갈아준 후 홀더를 다시 끼우고
덮개를 닫습니다.
1. Replace the Hepa lter when the “lter” indicator is
illuminated. If the Hepa lter is non-washable, replace
it with a new one. If the lter is washable rinse it in cold
running water. Ensure it is totally dry before replacing.
2. Open the rear lid lifting the two lower wings marked
“lter”, pull it backwards and change the lter. Use
Electrolux original lters: EFH 12, 12W, 13W or s-lter.
3. To close the lid, insert the front hooks in the rails, push
the lid forward and press down.
1. Replace the motor lter when dirty or after every
5th s-bag®. Push the lter holder down and pull it out.
Exchange the lter and close the lid.
Replacing the Hepa filter / 헤파필터 교체하기
Replacing the filters / 필터 교체하기
Replacing the motor filter
모터 보호 필터 교체하기

10
1. 노즐을 튜브에서 분리합니다. 호스 핸들을 이용해서
노즐을 청소합니다.
2. 노즐의 바퀴 부분이 먼지로 막힐 경우, 작은
드리아버로 휠캡을 빼냅니다.
3. 바퀴의 축을 돌려 빼고 모든 부품을 청소합니다.
분리할 때와 반대 순서로 부품을 다시 조립합니다.
1. 걸쇠를 눌러 브러쉬 롤 덮개를 엽니다. 그러면 전면
바퀴를 청소하실 수 있습니다.
2. 브러쉬 롤을 꺼내 얽힌 부분을 가위를 사용하여
잘라냅니다. 호스 핸들을 사용하여 노즐을
청소합니다. 분리할 때와 반대 순서로 부품을 다시
조립합니다.
3. 노즐의 바퀴 부분이 먼지로 막힌 경우, 작은
드라이버를 사용하여 제거해 줍니다.
Cleaning the Aeropro nozzle / 에어로프로 노즐 청소하기
Cleaning the Aeropro motorized nozzle / 에러로프로 모터 노즐 청소* (일부 모델에 해당)
Always disconnect the nozzle before cleaning it. / 청소하기 전에 항상 노즐을 분리합니다.
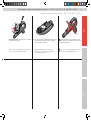
1. Disconnect the nozzle from the tube. Use the hose
handle to clean the nozzle.
2. If the wheels are stuck, clean them by removing the
wheel cap with a small screwdriver.
3. Unscrew the wheel axis and clean all parts. Ret in
reverse order.
1. Open brush roll cover by pushing the latches. This
will free the front wheels for cleaning.
2. Pull out the brush roll and remove entangled threads
by snipping them away with scissors. Use the hose
handle to clean the nozzle. Ret in reverse order.
3. If the wheels are stuck, remove them carefully by
using a small screwdriver.

eng
cho
tha
ind
chn
chn
11
1. 핸들 리모콘의 어떤 버튼을 눌러도 표시등에 불이
켜지지 않으면 배터리를 교체하여 줍니다.
2. 리튬(LITHIUM) CR2032 타입 배터리만을
사용하십시오. 배터리는 다 닳으면 방치해두지
말고, 안전하게 버려야 합니다.
모터 노즐 시스템의 원격 핸들에는 배터리나 표시
램프가 없으므로 모터 핸들을 열지 마십시오.
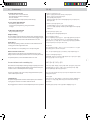
1. Change battery when light indicator is not responding
when pressing any button.
2. Use only batteries type LITHIUM CR2032. Batteries must
be removed from the appliance before it is scrapped
and are to be disposed of safely.
Remote handle with motorized nozzle system DO
NOT have any batteries or light indicator, so DO NOT try to
open the motorized handle.
Changing the battery in remote handle / 핸들 리모콘 배터리 교체하기
Cleaning Aeropro nozzles and changing battery in handle / 에러로프로 노즐 청소하기 및 핸들 배터리 교체하기

12
진공 청소기가 작동하지 않는 경우
• 플러그가 전원 콘센트에 제대로 꽂혀 있는지 확인하십시오.
플러그나 전선이 손상되었는지 확인하십오.
퓨즈가 끊어졌는지 확인하십시오.
핸들리모콘 버튼을 누를 때 배터리 표시등에 불이 들어오는지 확인하십시오.(
해당 모델의 경우)
S-BAG 표시 램프에 불이 들어오는 경우
• S-bag® 먼지봉투가 가득 차거나 막히지 않았는지 확인합니다.
• 만약 이미 S-bag® 먼지봉투를 교체하였다면 9페이지를 참조하여 모터필터를
교체하십시오.
필터 표시 램프에 불이 들어오는 경우
• 9페이지를 참조하여 헤파필터를 교체하십시오.
청소기의 모든 불이 깜박일 때
청소기가 과열되었을 가능성이 높습니다 : 전원 코드를 콘센트에서 분리하십시오;
노즐, 튜브, 호스가 막혔는지 확인하십시오. 다시 전원을 연결하기 전에 30분
정도 식히십시오. 만약 여전히 청소기가 작동하지 않는다면 지정된 일렉트로룩스
고객센터로 연락하십시오.(고객센터 1566-1238)
호스 청소하기
호스는 눌러 짜면서 청소할 수 있습니다. 그러나 호스에 유리조각이나 바능 등이
걸려 막혀있는 경우가 있으므로 주의하십시오.
주의 : 호스 청소 과정에서 발생된 손상에 대해서는 보증이 적용되지 않습니다.
진공청소기 내부로 물이 들어갔을 때
일렉트로룩스 지정 서비스 센터에서 모터를 교환해야 합니다. 물이 들어가 발생한
모터의 손상은 보증 수리가 되지 않습니다.
문제 해결
The vacuum cleaner does not start
• Checkthatthecableisconnectedtothemains.
• Checkthattheplugandcablearenotdamaged.
• Checkforablownfuse.
• Checkifthebatteryindicatorlampresponds(certainmodelsonly).
The s-bag® indicator light is illuminated
• Checkifthes-bag®isfullorblocked.
• Ifyouhavealreadychangedthes-bag®,changethemotorlter.
See page 9.
The lter indicator light is illuminated
• ChangetheHepalter.Seepage9.
All lights are blinking
The cleaner might be overheated: disconnect it from the mains; check if the nozzle, tube
or hose are blocked. Let the cleaner cool down for 30 minutes before plugging it in again.
If the cleaner still does not work, contact an authorized Electrolux service centre.
Clearing the hose
Clear the hose by “squeezing“ it. However, be careful in case the obstruction has been
caused by glass or needles caught inside the hose.
Note: The warranty does not cover any damage to hoses caused by cleaning them.
Water has entered the vacuum cleaner
It will be necessary to replace the motor at an authorized Electrolux service centre.
Damage to the motor caused by the penetration of water is not covered by the warranty.
For any further problems, contact an authorized Electrolux service centre.
Troubleshooting
소비자 정보 및 지속가능 정책
Electrolux는 제품의 부적절한 사용 또는 제품 개조로 인해 발생하는 모든 손해에
대해 일체 책임을 지지 않습니다. 보증 및 소비자 문의에 대한 자세한 내용은
패키지와 함께 제공된 보증 책자를 참조하십시오.
청소기 또는 사용 설명서에 대해 의견이 있으시면 [email protected]으로
이메일을 보내 주십시오.
지속가능 정책
Electrolux 청소기는 친환경 제품입니다. 모든 플라스틱 부품에는 재활용 표시가
되어 있습니다. 자세한 내용은 Electrolux 웹 사이트 www.electrolux.com을
참조하십시오.
포장 재료는 환경 친화적인 소재로 만들어졌으며 재활용할 수 있습니다.
Electrolux declines all responsibility for all damages arising from any improper use of the
appliance or in cases of tampering with the appliance. For more details of warranty and
consumers’ contacts see the Warranty Booklet in the packaging
If you have any comments on the cleaner or the Operating Instructions manual please
e-mail us at [email protected]
Sustainability policy
This product is designed with the environment in mind. All plastic parts are marked for
recycling purposes. For details see our website: www.electrolux.com
The packaging material is chosen to be environmentally friendly and can be recycled.hhh
Consumer information and sustainability policy

eng
cho
tha
ind
chn
chn
13
안전에 대한 주의사항
본 진공 청소기는 성인에 의한 일반적인 가정의 실내 청소용 제품입니다. 지식이나
경험이 부족하거나 정신적, 신체적으로 도움이 필요한 경우에는 안전을 위하여
반드시 도움을 줄 수 있는 사람의 도움을 받아 사용하십시오. 진공청소기를
사용하지 않을 때에는 항상 전원 플러그를 콘센트에서 분리해 주십시오.
주의
본 진공청소기는 전기 기기입니다.
•
액체를 흡입하지 마십시오.
• 제품 세척 시 물에 담그지 마십시오.
• 정기적으로 호스를 점검하시고, 손상된 경우 사용을 중단하십시오.
위 사항은 모터에 치명적인 손상을 줄 수 있으며 위 사항에 의한 모터 손상은 보증
수리가 되지 않습니다.
다음과 같은 곳을 청소할 때에는 절대로 진공청소기를 사용하지 마십시오.
• 인화성 기체가 차있는 곳이나 그 부근
날카로운 물체
타다 남은 불똥 또는 꺼지지 않은 담배꽁초 등
미세한 먼지, 예 : 고운 석고 가루, 콘크리트, 밀가루 또는 잿가루
전원 전선에 대한 주의사항
•
정기적으로 전원 전선이 손상되었는지 점검하십시오. 전원 전선이 손상된
상태에서는 절대로 진공 청소기를 사용하지 마십시오.
•
손상된 전선은 일렉트로룩스 지정 서비스 센터에서 교환해야만 합니다. 청소기
전선이 손상되었을 경우에는 보증수리가 되지 않습니다.
•
절대로 전선을 잡고 청소기를 끌거나 들어 올리지 마십시오.
모든 서비스는 일렉트로룩스 지정 서비스 센터로 문의하십시오. 진공
청소기는 반드시 건조한 곳에 보관하십시오.
Safety advice
Safety requirement and warning
This appliance is not intended for use by persons (including children) with reduced
physical, sensory or mental capabilities or lack of experience and knowledge, unless they
are given supervision or instructions concerning the use of the appliance by a person
responsible for their safety.
Children should be supervised to ensure that they do not play with the appliance.
Always disconnect the plug from the mains before cleaning or maintaining the appliance.
Never use the vacuum cleaner without its lters.
Caution
This appliance contains electrical connections:
•
Never vacuum any liquid
• Do not immerse in any liquid for cleaning
• The hose should be checked regularly and must not be used if damaged.
The above can cause serious damage to the motor, which is not covered by the warranty.
Never use vacuum cleaner
• Closetoammablegases,etc.
• Onsharpobjects
• Onhotorcoldcinders,litcigarettebutts,etc.
• Onnedust,forinstanceplaster,concrete,our.
Power cord precautions
•
Regularly check that the plug and cord are not damaged. Never use the vacuum
cleaner if the cord is damaged.
•
If the cord is damaged, it must be replaced only by an authorized Electrolux service
centre in order to avoid a hazard. Damage to the vacuum cleaner’s cord is not covered
by the warranty.
•
Never pull or lift the vacuum cleaner by the cord.
All servicing and repairs must be performed by an authorized Electrolux service
centre. Store the vacuum cleaner in a dry place.
안전에 대한 주의사항

14
17 18 19 20 25
21 22 23 24 26
4
10
11
16
13
15
14
3
2
1
5
46789
12

eng
cho
tha
ind
chn
chn
15
感谢您选择 Electrolux UltraOne 真空吸尘器。这些操作说明适用于 UltraOne 的
所有型号。也就是说,操作说明中有可能没有包含具体型号的某些配件/功能。为确
保获得最佳使用效果,请务必使用 Electrolux 原装配件。
简体中文
开始使用前
•
打开 UltraOne 产品和 Aeropro 系统的包装,检查配件是否齐全*。
•
Aeropro 系统由专为您的 UltraOne 设计的软管、手柄、硬管和吸嘴组成,可能因
型号不同而异。
•
阅读操作说明。
•
请特别注意“安全建议”章节。
尽情享用 Electrolux UltraOne 吧!
目录:
真空吸尘器使用方法. . . . . . . . . . . . . . . . . . . . . . . . . . 18-19
获得最佳效果的建议. . . . . . . . . . . . . . . . . . . . . . . . . . 20-21
更换滤网. . . . . . . . . . . . . . . . . . . . . . . . . . . . . . . 22-23
清洁 Aeropro 吸嘴以及更换遥控手柄中的电池
..............24-25
故障排除. . . . . . . . . . . . . . . . . . . . . . . . . . . . . . . . 26
安全建议. . . . . . . . . . . . . . . . . . . . . . . . . . . . . . . . 27
消费者信息和环保政策. . . . . . . . . . . . . . . . . . . . . . . . . . 28
UltraOne 图示:
1 显示屏
2 Hepa 滤网盖
3 Hepa 滤网
4 固定槽
5 电源线
6 马达滤网
7 马达滤网支架
8 S-bag®
9 集尘室盖
10 Aeropro“三合一”刷嘴储藏盒及尘盒按扭
11 Aeropro“三合一”刷嘴储藏盒
12 Aeropro“三合一”吸嘴
13 Aeropro 软管
14 手柄
15 Aeropro 伸缩管
16 固定夹
17 带手动控制功能的型号的显示屏
18 Aeropro classic 手柄
19 Aeropro ergo 手柄
20 Aeropro 吸嘴
21 带遥控功能的型号的显示屏
22 Aeropro 遥控手柄
23 电机传动吸嘴的 Aeropro 遥控手柄
24 Aeropro 电机传动吸嘴
25 Aeropro 涡轮吸嘴*
26 Aeropro parketto 吸嘴*
* 配件可能因型号不同而异。
內容
感謝您選擇使用 Electrolux UltraOne 吸塵器。這些「操作說明」涵蓋所有的
UltraOne 系列型號。這表示針對您所選用的特定型號,某些配件/功能可能不包含在
內。為了確保最佳的使用效果,請一律使用 Electrolux 原廠的配件。這些配件是專
門針對您的吸塵器而設計的。
繁體中文
開始使用前
•
打開彩盒,取出您的 UltraOne 吸塵器和 Aeropro 系統配件,並且檢查內附配件
是否完整*。
•
Aeropro 系統包含 UltraOne 專用的軟管、手柄、伸縮管和吸頭,內容會依不同型
號而有所差異。
•
閱讀「操作說明」。
•
請詳閱「安全守則」一章。
祝您使用 Electrolux UltraOne 愉快!
目錄:
如何使用吸塵器. . . . . . . . . . . . . . . . . . . . . . . . . . . . 18-19
如何獲得最佳使用效果的秘訣. . . . . . . . . . . . . . . . . . . . . . 20-21
更換濾網. . . . . . . . . . . . . . . . . . . . . . . . . . . . . . . 22-23
清潔 Aeropro 吸頭和更換遙控手柄的電池
................24-25
疑難排解. . . . . . . . . . . . . . . . . . . . . . . . . . . . . . . . 26
安全守則. . . . . . . . . . . . . . . . . . . . . . . . . . . . . . . . 27
消費者資訊與環境永續政策. . . . . . . . . . . . . . . . . . . . . . . . 28
了解您的 UltraOne 吸塵器:
1 顯示螢幕
2 Hepa 濾網蓋
3 Hepa 濾網
4 停放插槽
5 電源線
6 馬達濾網
7 馬達濾網架
8 專利S-bag®集塵袋
9 集塵袋槽上蓋
10 開啟 Aeropro 三合一配件收納槽和集塵袋槽的按鈕
11 Aeropro 三合一配件收納槽
12 Aeropro 三合一吸頭
13 Aeropro 軟管
14 手柄
15 Aeropro 伸縮管
16 停放插槽
17 手控型號的顯示
18 Aeropro 經典手柄
19 Aeropro Ergo 手柄
20 Aeropro 吸頭
21 配備遙控手柄的型號上的顯示螢幕
22 Aeropro 遙控手柄
23 Aeropro 電動強力吸頭專用遙控手柄
24 Aeropro 電動強力吸頭
25 Aeropro 渦輪吸頭*
26 Aeropro Parketto 木質地板專用吸頭*
* 配件內容會根據不同型號而有差異。
目录

16
Click!
Click!
Click!
1. 按下按钮并抬起,打开前盖。 检查 s-bag® 集尘袋
是否已安装到位。
4. 将伸缩管与软管手柄连接(要取下软管手柄,请按下
锁定按钮并拔出软管手柄)。
5. 调整伸缩管:请一手按住锁定按钮,一手拉动手柄。 6. 拉出电源线,并插到插座上。
2. 插入软管(要取下软管,请按下锁定按钮并拔出软
管)。
将软管插入软管柄,直至压扣咔哒一声接合入位
(按下压扣可松脱软管)。
3. 将伸缩管与地板吸嘴连接(要取下吸嘴,请按下锁定
按钮并拔出吸嘴)。
1. 拉按鈕以開啟上蓋。 檢查 s-bag® 集塵袋是否安裝
在正確的位置。
2. 插入軟管 (若要拔除軟管,請按下兩邊的鎖鈕再將
軟管拔出)。
將軟管插入軟管手柄,直到壓扣正好卡住 (按住
壓扣可鬆開軟管)。
3. 將伸縮管接到地板吸頭 (若要拔除吸頭,請按下鎖
鈕再拔出吸頭)。
4. 將伸縮管接到軟管手柄 (若要拔除軟管手柄,請按
下鎖鈕再拔出軟管手柄)。
5. 欲調整伸縮管長度, 以一手按住鎖扣,再以另一手
拉手柄即可。
6. 拉出電源線並插上電源。

eng
cho
tha
ind
chn
chn
17
7. 启动/关闭真空吸尘器:按下开/关按钮即可。
10. 调节吸力。 带遥控功能的型号:
吸尘器启动时会采用自动模式(自动调节吸力)。
按 MIN/MAX 按钮可手动调节吸力。要恢复自动调节
状态,请按 AUTO 按钮。
11. 带遥控功能和 Aeropro 电机传动吸嘴的型号: 要
打开和关闭电机传动吸嘴,请按手柄上的 BRUSH 按
钮。
12. 清洁后,请按下 REWIND 按钮收回电缆。
8. 带遥控功能的型号也可以通过手柄上的开/关按钮进
行操作。
9. 调节吸力。 带手动调节功能的型号: 按 +/- 按钮
调节吸力。
真空吸尘器使用方法 / 如何使用吸塵器
7. 欲開/關吸塵器 ,請按下開/關按鈕。 8. 附遙控手柄的型號 也可以直接按手柄上的開/關按鈕
以開/關機器。
9. 調整吸力。 手動調整的型號。 請按 [+/-] 按鈕來
調整吸力。
启动/关闭真空吸尘器,以及调节吸力 / 開/關吸塵器及調整吸力
10. 調整吸力。 附遙控手柄的型號。
吸塵器開機後即為自動功能模式 (自動調整吸力)
。 若要手動調整,請按 [MIN/MAX] 按鈕。若要返
回自動功能模式,請按 [AUTO] 按鈕。
11. 附遙控手柄和 Aeropro 電動強力吸頭的型號。 若
要開/關電動強力吸頭,請按下手柄上的 [BRUSH]
按鈕。
12. 吸塵器使用完畢後, 請按下捲線[REWIND]按鈕以捲
回電源線。

18
1.
2.
3.
3.
4.
5.
6.
带手动调节功能的型号: 请按图示操作获得最佳效
果。
带自动功能的型号:* 可自动调节吸力,以便能在各种
表面上获得最佳清洁效果和舒适度。*
* 仅限于特定型号
1.
窗帘
4.
硬质地板 5. 小地毯 6. 高级地毯
2.
缝隙、角落 3. 书架及室内装饰物
吸力设置 吸力设置 吸力设置
吸力设置吸力设置吸力设置
毛刷收起。 毛刷打开。 毛刷打开。可依个人喜好打开或关闭辊刷。 通过旋转辊刷搅动地毯,电机传动吸
嘴能提供最好的吸尘效果,对地毯进
行深度清洁。 在辊刷打开的情况下,
不要让电机传动吸嘴原地不动。
注意: 在毛质地毯、带长穗或厚度超
过 15 毫米的地毯上使用时,应将电
机传动吸嘴的辊刷关闭。 按 BRUSH
按钮关闭辊刷。
手動調整的型號: 請按照圖示操作以獲得最佳使用
效果。
自動功能型號:* 吸塵機會自動調整吸力,以輕鬆地在
任何表面獲得最佳清潔效果。
* 僅限特定型號。
吸力設定 吸力設定 吸力設定
1.
窗簾 2. 縫隙、角落 3. 書櫃、襯墊
4.
硬質地板 5. 地毯 6. 精緻地毯
吸力設定吸力設定吸力設定
毛刷下放。 毛刷收起。 毛刷收起。依個人喜好開啟或關閉滾刷。
透過旋轉滾刷震動地毯,電動強力吸
頭可獲得最佳吸塵效果並深入清潔地
毯。 滾刷開啟時,請勿讓電動強力吸
頭靜止不動。
注意: 在毛毯、有長鬚邊或軟毛
深度超過 15 毫米的地毯上使用電
動強力吸頭時,請將滾刷關閉。 按
[BRUSH] 按鈕即可關閉滾刷。
ページが読み込まれています...
ページが読み込まれています...
ページが読み込まれています...
ページが読み込まれています...
ページが読み込まれています...
ページが読み込まれています...
ページが読み込まれています...
ページが読み込まれています...
ページが読み込まれています...
ページが読み込まれています...
ページが読み込まれています...
ページが読み込まれています...
ページが読み込まれています...
ページが読み込まれています...
ページが読み込まれています...
ページが読み込まれています...
ページが読み込まれています...
ページが読み込まれています...
ページが読み込まれています...
ページが読み込まれています...
ページが読み込まれています...
ページが読み込まれています...
ページが読み込まれています...
ページが読み込まれています...
-
 1
1
-
 2
2
-
 3
3
-
 4
4
-
 5
5
-
 6
6
-
 7
7
-
 8
8
-
 9
9
-
 10
10
-
 11
11
-
 12
12
-
 13
13
-
 14
14
-
 15
15
-
 16
16
-
 17
17
-
 18
18
-
 19
19
-
 20
20
-
 21
21
-
 22
22
-
 23
23
-
 24
24
-
 25
25
-
 26
26
-
 27
27
-
 28
28
-
 29
29
-
 30
30
-
 31
31
-
 32
32
-
 33
33
-
 34
34
-
 35
35
-
 36
36
-
 37
37
-
 38
38
-
 39
39
-
 40
40
-
 41
41
-
 42
42
-
 43
43
-
 44
44


Electrolux Z8830PT ユーザーマニュアル
- カテゴリー
- 掃除機
- タイプ
- ユーザーマニュアル
関連論文
-
Electrolux ZUOM9911SO ユーザーマニュアル
-
Electrolux PD91-ANIMA ユーザーマニュアル
-
-
-
-
Electrolux EHET66CS ユーザーマニュアル
-
-
-
-
