
Pure C9
Bagless canister vacuum cleaner/
无袋式真空吸尘器/
集塵盒臥式插電吸塵器/
유선 진공 청소기/
Penyedot debu tanpa kantung penampung/
/
Máy hút bụi dạng hộp không túi
Instruction Book/说明书/說明手冊/
사용설명서/Buku Petunjuk/
/Sách hướng dẫn
GB INSTRUCTION BOOK ................2
SC 说明书 ................................................10
CT 說明手冊 ............................................ 18
KO 사용설명서 .......................................26
BI BUKU PETUNJUK ..........................34
TH .....................................42
VN SÁCH HƯỚNG DẪN ......................... 50

www.electrolux.com
2
M1 *M2 *
U *
K
V* W* X*
Y* Z* AA* AB*
M3 *
*
T *
A1
*
L
A2
*
E
F
C
D
B
A
M
*
N
*
H
I
J
G
OE
G
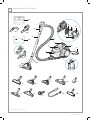
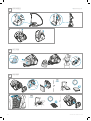
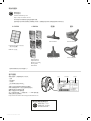
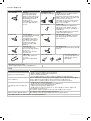
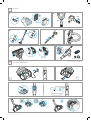
1OVERVIEW OF THE PRODUCT
* CERTAIN MODELS ONLY

3
www.electrolux.com
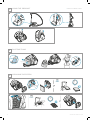
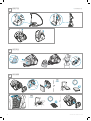
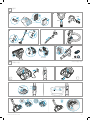
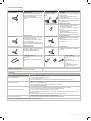
2INSTALLATION
Click!
Click!
Click!
Click!
12
3 4 5
Ref: 2xAA
*
CR1632
Ref: LITHIUM CR1632
**
6 7
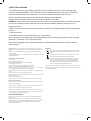
3USING THE PRODUCT
MAX
MIN
MIN
MAX
*
10
*
8 9
* CERTAIN MODELS ONLY
*
11

www.electrolux.com
4
24h
12 months
16
24h
6 months
15
12
12
13
5CLEANING THE FILTERS
3
4
USING THE PRODUCT
DUST EMPTYING
MAX
14
* CERTAIN MODELS ONLY

5
www.electrolux.com
24h
17
A
B
C
5!
19
6
7
MAINTENENCE
SYSTEM CHECK
* *
18
* CERTAIN MODELS ONLY
5CLEANING THE FILTERS

www.electrolux.com
6
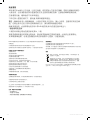
SAFETY PRECAUTIONS
This appliance can be used by children aged from 8 years and above and persons with reduced physical,
sensory or mental capabilities or lack of experience and knowledge if they have been given supervision or
instruction concerning use of the appliance in a safe way and understand the hazards involved.
Children should be supervised to ensure that they do not play with the appliance.
Cleaning and maintenance shall not be done by children without supervision.
WARNING: Turbo nozzles* have a rotating brush where parts can get entrapped. Please use them with caution
and only on intended surfaces. Please turn the vacuum cleaner o before removing entrapped parts or
cleaning the brush.
Batteries must be removed from the remote control in the handle* / LED lighted nozzle* before scrapping the
product**.
*Certain models only.
**Information on how to remove the battery is in section 6 and 7.
Always disconnect the plug from the mains before cleaning or maintaining the appliance or when removing
the battery. The battery is to be disposed of safely.
If the cord is damaged, it must be replaced only by an authorized Electrolux service centre in order to
avoid a hazard.
Pure C9 should only be used for normal vacuuming indoors and in a
domestic environment. Make sure the vacuum cleaner is stored in a dry
place.
All service or repairs must be carried out by an authorized Electrolux
service centre.
Packaging material, e.g. plastic bags should not be accessible to children
to avoid suocation.
Never use the vacuum cleaner:
In wet areas.
Close to ammable gases, etc.
When the product shows visible signs of damage.
On sharp objects or uids.
When the oor nozzle shows visible signs of a damages.
On hot or cold cinders, lighted cigarette butts, etc.
On ne dust, for instance from plaster, concrete, our, hot or cold ashes.
Do not leave the vacuum cleaner in direct sunlight.
Avoid exposing the vacuum cleaner to strong heat or freezing tempera-
tures.
Never use the vacuum cleaner without its lters.
Do not try to touch the brush roll while the cleaner is switched on and the
brush roll is turning.
When the wheels are blocked.
Do not use your vacuum cleaner if the lters are damaged or broken.
Power cord precautions
Check the plug and cord regularly. Never use the vacuum cleaner if the
plug or cord is damaged.
Damage to the vacuum cleaner’s cord is not covered by the warranty.
Never pull or lift the vacuum cleaner by the cord.
Using the vacuum cleaner in the above circumstances may cause serious
personal injury or damage to the product. Such injury or damage is not
covered by the warranty or by Electrolux.
SERVICING AND WARRANTY
All service or repairs must be carried out by an authorized Electrolux
service centre.
Damage to the vacuum cleaner’s cord is not covered by the warranty.
Damage to the motor caused by; vacuuming liquid, immersing appliance
in liquid or using appliance with a damaged hose and nozzle is not
covered by the warranty.
DISPOSAL
This symbol on the product indicates that this product contains
a battery which shall not be disposed with normal household
waste.
This symbol on the product or on its packaging indicates that
the product may not be treated as household waste.
To recycle your product, please take it to an ocial collection
point or to an Electrolux service center that can remove and
recycle the battery and electric parts in a safe and professional
way. Follow your country’s rules for the separate collection of
electrical products and rechargeable batteries.
Hereby, Electrolux Home Care and SDA, declares that the Vacuum Cleaner
with radio equipment type FOR1, FOR2 and FOR3 is in compliance with
Directive 2014/53/EU.

7
www.electrolux.com
ENGLISH
Thank you for choosing Electrolux Pure C9 vacuum cleaner. Always use
original accessories and spare parts to get the best results. This product is
designed with the environment in mind. All plastic parts are marked for
recycling purposes.
BEFORE STARTING
• Read this manual carefully.
• Check that all parts described are included.
• Pay special attention to the safety precautions!
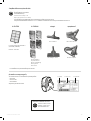
DESCRIPTION OF PURE C9 VACUUM CLEANER
A. Display
A1 rotary knob control*
A2 remote control*
B. Filters lid
C. Fine dust lter
D. Pre-motor lter
E. Parking slots
F. Power cord
G. Carry handle
H. Cyclone compartment and
nose cone lter
I. Air channel
J. Dust compartment
L. AeroPro hose
M. AeroPro handle
M1 AeroPro Classic handle*
M2 AeroPro Ergo handle*
M3 AeroPro Remote Control
handle*
N. AeroPro telescopic tube
O. Parking clip
Nozzle Accessories
K. AeroPro 3in1 tool
T. Motorized nozzle*
U. FlowMotion nozzle*
V. FlowMotion LED nozzle
(with front lights)*
W. AeroPro Turbo nozzle*
X. AeroPro Mini Turbo nozzle*
Y. ParkettoPro nozzle*
Z. AeroPro FlexProPlus nozzle*
AA. AeroPro Long crevice
nozzle*
AB. BedPro nozzle*
* Selected models only
Picture page 2-6
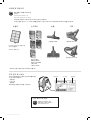
HOW TO USE THE VACUUM CLEANER
1 Check that all lters are properly placed before using the vacuum
cleaner.
2 Insert the hose into the cleaner (to remove it, press the lock buttons
and pull). Insert the hose into the hose handle until the lock button
clicks (to release it, press the lock button and pull).
3 Attach the telescopic tube to the nozzle. Attach the telescopic tube to
the hose handle (to remove it, press the lock button and pull).
4 Adjust the telescopic tube by holding the lock with one hand and
pulling the handle with the other hand.
3IN1 ACCESSORY TOOL
5 You can fasten the clip-on holder and 3in1 tool under the handle to
have it easily accessible. The tool has 3functions, see pictures on next
page.
CHANGING THE BATTERIES*
6 Nozzle with front lights*: Before rst use, remove the protective lm
(on top of the batteries). Change batteries when front lights start
blinking fast. Use 2 AA batteries.
7 Handle with remote control*: Change battery when light indicator
turns red or is not responding when pressing any button. Use only
batteries type LITHIUM CR1632.
NB: Remove the batteries from the product before scrapping. Follow
your country’s rules for collection of batteries and electrical products.
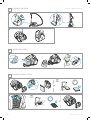
START/STOP THE VACUUM CLEANER AND ADJUST SUCTION
POWER
8 Pull out the power cord and plug it into the mains. Press the ON/OFF
button to turn the cleaner on/o. Models with remote control can also
be operated by the ON/OFF button on the handle.*
9 After cleaning, push the REWIND button to rewind the cable.
10 Adjust suction power (manual control models): Turn the rotary knob
on the cleaner or use the air valve on the handle.*
Adjust suction power (remote control models): Press +/- button on
the handle. MIN/MAX and symbols indicators on display will show
level of power.*
VACUUMING WITH THE UNIVERSAL NOZZLE V*, W*
11 Change nozzle setting with the pedal. Icon illustrates recommended
oor type (hard oor or carpet).
FlowMotion LED nozzle*: Move the nozzle forward. The front light
turns on automatically after a few seconds. When the nozzle is not
used, the light turns o automatically after a few seconds.
PARKING POSITIONS, MOVING THE VACUUM CLEANER
12 Use parking position (1), at the back of the vacuum cleaner, when you
pause while vacuuming.
Use parking position (2), underneath the vacuum cleaner, to carry and
store the vacuum cleaner.
13 The vacuum cleaner has two carrying handles.
EMPTYING THE DUST COMPARTMENT
14 Empty the dust compartment when the level of dust has reached the
maximum limit ("MAX"-mark).
Press the release button and pull to remove the dust compartment.
Hold the dust compartment over a dust bin. Press the unlock button
underneath the lid, open the lid by swinging it outwards. Empty dust
into the dustbin. Ret in reverse order.
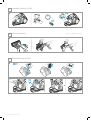
REPLACING THE FILTERS
15 Pull the FILTER button to open the lter lid.
Clean the ne dust lter after six months of use, or when dust is visible.
Pull the tab on the frame to remove the ne dust lter. Rinse the lter
under running water.
NB: Do not use cleaning agents. Let the lter dry completely (min. 24 h
in room temperature) before putting back !
16 Press and slide the lock mechanism to the right to release the
pre-motor lter. Remove the lter by pulling the lter frame tab.
Clean the pre-motor lter after twelve months of use.
Only use original s-lter Recommended by Electrolux (See
Consumables and Accessories). Rinse the inside (dirty side) in
lukewarm tap water. Tap the lter frame to remove the water. Repeat
the process four times.
NB: Do not use cleaning agents. Avoid touching the lter surface.
Let the lter dry completely (min. 24 h in room temperature) before
putting back ! Change the washable lter at least once a year or when
it is very dirty or damaged.
After replacing the lters, close the lter lid until it is clicked back into
place.
17 Cleaning the nose cone lter: the nose cone lter is located inside the
cyclone compartment. Clean the nose cone lter if dust has entered.
Pull the nose cone lter to remove. Remove dust with your hand.
Clean under running water if heavily soiled. Ret in reverse order.
NB: Do not use cleaning agents. Let the lter dry completely (min. 24 h
in room temperature) before putting back!
CLEANING THE UNIVERSAL NOZZLE V*, W** AND THE TURBO
NOZZLE X*
18 Disconnect the universal nozzle from the tube. Clean with the hose
handle.
Disconnect the turbo nozzle from the tube and remove entangled
threads etc by snipping them away with scissors. Use the hose handle
to clean the nozzle. *
Enjoy a great cleaning experience with Pure C9!
Electrolux reserves the right to change products, information and
specications without notice.

www.electrolux.com
8
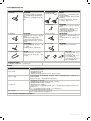
TIPS ON HOW TO GET THE BEST RESULTS
NOZZLE/ACCESSORY USE FOR: NOZZLE/ACCESSORY USE FOR:
T. Motorized nozzle* Carpet nozzle:
- Motorized nozzle gives the best
dust pick-up and deep cleaning of
carpets through the rotating brush
roller agitating the carpet.
- Do not leave the motorized nozzle
stationary with brush roller on.
U. FlowMotion nozzle*
V. FlowMotion LED
nozzle*
Universal nozzle:
- For all oor types, secures best dust pick up on
both carpets and hard oors.
- Change nozzle setting with the pedal. Icon will
show recommended oor type.
- Front light helps to detect dust and dirt in dark
spaces (under furniture etc). PureVision only
X. Mini Turbo nozzle* Upholstery nozzle:
- Brushes and vacuums at the same time (best
pick up of hair, bres etc).
- For textile furniture, car seats, mattresses etc.
- Brush roller is driven by the airow of the
vacuum cleaner.
- Not suitable for carpets with very deep pile and
long fringes as it can get stuck in the rotating
brush roll.
W. Turbo nozzle* Carpet nozzle:
- Brushes and vacuums at the same
time (best pick up of hair, bres etc).
- Brush roller is driven by the airow
of the vacuum cleaner.
- Not suitable for carpets with very
deep piles and long fringes, anti-slip
carpets like door mats or water
resistant carpets. Use universal
nozzle instead.
Z. FlexProPlus nozzle* Hardoor nozzle:
- For reach under/between furniture, corners and
other obstacles.
- Can easily turn 180 degrees for direct access to
narrow spaces.
Y. ParkettoPro nozzle* Hard oor nozzle:
- For gentle cleaning of hard oor
(parquet, wooden oor, tiles etc).
- Best dust pick up on hard oor with
crevice.
AB. BedPro nozzle* Bed nozzle:
- Removes dirt and dust mites from bedding and
mattresses.
AA. Long crevice nozzle* Extra long tool:
- For areas hard to reach (top of
shelves etc).
- For narrow spaces (behind radiators,
under car seats etc).
K. 3in1 accessory tool* 3 tools in 1:
1. Dusting tool for hard surfaces
(bookshelves, skirting boards etc).
2. Upholstery tool for textiles (curtains,
upholstery etc).
3. Crevice tool for narrow spaces
(behind radiators etc).
123
Models with manual power regulation
– follow graphics on cleaner for optimal performance.
TROUBLESHOOTING
PROBLEM SOLUTION
The vacuum cleaner does not start
• Check that the cable is connected to the mains.
• Check that the plug and cable are not damaged.
• Check for a blown fuse.
• Check if the battery indicator lamp in the remote control handle responds (certain models only).
The cleaner stops The cleaner might be overheated: disconnect it from the mains; check if the nozzle, tube, hose or lters
are blocked. Let the cleaner cool down for 120 minutes before plugging it in again.
If the cleaner still does not work, contact an authorized Electrolux service centre.
Reduction of suction capacity versus
normal
• Check if the dust compartment is full or blocked.
• Check if the air channel and inlet or outlet connection is blocked and needs to be cleared.
• Check if the pre-motor lter is clogged and needs changing.
• Check if nozzle is blocked and needs to be cleared.
• Check if hose is blocked by squeezing it gently. However, be careful in case the obstruction has been
caused by glass or needles caught inside the hose.
Note: The warranty does not cover any damage to the hose caused by cleaning it.
Water has been sucked into the vacuum
cleaner It will be necessary to replace the motor at an authorized Electrolux service centre.
Damage to the motor caused by the penetration of water is not covered by the warranty.
For any further problems, contact an authorized Electrolux service centre.

9
www.electrolux.com
VISIT OUR WEBSITE TO:
Get usage advice, brochures,
trouble shooter, service information:
www.electrolux.com
CUSTOMER CARE AND SERVICE
When contacting Service, ensure that you have
the following data available:
- Model Number
- PNC number
- Serial number
The information can be found on the rating plate.
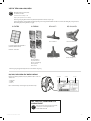
PureAdvantage D11 Washable
(Australia, New Zealand)
HEPA 13 washable
Silent Parketto Delicate Care KIT
Clean & Tidy KIT DustMagnet Silent
Crispy Bamboo
Tropical Breeze
Brown Sugar & Fig
Evening Rose
Citrus Burst
* Availability of accessory is dependent on tube dimension
CONSUMABLES & ACCESSORIES
Buy Consumables & Accessories
for your appliance:
www.electroluxshop.co.kr
https://shop.electrolux.com.au/
Availability of Consumables & Accessories varies by region and country.
Please refer to our local Electrolux website for more details or contact local customer service hotline for support.
PNC Number Serial NumberModel Number
S-FILTER S-FRESH NOZZLE* KITS

www.electrolux.com
10
M1 *M2 *
U *
K
V* W* X*
Y* Z* AA* AB*
M3 *
*
T *
A1
*
L
A2
*
E
F
C
D
B
A
M
*
N
*
H
I
J
G
OE
G
1. 产品概览
* 仅限特定机型

11
www.electrolux.com
2. 安装
ԩѺ
ԩѺ
ԩѺ
ԩѺ
1. 2.
3. 4. 5.
Ref: 2xAA
*
CR1632
8KL 敏ऄࡐֺ՚)8狣狨狥狤
**
6. 7.
3. 使用产品
߂ם
߂ش
߂ش
߂ם
*
10.
*
8. 9.
* 仅限特定机型
*
11.

www.electrolux.com
12
24h
12 months
16.
24h
6 months
15.
12
12.
13.
5. 清洗滤网
3.
4.
使用产品
清空灰尘
3'>
߂ם
14.
* 仅限特定机型

13
www.electrolux.com
24h
17.
A
B
C
5!
19.
6.
7.
维护
系统检查
* *
18
* 仅限特定机型
5清洗滤网

www.electrolux.com
14
安全预防措施
本机不可由肢体伤残、感觉或精神障碍以及缺乏相关经验和知识的人员(包括儿童)使用,除
非有负责其安全的人员对其进行看管或指导, 并让他们了解相关危险。
儿童施加看管,确保他们不将本器具作为玩具。
清洁和维护不应由儿童在无人监督的情况下完成。
警 告:涡轮吸头*带有可能导致其他小部件被卡住的旋转刷头。在使用它们时请务必谨慎,并且
仅在规定表面上使用。在取出被卡住的部件或清洁刷头之前,首先请关闭吸尘器的电源。
丢 弃 本 品 之 前,请将电池从手柄遥控/LED亮灯吸头上取出**。
*
仅限特定机型。
**
有关如何取出电池的信息在第 6 节和第 7 节。
清洁或维护本器具时,务必断开插头与主电源的连接。采用安全的方式处理电池。
如果电源线受损,为了避免造成危险,只能由获授权的 Electrolux 服务中心进行更换。
Pure C9 仅可用于室内和家庭环境中正常的吸尘。请将真空吸尘器存放
在干燥的位置。
所有服务或维修均必须由获授权的 Electrolux 服务中心提供。
请勿让儿童接触、塑料袋等包装材料,以避免窒息。
切勿在以下情况下使用真空吸尘器:
潮湿区域。
靠近易燃气体等。
当产品显示明显损坏迹象时。
在锋利的物体或液体上,
当地板吸头显示明显损坏迹象时。
在热或冷的炭渣、未熄灭的烟蒂等污物上。
在 细 粉 尘 (例 如 石 膏 粉 、水 泥 、面 粉) 、热 或 冷 灰 烬 上 。
请勿将真空吸尘器置于阳光直射的环境下。
避免将真空吸尘器暴露在强热或冰冻温度下。
切勿在未安装滤网的情况下使用吸尘器。
当吸尘器启动且刷辊正在转动时,切勿试图触摸刷辊。
当滚轮被卡住时。
如滤网损坏,请勿使用真空吸尘器。
电源线预防措施
定期检查插头和电源线如果电源线损坏,切勿使用吸尘器。
吸尘器电源线受损不在保修范围之内。
切勿通过电源线拉动或提起吸尘器。
在以上情况下使用真空吸尘器可能造成严重人身伤害或损坏产品。该
等伤害或损坏不在 Electrolux 的保修范围内。
维修及保修
所有服务或维修均必须由获授权的 Electrolux 服务中心提供。
吸尘器电源线受损不在保修范围之内。因吸入液体、将器具浸没在液体
中或使用带有受损软管和吸头的器具导致的电机损坏不在 Electrolux的
保修范围内。
弃置
产品上的此符号表示本产品包含电池,不得与普通生活垃圾
一起处理。
产品或其包装上的此标记表示该产品不能作为家庭垃圾来
处理。
为回收您的产品,请将其带至官方的收集点或 Electrolux 服
务中心,以采用安全且专业的方式移除和回收电池和电器部
件。依据您所在国家/地区的规定,单独收集电子产品和可充
电电池。
Electrolux Home Care and SDA 特 此 声 明,带 有 FOR1、FOR2 及 FOR3 型
无线电设备的真空吸尘器符合 2014/53/EU 指 令。

15
www.electrolux.com
中文
感谢您选用 Electrolux Pure C9 真空吸尘器。为保证最佳使用效果,请始
终使用原装配件和备件。本品设计以环保为准。所有塑料部件均有回收
标志。
使用前指南
• 请仔细阅读并保留本手册。
• 检查是否包含所有描述的部件。
• 请特别注意安全预防措施!
PURE C9 真空吸尘器说明
A. 显示屏
A1 旋钮控件*
A2 遥控*
B. 滤网盖
C. 微尘过滤网
D. 马达前置滤网
E. 固定卡槽
F. 电源线
G. 手柄
H. 旋风集尘盒和鼻锥滤网
I. 风道
J. 集尘盒
L. AeroPro 软管
M. AeroPro 手柄
M1 AeroPro Cassic 手柄*
M2 AeroPro Ergo 手柄*
M3 AeroPro 遥控手柄*
N. AeroPro 伸缩管
O. 固定夹
吸头配件
K. AeroPro 三合一毛刷
T. 电动吸嘴*
U. FlowMotion 多功能地刷*
V. FlowMotion LED 多功能地
刷(带前灯)*
W. AeroPro 涡轮地刷*
X. AeroPro 微型涡轮地刷*
Y. ParkettoPro 硬地板刷*
Z. AeroPro FlexProPlus 涡轮
地刷*
AA. AeroPro 长缝隙吸嘴*
AB. BedPro 床用吸头*
* 仅适用于部分机型
图片页面 2-6
如何使用这款真空吸尘器
1 使用真空吸尘器之前,检查所有滤网是否已安装到位。
2 将软管插入吸尘器(要取下软管,请按下锁定按钮并拉出软管)。
将软管插入软管手柄,直至压扣咔嗒一声接合到位(按下压扣可
松脱软管)。
3 将伸缩管与地刷相连。将伸缩管与软管手柄相连(要取下吸头,
请按下锁定按钮并拉出吸头)。
4 要调节伸缩管,请单手按住锁定按钮,然后用另一只手牵拉手柄。
三合一毛刷
5 可将卡扣式支架和三合一毛刷固定在手柄下方,以便于取用。
该工具有 3 种功能,参阅下一页图片。
更换电池*
6 带前灯的吸头*:首次使用前,移除保护膜(电池上方)。当前灯
开始快速闪烁时,则需更换电池。请使用 2 节 AA 电池。
7 具备遥控功能的手柄*:当指示灯变红或按下任何按钮后均无反应
时,请更换电池。仅可使用 CR1632 型号锂电池。
注意:丢弃之前,请将电池从产品中取出。请遵循您所在国家/地
区收集电池和电子产品的规定。
启动/暂停真空吸尘器,并调节吸力
8 拉出电源线并将其插入主电源插座。按下开关按钮,打开或关闭吸
尘器。带遥控器的型号也可通过手柄上的开关按钮操作。*
9 吸尘工作完毕后,按下“收线”按钮可收回电源线。
10
调整吸力(手动控制机型):转动吸尘器上的旋钮或使用手柄上的
气阀。*
调整吸力(遥控机型):按手柄上的 “+/-” (增大/减小)按钮。显
示器上的最小/最大及符号指示将显示功率。*
使用通用吸头吸尘 (V*, W*)
11 使用踏板更换吸头设置。图标将显示推荐的地板类型(硬质地板或
地毯)。
FlowMotion LED 吸头*:向前移动吸头。数秒后,前灯自动亮起。
不使用吸头数秒后,前灯自动熄灭。
固定位置,移动真空吸尘器
12 清洁时如需暂停片刻,可使用真空吸尘器后侧 (1) 的固定位置。
使用真空吸尘器后侧底部 (2)3 这款真空吸尘器有两个手提手
柄。
清空集尘盒
14 集尘达到最大限度(“最大”标记)时,清空集尘盒。按压释放按
钮,然后拉出集尘盒。将集尘盒放在垃圾桶上方。按下盖子下方的
解锁按钮,向外旋转按钮,打开盖子。将灰尘倒入垃圾桶。按相反
的顺序重新组装。
更换滤网
15 按下滤网按钮,打开滤网盖。
使用 6 个月后或当集尘明显可见时,
清洗微尘过滤网。
拉出框架上的标签,移除
微尘过滤网
。用自来水
冲洗滤网。
注意:请勿使用清洁剂。待滤网完全干(至少在室温下放置 24 小
时)后,再装回!
16 按下并滑动锁定装置至右侧,释放马达前置滤网。拉出滤框标签,
移除滤网。使用十二个月后清洗预电机滤网。仅使用 Electrolux 推
荐的原装滤网(请查阅耗材和配件)。在微温自来水下冲洗内部
(脏污面)。轻拍滤框,去除水份。重复此过程四次。
注意:请勿使用清洁剂。避免触碰滤网表面。待滤网完全干(至少
在室温下放置 24 小时)后,再装回!每年至少更换可冲洗滤网一
次,或者在其变得很脏或者破损时进行更换。更换滤网后,将滤网
盖推回,直至两个按钮咔嗒一声接合到位。
17 清洗鼻锥滤网:鼻锥滤网位于旋风集尘盒内部。如有灰尘进入,则
需清洗鼻锥滤网。拉出鼻锥滤网。用手除去灰尘。如污染严重,可
用自来水清洗。按相反的顺序重新组装。
注意:请勿使用清洁剂。待滤网完全干(至少在室温下放置 24 小
时)后,再装回!
清洁通用地刷 V*, W** 和涡轮吸头 X*
18 将通用地刷从伸缩管上卸下。用软管手柄清洁。
将涡轮吸头从伸缩管上卸下,然后用剪刀减掉交缠的丝线等杂物。
用软管手柄清洁吸头。*
使用 Pure C9,享用一次很棒的清洁体验!
Electrolux 保留变更产品、信息及规格的权利,恕不预先通知。

www.electrolux.com
16
关于如何获得最佳效果的建议
吸头/配件 用于:吸头/配件 用于:
T. 电动吸嘴*地毯吸头:
- 电动吸嘴可通过旋转刷辊拍打地毯,
从而达到最佳的吸尘效果,深度清洁
地毯。
- 启动刷辊后,不要让电动吸嘴呆在一
个位置静止不动。
U. FlowMotion 地刷*
V. FlowMotion LED 地刷*
通用吸头:
- 适合所有地板类型,确保在地毯和硬质
地板上的最佳除尘效果。
- 使用踏板更换吸头设置。图标将显示建
议的地板类型。
- 前灯有助于发现暗处(家具下方等位
置)的灰尘和污垢。 仅限 PureVision 吸头
X. 微型涡轮吸头*室内装潢织物:
- 同时使用刷子和真空装置(清理毛发、
纤维等的理想工具)。
- 适合布艺家私、汽车座椅、床垫等。
- 滚筒刷由真空吸尘器的气流驱动。
- 不适合长绒和长毛边地毯,因为长绒或
长边会卷入旋转刷辊中。
W. 涡轮地刷*地毯:
- 同时使用刷子和真空装置(清理毛
发、纤维等的理想工具)。
- 滚筒刷由真空吸尘器的气流驱动。
- 不适合长绒和长毛边地毯以及垫或防
水地毯等防滑地毯。请用通用吸头代
替。
Z. FlexProPlus 地刷*硬质地板:
- 用于清洁家具、角落及其他障碍物下方
/之间的灰尘。
- 可轻松旋转 180° ,伸入狭窄空间。
Y. ParkettoPro 吸头*硬质地板:
- 用于温和清洁硬质地板(镶木地板、
木地板、瓷砖等)。
- 确保带缝硬质地板的最佳除尘效果。
AB.BedPro 吸头*床用吸头:
- 可吸除寝具和床垫上的污垢及尘螨。
AA. 长缝吸头*加长工具:
- 适合难以到达的区域(书架顶端等)。
- 适合狭窄空间(暖气片背后、汽车座
椅底部等)
K. 三合一毛刷*三合一毛刷:
1. 适用于硬质表面(书架、
踢脚板等)除尘工具。
2. 适用于纺织品(窗帘、装
饰等)清洁工具。
3. 适用于狭窄空间(暖气片
背后等)清理工具。
1. 2. 3.
手动功率调节模式
— 根据吸尘器上的图形,获取最佳性能。
故障排除
问题 解决方案
真空吸尘器无法启动
• 检查电缆是否接通电源。
• 检查插头和电缆是否受损。
• 检查保险丝是否熔断。
• 检查遥控手柄上的电池指示灯是否响应(仅限于特定机型)。
吸尘器停止工作
吸尘器可能过热:断开电源;检查吸头、管道、软管或滤网是否堵塞。让吸尘器冷却 120 分钟,然
后再插入电源。
如吸尘器仍不工作,请联系经授权的 Electrolux 服务中心。
吸力低于正常水平
• 检查集尘盒是否装满或堵塞。
• 检查风道及进出口连接是否堵塞,是否需要清理。
• 检查前预电机滤网是否堵塞,是否需要更换。
• 检查吸头是否堵塞,是否需要清理。
• 轻轻挤压软管,检查是否被堵塞。但是,当玻璃或针卡在软管中造成阻塞时,要小心处理。
注意:因清洗所致的软管受损不在保修范围内。
一旦水被吸入真空吸尘器 将需要在经授权的 Electrolux 服务中心更换电机。
因进水引起的电机受损不在保修范围内。
如有任何其他问题,请联系经授权的 Electrolux 服务中心。

17
www.electrolux.com
请访问我们的网站:
获取使用建议、宣传手册、
故障检修员联系方式、服务信息:
www.electrolux.com
客户关怀及服务
在联系售后服务时,确保您有以下可用的数据:
- 型号
- PNC 号
- 序列号
产品铭牌上可找到该等信息。
产品标准:GB4706.1-2005, GB4706.7-2004,
GB4343.1-2018, GB17625.1-2012
PureAdvantage D11 可洗
(澳大利亚, 新西兰)
HEPA 13 可洗
Silent Parketto 吸头 精致护理套件
清洁及整理套件DustMagnet Silent 吸头
Crispy Bamboo
Tropical Breeze
Brown Sugar & Fig
Evening Rose
Citrus Burst
* 配件可用性取决于伸缩管尺寸
耗材及配件
购买适合您器具的耗材及配件:
中国大陆微信公众号:伊莱克斯小家电体验中心
各国家和地区的耗材及配件可用性各不相同。
请参阅我们当地的 Electrolux 网站,了解更多详情或联系当地客户服务热线寻求支持。
PNC 号序列号型号
S-FILTER 滤网 S-FRESH 香氛包 吸头*套件

www.electrolux.com
18
M1 *M2 *
U *
K
V* W* X*
Y* Z* AA* AB*
M3 *
*
T *
A1
*
L
A2
*
E
F
C
D
B
A
M
*
N
*
H
I
J
G
OE
G
1. 產品概覽
* 僅適用特定型號

19
www.electrolux.com
2. 安裝
Click!
Click!
Click!
Click!
1. 2.
3. 4. 5.
Ref: 2xAA
*
CR1632
Ref: LITHIUM CR1632
**
6. 7.
3. 使用本產品
MAX
MIN
MIN
MAX
*
10.
*
8. 9.
* 僅適用特定型號
*
11.

www.electrolux.com
20
24h
12 months
16.
24h
6 months
15.
12
12.
13.
5. 清潔濾網
3.
4.
使用本產品
清空灰塵
MAX
14.
* 僅適用特定型號
ページが読み込まれています...
ページが読み込まれています...
ページが読み込まれています...
ページが読み込まれています...
ページが読み込まれています...
ページが読み込まれています...
ページが読み込まれています...
ページが読み込まれています...
ページが読み込まれています...
ページが読み込まれています...
ページが読み込まれています...
ページが読み込まれています...
ページが読み込まれています...
ページが読み込まれています...
ページが読み込まれています...
ページが読み込まれています...
ページが読み込まれています...
ページが読み込まれています...
ページが読み込まれています...
ページが読み込まれています...
ページが読み込まれています...
ページが読み込まれています...
ページが読み込まれています...
ページが読み込まれています...
ページが読み込まれています...
ページが読み込まれています...
ページが読み込まれています...
ページが読み込まれています...
ページが読み込まれています...
ページが読み込まれています...
ページが読み込まれています...
ページが読み込まれています...
ページが読み込まれています...
ページが読み込まれています...
ページが読み込まれています...
ページが読み込まれています...
ページが読み込まれています...
ページが読み込まれています...
ページが読み込まれています...
ページが読み込まれています...
-
 1
1
-
 2
2
-
 3
3
-
 4
4
-
 5
5
-
 6
6
-
 7
7
-
 8
8
-
 9
9
-
 10
10
-
 11
11
-
 12
12
-
 13
13
-
 14
14
-
 15
15
-
 16
16
-
 17
17
-
 18
18
-
 19
19
-
 20
20
-
 21
21
-
 22
22
-
 23
23
-
 24
24
-
 25
25
-
 26
26
-
 27
27
-
 28
28
-
 29
29
-
 30
30
-
 31
31
-
 32
32
-
 33
33
-
 34
34
-
 35
35
-
 36
36
-
 37
37
-
 38
38
-
 39
39
-
 40
40
-
 41
41
-
 42
42
-
 43
43
-
 44
44
-
 45
45
-
 46
46
-
 47
47
-
 48
48
-
 49
49
-
 50
50
-
 51
51
-
 52
52
-
 53
53
-
 54
54
-
 55
55
-
 56
56
-
 57
57
-
 58
58
-
 59
59
-
 60
60


