LevelOne WBR-3406TX Quick Install Manual
- カテゴリー
- ルーター
- タイプ
- Quick Install Manual

LevelOne
WBR-3406TX
11g Wireless 1W,4L Broadband Router
Quick Install Guide
English
Português
한국어
簡體中文
繁體中文
Английский
ภาษาไทย
ﻲــﺑﺮــﻋ

Fig 1 Hardware installation instruction
Fig 2 System Status Page
2

Fig 3 Setup Wizard page
Fig 4 Select WAN Type page
3

Fig 5 PPTP setting
Fig 6 Change Password page
4

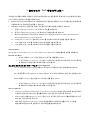
English
1 Hardware Installation
Congratulations on your purchase of this outstanding LevelOne WBR-3406TX Broadband Router.
This is a step-by-step instruction of how to start using the router and get connected to the Internet.
Any further problem, please refer to the User`s manual.
Please turn off the power, remove the power cord from the outlet, and keep your hands dry when you try to install the
hardware of this product.
1.1 Procedure for Hardware Installation (Please refer to Fig 1)
1. Setup LAN connection: connect an Ethernet cable from your computer’s Ethernet port to one of the
LAN ports of this product.
2. Setup WAN connection: prepare an Ethernet cable for connecting this product to your cable/xDSL
modem or Ethernet backbone.
3. Power on:
Connecting the power cord to power inlet and turning the power switch on, this product will
automatically enter the self-test phase. When it is in the self-test phase, the “STATUS” LED indicator
will be lighted ON for about 5 seconds, and then STATUS LED will be flashed 3 times to indicate
that the self-test operation has finished. Finally, the “STATUS” LED will be continuously flashed
once per second to indicate that this product is in normal operation.
RESET
To reset system settings to factory defaults, please follow the steps:
1. Power off the device,
2. Press the reset button and hold,
3. Power on the device,
4. Keep the button pressed about 5 seconds,
5. Release the button,
6. Watch the Status LED , it will flash 8 times and then Status flash
once per second.
This QIG will lead you to setup a internet connection. Other settings such as wireless setting, Please refer to the manual.

2 Network Settings
To use LevelOne WBR-3406TX correctly, you have to properly configure the network settings of your computers and
install the attached setup program into your MS Windows platform
Make Correct Network Settings of Your Computer
The default IP address of this product is 192.168.123.254, and the default subnet mask is 255.255.255.0. These
addresses can be changed on your need, but the default values are used in this QIG. If the TCP/IP environment of your
computer has not yet been configured, you can refer to Appendix A in User`s manual to configure it. For example,
1. Configure IP as 192.168.123.1, subnet mask as 255.255.255.0 and gateway as 192.168.123.254, or more
easier,
2. Configure your computers to load TCP/IP setting automatically, that is, via DHCP server of this product.
LevelOne WBR-3406TX provides Web based configuration scheme, that is, configuring by your Web browser. This
approach can be adopted in any MS Windows, Macintosh or UNIX based platforms.
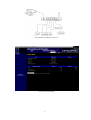
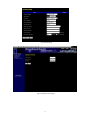
Start-up and Log in(Fig 2)
Activate your browser, and disable the proxy or add the IP address of this product into the exceptions. Then, type this
product’s IP address in the Location (for Netscape) or Address (for IE) field and press ENTER. For example:
http://192.168.123.254.
After the connection is established, you will see the web user interface of this product as Fig2. There are two
appearances of web user interface: for general users and for system administrator.
To log in as an administrator, enter the system password (the factory setting is ”admin”) in the System Password field
and click on the Log in button. If the password is correct, the web appearance will be changed into administrator
configure mode. As listed in its main menu, there are several options for system administration.
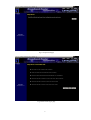
Wizard(Fig 3)
Setup Wizard will guide you through a basic configuration procedure step by step.

3 Setup Wizard - Select WAN Type(Fig 4)
This option is primary to enable this product to work properly. The setting items and the web appearance depend on the
WAN type. Choose correct WAN type before you start.
1. LAN IP Address: the local IP address of this device. The computers on your network must use the LAN IP address
of your product as their Default Gateway. You can change it if necessary.
2. WAN Type: WAN connection type of your ISP. You can choose a correct setting from the following six options:
A. Static IP Address: ISP assigns you a static IP address.
B. Dynamic IP Address: Obtain an IP address from ISP automatically.
C. Dynamic IP Address with Road Runner Session Management.(e.g. Telstra BigPond)
D. PPP over Ethernet: Some ISPs require the use of PPPoE to connect to their services.
E. PPTP: Some ISPs require the use of PPTP to connect to their services.
F. L2TP: Some ISPs require the use of L2TP to connect to their services.
Static IP Address
WAN IP Address, Subnet Mask, Gateway, Primary and Secondary DNS: enter the proper setting provided by your ISP.
Dynamic IP Address
1. Host Name: optional. Required by some ISPs, for example, @Home.
2. Renew IP Forever: this feature enables this product to renew your IP address automatically when the lease time is
expiring-- even when the system is idle.
Dynamic IP Address with Road Runner Session Management.(e.g. Telstra BigPond)
LAN IP Address is the IP address of this product. It must be the default gateway of your computers.
WAN Type is
Dynamic IP Address
. If the WAN type is not correct, change it!
Host Name: optional. Required by some ISPs, e.g. @Home.
• Renew IP Forever: this feature enable this product renew IP address automatically when the
lease time is being expired even the system is in idle state.
PPP over Ethernet
1. PPPoE Account and Password: the account and password your ISP assigned to you. For security, this field appears
blank. If you don't want to change the password, leave it empty.
2. PPPoE Service Name: optional. Input the service name if your ISP requires it. Otherwise, leave it blank.
3. Maximum Idle Time: the amount of time of inactivity before disconnecting your PPPoE session. Set it to zero or
enable Auto-reconnect to disable this feature.

PPTP(Fig 5)
1. My IP Address and My Subnet Mask: the private IP address and subnet mask your ISP assigned to you.
2. Server IP Address: the IP address of the PPTP server.
3. PPTP Account and Password: the account and password your ISP assigned to you. If you don't want to change the
password, keep it empty.
4. Connection ID: optional. Input the connection ID if your ISP requires it.
5. Maximum Idle Time: the time of no activity to disconnect your PPTP session. Set it to zero or enable
Auto-reconnect to disable this feature. If Auto-reconnect is enabled, this product will automatically connect to ISP
after system is restarted or connection is dropped.
L2TP
1. IP Mode: The IP Mode assigned by your ISP. You can select either Static IP Address or Dynamic IP address.
2. My IP Address and My Subnet Mask: the private IP address and subnet mask your ISP assigned to you when
your IP Mode is Static IP Address.
3. Server IP Address: the IP address of the L2TP server.
4. L2TP Account and Password: the account and password your ISP assigned to you. If you don't want to change
the password, keep it empty.
Maximum Idle Time: the time of no activity to disconnect your L2TP session. Set it to zero or enable Auto-reconnect to
disable this feature. If Auto-reconnect is enabled, this product will automatically connect to ISP after system is
restarted or connection is dropped.
4. Change Password(Fig 6)
You can change Password at Basic Setting/Change Password. We strongly recommend you to change the system
password for security reason.
Please type old password in the first column. (The default password is “admin”)
Type new password in the second column.
Type new password again in the third column for confirmation.
Click “save”, and your new password should take effect immediately.
The basic setting of WBR-3406TX is now completed. Please refer to the User`s manual for further configurations.

Português
1 Instalação do Hardware
Parabéns em sua compra deste excepcional LevelOne WBR-3406TX Broadband Router.
Este contem instruções passo-á-passo em como iniciar o Router e ficar conectado á Internet.
Qualquer problema adicional, por favor, recorra ao Manual do Usuário.
Por favor, desligue a energia, remova o cabo de força da tomada, e mantenha suas mãos secas quando você tentar
instalar o hardware deste produto.
Procedimentos para instalação do Hardware (Por favor, recorra a Fig 1)
1. Setup da conexão LAN: conecte um cabo Ethernet da porta Ethernet do seu computador para uma das
portas LAN deste produto.
2. Setup da conexão WAN: prepare um cabo Ethernet para conectar este produto para seu cable/Xdsl
modem ou backbone Ethernet.
3. Power on:
Conectando o cabo de força para a entrada de energia e ligando a chave, este produto irá
automaticamente entrar em fase de auto-teste. Quando iniciar a fase auto-teste, o indicador do LED
“STATUS” irá acender ON por aproximadamente 5 segundos, e então STATUS LED irá piscar 3
vezes para indicar que a operação de auto-teste terminou. Finalmente, the “STATUS” LED irá piscar
continuamente uma vez por segundo para indicar que a operação deste produto está normal
.
RESET
Para reset os ajustes pré-definidos de fábrica, por favor, siga os passos:
1. Desligue o equipamento,
2. Pressione o botão de reset e mantenha,
3. Ligue o equipamento,
4. Mantenha o botão pressionado por aproximadamente 5 segundos,
5. Solte o botão,
6. Observe o Status LED, ele irá piscar 8 vezes e então Status pisca
uma vez por segundo.
This QIG will lead you to setup a internet connection. Other settings such as wireless setting, Please refer to the manual.

2 Ajustes de Rede
Para usar o LevelOne WBR-3406TX corretamente, você tem que configurar adequadamente os ajustes de rede de seus
computadores e instalar o programa setup em sua plataforma MS Windows.
Faça corretos ajustes de Rede de seu computador
O endereço IP pré-definido deste produto é 192.168.123.254, e a máscara subnet pré-definida é 255.255.255.0.
Estes endereços podem ser mudados conforme sua necessidade, mas valores pré-definidos são usados neste manual. Se
TCP/IP nativo de seu computador não está configurado ainda, você pode recorrer ao Appendix A do manual do Usuário
para configurar isto. Por exemplo:
1. Configurar IP como 192.168.123.1, máscara subnet como 255.255.255.0 e gateway como 192.168.123.254, ou
mais fácil,
2. Configurar seus computadores para carregarem ajustes de TCP/IP automaticamente, ou seja, via DHCP server
deste produto.
LevelOne WBR-3406TX possibilita configuração via Web, ou seja, configurar pelo seu navegador Web. Isto pode ser
adotado em qualquer plataforma MS Windows, Macintosh ou UNIX.
Start-up and Log in(Fig 2)
Ativar seu navegador, e disabilitar o proxy ou adicionar o endereço IP deste produto para as exceções.
Então, escreva o endereço IP deste produto nos campos Location (para Netscape) ou Adress (para IE) e pressione
ENTER. Por exemplo:
http://192.168.123.254
.
Após a conexão estar estabelecida, você irá ver a interface do usuário web deste produto como na Fig2.
Existem duas aparências de interface do usuário web: para usuários gerais e para administradores de sistema.
Para log in como um administrador, entre com a senha do sistema (o ajuste da fábrica é “admin”) no campo do Sistema
da Senha e clique no botão de Log in. Se a senha está correta, a aparência da web irá mudar para modo de configuração
do administrador. Como isto está listado no menu principal, existem várias opções para administração do sistema.
Wizard(Fig 3)
Setup Wizard irá guiar você através de procedimentos de configuração básica, passo-á-passo.
Pressione “Next>”
3 Setup Wizard – Selecionar o tipo de Wan(Fig4)
Esta opção é primária para permitir este produto funcionar adequadamente. Os itens de ajuste e a aparência da web

dependem do tipo de WAN. Escolha o tipo de WAN correta antes de você iniciar.
1. Endereço de LAN IP: endereço de IP local deste acessório. Os computadores em sua rede podem usar o endereço
LAN IP de seu produto como Gateway pré-definido. Você pode modificar isto se necessário.
2. Tipo WAN: tipo de conexão WAN de seu Provedor de Acesso. Você pode escolher um correto ajuste das seis
opções seguintes:
A. Endereço de IP Estático: Provedor de Acesso designa um endereço de IP estático..
B. Endereço de IP Dinâmico: obtenha um endereço de IP automaticamente do Provedor de Acesso.
C. Endereço de IP Dinâmico com Road Runner Session Management.(e.g. Telstra BigPond)
D. PPP over Ethernet: alguns Provedores de Acesso necessitam o uso de PPPoE para conectar para seus
serviços.
E. PPTP: alguns Provedores de Acesso necessitam o uso de PPTP para conectar para seus serviços.
F. L2TP: alguns Provedores de Acesso necessitam o uso de L2TP para conectar para seus serviços.
Endereço de IP Estático
Endereço IP WAN, Máscara Subnet, Gateway, Primário e Secundário DNS: entre com o próprio ajuste fornecido pelo
seu Provedor de Acesso.
Endereço de IP Dinâmico
1. Nome do Host: opcional. Solicitado por alguns Provedores de Acesso, por exemplo, @Home..
2. Renovar IP: esta caracteristica permite este produto renovar seu endereço IP automaticamente quando o tempo
de locação está expirando – mesmo quando o sistema está ocioso
.
Endereço de IP Dinâmico com Road Runner Session Management.(e.g. Telstra BigPond)
Endereço LAN IP é o endereço IP deste produto. Isto deve ser o gateway pré-definido de seus computadores.
Tipo WAN é o endereço de IP Dinâmico. Se o tipo WAN não está correto, mude!
Nome do Host: opcional. Solicitado por alguns Provedores de Acesso, por exemplo,
@Home.
• Renovar IP: esta caracteristica permite este produto renovar seu endereço IP
automaticamente quando o tempo de locação está expirando – mesmo quando o sistema
está ocioso.

PPP over Ethernet
1. Conta PPPoE e senha: a conta e senha eu Provedor de Acesso designou para você. Por segurança, este campo
aparece em branco. Se você não deseja trocar a senha, deixe vazio.
2. Serviço de Nome PPPoE: opcional. Nome de entrada de serviço que seu Provedor de Acesso solicita. Senão, deixe
vazio.
3. Tempo máximo de Ociosidade: total do tempo de inatividade antes de desconectar sua seção PPPoE.. Ajuste isto
para zero ou permita Auto-reconexão para desabilitar esta característica
PPTP(Fig 5)
1. Meu endereço de IP e minha Máscara Subnet: o endereço IP confidencial e Máscara Subnet designada pelo
Provedor de Acesso para você.
2. Endereço do Servidor de IP: endereço de IP do servidor de PPTP..
3. Conta PPTP e Senha: conta e senha que o Provedor de Acesso designou para você. Se você não deseja trocar
a senha, mantenha vazio.
4. ID da conexão: opcional. Entre com a ID da conexão se o seu Provedor de Acesso requerer isto.
5. Tempo máximo de Ociosidade: total do tempo de inatividade antes de desconectar sua seção PPTP.Ajuste
isto para zero ou permita Auto-reconexão para desabilitar esta característica. Se Auto-reconexão é
permitida, este produto irá automaticamente conectar o Provedor de Acesso após o sistema é reiniciado ou
a conexão baixada.
L2TP
1. Modo IP: Modo IP designado pelo seu Provedor de Acesso. Você pode selecionar Endereços de IP Dinâmico
ou Estático
2. Meu endereço de IP e minha Máscara Subnet: o endereço IP confidencial e Máscara Subnet designada pelo
Provedor de Acesso para você quando seu Modo IP é Endereço de IP Estático
3. Endereço do Servidor de IP: Endereço de IP do servidor L2TP.
4. Conta e Senha L2TP: conta e senha que o Provedor de Acesso designou para você. Se você não deseja trocar
a senha, mantenha vazio
..
Tempo máximo de Ociosidade: total do tempo de inatividade antes de desconectar sua seção L2TP.
Ajuste isto para zero ou permita Auto-reconexão para desabilitar esta característica. Se Auto-reconexão é permitida, este
produto irá automaticamente conectar o Provedor de Acesso após o sistema é reiniciado ou a conexão baixada.
4. Mudando a Senha (Fig 6)
Você pode mudar sua Senha em Basic Setting/Change Password. Nós recomendamos, por questões

de segurança, que você mude a senha do sistema.
Por favor, escreva a senha antiga na primeira coluna. (a senha pré-definida é “admin”)
Escreva a nova senha na Segunda coluna.
Escreve a nova senha na terceira coluna para confirmação.
Clique “save” e a sua nova senha deverá automaticamente ser efetivada.
O ajuste básico do WBR-3406TX agora esta completado. Por favor, recorra ao manual do Usuário
para configurações adicionais.

한국어
1 하드웨어 설치
본 LevelOne WBR-3406TX의 구입을 축하합니다.
본 가이드는 라우터를 사용하고 인터넷에 연결하는 방법에 대한 단개별 설명입니다.
문제가 발생하는 경우 사용설명서를 참조하십시오.
전원을 끄고 콘센트에서 전원 코드를 뽑으십시오. 젖은 손으로 본 제품의 하드웨어를 설치하지 마십시오.
1.1 하드웨어 설치 절차(그림 1 참조)
1. LAN 연결 설치: 이더넷 케이블을 사용하여 컴퓨터의 이더넷 포트와 본 제품의 LAN 포트 중 하
나를 연결합니다.
2. WAN 연결 설치: 본 제품을 케이블/xDSL 모뎀이나 이더넷 백본에 연결하기 위한 이더넷 케이블을
준비합니다.
3. 전원 켜기:
전원 코드를 전원 입력구에 연결하고 전원 스위치를 켜면 본 제품이 자동으로 자체 진단 단계로 들
어갑니다. 자체 진단 단계에서 “상태” LED 표시등이 5 초간 켜져 있다가 3 번 깜박이면 자체 진단 동
작이 끝난 것입니다. 끝으로 “상태” LED 가 1 초에 한 번씩 계속해서 깜박이면 본 제품이 정상적으
로 작동하는 것입니다.
초기화
시스템 설정을 공장 기본 설정으로 되돌리려면 다음 단계를 수행하
십시오.
1. 장치를 끕니다.
2. 리셋 단추를 길게 누릅니다.
3. 장치를 꼅니다.
4. 단추를 5 초간 길게 누릅니다.
5. 단추에서 손을 뗍니다.
6. 상태 LED 를 지켜보면 8 번 깜박인 후 1 초에 한 번씩 깜박입니다.
1
This QIG will lead you to setup a internet connection. Other settings such as wireless setting, Please refer to the manual.

2 네트워크 설정
LevelOne WBR-3406TX사용하려면 컴퓨터의 네트워크 설정을 제대로 구성하고 첨부된 설치 프로그
램을 MS Windows 플랫폼에 설치해야 합니다.
올바른 컴퓨터 네트워크 설정
본 제품의 기본 IP
주소
는 192.168.123.253 이며 기본
서브넷
마스크
는 255.255.255.0 입니다. 필요에 따라 이들 주
소를 변경할 수 있지만 본 QIG 에서는 기본값을 사용합니다. 컴퓨터의 TCP/IP 환경을 아직 구성하지 않은 경우 사
용설명서의 부록 A 를 참조하여 구성하십시오. 예를 들면,
1. IP 는 192.168.123.1 로,
서브넷
마스크
[subnet mask]는 255.255.255.0 으로,
게이트웨이
[gateway]는
192.168.123.254 로 구성합니다.
2. 컴퓨터가 TCP/IP 설정을 자동으로 로드하도록 설정합니다. 즉 본 제품의 DHCP 서버를 통하도록 구성합
니다.
LevelOne WBR-3406TX는 웹 기반 구성 방식을 제공합니다. 즉 웹 브라우저를 사용하여 구성할 수 있습니다. 이 방
식은 MS Windows, Macintosh 또는 UNIX 기반 플랫폼에서 채택할 수 있습니다.
시작 및 로그인(그림 2)
브라우저를 활성화하고,
프록시를
비활성화하거나
본
제품의
IP
주소를
예외에
추가하십시오
. 그 다음에 본 제
품의 IP 주소를
위치
(Location)(Netscape 의 경우) 또는
주소
(Address)(IE 의 경우) 필드에 입력하고 <Enter>를 누르
십시오. 예: http://192.168.123.254.
연결이 성립되면 그림 2 와 같은 본 제품의 웹 사용자 인터페이스가 나타납니다. 웹 사용자 인터페이스의 모양은
일반인용
과
시스템
관리자용
두 가지 입니다.
관리자로 로그인하려면
시스템
암호
(System Password) 필드에 시스템 암호(공장 기본 설정은 “admin”)를 입력하
고
로그인
(Log in) 단추를 누르십시오. 암호가 정확한 경우 웹 모양이 관리자 구성 모드로 변경됩니다. 메인 메뉴
에 열거되어 있듯이 시스템 관리에는 몇 가지 옵션이 있습니다.
마법사[Wizard] (그림 3)
설치 마법사가 기본 구성 절차를 단계별로 안내합니다.
2
로그인 후 오른쪽 상단에 위치한 언어옵션을 클릭하면 한국어 버전 UI로 변환이 가능합
니다.

3 설치 마법사 – WAN 유형 선택(그림 4)
이 옵션은 본 제품이 제대로 작동할 수 있게 하는데 중요합니다. 설정 항목과 웹 모양은 WAN 유형에 달려 있습
니다. 시작하기 전에 WAN 유형을 선택하십시오.
1. LAN IP 주소: 본 장치의 로컬 IP 주소. 네트워크에 있는 컴퓨터는 제품의 LAN IP 주소를 기본 게이트웨이로
사용해야 합니다. 필요하다면 변경할 수 있습니다.
2. WAN Type: ISP 의 WA N 연결 유형. 다음 6 가지 옵션 중 정확한 설정을 선택할 수 있습니다.
A.
정적
IP
주소
(Static IP Address): ISP 가 정적 IP 주소를 부여합니다.
B.
동적
IP
주소
(Dynamic IP Address): ISP 로부터 IP 주소를 자동으로 얻습니다.
C. 로드 러너 세션 관리가 있는 동적 IP 주소(예: Telstra BigPond) Dynamic IP Address with Road Runner
Session Management.(e.g. Telstra Big Pond)
D. PPPoE(PPP over Ethernet): 일부 ISP 는 PPPoE 를 사용하여 서비스에 연결할 것을 요구합니다.
E. PPTP: 일부 ISP 는 PPTP 를 사용하여 서비스에 연결할 것을 요구합니다.
F. L2TP: 일부 ISP 는 L2TP 를 사용하여 서비스에 연결할 것을 요구합니다.
Static IP Address
WAN IP Address, Subnet Mask, Gateway, Primary 및 Secondary DNS: ISP 가 제공한 올바른 설정을 입력합니다.
Dynamic IP Address
1.
호스트
이름
(Host Name): 옵션. 일부 ISP 가 요구함. 예를 들면, @Home.
2. IP
영구
갱신
(Renew IP Forever): 이 기능은 시스템이 대기 상태인 경우에도 임차 시간이 만료되면
본 제품이 IP 주소를 자동으로 새로 바꿀 수 있게 합니다.
로드 러너 세션 관리가 있는 동적 IP 주소(예: Telstra BigpPond)
LAN IP
주소
[LAN IP Address]는 본 제품의 IP 주소입니다. 컴퓨터의 기본 게이트웨이여야 합니다.
WAN 유형은 동적 IP 주소[Dynamic IP Address]입니다. WAN 유형이 정확하지 않은 경우 변경하십시오!
호스트
이름
(Host Name): 옵션. 일부 ISP 가 요구함. 예를 들면, @Home.
• IP
영구
갱신
(Renew IP Forever): 이 기능은 시스템이 대기 상태인 경우에도 임차 시간이 만료되면
본 제품이 IP 주소를 자동으로 새로 바꿀 수 있게 합니다.
PPP over Ethernet
1. PPPoE Account 및 Password(PPPoE Account and Password): ISP 가 부여한 계정 및 암호. 보안을 위해서
이 필드는 빈칸으로 나타납니다. 암호를 변경하고 싶지 않은 경우 빈칸으로 두십시오.
2. PPPoE
서비스
이름
(PPPoE Service Name): 옵션. ISP 가 요구하는 경우 서비스 이름을 입력합니다. 요구
하지 않는 경우 빈칸으로 두십시오.
3.
최대
유휴
시간
(Maximum Idle Time): PPPoE 세션을 종료하기 전까지의 비활성 시간. 이 기능을
비활성화하려면 영(0)으로 설정하거나 자동 재연결을 활성화하십시오.
3

PPTP(그림 5)
1.
내
IP
주소
및
서브넷
마스크
(My IP Address and My Subnet Mask): ISP 가 부여한 사설 IP 주소 및 서브넷 마스
크.
2.
서버
IP
주소
(Server IP Address): PPTP 서버의 IP 주소.
3. PPTP
계정
및
암호
(PPTP Account and Password): ISP 가 부여한 계정 및 암호. 암호를 변경하고 싶지 않은 경우
빈칸으로 두십시오.
4.
연결
ID(Connection ID): 옵션. ISP 가 요구하는 경우 연결 ID 를 입력합니다.
5.
최대
유휴
시간
(Maximum Idle Time): PPTP 세션을 종료하기 전까지의 비활성 시간. 이 기능을
비활성화하려면 영(0)으로 설정하거나 자동 연결을 활성화하십시오. 자동 재연결이 활성화되어 있는 경우
시스템을 다시 시작하거나 연결이 끊어지면 본 제품이 자동으로 연결합니다.
L2TP
1. IP
모드
(IP Mode): ISP 가 부여한 IP 모드. 정적 IP 주소나 동적 IP 주소를 선택할 수 있습니다.
2.
내
IP
주소
및
서브넷
마스크
(My IP Address and My Subnet Mask): IP 모드가 정적 IP 주소일 때 ISP 가 부여
한 사설 IP 주소 및 서브넷 마스크.
3.
서버
IP
주소
(Server IP Address): L2TP 서버의 IP 주소.
4. L2TP
계정
및
암호
(L2TP Account and Password): ISP 가 부여한 계정 및 암호. 암호를 변경하고 싶지 않은
경우 빈칸으로 두십시오.
최대
유휴
시간
(Maximum Idle Time): L2TP 세션을 종료하기 전까지의 비활성 시간. 이 기능을 비활성화하려면
영(0)으로 설정하거나 자동 재연결을 활성화하십시오. 자동 재연결이 활성화되어 있는 경우 시스템을 다시
시작하거나 연결이 끊어지면 본 제품이 자동으로 연결합니다.
4. 암호 변경[Change Password] (그림 6)
기본 설정/암호 변경[Basic Setting/Change Password]에서 암호를 변경할 수 있습니다. 보안을 위해서 시스템 암
호를 변경할 것을 강력히 권장합니다.
첫 번째 필드에 이전 암호를 입력합니다. (기본 암호는 “admin”입니다.)
두 번째 필드에 새 암호를 입력합니다.
확인을 위해 세 번째 필드에 새 암호를 다시 입력합니다.
“저장”을 누르면 새 암호가 곧바로 적용됩니다.
이제 WBR-3406TX의 기본 설정이 완료되었습니다. 더 자세한 구성에 대해서는 사용설명서를 참조하십시오.
4

简体中文
1 硬件安装
恭喜您选购功能卓越的 LevelOne WBR-3406TX 宽频路由器。
这份快速安装说明书采用 step-by-step的解说方式,引导您设定 WBR-3406TX的基本功能,并能成功的连接上网。
若使用上还有任何更进一步的问题,请参阅使用手册。
安装之前,请先关掉电源,确定变压器没有连接至插座。也请注意勿在双手湿滑的情况下安装本产品。
1.1 硬件安装步骤(请参考 Fig 1)
1. 确认LAN端连接: 用标准网络线将您计算机的主机与WBR-3406TX 的任一LAN埠相连接。
2. 确认WAN端连接: 用标准网络线将BR-TX与您的缆线调制解调器、xDSL调制解调器,
或以太网络骨干相连接。
3. 开启电源:
将电源变压器安插至插座,并连接至TX。本产品将会开始进行自我侦测。在自我侦
测状态中,”STATUS” LED指示灯会恒亮5秒钟。若自我侦测完成,LED指示灯会闪烁三次。
之后,在正常运作状态下,LED指示灯将以每秒一次的频率持续闪烁。
回复默认值
若想将TX的各项设定回复出厂默认值,请按照以下步骤
操作:
1. 关闭电源
2. 按住reset键不放,
3. 插上电源,激活本装置,
4. 持续按压reset键约五秒钟,
5. 放掉reset键,
6. 注意Status LED指示灯,若操作正确,LED将于闪烁八次之后 ,
以每秒一次的频率持续闪烁。
This QIG will lead you to setup a internet connection. Other settings such as wireless setting, Please refer to the manual.

2 网络设定
您必须先设定您工作的网络环境,并在微软的窗口操作系统里安装需要的设定程序,才能正确的使用 LevelOne
WBR-3406TX。
设定您工作计算机的网络环境
本产品预设的 IP 地址是 192.168.123.254, 预设的子网掩码为 255.255.255.0. 这些设定值可依您的需要更改。但本
安装说明将依预设的设定值做说明。若您计算机中的 TCP/IP 协议尚未设定好 ,请参考手册中的附录 A 做更进
一步的设定。举例来说,您可以:
1. 将计算机的 IP 设定为 192.168.123.1, 子网掩码设为 255.255.255.0 网关服务器设为 192.168.123.254, 或
2. 将您计算机中的 TCP/IP 设定为自动获取。在此选项之下,您的计算机将透过本产品的 DHCP 服务器自
动获得 IP 地址。
LevelOne TX 提供网页式设定的功能,意即您可以透过您的网页浏览器作本产品的设定。不论在
Windows, Macintosh 或是 UNIX 的作业平台中,都支持此项功能。
激活与登入(请参考 Fig 2)
激活您的网页浏览器,并关闭
proxy
服务器,或者将本产品的 IP 地址加入
exceptions
名单。在
Location
(Netscape
适用) 或
Address
(IE 适用)栏中,输入本产品的 IP 地址并按下 ENTER 键。默认值为
http:/ 192.168.123.254
.
/
成功建立联机后,您可以看到本产品的网页设定接口(如图 2). 端视您是用”一般使用者”或是”系统管理者”的身
分登入,网页设定接口会呈现不一样的画面。
您可用系统管理者密码登入成为管理者身分。在系统密码字段输入预设密码”admin”后,单击”登入”。. 正确登
入后,设定接口会进入管理者设定模式。您可以更改各项设定值以符合您的需求。
设定精灵(请参考 Fig 3)
设定精灵会逐步引导您完成本产品的基本设定。
3 设定精灵 – 选择 WAN 端类型(请参考 Fig 4)
选择适当的WAN端类型才能让TX正确的运作。每个WAN端类型的设定与网页接口均不同。在使用
本产品前,必须先选择适当的 WAN 端类型。
1. LAN
端
IP
地址
: 本产品的受信端 IP 地址。 您网络环境中的计算机必须以此 LAN 端 IP 地址作为预设网
关服务器。您可以更改此项设定值。
2. WAN
端类型
: 提供您网络服务的 ISP 的 WAN 端联机类型。共有六种不同的类型供您选择。请与 ISP 业者
确认联机的 WA N 端类型。

A.
固定
IP
地址
: ISP 已指定您一个固定的 IP 地址。
B.
浮动
IP
地址
: 于每次联机时,自动从 ISP 获取 IP 地址。
C.
浮动
IP
地址
,支持 Road Runner Session 管理功能。(适用于. Telstra BigPond 等 ISP)
D. PPP over Ethernet: 某些 ISP 业者使用 PPPoE 联机方式提供服务。
E. PPTP: 某些 ISP 业者使用 PPTP 联机方式提供服务。
F. L2TP: 某些 ISP 业者使用 L2TP 联机方式提供服务。
固定 IP 地址
使用此联机方式者,请依照您所属 ISP 业者的指示输入 WAN IP 地址, 子网掩码, 预设网关服务器, 主要及次要
DNS 服务器等各项设定值。
浮动 IP 地址
1. 主机名称: 某接 ISP 会需要您输入特定的主机名称,例如: @Home.
2. 永远自动更新 IP 地址: 这项设定将使本产品自动在一定的时间之后更新 IP 地址。本设定在系统闲置之后
仍会自动激活。.
浮动 IP 地址,支持 Road Runner Session 管理功能。(适用于. Telstra BigPond 等 ISP)
1. 局域网络 IP 地址可指定为TX的IP地址。此地址亦是您计算机的默认值网关服务器地址。.
2. 广域网络联机类型必须设定为”浮动 IP 地址”.
3. 主机名称: 某接 ISP 会需要您输入特定的主机名称,例如: @Home.
4. 永远自动更新 IP 地址: 这项设定将使本产品自动在一定的时间之后更新 IP 地址。本设定在系统闲置之后
仍会自动激活
PPP over Ethernet(以太网络点对点通讯协议)
1. PPPoE
帐号与密码
: 请依照您所属 ISP 业者所提供的帐号及密码输入本字段。为避免资料外泄,您输入
的字符将不会显示在屏幕上。
2. PPPoE
服务名称
: : 本字段可不填。若您的 ISP 有特别指定,请照指示输入。否则请将本字段保持空白。
3.
最大闲置时间
: 您可指定联机的最大闲置时间,若在设定的时间值之内您都没有任何的使用动作,
WBR-3406TX将自动断线。将本设定值设为”0”可关闭此功能。
PPTP(请参考 Fig 5)
1.
我的
IP
地址与我的子网掩码
:请使用您所属的 ISP 提供给您的 IP 地址与子网掩码设定值。
2.
服务器
IP
地址
: 请输入 PPTP 服务器的 IP 地址。
3. PPTP
帐号及密码
: 请依照您所属 ISP 业者所提供的帐号及密码输入本字段。.
4.
联机
ID: 本字段可不填。若您的 ISP 有特别指定,请输入在本字段。.
5.
最大闲置时间
: 您可指定联机的最大闲置时间,若在设定的时间值之内您都没有任何的使用动作,
WBR-3406TX将自动断线。将本设定值设为”0”可关闭此功能。
ページが読み込まれています...
ページが読み込まれています...
ページが読み込まれています...
ページが読み込まれています...
ページが読み込まれています...
ページが読み込まれています...
ページが読み込まれています...
ページが読み込まれています...
ページが読み込まれています...
ページが読み込まれています...
ページが読み込まれています...
ページが読み込まれています...
ページが読み込まれています...
ページが読み込まれています...
ページが読み込まれています...
ページが読み込まれています...
ページが読み込まれています...
ページが読み込まれています...
ページが読み込まれています...
-
 1
1
-
 2
2
-
 3
3
-
 4
4
-
 5
5
-
 6
6
-
 7
7
-
 8
8
-
 9
9
-
 10
10
-
 11
11
-
 12
12
-
 13
13
-
 14
14
-
 15
15
-
 16
16
-
 17
17
-
 18
18
-
 19
19
-
 20
20
-
 21
21
-
 22
22
-
 23
23
-
 24
24
-
 25
25
-
 26
26
-
 27
27
-
 28
28
-
 29
29
-
 30
30
-
 31
31
-
 32
32
-
 33
33
-
 34
34
-
 35
35
-
 36
36
-
 37
37
-
 38
38
-
 39
39