LevelOne WBR-3470 インストールガイド

カテゴリー
セキュリティデバイスコンポーネント
タイプ
インストールガイド

このマニュアルも適しています

WBR-3470
ADSL2+ VoIP Router 1W 4L
Quick Installation Guide
English Português
Deutsch 繁體中文
Français 한국어
Español 日本語
Nederlands Русский
Danish ไทย
Italiano ﻲﺑﺮﻋ
Ελληνικά
1
Front LED
LED Description
1 PWR Lights when the power is ON.
2 SYS Lights when the system is ready.
3-6
LAN Port
1-4
Steady glow when connected to an Ethernet device.
Glows green for 100Mbps; Orange for 10Mbps.
Blinking light when data is Transmitted / Received.
7 WLAN
Lit green when the wireless connection is established.
Flashes when sending/receiving data.
8-9 Phone Lit green when the phone is off-hook.
10 LINE
Lit when the inbound and outbound calls transmitted
through PSTN.
11 VoIP Lit when SIP registration is OK.
12 PPP Steady glow when there is a PPPoA / PPPoE connection.
13 ADSL
Lights when successfully connected to an ADSL DSLAM
(linesync).
2
Rear Ports
8
7 6 5 4 1 2
3
Port Description
1
Power
Switch
Power ON/OFF switch.
2 PWR
Connect the supplied power adapter to this jack.
3 RESET
After the router is powered on, press this recessed button using
the end of paper clip or other small pointed object to reset the
router or to restore it to factory default settings.
1. Recovery procedures for non-working routers (e.g. after a
failed firmware upgrade flash):
2. Recovery procedures for a lost web interface password:
4
LAN
Connect a UTP Ethernet cable (Cat-5 or Cat-5e) to one of the
four LAN ports when connecting to a PC or an office/home
network of 10Mbps or 100Mbps.
5
Phone
Connect RJ-11 cable to this port when connecting to an analog phone
set.
6 LINE
Connect RJ-11 cable to this port when connecting to the telephone
wall jack
7 ADSL
Connect the supplied RJ-11 (“telephone”) cable to this port when
connecting to the ADSL/telephone network.
8
Antenna
Connect the detachable antenna to this port.
3
Package Contents
3 WBR-3470
3 AC-DC Power Adapter (12VDC, 1.2A)
3 RJ-11 ADSL/telephone Cable
3 Cat.5 Cable
3 CD Manual
3 Quick Installation Guide
Note
For more detailed instructions on configuring and using the ADSL2+ VoIP
Router, please refer to the User Manual
Warning
Do not use the WBR-3470 in high humidity or high temperatures.
Do not use the same power source for the WBR-3470 as other equipment.
Do not open or repair the case yourself. If the WBR-3470 is too hot, turn
off the power immediately and have it repaired at a qualified service
center.
Avoid using this product and all accessories outdoors.
Attention
Place the WBR-3470 on a stable surface.
Only use the power adapter that comes with the package. Using a
different voltage rating power adaptor may damage the router.
4
Connecting ADSL2+ VoIP Router
1. Connect the Router to a LAN (Local Area Network) and the ADSL/telephone (LINE) network.
2. Power on the device.
3. Make sure the PWR and SYS LEDs are lit steadily and that the relevant LAN LED is lit.
4. Connect an RJ11 cable to VoIP port when connecting to an analog phone set.
5. Connect an RJ11 cable to LINE port when connecting to the telephone wall jack
5
Configuring the Network Properties
Configuring PC in Windows XP
1. Go to Start / Control Panel (in Classic
View). In the Control Panel, double-click on
Network Connections
2. Double-click Local Area Connection.
3. In the Local Area Connection Status
window, click Properties.
4. Select Internet Protocol (TCP/IP) and click
Properties.
5. Select the Obtain an IP address
automatically and the Obtain DNS server
address automatically radio buttons.
6. Click OK to finish the configuration.
6
Configuring Your ADSL2+ VoIP Router
Note
To configure this device, you must have IE 5.0 / Netscape 4.5 or above
installed
1. Open the web browser and type
http://192.168.1.254 in the browser’s
address box. This number is the default IP
address for this router. Press Enter.
2. A username and password window will
appear. The default username and
password are admin and admin. Press
OK to proceed.
3. You will get a status report on web page.
7
Verifying Your Local Network Connection with the Device
To see if this ADSL Router is
visible on the local network, go
to Start / Run. In the Run dialog
box, type “ping 192.168.1.254”
then presses OK.
A command prompt window will
pop out. If your ping is
successful which means your
local network is able to reach to
the device, then the command
prompt window will close up
automatically.
Connection fails, when you see
Request timed out” in the
command prompt window. You
may need to check your set up.
8
DE
Lieferumfang
3 WBR-3470
3 Netzteil (12 V Gleichspannung; 1,2 A)
3 RJ-11-ADSL/Telefonkabel
3 Cat.5-Kabel
3 Anleitung auf CD
3 Schnell-Installationsanleitung
Hinweis
Detailliertere Hinweise zur Konfiguration und zum Einsatz des
ADSL2+-VoIPs/Routers finden Sie in der Bedienungsanleitung.
Warnung
Verwenden Sie das Gerät nicht an feuchten oder heißen Orten.
Schließen Sie das Gerät an eine eigene Stromquelle an.
Öffnen Sie nicht das Gehäuse, versuchen Sie nicht, das Gerät selbst zu
reparieren. Falls sich das Gerät überhitzen sollte, schalten Sie sofort den
Strom ab und lassen das Gerät in einem qualifizierten Servicecenter
reparieren.
Setzen Sie das Produkt und sämtliche Zubehörteile nicht im Freien ein.
Achtung
Stellen Sie das Produkt auf einem stabilen Untergrund auf.
Verwenden Sie ausschließlich das mitgelieferte Netzteil. Bei Verwendung
eines Netzteils mit abweichenden Ausgangswerten kann der Router
beschädigt werden.
9
ADSL2+ VoIP-Router anschließen
1. Verbinden Sie den Router mit dem LAN (lokales Netzwerk) und dem
(A)DSL/Telefon-Netzwerk (LINE).
2. Schalten Sie das Gerät ein.
3. Überzeugen Sie sich davon, dass die LEDs PWR und SYS sowie die entsprechende
LAN-LED dauerhaft leuchten.
4. Verbinden Sie den VoIP-Anschluss über ein RJ11-Kabel mit einem Analogtelefon.
5. Verbinden Sie den LINE-Anschluss über ein RJ11-Kabel mit der Telefonsteckdose.
10
Netzwerkeinstellungen konfigurieren
PC unter Windows XP konfigurieren
1. Rufen Sie (in der klassischen Ansicht)
Start / Control Panel (Start / Einstellungen
/ Systemsteuerung) auf. In der
Systemsteuerung doppelklicken Sie auf
Network Connections
(Netzwerkverbindungen).
2. Doppelklicken Sie auf Local Area
Connection (LAN oder
Hochgeschwindigkeitsinternet).
3. Im Fenster Local Area Connection Status
(Status von LAN-Verbindung) klicken Sie
auf Properties (Eigenschaften).
4. Wählen Sie Internet Protocol
(Internetprotokoll) (TCP/IP) aus und klicken
Sie auf Properties (Eigenschaften).
5. Wählen Sie Obtain an IP address
automaticall (IP-Adresse automatisch
beziehen) und Obtain DNS server address
automatically (DNS-Serveradresse
automatisch beziehen).
6. Klicken Sie zum Abschluss der Konfiguration
auf OK.
11
So konfigurieren Sie Ihr ADSL2+-VoIP/Router
Hinweis
Zur Konfiguration des Gerätes muss Internet Explorer 5.0/Netscape 4.5 oder
eine jeweils aktuellere Version installiert sein.
1. Öffnen Sie den Webbrowser und geben Sie
http://192.168.1.254 in das Adresse-Feld
des Browsers ein. Diese Adresse ist die
Standard-IP-Adresse des Routers.
Drücken Sie Enter.
2. Ein Fenster zur Eingabe von
Benutzername und Kennwort wird
eingeblendet. Standard-Benutzername
und Standard-Kennwort lauten
„admin“ und „admin“. Klicken Sie zum
Fortfahren auf OK.
3. Ein Statusbericht wird in Form einer
Webseite angezeigt.
12
Lokale Netzwerkverbindung mit dem Gerät überprüfen
Um zu überprüfen, ob Ihr
ADSL-Router im Netzwerk
angesprochen werden kann,
klicken Sie auf Start / Run
(Start/Ausführen). Im
Ausführen-Dialogfenster geben
Sie ping 192.168.1.254 ein und
klicken dann auf OK.
Ein Befehlsfenster
(„DOS-Fenster“) öffnet sich.
Sofern der Ping erfolgreich war,
kann das Gerät im lokalen
Netzwerk erreicht werden. Das
Befehlsfenster schließt sich nach
kurzer Zeit von selbst.
Bei einem Verbindungsfehler
wird Request timed out
(Zeitüberschreitung der
Anforderung) angezeigt. In
diesem Falle sollten Sie Ihre
Einstellungen noch einmal
überprüfen.
13
FR
Contenu de l’emballage
3 WBR-3470
3 Adaptateur d'alimentation (12VDC, 1.2A)
3 Câble RJ-11 ADSL/téléphone
3 Câble Cat.5
3 Manuel CD
3 Guide d'Installation Rapide
Note
Pour des instructions plus détaillées sur la configuration et l’utilisation du
VoIP routeur ADSL2+, veuillez vous référer au Manuel d’utilisation
Avertissement
N’utilisez pas le WBR-3470 dans des environnements dont l’humidité ou
la température est élevée.
N’utilisez pas la même source d’alimentation pour le WBR-3470 et
d’autres appareils.
N’ouvrez pas et ne réparez pas le boîtier par vous-même. Si le WBR-3470
est trop chaud, éteignez immédiatement l’alimentation et faites le réparer
dans un centre de maintenance agréé.
Evitez d'utiliser ce produit et ses accessoires en extérieur.
Attention
Placez le WBR-3470 sur une surface stable.
N’utilisez que l’adaptateur d’alimentation livré dans l’emballage.
L’utilisation d’un adaptateur avec une tension nominale différent peut
endommager le routeur.
14
Connexion du routeur ADSL2+ VoIP
1. Connectez le routeur à un réseau local LAN (Local Area Network) et au réseau
téléphonique/ADSL (LIGNE).
2. Allumez l'appareil.
3. Assurez-vous que les LED PWR et SYS sont allumées en continu et que la LED LAN
correspondante est allumée.
4. Connectez un câble RJ11 sur le port VoIP lorsque vous connectez à un combiné
téléphonique analogique.
5. Connectez un câble RJ11 sur le port LIGNE lorsque vous connectez à une prise murale
téléphonique
15
Configurer les propriétés réseau
Configurer le PC sous Windows XP
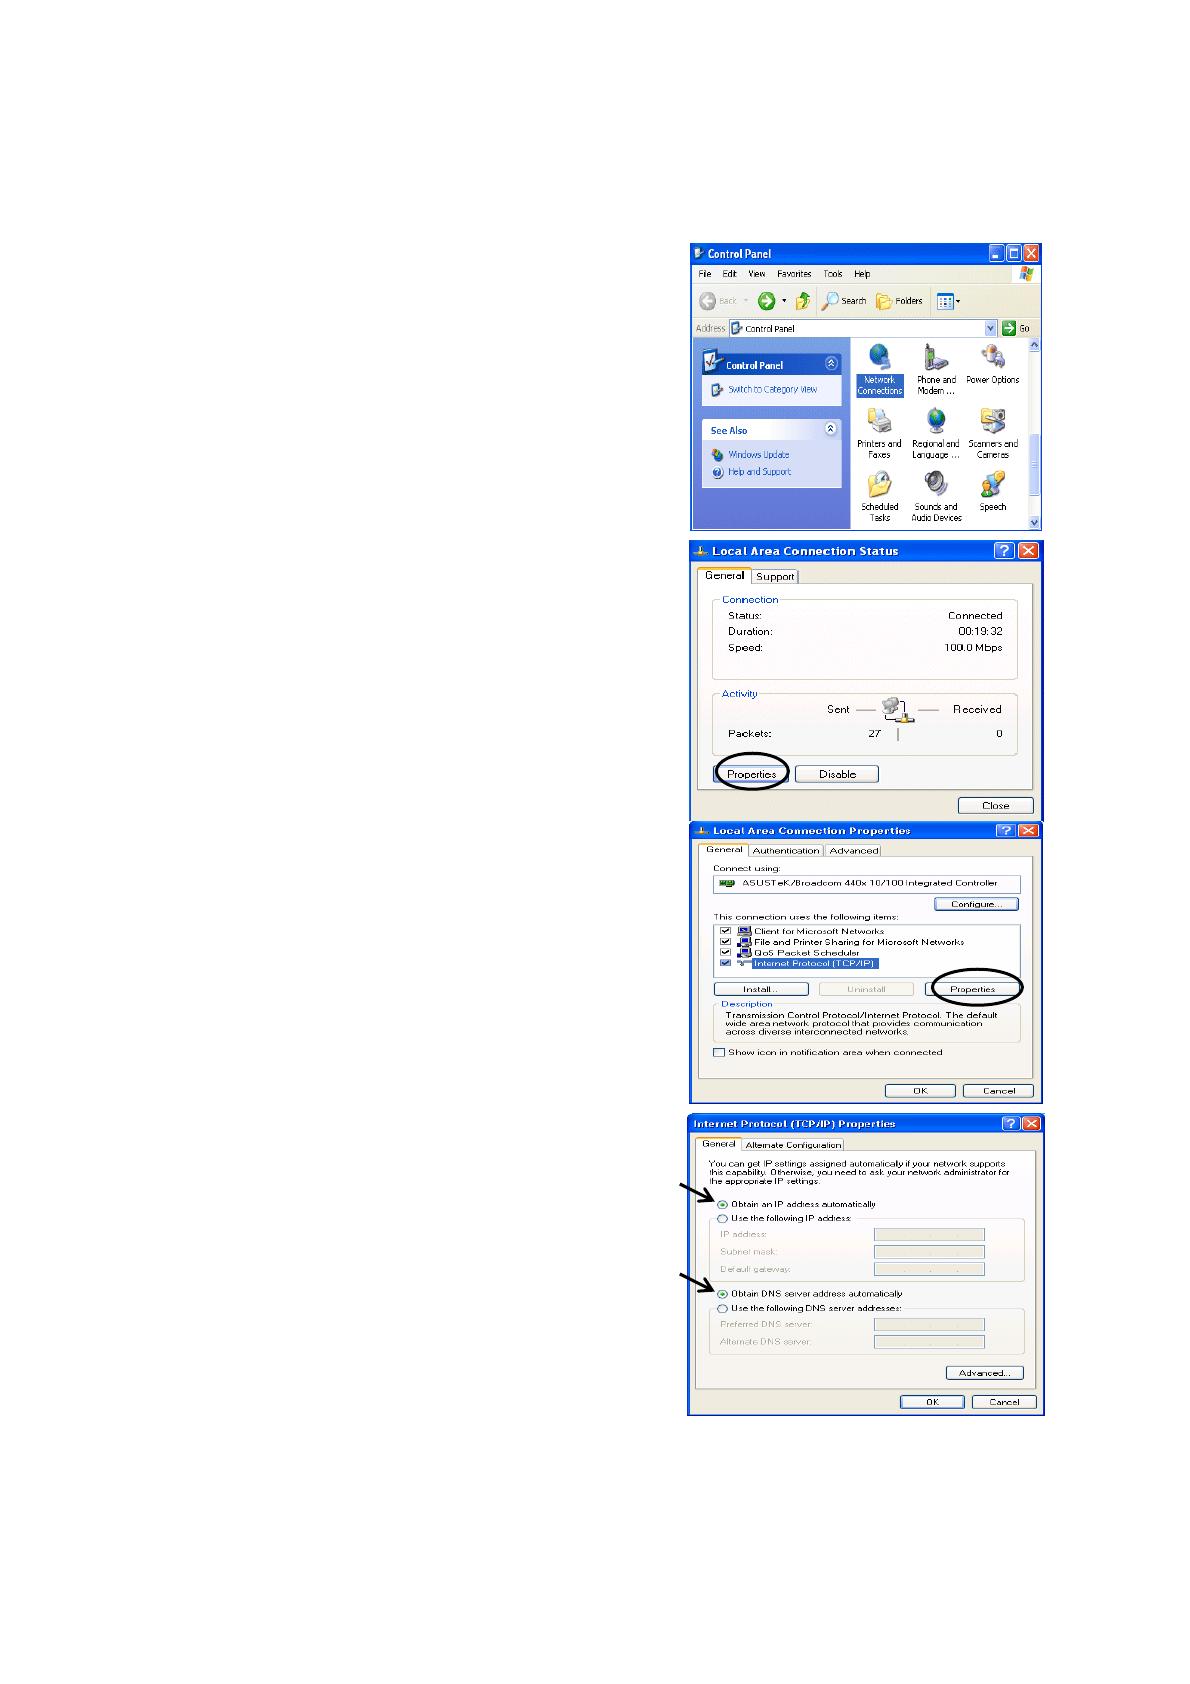
1. Allez dans Start / Control Panel (Démarrer /
Panneau de configuration) (en vue
Classique). Dans le pannesau de
configuration, double cliquez sur
Connexions réseau
2. Double cliquez sur Local Area Connection
(Connexion au réseau local).
3. Dans la fenêtre d’état de la Local Area
Connection Status (Connexion au réseau
local), cliquez sur Properties (Propriétés).
4. Sélectionnez Internet Protocol (Protocole
Internet) (TCP/IP) et cliquez sur Properties
(Propriétés).
5. Sélectionnez les boutons radio Obtain an IP
address automatically (Obtenir une
adresse IP automatiquement) et Obtain
DNS server address automatically
(Obtenir une adresse serveur DNS
automatiquement).
6. Cliquez sur OK pour terminer la
configuration.
16
Configuration de votre VoIP/routeur ADSL2+
Note
Pour configurer cet appareil, vous devez avoir installé IE 5.0 / Netscape 4.5
ou supérieur
1. Ouvrez le navigateur Web et tapez
http://192.168.1.254 dans sa barre
d’adresse. Ce numéro est l’adresse IP par
défaut de ce routeur. Appuyez sur Enter
(Entrée).
2. Une fenêtre de nom d’utilisateur et de mot
de passe apparaît. Les nom d’utilisateur
et mot de passe par défaut sont admin
et admin. Appuyez sur OK pour
continuer.
3. Vous obtenez un rapport d’état sur une
page Web.
17
Vérifier votre connexion entre le réseau local et l’appareil
Pour voir si le routeur ADSL est
visible sur le réseau local, allez
dans Start/Run (Démarrer /
Exécuter. Dns la boîte de
dialogue d’exécution, tapez
“ping 192.168.1.254” puis
appuyez sur OK.
Un fenêtre d’invite de
commande apparaît. Si le ping
aboutit, ce qui signifie que votre
réseau local est capable
d’atteindre le périphérique, alors
la fenêtre d’invite de commande
se ferme automatiquement.
Lorsque la connexion échoue,
l’invite de commande affiche
“Request time out (Délai
d'attente de la demande
dépassé.) ”. Vous devez vérifier
à nouveau votre installation.
18
ES
Contenidos de la caja
3 WBR-3470
3 Adaptador de alimentación (12 VCC, 1,2 A)
3 Cable ADSL o de teléfono RJ-11
3 Cable de categoría 5
3 Manual en CD
3 Guía de instalación rápida
Nota
Para más información sobre la configuración y el uso del Módem Enrutador
ADSL2+, consulte el Manual del usuario
Advertencia
No utilice el equipo WBR-3470 en entornos de alta humedad o altas
temperaturas.
No utilice la misma fuente de alimentación del WBR-3470 también para
otro equipo.
No abra ni repare la carcasa usted mismo. Si el equipo WBR-3470 se
calienta demasiado, desactive la alimentación inmediatamente y solicite
su reparación a un centro de servicio cualificado.
Evite utilizar este producto y todos sus accesorios en exteriores.
Atención
Coloque el equipo WBR-3470 sobre una superficie estable.
Utilice únicamente el adaptador de alimentación que incluye la caja. Si
utiliza un adaptador de alimentación de otro voltaje podría dañar el
enrutador.
19
Conectar el enrutador VoIP ADSL2+
1. Conecte el enrutador a una red de área local (LAN, Local Area Network) y a la red ADSL o de
teléfono (LÍNEA).
2. Encienda el dispositivo.
3. Asegúrese de que los LED PWR y SYS (alimentación y sistema) están encendidos
permanentemente y de que el LED LAN correspondiente también lo está.
4. Conecte un cable RJ11 al puerto VoIP cuando realice la conexión con un equipo telefónico
analógico.
5. Conecte un cable RJ11 al puerto LÍNEA cuando realice la conexión con la toma mural del
teléfono
20
  • Page 1 1
  • Page 2 2
  • Page 3 3
  • Page 4 4
  • Page 5 5
  • Page 6 6
  • Page 7 7
  • Page 8 8
  • Page 9 9
  • Page 10 10
  • Page 11 11
  • Page 12 12
  • Page 13 13
  • Page 14 14
  • Page 15 15
  • Page 16 16
  • Page 17 17
  • Page 18 18
  • Page 19 19
  • Page 20 20
  • Page 21 21
  • Page 22 22
  • Page 23 23
  • Page 24 24
  • Page 25 25
  • Page 26 26
  • Page 27 27
  • Page 28 28
  • Page 29 29
  • Page 30 30
  • Page 31 31
  • Page 32 32
  • Page 33 33
  • Page 34 34
  • Page 35 35
  • Page 36 36
  • Page 37 37
  • Page 38 38
  • Page 39 39
  • Page 40 40
  • Page 41 41
  • Page 42 42
  • Page 43 43
  • Page 44 44
  • Page 45 45
  • Page 46 46
  • Page 47 47
  • Page 48 48
  • Page 49 49
  • Page 50 50
  • Page 51 51
  • Page 52 52
  • Page 53 53
  • Page 54 54
  • Page 55 55
  • Page 56 56
  • Page 57 57
  • Page 58 58
  • Page 59 59
  • Page 60 60
  • Page 61 61
  • Page 62 62
  • Page 63 63
  • Page 64 64
  • Page 65 65
  • Page 66 66
  • Page 67 67
  • Page 68 68
  • Page 69 69
  • Page 70 70
  • Page 71 71
  • Page 72 72
  • Page 73 73
  • Page 74 74
  • Page 75 75
  • Page 76 76
  • Page 77 77
  • Page 78 78

LevelOne WBR-3470 インストールガイド

カテゴリー
セキュリティデバイスコンポーネント
タイプ
インストールガイド
このマニュアルも適しています