
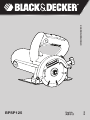
BPSP125
3
8
English
www.blackanddecker.com

6
7
2
A
B
C
D
FE
5
1
2
4
3
5
9
7
6

3
ENGLISH
Tile Cutter
BPSP125
Technical Data
Specification BPSP125
Power W 1,320
No-load speed rpm 13,000
Wheel diameter mm 125
Max. depth of cut mm 41
Weight kg 3.1
Cable length m 2.5
General Safety Rules
Warning! Read all instructions. Failure
to follow all instructions listed below may
result in electric shock, fire, and/or seri-
ous injury.
Keep all warning descriptions and instruction
manuals for future reference.
The term "power tool" in all of the warnings listed
below refers to power-operated (wired) power tool
or battery-operated (wireless) power tool.
a) Workplace Safety
1. Keep the workplace clean and well lit.
Cluttered and dark areas invite accidents.
2. Do not operate power tools in explosive
environments, such as in the presence of
flammable liquids, gases, or dust. Power
tools create sparks which may ignite dust or
fumes.
3. Keep children and bystanders away while
operating a power tool.Distractions can
cause you to lose control.
b) Electrical Safety
1. Power tool plugs must match the outlet.
Never modify the power plug in any way.
Do not use any adapter plugs with earthed
(grounded) power tools. Unmodified plugs
and matching outlets will reduce risk of electric
shock.
2. Avoid body contact with earthed or
grounded surfaces, such as pipes, radia-
tors, and refrigerators. There is an increased
risk of electric shock if your body is earthed or
grounded.
3. Do not expose power tools to rain or wet
conditions. Water entering a power tool will
increase the risk of electric shock.
4. Do not abuse the electrical cable. Never
use the cable for carrying, pulling or
unplugging the power tool. Keep cables
away from heat, oil, sharp edges, or moving
parts. Damaged or entangled cables increase
the risk of electric shock.
5. When operating a power tool outdoors, use
an extension cord suitable for outdoor use.
Use of electrical cables suitable for outdoor
use reduces the risk of electric shock.
6. If you have to operate a power tool in
a damp location, use a residual-current
device (RCD) protected supply. Use of an
RCD reduces the risk of electric shock.
c) Personal safety
1. Stay alert; watch what you are doing and
use common sense when operating a
power tool. Do not operate a power tool
while you are tired or under the influence
of drugs, alcohol or medication. A moment
of inattention while operating power tools may
result in serious personal injury.
2. Use safety equipment. Always wear eye
protection. Safety equipment such as dust
masks, non-skid safety shoes, safety helmets,
or hearing protection used for appropriate con-
ditions will reduce personal injuries.
3. Avoid accidental starting. Ensure the switch
is in the off position before plugging in,
inserting the battery pack, or when carrying
and transporting the tool. Carrying power
tools with your finger on the switch or plugging
in power tools that have the switch on invites
accidents.
4. Remove any adjusting keys or wrenches
before turning the power tool on. A wrench
or a key left attached to a rotating part of the
power tool may result in personal injury.
5. Do not overreach. Keep proper footing
and balance at all times. This enables better
control of the power tool in unexpected situ-
ations.
6. Dress properly. Do not wear loose cloth-
ing or jewellery. Keep your hair, clothing,
and gloves away from moving parts. Loose
clothes, jewellery, or long hair can be caught in
moving parts.
7. If devices are provided for the connec-
tion of chip conveyors and dust collecting
equipment, ensure these are connected
and properly used. Use of these devices can

4
ENGLISH
reduce dust related hazards.
d) Power Tool Use and Care
1. Do not force the power tool. Use the cor-
rect power tool for your application. The
correct power tool will do the job better and
safer at the rate for which it was designed.
2. Do not use the power tool if the switch
does not turn it on and off. Any power tool
that cannot be controlled with the switch is
dangerous and must be repaired.
3. Disconnect the plug from the power source
and/or the battery pack from the power tool
before making any adjustments, changing
accessories, or storing power tools. Such
preventive safety measures reduce the risk of
starting the power tool accidentally.
4. Store idle power tools out of the reach of
children. Do not allow persons unfamiliar
with the power tool or these instructions to
operate the tool. Power tools are dangerous
in the hands of untrained users.
5. Maintain power tools. Check for misalign-
ment or binding of moving parts, breakage
of parts and any other condition that may
affect the operation of the power tools. If
damaged, have the power tool repaired
before use. Many accidents are caused by
poorly maintained power tools.
6. Keep the cutting blades sharp and clean.
Maintaining cutting blades with sharp edges
prevents power tools from being stuck and it is
easier to control.
7. Use the power tool, accessories, and tool
bits etc., in accordance with these instruc-
tions, taking into account the working con-
ditions, and the work to be performed. Use
of the power tool for operations different from
those intended could result in a hazardous
situation.
e) Service
1. Have your power tool serviced by a
qualified repair person using only identical
replacement parts. This will ensure the safety
of the power tool after maintenance.
Additional Safety Precautions for
Marble Cutters
Caution! Do not touch exposed metal parts of
the tool when cutting through walls and floors, or
when in contact with electrical wiring! Hold the
tool by insulated gripping surfaces when per-
forming an operation where the cutting tool
may come in contact with concealed wiring or
its own cord. Contact with a "live" wire will make
exposed metal parts of the tool "live" and this will
cause electric shock to the operator.
1. Always keep your hands away from the cut-
ting area and the diamond wheel. Always
keep the other hand on the side handle. If
you hold the tool with both hands, you will not
be injured by the wheel.
2. Do not touch the underside of the work-
piece because the guard cannot protect the
part of the wheel under the workpiece.
3. Always use a diamond wheel with well-
matched size and center (diamond or circular
shape). Mismatched wheel and holder will result
in eccentric operation and you may lose control.
4. Do not use any washer or bolt that is dam-
aged or unfit in size; otherwise you will lose
control of the operation.
5. Do not use any grinding wheel.
6. Do not use any diamond wheel that does not
conform to the manufacturer's stipulations.
7. Do not use any cutting wheel that has been
damaged, distorted, or cracked.
8. Do not operate the tool without the fixed
guard.
9. Do not start the tool with the cutting wheel
touching the workpiece.
10. After switching off the tool, put down the
tool only after the cutting wheel has com-
pletely stopped running. Do not force the
wheel to stop.
11. Disconnect the plug from the power source
and ensure that the diamond wheel is sta-
tionary before replacing it, adjusting the
cutting depth or water pipe, or repairing the
tool.
12. Only hold the tool by its insulated gripping
surface when the diamond wheel is likely
to cut through concealed wires or its own
cord. If the diamond wheel touches a "live"
wire, the exposed metal parts of the power
tool may be charged and thus cause electric
shock to the operator.
13. Be extra cautious when "blind cutting"
through walls or other blind areas because
the diamond wheel may cut into gas or water
piping, wires, or resilient objects.
Symbols
The label on your tool may include the following
symbols:

5
ENGLISH
V ........Volts
A ........Amperes
Hz ........Hertz
W ........Watts
min ........minutes
........ Alternating current
........ Direct current
n
0 ........No load speed
........Class II Double insulation
........Safety alert symbol
.../min ........Revolutions or reciprocations per
minute
Double Insulation
The tool is double insulated. This means that
all the external metal parts are electrically insulated
from the mains power supply. This is done by plac-
ing insulated barriers between the electrical and
mechanical components so as to make it unnec-
essary for the tool to be earthed. Note: Double
insulation does not take the place of normal safety
precautions when operating this tool. The insula-
tion system is for added protection against injury
resulting from a possible electrical insulation failure
within the tool.
Electrical Safety
Always check that the power supply corresponds
to the voltage on the rating plate.
Using an Extension Cable
An extension cable should not be used unless
absolutely necessary. Use of an improper exten-
sion cable could result in a risk of fire and electric
shock. If an extension cable must be used, use
only those that are approved by the country's elec-
trical authority. Make sure that the extension cable
is in good condition before using. Always use the
cable that is suitable for the power input of your
tool (see technical data on name plate). The mini-
mum conductor size is 1.5mm2.
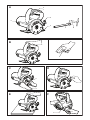
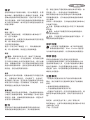
Parts (Fig. A)
This tool is designed especially for cutting tiles and
stones.
1. On/Off switch
2. Lock-on button
3. Butterfly screw
4. Base
5. Brush cap
6. Socket wrench
7. Spanner
Assembly and Adjustment
Prior to assembly and adjustment, always unplug
the tool.
Installing & Removing the Diamond Wheel (Fig. C)
Installation
Insert the diamond wheel (9) to the spindle.
Grip outside flange with spanner (7) and turn the
screw counterclockwise with the socket wrench (6).
Be sure to tighten clamp blot securely.
Use only the recommended diamond wheel with
the correct hole size.
Removing
Follow the procedures above in reverse order.
Cutting Depth Adjustment (Fig. D)
To increase or decrease the depth of cut, loosen
the butterfly screw (3), move the base (4) to adjust
the depth, and tighten the screw to secure the
depth.
To prevent tool fault, the depth-of-cut adjustment
knob has been set to the optimal position at fac-
tory default.
Users may also set the knob to a desired position
at any time.
Instruction for Use
Always observe the safety instructions and appli-
cable regulations.
Ensure that the butterfly screw (3) is properly tight-
ened before operating the tool.
Switching On And Off (Fig. B)
To switch the tool on, press the on/off switch (1).
To switch the tool off, release the on/off switch.
This tool has a lock-on feature. To activate, press
the on/off switch and then the lock-on button (2).
To de-activate, press the on/off button again.
Always switch off the tool and then the power sup-
ply when work is finished.
Cutting (Fig. E)
Align the front edge of the base with the cutting
line on the workpiece. Hold the tool firmly. Set the
base on the workpiece to be cut without the wheel
making any contact.
Turn the tool on and wait until the wheel attains full
speed.
Move the tool forward over the workpiece surface,
advancing smoothly until the cut is completed.
Keep the cutting line straight.
This tool should only be used on horizontal

6
ENGLISH
surfaces.
Be sure to move the tool gently forward, in a
straight line. Forcing, or exerting excessive pres-
sure, or allowing the wheel to bend, pinch or twist
in the cut can cause the motor to over heat and
tool to kick back dangerously.
When the depth of cut is over 20mm deep, make
2 or 3 separate cuts to prevent motor failure.
Maintenance
Your Black & Decker power tool has been
designed to operate over a long period of time
with minimal maintenance. Continuous satisfac-
tory operation depends upon proper tool care
and regular cleaning. Do not repair the tool your-
self. Please send your tool to authorized Black &
Decker service centers for regular maintenance
and service, or when a significant change in per-
formance is observed.
Carbon Brushes
Carbon brushes (Fig. F)
Remove and check carbon brushes regularly.
Replace when they have worn down to about
6mm or less.
Keep carbon brushes clean for free movement
in the holder. Both carbon brushes should be
replaced at the same time.
Use only Black & Decker carbon brushes.
Use a slotted screwdriver to remove brush caps
(5). Remove worn brushes, insert new ones, and
secure the brush caps.
Cleaning
Warning: Unplug the tool before you use a
cloth to clean the housing. With the motor running,
blow dirt and dust out of all air vents with dry air at
least once a week. Wear safety glasses when per-
forming this. Exterior plastic parts may be cleaned
with a damp cloth and mild detergent. Although
these parts are highly solvent resistant, NEVER use
solvents.
Tool Care
Avoid overloading the power tool. Overloading will
result in a considerable reduction in speed and effi-
ciency and the tool will over heat. In this case, run
the power tool at no load for a minute or two until
cooled to normal working temperature by the built
in fan. Switching your tool on and off whilst under
load will considerably reduce the life of the tool.
Important
To ensure product safety and reliability, repairs,
maintenance and adjustment (other than those
listed in this manual) should be performed by
authorized service centers or other qualified orga-
nizations, always using identical replacement parts.
Unit contains no user serviceable parts inside.
Accessories
The performance of any power tool is dependent
on the accessory used. Black & Decker acces-
sories are engineered to high quality standards
and are manufactured from the best materials.
Stringent tests are performed before the accesso-
ries are launched in the market. They are designed
to enhance the performance of power tools.
Purchase Black & Decker accessories to bring
your Black & Decker power tools to greater per-
formance. Recommended Black & Decker acces-
sories are available at your local authorized dealers
or service centers.
Black & Decker offers a large selection of acces-
sories at your local dealer or authorized service
center.
Note: Use only wheels rated at least equal to
the maximum speed marked on the tool.
Warning: The use of any other accessory not
recommended for use with this tool could be haz-
ardous.
Warning: Only stone-cutting diamond wheel
can be used. Do not use grinding wheel or toothed
blades.
Protecting The Environment
In the event that you need to replace your tool
or if it is of no further use to you, please consider
the protection of the environment. Black & Decker
recommends you to contact your local council for
disposal information.
Service Information
Black & Decker offers a full network of our offices
and authorized service locations throughout Asia.
All Black & Decker Service Centers are staffed
with trained personnel to provide customers with
efficient and reliable power tool service. You may
contact your nearest Black & Decker service cen-
ter for technical advice, repair, or genuine factory
replacement parts.
Notes
◆ Black & Decker's policy is one of continuous

7
ENGLISH
improvement to our products and as such, we
reserve the right to modify product specifications
without prior notice.
◆ Standard equipment and accessories may vary
by country.
◆ Product specifications may differ by country.
◆ Complete product range may not be available in
all countries. Contact your local Black & Decker
dealers for range availability.

8
BPSP125
BPSP125
1,320
/ 13,000
125
4 1
3.1
2.5
/
a)
1.
2.
3.
b)
1.
2.
3.
4.
5.
6.
(RCD)
RCD
c)
1.
2.
3. /
4.
5.
6.
7.

9
d)
1.
2.
3.
/
4.
5.
6.
7.
e)
1.
1.
2.
3.
4.
5.
6.
7.
8.
9.
10.
11.
12.
13.
V ........
A ........
Hz ........
W ........
min ........
........

10
........
n
0
........
........II
........
.../min ........
,
1.5
A
1.
2.
3.
4.
5.
6.
7.
C
9
76
D
3
4
3
B
1
2
E
20

11
F
5
Black & Decker
◆
◆
◆
◆
88
676A

N384600 01/2014
-
 1
1
-
 2
2
-
 3
3
-
 4
4
-
 5
5
-
 6
6
-
 7
7
-
 8
8
-
 9
9
-
 10
10
-
 11
11
-
 12
12


