
ENGLISH
Introduction
Congratulations on your purchase and welcome to
Philips! To fully benet from the support that Philips
offers, register your product at www.philips.com/
welcome.
Important
Read this user manual carefully before you use the
appliance and save it for future reference.
Warning
- This appliance is not intended for use by
persons (including children) with reduced
physical, sensory or mental capabilities, or lack
of experience and knowledge, unless they
have been given supervision or instruction
concerning use of the appliance by a person
responsible for their safety.
- Children should be supervised to ensure that
they do not play with the appliance.
Caution
- Use and store the appliance at a temperature
between 5°C and 35°C.
- The shaver complies with the internationally
approved IEC safety regulations and can be
safely cleaned under the tap (Fig. 1).
- Be careful with hot water. Always check if the
water is not too hot, to avoid burning your
hands.
- This washable shaver is not suitable for shaving
in the shower.
- Do not immerse the shaver in water (Fig. 2).
- Remove the batteries from the appliance if you
are not going to use it for a month or more.
- Do not use the shaver in combination with
pre-shave lotions, creams, foams, gels or other
cosmetic products.
Compliance with standards
- This Philips appliance complies with all
standards regarding electromagnetic elds
(EMF). If handled properly and according to the
instructions in this user manual, the appliance
is safe to use based on scientic evidence
available today.
Preparing for use
The appliance runs on two R6 AA 1.5-volt alkaline
batteries. Preferably use Philips batteries to achieve
optimal shaving performance.
Inserting batteries
Make sure your hands and the appliance are dry
when you insert the batteries.
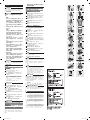
1 Remove the battery compartment
cover (Fig. 3).
2 Put two batteries in the battery
compartment (Fig. 4).
Make sure the + and - poles point in the right
direction.
Note: The appliance does not work if the batteries
have been placed incorrectly.
3 Slide the battery compartment cover back
onto the appliance (‘click’) (Fig. 5).
Avoiding damage due to battery
leakage
- Do not expose the appliance to temperatures
higher than 35°C.
- Remove the batteries if you are not going to
use the appliance for a month or more.
- Do not leave empty batteries in the appliance.
Using the appliance
1 Remove the protection cap.
2 Press the on/off button to switch on the
shaver (Fig. 6).
3 Move the shaving heads over your skin. Make
both straight and circular movements (Fig. 7).
Note: Shaving on a dry face gives the best results.
Note: Your skin may need 2 or 3 weeks to get
accustomed to the Philips shaving system.
4 When you have nished shaving, press the on/
off button again to switch off the appliance.
5 Clean the shaver after every use (see chapter
‘Cleaning’).
6 Put the protection cap on the shaver to
prevent damage to the shaving heads (Fig. 8).
Note: Make sure that the lug of the protection cap
covers the release button.
Cleaning and maintenance
Never use scouring pads, abrasive cleaning agents
or aggressive liquids such as petrol or acetone to
clean the appliance.
Be careful with hot water. Always check if the
water is not too hot, to avoid burning your hands.
Regular cleaning guarantees better shaving
performance.
The easiest and most hygienic way to clean the
appliance is to rinse the shaving unit and the hair
chamber with hot water every time you have used
the appliance.
4222.002.5100.3
HQ906, HQ902
After every use: shaving unit and hair
chamber
Never rinse the shaver when the battery
compartment is open. Always make sure
the battery compartment cover is properly
attached before you start rinsing the shaver.
1 Switch off the shaver.
2 Rinse the outside of the shaving unit under a
hot tap for some time (Fig. 9).
3 Press the release button (1) and pull the
shaving unit in a straight upward movement
off the shaver (2) (Fig. 10).
4 Rinse the inside of the shaving unit under
a hot tap for some time (Fig. 11).
5 Rinse the hair chamber under a hot tap for
some time (Fig. 12).
6 Put the shaving unit back onto the
shaver (Fig. 13).
Every two months: shaving heads
Note: Do not use cleaning agents or alcohol to clean
the shaving heads. Only use HQ110 Shaving Head
Cleaning Spray.
1 Switch off the shaver.
2 Press the release button (1) and pull the
shaving unit off the shaver (2) (Fig. 10).
3 Turn the orange wheel anticlockwise (1) and
remove the retaining frame (2) (Fig. 14).
4 Remove the shaving heads from the shaving
unit one by one (Fig. 15).
Note: Do not clean more than one cutter and
guard at a time, since they are all matching sets.
If you accidentally mix up the cutters and guards,
it may take several weeks before optimal shaving
performance is restored.
5 Remove the cutter from the guard (Fig. 16).
6 Clean the cutter with the short-bristled side
of the brush. Brush carefully in the direction
of the arrows (Fig. 17).
7 Clean the guard with the brush (Fig. 18).
8 Put the shaving heads back into the shaving
unit.
9 Put the retaining frame back into the shaving
unit and turn the orange wheel clockwise.
10 Put the shaving unit back onto the shaver.
Storage
- Put the protection cap on the shaver after use
to prevent damage to the shaving heads (Fig. 8).
Note: Make sure that the lug of the protection cap
covers the release button.
Replacement
Replace the shaving heads every two years for
optimal shaving results.
Replace damaged or worn shaving heads with
Philips HQ55 shaving heads.
For instructions on how to remove the shaving
heads, see section ‘Every two months: shaving
heads’ in chapter ‘Cleaning and maintenance’.
Environment
- Do not throw away the appliance with the
normal household waste at the end of its life,
but hand it in at an ofcial collection point for
recycling. By doing this, you help to preserve
the environment (Fig. 19).
- Batteries contain substances that may pollute
the environment. Do not throw away empty
batteries with the normal household waste,
but dispose of them at an ofcial collection
point for batteries. Always remove the batteries
before you discard and hand in the appliance at
an ofcial collection point (Fig. 20).
Guarantee & service
If you need service or information or if you have
a problem, please visit the Philips website at www.
philips.com or contact the Philips Consumer Care
Centre in your country (you nd its phone number
in the worldwide guarantee leaet). If there is no
Consumer Care Centre in your country, go to your
local Philips dealer.
Guarantee restrictions
The shaving heads (cutters and guards) are
not covered by the terms of the international
guarantee because they are subject to wear.
Troubleshooting
This chapter summarises the most common
problems you could encounter with the
appliance. If you are unable to solve the problem
with the information below, contact the Consumer
Care Centre in your country.
13
14
15
16
17
18
19 20
1 2
3 4
5 6
7 8
9
10
11 12
Problem Possible cause Solution
The shaver
does not
shave as
well as it
used to.
The shaving heads
are dirty.
Clean the shaving heads
thoroughly before you continue
shaving (see chapter ‘Cleaning’).
Long hairs obstruct
the shaving heads.
Clean the cutters and guards
properly with the brush
supplied (see chapter ‘Cleaning’).
The shaving heads are
damaged or worn.
Replace the shaving heads (see
chapter ‘Replacement’).
The batteries are low. Replace the batteries (see
chapter ‘Preparing for use’).
The shaver
does not
go on when
I press
the on/off
button.
The batteries are
placed incorrectly.
Make sure the + and -
indications on the batteries
match the indications in the
battery compartment.
The batteries are
empty.
Replace the batteries (see
chapter ‘Preparing for use’).
My skin is
irritated
after
shaving.
Your skin needs time
to get used to the
Philips shaving system.
Skin irritation during the rst
2-3 weeks of use is normal.
After this period, the skin
irritation usually disappears.
4222.002.5100.3.indd 1 09-12-09 14:22

简体中文
13
14
15
16
17
18
19 20
1 2
3 4
5 6
7 8
9
10
11 12
产品简介
感谢您的惠顾,欢迎光临飞利浦!为了您能充
分享受飞利浦提供的支持服务,请登陆 www.
philips.com/welcome 网站注册您的产品。
注意事项
使用产品之前,请仔细阅读本使用
说明书,并妥善保管以备日后参
考。
警告
-- 本产品不打算由肢体不健全、感
觉或精神上有障碍或缺乏相关经
验和知识的人(包括儿童)使
用,除非有负责他们安全的人对
他们使用本产品进行监督或指
导。
-- 应照看好儿童,确保他们不玩耍
该产品。
注意
-- 必须在-5-摄氏度至-35-摄氏度之
间的温度下使用和存放本产品。-
-- 此剃须刀符合国际认可的-IEC-
安全标准,可放心在自来水下清
洗。-(图-1)
-- 使用热水时一定要小心。切记先
检查水温是否太高,以防手被烫
伤。
-- 这种剃须刀的水洗设计不适合在
淋浴时使用。
-- 切勿将剃须刀浸入水中。-(图-2)
-- 如果超过一个月不使用本产品,
请从产品中取出电池。
-- 请勿将本剃须刀与剃须润滑液、
面霜、泡沫、凝胶或其它护肤产
品结合使用。
符合标准
-- 这款飞利浦产品符合关于电磁场-
(EMF)-的相关标准。据目前的
科学证明,如果正确使用并按照
本用户手册中的说明进行操作,
本产品是安全的。
使用准备
本产品使用两节 R6 AA 1.5 伏碱性电池。最好
使用飞利浦电池,以实现最佳的剃须效果。
插入电池
确保您在安装电池时双手和产品都
是干的。
- 1- -卸下电池仓盖。-(图-3)
- 2- -将两节电池放入电池仓。-(图-4)
确保电池的正负极没有装反。
注意:-如果电池装错,则产品就不会工作。
- 3- -将电池仓盖滑回产品上(“咔哒”一声)
。-(图-5)
防止因电池泄漏而引起的损坏
- 切勿将产品暴露在温度高于 35°C 的环
境中。
- 如果一个月或一个月以上不使用本产品,
则将电池取出。
- 切勿将耗尽的电池留在产品中。
使用本产品
- 1- -取下保护盖。
- 2- -按下开/关按钮启动剃须刀。-(图-6)
- 3- -将剃须刀头在皮肤上移动。作直线和迂回
动作。-(图-7)
注意:-在干爽的面部剃须效果最佳。
注意:-您的皮肤可能需要-2-到-3-周才能适应
飞利浦剃须系统。
- 4- -完成剃须后,再次按开/关按钮关闭产品电
源。
- 5- -每次使用后均应清洁剃须刀(请参阅“清
洁”一章)。-
- 6- -用保护盖盖好剃须刀,以防剃须刀刀头受
损。-(图-8)
注意:-确保保护盖的凸缘盖住释放钮。
清洁和保养
不要使用钢丝绒、研磨性清洁剂或
腐蚀性液体(例如汽油或丙酮)来
清洁产品。-
使用热水时一定要小心。切记先检
查水温是否太高,以防手被烫伤。
为保证更好的剃须效果,剃须刀必须定期清
洗。
最简单和最卫生的清洁方法是每次使用完本产
品之后,用热水冲洗剃须刀头部件和胡茬储
藏室。
每次使用后:清洗剃须刀头部件
和胡茬储藏室
切勿在电池仓打开的情况下冲洗剃
须刀。开始冲洗剃须刀之前,务必
确保正确安装了电池仓盖。
- 1- -关闭剃须刀。
- 2- -将剃须刀头部件的外部放在热水龙头下冲
洗片刻。-(图-9)
- 3- -按释放按钮-(1),垂直向上移动剃须刀头部
件,将其从剃须刀-(2)-中拉出。-(图-10)
- 4- -将剃须刀头部件的内部放在热水龙头下冲
洗片刻。-(图-11)
- 5- -将胡茬储藏室放在热水龙头下冲洗片刻。-(
图-12)
- 6- -将剃须刀头部件重新安装到剃须刀上。-(
图-13)
每两个月:清洁剃须刀头
注意:-请勿使用清洁剂或酒精来清洁剃须刀
头。只能使用-HQ110-剃须刀头清洁喷雾剂。-
- 1- -关闭剃须刀。
- 2- -按释放按钮(1)并将剃须刀头部件从剃须
刀中拉出(2)。-(图-10)
- 3- -逆时针转动橙色轮轴-(1)-并取下固定架-(2)
。-(图-14)
- 4- -将剃须刀头依次从剃须刀头部件上卸下。-(
图-15)
注意:-不要同时清洁多组刀片和网罩,因为
它们都是相互匹配的。如果不小心将刀片和网
罩弄混,则需要数周时间才能恢复产品的最佳
剃须性能。
- 5- -将刀片从网罩上取下。-(图-16)
- 6- -用毛刷的短毛一侧清洁刀片。按箭头方向
小心地清洁。-(图-17)
- 7- -用清洁刷清洁网罩。-(图-18)
- 8- -将剃须刀头重新放入剃须刀头部件。-
- 9- -将固定架放回剃须刀头部件内,并沿顺时
针方向转动橙色轴轮。
-10--将剃须刀头部件重新安装到剃须刀上。
存储
- 使用之后用保护盖盖好剃须刀,以防剃须
刀头受损。 (图 8)
注意:-确保保护盖的凸缘盖住释放钮。
更换
每两年更换一次刀头以获得最佳的剃须效果。
使用飞利浦 HQ55 剃须刀头更换损坏或磨损的
剃须刀头。
有关如何拆卸剃须刀头的说明,请参阅“清洁
和保养”一章中的“每两个月:清洁剃须刀
头”部分。
环境
- 弃置产品时,请不要将其与一般生活垃圾
堆放在一起;应将其交给官方指定的回收
中心。这样做有利于环保。 (图 19)
- 电池包含可能污染环境的物质。不要将废
电池和普通生活垃圾一同丢弃,而应交给
正式的电池收集点处理。丢弃产品时,一
定要将电池取出,并将产品送到官方指定
的回收站。 (图 20)
保修与服务
如果您需要服务或信息,或者有任何疑问,请
访问飞利浦网站:www.philips.com。您也可
与您所在地的飞利浦客户服务中心联系(可从
全球保修卡中找到其电话号码)。如果您的所
在地没有飞利浦顾客服务中心,则可以与当地
的飞利浦经销商联系。
保修限制
由于剃须刀头(刀片和网罩)属于易磨损物
品,因此不在国际保修条款的涵盖范围之列。
故障种类和处理方法
本章归纳了使用本产品时最可能遇到的问题。
如果您无法根据下面的信息解决问题,请与贵
国(地区)的飞利浦客户服务中心联系。
问题 可能的原因 解决方法
剃须刀的
剃须效果
没有以前
好。
剃须刀头很
脏。
先彻底清洁剃须刀头,再继续剃
须(请参阅“清洁”一章)。
过长的胡须堵
塞了剃须刀
头。
用随附的毛刷适当清洁刀片和网
罩(请参阅“清洁”一章)。
剃须刀头已损
坏或磨损。
更换剃须刀头(见“更换”一
章)。
电池电量不
足。
更换电池(见“使用准备”一
章)。
按下开/关
钮时,剃
须刀不能
启动。
电池放置不正
确。
确保电池的正负极指示与电池仓
内的指示一致。
电池已耗尽。 更换电池(见“使用准备”一
章)。
我在剃须
后出现皮
肤过敏。
您的皮肤需要
一定的时间来
适应飞利浦剃
须刀。
开始使用时的 2-3 周内,皮肤过
敏是正常情况。在此之后,通常
不再会出现皮肤过敏现象。
2009/12/09
4222.002.5100.3.indd 2 09-12-09 14:23
-
 1
1
-
 2
2

